
SXBHAE 924 WD - Refrigerator HOTPOINT - Free user manual and instructions
Find the device manual for free SXBHAE 924 WD HOTPOINT in PDF.


| Product Type | Fridge-Freezer |
| Brand | Hotpoint |
| Model | SXBHAE 924 WD |
| Total Net Capacity | 380 L |
| Energy Class | E |
| Annual Energy Consumption | 280 kWh |
| Height | 1900 mm |
| Width | 924 mm |
| Depth | 700 mm |
| Weight | 80 kg |
| Power Supply | 220-240 V, 50 Hz |
| Climate Class | SN-T |
| Noise Level | 42 dB(A) |
| No Frost System | Yes (both compartments) |
| Water Dispenser | Yes (external) |
| Shelves Material | Glass |
| Lighting | LED |
| Control Type | Electronic with display |
| Reversible Door | Yes |
| Defrosting | Automatic (fridge), Manual (freezer) |
| Refrigerant | R600a |
| Spare Parts Availability | At least 7 years after last unit produced |
| Installation Type | Freestanding |
Frequently Asked Questions - SXBHAE 924 WD HOTPOINT
User questions about SXBHAE 924 WD HOTPOINT
0 question about this device. Answer the ones you know or ask your own.
Ask a new question about this device
Download the instructions for your Refrigerator in PDF format for free! Find your manual SXBHAE 924 WD - HOTPOINT and take your electronic device back in hand. On this page are published all the documents necessary for the use of your device. SXBHAE 924 WD by HOTPOINT.
USER MANUAL SXBHAE 924 WD HOTPOINT
Gebrauchsanweisung
Instructions for use
Mode d'emploi
Gebruiksaanwijzing
ENGLISH Instructions for use Page 4
IMPORTANT to be read and observed
Before using the appliance, read these safety instructions. Keep them nearby for future reference. These instructions and the appliance itself provide important safety warnings, to be observed at all times. The manufacturer declines any liability for failure to observe these safety instructions, for inappropriate use of the appliance or incorrect setting of controls.
⚠️ Very young children (0-3 years) should be kept away from the appliance. Young children (3-8 years) should be kept away from the appliance unless continuously supervised. Children from 8 years old and above and persons with reduced physical, sensory or mental capabilities or lack of experience and knowledge can use this appliance only if they are supervised or have been given instructions on safe use and understand the hazards involved. Children must not play with the appliance. Cleaning and user maintenance must not be carried out by children without supervision.
PERMITTED USE
⚠️ CAUTION: The appliance is not intended to be operated by means of an external switching device, such as a timer, or separate remote controlled system.
This appliance is intended to be used in household and similar applications such as: staff kitchen areas in shops, offices and other working environments; farm houses; by clients in hotels, motels, bed
& breakfast and other residential environments.
⚠ This appliance is not for professional use. Do not use the appliance outdoors.
⚠ The bulb used inside the appliance is specifically designed for domestic appliances and is not suitable for general room lighting within the home (EC Regulation 244/2009).
⚠️ The appliance is designed for operation in places where the ambient temperature comes within the following ranges, according to the climatic class given on the rating plate. The appliance may not work properly if it is left for a long time at a temperature outside the specified range.
Climatic Class Amb. T. (°C)
SN: From 10 to 32 °C
ST: From 16 to 38 °C;
N: From 16 to 32 °C
T: From 16 to 43 °C
This appliance does not contain CFCs. The refrigerant circuit contains R600a (HC). Appliances with Isobutane (R600a): isobutane is a natural gas without environmental impact, but is flammable. Therefore, make sure the refrigerant circuit pipes are not damaged, especially when emptying the refrigerant circuit.
⚠ WARNING: Do not damage the appliance refrigerant circuit pipes.
⚠ WARNING: Keep ventilation openings, in the appliance enclosure or in the built-in structure, clear of obstruction.
⚠ WARNING: Do not use mechanical, electric or chemical means other than those recommended by the Manufacturer to speed up the defrost process.
⚠ WARNING: Do not use or place electrical devices inside the appliance compartments if they are not of the type expressly authorised by the Manufacturer.
⚠ WARNING: Ice makers and/or water dispensers not directly connected to the water supply must be filled with potable water onl.
⚠ WARNING: Automatic ice-makers and/or water dispensers must be connected to a water supply that delivers potable water only, with mains water pressure between 0.17 and 0.81 MPa (1.7 and 8.1 bar).
⚠️ Do not store explosive substances such as aerosol cans with a flammable propellant in this appliance.
⚠️ Do not swallow the contents (non-toxic) of the ice packs (provided with some models). Do not eat ice cubes or ice lollies immediately after taking them out of the freezer since they may cause cold burns.
⚠ For products designed to use an air filter inside an accessible fan cover, the filter must always be in position when the refrigerator is in function.
⚠ Do not store glass containers with liquids in the freezer compartment since they may break. Do not obstruct the fan (if included) with food items.
After placing the food check that the door of the compartments closes properly, especially the freezer door.
⚠️ Damaged gaskets must be replaced as soon as possible.
⚠️ Use the refrigerator compartment only for storing fresh food and the freezer compartment only for storing frozen food, freezing fresh food and making ice cubes.
⚠️ Avoid storing unwrapped food in direct contact with internal surfaces of the refrigerator or freezer compartments.
Appliances could have special compartments (Fresh Food Compartment, Zero Degree Box, etc.). Unless specified in the specific booklet of product, they can be removed, maintaining equivalent performances.
⚠️ C-Pentane is used as blowing agent in the insulation foam and it is a flammable gas
INSTALLATION
⚠️ The appliance must be handled and installed by two or more persons - risk of injury. Use protective gloves to unpack and install - risk of cuts.
⚠️ Installation, including water supply (if any) and electrical connections, and repairs must be carried out by a qualified technician. Do not repair or replace any part of the appliance unless specifically stated in the user manual. Keep children away from the installation site. After unpacking the appliance, make sure that it has not been damaged during transport. In the event of problems, contact the dealer or your nearest After-sales Service. Once installed, packaging waste (plastic, styrofoam parts etc.) must be stored out of reach of children - risk of suffocation. The
appliance must be disconnected from the power supply before any installation operation - risk of electric shock. During installation, make sure the appliance does not damage the power cable - risk of fire or electric shock. Only activate the appliance when the installation has been completed.
⚠️ Be careful not to damage the floors (e.g. parquet) when moving the appliance. Install the appliance on a floor or support strong enough to take its weight and in a place suitable for its size and use. Make sure the appliance is not near a heat source and that the four feet are stable and resting on the floo, adjust as required, and check that the appliance is perfectly level using a spirit level. Wait at least two hours before switching the appliance on, to ensure that the refrigerant circuit is fully efficient
⚠ WARNING: To avoid a hazard due to instability, positioning or fixing of the appliance must be done in accordance with the manufacturer instructions. It is forbidden to place the refrigerator in such way that the metal hose of gas stove, metal gas or water pipes, or electrical wires are in contact with the refrigerator back wall (condenser coil).
All dimensions and spacing needed for installation of the appliance are in the Installation instruction booklet.
ELECTRICAL WARNINGS
⚠ It must be possible to disconnect the appliance from the power supply by unplugging it if plug is accessible, or by a multi-pole switch installed upstream of the socket in accordance with the wiring rules and the appliance must be earthed in conformity with national electrical safety standards.
⚠ Do not use extension leads, multiple sockets or adapters. The electrical components must not be accessible to the user after installation. Do not use the appliance when you are wet or barefoot. Do not operate this appliance if it has a damaged power cable or plug, if it is not working properly, or if it has been damaged or dropped.
⚠️ If the supply cord is damaged, it must be replaced with an identical one by the manufacturer, its service agent or similarly qualified persons in order to avoid a hazard - risk of electric shock.
CLEANING AND MAINTENANCE
⚠ WARNING: Ensure that the appliance is switched off and disconnected from the power supply before performing any maintenance operation; never use steam cleaning equipment - risk of electric shock.
⚠ Do not use abrasive or harsh cleaners such as window sprays, scouring cleansers, flammable fluids, cleaning waxes, concentrated detergents, bleaches or cleansers containing petroleum products on plastic parts, interior and door liners or gaskets. Do not use paper towels, scouring pads, or other harsh cleaning tools.
DISPOSAL OF PACKAGING MATERIALS
The packaging material is 100% recyclable and is marked with the recycle symbol △.
The various parts of the packaging must therefore be disposed of responsibly and in full compliance with local authority regulations governing waste disposal.
DISPOSAL OF HOUSEHOLD APPLIANCES
This appliance is manufactured with recyclable or reusable materials.
Dispose of it in accordance with local waste disposal regulations. For further information on the treatment, recovery and recycling of household electrical appliances, contact your local authority, the collection service for household waste or the store where you purchased the appliance. This appliance is marked in compliance with European Directive 2012/19/EU, Waste Electrical and Electronic Equipment (WEEE). By ensuring this product is disposed of correctly, you will help prevent negative consequences for the environment and human health.negative sull'ambiente e sulla salute umana.
The symbol 📄 on the product or on the accompanying documentation indicates that it should not be treated as domestic waste but must be taken to an appropriate collection center for the recycling of electrical and electronic equipment.
ENERGY SAVING TIPS
To guarantee adequate ventilation follow installation instructions. Insufficient ventilation at the back of the product increases energy consumption and decreases cooling efficiency.
Frequent door opening might cause an increase in Energy Consumption.
The internal temperature of the appliance and the Energy Consumption may be affected also by the ambient temperature, as well as location of the appliance. Temperature setting should take into consideration these factors.
Reduce door opening to a minimum.
When thawing frozen food, place in the refrigerator. The low temperature of the frozen products cools the food in the refrigerator. Allow warm food and drinks to cool down before placing in the appliance.
Positioning of the shelves in the refrigerator has no impact on the efficient usage of energ. Food should be placed on the shelves in such way to ensure proper air circulation (food should not touch each other and distance between food and rear wall should be kept).
You can increase storage capacity of frozen food by removing baskets and, if present, Stop Frost shelf.
Do not worry about noises coming from the compressor which are described as normal noises in this product's Quick Guide.
PROPER USE OF REFRIGERATORS
Leveling feet
I. Precautions before installation:
Information in the Instruction Manual is only for reference. The physical product may differ. Before installation of accessories, it shall be ensured that the refrigerator is disconnected from power.
Before adjusting the leveling feet, precautions shall be taken to prevent any personal injury.
- Schematic diagram of the leveling feet.
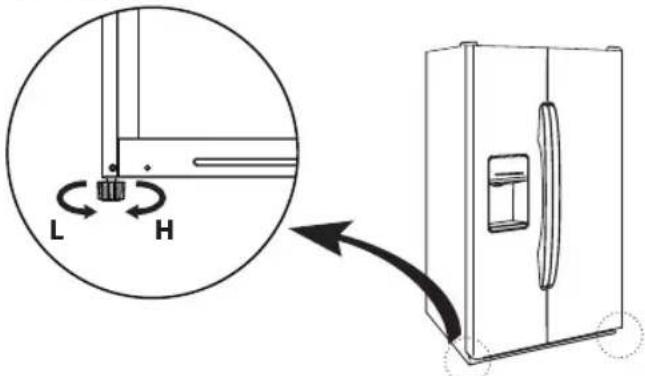
The picture above is only for reference.
The actual configuration will depend on the physical product or statement by the distributo
- Adjusting procedures:
a. Turn the feet clockwise to raise the refrigerator;
b. Turn the feet counterclockwise to lower the refrigerator;
c. Adjust the right and left feet based on the procedures above to a horizontal level.
Leveling door
I. Precautions before installation:
Before installation of accessories, it shall be ensured that the refrigerator is disconnected from power.
Before adjusting the , precautions shall be taken to prevent a door ny personal injury.
2. Schematic diagram of leveling the door
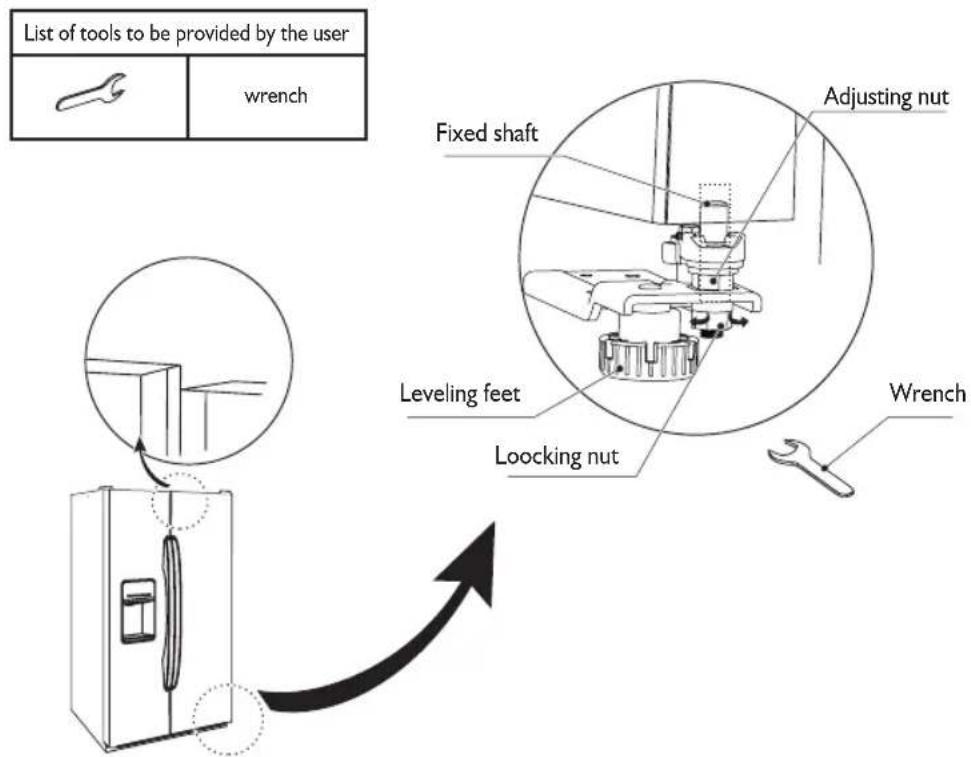
The picture above is only for reference.
The actual configuration will depend on the physical product or statement by the distributo
When the fridge door is low:
Open the door, use a wrench to loosen the locking nut and to rotate the adjusting nut anti-clockwise to raise the height of the door. Once the doors are aligned, then tighten the locking nut by rotating it anti-clockwise.
When the fridge door is high:
Open the door, use a wrench to rotate the adjusting nut clockwise to lower the height of the door.
Once the doors are aligned, then tighten the locking nutby rotating it anti-clockwise.
Connection of the Water Facility
I. Precautions before installation:
Information in the Instruction Manual is only for reference. The physical product may differ.
Before installation of accessories, it shall be ensured that the refrigerator is disconnected from power.
Water hazards!
The water pressure of the combined fridge-freezer is 2-7 bars. If the water pressure is too high, please install a decompressor.
Please do not connect combined fridge-freezers to a tap or a tap of water heater.
Please do not bend inlet pipes and drain-pipes when placing, and shall carefully connect water pipes.
Do not use any old and used water pipes.
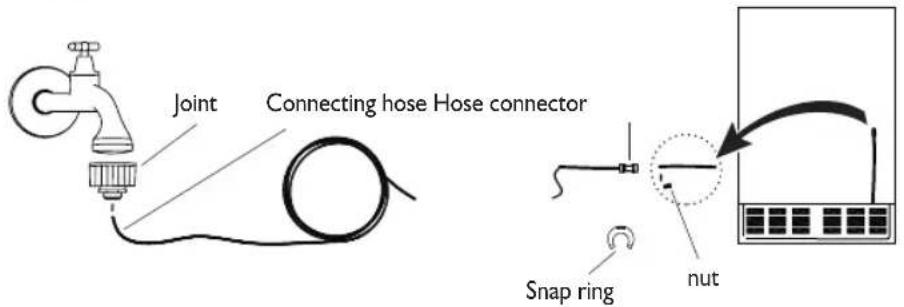
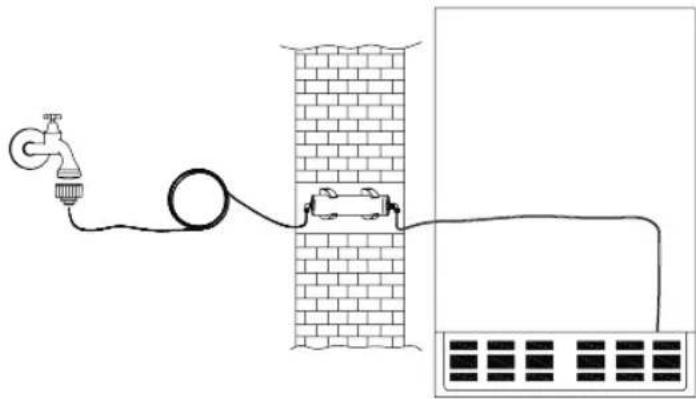
Please purchase the joint to connect the pipe and the faucet and install it according to the schematic diagram.
- Schematic diagram
- Installing procedures
a. Push the end of the connecting hose into the joint. Fasten the joint to the faucet.
b. Pull out the nut from white flexible hose. Push the terminal of white flexible hose into the ho connector, fastened with snap ring. If necessary, please rivet the flexible hose onto wall to avoi stumbling.
c. Carefully unscrew the tap to check whether the pipeline is sealed.
Assembly and Fixing of Filter
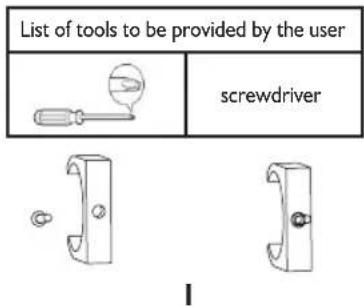
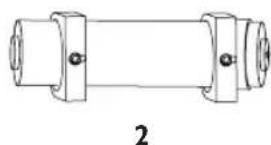
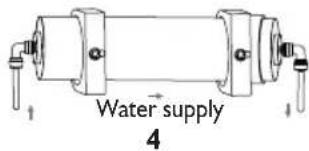
I. Fix the single clamps on the wall with screws
- Put the cartridge into the single clamps;
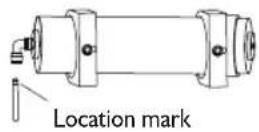
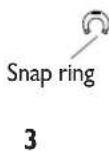
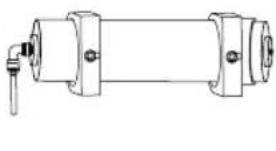
-
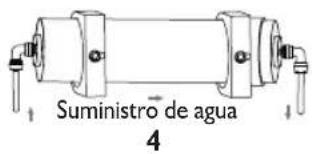
Insert one end of the quick-connect elbow to the inlet of the filter cartridge, with the other end of the quick-connect elbow inserted to the inlet water pipe against the position mark and fastened with snap ring;
-
Using the same way as mentioned above, insert one end of the quick-connect elbow to the outlet of the filter cartridge, with the other end of the quick-connect elbow in erted to the outlet water pipe against the position mark.
Replace Water Filter
I. Precautions before installation:
Before installation of accessories, it shall be ensured that the refrigerator is disconnected from power.
After being used for 6 consecutive months, the 📞/✉ indicator will flash.
If that happens, please replace.
- Schematic diagram
- Procedures:
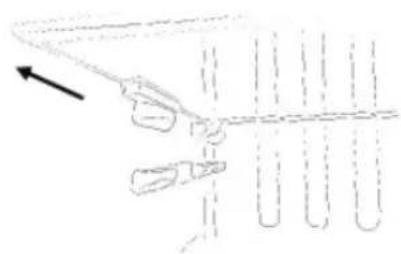
Pull out the plug. Turn off the water intake. Take off the filter and the snap ring on the quick connector and then pull out the water pipe. Insert the new filter into the quick connector and then install the snap ring. Re-supply water and check whether there is water flowing out.
If necessary, please repeat above steps. Insert the plug again. Keep pressing the button for 3 seconds to start up the filter. The display of 📄/ 📋 disappears.
STRUCTURE AND FUNCTIONS
For I&W (Ice and Water) version
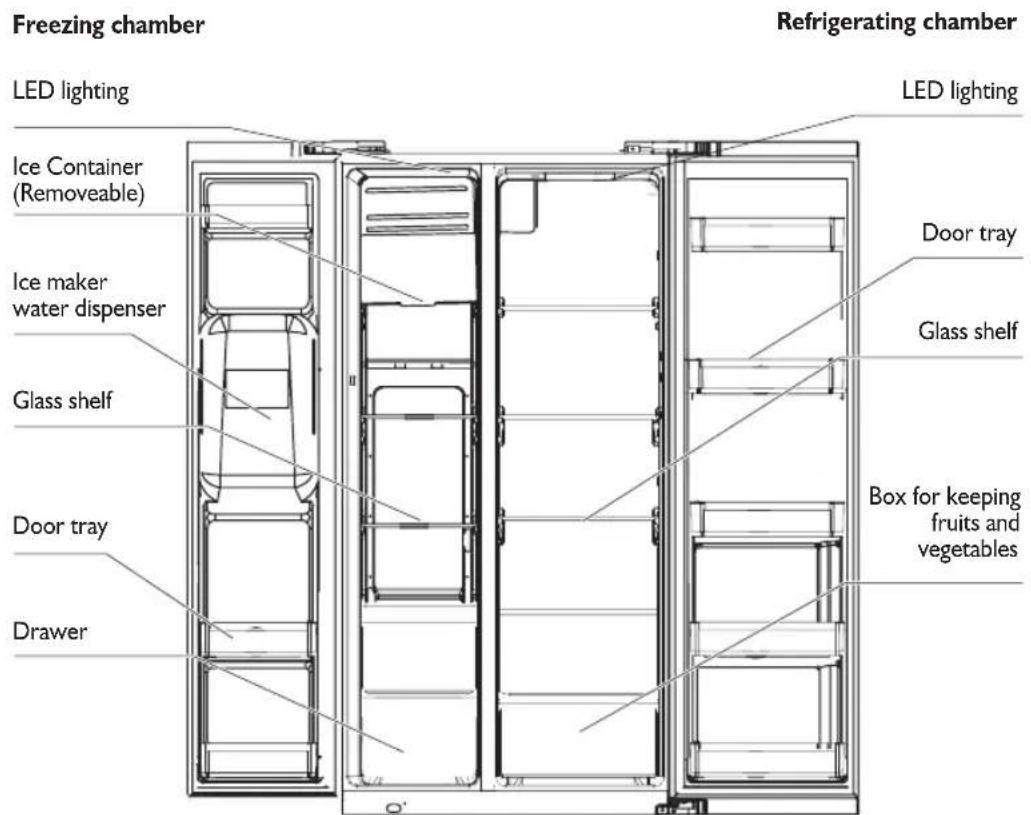
The picture above is only for reference.
The actual configuration will depend on the physical product or statement by the distributor
Refrigerating chamber
- The Refrigerating Chamber is suitable for storage of a variety of fruits, vegetables, beverages and other food consumed in the short term.
- Cooking foods shall not be put in the refrigerating chamber until cooled to room temperature.
- Foods are recommended to be sealed up before putting into the refrigerator.
- The glass shelves can be adjusted up or down for a reasonable amount of storage space and easy use.
Freezing chamber
- The low temperature freezing chamber may keep food fresh for a long time and it is mainly used to store frozen foods and making ice.
- The freezing chamber is suitable for storage of meat, fish, rice balls and other foods not to be consumed in short term.
- Chunks of meat are preferably to be divided into small pieces for easy access. Please be noted food shall be consumed within the shelf time.
- The temperature should be set to “FASTING”, when you want to refrigerate foods quickly.
Note: Storage of too much food during operation after the initial connection to power may adversely affect the freezing effect of the refrigerator. Foods stored shall not block the air outlet; or otherwise the freezing effect will also be adversely affected.
STRUCTURE AND FUNCTIONS
For IDI (In Door Ice) version
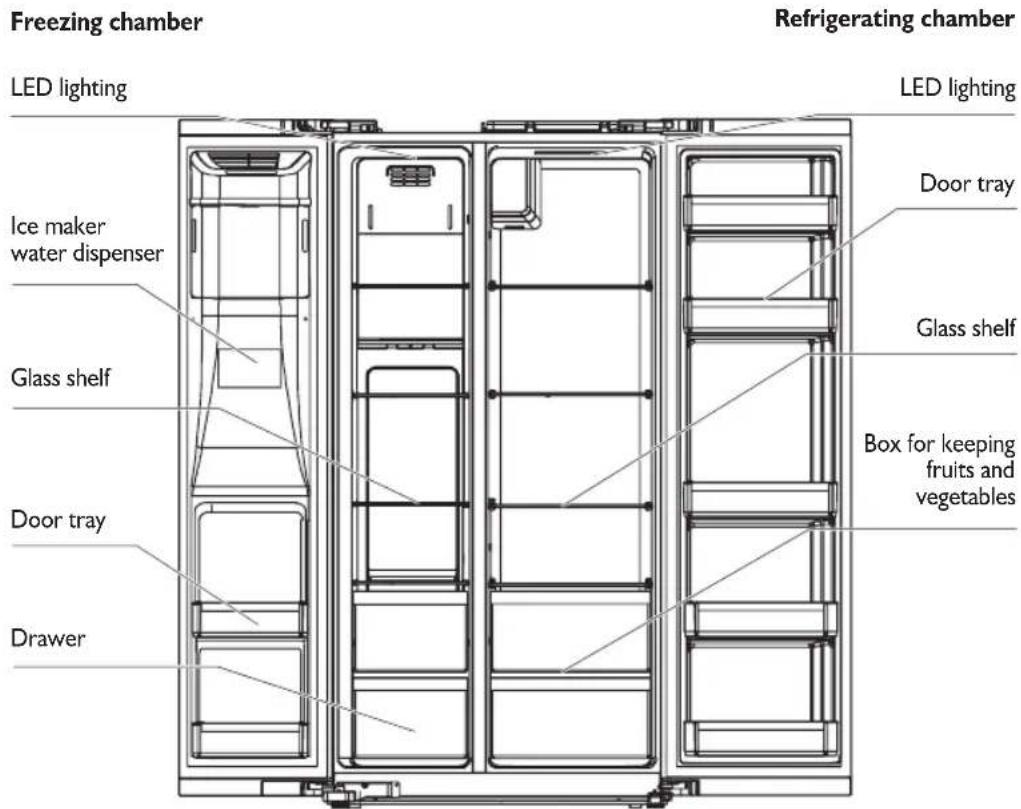
The picture above is only for reference.
The actual configuration will depend on the physical product or statement by the distributor
Refrigerating chamber
- The Refrigerating Chamber is suitable for storage of a variety of fruits, vegetables, beverages and other food consumed in the short term.
- Cooking foods shall not be put in the refrigerating chamber until cooled to room temperature.
- Foods are recommended to be sealed up before putting into the refrigerator.
- The glass shelves can be adjusted up or down for a reasonable amount of storage space and easy use.
Freezing chamber
- The low temperature freezing chamber may keep food fresh for a long time and it is mainly used to store frozen foods and making ice.
- The freezing chamber is suitable for storage of meat, fish, rice balls and other foods not to be consumed in short term.
- Chunks of meat are preferably to be divided into small pieces for easy access. Please be noted food shall be consumed within the shelf time.
- The temperature should be set to “ ____”, when you want to refrigerate foods quickly.
Note: Storage of too much food during operation after the initial connection to power may adversely affect the freezing effect of the refrigerator. Foods stored shall not block the air outlet; or otherwise the freezing effect will also be adversely affected.
Functions
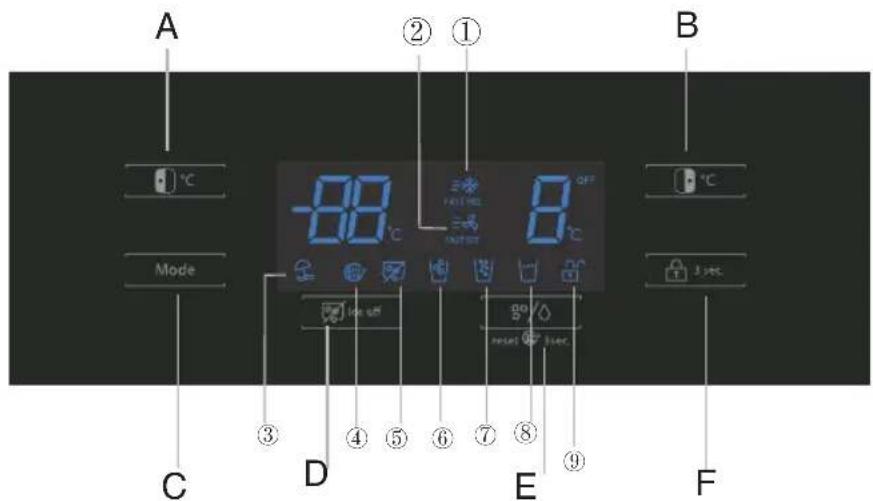
(Pictured above SBS I&W)
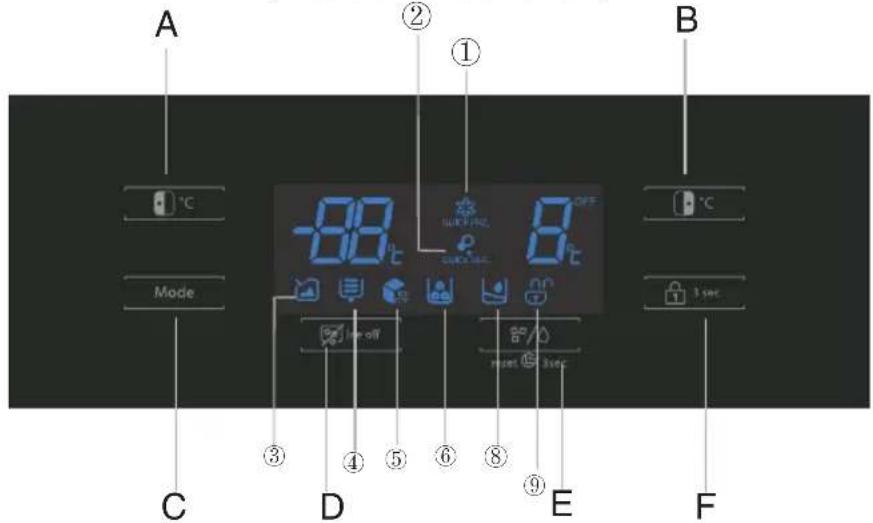
(Pictured above SBS IDI)
The picture above is only for reference.
The actual configuration will depend on the physical product or statement by the distributor
Display
① FAST FRZ / QUICK FRZ.
④ Water Filter
⑦ Fetching crushed ice
② R TSAF FQUICK REF.
⑤ Ice off
⑧Fetching cold water
③ Vacation icon
⑥ Fetching ice cubes
⑨ Lock/unlock icon
Button operation
A. Freezer compartment temperature adjustment
B. Fridge compartment temperature adjustment
C.Mode setting
D. Ice OFF/CFM
E. Fetching ice Fetching/ Filter set
F.Lock/unlock controls
Operation instructions
The first time the power was turn on for the refrigerator, the display screen will total display for 3 seconds. Meanwhile the starting up bell rings and then the screen enters the normal display of the operation. The first time for using the refrigerator, temperatures of refrigerating chamber, temperature and freezing chamber should be set at 5°C / -18°C respectively.
When the error occurs, the display shows the error code (see next page); during normal operation, the display shows the set temperature of the cooling compartment.
Under normal circumstances, the refrigerator stops operating for 30 seconds, then the display shows the lock state, and the display goes out after the lock state continued for 30s.
Lock /unlock
In the unlocked state, continue to press the button for 3 seconds, enter the lock state;
In the locked state, continue to press the button for 3 seconds, enter the unlocked state.
All the following functions must be operated in the unlocking status.
Mode setting
Press mode button to select different control mode.
Vacation mode 📄/
Press the button to enter the vacation mode. Icon after locking.
/ lights up, the vacation mode will start
Press the button or to exit the vacation mode.
FAST REFRIG.mode ≡∞/Ω
Press the button Mode to enter the quick cooling mode. Icon ≡/ lights up, the quick cooling mode will start after locking.
Press the button to exit the Quick cooling mode.
Press the button to enter the quick freezing mode. Icon mode will start, after locking.
≡※ / ※ lights up, the quick freezing
Press the button to exit the Quick freezing mode.
Temperature setting of refrigerating chamber B
Press temperature adjusting button of the refrigerating chamber, cold storage region will make flashing indication. Then press the button again to set the temperature, and will hear one beep. Setting scope is between 2°C and 8°C. Every time you press the button, the temperature will change 1°C. After adjusting, the digital tube will keep flashing for 5 seconds. New temperature setting will come into effect after locking.
Temperature setting of freezing chamber -88
Press temperature adjusting button of the freezing chamber, quick freezing region will make flashing indication. Then press the button again to set the temperature, and you will hear one beep. Setting scope is between -16°C and -24°C. Every timeyou press the button, the temperature will change 1°C. After adjusting, the digital tube will keep flashing for 5 seconds. New temperature setting will come into effect after locking.
Quick-freeze time setting
Choose the quick-freeze mode and press the button continuously for 3 seconds to enter the quick-freeze time setting mode; with a short press on, set the circulating mode of "26-48-26-48" after the quick-freeze time is shown on the freezer chamber temperature display unit -88.
The quick-freeze mode works separately under the 26H and 48H quick-freeze quitting modes. With the quick-freeze time setting mode on, lock the mode or press the for 3s to quit the quick-freeze time setting mode.
The 48H quick-freeze mode is used for overall performance test and not recommendable for customers.
ICE OFF
Press the button and the icon is illuminated or distinguished in order to start/switch icing function.
DISPERNSER
Press the button to enter the ice/water selection condition; choose the circulating condition of "Fetching ice cubes / Fetching crushed ice/ Fetching water / none", and then the corresponding icon on the panel will be illuminated successively.
When the system is in operation, the working time of the filter will be added up; after 150 days, the filter icon will be displayed, and 180 days, the filter icon flashed; press and hold the button for 3s to utilize RESET function with which the working time of the filter is reset.
After replace the filter, the flashed icon 📄 / 📋 distinguished.
Storage upon power failure
In case of power failure, the instant working state will be locked and maintained until re-electrification.
Opening warning and alarm control
When the refrigerator chamber door gets open, the warning tone will play. If the door is not closed in two minutes, the buzzer will sound once every minute until the door is closed.
Fault indication
The following warnings appearing on the display indicate corresponding faults of the refrigerator.
Though the refrigerator may still haverefrigerator and freezing function with the following faults, the user shall contact a maintenance specialist for maintenance, so as to ensure normal use of the refrigerator.
| Error code Error description | |
| E0 | Icemaker error |
| E1 | Temperature sensor detection circuit error of refrigerating chamber |
| E2 | Temperature sensor detection circuit error of freezing chamber |
| E5 | Freezing defrost sensor detection circuit error |
| E6 | Communication error |
| E7 | Circulation of temperature sensor detection circuit error |
| EE | Icemaker sensor circuit |
| EH | Moisture sensor error |
Fetching water and Ice
- Sounds will be produced during making ice cubes and crushed ice: Water valve will produce buzzing sounds water's flowing into ice vessel will produce sounds; grinding machine's grinding ice into small pieces or product ice's falling into the container will produce sounds. The sounds are normal.
- Scratching noises may be produced when taking out the ice cubes. Nothing to worry about this. The ice in the container may be stuck together. In such cases, please take out the ice container and separate stuck ice into pieces by means of, for instance, using plastic or wooden spoons to push hard on the ice carefully.
- Other possibilities are illustrated in the chapter “ice container cleaning” To avoid overheating of the ice-making machine’s engine, please fetch ice about 1 minute after the stopping. Please wait for a while until the engine’s temperature reaches working temperature. Please fetch the ice from the ice container if you need a lot of ice.
- The chapter “ice container cleaning” explains how to remove ice container from freezer compartment.
If there is no enough ice in the ice container, the ice cannot be taken out. Please wait for a while until new ice is made. To prevent ice smell or bad taste of the ice, please clean the ice container regularly.
- Ice and water can only be fetched when the door of freezer compartment is closed. In the process of fetching water and ice, if you open the freezer door, that process will automatically end.
- When it displays or 📋/ 📋 goes out, you click the buttons of water dispenser again.
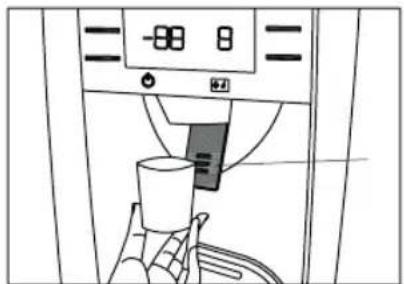
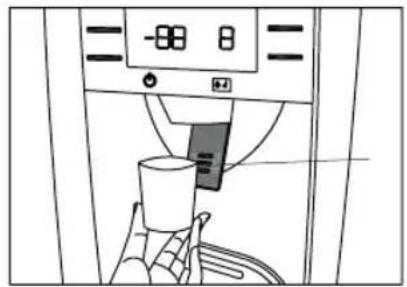
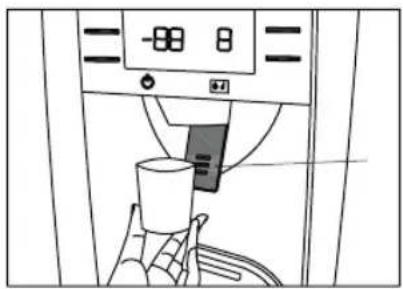
Fetching cold water
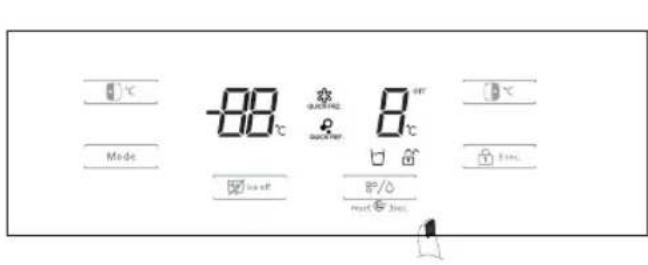
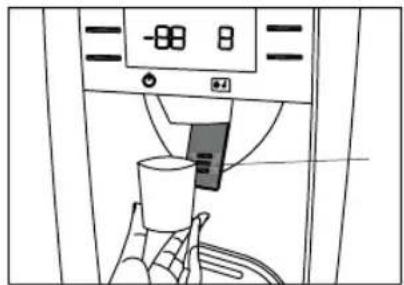
Keep pressing the buttons 8/0 until the indicator 📁/ turns on.
Push the container in the direction of fetching water cushion, Cold water starts to flow into the container.
Remove the container from fetching water cushion and end the exporting of water.
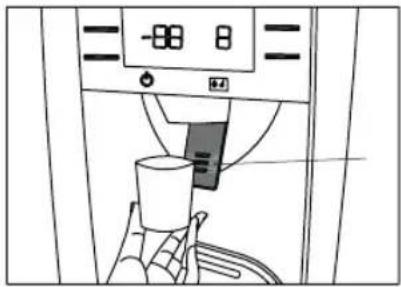
Fetching crushed icer(Apply only to SBS I&W)
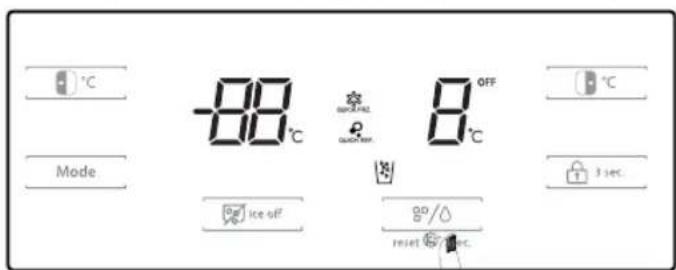
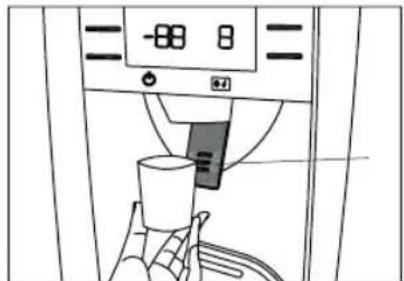
Keep pressing the buttons of Water Dispenser until the signal turns up.
Make the container tight with mouth of water dispenser to prevent the side jet.
Press the container in the direction of fetching water cushion. Fill the container with crushed ice.
Remove the container from fetching water cushion and end the exporting of water.
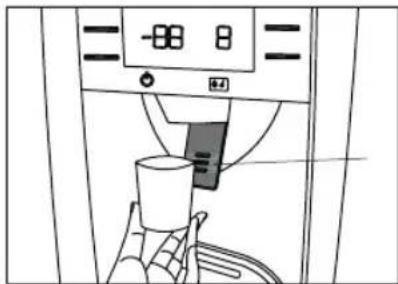
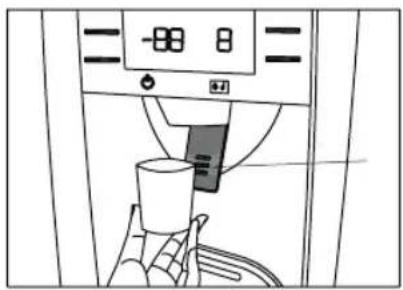
Fetching ice cubes
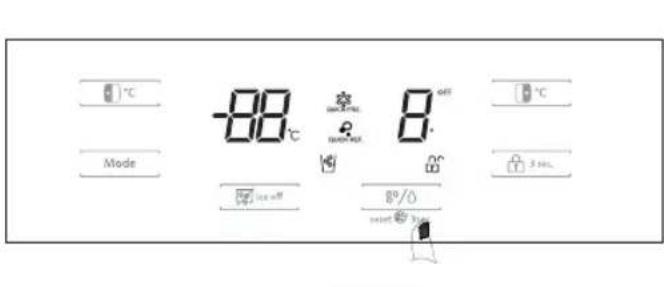
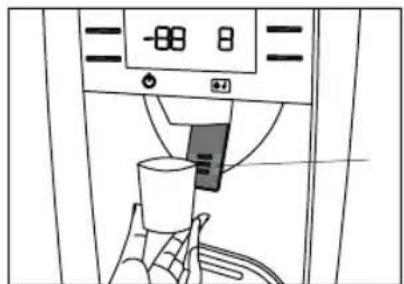
Keep pressing the buttons until the
signal lights up.
Push the container in the direction of fetching water cushion.
Ice cubes start to fall into the container.
Remove the container from fetching water cushion and end the exporting of ice.
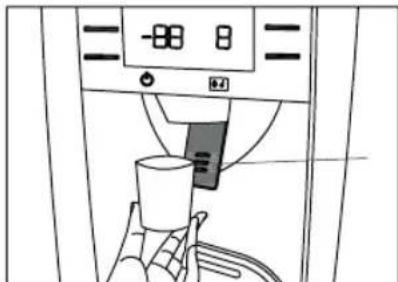
Lock the ice-making machine
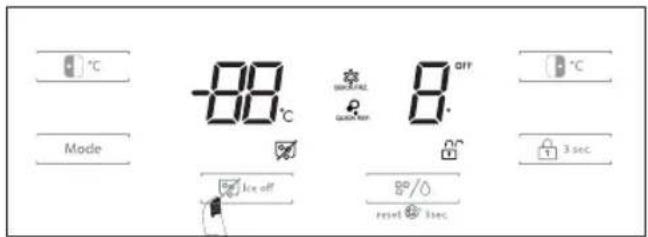
If the function of fetching water and ice is not used for long, you can lock the ice-making machine:
Press the button, the display lights up.
Temperature setting
Important note: The display will only be illuminated when a button is pressed or a compartment door opened, at all other times the display will be in a standby state.
Important note: The control panel will automatically lock itself. Before adjusting the temperature or selecting any mode the panel must be unlocked by pressing and holding the lock button for 3 seconds until the lock symbol disappears from the display.
Note: The standard operating temperature for the fridge compartment should be between 0°C and 4°C and the standard operating temperature for the freezer compartment should be between -18°C and -25°C.
Note: The temperature of the freshly stored food and how often the door is opened affects the temperature in the refrigerator compartment. If required, change the temperature setting.
Freezer compartment temperature adjustment
To change the temperature of the freezer compartment, press the freezer temperature adjustment button. The temperature of the freezer can be set between -16°C and -24°C .
Press the freezer temperature adjustment button until the required temperature is shown on the display. Please note that during the temperature setting process the freezer temperature on the display will flash.
Once the required temperature is set the freezer temperature will flash for a few seconds, the display will be automatically locked and then after approximately 30 seconds the display will disappear.
Freezer compartment temperature
The freezer compartment temperature will be shown on the display when a compartment door is opened or a button is pressed.
Fridge compartment temperature adjustment
To change the temperature of the fridge compartment, press the fridge temperature adjustment button. The temperature of the fridge can be set between 2° Cand 8° C.
Press the fridge temperature adjustment button until the required temperature is shown on the display. Please note that during the temperature setting process the fridge temperature on the display will flash. Once the required temperature is set the fridge temperature will flash for a few seconds, the display will be automatically locked and then after approximately 30 seconds the display will disappear.
Fridge compartment temperature
The fridge compartment temperature will be shown on the display when a compartment door is opened or a button is pressed.
Mode settings
The appliance has 4 pre-set modes that can be selected by pressing the mode button and these are:
• Vacation (holiday)
- Quick freeze
- Quick freeze and cool
- Quick cool

Vacation mode (holiday mode) VACATION / VACATION
This mode is designed to prevent your appliance from wasting energy during times when it's not in regular use (when you are on vacation/holiday for example).
By selecting this function the temperature of the freezer compartment will automatically be set to -18°Cand the fridge compartment will be turned off.
To use the vacation mode you must press the mode button until the vacation icon is lit on the display. To exit the vacation mode press the mode button until no mode icon is lit on the display.
Important note: If this mode is selected then all food and drinks must be removed from the fridge compartment
Quick freeze ≡ FAST / QUICK FRZ.
This mode is designed for when freezing items that are not already pre-frozen.
If you are placing fresh food inside the freezer then ideally you should have lowered the temperature beforehand ready to accommodate it and facilitate as quick a freeze as possible. You may need to pre select the quick freeze mode as early as 12 hours before. By selecting this function the temperature of the freezer compartment will automatically be set to -24 °C for a maximum of 26 hours (after this time the temperature will revert to what it was previously set at). If the temperature of freezer goes below -24°C during the 26 hours then the appliance will exit the quick freeze mode automatically.
To use the quick freeze mode you must press the mode button until the quick freeze icon is lit on the display. To exit the quick freeze mode press the mode button until no mode icon is lit on the display.
Quick freeze & cool ✉ FAST FRZ. ✉ FAST REF / ✉ QUICK FRZ. 🔒 QUICK REE
In order to have a colder temperature in the refrigerator, put the quick freeze & cool setting on to set the unit to the coolest temperature. By selecting this function the temperature of the freezer and fridge compartments will automatically be set to -24°C and 2°C for a maximum of 26 hours for the freezer setting and 2 hours 30 minutes for the fridge setting (after this time the temperature will revert to what it was previously set at). If the temperature of freezer goes below -24°C during the 26 hours then the appliance will exit the quick freeze mode automatically.
To use the quick freeze and cool modes together you must press the mode button until the quick freeze and cool icons are lit on the display. To exit the quick freeze and cool mode press the mode button until no mode icon is lit on the display.
Quick cool = FAST / QUICK REF.
In order to have a colder temperature in the refrigerator, put the quick cool setting on to set the unit to the coolest temperature. By selecting this function the temperature of the fridge compartment will automatically be set to 2° C for a maximum of 2 hours and 30 minutes (after this time the temperature will revert to what it was previously set at).
To use the quick cool mode you must press the mode button until the quick cool icon is lit on the display. To exit the quick cool mode press the mode button until no mode icon is lit on the display.
Lock/unlock LOCK LOCK
To use the lock function you must press the lock button (the symbol on the display will be lit). This will cause all actions to be ignored, until the lock is removed.
To unlock the display and functions, hold the lock button for 3 seconds (the symbol on the display will be disappear).
Notes:
- In order to make ice cubes quickly, set the freezer to the lowest temperature, or select the Quick Freeze Mode. This will make the temperature of the freezer lower.
- Do not over-fill with water. It may become difficult to remove the ice cubes from ice tray and a trickle of water into the ice box will make the ice cubes freeze together.
- If the knob is turned before the ice cubes are ready, any remaining water will trickle into the ice box and cause the ice cubes to freeze together.
Shelving and rack adjustment
Important note: all food and drink should be removed from all shelves and racks before adjusting or removing them
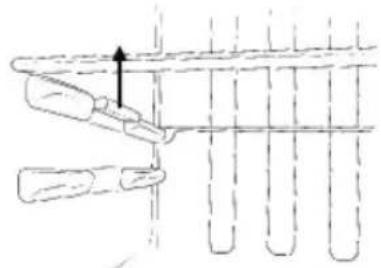
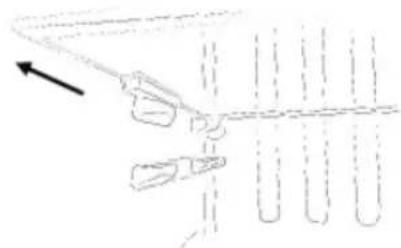
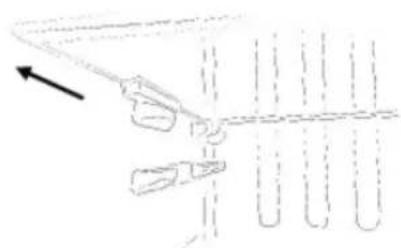
You can adjust the shelving in the fridge compartment to your required configuration. o remove a shelf, lift it up slightly so the plastic stabilisers that on either side of the shelf are above the shelf rails and then pull it towards you.
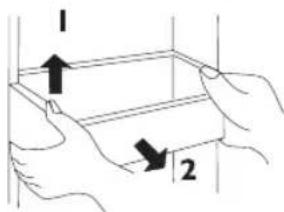
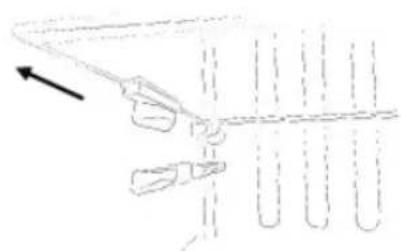
You can adjust the racks in the fridge and freezer compartments to your required configuration. o remove a rack hold both sides of the rack, lift it upwards (1) and then pull it towards you (2).
Bulb Replacement
The fridge and freezer lights are energy efficient, long life LEDs. Therefore, they should not need replacing through out the life of the product.
The bulb is a direct current 12V LED module and in the unlikely event it does fail then it will need to be replaced by a qualified enginee .
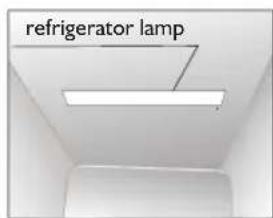
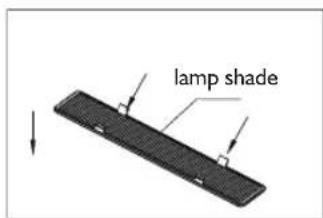
Reversing the Door
The doors cannot be reversed.
ENERGY SAVING ADVICE
- Do not install the appliance close to sources of heat, such as a cooker, dishwasher or radiator.
- Locate the appliance in a cool well-ventilated room and make sure that the air vents are clear.
- Try to avoid keeping the doors open for a long time, as warm air will enter the cabinet and may cause a build-up of ice as well as affecting the energy consumption. Ensure there are no obstructions preventing the doors from closing properly.
- Ensure that the door seals are clean and there are no tears or splits.
- Keep the most perishable foods, (those with a short shelf-life, such as cooked meats), in the coldest part of the fridge. The Salad Crisper Box is the warmest part of your fridge and should be used for vegetables, salads and fruits etc.
- Do not overload the appliance: the cooling air that circulates and keeps the appliance cold gets blocked, and pockets of warm air form.
- Do not put hot food into the fridge or freezer – let it cool down first
- Store fresh food in airtight boxes or wrap in bags or foil which are suitable for freezing.
- Do not allow frozen food to come in to direct contact with food to be frozen.
- Pre-frozen food must be placed in the freezer as quickly as possible after purchasing.
- To prevent frost damage to fresh vegetables or fruits they must be processed appropriately before being placed into the freezer compartment.
- You must always follow the storage guidelines printed on all food packaging.
However, below is some suggested maximum storage times at -18°C (4 star freezer rating) for a variety of foods:
- Fresh meat & poultry –up to 12 months
- Cooked meat –up to 2 months
- Fresh fish –up to 6 month
- Fruit & vegetables –up to 12 months
- Bread & cakes –up to 6 months
POWER FAILURE
If there is a power failure during the storage of frozen foods, keep the door closed. If the temperature within your freezer should rise, do not refreeze the food without checking it's condition.
- Ice Cream: Once thawed should be discarded.
- Fruit and Vegetables: If soft should be cooked and used up.
- Bread and Cakes: Can be refrozen without danger.
- Shellfish:Should be refrigerated and used up quickl.
- Cooked Dishes: i.e. casseroles should be refrigerated and used up.
• Large Pieces of Meat: Should be refrigerated and used up quickly - Small Joints: Should be refrigerated and used up quickly
- Chicken: Should be refrigerated and used up quickly
MAINTENANCE & CLEANING
Disconnect the appliance from the power supply before cleaning.
Internal Cleaning
- Do not pour water over the appliance.
- The cavity should be cleaned periodically using a solution of bicarbonate of soda and lukewarm water (5ml to 0.5 litre of water)
- Clean the accessories separately with soap and water. Do not put them in the dishwasher.
- Do not use abrasive products, detergents or soaps.
• After washing, rinse with clean water and dry carefully. - When you have finished cleaning reconnect the plug with dry hands
External Cleaning
- Wash the outer cabinet with warm soapy water. Do NOT use abrasive products.
- There are sharp edges on the underside of the product so care should be taken when cleaning.
- Once or twice a year dust the rear of the appliance and the compressor at the back of the appliance, with a brush or vacuum cleaner, as an accumulation of dust will affect the performance of the appliance and cause increased energy consumption.
When the appliance is not in use
When the appliance is not in use for long periods, disconnect from the electricity supply, empty all of the food and clean the inside. Leave the door open to prevent the build-up of odours.
Defrosting
Note: Care must be taken when performing the following procedure.
- The appliance is frost free, so there shouldn't be any requirement to defrost the freezer. However, in the unlikely event the appliance does need defrosting please follow the below steps:
- Try to use as much as possible of the food in the freezer, before defrosting. However, any food that is left, wrap in newspaper and place aside until ready to place back after cleaning.
- Switch the appliance off at the wall socket and remove the plug.
- Open the freezer door.
- Place a suitable container to collect the water created from the defrosted ice.
• After defrosting, clean and dry the interior. - Switch the appliance on and replace any frozen food.
Defrosting can be accelerated by putting bowls of hot (not boiling) water in the freezer and loosening the frost with a suitable plastic scraper.

Never use sharp metal tools as it may damage the appliance.
Never use an electrical heater, this may cause an electric shock.
For I&W (Ice and Water) version
Clean the Ice Container
Ice in the ice container may block the outlet because of lumping or other reasons. In this case the ice container needs cleaning or eliminating block.
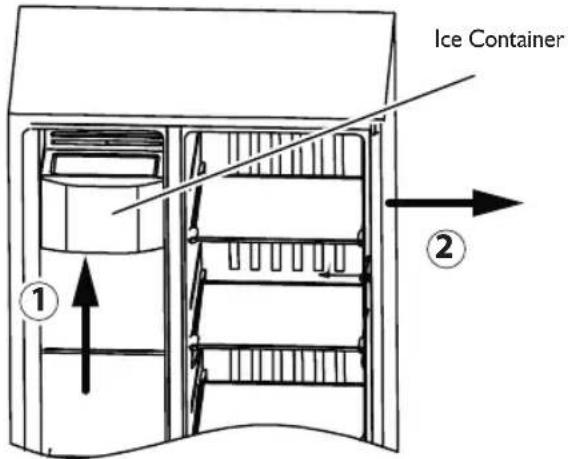
I. Press the button to lock the icemaker, Pull out the plug. Hold up the components of ice storage box by both hands and pull them out upwards and outwards horizontally.
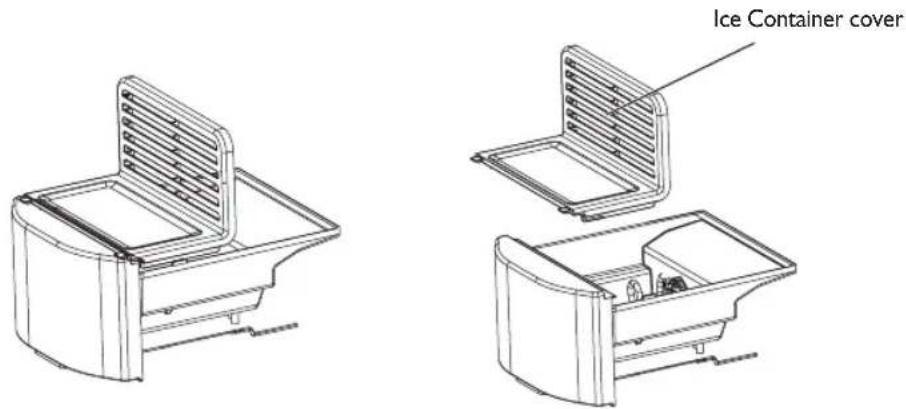
-
Please take out Ice Container cover and clean Ice Container. According to the Ice Container to take down the reverse direction of the installation can be.
-
Close the door of freezer compartment. Insert the plug again. Press the 📄 ice off button to unlock the icemaker.
For IDI (In Door Ice) version
Clean the Ice Container
Ice in the ice container may block the outlet because of lumping or other reasons. In this case the ice container needs cleaning or eliminating block.
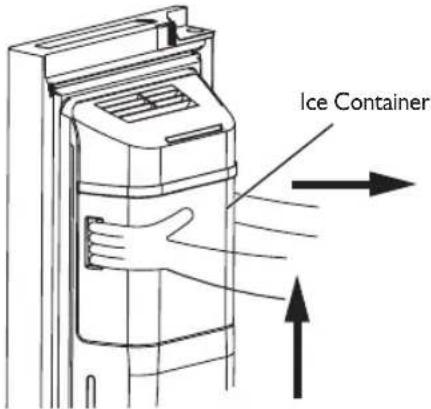
I. Press the button to lock the icemaker, Pull out the plug. Hold up the components of ice storage box by both hands and pull them out upwards and outwards horizontally.
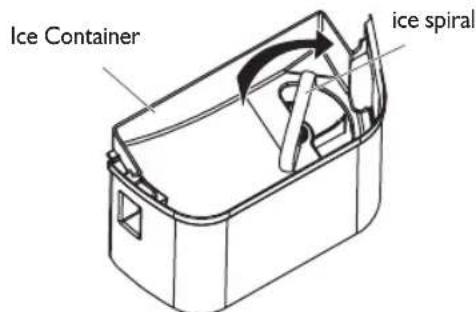
- Please take out it if there is any ice in the outlet. If necessary, please remove ice spiral in clockwise or anticlockwise direction, in order to take out ice that is tilt or stuck.
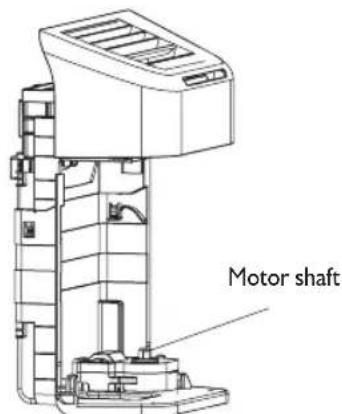
- Put back the ice container. If necessary, please rotate the ice spiral in order to gear it into motor shaft. Close the door of freezer compartment. Insert the plug again.
Press the 📄 Ice off button to unlock the icemaker.
Cleaning of Glass shelfr
- As the innermost part of the refrigerator liner where contacting the shelves has a backstop, you shall raise the shelves upward, then you can be able to take it out.
- Adjust or clean the shelves according to your requirement.
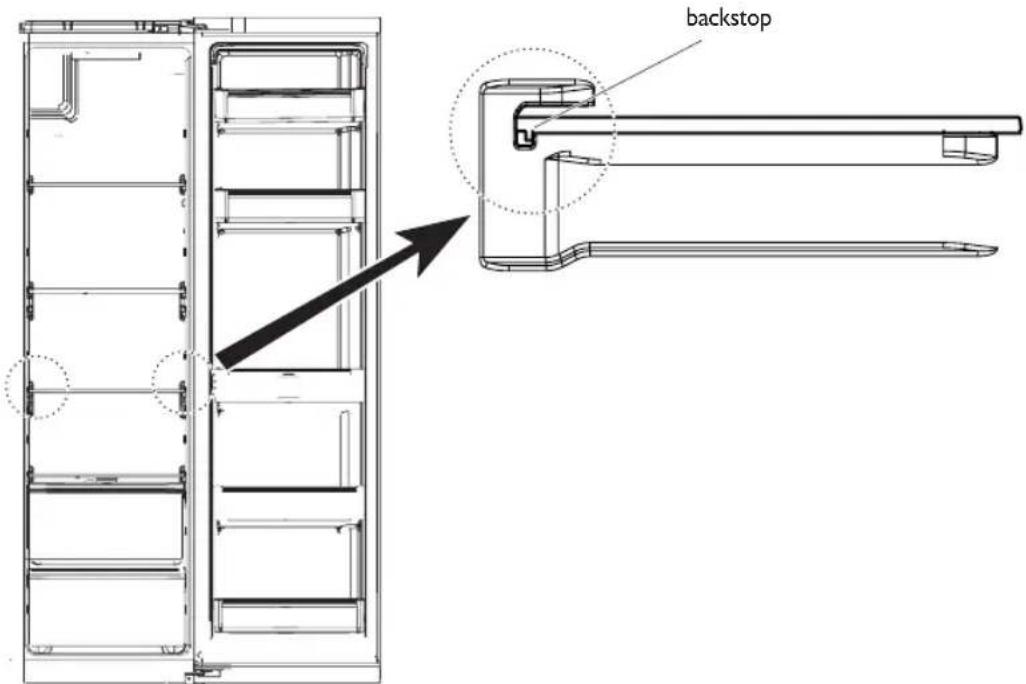
The picture above is only for reference.
The actual configuration will depend on the physical product or statement by the distributo
Defrosting
- The refrigerator is made based on the air-cooling principle and thus has automatic defrosting function. Frost formed due to change of season or temperature may also be manually removed by disconnection of the appliance from power supply or by wiping with a dry towel.
Out of operation
- Power failure: In case of power failure, even if it is in summer, foods inside the appliance can be kept for several hours; during the power failure, the times of door opening shall be reduced, and no more fresh food shall be put into the appliance.
- Long-time nonuse: The appliance shall be unplugged and then cleaned; then the doors are left open to prevent odor.
- Moving: Before the refrigerator is moved, take all objects inside out, fix the glass partitions vegetable holder, freezing chamber drawers and etc. with tape, and tighten the leveling feet; close the doors and seal them with tape. During moving, the appliance shall not be laid upside down or horizontally, or be vibrated; the inclination during movement shall be no more than 45° .

The appliance shall run continuously once it is started. Generally, the operation of the appliance shall not be interrupted; or otherwise the service life may be impaired
TROUBLE SHOOTING
| Problem Solution | |
| Failed operation | Check whether the appliance is connected to power or whether the plug is in well contactCheck whether the voltage is too lowCheck whether there is a power failure or partial circuits have tripped |
| Odor | Odorous foods shall be tightly wrappedCheck whether there is any rotten foodClean the inside of the refrigerator |
| Long-time operation of the compressor | Long operation of the refrigerator is normal in summer when the ambient temperature is highIt is not suggestible having too much food in the appliance at the same timeFood shall get cool before being put into the applianceThe doors are opened too frequently |
| Light fails to get lit | Check whether the refrigerator is connected to power supply and whether the illuminating light is damagedHave the light replaced by a specialist |
| Doors cannot be properly closed | The door is stuck by food packages Too much food is placedThe refrigerator is tilted |
| Loud noise | Check whether the floor is level and whether the refrigerator is placed stablyCheck whether accessories are placed at proper locations |
| Door seal fails to be tight | Remove foreign matters on the door sealHeat the door seal and then cool it for restoration (or blow it with an electrical drier or use a hot towel for heating) |
| Water pan overflows | There is too much food in the chamber or food stored contains too much water, resulting in heavy defrostingThe doors are not closed properly, resulting in frosting due to entry of air and increased water due to defrosting |
| Hot housing | Heat dissipation of the built-in condenser via the housing, which is normalWhen housing becomes hot due to high ambient temperature, storage of too much food or shutdown of the compressor is shut down, provide sound ventilation to facilitate heat dissipation |
| Surface condensation | Condensation on the exterior surface and door seals of the refrigerator is normal when the ambient humidity is too high. Just wipe the condensate with a clean towel. |
| Abnormal noise | Buzz: The compressor may produce buzzes during operation, and the buzzes are loud particularly upon start or stop. This is normal.Creak: Refrigerant flowing inside of the appliance may produce creak, which is normal. |
AFTER-SALES SERVICE
Before contacting After-Sales Service:
I. See if you can solve the problem yourself with the help of the "Troubleshooting guide").
2. Switch the appliance on again to see if the problem has been solved. If it has not, disconnect the appliance from the power supply and wait for about an hour before switching on again.
3. If the problem persists after this course of action, contact After-sales Service.
Specify:
• the nature of the problem
• the appliance model,
- the Service number (the number after the word SERVICE on the rating plate on the inside of the appliance)
- your full address
- your telephone number and area code.
SERVICE
0000 000 00000
SICHERHEITSHINWEISE
- Verfahren:
- Procedimiento:
- Procedure:
GUIDA ALLA RICERCA GUASTI
3. Postupy:
- PERMITTED USE
- CLIMATIC CLASS AMB. T. (°C)
- INSTALLATION
- ELECTRICAL WARNINGS
- CLEANING AND MAINTENANCE
- DISPOSAL OF PACKAGING MATERIALS
- DISPOSAL OF HOUSEHOLD APPLIANCES
- ENERGY SAVING TIPS
- PROPER USE OF REFRIGERATORS
- LEVELING FEET
- LEVELING DOOR
- PRECAUTIONS BEFORE INSTALLATION
- SCHEMATIC DIAGRAM OF LEVELING THE DOOR
- WHEN THE FRIDGE DOOR IS LOW
- WHEN THE FRIDGE DOOR IS HIGH
- CONNECTION OF THE WATER FACILITY
- ASSEMBLY AND FIXING OF FILTER
- REPLACE WATER FILTER
- STRUCTURE AND FUNCTIONS
- FOR I&W (ICE AND WATER) VERSION
- REFRIGERATING CHAMBER
- FREEZING CHAMBER
- FOR IDI (IN DOOR ICE) VERSION
- DISPLAY
- BUTTON OPERATION
- OPERATION INSTRUCTIONS
- LOCK /UNLOCK
- MODE SETTING
- VACATION MODE 📄
- FAST REFRIG.MODE ≡∞/Ω
- TEMPERATURE SETTING OF REFRIGERATING CHAMBER B
- TEMPERATURE SETTING OF FREEZING CHAMBER -88
- QUICK-FREEZE TIME SETTING
- ICE OFF
- DISPERNSER
- STORAGE UPON POWER FAILURE
- OPENING WARNING AND ALARM CONTROL
- FAULT INDICATION
- FETCHING WATER AND ICE
- FETCHING COLD WATER
- FETCHING CRUSHED ICER(APPLY ONLY TO SBS I&W)
- FETCHING ICE CUBES
- LOCK THE ICE-MAKING MACHINE
- TEMPERATURE SETTING
- FREEZER COMPARTMENT TEMPERATURE ADJUSTMENT
- FREEZER COMPARTMENT TEMPERATURE
- FRIDGE COMPARTMENT TEMPERATURE ADJUSTMENT
- FRIDGE COMPARTMENT TEMPERATURE
- MODE SETTINGS
- VACATION MODE (HOLIDAY MODE) VACATION / VACATION
- QUICK FREEZE ≡ FAST / QUICK FRZ
- QUICK FREEZE & COOL ✉ FAST FRZ. ✉ FAST REF / ✉ QUICK FRZ. 🔒 QUICK REE
- QUICK COOL = FAST / QUICK REF
- LOCK/UNLOCK LOCK LOCK
- NOTES
- SHELVING AND RACK ADJUSTMENT
- BULB REPLACEMENT
- REVERSING THE DOOR
- ENERGY SAVING ADVICE
- POWER FAILURE
- MAINTENANCE & CLEANING
- INTERNAL CLEANING
- EXTERNAL CLEANING
- WHEN THE APPLIANCE IS NOT IN USE
- DEFROSTING
- CLEAN THE ICE CONTAINER
- CLEANING OF GLASS SHELFR
- OUT OF OPERATION
- TROUBLE SHOOTING
- AFTER-SALES SERVICE
- BEFORE CONTACTING AFTER-SALES SERVICE
- SPECIFY
- SICHERHEITSHINWEISE
- POSTUPY
Brand : HOTPOINT
Model : SXBHAE 924 WD
Category : Refrigerator