
DCD-685 - CD Player DENON - Free user manual and instructions
Find the device manual for free DCD-685 DENON in PDF.
| Product type | CD player |
| Brand | DENON |
| Model | DCD-685 |
| Dimensions (W x H x D) | 434 x 100 x 285 mm |
| Weight | 3.6 kg |
| Power supply | 230 V AC, 50 Hz |
| Power consumption | 12 W |
| D/A converter | Super linear lambda converter (A.SLC) 20 bits |
| Frequency response | 2 Hz - 20 kHz |
| Dynamic range | 100 dB |
| Signal-to-noise ratio | 110 dB |
| Harmonic distortion | 0.003% (1 kHz) |
| Channel separation | 103 dB (1 kHz) |
| Output voltage | 0.2 - 2.0 V |
| Digital output | Optical (OPTICAL) |
| Headphone jack | Yes, with volume adjustment |
| Playback functions | Programmed, repeat, random, auto edit, auto space, pitch control |
| Pitch control | Speed adjustment from -12% to +12% (DCD-685 only) |
| CD-R/RW playback | Yes, after finalization |
| Remote control | RC-266, infrared, AA batteries |
| Care and cleaning | Clean with a soft, dry cloth, without chemicals |
| Safety | Do not open the cover, avoid humidity, operating temperature 10°C to 35°C |
Frequently Asked Questions - DCD-685 DENON
User questions about DCD-685 DENON
0 question about this device. Answer the ones you know or ask your own.
Ask a new question about this device
Download the instructions for your CD Player in PDF format for free! Find your manual DCD-685 - DENON and take your electronic device back in hand. On this page are published all the documents necessary for the use of your device. DCD-685 by DENON.
USER MANUAL DCD-685 DENON
Use compact discs that include the disc mark.
CD's with special shapes (heart-shaped CDs, octagonal CDs etc.) cannot be played on this set. Attempting to do so may damage the set. Do not use such CDs.


"CLASS 1 LASER PRODUCT"
• DECLARATION OF CONFORMITY
We declare under our sole responsibility that this product, to which this declaration relates, is in conformity with the following standards: EN60065, EN55013, EN55020, EN61000-3-2 and EN61000-3-3. Following the provisions of 73/23/EEC, 89/336/EEC and 93/68/EEC Directive.
NOTE ON USE / HINWEISE ZUM GEBRAUCH / OBSERVATIONS RELATIVES A L'UTILISATION NOTE SULL'USO / NOTAS SOBRE EL USO / ALVORENS TE GEBRUIKEN / OBSERVERA OBSERVAÇÕES QUANTO AO USO
natural_image
Cartoon illustration of a sun with angry expression and a broken-out box, showing water droplets (no text or symbols)- Avoid high temperatures.
Allow for sufficient heat dispersion when installed on a rack.
- Handle the power cord carefully.
Hold the plug when unplugging the cord.
natural_image
Cartoon illustration of a sad rectangular object with falling petals and a surprised face, surrounded by small dots (no text or symbols)- Keep the set free from moisture, water, and dust.
- Unplug the power cord when not using the set for long periods of time.
natural_image
Cartoon illustration of a book character with steam rising, surrounded by books and papers (no text or symbols)* (For sets with ventilation holes)
- Do not obstruct the ventilation holes.
natural_image
Cartoon illustration of a spray bottle spraying water onto a container with a smiling face (no text or symbols)- Do not let insecticides, benzene, and thinner come in contact with the set.
- Lassen Sie das Gerät nicht mit Insektiziden, Benzin oder Verdünnungsmitteln in Berührung kommen.
- Ne pas mettre en contact des insecticides, du benzène et un diluant avec l'appareil.
- Assicuratevvi che l'unità non venga in contatto con insetticidi, benzolo o solventi.
- No permita el contacto de insecticidas, gasolina y diluyentes con el equipo.
- Laat geen insektenverdelgende middelen, benzine of verfverdunner met dit apparaat in kontakt komen.
- Se till att inte insektsmedel på spraybruk, bensen och thinner kommer i kontakt med apparatens hölje.
- Não permita que inseticidas, benzina e dissolvente entrem em contacto com o aparelho.
natural_image
Cartoon illustration of a car with a hand holding a tool, showing motion and spray effects (no text or symbols)- Never disassemble or modify the set in any way.
- Versuchen Sie niemals das Gerät auseinander zu nehmen oder auf jegliche Art zu verändern.
- Ne jamais démonter ou modifier l'appareil d'une manière ou d'une autre.
- Non smontate mai, né modificate l'unità in nessun modo.
- Nunca desarme o modifique el equipo de ninguna manera.
- Nooit dit apparaat demonteren of op andere wijze modifiëren.
- Ta inte isär apparaten och försök inte bygga om den.
- Nunca desmonte ou modifique o aparelho de alguma forma.
IMPORTANT TO SAFETY
WARNING:
TO PREVENT FIRE OR SHOCK HAZARD, DO NOT EXPOSE THIS APPLIANCE TO RAIN OR MOISTURE.
CAUTION:
1. Handle the power supply cord carefully
Do not damage or deform the power supply cord. If it is damaged or deformed, it may cause electric shock or malfunction when used. When removing from wall outlet, be sure to remove by holding the plug attachment and not by pulling the cord.
2. Do not open the top cover
In order to prevent electric shock, do not open the top cover. If problems occur, contact your DENON DEALER.
3. Do not place anything inside
Do not place metal objects or spill liquid inside the CD player.
Electric shock or malfunction may result.
Please, record and retain the Model name and serial number of your set shown on the rating label.
Model No. DCD-485/685 Serial No.
Thank you for purchasing this DENON Compact Disc Player. Please read the operating instructions thoroughly in order to acquaint yourself with the CD player and achieve maximum satisfaction from it.
Be sure to keep this manual for future reference, should any questions or problems arise.
— TABLE OF CONTENTS —
FEATURES 5
CAUTIONS DURING USE 5
NAMES AND FUNCTIONS OF PARTS ......6, 7
CONNECTION 7
OPENING AND CLOSING THE DISC HOLDER AND LOADING A DISC 8
NORMAL CD PLAYBACK 8
- This CD player is capable of playing discs which have the mark at right.
- During track selection, during search and when the player sustains a strong impact, the disc's rotational speed changes greatly, causing a small noise to be emitted. This is not a malfunction of the player.
- If the CD player is operated while an FM or AM broadcast is being received, there may be noise in the FM or AM reception. Please switch the power to the CD player off at such times.
- The DCD-485/685 has a broad dynamic range. Please exercise caution when turning up the volume on the amplifier in cases when the playback volume is low. If the volume is turned up too high, it could damage the speakers.

Please check to make sure the following items are included with the main unit in the carton:
(1) Operating Instructions ....1
(2) Connection Cord....1
(3) Remote Control Unit RC-266 1
(4) R6P/AA Dry Cell Battery 2
(5) AC Cord 1
(6) Service Station List ....1
NOTE:
This CD player uses the semiconductor laser. To allow you to enjoy music at a stable operation, it is recommended to use this in a room of 10^ C ( 50^ F) \~ 35^ C ( 95^ F).
FEATURES
The DCD-485 is CD Player equipped with Enhanced Multilevel - D/A converter and DCD-685 is CD Player equipped with DENON's unique AsLC (super linear converter) for eliminating sound quality deterioration in the PCM playback system in order to faithfully recreate the sound field of live halls or studios where compact discs are recorded. These models use carefully selected parts to provide high performance and sound field recreation with rich musical expression.
(1) Enhanced Multilevel - D/A converter (DCD-485 only)
Enhanced Multilevel noise shaping/ - D/A converters with superior resolution offers reproduction of the original sound field with rich musical expression.
(2) High precision D/A converter (DCD-685 only)
The DCD-685 uses an _SLC (lambda super linear converter) that theoreti-cally eliminates all zero-cross distortion, the main cause of reduced sound quality. This in combination with the multi-bit high precision 20-bit D/A converter in creases sound reproduction performance, particularly at low volumes.
(3) Pitch control function (DCD-685 only)
During playback of CDs, the play speed can be adjusted between -12% and +12%.
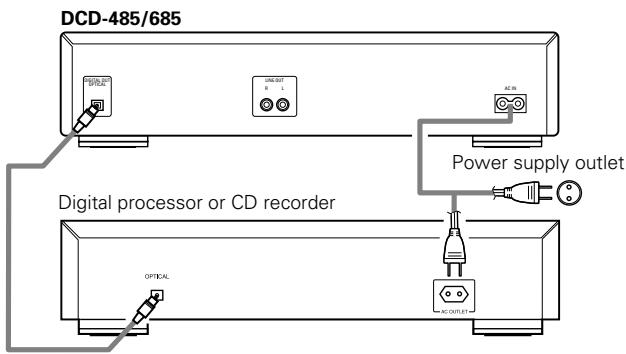
(4) Digital Output (OPTICAL)
The data on the compact disc is output in digital format, so the music can be reproduced on an external digital processor or CD recorder.
(5) CD-R/RW playback
This set can play finalized CD-R/RW discs. Note however that depending on the recording quality, it may not be able to play certain CD-R/RW discs.
- Do not use any discs but exclusive audio discs with this CD player.
- Placing this player or its connection cords near a TV or other audio device could cause a humming sound to be emitted. If this occurs, relocate the player or reroute the connection cords.
- Be sure to remove the disc from the player before moving it. The disc could be damaged if left in the player while it is being moved.
- Do not place any object in the tray in the position where the disc is loaded or open and close the tray with anything inside. Foreign objects in the tray could damage the play mechanism.
- Do not move the player from a cold place to a warm place suddenly. If the player is cold when brought into a warm room, condensation could form, preventing proper operation of the player. If condensation does form on the player when it is brought into a warm room, wait at least 30 minutes before use.
NAMES AND FUNCTIONS OF PARTS
1 Power Switch (POWER)
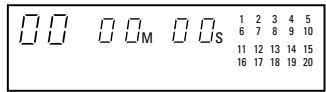
- When the power is turned on, “☐☐” appears on the TRACK No. display and if no disc is loaded, “☐☐ ☐☐M☐☐S” appears on the digital display.
- If the power is turned on with a disc already loaded, the total number of tracks on the disc is displayed on the TRACK No. display, the total time is displayed on the TIME display, the numbers on the music calendar light up to the number of tracks on the disc and playback begins.
② Headphones Jack (PHONES)
- For private listening, you can connect your headphones to this jack. (Headphones are sold separately.) Do not raise the volume level too much when listening through headphones.
3 Volume Control (PHONES LEVEL) (DCD-685 only)
- Use this to adjust the output level of the headphones.
4 Remote Control Sensor (REMOTE SENSOR)
- This sensor receives the infrared light transmitted from the wireless remote control unit.
- For remote control, point the supplied remote control unit RC-266 towards this sensor.
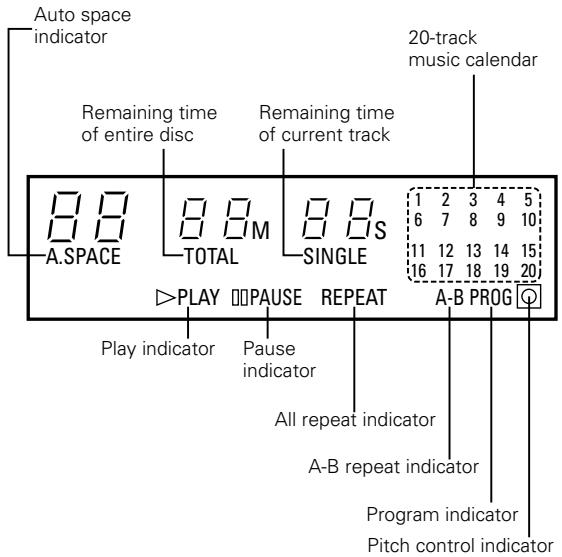
5 Display
- The digital display is divided into sections, such as displays for track number, playback time and calendar, as shown below.
6 Pitch - Button (PITCH -) (DCD-685 only)
- Push this button to slow down the playing speed. (Refer to page 12.)
7 Pitch + Button (PITCH +) (DCD-685 only)
- Push this button to make the playing speed faster. (Refer to page 12.)
8 Auto Edit Button (A. EDIT)
- The tracks on a CD are automatically split into two halves, Side A and Side B, like an analog disc, with the division at the place between tracks which is closest to 1/2 the total playing time and with the tracks remaining in the same order. (Refer to page 11.)
9 Repeat All Button (ALL)
- Push this button to repeat playback of all tracks.
When this button is pushed, [REPEAT] lights on the display and all tracks on the disc or in a program will be repeatedly played back. - Push this button once more to disengage the repeat function. (Refer to page 10.)
10 A-B Repeat Button (A-B)
- Push this button for repeat playback between a designated starting point (A) and at ending point (B). (Refer to page 10.)
11 Auto Space Button (A. SPACE)
- Pushing this button will cause the A. SPACE indicator to light and a blank space of approximately 4 seconds is inserted between tracks during CD playback. Pushing the button once more, the A. SPACE indicator goes out and the Auto Space feature is cancelled.
- When one of the automatic search buttons (I◄◄ or ►►I) or jog dial is pushed, the Auto Space function will not operate.
- The Auto Space function will work during normal playback as well as programmed playback or random playback.
- Although 4-second blanks are inserted between tracks, this additional time is not reflected by the indication on the time remaining display or time display when the Auto Edit function is engaged. (Refer to page 11.)
12 Jog Dial (I ◀◀ - ▶▶▶)
- Turn this to move to the beginning of the desired track. (Refer to page 9.)
13 Time Mode Button (TIME)
- This button is used to select the desired indication on the TIME display. The indication on this display will change each time the button is pushed.
Normally, the elapsed playback time of the current track is displayed. Pushing the button once, SINGLE is displayed and the remaining time of the current track is displayed. Pushing once more, TOTAL is displayed and total playing time of remaining tracks is displayed. However, when programmed play is in progress, the total remaining time of the program is displayed. Push the button once again to return to the normal display of the elapsed playback time of the current track. - For discs containing more than 20 tracks, the remaining time is not displayed for tracks 21 and on.
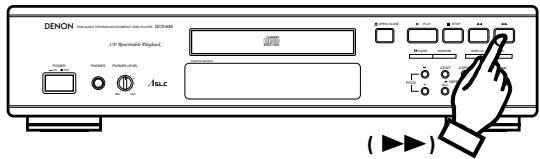
14 Manual Search Forward Button (▶▶)
- Push this button during playback for fast forward search. As long as the button is kept pushed, music signals are played back faster than normal.
- Pushing this button when the pause mode is engaged, you can quickly forward the pickup to a desired position, three times faster compared to manual forward search during playback. During this time, no sound is heard. (Refer to page 10.)
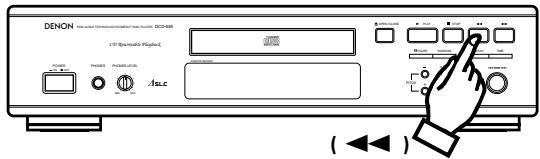
15 Manual Search Reverse Button (◀◀)
- Push this button during playback for fast reverse search. As long as the button is kept pushed, music signals are played back faster than normal.
- Pushing this button when the pause mode is engaged, you can quickly reverse the pickup to a desired position, three times faster compared to manual reverse search during playback. During this time, no sound is heard. (Refer to page 10.)
16 Dimmer Button (DISPLAY)
- Push this button to change the brightness of the display.
- Push once to make the display 2/3 as bright as normal.
- Push again to make the display 1/3 as bright as normal.
- Push once again to turn the entire display off during playback and all except the track number off in any other mode.
17 Stop Button (■ STOP)
- Push this button to stop playback or pause mode. The disc will stop rotating.
18 Random Button (RANDOM)
- Push this button to play the track in random order. (Refer to page 11.)
19 Play Button (▶ PLAY)
- Push this button to start playback of a disc during stop or pause mode.
- When this button is pushed, ▶ PLAY is displayed and the track number being played is displayed.
- Tracks are shown on the calendar display. Once a track has been played, the corresponding track number goes out on the calendar display.
20 Pause Button (II PAUSE)
- Push this button to stop playback temporarily during playback.
- When this button is pushed during playback, playback is stopped temporarily, the ▶ PLAY indicator goes out and the □ PAUSE indicator lights.
- Push this button or the ▶ PLAY button again to continue playback.
21 Open/Close Button (▲ OPEN/CLOSE)
- The disc holder is opened and closed by pushing this button.
- Push this button once to open the disc holder and once again to close it.
- When the disc holder is closed with a disc loaded, the disc will rotate for a few seconds while the disc contents are read. The number of tracks and total playback time on the disc are then displayed on the digital display 5.
22 Disc Holder
- Place the disc on the disc holder with the label facing up.
- Use the ▲ OPEN/CLOSE button 21 to open and close the disc holder.
- The disc holder may also be closed by pressing the ▶ PLAY button 19 or Ⅱ PAUSE button 20.
23 Digital Output Jack (OPTICAL)
- Digital data is output in optical form from this jack. (Refer to page 7 for connections.)
24 Output Terminal (LINE OUT)
- Connect these jacks to the input jacks on your amplifier. (Refer to page 7 for details on the connections.)
25 AC INLET
- Connect the included AC cord here.
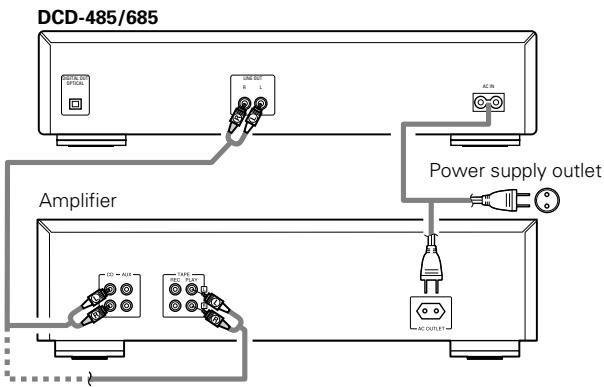
CONNECTION
(1) Connecting the Output Terminal (LINE OUT)
Use the included pin cords to connect the left (L) and right (R) output terminal (LINE OUT) of the DCD-485/685 to the CD, AUX or TAPE PLAY left (L) and right (R) input jacks of the amplifier.
Connection Precautions
- Before proceeding with connections or disconnections of cables and power cords, be sure to turn all system components off.
- Ensure that all cables are connected properly to the L (left) and R (right) jacks.
- Insert plugs fully into the terminals.
- Connect the output jacks to the amplifier CD, AUX or TAPE PLAY input jacks.
(2) Connecting the Digital Output Jack (OPTICAL)
Use an optical link cable to connect the digital output jack (OPTICAL) of the DCD-485/685 to the digital input jack (OPTICAL) on a digital processor or CD recorder, available in stores.
OPENING AND CLOSING THE DISC HOLDER AND LOADING A DISC
Opening and closing the disc holder (This operation only works while the power is on.)
- Push the POWER switch to turn on the power.
- Push the ▲ OPEN/CLOSE button.
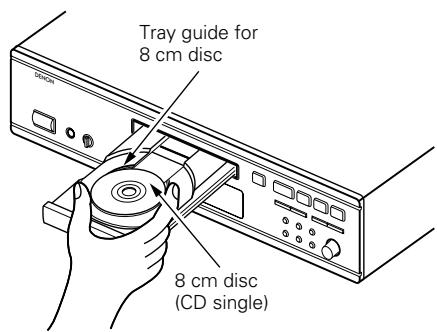
How to load a disc
- Make sure the disc holder is completely open.
- Hold the disc by the edges and place it on the disc tray. (Do not touch the signal surface, i.e., the glossy side.)
- When using 12 cm. diameter discs, make sure the outer edge matches the tray guide circumference (Fig. 1) and when using CD singles (8 cm. diameter) match the outer edge with the inner tray guide circumference. (Fig. 2)
- Push the ▲ OPEN/CLOSE button to close the disc holder.
- When the disc holder is closed, the disc is read and after a few seconds the number of tracks and total playing time are displayed on the TRACK No. and TIME displays, respectively.
- When the disc holder is open and a disc is loaded, you may also push the ▶ PLAY or ■ PAUSE button to close the disc holder. (If the ▶ PLAY button is pushed, playback will start immediately upon the disc contents having been read.)
Fig. 1
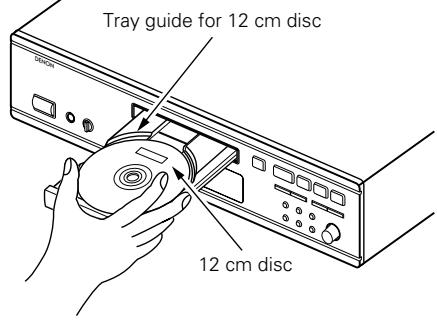
Fig. 2
Caution:
- If your finger should get caught in the disc holder when it closes, push the ▲ OPEN/CLOSE button.
- Do not place any foreign objects on the disc tray and do not place more than one disc on the tray at a time. Otherwise malfunction may occur.
- Do not push in the disc tray manually when the power is off as this may cause malfunction and damage the CD player.
- This player can play CD-R/RW discs, but only if they are finalized. Note however that depending on the recording quality, the player may not be able to play some finalized CD-R/RW discs. If a problem occurs with such discs (for example if the disc cannot be read when it is loaded or when the play mode is set), " E_RR " appears on the time display section when the disc is unloaded.
NORMAL CD PLAYBACK
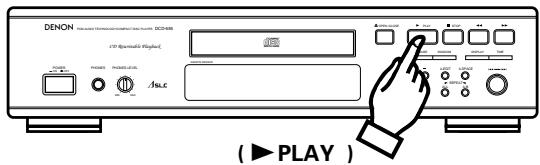
(1) Starting Playback

- Push the POWER switch to turn on the power.
- Load the disc you want to play.
- When the disc holder is closed, the disc is read and the number of tracks and total playing time of the disc are displayed.
- Push the ▶ PLAY button.
- The number of the track currently playing and the elapsed time, etc. displayed.
- Playback can also be started by pushing the jog dial.
(2) Stopping Playback
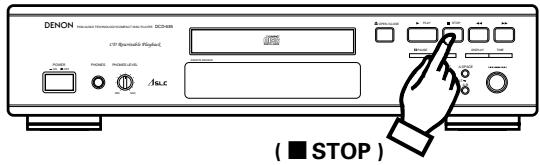
- Push the ■ STOP button.
- When all tracks have been played on a disc, playback will stop by itself.
Precautions:
- If no disc has been loaded or the disc has been placed upside down, the track number and time display will all read zero and the entire calendar will light.
- When the information on the disc cannot be read correctly, for example due to dust or dirt on the disc, the track number and time display will all read Zero and the entire calendar will light. And the number of tracks, remaining time per track will not be displayed. Also, the search operation may take longer than usual.
No disc or Improper display
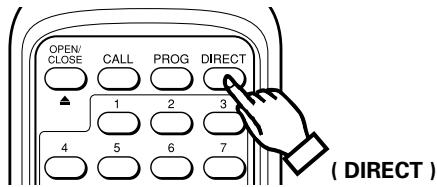
(1) Playing a specific track .... Direct Search
(Remote control unit only)
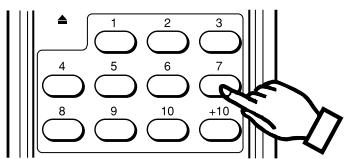
( Number buttons )
- Use the number buttons and the +10 button to input the number of the desired track.
For example, to play track number 4, push 4 and to play track number 12, push +10 and 2 . Playback will begin from that track.
(2) Advancing to the next track during
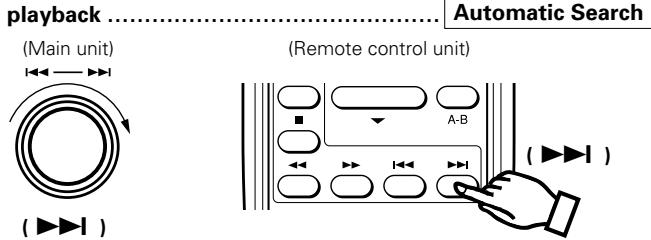
Either turn the jog dial on the main unit clockwise (Ω) or push the automatic search forward button (▶▶▶) on the remote control unit during playback.
- The pickup will advance to the beginning of the next track and playback will continue. Turning the jog dial or pushing the button several times will forward the pickup the corresponding number tracks.
(3) Returning to the beginning of the
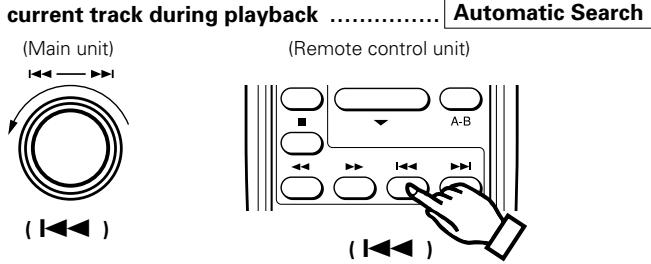
Either turn the jog dial on the main unit counterclockwise (Ω) or push the automatic search reverse button (I◄◄) on the remote control unit during playback.
- The pickup will return to the beginning of the current track and playback will continue. Turning the jog dial or pushing the button several times will return the pickup the corresponding number tracks.
(4) Playing specific tracks in a specific

- With this function, you can choose any of the tracks on the disc and program them to play in any order.
- Programming is possible also with the disc holder open.
- Up to 20 tracks can be programmed.
- The programmed tracks are shown on the calendar.
1 Programming
(Remote control unit only)
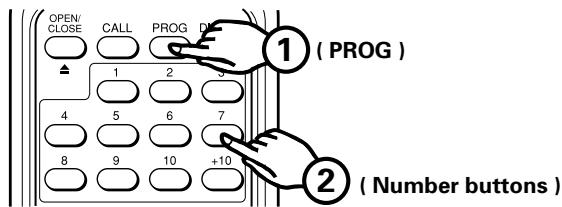
- Push the PROG button so that the [PROG] indicator lights, then use the number buttons and the +10 button of the remote control unit to program the tracks.
For example, to program tracks 3, 12 and 7, push PROG, 3, +10, 2 and 7.
The corresponding track number lights on the calendar each time a track is programmed, the track number is displayed on the TRACK No. display and the total playing time of the programmed tracks is displayed on the TIME display. A few seconds after the last track has been programmed, the total number of programmed tracks is displayed on the TRACK No. display.
② Checking the programmed tracks
(Remote control unit only)

- Push the CALL button.
The programmed tracks are displayed in order on the TRACK No. display each time the CALL button is pushed.
③ Playing the programmed tracks
- Push the ▶ PLAY button to play the tracks in the programmed order.
4 Clearing the program
- The entire program is cleared when the DIRECT button on the remote control unit is pushed. The program is also cleared when the ▲ OPEN/CLOSE button is pushed.
NOTES:
- If programming is done in the play or pause mode, the track currently playing is programmed at the first position. Other tracks can be added to the program, but the number of programmed tracks and the playing time will not be displayed.
- Direct search is not possible during programmed play. If the number buttons are pushed, that track is added to the end of the program.
- Programming is possible also with the disc holder open. Track numbers greater than the number of tracks recorded on the disc can be programmed, but will be automatically cleared before playback begins.
- The remaining time per track will only be displayed for track numbers 1 through 20.
- The total program time and remaining program time are not displayed if tracks greater than track number 20 are programmed.
(5) Repeating playback of all track..... Repeat
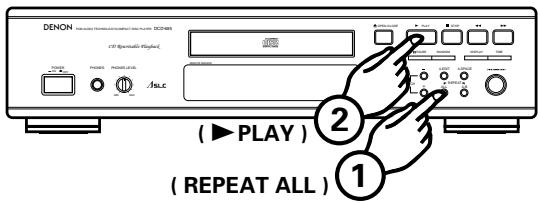
- Push the REPEAT ALL button.
- Push the ▶ PLAY button.
- Pushing the REPEAT ALL button, [REPEAT] is displayed.
- Steps 1 and 2 above may be reversed.
- To cancel the repeat playback mode, push the REPEAT ALL button once more.
- Pushing the REPEAT ALL button during programmed playback, playback of the tracks entered into the memory will be repeated.
- In the program mode, only programmed tracks are played repeatedly. If you want to play a single track repeatedly, for example, do so by programming that track.
(6) Repeating playback of a desired interval ...... A-B Repeat
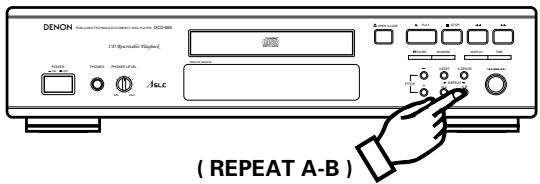
- Start playback and push the REPEAT A-B button when you reach the starting point of the interval. The A-B indicator starts blinking.
- Continue playback or advance the pickup using the automatic search forward button (▶▶▶) or manual search forward button (▶▶▶) until the ending point is reached. Then push REPEAT A-B button once more. The ▶A-B indicator will light.
- The pickup will now return to the starting point and repeat playback of the selected interval.
- This interval will be repeated until the A-B repeat mode is cancelled by pushing the REPEAT A-B button once more. The [A-B] indicator goes out.
- A-B repeat playback is not possible during programmed playback.
(7) Pausing playback at any point .... Pause
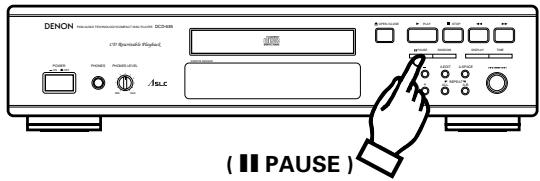
- Playback can be temporarily halted and then continued from the same point in the track.
- Push the ■ PAUSE button during playback.
- To continue playback, push the ▶ PLAY or ■ PAUSE button once more.
(8) Audible quick search Manual Search
- Using this function, you can cue to a desired point within a track, either in the forward or reverse direction.
- Release the manual search button (◀◀ or ▶▶) when the desired point has been reached. Normal playback then continues.
① Manual search forward
-
Push the manual search forward button (▶▶) during playback. Playback of the track is sped up.
-
As a reference, the current track number and elapsed playback time within the track are displayed.
- Manual search forward is approximately three times faster when engaged during the pause state compared to playback. In this case, no sound is heard however.
- If the manual search forward button (▶▶) is kept pushed after the end of the final track on the disc is reached, “ ]” is displayed and manual search stops. To return to another point, push the manual search reverse button (◀◀) until “ ]” disappears.
② Manual search in reverse
-
Push the manual search reverse button(◀◀) during playback. Reverse playback of the track is sped up.
-
As a reference, the current track number and elapsed playback time within the track are displayed.
- Manual search in reverse is approximately three times faster when engaged during the pause state compared to playback. In this case, no sound is heard however.
- If the manual search reverse button (◀◀) is kept pushed after the beginning of the first track on the disc is reached, "【" is displayed and manual search stops. To return to another point, push the manual search forward button (▶▶) until "【" disappears.
(9) Inserting blanks between tracks .... Auto Space
- This is convenient feature that will insert 4-second blanks between tracks, which can be used when recording compact discs on tape.

- Pushing the A. SPACE button will cause the [A. SPACE] indicator to lights.
- Push the ▶ PLAY button to start playback.
When a track has been played to its end, a 4-second silence is made before the next track starts playing.
- Push the A. SPACE button again to cancel the function.
NOTE:
4-second blank section is not created when the A-B repeat function is used within a single track.
(10) Searching and pausing at the beginning of the
track ...... Pause
① With direct search
(Remote control unit only)
- In this case, the set pauses at the beginning of the track found with the direct search operation.
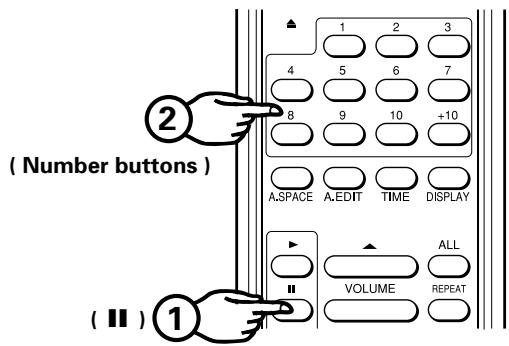
- Push the ■ PAUSE button.
- Push the number button(s) for the desired track.
- To start playback, push the ▶ PLAY or || PAUSE button.
- This operation is not valid in the program mode.
② With automatic search
- In this case, the set pause at beginning of the track found with the automatic search operation.
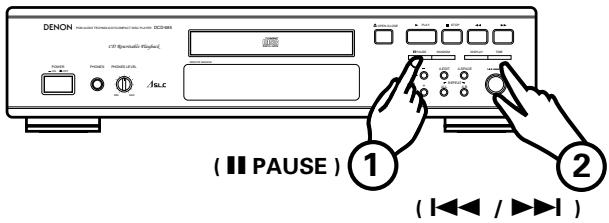
- Push the ■■ PAUSE button during playback.
- Either turn the jog dial on the main unit or push the automatic search button(s) (I◀◀, ▶▶▶▶) on the remote control unit to select the desired track.
- To start playback, push the ▶ PLAY or ■ PAUSE button.
- This operation is also effective in the program mode.
③ With program search
- Push the II PAUSE button on remote control unit after the programming operation is completed. The set will pause at the beginning of the first programmed track.
(11) Edit recording on sides A and B of the tape ..... Auto Edit
- The auto edit function automatically divides the tracks on the compact disc into sides A and B, with the division at the beginning of a track in such as way that the disc's total playing time is divided as close as possible by one half.
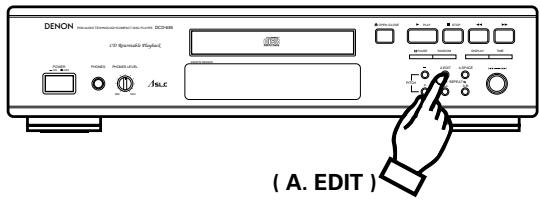
- When the A. EDIT button is pushed in the stop condition, the total play time of side A (the first half) and the track numbers (on the calendar) are displayed for about 2 seconds. Next, the side B (last half) information is similarly displayed after which the player automatically pauses at the beginning of the first track of side A. PROG will be lit on the display at this time.
- Pushing the ▶ PLAY button will start playback.
When side A has finished playing, the player will pause at the beginning of the first track on side B.
- Pushing the ▶ PLAY button again will start the play mode. When side B has finished playing, the player automatically stop.
NOTES:
- The auto edit function will not work for discs containing 21 tracks or more.
- Pushing ■ STOP or ▲ OPEN/CLOSE button during auto editing will cancel auto editing.
(12) Playing Tracks in Random Order ...... Random Playback
- All of the tracks recorded on the disc can be played once in random order.
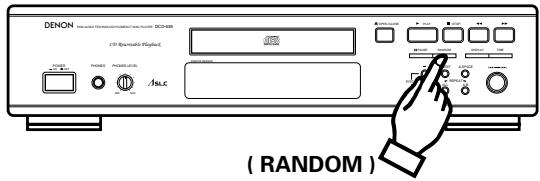
- When the RANDOM button is pushed, the ▶ PLAY indicator blinks and random playback starts automatically.
- If the RANDOM button is pushed when tracks are programmed, only the programmed tracks are played at random.
- If the RANDOM button is pushed when the repeat function is set, all tracks will be played through once in random order, after which all tracks will be played through again in different order and so on.
- During the search operation, the track numbers from the first to the last track on the disc are displayed in rapid succession on the track number display, so you cannot tell what track is going to be played next until playback begins.
NOTES:
- The total remaining time is not displayed during the random mode.
- The random mode is cancelled if the RANDOM button is pushed during the random mode.
(13) Changing the Speed of Playback
(DCD-685 only) Pitch Control
- Playback can be speeded up or slowed down.
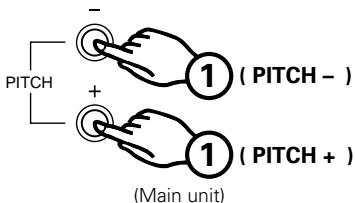
① Push the PITCH + or PITCH – button during the play or pause mode to change the speed of playback.
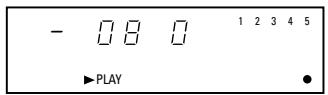
② When one of the PITCH buttons is pushed, the amount of the speed change appears on the TIME display for approximately 2 seconds. “●” blinks when the speed is slower than normal, “●” lights when the speed is faster than normal. The speed can be changed in steps of 0.1% from -12.0% to +12.0%.
Shown as example : -8.0%
③ Push the ▶ PLAY button during playback with a different speed to return to normal speed playback.
Also, the speed setting is cancelled if the stop mode is set during playback at a different speed.
NOTES:
- No data is output from the digital output jack (OPTICAL) during playback with a different speed (when “●” is lit or blinking). If you want to output data, push the ▶ PLAY button to return to normal speed playback.
- The pitch also changes when the speed is changed.
- If the speed is changed during the time edit operation, the total playing time changes, so the time of the blank space is not calculated accurately.
- The time display (elapsed playback time, remaining time per track or total remaining time) will not be accurate during playback with a different speed.
- A maximum of 2 second is required to return to the normal speed when the ▶ PLAY button is pushed during playback with a different speed. During this time, only the ▲ OPEN/CLOSE and ■ STOP buttons will function.
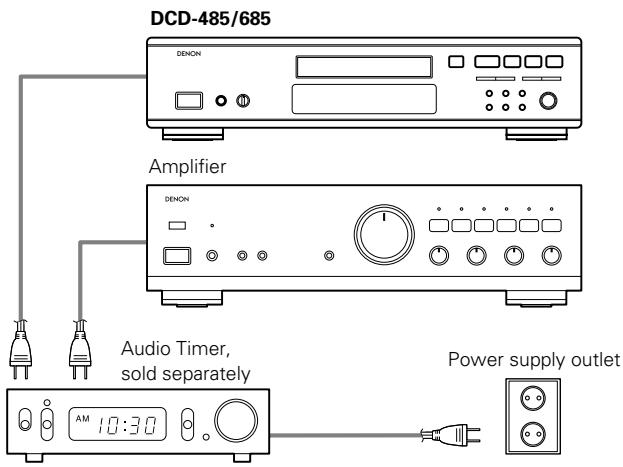
TIMER-CONTROLLED PLAYBACK
Operation
- Turn on the power of all system components.
- Set the input selector on the amplifier to correspond to the inputs the CD player is connected to.
- Make sure a disc has been loaded in the disc holder.
- Check the time on the timer and then set the desired turn-on time.
- Turn the audio timer ON.
Power is turned off automatically in all components connected to the timer. - When the preset turn-on time is reached, power is turned on in the system components and CD playback starts from the first track.
■ Connection
THE COMPACT DISC
1. Precautions on handling compact discs
- Do not allow fingerprints, oil or dust on the surface of the compact disc. If the signal surface is dirty, wipe it off with a soft, dry cloth. Wipe in circular motions from the center and out.
- Do not use water, benzene, thinner, record sprays, electrostatic proof chemicals or silicone-treated cloth to clean discs.
- Always use care when handling discs to prevent damaging the surface, in particular when removing a disc from the case and returning it.
- Do not bend compact discs.
- Do not apply heat to compact discs.
- Do not enlarge the hole in the center of the disc.
- Do not write on the disc and do not attach any labels.
- Condensation will form on the disc surface if it is brought into a warm room from a cold area, such as outdoors during winter.
Wait until the condensation disappears. Never dry discs with hair dryers, etc.
2. Precautions on storage
• After playing a disc, always return it to its case.
- Keep discs in the cases when they are not to be played. This will protect them from dust and dirt and prolong their service life.
- Do not store discs in the following places:
1) Places exposed to direct sunlight for a considerable time.
2) Places subject to accumulation of dust or high humidity.
3) Places exposed to high temperatures, such as close to heater outlets.
PLAYBACK USING THE REMOTE CONTROL UNIT
Remote control unit can be used to control the CD player from a convenient distance.
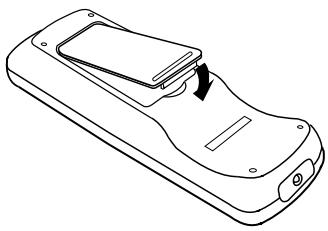
(1) Inserting the dry cell batteries
- Remove the battery cover on the back of the remote control unit.
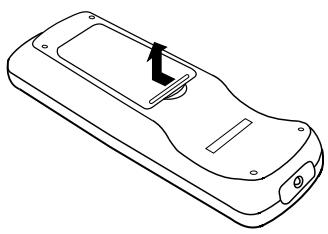
natural_image
Line drawing of a mobile phone casing with a black arrow indicating the left side (no text or symbols)- Insert two R6P (standard size AA) dry cell batteries with correct polarity as indicated inside the battery compartment.

natural_image
Line drawing of a mobile phone casing with two cylindrical batteries inserted (no text or symbols)- Replace the battery cover.
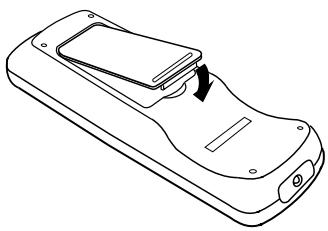
natural_image
Line drawing of a mobile phone casing with a scroll wheel and a scroll wheel (no text or symbols)Notes on the Batteries
- The remote control unit uses standard size AA dry cell batteries.
- The batteries will need to be replaced approximately once a year. Replacement may be necessary earlier depending on how much the remote control unit is used.
- If, in less than a year from the time new batteries were inserted, the remote control fails to operate the CD player from a near-by position, it is time to replace the batteries.
- The included battery is only for verifying operation. Replace it with a new battery as soon as possible.
- Insert the batteries properly, following the polarity diagram inside the battery compartment, in other words make sure (+) and (−) terminals are properly aligned.
- Batteries are prone to damage and leakage. Therefore:
- Do not combine new batteries with used ones.
- Do not combine different types of batteries.
- Do not jumper opposite poles of the batteries, expose them to heat, break them open nor expose of them in open fire.
- If the remote control unit is not to be used for a long period of time, remove the batteries from the unit.
- If the batteries have leaked, remove any traces of battery fluid from the battery compartment, wiping thoroughly with a dry cloth. Then insert new batteries.
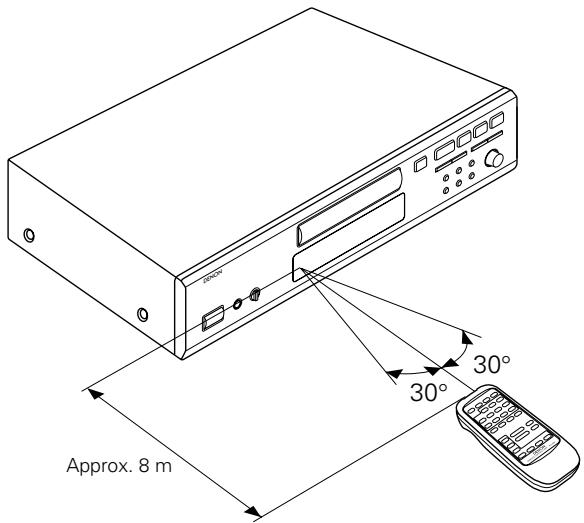
(2) Directions for Use
- Operate the remote control unit while pointing it towards the remote control sensor on the CD player (see below).
When a remote control signal is received, the remote control indicator on front of the CD player lights briefly. - The remote control unit can be used at a distance up to 8 meters in a straight line from the CD player. This distance decreases if there are obstructions blocking the signal path or when the remote control unit is operated at an angle from the remote control sensor.
- The buttons on the remote control unit have identical functions with those on the CD player.
However, the following functions cannot be remote controlled: Power ON/OFF.
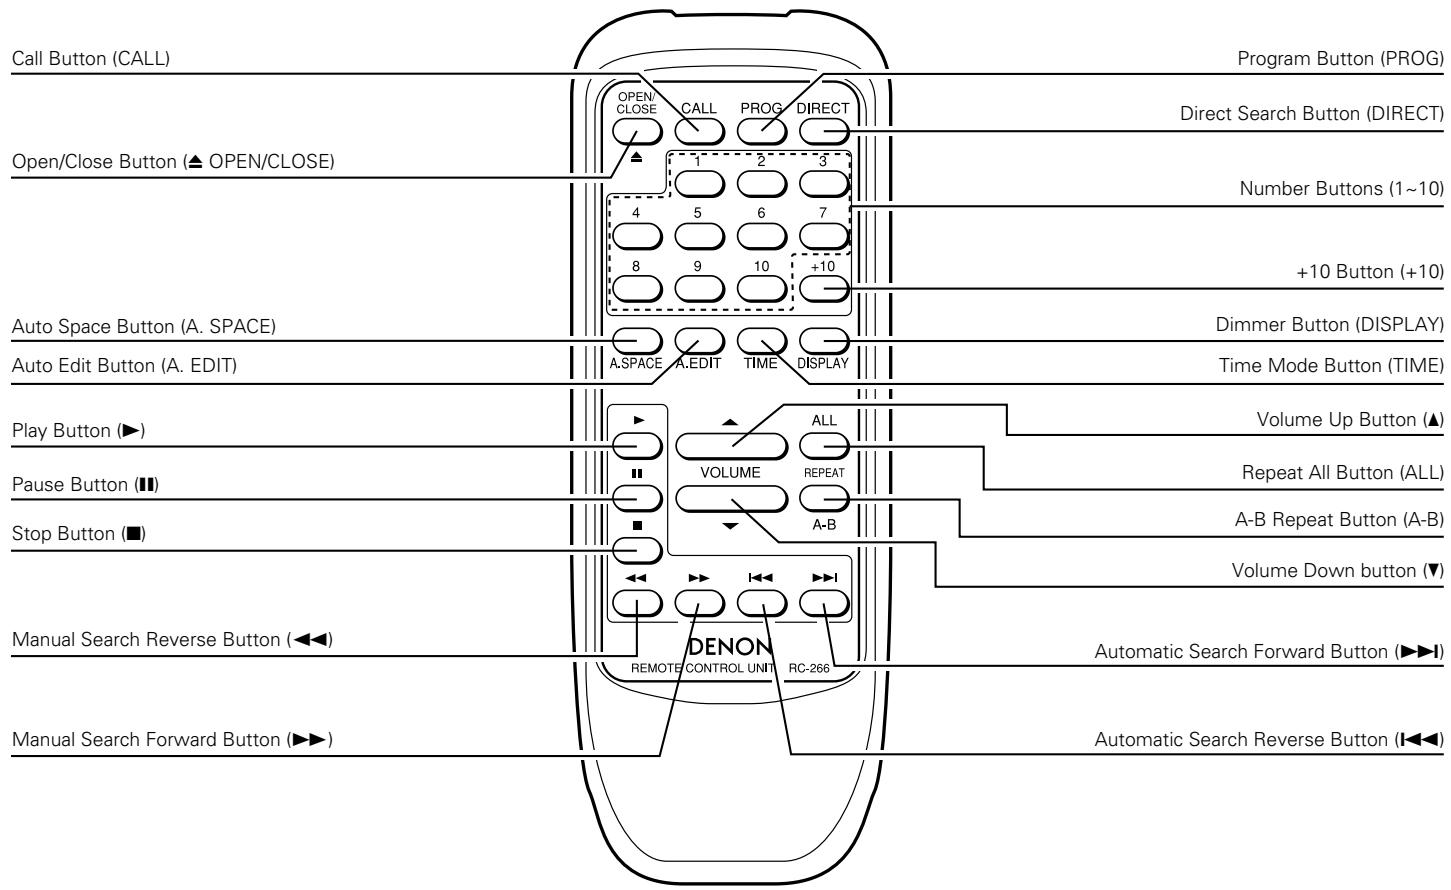
REMOTE CONTROL UNIT RC-266
Track Selection
Use the number buttons (1\~10 and +10) while programming and to access a desired track almost instantly.
The automatic search buttons (I◀◀ and ▶▶▶) are best used to advance or return from the current track to the next track.
Setting to the Program Mode
- For programming operation, push the PROG button then the number buttons (1 \~ 10 and +10).
- The remote control unit is normally set to the direct mode.
Checking Programmed Contents
By pushing the CALL button on the remote control unit, programmed contents will be displayed. Tracks entered into the memory, will be displayed starting from the first track entered and will advance one step at a time each time the CALL button is pushed.
Notes on Operation
- Do not push identical buttons on the CD player and remote control unit simultaneously as this may cause malfunction.
- The remote control unit may be difficult to operate if the remote control sensor is exposed to strong light, such as direct sunlight or light from fluorescent lamps or if there are obstacles between the remote control unit and the sensor.
- Direct track selection
Using the number buttons (1\~10 and +10), tracks can be directly assigned for playback.
- Track selection while programming
Push the PROG button and then the track numbers you wish to enter into the memory.
Example: PROG → 3 → +10 & 1 → 5....
(Tracks 3, 11, 5 and so on are entered into the memory.)
Memorized tracks are erased by pushing DIRECT button in any time.
- Correct use of the number buttons
Direct selection of single-digit tracks is easy by just pushing the desired number button. For tracks with numbers from 11 and on, first push the +10 button and then a single-digit button. E.g., to select track 22, push the +10 button twice and then push the 2 button.
Output Level Adjustment
The output level of the Line Out jacks and the Headphone output jack can be changed.
The output level of the Digital Out jack cannot be changed.
Pushing the Volume Up (▲) button during play will increase the output level.
Pushing the Volume Down (▼) button will decrease the output level.
INSTALLATION PRECAUTIONS
The CD player uses a microcomputer for controlling internal electronic circuits. In the event that the player is used while a near-by tuner or TV is turned on, although unlikely, interference could occur either in the sound from the tuner or the picture of the TV. To avoid this, please take the following precautions.
- Keep the CD player as far away from the tuner or TV set as possible.
- Keep the power cable and connecting cable of the CD player separate from the antenna wires of the tuner and TV.
- Interference is particular likely to occur when an indoor antenna or a 300 /ohms feeder cable is used. Thus, use of an outdoor antenna and 75 /ohms coaxial cable is strongly recommended.
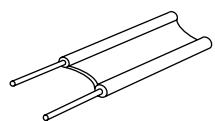
300 Ω/ohms feeder cable
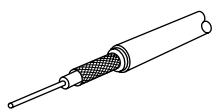
75 Ω/ohms coaxial cable
TROUBLESHOOTING
If the CD player does not seem to be functioning properly, check the following:
Disc holder does not open or close.
- Is the power on?
When a disc is loaded, 00 00M00S is displayed.
- Is the disc loaded properly?......See page 8
- For CD-R/RW discs, has the disc been finalized?
When the ▶ PLAY button is pushed, playback does not start.
- Is the disc dirty or scratched? ......See page 12
There is no sound or it is distorted.
- Is the output cord properly connected to the amplifier? ....... See page 7
- Have the amplifier controls been set correctly?
A specific section of the disc will not play.
- Is the disc dirty or scratched? ......See page 12
Programmed playback does not work.
- Have programming been properly done? ......See pages 9, 10 and 14
Incorrect operation when buttons on the remote control are pressed.
- Is the remote control unit being operated too far from the CD player?......See page 13, 14
- Are there obstacles blocking the ray?
- Is the remote control sensor exposed to strong light?
- Are the batteries exhausted?
SPECIFICATIONS
| DCD-485 | DCD-685 | |
| AUDIO | ||
| Number of Channels: | 2 channels | ← |
| Frequency Response: | 2 ~ 20,000 Hz | ← |
| Dynamic Range: | 98 dB | 100 dB |
| Signal-to-noise Ratio: | 105 dB | 110 dB |
| Harmonic Distortion: | 0.003 % (1 kHz) | 0.003 % (1 |
| Separation: | 102 dB (1 kHz) | 103 dB (1 k |
| Wow and Flutter: | Below measurable limit:(±0.001 % W. peak) | ← |
| Output Voltage: | 0.2 ~ 2.0 V | ← |
| DISCS | Compact Disc format | ← |
| GENERAL CHARACTERISTICS | ||
| Power Supply: | AC 230 V, 50 Hz | ← |
| Power Consumption: | 11 W | 12W |
| Dimensions: | 434 (W) x 100 (H) x 285 (D) mm | ← |
| Mass: | 3.4 kg | 3.6kg |
FUNCTIONS AND DISPLAY
| Functions: | Automatic search, programmed playback, repeat playback, manual search, auto space, time mode, auto edit, dimmer, random playback, pitch control (DCD-685 only) |
| Display: | Track number, time, music calendar and engaged modes |
| Others: | Headphones jack |
REMOTE CONTROL UNIT
| RC-266 | |
| Remote Control System: | Infrared pulse system |
| Power Supply: | 3 V DC; two R6P(standard size AA)dry cell batteries |
| External Dimensions: | 54.5 (W) x 140 (H) x 24.8 (D) mm |
| Mass: | 85 g including batteries |
* Design and specifications are subject to change without notice in the course of product improvement.
natural_image
Line drawing of a mobile phone casing with a black arrow indicating the left side (no text or symbols)natural_image
Line drawing of a mobile phone casing with two cylindrical batteries inserted (no text or symbols)natural_image
Line drawing of a mobile phone casing with a scroll wheel and handle (no text or symbols)(Unité principale)
natural_image
Line drawing of a mobile phone casing with a black arrow indicating the left side (no text or symbols)natural_image
Line drawing of a mobile phone casing with two cylindrical batteries inserted (no text or symbols)natural_image
Line drawing of a mobile phone casing with a scroll wheel and a slide, showing no text or symbols.natural_image
Line drawing of a mobile phone casing with a black arrow indicating the left side (no text or symbols)natural_image
Diagram of a mobile phone casing with battery and adjustment mechanism (no text or symbols)natural_image
Line drawing of a mobile phone casing with a scroll wheel and a slide, showing no text or symbols.Note sulle pile
TELECOMANDO RC-266
Selezione traccia
natural_image
Line drawing of a mobile phone casing with a black arrow indicating the left side (no text or symbols)natural_image
Diagram of a mobile phone casing with battery pack and adjustment arrows indicating action (no text or symbols)- Coloque la tapa.
natural_image
Line drawing of a mobile phone casing with a scroll wheel and a scroll wheel (no text or symbols)UNIDAD DE CONTROL REMOTO RC-266
Selección de pista
natural_image
Line drawing of a mobile phone casing with an arrow indicating the left side (no text or symbols present)natural_image
Diagram of a mobile phone casing with battery pack and internal components (no text or symbols)natural_image
Line drawing of a mobile phone casing with a scroll wheel and internal panel (no text or symbols)Opmerkingen over de batterijen
natural_image
Line drawing of a mobile phone casing with a black arrow indicating the left side (no text or symbols)natural_image
Diagram of a mobile phone casing with two cylindrical batteries inserted, showing internal components and mounting points (no text or symbols)natural_image
Line drawing of a mobile phone casing with a scroll wheel and a slide, showing no text or symbols.Observera angående batterier
(Melodierna 3, 11, 5 osv. inprogrammeras i minnet.)
natural_image
Line drawing of a mobile phone casing with a button and indicator arrow (no text or symbols)natural_image
Line drawing of a mobile phone casing with battery pack and adjustment arrows indicating components (no text or symbols)natural_image
Line drawing of a mobile phone casing with a scroll wheel and a slide, showing no text or symbols.UNIDADE DE TELECOMANDO RC-266
Seleção de faixas
no mostrador 00 00M00s.


- "CLASS 1 LASER PRODUCT"
- NOTE ON USE / HINWEISE ZUM GEBRAUCH / OBSERVATIONS RELATIVES A L'UTILISATION NOTE SULL'USO / NOTAS SOBRE EL USO / ALVORENS TE GEBRUIKEN / OBSERVERA OBSERVAÇÕES QUANTO AO USO
- IMPORTANT TO SAFETY
- WARNING:
- CAUTION:
- Handle the power supply cord carefully
- Do not open the top cover
- Do not place anything inside
- — TABLE OF CONTENTS —
- Please check to make sure the following items are included with the main unit in the carton:
- NOTE:
- FEATURES
- Enhanced Multilevel - D/A converter (DCD-485 only)
- High precision D/A converter (DCD-685 only)
- Pitch control function (DCD-685 only)
- Digital Output (OPTICAL)
- CD-R/RW playback
- NAMES AND FUNCTIONS OF PARTS
- Power Switch (POWER)
- ② Headphones Jack (PHONES)
- Volume Control (PHONES LEVEL) (DCD-685 only)
- Remote Control Sensor (REMOTE SENSOR)
- Display
- Pitch - Button (PITCH -) (DCD-685 only)
- Pitch + Button (PITCH +) (DCD-685 only)
- Auto Edit Button (A. EDIT)
- Repeat All Button (ALL)
- A-B Repeat Button (A-B)
- Auto Space Button (A. SPACE)
- Jog Dial (I ◀◀ - ▶▶▶)
- Time Mode Button (TIME)
- Manual Search Forward Button (▶▶)
- Manual Search Reverse Button (◀◀)
- Dimmer Button (DISPLAY)
- Stop Button (■ STOP)
- Random Button (RANDOM)
- Play Button (▶ PLAY)
- Pause Button (II PAUSE)
- Open/Close Button (▲ OPEN/CLOSE)
- Disc Holder
- Digital Output Jack (OPTICAL)
- Output Terminal (LINE OUT)
- AC INLET
- CONNECTION
- Connecting the Output Terminal (LINE OUT)
- Connection Precautions
- Connecting the Digital Output Jack (OPTICAL)
- OPENING AND CLOSING THE DISC HOLDER AND LOADING A DISC
- How to load a disc
- NORMAL CD PLAYBACK
- Starting Playback
- Stopping Playback
- Precautions:
- Clearing the program
- NOTES:
- Repeating playback of all track..... Repeat
- Repeating playback of a desired interval ...... A-B Repeat
- Pausing playback at any point .... Pause
- Audible quick search Manual Search
- ① Manual search forward
- ② Manual search in reverse
- Inserting blanks between tracks .... Auto Space
- Searching and pausing at the beginning of the
- ① With direct search
- ② With automatic search
- ③ With program search
- Edit recording on sides A and B of the tape ..... Auto Edit
- Playing Tracks in Random Order ...... Random Playback
- Changing the Speed of Playback
- TIMER-CONTROLLED PLAYBACK
- Operation
- ■ Connection
- THE COMPACT DISC
- Precautions on handling compact discs
- Precautions on storage
- PLAYBACK USING THE REMOTE CONTROL UNIT
- Inserting the dry cell batteries
- Notes on the Batteries
- Directions for Use
- REMOTE CONTROL UNIT RC-266
- Track Selection
- Setting to the Program Mode
- Checking Programmed Contents
- Notes on Operation
- - Track selection while programming
- - Correct use of the number buttons
- Output Level Adjustment
- INSTALLATION PRECAUTIONS
- TROUBLESHOOTING
- SPECIFICATIONS
- Note sulle pile
- TELECOMANDO RC-266
- Selezione traccia
- UNIDAD DE CONTROL REMOTO RC-266
- Selección de pista
- Opmerkingen over de batterijen
- Observera angående batterier
- UNIDADE DE TELECOMANDO RC-266
- Seleção de faixas
Brand : DENON
Model : DCD-685
Category : CD Player