
KN 14 - Stapler GUDE - Free user manual and instructions
Find the device manual for free KN 14 GUDE in PDF.


| Product type | Manual stapler |
| Brand | Güde |
| Model | KN 14 |
| Power source | Manual |
| Staple capacity | Up to 100 staples |
| Staple type | Type 14 staples (width 6 mm, length 4-14 mm) |
| Stapling depth | Adjustable |
| Magazine | Sliding magazine |
| Handle | Ergonomic, non-slip rubber |
| Main functions | Stapling paper, cardboard, light fabrics |
| Dimensions (L x W x H) | Approx. 20 x 15 x 5 cm |
| Weight | Approx. 0.5 kg |
| Housing material | Robust steel and ABS |
| Safety | Trigger lock, safety lock |
| Maintenance and cleaning | Clean with a dry cloth; lubricate moving parts with machine oil |
| Spare parts and repairability | Springs and anvils available; repair possible by after-sales service |
| General information | Comes with 100 staples |
Frequently Asked Questions - KN 14 GUDE
User questions about KN 14 GUDE
0 question about this device. Answer the ones you know or ask your own.
Ask a new question about this device
Download the instructions for your Stapler in PDF format for free! Find your manual KN 14 - GUDE and take your electronic device back in hand. On this page are published all the documents necessary for the use of your device. KN 14 by GUDE.
USER MANUAL KN 14 GUDE
----EN Translation of the original instructions
40088 40212 40220 40205
German 3
English _ 10
French _ 17
Czech _ 24
Slovak 31
Dutch 38
Italian 45
Hungarian _ 52
Polish 61
EC Declaration of Conformity
EU Declaration of Conformity 67
Introduction
Thank you very much for the confidence in our Company and our product. With the purchase of this Güde product you have decided to choose a high-quality appliance meeting the current safety standards.
Please read these Operating Instructions carefully before putting the appliance into operation. Only put the appliance into operation after you have completely read and understood these Operating Instructions. This manual includes important instructions that are absolutely necessary for safe and trouble-free operation of your appliance. Therefore, it should always be kept near the appliance for future reference.
Parts of nailers, pic. A, Art. No. 40220
- Magazine
- Trigger
- Clamping lever
- Extension
- Stop lever
- Switch fuse
Parts of tackers, pic. B, Art. No. 40880
- Magazine
- Trigger
- Clamping lever
- Extension
- Switch fuse
Parts of tackers, pic. C, Art. No. 40205
- Magazine
- Trigger
- Clamping lever
- Extension
- Stop lever
- Switch fuse
Parts of tackers, pic. D, Art. No. 40212
- Magazine
- Trigger
- Clamping lever
- Extension
- Stop lever
- Switch fuse
Technical specifications, Art. No. 40220
Connecting thread: 1/4"
Operating pressure: 6 bar
Nail length: 50 mm
Nail thickness: 1.05 mm
Nail head diameter: 2 mm
Max. clamp length: 50 mm
Clamp back width: 5.8 mm
Clamp thickness: 1 mm
Recommended inner hose diameter: 6 mm
Weight: 3.6 kg
Case includes: tacker, 2 socket-screw keys, 500 clamps with a length of 19, 32 and 40 mm, 1000 pins with a length of 25 and 40 mm, 1 oil bottle, protective goggles.
Spare nails for Art. No. 40220
| Length | ∅ of nail head | Nail thickness | Pcs | Art. No. |
| 15 mm | 2 mm | 1.05 mm | 5,000 | 40213 |
| 25 mm | 2 mm | 1.05 mm | 5,000 | 40214 |
| 30 mm | 2 mm | 1.05 mm | 5,000 | 40215 |
| 40 mm | 2 mm | 1.05 mm | 5,000 | 40216 |
| 50 mm | 2 mm | 1,01 mm | 5000 | 40217 |
Spare staples for Art. No. 40220
| Length | Back width | Clamp thickness | Pcs | Art. No. |
| 13 mm | 5.8 mm | 1 mm | 2,500 | 40253 |
| 22 mm | 5.8 mm | 1 mm | 2,500 | 40254 |
| 32 mm | 5.8 mm | 1 mm | 2,500 | 40255 |
| 40 mm | 5.8 mm | 1 mm | 2,500 | 40256 |
Technical specifications of # 40088
Connecting thread: 1/4"
Operating pressure: 6 bar
Clamp length: 6-16 mm
Clamp back width: 12.8 mm
Clamp thickness: 0.65 mm
Recommended inner hose diameter: 6 mm
Weight: 1.8 kg
Case includes: tacker, protective goggles, oil bottle, measure tape, 600 8 mm clamps, 600 10 mm clamps, 600 14 mm clamps.
Spare staples for Art. No. 40088
| Length | Back width | Clamp thickness | Pcs | Art. No. |
| 16 mm | 12.8 mm | 0.65 mm | 5,000 | 40267 |
| 8 mm | 12.8 mm | 0.65 mm | 5,000 | 40268 |
| 10 mm | 12.8 mm | 0.65 mm | 5,000 | 40269 |
| 12 mm | 12.8 mm | 0.65 mm | 5,000 | 40271 |
| 14 mm | 12.8 mm | 0.65 mm | 5,000 | 40272 |
Technical specifications of # 40205
Connecting thread: 1/4"
Operating pressure: 6 bar
Nail length: 32-64 mm
Nail thickness: 1.6 mm
Nail head diameter: 2 mm
Recommended inner hose diameter: 6 mm
Weight: 2.9 kg
Spare nails for Art. No. 40205
| Length | ∅ of nail head | Nail thickness | Pcs | Art. No. |
| 32 mm | 2 mm | 1.6 mm | 5,000 | 40206 |
| 45 mm | 2 mm | 1.6 mm | 5,000 | 40207 |
| 50 mm | 2 mm | 1.6 mm | 5,000 | 40208 |
| 64 mm | 2 mm | 1.6 mm | 5,000 | 40209 |
Technical specifications of # 40212
Connecting thread: 1/4
Operating pressure: 6 bar
Nail length: 15-50 mm
Nail thickness: 1.05 mm
Diameter of nail head: 2 mm
Recommended inner hose diameter: 6 mm
Weight: 3.5 kg
Case includes: 2 socket-screw keys, protective goggles, approx. 1,000 15/25/30/40 mm nails
Spare nails for Art. No. 40212
| Length | ∅ of nail head | Nail thickness | Pcs | Art. No. |
| 15 mm | 2 mm | 1.05 mm | 5,000 | 40213 |
| 25 mm | 2 mm | 1.05 mm | 5,000 | 40214 |
| 30 mm | 2 mm | 1.05 mm | 5,000 | 40215 |
| 40 mm | 2 mm | 1.05 mm | 5,000 | 40216 |
| 50 mm | 2 mm | 1.05 mm | 5,000 | 40217 |
General safety instructions

Please read and keep all these instructions before putting the appliance into operation.
Keep the safety instructions for future reference!
Safe work
Keep the place of your work clean!
A dirty working environment is the cause of injuries.
Consider the surrounding influences
Do not expose the appliance to rain. Do not use the appliance in a wet or damp environment. Ensure appropriate lighting. Do not use the appliance near flammable liquids or gases.
Keep away from other persons!
Do not let other persons, especially children, touch the appliance. Keep them away from the place of your work.
Store the appliance in a safe place!
If the appliance is not used, it should be stored in a dry, locked room to prevent children from accessing it.
Do not overload the appliance!
It works better and safer in the specified power range.
Use the right appliance!
Do not use appliances with low power for challenging works. Do not use the appliance for purposes for which it has not been designed.
Wear appropriate working clothes!
Do not wear loose clothes and jewels as they could get caught by the moving parts.
Anti-slip shoes are recommended to be worn when working outside.
Wear a hairnet if you have long hair.
Use personal protective aids!
Protective gloves should always be worn.
Secure the workpiece!
Use a clamping device or a vice to hold the workpiece. It will be held safer than just with your hand.
Avoid abnormal body posture!
Make sure your posture is safe and balanced at all times.
Treat your appliance with care!
Keep the appliance sharp and clean so that it can be worked with better and safer.
Follow the maintenance regulations and tool replacement instructions.
Check regularly the appliance cable and have it replaced by an authorised professional if damaged.
Check regularly the extension cables and replace them if damaged.
Keep the handles dry and with no oil and fat.
Be careful!
Pay attention to what you are doing. Use common sense when working. Do not use the appliance if you are tired.
Check the appliance for any damage!
Before using the appliance again, carefully check that the guards or slightly damaged parts function smoothly and as specified.
Check that the rotating parts are working smoothly and are not being dragged, and that no parts are damaged.
All parts must be assembled correctly and meet all conditions to ensure the appliance works smoothly.
Any guards and parts that are damaged must be professionally repaired or replaced by an authorized specialist shop, unless otherwise provided in the Operating Instructions.
Have any damaged switches replaced by a customer service shop. Do not use the appliance if the switch cannot be turned on and off.
Risk of explosion
Do not work in rooms where there is a risk of explosion.
The maximum pressure must be adhered to.
Only compressed air energy must be used.
Do not use oxygen or other gases.
CAUTION!
Use of other extensions or accessories may cause injuries.
Have your appliance repaired by a professional!
This appliance complies with appropriate safety provisions. Repairs may only be performed by a professional who uses original spare parts; otherwise, the user is at risk of injury.
Special safety instructions

CAUTION!
Squeaking pneumatic hose when the quick-acting coupling is opened.
Hold the pneumatic hose while it is being released.
Swirl of dust, liquids, dirt particles, and sparks during operation.
Wear a respirator, protective goggles, and protective gloves.
Noise during operation
Wear ear protection.
Risk of appliance rebound!
Do not use a pad to specify the nailing depth.
Do not start the appliance in open spaces as the clamps/nails can freely fly off!

Wear protective goggles.
Prevent possible causes of injury! Disconnect the appliance from the compressed air source for the following works:
Change of the appliance position or characteristics. Keep the switch fuses in a working state before moving up/down ladders, scaffoldings, stairs, travelling work platforms, landings, unstable bases, etc.
Prevent thin workpieces and edge surfaces from breaking through!
Vibrations may get transposed on the operator when using the appliance.
Risk of trip! Pay attention to pneumatic hoses laying on the floor or, better, avoid such a situation.
Do not use the appliance for hard surfaces like concrete, metal and similar materials.

Never use hydrogen, oxygen, carbon dioxide or any other gas in bottles as a source of energy for this appliance as that could cause an explosion and subsequently serious injuries.

When in the working order, wear the appliance by its handle only and never with the pressed trigger. Make sure you are not perforating thin material when working and the appliance is not slipping on corners and edges.
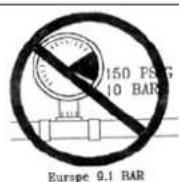
Never connect the appliance with a pneumatic hose the pressure of which exceeds 150 psi or 10.0 bar.

The hose must be dimensioned for pressure of min. 10.3 bar or 150 psi, however, at least for 150 % of the maximum pressure in the system.

The appliance and the feed hose must be fitted with a hose coupling so that the pressure fully leaks when the connecting hose is disconnected.

The magazine can only be filled when the appliance is connected to the air inlet.

The appliance must never be used if the fuse, trigger or springs are missing or if they cannot be used or are damaged. The fuse, trigger and springs must never be removed.

Check whether the trigger, screws and nuts are fully tightened before using the appliance.

The appliance must not be changed in any way without prior approval.

The appliance must always be disconnected from the air inlet after being used and if you are not using it any more.

Never aim the pointed side of the appliance at yourself or other persons. Hold the appliance in a way the head and body could not get damaged if there is back impact. Never start the appliance when pointing to an open space.

The switch fuse can only be fixed to the working area, however, never on materials that are too hard to enable clamps or nails to get through.

Never use the appliance to nail in an inclined position. Never start the appliance at a place where a clamp or nail has already been fired!
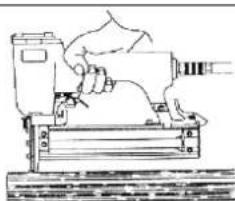
Do not shift the fuse to the working surface when you are planning to fire.

Do not fire too near the edge of the working surface.
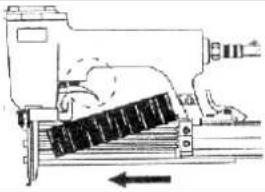 | The magazine must not be filled if the trigger or fuse is pressed. |


Use the appliance only with the recommended pressure (approx. 6 bar).
Marking
Product safety:
| CE | |
| Product corresponds to appropriate EU standards |
Prohibitions:
 |  | |
| No pulling the cable Not to be used when raining | ||
 | ||
| No touching inside | ||
Cautions:
 |  | |||
| Warning/caution Risk of dragging in | ||||
 |  | |||
| Bystanders must keep safe distance | Warning against thrown-off items | |||
Commands:
 |  |
| Please read the Operating Instructions before using the appliance | Wear ear and eye protection |
Package:
 | |
| Protect against moistureCaution - fragileThis side up |
Technical specifications:
 |  |
| Connecting thread Operating pressure | |
 |  |
| Clamp thickness Clamp width | |
 |  |
| Clamp length Nail length | |
| ### | ### |
| Nail thickness ∅ of nai | head |
Use as designated
Pneumatic appliances are appliances for craftsmen and are suitable for: fixing boards with grooves and tongues, mouldings, skirting boards, facings and similar materials. Any other use is in conflict with the designation.
Operation
 1 1 | Connect the appliance with the air intake hose.Do not aim the appliance at yourself or other persons. |
Use the extension if attached separately.

Press the clamping lever and move the magazine back to open.

Insert clamps/nails into the magazine. The appliance must not be loaded if the trigger is pressed.

Move the magazine back so that the clamping lever can engage.

Compressed air connection:
Connect the maintenance unit with the filter pressure control valve and the oil mist lubricator.
To ensure continuous and long-term operation, the appliance must be constantly supplied with pneumatic oil.
We recommend:
The Güde mini-lubricator can be ordered under Art. No. 41086 and Güde pneumatic oil under Art. No. 40060.
- Release the lock if applicable.
- Set the required pressure.
- Apply the switch fuse or guide plate to the workpiece while exerting strong pressure.

To fire a clamp/nail, pull the trigger.

Remove the air inlet hose if the cover is blocked or if you want to finish your work.

Press the clamping lever and move the magazine up to open.

Or remove the blocked clamps or nails.
As soon as you want to continue your work, start with step 3 of this chapter.
After finishing your work
- Disconnect the quick-acting coupling from the extension. • Empty the magazine.
- Blow the appliance with compressed air.
- Store the appliance safely.
Warranty
A warranty period of 12 months applies to commercial use and 24 months apply to private use and commences on the day of purchase of the device.
Warranty applies exclusively to failures due to defective material or workmanship. An original sale slip with indication of date of sale must be presented in case of claiming for the warranty rights.
Warranty does not cover unprofessional use such as device overload, violent use, damage caused by third party or foreign materials, failure to comply with operations and assembly manual, and normal wear and tear.
Residual risks and protective measures
Inappropriate local lighting
Inadequate lighting represents a high safety risk
Appropriate lighting should always be provided when working with the appliance.
Disconnect the appliance from compressed air and store it properly.
Behaviour in case of emergency
Provide necessary first aid treatment corresponding to the injury nature and seek qualified medical help as soon as possible. Protect the injured person from other injuries and calm him/her down.
First aid kit must always be available in the place of your work in case of accident in accordance with DIN 13164. Material taken out of the first aid kit needs to be supplemented right away.
If help is needed,
please provide the following details:
- Place of accident
- Accident nature
- Number of injured persons
- Injury type
Disposal
The disposal instructions are based on icons placed on the appliance or its package. The description of the meanings can be found in the "Marking" chapter.
Transport package disposal
The package protects the appliance against damage during transport. Packing materials are usually chosen depending on their environmental friendliness and disposal method and can therefore be recycled.
Returning the package to material circulation saves raw materials and reduces waste disposal costs.
Parts of packages (e.g. foils, styropor) can be dangerous to children. Risk of suffocation!
Keep parts of packages away from children and dispose them as soon as possible.
Operating staff requirements
The operator must carefully read the Operating Instructions before using the appliance.
Qualification
No special qualification is necessary for using the appliance apart from detailed instruction by an expert.
Minimum age
The appliance can only be operated by persons over 16 years of age. An exception includes youngsters operating the appliance within their professional education to achieve necessary skills under trainer's supervision.
Training
Using the appliance only requires appropriate instructions by a professional or reading the Operating Instructions. No special training necessary.
Servicing
Do you have any technical questions? A claim? Do you need spare parts or the Operating Instructions?
You will be helped quickly and without needless bureaucracy at our webpage www.guede.com in the Services part. Please help us be able to assist you. To be able to identify your appliance when claimed, we need to know its serial No., order No. and year of production. All these details can be found on the type label. Enter the details below for future reference.
Serial No.:
Order No.:
Year of production:
Tel.: +49 (0) 79 04 / 700-360
Fax: +49 (0) 79 04 / 700-51999
E-Mail: support@ts.guede.com
Troubleshooting
At all failures it is first necessary to check whether the appliance is sufficiently and permanently supplied with pneumatic oil.
| Failure Cause Removal | ||
| Compressed air leaking from the cover hole | O-rings are damaged or dirty, which has been caused by a foreign item. | Clean or replace the O-rings. |
| Compressed air leaking from the valve | O-rings are damaged or the valve is faulty. | Replace the O-rings and valve. |
| Compressed air leaking between the body and cylinder cover | Screws are loosened. O-rings are damaged. | Tighten the screws. Replace the O-rings. |
| Piston not fully returning, idle strokes | Appliance placed too weakly or too shortly.Piston dragging as it is not lubricated.O-ring is faulty. | Place the appliance stronger.Lubricate the cylinder surface contact.Replace the O-ring, check the operating pressure. |
| Nails not fully fired | Air pressure too low.Hose piping with a too small cross section.Appliance not lubricated.Firing mechanism worn out. | Gradually increase the pressure by 0.5 bar to make sure nails are fired properly.Hose piping inner diameter at least 6 mm.Clean and lubricate the parts.Grindthe firing mechanism down by app. 0.2 mm. |
| Failure Cause Removal | ||
| Nails breaking and overlapping | Firing mechanism significantly worn out.Appliance placed too weakly. | Replace the firing mechanism.Place the appliance stronger. |
| Appliance running too slowly | O-ringis damaged.Valve is damaged. | Replace the O-ring.Replace the valve completely. |
| Firing mechanism is blocked by nails | Wrong nails used.Firing mechanism has fray. | Insert correctly appropriate nails.Remove the firing mechanism off fray. |
| Appliance not working | Check the air inlet. Operating pressure may be too low. | Increase the operating pressure. However, max. operating pressure must be adhered to. |
| Irregular appliance operation | • Install a set of pins with a head valve. | |
| Air leaking from the appliance in the bottom part | • Tighten the screws or install the absorber or a set of pins. | |
| Wrong reverse movement | • Clean the appliance and install an absorber or a set of pins. | |
| Other failures | • Contact an expet, seller or distributor. | |
| Clamps/nails blocked in the guide plate | • Magazine dirty• Beltwith clamps/nails not moving fully forward• Ramworn-out | • Clean (blow) he magazine.Wrong clamps/nails have been used.Use appropriate clamps/nails |
Maintenance table
Following the maintenance instructions specified in this document will provide this high-quality product with long and trouble-free operation. Disconnect the appliance from the compressed air source for maintenance and treatment. To ensure long and trouble-free working of your tacker/nailer, it is necessary to clean it every day and regularly lubricate it. For this purpose, special tool oil should only be used:
| Via oil mist lubricator | A complete maintenance unit includes an oil mist lubricator and is fitted on the compressor. |
| Via lubricator on the piping | In the immediate vicinity of the appliance (app. 50 cm distance), a lubricator sufficiently providing the appliance with oil is installed on the lubricator piping. |
| Manually If your appliance has no maintenance unit or lubricator on piping, 3-5 oil drops must be added to the compressed air connection before the pneumatic appliance is put into operation. If the pneumatic appliance has been out of service for several days, 5-10 oil drops must be added to the compressed air connection before switching the appliance on. Store your pneumatic appliances only in dry rooms. | |
Lubricate the appliance with special oil for pneumatic appliances using an extension if there has been a long operation break.
Store the appliance in a cleaned, dry, dust-free condition and at temperatures above 5°C.
Introduction


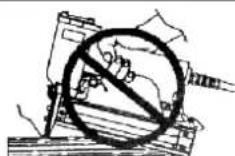


Before driving a staple/nail, pull the trigger.

EC-DECLARATION OF CONFORMITY
We, hereby declare the conception and construction of the below mentioned appliances correspond - at the type of construction being launched - to appropriate basic safety and hygienic requirements of EC Directives. In case of any change to the appliance not discussed with us the Declaration expires.
EC DECLARATION OF CONFORMITY
EU DECLARATION OF CONFORMITY
- INTRODUCTION
- PARTS OF NAILERS, PIC. A, ART. NO
- PARTS OF TACKERS, PIC. B, ART. NO
- PARTS OF TACKERS, PIC. C, ART. NO
- PARTS OF TACKERS, PIC. D, ART. NO
- TECHNICAL SPECIFICATIONS, ART. NO
- TECHNICAL SPECIFICATIONS OF
- GENERAL SAFETY INSTRUCTIONS
- SAFE WORK
- KEEP THE PLACE OF YOUR WORK CLEAN
- CONSIDER THE SURROUNDING INFLUENCES
- KEEP AWAY FROM OTHER PERSONS
- STORE THE APPLIANCE IN A SAFE PLACE
- DO NOT OVERLOAD THE APPLIANCE
- USE THE RIGHT APPLIANCE
- WEAR APPROPRIATE WORKING CLOTHES
- USE PERSONAL PROTECTIVE AIDS
- SECURE THE WORKPIECE
- AVOID ABNORMAL BODY POSTURE
- TREAT YOUR APPLIANCE WITH CARE
- BE CAREFUL
- CHECK THE APPLIANCE FOR ANY DAMAGE
- RISK OF EXPLOSION
- CAUTION
- HAVE YOUR APPLIANCE REPAIRED BY A PROFESSIONAL
- SPECIAL SAFETY INSTRUCTIONS
- SQUEAKING PNEUMATIC HOSE WHEN THE QUICK-ACTING COUPLING IS OPENED
- SWIRL OF DUST, LIQUIDS, DIRT PARTICLES, AND SPARKS DURING OPERATION
- NOISE DURING OPERATION
- RISK OF APPLIANCE REBOUND
- DO NOT START THE APPLIANCE IN OPEN SPACES AS THE CLAMPS/NAILS CAN FREELY FLY OFF
- WEAR PROTECTIVE GOGGLES
- PREVENT POSSIBLE CAUSES OF INJURY! DISCONNECT THE APPLIANCE FROM THE COMPRESSED AIR SOURCE FOR THE FOLLOWING WORKS
- DO NOT USE THE APPLIANCE FOR HARD SURFACES LIKE CONCRETE, METAL AND SIMILAR MATERIALS
- MARKING
- USE AS DESIGNATED
- OPERATION
- COMPRESSED AIR CONNECTION
- WE RECOMMEND
- AFTER FINISHING YOUR WORK
- WARRANTY
- RESIDUAL RISKS AND PROTECTIVE MEASURES
- INAPPROPRIATE LOCAL LIGHTING
- BEHAVIOUR IN CASE OF EMERGENCY
- DISPOSAL
- OPERATING STAFF REQUIREMENTS
- QUALIFICATION
- MINIMUM AGE
- TRAINING
- SERVICING
- TROUBLESHOOTING
- MAINTENANCE TABLE
- EC-DECLARATION OF CONFORMITY
- EC DECLARATION OF CONFORMITY
- EU DECLARATION OF CONFORMITY
Brand : GUDE
Model : KN 14
Category : Stapler