
EHXS01 - Facial care device PANASONIC - Free user manual and instructions
Find the device manual for free EHXS01 PANASONIC in PDF.
| Product type | Facial steam care device |
| Brand | Panasonic |
| Model | EH-XS01 |
| Power supply | 220-240 V~, 50-60 Hz |
| Power consumption | 290 W |
| Steam temperature | Approximately 40 °C at 20 cm from the cover |
| Acoustic noise (with water) | 46 dB(A) re 1 pW |
| Acoustic noise (without water) | 40 dB(A) re 1 pW |
| Tank capacity | Indicators for 3, 6 or 12 minutes of steam |
| Recommended water type | Distilled or purified water |
| Usage | Household use only |
| Safety | Do not use by pregnant women, people with sensitive skin or dermatitis |
| Interior cleaning | Once a month to remove limescale |
| Exterior cleaning | Soft cloth slightly damp |
| Included accessories | Power cord, water tank |
| Main functions | Hot steam for deep facial hydration |
| Features | Tilt switch for draining, removable cover |
| Recommended usage distance | Face at least 20 cm from the edge of the cover |
Frequently Asked Questions - EHXS01 PANASONIC
User questions about EHXS01 PANASONIC
0 question about this device. Answer the ones you know or ask your own.
Ask a new question about this device
Download the instructions for your Facial care device in PDF format for free! Find your manual EHXS01 - PANASONIC and take your electronic device back in hand. On this page are published all the documents necessary for the use of your device. EHXS01 by PANASONIC.
USER MANUAL EHXS01 PANASONIC
Operating Instructions
(Household) The Facial Steamer
Model No. EH-XS01
English. 3
Deutsch 17
Français 31
Italiano 45
Espanol 59
Polski 73
Front
Back
Bottom
0
Panasonic
Operating Instructions (Household) The Facial Steamer Model No. EH-XS01
Contents
Safety precautions 5
Parts identification 8
Recommended Uses 8
Preparation. 9
How to use the steamer 9
After use 10
Cleaning 11
Troubleshooting 13
Specifications 14
Caution for AC Mains Lead. 14
Thank you for purchasing this Panasonic product.
Before operating this unit, please read these instructions completely and save them for future use.
Warning
- This appliance can be used by children aged from 8 years and above and persons with reduced physical, sensory or mental capabilities or lack of experience and knowledge if they have been given supervision or instruction concerning use of the appliance in a safe way and understand the hazards involved. Children shall not play with the appliance. Cleaning and user maintenance shall not be made by children without supervision.
- After use, the appliance should be cleaned to avoid the accumulation of grease and other residues.
Safety precautions
To reduce the risk of injury, loss of life, electric shock, fire, and damage to property, always observe the following safety precautions.
Explanation of symbols
The following symbols are used to classify and describe the level of hazard, injury, and property damage caused when the denotation is disregarded and improper use is performed.

WARNING
Denotes a potential hazard that could result in serious injury or death.

CAUTION
Denotes a hazard that could result in minor injury or property damage.
The following symbols are used to classify and describe the type of instructions to be observed.

This symbol is used to alert users to a specific operating procedure that must not be performed.

This symbol is used to alert users to a specific operating procedure that must be followed in order to operate the unit safely.

WARNING
To prevent skin or health problems
Women who are pregnant or currently in a

menstrual period should not use this appliance.
- Doing so may cause problems with skin due to hormone imbalance.
The following persons should not use this appliance.
-
Persons who have allergies or sensitive skin
-
Persons with skin diseases or atopic dermatitis
-
Persons with epilepsy or blood pressure abnormalities
Do not use the appliance in following cases:
- When your skin is damaged or you have eczema or a swelling
- When there are abnormalities on the skin such as dermatitis or extreme sunburns
- Doing so may cause problems with skin or body.

Do not use the appliance by persons who are unable to feel heat.
- Doing so may cause burns or scalding.

Immediately stop using if you experience any pain or abnormalities on your skin or throughout your body.
- Failure to do so may cause problems with skin or body.
This product
Do not store within the reach of children or infants.

Do not let them use it.
- Doing so may cause burns or scalding, electric shock, or injury.

Do not allow a child to lick the appliance plug.
- Doing so may cause burns, electric shock, or injury.


WARNING
Do not use in proximity of flammable materials (such as alcohol, benzine, thinner, spray, hair care product, nail polish remover).
- Doing so may cause an explosion or fire.

Do not drop or subject to shock.
- Doing so may cause electric shock or ignition.
Use the water supply tank to supply water to the appliance, and make sure that the appliance and the power switch do not get wet when filling the water tank.
- Doing so may cause electric shock, burns, or fire due to a short circuit.

Do not use the appliance with a wet hand.
- Doing so may cause electric shock or fire due to a short circuit.
Do not use or store the appliance in bathroom or in other rooms with high humidity. Do not place the appliance where it may get wet (such as next to wash basin).
- Doing so may cause electric shock or fire.
Do not insert metal objects such as pins, wires, or any other foreign object in the various outlets, and do not block the outlets.
- Doing so may cause electric shock.
Never modify, disassemble, or repair.
- Doing so may cause ignition or injury due to abnormal operation.
Contact an authorized service centre for repair.
In case of an abnormality or malfunction Immediately stop using and remove the power plug if there is an abnormality or malfunction.
- Failure to do so may cause fire, electric shock, or injury.

The cord is damaged
- The main unit is deformed or smells of burning.
- Immediately request inspection or repair at an authorized service centre.
Power cord
Do not damage or modify, or forcefully bend, pull, or twist the power cord.
Also, do not place anything heavy on or pinch the

cord.
Do not allow pins or trash to adhere to the power plug/the appliance plug.
- Doing so may cause electric shock or fire due to a short circuit.
Do not use when the power cord is damaged or hot. Never use the appliance if the power plug fits loosely in a household outlet.
- Doing so may cause burns, electric shock, or fire due to a short circuit.
Do not use anything other than the supplied power cord.

Also, do not use any other product with the supplied power cord.
- Doing so may cause burns or fire due to a short circuit.

WARNING
Do not use in a way exceeding the rating of the household outlet or the wiring.

- Exceeding the rating by connecting too many plugs to one household outlet may cause fire due to overheating.

Do not plug or unplug the power plug and appliance plug into household outlet and the main unit with wet hands.
- Doing so may cause electric shock or injury.

When storing, do not wrap the power cord around the main unit.

- Doing so may cause the wire in the power cord to break with the load, and may cause burns, electric shock, or fire due to a short circuit.
Always ensure the appliance is operated on an electric power source matched to the rated voltage indicated on the appliance.
Fully insert the power plug or the appliance plug.
- Failure to do so may cause fire, or electric shock.

Periodically clean to ensure dust does not accumulate on the power plug or the appliance plug.
- Failure to do so may cause fire due to insulation failure caused by humidity.
Disconnect the power plug and wipe with a dry cloth.

CAUTION
To prevent skin or health problems

Do not use this appliance for purposes other than care of the face.
- Doing so may cause burns or scalding.
Power cord
Disconnect the power plug or the appliance plug by holding onto it instead of pulling on the cord.

- Failure to do so could place an excessive load on the power cord, damaging it and leading to burns, electric shock, or fire due to short circuit, etc.
Disconnect the power plug from the household outlet when not using.
- Failure to do so may cause electric shock or fire due to electrical leakage resulting from insulation deterioration.
Note the following precautions
Do not put anything other than distilled water or purified water into the water supply tank.
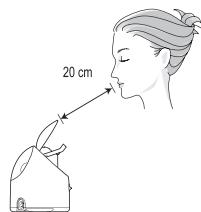
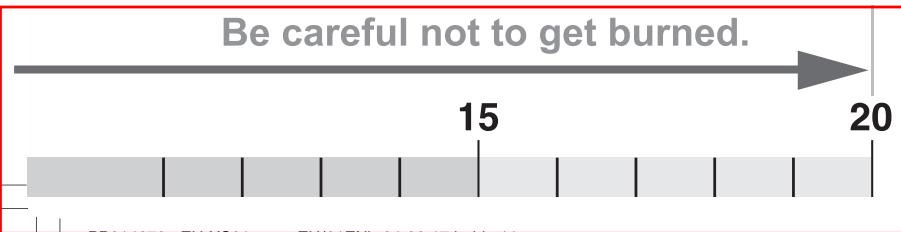
Keep your face at least 20 cm from the edge of the lid.

Steam continues to be emitted (for about 1 minute) after the power has been cut off. Stay away from the steam outlet immediately after use.
Do not touch the steam in following cases:
- When operating the power switch
- When opening and closing the lid
- Doing so may cause burns or scalding.

CAUTION
Do not close the lid when using steam.
- The hot steam is emitted from around the lid and may cause burns or scalding.
Do not tilt, shake, or move the appliance or do not attach or remove the water supply tank during use or within 10 minutes after use.
- A large volume of steam is emitted and hot water is spilt out from the steam outlet and cause burns or scalding.
Use on a flat surface. Not for handheld use.
- Doing so may cause accidents or injury.
Except when cleaning, do not shake the main unit when it contains water.
- Hot water may splatter from the steam outlet and cause burns or scalding.
When disposing of the water after use, hold the appliance so that your hands are not exposed to th
hot water.
Exercise caution with the hot temperature of the water supply tank after use.
- Failure to do so may cause burns or scalding.
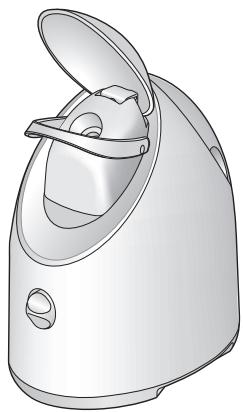
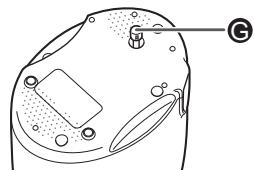
Parts identification
A Lid
Steam outlet
Nozzle Guard
Power switch [0/1]
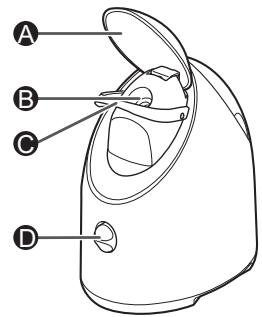
Water outlet
F Appliance socket
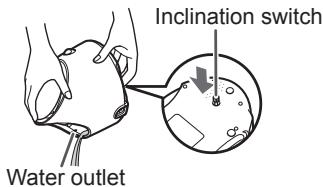
Inclination switch
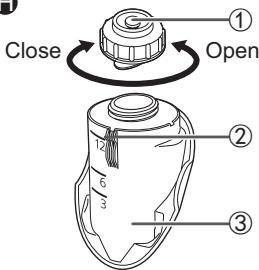
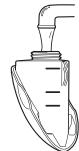
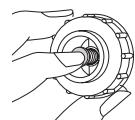
Water supply tank
① Water supply cap
② FULL line
③ Tank
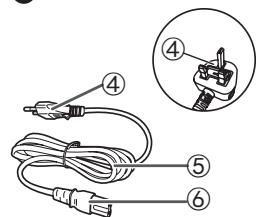
Power cord
④ Power plug
⑤ Cord
⑥ Appliance plug
- The shape of the plug differs on the area.
- When the appliance is used for the first time, some water may remain around the water supply tank. This is residual water used for inspection in the factory, and does not cause any sanitation problems.
Recommended Uses
Heed the following to protect your skin:
- Excessive steam care is not good for your skin.
When first starting, use the steamer about once a day for two or three days a week, then after about a month use it daily.
Adjust the number of uses and the usage time according to the condition of your skin.
- If problems arise with your skin while using the steam, stop using it and consult a physician.
After steam care, apply your regular basic skin-care products to trap the moisture in your skin.
Preparation
Use only distilled water or purified water.
Since the service life of the appliance may shorten depending on water quality, the use of distilled water or purified water is recommended.
Distilled water and purified water are usually available at supermarkets, etc.
Do not use the following types of water:
Mineral water, tap water, ground water, geothermal water, ionized alkaline water, physiological saline, slightly acidic water.
Using these type of water may cause shorten life of the main unit.
Do not mix with anything.
Do not mix the water with any other substance, such as lotion, aromatic oil, etc.
Doing so may cause burns, malfunctions, or shorten the life of the main unit.
1 Place the main unit on a flat, level surface.
Set it in a place not affected by the wind from an airconditioner, etc.
2 Remove the water supply tank from the main unit.
3 Fill the water supply tank with water.
- Turn and open the water supply cap.
- Fill the tank with water.
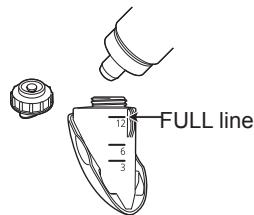
FULL line: 12 minutes steam for thorough skin hydration
6 line: 6 minutes steam for quick moisture replenishing
3 line: deep cleansing with 3 minutes steam
- Close the water supply cap.
- Wipe away any water on the surface of the water supply tank.
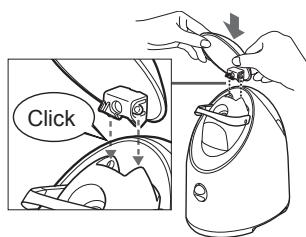
4 Attach the water supply tank to the main unit.
Push the water supply tank into the main unit until it clicks.
- Water is supplied to the main unit and the water in the tank decreases when the water supply tank is attached the main unit.
- If the water supply tank is repeatedly attached and removed, water may begin to leak from the water outlet.
How to use the steamer
1 Insert the appliance plug into the main unit.
2 Plug in the power plug into the household outlet.
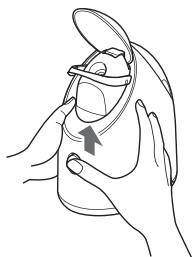
3 Open the lid all the way to the top.


4 Slide the power switch upwards to turn on the appliance.
The steam is released after about 1 minute.
- The hissing sound is due to electrical discharge.
The sound may be intermittent, depending on how the steam is produced.
5 Direct the steam to your face.
- Keep your face at least 20~cm away from the edge of the lid.
- If you cannot judge the distance, use the distance guide below.
To ensure that the steam covers your entire face, direct the steam to the top of your chin.
If you have trouble adjusting the position of the steam on your face, try adjusting the height of the table, chair or cushion. - When the remaining water is low, the way that the steam is emitted changes.
6 Slide the power switch downwards to turn off the appliance.
After using the appliance, take care of your skin by moisturizing with lotion, performing cleansing, etc. If you do not take care of your skin, water will evaporate from it, making it dry.
After use
1 Leave the appliance alone to cool for at least 10 minutes.
Do not move the main unit.
2 Unplug the power plug from the household outlet and the appliance plug from the main unit.
Bundle up the power cord for storage. Do not wrap it around the steamer.
3 Close the lid and remove the water supply tank from the main unit.
Remove the tank in a water-safe location as water droplets may drip from the tank.
4 Discard the water in the tank.
Wipe away any water on the surface of the tank.
Distance guide
Steam within this range is hot.

Note
Be sure to discard the water in the tank and the main unit every time after use.
Failure to do so may cause adhering of water stains or unusual odors.
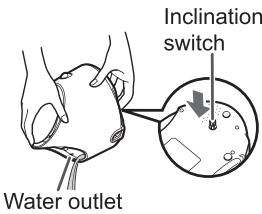
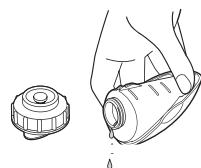
5 Discard the water in the main unit.
Discard the water from the water outlet in the direction of the "Drain" arrow while pushing the inclination switch on the bottom of the main unit.
Even after draining the water, some water remains in the appliance.
This does not cause any sanitary problems since the water is boiled when used the next time.
6 Attach the water supply tank.
Push the water supply tank into the main unit until it clicks.
7 Use a towel, etc., to wipe any water droplets off the main unit, then store the main unit in a dry place.
When not planning to use it for a long period of time (several weeks or more), dry the steamer off thoroughly before storing it.
Cleaning
Notes
- Disconnect the power cord from the steamer before cleaning.
- Do not wash or soak the appliance in water.
Cleaning inside the main unit
2 Attach the water supply tank to the main unit.
(Clean once a month.)
To remove limescale and prevent it from forming, clean the inside of the steamer using the procedure below.
After using, always let the main unit cool down for at least 10 minutes.
1 Fill the water supply tank with water up to FULL line and close the water supply cap.
Push the water supply tank into the main unit until it clicks.
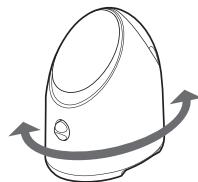
3 Shake the appliance horizontally 3 to 4 times.
Shake the appliance gently without tilting it.
4 Remove the water supply tank from the main unit.
5 Discard the water from the water outlet in the direction of the "Drain" arrow while pushing the inclination switch on the bottom of the main unit.
Return the appliance to a flat position and repeat the step above 2 to 3 times.
6 Repeat the steps 2 to 5 above 2 or 3 times.
7 Wipe off the water on the main unit and the water supply tank.
Cleaning the appliance
(If it seems dirty)
Wipe the appliance with a cloth moistened with soapy water.
Never use alcohol, thinner, benzine, enamel remover, etc.
Doing so may result in malfunction or part cracks or discoloration.
Cleaning the power cord
(Clean once a month.)
Remove the power plug from the household outlet and the appliance plug from the main unit. Wipe away any dust, etc., using a dry cloth.
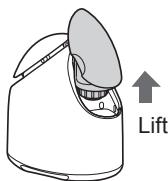
If the lid is off
Line up the hooks in the lid with the grooves in the steamer's hook receiver and press in. Press down on both sides at the same time from straight above.
If the water supply cap seal detaches
- Push up the centre of the water supply cap. Use your index finger to push up on the centre of the water supply cap.
- Press lightly along the outer rim of the water supply cap seal and find the raised edge on the water supply seal.
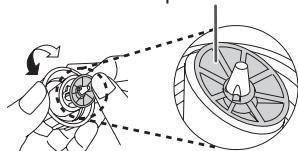
Water supply cap seal
Troubleshooting
| Problem | Possible cause | Action |
| No steam is produced even about 1 minute or more after the power is turned on. | The power plug or appliance plug is not plugged all the way in. | Plug the power plug and appliance plug securely all the way in. |
| There is no water in the water supply tank. | Let the steamer cool down for at least 10 minutes, then supply water. (See page 9.) | |
| The steamer is not on a level surface. | Place the steamer on a desk or other flat surface. | |
| The steamer is tilted. | Attach the lid. (See page 12.) | |
| The lid is off. | ||
| The amount of steam has decreased. | There are calcium carbonate or limescale deposits inside the steamer. | Contact an authorized service centre for repair. |
| • While the steam is being produced, its colour gets lighter and it is hard to see. • There are hot water droplets flying out with the steam. | You are using something else mixed in with the water. | Let the steamer cool down for at least 10 minutes, then clean the inside of the steamer. (See page 11.) |
| There is a hissing sound while the steam is being produced. | The sound is due to electrical discharge and is not a problem. | |
| Water leaks from the water outlet. | The water supply tank has been attached and removed repeatedly. | Throw out the water inside the steamer, then press down on the water supply tank with the water in it until a click is heard. |
| The steamer is tilted. | Set the steamer so that it is flat. | |
| The power plug is abnormally hot. | The power plug is not firmly inserted into the outlet. | Use an outlet in which the power plug fits snugly. |
If the problems still cannot be solved, contact the store where you purchased the unit or a service centre authorized by Panasonic for repair. 1
Specifications
| Power source | 220 - 240 V~, 50 - 60 Hz | |
| Power consumption | 290 W | |
| Steam temperature | Approx. 40 °C (at a distance of approx. 20 cm from the edge of the lid) | |
| Airborne Acoustical Noise | Operate mode with water | 46 (dB (A) re 1 pW) |
| Operate mode without water | 40 (dB (A) re 1 pW) | |
This product is intended for household use only.
Caution for AC Mains Lead
For your safety, please read the following text carefully.
This appliance is supplied with a moulded three pin mains plug for your safety and convenience.
A 13-ampere fuse is fitted in this plug.
Should the fuse need to be replaced please ensure that the replacement fuse has a rating of 13-ampere and that it is approved by ASTA or BSI to BS1362.
Check for the ASTA mark or the BSI mark on the body of the fuse.
If the plug contains a removable fuse cover you must ensure that it is refitted when the fuse is replaced.
If you lose the fuse cover the plug must not be used until a replacement cover is obtained.
A replacement fuse cover can be purchased from your local dealer.
CAUTION!
IF THE FITTED MOULDED PLUG IS UNSUITABLE FOR THE SOCKET OUTLET IN YOUR HOME THEN THE FUSE SHOULD BE REMOVED AND THE PLUG CUT OFF AND DISPOSED OF SAFELY.
THERE IS A DANGER OF SEVERE ELECTRICAL SHOCK IF THE CUT OFF PLUG IS INSERTED INTO ANY 13-AMPERE SOCKET.
THIS PLUG IS NOT WATERPROOF-KEEP DRY.
Before use
Remove the connector cover.
How to replace the fuse
The location of the fuse differ according to the type of AC mains plug (figures A and B). Confirm the AC mains plug fitted and follow the instructions below.
Illustrations may differ from actual AC mains plug.
- Open the fuse cover with a screwdriver.
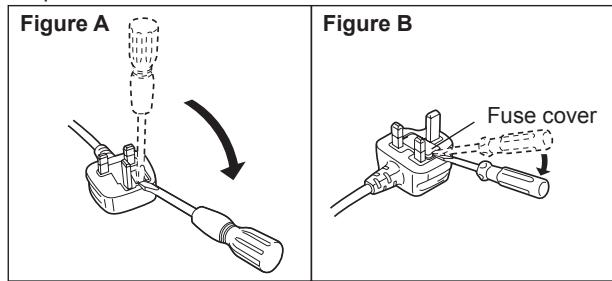
- Replace the fuse and close or attach the fuse cover.

Disposal of Old Equipment
Only for European Union and countries with recycling systems
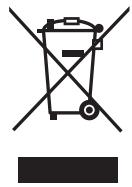
This symbol on the products, packaging, and/or accompanying documents means that used electrical and electronic products must not be mixed with general household waste.
For proper treatment, recovery and recycling of old products, please take them to applicable collection points in accordance with your national legislation.
By disposing of them correctly, you will help to save valuable resources and prevent any potential negative effects on human health and the environment.
For more information about collection and recycling, please contact your local municipality.
Penalties may be applicable for incorrect disposal of this waste, in accordance with national legislation.
Panasonic
Betriebsanleitung
© Panasonic Corporation 2017
EN,GE,FR,IT,SP,PL
Printed in China
EH9700XS011503 S0517-0

- Panasonic
- Contents
- Warning
- Safety precautions
- Explanation of symbols
- CAUTION
- Parts identification
- Recommended Uses
- Preparation
- Use only distilled water or purified water.
- Do not use the following types of water:
- Do not mix with anything.
- Place the main unit on a flat, level surface.
- Remove the water supply tank from the main unit.
- Fill the water supply tank with water.
- Attach the water supply tank to the main unit.
- How to use the steamer
- Slide the power switch upwards to turn on the appliance.
- Direct the steam to your face.
- Slide the power switch downwards to turn off the appliance.
- After use
- Leave the appliance alone to cool for at least 10 minutes.
- Unplug the power plug from the household outlet and the appliance plug from the main unit.
- Close the lid and remove the water supply tank from the main unit.
- Discard the water in the tank.
- Distance guide
- Steam within this range is hot.
- Note
- Discard the water in the main unit.
- Cleaning
- Notes
- Cleaning inside the main unit
- Cleaning the appliance
- Cleaning the power cord
- If the lid is off
- If the water supply cap seal detaches
- Caution for AC Mains Lead
- CAUTION!
- Before use
- How to replace the fuse
- Disposal of Old Equipment
- Only for European Union and countries with recycling systems
Brand : PANASONIC
Model : EHXS01
Category : Facial care device