
SDBE 2400 A1 - Iron SILVERCREST - Free user manual and instructions
Find the device manual for free SDBE 2400 A1 SILVERCREST in PDF.


| Type de produit | Steam iron |
| Marque | SilverCrest |
| Modèle | SDBE 2400 A1 |
| Puissance | 2400 W |
| Alimentation | 220-240 V, 50/60 Hz |
| Capacité du réservoir d'eau | 300 ml |
| Débit de vapeur continu | 40 g/min |
| Débit de vapeur variable | Yes (15-40 g/min) |
| Fonction anti-goutte | Yes |
| Système anti-calcaire | Self-cleaning function |
| Semelle | Stainless steel |
| Arrêt automatique | Yes (8 min vertical, 30 sec horizontal) |
| Bouton spray | Yes |
| Indicateur de température | Yes |
| Réservoir transparent | Yes |
| Dimensions (L×P×H) | 300 × 120 × 150 mm |
| Poids | 1.2 kg |
| Longueur du câble | 2 m |
| Nettoyage | Self-cleaning button |
| Pièces détachées | Available via customer service |
Frequently Asked Questions - SDBE 2400 A1 SILVERCREST
User questions about SDBE 2400 A1 SILVERCREST
0 question about this device. Answer the ones you know or ask your own.
Ask a new question about this device
Download the instructions for your Iron in PDF format for free! Find your manual SDBE 2400 A1 - SILVERCREST and take your electronic device back in hand. On this page are published all the documents necessary for the use of your device. SDBE 2400 A1 by SILVERCREST.
USER MANUAL SDBE 2400 A1 SILVERCREST
STEAM IRON SDBE 2400 A1
GB
STEAM IRON
Operating instructions
HU
GÖZÖLŐS VASALÓL
Kezelési útmutató
CZ
NAPAŘOVACÍ ŽEHLIČKA
Návod k obsluze
DE AT CH
DAMPFBÜGELEISEN
Bedienungsanleitung
PL
ŻELAZKO NA PARE
Operating instructions
EN
STEAM IRON
Operating instructions
SK
STEAM IRON
Operating instructions


English....2
Polish 14
Hungarian 28
Slovenian 42
Czech 54
Slovak 66
German 78
ID: SDBE 2400 A1_14_V1.1




Overview


Contents
- Overview 3
- Intended purpose 4
- Safety information .... 4
- Items supplied 7
- Before using for the first time 7
- Operation 7
6.1 Filling the water tank 7 6.2 Set iron temperature.... 8 6.3 Spray function 8 6.4 Ironing without steam 8 6.5 Ironing with steam.... 8 6.6 Steam burst function 9
- Safety shut-off 9
- Cleaning 10
- Storage 10
- Disposal 11
- Troubleshooting 11
- Technical specifications .... 11
- Warranty of the HOYER Handel GmbH 12
2
GB


1. Overview
1 Spray nozzle 2 Lid (of the water tank) 3 Steam flow rate controller: from no steam to a lot of steam 4 Steam burst button 5 Spray button 6 AUTO SHUT OFF Operating lamp
lights up during normal operation flashes after automatic safety shut-off
7 Handle 8 Moving protective sleeve for power cable 9 Power cable with mains plug 10 Symbol explanation (multilingual) 11 Temperature control lamp 12 Iron rest 13 Symbols with explanation (functions of the steam iron)

Anti-drip

Anti-limescale

Automatic safety shut-off

Vertical steam burst
14 Position mark for setting the temperature controller 15 Water tank 16 Temperature controller 17 self clean Self-cleaning button 18 max Marking of the maximum filling level of the water tank 19 Sole plate with holes for steam jet 20 Measuring beaker 21 Opening the water tank


GB
3


Thank you for your trust!
Congratulations on your new steam iron.
For safe handling of the product and to get to know all its features:
- Read these operating instructions thoroughly before first use.
- Above all, observe the safety instructions!
- The device should only be used as described in these operating instructions.
- Keep these operating instructions for future reference.
- If you pass the device on to someone else, please include these operating instructions.
We hope you enjoy your new steam iron!
2. Intended purpose
The steam iron is suitable for ironing laundry items.
The device is designed for private household use and must not be used for commercial purposes.
The device must only be used indoors.
Foreseeable misuse

DANGER! Fire hazard!
Even during short interruptions, place the steam iron upright and never on its sole plate 19.
Despite the automatic shut-off, the steam iron must not be left unsupervised.
3. Safety information
Warnings
If necessary, the following warnings will be used in these operating instructions:

DANGER! High risk: failure to observe this warning may result in injury to life and limb.
WARNING! Moderate risk: failure to observe this warning may result in injury or serious material damage.
CAUTION: low risk: failure to observe this warning may result in minor injury or material damage.
NOTE: circumstances and specifics that must be observed when handling the device.
4
GB


Instructions for safe operation
This device can be used by children from the age of 8 and people with restricted physical, sensory or intellectual abilities or people without adequate experience and/or understanding, if they are supervised or instructed on how to use this device safely and if they are aware of the resulting danger. Children must not play with the device. Cleaning and maintenance by the user must not be performed by children without supervision.
- While switched on or cooling down, the iron and its power cable must be kept out of the reach of children younger than 8 years.
- The iron must not be left unattended when it is connected to the power mains.
- The plug must be pulled out of the socket before the water container is filled with water.
- The filling opening must not be opened during operation.
- The iron must be used and put down on a stable surface.
- The iron must not be used if it has been dropped, if visible damage can be seen, or if it leaks.

DANGER for children
- Packing materials are not children's toys. Children should not be allowed to play with the plastic bags: There is a risk of suffocation.

DANGER! Risk of electric shock due to moisture
- Never place the device anywhere that it could fall into water while plugged in.
- Protect the device from moisture, water drops and water spray.
- The device, the cable and the mains plug must not be immersed in water or any other liquids.
- If liquid gets into the device (except in the water tank), pull out the mains plug immediately. Have the device checked before reusing.
- If the device has fallen into water, pull out the mains plug immediately, and only then remove the device from the water. Do not use the device again, and have it checked by a specialist.
- The water tank must not be filled with water above the max marking, otherwise it may overflow.
- Never touch the device with wet hands.

DANGER! Risk of electric shock
- Lay the power cable such that no one can step on it, get caught on it, or trip over it.
- Only connect the mains plug to a properly installed and easily accessible wall socket whose voltage corresponds to the specifications on the rating plate. The wall socket must continue to be easily accessible after the device is plugged in.
- Ensure that the power cable cannot be damaged by sharp edges or hot points. Do not wrap the power cable around the device (Danger! Risk of cable damage!).
- Ensure that the power cable cannot be trapped or crushed. • To pull the mains plug out of the wall socket, always pull on the mains plug, and never on the power cable.
- Disconnect the mains plug from the wall socket, ...
... after every use, ...if there is a fault, ... when you are not using the device, ... before you clean the device and ... during thunderstorms.
- To avoid any risk, do not make modifications to the product.
- If the mains power cable of this device should become damaged, it must be replaced by the manufacturer, the manufacturer's customer service department or a similarly qualified specialist, in order to avoid any hazards.
- If the power cable or the device is damaged, immediately pull the mains plug out of the wall socket.

DANGER! Fire hazard!
- Use the device on a stable, level and heat-resistant surface.
- Even during short interruptions, always place the steam iron upright and never on its sole plate. It must be placed on a stable and heat-resistant surface. Pull out the mains plug during longer interruptions or if you leave the room.

DANGER! Risk of injury through burning!
- Do not touch the hot surfaces of the device.
- Allow the device to cool down completely before you clean it or put it away.
- Danger due to sudden evaporation. Allow the device to cool down completely before you refill it with fresh water.


- Warning: risk of burns from steam and sprayed hot water when using the steam burst button. When using the steam burst, always point the sole plate towards the item of laundry or ironing board.
- The sole plate becomes very hot during operation. Only touch the handle and control elements of the steam iron during operation.
Never iron items of clothing on a person's body.
WARNING! Risk of material damage
- Use the original accessories only.
- Do not use any astringent or abrasive cleaning agents.
- Do not iron over e.g. zippers, metal buttons or applications that could damage the sole plate.
- Do not put vinegar, limescale remover or any other additives into the water tank. Additives can damage the device.
4. Items supplied
1 Steam iron 1 Measuring beaker 1 Operating instructions
5. Before using for the first time
- Ensure that you have pulled out the mains plug 9.
- Peel the protective foil off the sole plate 19.
- Open the lid 2 (of the water tank).
- Half-fill the water tank 15.
- Insert the mains plug 9 into a wall socket corresponding to the technical data.
- Set the temperature controller 16 to max.
The temperature control lamp 11 lights up.
- When the device has reached the desired temperature (temperature control lamp 11 goes out), iron an old cotton cloth in steam mode (steam flow rate controller 3 on) until the water tank 15 is empty.
6. Operation

DANGER! The sole plate 19 becomes very hot during operation. Only touch the handle 7 and control elements of the steam iron during operation.
• Even during short interruptions, always place the steam iron upright and never on its sole plate 19. There is a fire hazard! - NOTE: you may notice an odour when using for the first time. This is a result of the manufacturing process and is not a defect with the device. Ensure adequate ventilation.
The sole plate 19 cools down slightly during ironing. In order to reach the set temperature again, the device heats the sole plate up again, during which the temperature control lamp 11 lights up. It goes out again when the set temperature has been reached. This process repeats itself during ironing.
6.1 Filling the water tank

DANGER! Pull the mains plug 9 out of the socket before you fill up the water tank 15.
Use clean tap water without any additives (e.g. vinegar, limescale remover, starch, perfume, softener).
The integrated anti-limescale protection reduces limescale deposits for average water hardness, and thus extends the service life of the device. If your tap water is hard, use distilled water. Where the water is moderately hard, mix distilled water and tap water at a ratio of 1:1.
- Disconnect the mains plug 9 from the wall socket.
- Turn the steam flow rate controller 3 left to 0.
- Open the lid 2 (of the water tank) and hold the device at a slight angle to fill it.
- Use the measuring beaker 20 to pour in water up to the mark 18 max, but at least up to one quarter. Hold the steam iron upright to check.
- Close the lid 2 (of the water tank).
- Put down the steam iron in an upright position.
6.2 Set iron temperature
- Set the desired temperature using the temperature controller 16:
- min the device is not getting hot
- Temperature: up to approx. 110 °C
- Temperature: up to approx. 150 °C
- Temperature: up to approx. 210
- max maximum temperature
- The temperature control lamp 11 is lit for as long as the steam iron is heating. It goes out when the set temperature has been reached. You can then begin ironing.
6.3 Spray function
Use the spray function in order to dampen dry items of laundry. This option is available irrespective of the set temperature. For this purpose, the water tank 15 must be at least one quarter full.
- Press the spray button 5 repeatedly. While doing so, hold the steam iron over the item of laundry. Ensure that no water sprays onto the ground.
6.4 Ironing without steam
Sensitive fabrics are ironed at lower temperatures and without steam. In order to dampen them, the spray function is available.
- Set the steam flow rate controller 3 to 0 and set the temperature controller 16 to min.
- Fill the water tank 15 if you wish to use the spray function.
- Connect the mains plug 9 with the wall socket.
- Set the desired temperature using the temperature controller 16. The temperature control lamp 11 lights up.
- Start ironing as soon as the ironing temperature has been reached 11 and the temperature control lamp goes out.
- Finish ironing, set the temperature controller 16 to min and pull out the mains plug 9.
- Allow the steam iron to cool down, and pour off any remaining water from the water tank 15 through the filling opening in the water tank (under the lid 2).
6.5 Ironing with steam
Steam ironing requires a high temperature, at least the temperature setting for ♣ In order to additionally dampen items of clothing, the spray function is also available.
- Set the steam flow rate controller 3 to 0 and set the temperature controller 16 to min.
- Fill the water tank 15.
- Connect the mains plug 9 with the wall socket.
- Set the temperature controller 16 to the desired temperature (at least ⚙). The temperature control lamp 11 lights up.
- As soon as the ironing temperature has been reached and the temperature control lamp 11 goes out, adjust the steam flow rate controller 3 to the desired steam flow rate and start ironing.
The steam will...
... start to come out as soon as you hold the steam iron horizontal, and ... stop as soon as: - you hold the steam iron vertically, - the temperature is too low, - the water tank is empty or - you set the steam flow rate controller 3 to 0.
- Finish ironing, set the temperature controller 16 to min, set the steam flow rate controller 3 to 0 and pull out the mains plug 9.
- Allow the steam iron to cool down, and pour off any remaining water from the water tank 15 through the filling opening in the water tank (under the lid 2).
6.6 Steam burst function
The steam burst function requires a high temperature. Select a temperature setting between ♀ and max. For this purpose, the water tank 15 must be at least one quarter full.
- Press the steam burst button 4 ⏻ while the steam iron glides over the item of laundry.
- Wait a few seconds before you press the steam burst button 4 🎨 again.
NOTE: for smoothing items of clothing that are hanging up, you can use the steam burst in a vertical position.
7. Safety shut-off

DANGER! Fire hazard!
Despite the automatic shut-off, the steam iron must not be left unsupervised.
Your steam iron possesses a safety shut-off of the heating function (AUTO SHUT OFF).
Activating the function
The automatic shut-off occurs, if
- the device has stood still in vertical position for approx. 8 minutes.
- the device has stood still on the sole plate for approx. 30 seconds.
- the device has laid on its side for approx. 30 seconds.
When the safety shut-off is activated, an alarm sounds for approx. 3 seconds and the operating lamp 6 starts to flash until the function is switched off.
Switching off the function
Pick up the steam iron by its handle 7 and hold it horizontally for a few seconds or make some ironing movements.
8. Cleaning

DANGER! Pull the mains plug out of the wall socket before you clean the steam iron.
- Allow the device to cool down before cleaning.
CAUTION: do not use any astringent or abrasive cleaning agents.
Cleaning the device
- For cleaning the device, use a soft, moistened cloth.
- Dirt can be removed from the sole plate 19 using commercially available cleaning agents for chrome, silver or stainless steel.
- Residues that have melted on can be removed by heating the steam iron up to the max setting and then ironing an old cotton cloth.
Self-cleaning
CAUTION: do not put vinegar, limescale remover or any other additives into the water tank 15. Additives can damage the device.
If you use tap water, you should run the self-cleaning cycle after every use. Otherwise use the self-cleaning cycle at least twice per month.
- Fill the water tank 15.
- Put down the steam iron in an upright position.
- Connect the mains plug 9 with the wall socket.
- Set the steam flow rate controller 3 to 0 and set the temperature controller 16 to max.
- Wait until the temperature control lamp 11 goes out.
- While doing so, hold the device horizontally over a heat-resistant household dish.
- Press the 17 self clean button and hold it down. Limescale residues will then be ejected with steam and hot water from the steam holes in the sole plate 19. Hold the button down until no more steam or water emerges.
- Repeat steps 1. to 7. until no more residues are coming out.
- Pull out the mains plug 9, allow the device to cool down, and pour off any remaining water.
9. Storage

DANGER!
Store the steam iron out of the reach of children.
- Pull out the mains plug 9.
- Allow the device to cool down.
- Set the temperature controller 16 to min.
- Set the steam flow rate controller 3 to 0.
- Pour off any remaining water from the water tank 15 through the filling opening in the water tank (under the lid 2).
- Store the steam iron standing upright.
10. Disposal
This product is subject to the provisions of European Directive 2012/19/EC. The symbol showing a wheelie bin crossed through indicates that the product requires separate collection.
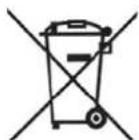
Separate refuse collection in the European Union. This applies to the product and all accessories marked with this symbol. Products identified with this symbol may not be discarded with normal household waste, but must be taken to a collection point for recycling electric and electronic appliances. Recycling helps to reduce the consumption of raw materials and protect the environment.
When disposing of the packaging, make sure you comply with the environmental regulations applicable in your country.
When disposing of the packaging, make sure you comply with the environmental regulations applicable in your country.
If your device fails to function as required, please try this checklist first. Perhaps there is only a minor problem, and you can solve it yourself.
If your device fails to function as required, please try this checklist first. Perhaps there is only a minor problem, and you can solve it yourself.

DANGER! Risk of electric shock! Do not attempt to repair the device yourself under any circumstances.
| Fault Possible causes / Action | |
| No function | Connect the device to the mains power supply.Use the temperature controller 16 to turn up the temperature. |
| Fault Possible causes / Action | |
| Little or no steam | Fill the water tank 15 to at least one quarter full.Switch on the steam flow rate controller 3 ( — — — —)Run the self-cleaning cycle. |
| Steam burst is not working. | Fill the water tank 15 to at least one quarter full.Set the right temperature.Leave a pause of a few seconds between steam bursts. |
| Spray burst is not working. | Fill the water tank 15 to at least one quarter full.For the first spray burst, you need to pump several times. |
| Acoustic alarm (bleep) / operating lamp 6 flashes. | Automatic shut-off, if:- the device has stood still in vertical position for approx. 8 minutes.- the device has stood still on the sole plate for approx. 30 seconds.- the device has laid on its side for approx. 30 seconds.Pick up the steam iron by its handle 7 and hold it horizontally for a few seconds or make some ironing movements. |
Subject to technical modification.
| Model: SDBE 2400 A1 | |
| Mains voltage: | 220 - 240 V ~ 50/60 Hz |
| Protection class: I | |
| Power rating: 2,000 - 2,400 W | |

13. Warranty of the HOYER Handel GmbH


Dear Customer,
your device is provided with a 3 year warranty starting with the purchase date. In the event of product defects, you are entitled to statutory rights against the vendor. These statutory rights are not restricted by our warranty presented in the following.
Your device is provided with a 3-year warranty starting from the purchase date. In the event of product defects, you are entitled to statutory rights against the vendor. These statutory rights are not restricted by our warranty presented in the following.
Warranty conditions
The warranty period starts with the purchase date. Please keep the original purchase receipt in a safe place. This document is required to verify the purchase.
If within three years from the purchase date of this product a material or factory defect occurs, the product will be repaired or replaced by us – at our discretion – free of charge to you. This warranty implies that within the period of three years the defective device and the purchase receipt are presented, including a brief written description of the defect and the time it occurred.
If the defect is covered by our warranty, the repaired or a new product will be returned to you. No new warranty period starts with a repair or replacement of the product.
Warranty period and statutory claims for defects
The warranty period is not extended when the warranty has been claimed. This also applies to replaced and repaired parts. Any damages and defects already existing at the time of purchase must be reported immediately upon unpacking. Repairs arising after the expiration of the warranty period are subject to a charge.
Warranty coverage
The device was produced carefully according to strict quality guidelines and tested diligently prior to delivery.
The warranty applies to material or factory defects. This warranty does not include product parts that are subject to standard wear and therefore can be considered wear parts; the same applies to damages at fragile parts, e.g. switches, rechargeable batteries or parts made of glass.
This warranty expires if the product is damaged, not used as intended or not serviced. For the proper operation of the product, all instructions listed in the operating instructions must be observed carefully. Any form of use and handling that is advised against in the operating instructions or warned against must always be avoided.
The product is only intended for private and not for commercial use. In the case of incorrect and improper treatment, use of force and interventions not performed by our authorised Service Centre, the warranty shall cease.
Handling in case of a warranty claim
In order to ensure prompt processing of your matter, please observe the following notes:
- Please keep the article number IAN: 100696 and the purchase receipt as a purchase verification for all inquiries.
- If faulty operation or other defects occur, first contact the Service Centre listed in the following by telephone or email.
- Then, you are able to send a product reported as defective free of charge to the service address specified to you, including the purchase receipt and the information on the defect and when it occurred.

Please visit www.lidl-service.com to download this and many other manuals, product videos and software.


GB Service Great Britain
Tel.: 0871 5000 720 (£ 0.10/ Min.)
E-Mail: hoyer@lidl.co.uk
IE Service Ireland
Tel.: 1890 930 034
(0,08 EUR/ Min., (peak))
(0,06 EUR/ Min., (off peak))
E-Mail: hoyer@lidl.ie
IAN: 100696

Supplier
Please note that the following address is no
service address. First contact the afore-
mentioned Service Centre.
HOYER Handel GmbH
Kühnehöfe 5
22761 Hamburg
Germany


13


Table of contents

23EN


25EN


Table of contents

Warranty card 100696
16 Temperature controller

DANGER for children

71SK


77SK

Contents


- STEAM IRON SDBE 2400 A
- STEAM IRON
- GÖZÖLŐS VASALÓL
- NAPAŘOVACÍ ŽEHLIČKA
- DAMPFBÜGELEISEN
- ŻELAZKO NA PARE
- CONTENTS
- OVERVIEW
- THANK YOU FOR YOUR TRUST
- INTENDED PURPOSE
- FORESEEABLE MISUSE
- SAFETY INFORMATION
- WARNINGS
- INSTRUCTIONS FOR SAFE OPERATION
- DANGER FOR CHILDREN
- DANGER! RISK OF ELECTRIC SHOCK DUE TO MOISTURE
- DANGER! RISK OF ELECTRIC SHOCK
- DANGER! FIRE HAZARD
- DANGER! RISK OF INJURY THROUGH BURNING
- WARNING! RISK OF MATERIAL DAMAGE
- ITEMS SUPPLIED
- BEFORE USING FOR THE FIRST TIME
- OPERATION
- FILLING THE WATER TANK
- SET IRON TEMPERATURE
- SPRAY FUNCTION
- IRONING WITHOUT STEAM
- IRONING WITH STEAM
- STEAM BURST FUNCTION
- SAFETY SHUT-OFF
- ACTIVATING THE FUNCTION
- SWITCHING OFF THE FUNCTION
- CLEANING
- CLEANING THE DEVICE
- SELF-CLEANING
- STORAGE
- DANGER
- DISPOSAL
- WHEN DISPOSING OF THE PACKAGING, MAKE SURE YOU COMPLY WITH THE ENVIRONMENTAL REGULATIONS APPLICABLE IN YOUR COUNTRY
- IF YOUR DEVICE FAILS TO FUNCTION AS REQUIRED, PLEASE TRY THIS CHECKLIST FIRST. PERHAPS THERE IS ONLY A MINOR PROBLEM, AND YOU CAN SOLVE IT YOURSELF
- SUBJECT TO TECHNICAL MODIFICATION
- DEAR CUSTOMER
- WARRANTY CONDITIONS
- WARRANTY PERIOD AND STATUTORY CLAIMS FOR DEFECTS
- WARRANTY COVERAGE
- HANDLING IN CASE OF A WARRANTY CLAIM
- SUPPLIER
- TABLE OF CONTENTS
Brand : SILVERCREST
Model : SDBE 2400 A1
Category : Iron