Twintalker 4810 - Baby monitor SILVERCREST - Free user manual and instructions
Find the device manual for free Twintalker 4810 SILVERCREST in PDF.


| Product Type | Baby Monitor |
| Brand | SilverCrest |
| Model | Twintalker 4810 |
| Dimensions (Parent Unit) | Approx. 12 x 6 x 3 cm |
| Dimensions (Baby Unit) | Approx. 10 x 8 x 4 cm |
| Weight (Parent Unit) | Approx. 120 g |
| Weight (Baby Unit) | Approx. 150 g |
| Power Supply | Parent unit: rechargeable Li-ion battery (3.7V, 800mAh); Baby unit: mains powered via AC adapter (5V, 1A) |
| Range (Indoor) | Up to 300 meters (in open field) |
| Frequency | 2.4 GHz digital |
| Two-Way Talk | Yes, with built-in microphone and speaker on both units |
| Voice Activation (VOX) | Yes, with adjustable sensitivity |
| Temperature Sensor | Yes, displays nursery temperature on parent unit |
| Night Light | Yes, soft LED night light on baby unit (adjustable) |
| Lullabies | Yes, 5 built-in melodies with volume control |
| Sound Level Indicators | LED bar on parent unit shows sound level in baby room |
| Out of Range Alarm | Yes, visual and audible warning on parent unit |
| Low Battery Warning | Yes, indicator light and beep |
| Cleaning & Maintenance | Wipe with a soft, slightly damp cloth; do not use abrasive cleaners |
| Safety Features | Low radiation, automatic power-off when idle, secure digital transmission |
| Repairability & Spare Parts | Battery replaceable; AC adapter available; contact SilverCrest service |
| Warranty | 2 years |
Frequently Asked Questions - Twintalker 4810 SILVERCREST
User questions about Twintalker 4810 SILVERCREST
0 question about this device. Answer the ones you know or ask your own.
Ask a new question about this device
Download the instructions for your Baby monitor in PDF format for free! Find your manual Twintalker 4810 - SILVERCREST and take your electronic device back in hand. On this page are published all the documents necessary for the use of your device. Twintalker 4810 by SILVERCREST.
USER MANUAL Twintalker 4810 SILVERCREST
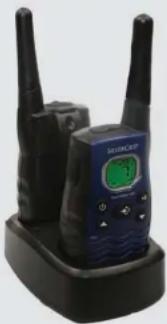
TWINTALKER 4810

V 1.0 - 05/09
CE
GB The features described in this manual are published with reservation to modifications
GB The CE symbol indicates that the unit complies with the essential requirements of the R&TTE directive.
2 Intended purpose 5
3 C E M a r k 5
4 Safety instructions 5
4.1 General 5
4.2 Burning injuries 5
4.3 Injuries 5
4.4 Danger of explosion 6
4.5 Poisoning danger 6
4.6 Legal 6
4.7 Notes 6
5 Cleaning and maintenance 6
6 Disposal of the device (environment) 7
7 Using a PMR device 7
8 Included in the package 7
9 Getting started 8
9.1 Installing/Removing the Belt Clip 8
9.2 Battery Installation 8
10 Charging the batteries 9
11 Description 9
12 LCD display information 10
13 Using the Twintalker 4810 10
13.1 Turning the Unit ON/OFF 10
13.2 Battery Charge Level/Low Battery Indication 10
13.3 Adjusting Speaker Volume 11
13.4 Receiving a Signal 11
13.5 Transmitting a Signal 11
13.6 Changing Channels 12
13.7 CTCSS (Continious Tone Coded Squelch System) / DCS (Digital Coded Squelch) 12
13.8 Monitor 13
13.9 VOX Selection 13
13.10 Channel Scan 14
13.11 Call Tones 15
13.12 Roger Beep On/Off 15
13.13 Key-Tone On/Off 16
13.14 Dual Channel Monitor function 16
13.15 Button Lock 16
13.16 Stopwatch function 17
13.17 Display back light 17
Twintalker 4810
14 Earpiece connection 17
15 Troubleshooting 18
16 Technical specifications 18
17 Service address and hotline support 19
18 Declaration of conformity and manufacturer 19
19 Warranty 20
19.1 Warranty period 20
19.2 Warranty handling 20
19.3 Warranty exclusions 20
1 Introduction
Thank you for purchasing the Twintalker 4810. It's a long range, low powered radio communication device with a range of maximum 8 Km. It has no running costs other than the minimal cost of re-charging the batteries.
The Twintalker operates on 8 channels.
The Twintalker is protected against vertically falling water drops when enclosure tilted up to 15° according to the IPX2 standard.
2 Intended purpose
It can be used for recreational purposes. For example: to keep in contact during travelling with 2 or more cars, biking, skiing. It can be used to keep in contact with your children when they are playing outside, etc...
3 CE Mark
The CE symbol on the unit, user guide and giftbox indicates that the unit complies with the essential requirements of the R&TTE directive 1995/5/EC.
4 Safety instructions
4.1 General
Please read carefully through the following information concerning safety and proper use. Make yourself familiar with all functions of the device. Keep this manual in a safe place for future use.
4.2 Burning injuries
- If the cover of the antenna is damaged, do not touch because when an antenna comes in contact with the skin, a minor burn may result when transmitting.
- Batteries can cause property damage such as burns if conductive material such as jewellery, keys or beaded chains touches exposed terminals. The material may complete an electrical circuit (short circuit) and become quite hot. Exercise care in handling any charged battery, particularly when placing it inside a pocket, purse or other container with metal objects.
4.3 Injuries
- Do not place your device in the area over an air bag or in the air bag deployment area. Air bags inflate with great force. If a PMR is placed in the bag deployment area and the air bag inflates, the communicator may be propelled with great force and cause serious injury to the occupants of the vehicle.
- Keep the PMR at least 15 centimetres away from a pacemaker.
- Turn your PMR OFF as soon as interference is taking place with medical equipment.
4.4 Danger of explosion
- Do not replace batteries in a potentially explosive atmosphere. Contact sparking may occur while installing or removing batteries and cause an explosion.
- Turn your PMR off when in any area with a potentially explosive atmosphere. Sparks in such areas could cause an explosion or fire resulting in bodily injury or even death.
- Never throw batteries in fire as they may explode.

Areas with potentially explosive atmospheres are often, but not always, clearly marked. They include fuelling areas such as below deck on boats, fuel or chemical transfer or storage facilities; areas where the air contains chemicals or particles, such as grain, dust or metal powders; and any other area where you would normally be advised to turn off your vehicle engine.
4.5 Poisoning danger
- Keep batteries away from small children.
4.6 Legal
- In some countries it is prohibited to use your PMR while driving a vehicle. In this case leave the road before using the device.
- Turn your PMR OFF when on board an aircraft when instructed to do so. Any use of the PMR must be in accordance with airline regulations or crew instructions.
- Turn your PMR OFF in any facilities where posted notices instruct you to do so. Hospitals or health care facilities may be using equipment that is sensitive to external RF energy.
- Replacing or modifying the antenna may affect the PMR radio specifications and violate the CE regulations. Unauthorised antennas could also damage the radio.
4.7 Notes
- Do not touch the antenna while transmitting, it could affect the range.
- Remove the batteries if the device is not going to be used for a long period.
5 Cleaning and maintenance
- To clean the unit, wipe with a soft cloth dampened with water. Don't use a cleaner or solvents on the unit; they can damage the case and leak inside, causing permanent damage.
- Battery contacts may be wiped with a dry lint-free cloth.
- If the unit gets wet, turn it off and remove the batteries immediately. Dry the battery compartment with a soft cloth to minimize potential water damage. Leave the cover off the battery compartment overnight or until completely dry. Do not use the unit until completely dry.
6 Disposal of the device (environment)
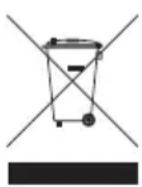
At the end of the product lifecycle, you should not throw this product into the normal household garbage but bring the product to a collection point for the recycling of electrical and electronic equipments. The symbol on the product, user guide and/or box indicate this.
Some of the product materials can be re-used if you bring them to a recycling point. By re-using some parts or raw materials from used products you make an important contribution to the protection of the environment. Please contact your local authorities in case you need more information on the collection points in your area.
7 Using a PMR device
To communicate between PMR devices they need to be set all on the same channel and CTCSS/DCS code (see chapter “13.7 CTCSS (Continious Tone Coded Squelch System) / DCS (Digital Coded Squelch)”) and within receiving range (up to max. 8 km in open field). Since these devices use free frequency bands (channels), all devices in operation share these channels(total 8 channels). Therefore, privacy is not guaranteed. Anybody with a PMR set to your channel can overhear the conversation. If you want to communicate (transmitting a voice signal) you need to press the PTT-button ⑪.
Once this button pressed, the device will go into transmit mode and you can speak into the microphone. All other PMR devices in range, on the same channel and in standby mode (not transmitting) will hear your message. You need to wait until the other party stops transmitting before you can reply to the message. At the end of each transmission the unit will send a beep if the Roger Beep is enable (see chapter "13.12 Roger Beep On/Off"). To reply, just press the PTT-button ⑪ and speak into the microphone.

If 2 or more users press the PTT-button at the same time the receiver will receive only the stongest signal and the other signal(s) will be suppressed. Therefore you should only transmit a signal (press PTT-button when the channel is free.

The range of radio waves is strongly affected by obstacles such as buildings, concrete/metal structures, the unevenness of the landscape, woodland, plants, ... This implies that the range between two or more PMR's may in some extreme cases be restricted to a maximum of a few tens of meters. You will soon notice that PMR works best when there is a minimum of obstacles between users.
8 Included in the package
- 2 x Twintalker 4810
- 2 x Beltclip
- 1 x Duo Charger
- 1 x Power adapter
- 8 x AAA NiMh battery
- 2 x Earpiece with microphone and PTT - button
- User guide
• Card with service address and Hotline
9 Getting started
9.1 Installing/Removing the Belt Clip
- To remove the belt clip from the unit, push the belt clip (B) towards the antenna, while pulling the clip tab (A).
- When re-installing the belt clip, a click indicates the belt clip is locked into position.

9.2 Battery Installation

- Remove the belt clip (See chapter "9.1 Installing/Removing the Belt Clip").
- Lift the battery door by gently pushing the door clip (C) using your finger nail.
- Install the NiMh batteries. Make sure that the polarity of the NiMh batteries is correct.
- Close the battery door.
- Re-install the belt clip.
10 Charging the batteries
When the batteries are installed, the desktop charger provides drop-in charging conveniency.
- Put the desktop charger on a flat surface.
-
Plug one end of the supplied adapter into an easy accessible electric socket and the other end into the connector on the backside of the desktop charger ②5.(See folded cover page - illustration C)
-
Put the radio in the charger as indicated.
-
The charging LED will turn on if it's properly inserted and charging.(See folded cover page - illustration D)

It will take about 8 to 10 hours to fully charge the batteries.

Do not press the PTT-button of the PMR's while they are placed in the charger!

Do not short-circuit the batteries or dispose in fire. Remove the batteries if this device is not going to be used for a long period. Do not charge non rechargeable batteries like Alkaline batteries in the charger. This might damage the PMR's and charger unit.
11 Description
See folded cover page - illustration A
- LCD display
- Headset connection
- Antenna
- Call button
- Menu button
- Enter the menu settings


- Down button

– Decrease the speaker volume
- Select the previous value in the menu
-
Charger contacts
-
Microphone
9. UP button

– Increase the speaker volume
- Select the next value in the menu
10. On-off button

11. Push to talk button PTT
12 LCD display information
See folded cover page - illustration B
- CTCSS indication
- DCS indication
- CTCSS/DCS/ Stopwatch seconds / Menu option -value
- Stopwatch 1/100 value
- VOX indication
- Dual Channel Mode (DCM) indication
- Channel/Menu item indication
- Speaker volume indication
- Key pad lock icon
- Battery level indication
- RX icon
– Displayed when receiving
- TX icon
– Displayed when transmitting - Scanning indication
– Displayed during scan mode
13 Using the Twintalker 4810

The display illustrations in next pages only show the icons or display informations of the functions that are explained in the text.
13.1 Turning the Unit ON/OFF
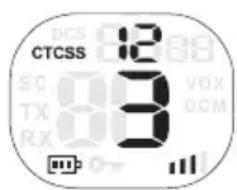
To turn ON:
- Press and hold the - button for 3 seconds. The unit will "beep" and the LCD display will display the current channel.
To switch OFF:
- Press and hold the - button for 3 seconds. The unit will "beep" and the LCD display will turn blank.
13.2 Battery Charge Level/Low Battery Indication
The battery charge level is indicated by the number of squares present inside the battery icon on the LCD Screen.
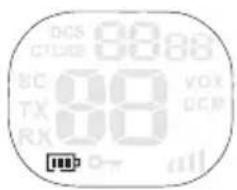

Battery Full

Battery 2/3 charged

Battery 1/3 charged

Battery empty
When the battery charge level is low, the battery icon will flash and a beep will be heard to indicate that the batteries need to be replaced or recharged.

Never recharge non-rechargeable batteries like for example Alkaline batteries.
13.3 Adjusting Speaker Volume

- Press the - button in stand-by-mode to increase the speaker volume. The volume level is displayed.
- Press the - button to decrease the speaker volume.
13.4 Receiving a Signal
The unit is continuously in the receive mode when the unit is switched ON and not transmitting.

In order for other people to receive your transmission, they must also be on the same channel and have set the same CTCSS code or DCS code. (See chapter “13.6 Changing Channels” and “13.7 CTCSS (Continious Tone Coded Squelch System) / DCS (Digital Coded Squelch)”) Either CTCSS or DCS can be used but never both at the same time.
13.5 Transmitting a Signal
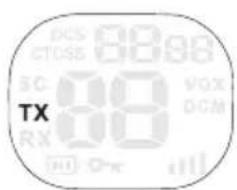
- Press and hold the PTT - button to transmit. The TX symbol is displayed.
- Hold the unit in a vertical position with the microphone 10cm from the mouth and speak into the microphone.
- Release the PTT - button transmitting. ⑪ when you want to stop

To check the channel activity use the monitor function (See chapter "13.8 Monitor").
13.6 Changing Channels
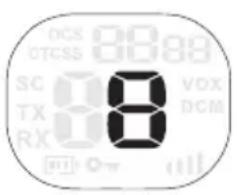
- Press the - button once, the current channel number flashes on the display.
- Press the - button ⑨ or the ▼ button to change the channel.
- Press the PTT - button ⑪ to confirm and return to stand-by mode.

If no button is pressed within 5 seconds during setting, the unit will return to standby.
13.7 CTCSS (Continious Tone Coded Squelch System) / DCS (Digital Coded Squelch)
License free PMR radio's operating on the 446 MHz frequency band, like the Twintalker 4810 PMR, have 8 available radio channels. If there are many PMR users in your neighborhood, there is a chance that some of these users are operating on the same radio channel.
To prevent that you receive signals from other users, sub-channels have been integrated.
Two PMR radio's will only be able to communicate with each other when they are operating on the same radio channel and when they have selected exactly the same sub-channel.
There are two kind of sub-channels :
- Continuous Tone Coded Squelch System (CTCSS)
• Digital Coded Squelch (DCS)
When using CTCSS, a low frequency tone (between 67 and 250 Hz) will be transmitted along with the voice signal. There are 38 available tones to choose from. You are free to choose one of these 38 available tones. Due to filtering, these tones will generally not be audible so they will not disturb the communication.
DCS is similar to CTCSS, but instead of sending a continuous tone of a selected frequency, a digital data transmission is added to the radio signal. This Digital Code is transmitted at a really low rate, around 134 bits per second (the code is 23 bits long). Only the PMR's of the latest generation will support DCS. There are 83 available DCS codes that can be used.
Since earlier models will only support CTCSS it will be better to use DCS to prevent that other users will be audible during your PMR conversations.
13.7.1 CTCSS
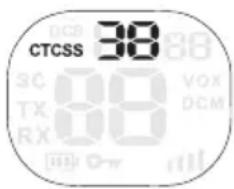
- Press the ➕ -button ⑤ twice : "CTCSS" and the current CTCSS code flashes on the display.
- Press the -button or the ⑨ button to change to another code.
- Press the PTT-button ⑪ to confirm and return to stand-by mode.
13.7.2 DCS
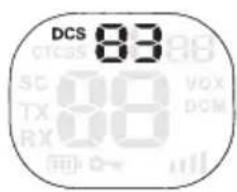
- Press the ➤ -button ⑤ three times : "DCS" and the current DCS code flashes on the display.
- Press the -button or the ⑨ button to change to another code.
- Press the PTT-button ⑪ to confirm and return to stand-by mode.

To disable CTCSS or DCS, select code "00" for CTCSS or for DCS in the menu. When the entry is confirmed, "OF" will be displayed.
13.8 Monitor
You can use the monitor feature to check for weaker signals in the current channel.
- Press the -button and -button simultaneously to activate channel monitoring.
- Press the -button to stop5channel monitoring.

During channel monitoring the receiver circuit in the PMR will not listen to CTCSS or DCS codes.
13.9 VOX Selection
The PMR is capable of voice activated (VOX) transmission. In VOX mode, the radio will transmit a signal when it is activated by your voice or other sound around you. VOX operation is not recommended if you plan to use your radio in a noisy or windy environment.

VOX mode will be overridden when you press the PTT - button ⑪.
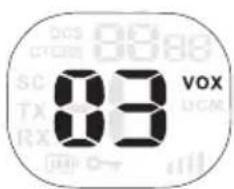
- Press the - button ⑤ four times, the current VOX setting flashes on the display and the VOX icon is displayed.
- Press the -button to set the VOX sensitivity level between 1 and 3 (level 3 is the most sensitive level).
- Press the ▼ button ⑥ until 'OF' appears on the display, to turn VOX OFF.
- Press the PTT - button mode. ⑪ to confirm and return to stand-by
13.10 Channel Scan
Channel scan performs searches for active signals in an endless loop from channel 1 to 8. Once an active channel is found you have the option to search for the CTCSS code or the DCS code that is set by the user who is broadcasting on the channel.
13.10.1 Scanning for an active radio channel
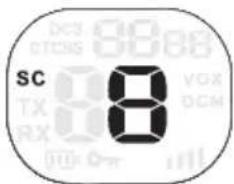
- Press the ➕ -button ⑤ five times: "SC" and the current channel flashes on the display.
- Press the -button or the ⑨ button to start the ⑥ channel scan.
Once an active channel is found, the scanning will stop and you can listen to the transmission.
When the transmission on the found channel stops, the scanning will resume automatically.

If you press the PTT button ☑ while listening to a found channel, the PMR will go back in stand-by mode on the found channel.
13.10.2 Scanning for a CTCSS code
When an active channel is found press the PTT button ⑪ to select the found active channel. Now you have to option to search for the CTCSS/DCS code that is used by the found user.
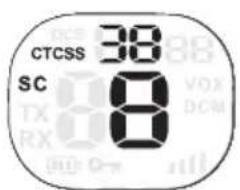
- Press the ➤ -button ⑤ six times : "SC" and "CTCSS 00" flashes on the display for the selected radio channel.
- Press the -button or the ⑨-button to start the ⑥ CTCSS scan.
Once there is a transmission on the channel, the CTCSS code (if used) will be detected and displayed.

- If you press the PTT button while listening to a found CTCSS code, the PMR will go back in stand-by mode on the channel with the CTCSS code.
- If no CTCSS code is detected there is a chance that DCS is selected by the user. In this case you can scan for the DCS code. (section 13.10.3)
13.10.3 Scanning for a DCS code
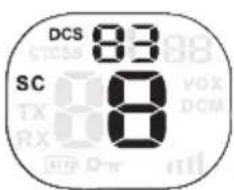
- Press the ➞ -button ⑤ seven times: "SC" and "DCS 00" flashes on the display for the selected radio channel.
- Press the -button or the ⑨ button to start the ⑥ DCS scan.
Once there is a transmission on the channel, the DCS code (if used) will be detected and displayed.

If you press the PTT button ☑ while listening to a found DCS code, the PMR will go back in stand-by mode on the channel with the DCS code.
13.11 Call Tones
A call tone alerts others that you want to start talking.
13.11.1 Setting the Call Tone
The Twintalker 4810 has 15 call tones.
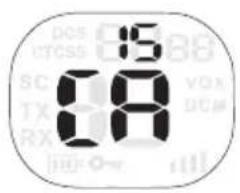
- Press the - button ⑤ eight times, “CA” is displayed and the current call tone is flashing.
- Press the - button ⑨ or the ▼button to change to another Call Tone.
- Press the PTT - button mode. ⑪ to confirm and return to stand-by
13.11.2 Sending a call Tone
Press the • button briefly. The call tone will be transmitted on the set channel.
13.12 Roger Beep On/Off
After the P button is released, the unit will send out a roger beep to confirm that you have stopped talking.
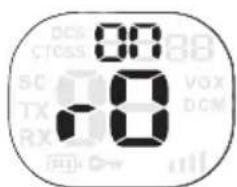
To set the Roger Beep.
- Press the ➤ - button ⑤ nine times. 'rO' will be displayed.
- Press ▲ to enable (ON) or ▼ to disable the Roger-Beep (OF).
- Press the PTT - button ⑪ to confirm your selection and return to the standby mode.
13.13 Key-Tone On/Off
When a button is pressed, the unit will beep briefly.

To set the key-tone.
- Press ten times. 'tO' will be displayed.
- Press ▲ to enable (ON) or ▼ disable the Key Tones (OF).
- Press the PTT - button ⑪ to confirm your selection and return to the standby mode.
13.14 Dual Channel Monitor function
In stand-by, the PMR is set on one channel with CTCSS/DCS code. The PMR will only receive signals transmitted on that channel with the CTCSS/DCS code.
Dual Channel Monitor (DCM) allows you to monitor a second channel with CTCSS/DCS code.
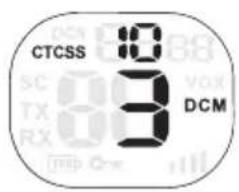
- Press the ➡ -button ⑤ eleven times," DCM OF" will flash on the display.
- Press the -button or the -button to change the channel.
- Press the -button to confirm the channel selection and go to CTCSS selection. (Press the -button again to go to DCS selection)
- Press the -button or the -button to change the CTCSS code or DCS code.
- Press the PTT-button ⑪ to confirm and return to stand-by mode.
- To disable the function select "OF" when selecting the DCM channel.
When the Dual Channel Monitor function is activated, the PMR will switch sequentially between the standby channel + CTCSS/DCS code and the Dual Channel + CTCSS/DCS code.
13.15 Button Lock

- Press and hold the -button for three seconds to activate the Button lock mode. The button lock icon is displayed on the LCD Screen.
- Press and hold the -button again for three seconds deactivate button lock

The PTT-button ⑪, the •-button ④ and the ⏻-button ⑩ will still be functional when the Button Lock is activated.
13.16 Stopwatch function
The Twintalker 4810 has a stopwatch that will count to 59'59"99.
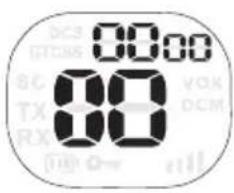
- Press the -button and hold for three seconds, the stopwatch display will appear.
- Press the -button to start the stopwatch.
- Press the -button to stop the stopwatch.
- Press the -button to reset the stopwatch to zero.
- Press the -button and hold for three seconds to deactivate the stopwatch.
13.17 Display back light
To activate the backlight of the LCD display, press any button except the PTT-button ⑪ or the • button.
The LCD backlight will light up for 6 seconds.
14 Earpiece connection
The Twintalker 4810 can be used with the included earpiece.
The connector is located under the protective rubber cover on the upper side of the unit ②. To attach the earpiece, open the rubber flap to expose the connector. The rubber flap cannot be removed from the PMR as it is fixed to the unit.
Insert the earpiece plug into the connector (2,5mm jack).
The small button on the earpiece has the same function as the PTT - button ⑪ on the unit. When you use the PTT - button ⑪ from the Earpiece, you must also use the microphone from the earpiece to talk into.

Do not connect other earpieces. This may damage your device.
15 Troubleshooting
| No power Clean the battery contacts with a soft cloth.Replace the batteries. | |
| No transmission | Make sure the PTT - button 11 is pressed completely before you speak.Monitor the channel activity and switch to another channel if the current is used. |
| No reception Check the speaker volume.Make sure that you are in the reception range of the sender and change if necessary your location. | |
| Limited Range and noise during transmission | The talking range depends on the terrain.Steal constructions, concrete buildings or the use in vehicles have a bad influence on the range.Try to avoid as many obstacles as possible and communicate in a clear line of sight.Change your locations. |
| Interference The receiver and transmitter are too close. The minimum distance between 2 units is 1,5m. | |
16 Technical specifications
| ChannelsSub-codeFrequencyRangeBatteriesTransmission PowerModulation TypeChannel spacingDuo Charger adapter | 8CTCSS 38 / DCS 83446.00625MHz - 446.09375 MHzUp to 8 Km (Open field)4 x AAA Alkaline or 4 x AAA NiMH rechargeable=< 500mW ERPFM - F3E12,5 kHzInput : 230V AC / 50Hz - Output : 9V DC / 200mA | |||||||||
| Channel Frequency Chart: CT | CSS Code Chart | |||||||||
| Channel | Frequency | (MHz) | Code Frequency (Hz) | Code Freq. (Hz) | Code Freq. (Hz) | Code Freq. (Hz) | Code Freq. (Hz) | |||
| 1 446, | 00625 0 | Disabled 10 | 94,8 20 13 | 1,8 30 186,2 | ||||||
| 2 446, | 01875 1 | 67,0 11 97 | 4 21 136,5 | 31 192,8 | ||||||
| 3 446, | 03125 2 | 71,9 12 100 | 0 22 141,3 | 32 203,5 | ||||||
| 4 446, | 04375 3 | 74,4 13 108 | 5 23 146,2 | 33 210,7 | ||||||
| 5 446, | 05625 4 | 77,0 14 107 | 2 24 151,4 | 34 218,1 | ||||||
| 6 446, | 06875 5 | 79,7 15 110 | 9 25 156,7 | 35 225,7 | ||||||
| 7 446, | 08125 6 | 82,5 16 114 | 8 26 162,2 | 36 233,6 | ||||||
| 8 446, | 09375 7 | 85,4 17 118 | 8 27 167,9 | 37 241,8 | ||||||
| 8 88,5 | 18 123,0 28 173,8 | 38 250,3 | ||||||||
| 9 91,5 | 19 127,3 29 179,9 | |||||||||
| DCS Code Chart | |||||||
| No | DCS code | No | DCS code | No | DCS code | No | DCS code |
| 0 | Disabled | 21 | 134 | 42 | 311 | 63 | 516 |
| 1 | 23 | 22 | 143 | 43 | 315 | 64 | 532 |
| 2 | 25 | 23 | 152 | 44 | 331 | 65 | 546 |
| 3 | 26 | 24 | 155 | 45 | 343 | 66 | 565 |
| 4 | 31 | 25 | 156 | 46 | 346 | 67 | 606 |
| 5 | 32 | 26 | 162 | 47 | 351 | 68 | 612 |
| 6 | 43 | 27 | 165 | 48 | 364 | 69 | 624 |
| 7 | 47 | 28 | 172 | 49 | 365 | 70 | 627 |
| 8 | 51 | 29 | 174 | 50 | 371 | 71 | 631 |
| 9 | 54 | 30 | 205 | 51 | 411 | 72 | 632 |
| 10 | 65 | 31 | 223 | 52 | 412 | 73 | 654 |
| 11 | 71 | 32 | 226 | 53 | 413 | 74 | 662 |
| 12 | 72 | 33 | 243 | 54 | 423 | 75 | 664 |
| 13 | 73 | 34 | 244 | 55 | 431 | 76 | 703 |
| 14 | 74 | 35 | 245 | 56 | 432 | 77 | 712 |
| 15 | 114 | 36 | 251 | 57 | 445 | 78 | 723 |
| 16 | 115 | 37 | 261 | 58 | 464 | 79 | 731 |
| 17 | 116 | 38 | 263 | 59 | 465 | 80 | 732 |
| 18 | 125 | 39 | 265 | 60 | 466 | 81 | 734 |
| 19 | 131 | 40 | 271 | 61 | 503 | 82 | 743 |
| 20 | 132 | 41 | 306 | 62 | 506 | 83 | 754 |
17 Service address and hotline support
The service adresses are printed on the extra service card included in the package or can be found on www.ucom.be.
18 Declaration of conformity and manufacturer
Topcom Europe Nv.
Grauwmeer 17
3001 Heverlee
Belgium
The declaration of conformity can be found on the last page of this user guide.
19 Warranty
19.1 Warranty period
The devices have a 36-month warranty period. The warranty period starts on the day the new unit is purchased. There is no warranty on standard or rechargeable batteries (AA/AAA type). Consumables or defects causing a negligible effect on operation or value of the equipment are not covered. The warranty has to be proven by presentation of the original or copy of the purchase receipt, on which the date of purchase and the unit-model are indicated.
19.2 Warranty handling
A faulty unit needs to be returned to an authorized service centre including a valid purchase note and a filled in service card. If the unit develops a fault during the warranty period, the service centre will repair any defects caused by material or manufacturing faults free of charge, by either repairing or exchanging the faulty units or parts of the faulty units. In case of replacement, colour and model can be different from the original purchased unit.
The initial purchase date shall determine the start of the warranty period. The warranty period is not extended if the unit is exchanged or repaired by the service centre.
19.3 Warranty exclusions
Damage or defects caused by incorrect treatment or operation and damage resulting from use of non-original parts or accessories are not covered by the warranty.
The warranty does not cover damage caused by outside factors, such as lightning, water and fire, nor any damage caused during transportation. No warranty can be claimed if the serial number on the units has been changed, removed or rendered illegible. Any warranty claims will be invalid if the unit has been repaired, altered or modified by the buyer.

Pełna bateria


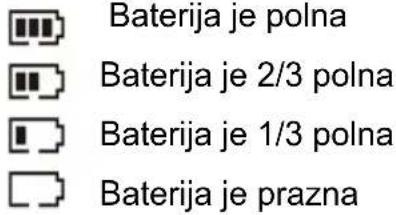
Ko je stanje napolnjenosti baterij nizko, se bo prikazala ikona baterije in zaslišal se bo pisk, ki označuje, da je baterije potrebno zamenjati ali ponovno napolniti.

- Pritisnite in zadržite gumb PTT ⑪ za oddajanje. Prikaže se simbol TX.
- Držite enoto v navpičnem položaju, mikrofon naj bo 10 cm oddaljen od ust in govorite v mikrofon.
- Spustite gumb PTT ⑪, ko želite prenehati z oddajanjem.

- Sedemkrat pritisnite gumb ➔ ⑤: "SC" in "DCS 00" utripa na zaslonu za izbran radijski kanal.
- Pritisnite gumb ali gumb, če želite začeti z iskanjem kode DCS.
13.7 CTCSS (Continuous Tone Coded Squelch System) / DCS (Digital Coded Squelch) 83
13.8 Sledování 84
11. Tlačítko Push to talk PTT
12 Informace na LCD displeji
Zapnutí:
- Continuous Tone Coded Squelch System (CTCSS)
• Digital Coded Squelch (DCS)
- Skinite kopču za pojas (pogledajte poglavlje "9.1 Postavljanje/Skidanje kopče za pojas").
- Podignite poklopac baterije laganim guranjem kopče poklopca (C) pomoću vašeg nokta.
- Umetnite NiMh baterije. Pazite da su polariteti NiMh baterija ispravno okrenuti.
- Zatvorite vratašca za baterije.
- Vratite kopču za remen.
10 Punjenje baterija
Kad su baterije instalirane, stolni punjač omogućava praktično punjenje.
Za potpuno punjenje baterija treba oko 8 do 10 sati.


Baterija je puna

Baterija je puna 2/3

Baterija je puna 1/3

Baterija je prazna
Kada je razina napunjenosti baterije niska, simbol baterije će treptati i oglasava se zvučni signal radi signaliziranja da je baterije potrebno zamijeniti ili napuniti.

Nikad ne punite baterije koji nisu punjive, primjerice poput alkalnih baterija.
13.3 Podešavanje glasnoće zvučnika
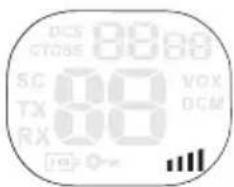
- Pritisnite tipku u moću Spreman da biste povećali glasnoću zvučnika. Razina glasnoće prikazana je na zaslonu.
- Pritisnite tipku ▼ ⑥ da biste smanjili glasnoću zvučnika.
13.4 Primanje signala
Uređaj je neprekidno u modu primanja kada je UKLJUČEN, a ne obavlja prijenos.

Kako bi drugi mogli primiti vaš prijenos i oni moraju biti na istom kanalu i imati podešen isti CTCSS ili DCS kod. (Pogledajte poglavlja “13.6 Promjena kanala” i “13.7 CTCSS (Continuous Tone Coded Squelch System - Sustav potiskivanja signala kontinuiranim tonom) / DCS (Digital Coded Squelch - Digitalno kodirano potiskivanje signala)”) Moguće je koristiti ili CTCSS ili DCS kod, ali nikada oba istovremeno.
13.5 Prijenos signala
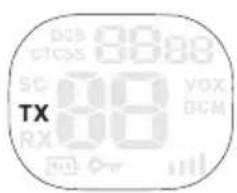
- Pritisnite i držite tipku PTT ⑪ da biste obavili prijenos. Na zaslonu je prikazana oznaka TX.
- Držite uređaj u okomitom položaju tako da mikrofon bude 10 cm od usta i govorite u mikrofon.
- Otpustite tipku PTT ⑪ kada želite prekinuti prijenos.

Kako biste provjerili aktivnost kanala, koristite funkciju nadzora (pogledajte poglavlje “13.8 Provjeravanje”).
- Continuous Tone Coded Squelch System (CTCSS)
• Digital Coded Squelch (DCS)
Pri korištenju CTCSS, zajedno s glasovnim signalom će se odašiljati niskofrekventni ton (između 67 i 250 Hz). Moguće je odabrati bilo koji između 38 ponuđenih tonova. Slobodno možete odabrati jedan od tih 38 dostupnih tonova. Zbog filtriranja te tonove općenito nije moguće čuti, stoga neće ometati komunikaciju.
DCS je sličan CTCSS-u, ali umjesto slanja kontinuiranog tona odabrane frekvencije, radio signalu se dodaje prijenos digitalnih podataka. Digitalni kod se odašilje pri niskoj brzini od oko 134 bita u sekundi (kod je dugačak 23 bita). DCS će podržavati samo PMR uređaji najnovije generacije. Postoji 83 dostupna DCS koda za korištenje. S obzirom da raniji modeli podržavaju samo CTCSS, bolje je koristiti DCS za sprječavanja oglašavanja ostalih korisnika tokom vaših PMR razgovora.
13.7.1 CTCSS
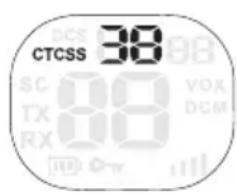
- Dvaput pritisnite tipku : Na zaslonu će treptati "CTCSS" i trenutni CTCSS kod.
- Pritisnite tipku ili tipku 9 da biste promijenili na drugi kod.
- Pritisnite tipku PTT ⑪ za potvrđivanje i povratak u mod Spreman.
13.7.2 DCS

- Triput pritisnite tipku : Na zaslonu će treptati "DCS" i trenutni DCS kod.
- Pritisnite tipku ili tipku ⑨ da biste promijenili na drugi kod.
- Pritisnite tipku PTT ⑪ za potvrđivanje i povratak u mod Spreman.

- Pritisnite tipku sedamputa: Na zaslonu trepće "SC" i "DCS 00" za odabrani radio kanal.
• Za pokretanje DCS pretraživanja pritisnite tipku ili ▲ ⑨ tipku ▼ ⑥ .
Kad se jednom uspostavi prijenos na kanalu, DCS kod (ako se koristi) će biti automatski detektiran i prikazan.

Za postavljanje 'bip' signala Prijem.

13.7 CTCSS (Continuous Tone Coded Squelch System) / DCS (Digital Coded Squelch)
• CTCSS (Continuous Tone Coded Squelch System)
• DCS (Digital Coded Squelch)
DECLARATION OF CONFORMITY
We, Topcom Europe Nv, Grauwmeer 17, 3001 Heverlee, Belgium, declare that our product :
Type: Private Mobile Radio Device Model type: Silvercrest Twintalker 4810 Class of equipment: Class 1
is in compliance with the essential requirements and other relevant provisions of the R&TTE directive 1999/5/EC and carries the CE mark accordingly.
Supplementary information:
The product complies with the requirements of:
- Low Voltage Directive 2006/96/EC - EN 60950-1: 2006
- Efficient use of frequency spectrum - ETSI EN 300 296-2 V1.1.1 (2001-03)
- EMC - ETSI EN 301 489-1 V1.6.1 (2005-09) - ETSI EN 301 489-5 V1.3.1 (2002-08)
Date: 06/05/2009 Place: Heverlee, Belgium Name: Verheyden Geert Function: Technical Director

European contact: Topcom Europe Nv, R&D department, Research Park, Grauwmeer 17, 3001 Heverlee, Belgium. Tel: +32 16 398920, Fax: +32 16 398939
SILVER CREST®



- 2 INTENDED PURPOSE 5
- 3 C E M A R K 5
- 4 SAFETY INSTRUCTIONS 5
- 1 INTRODUCTION
- 2 INTENDED PURPOSE
- 3 CE MARK
- 4 SAFETY INSTRUCTIONS
- 4.1 GENERAL
- 4.2 BURNING INJURIES
- 4.3 INJURIES
- 4.4 DANGER OF EXPLOSION
- 4.5 POISONING DANGER
- 4.6 LEGAL
- 4.7 NOTES
- 5 CLEANING AND MAINTENANCE
- 6 DISPOSAL OF THE DEVICE (ENVIRONMENT)
- 7 USING A PMR DEVICE
- 8 INCLUDED IN THE PACKAGE
- 9 GETTING STARTED
- 9.1 INSTALLING/REMOVING THE BELT CLIP
- 9.2 BATTERY INSTALLATION
- 10 CHARGING THE BATTERIES
- 11 DESCRIPTION
- UP BUTTON
- ON-OFF BUTTON
- PUSH TO TALK BUTTON PTT
- 12 LCD DISPLAY INFORMATION
- 13 USING THE TWINTALKER 4810
- 13.1 TURNING THE UNIT ON/OFF
- TO TURN ON
- TO SWITCH OFF
- 13.2 BATTERY CHARGE LEVEL/LOW BATTERY INDICATION
- 13.3 ADJUSTING SPEAKER VOLUME
- 13.4 RECEIVING A SIGNAL
- 13.5 TRANSMITTING A SIGNAL
- 13.6 CHANGING CHANNELS
- 13.7 CTCSS (CONTINIOUS TONE CODED SQUELCH SYSTEM) / DCS (DIGITAL CODED SQUELCH)
- 13.7.1 CTCSS
- 13.7.2 DCS
- 13.8 MONITOR
- 13.9 VOX SELECTION
- 13.10 CHANNEL SCAN
- 13.10.1 SCANNING FOR AN ACTIVE RADIO CHANNEL
- 13.10.2 SCANNING FOR A CTCSS CODE
- 13.10.3 SCANNING FOR A DCS CODE
- 13.11 CALL TONES
- 13.11.1 SETTING THE CALL TONE
- 13.11.2 SENDING A CALL TONE
- 13.12 ROGER BEEP ON/OFF
- 13.13 KEY-TONE ON/OFF
- 13.14 DUAL CHANNEL MONITOR FUNCTION
- 13.15 BUTTON LOCK
- 13.16 STOPWATCH FUNCTION
- 13.17 DISPLAY BACK LIGHT
- 14 EARPIECE CONNECTION
- 17 SERVICE ADDRESS AND HOTLINE SUPPORT
- 18 DECLARATION OF CONFORMITY AND MANUFACTURER
- 19 WARRANTY
- 19.1 WARRANTY PERIOD
- 19.2 WARRANTY HANDLING
- 19.3 WARRANTY EXCLUSIONS
- TLAČÍTKO PUSH TO TALK PTT
- 12 INFORMACE NA LCD DISPLEJI
- ZAPNUTÍ
- 10 PUNJENJE BATERIJA
- 13.3 PODEŠAVANJE GLASNOĆE ZVUČNIKA
- 13.4 PRIMANJE SIGNALA
- 13.5 PRIJENOS SIGNALA
- 13.7 CTCSS (CONTINUOUS TONE CODED SQUELCH SYSTEM) / DCS (DIGITAL CODED SQUELCH)
- DECLARATION OF CONFORMITY
- SILVER CREST®
Brand : SILVERCREST
Model : Twintalker 4810
Category : Baby monitor