
CF-172 - Refrigerator FAGOR - Free user manual and instructions
Find the device manual for free CF-172 FAGOR in PDF.
| Product type | Food slicer |
| Brand | FAGOR |
| Model | CF-172 |
| Power supply | Mains, voltage according to rating plate |
| Power | Not specified, detachable motor |
| Cutting capacity | Adjustable thickness via thickness selector |
| Max continuous operation | 5 minutes |
| Blade material | Sharpened steel, very sharp |
| Food carriage | With sliding guide and thumb guard |
| Food pusher | Foldable, holds the food |
| Safety | Double switch (I/0 + safety), protected blade |
| Cleaning | Parts washable with sponge and mild soap, except motor |
| Motor | Detachable, clean with damp cloth, do not immerse |
| Dishwasher | Do not put parts in dishwasher |
| Repairability | Contact an approved technical service, original spare parts |
| Use | Household use only |
| Electromagnetic compatibility | Suppressed according to EMC directives |
| Storage | Slicing carriage and cord stored in base |
Frequently Asked Questions - CF-172 FAGOR
User questions about CF-172 FAGOR
0 question about this device. Answer the ones you know or ask your own.
Ask a new question about this device
Download the instructions for your Refrigerator in PDF format for free! Find your manual CF-172 - FAGOR and take your electronic device back in hand. On this page are published all the documents necessary for the use of your device. CF-172 by FAGOR.
USER MANUAL CF-172 FAGOR
- ks 小小小 L = L_i is
:
j 1 j 1 j 1 j 1 j 1 j 1 j 1 j 1 j 1 j 1 j 1 j 1 j 1 j 1 j 1 j 1 j 1 j 1 j 1 j 1
1
Lss sall aie gao, Lssll aai
10
· = 0
4.15a j0 9jio
:da
Jsc JSc 1000
11 klll aikn nn nnnn nn nnnn
aaiiiaai iie
12 k all acl al y
:
1 1
J 1
13

gai wall 1
1
yollgololl
1 1 1 1 1 1 1 1 1 1 1 1 1

4 4

a jiaaii iie 4 a jy jil gall i gai gai ic
j 1
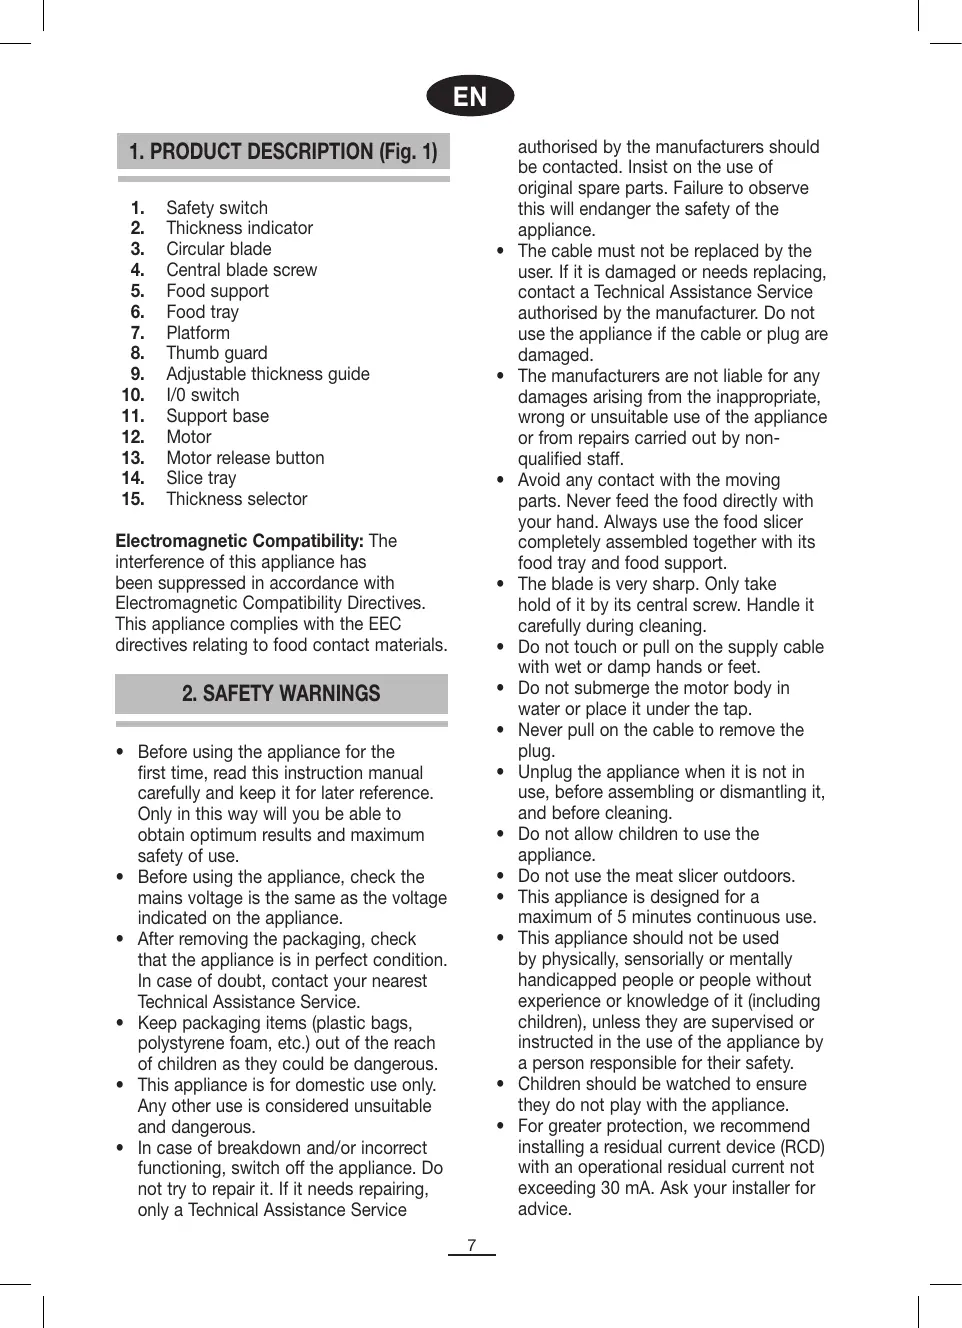
- Safety switch
- Thickness indicator
- Circular blade
- Central blade screw
- Food support
- Food tray
- Platform
- Thumb guard
- Adjustable thickness guide
- I/O switch
- Support base
- Motor
- Motor release button
- Slice tray
- Thickness selector
Electromagnetic Compatibility: The interference of this appliance has been suppressed in accordance with Electromagnetic Compatibility Directives. This appliance complies with the EEC directives relating to food contact materials.
2. SAFETY WARNINGS
- Before using the appliance for the first time, read this instruction manual carefully and keep it for later reference. Only in this way will you be able to obtain optimum results and maximum safety of use.
- Before using the appliance, check the mains voltage is the same as the voltage indicated on the appliance.
- After removing the packaging, check that the appliance is in perfect condition. In case of doubt, contact your nearest Technical Assistance Service.
- Keep packaging items (plastic bags, polystyrene foam, etc.) out of the reach of children as they could be dangerous.
- This appliance is for domestic use only. Any other use is considered unsuitable and dangerous.
- In case of breakdown and/or incorrect functioning, switch off the appliance. Do not try to repair it. If it needs repairing, only a Technical Assistance Service
authorised by the manufacturers should be contacted. Insist on the use of original spare parts. Failure to observe this will endanger the safety of the appliance.
- The cable must not be replaced by the user. If it is damaged or needs replacing, contact a Technical Assistance Service authorised by the manufacturer. Do not use the appliance if the cable or plug are damaged.
- The manufacturers are not liable for any damages arising from the inappropriate, wrong or unsuitable use of the appliance or from repairs carried out by nonqualified staff.
- Avoid any contact with the moving parts. Never feed the food directly with your hand. Always use the food slicer completely assembled together with its food tray and food support.
- The blade is very sharp. Only take hold of it by its central screw. Handle it carefully during cleaning.
- Do not touch or pull on the supply cable with wet or damp hands or feet.
- Do not submerge the motor body in water or place it under the tap.
- Never pull on the cable to remove the plug.
- Unplug the appliance when it is not in use, before assembling or dismantling it, and before cleaning.
- Do not allow children to use the appliance.
- Do not use the meat slicer outdoors.
- This appliance is designed for a maximum of 5 minutes continuous use.
- This appliance should not be used by physically, sensorially or mentally handicapped people or people without experience or knowledge of it (including children), unless they are supervised or instructed in the use of the appliance by a person responsible for their safety.
Children should be watched to ensure they do not play with the appliance. - For greater protection, we recommend installing a residual current device (RCD) with an operational residual current not exceeding 30mA . Ask your installer for advice.
3. ADJUSTMENT
- Before using the appliance for the first time, you should clean its different parts. See the "Cleaning" section.
- Place the appliance on a stable, even, dry surface.
- Remove the slice tray fixed to the inside of the base and unwind the cable (fig. 2).
- Pull out the platform and place the slice tray at the back of it, under the circular blade (fig. 3).
Fix the platform to the food tray, inserting the food tray stud in the platform groove (fig. 4). Pull the thumb guard out from the food tray and check it slides correctly along the platform.
Pull out the food support and place it on the food tray (fig. 5). - Select the desired slice thickness with the thickness selector, turning it clockwise for thicker slices and anticlockwise for thinner slices (fig. 6).
4. OPERATION
Important: Always use the food tray and the food support.
- Plug the appliance in.
- Slide the food tray towards you and place the food on it so that it is touching the adjustable thickness guide.
- Place the food support behind the food and push the food evenly against the thickness guide with one hand, keeping your thumb behind the guard. Press the I/O switch and the safety switch (fig. 7) with your other hand. The motor will only start up if both the switches are pressed.
- Slide the food tray towards the blade, then slide it back towards you. Continue sliding it carefully back and forth, keeping the food firmly pressed against the thickness guide to obtain regular-sized slices.
- When you have finished slicing, unplug the appliance. For your safety and for blade protection, turn the thickness indicator to zero to align the guide with the blade.
5. CLEANING
Unplug the food slicer.
This appliance can be totally dismantled for ease of cleaning.
Clean all parts of the food slicer except the motor, using a soft sponge and mild detergent. Rinse and dry them.
Never use metal scouring pads or abrasive detergent to clean the parts.
The food slicer motor can be removed. Use a slightly damp cloth to clean it. Do not submerge it in water or place it under the tap.
Do not wash any part of this appliance in the dishwasher.
For easy cleaning, dismantle the different parts in the order shown. Wash and dry them and then replace them in reverse order.
Dismantling the food slicer
Food tra: Slide the food support to its limit away from the blade, and then pull it upwards (fig. 8).
Circular blade: Ensure the appliance is unplugged from the mains. Turn the central blade screw anti-clockwise and carefully remove it. To assemble the blade again, align the nut studs with the housing grooves and turn it clockwise (fig. 9).
Motor: Ensure the appliance is unplugged from the mains. Press the button to release the motor and take it out of its housing. To assemble it again, first fit the top part of the motor into its housing and then the bottom part (fig. 10).
Note: the circular blade must first be removed in order for the motor to be moved in or out of its housing.
Thickness guide: With the blade removed, turn the thickness selector anti-clockwise until the guide comes out of its housing (fig. 11). To replace it again, fit the guide into its grooves and gently press it while turning the thickness selector clockwise (fig. 12).
Platform: Fold up the platform. Pull it upwards, firstly by one of its sides, then by the other. To put it back in place again, insert the studs on one side first, and then those on the other side (fig. 13).
6. STORAGE
Align the thickness guide with the blade. Fold up the platform. Wind the cable into the compartment on the base of the food slicer and place the slice tray over it. The food tray and food support can also be folded up to occupy less storage space.
7. INFORMATION FOR THE CORRECT DISPOSAL OF ELECTRICAL AND ELECTRONIC APPLIANCES

At the end of its working life, the product must not be disposed of as urban waste. It must be taken to a special local authority differentiated waste collection centre or to a
dealer providing this service. Disposing of a household appliance separately avoids possible negative consequences for the environment and health deriving from inappropriate disposal and enables the constituent materials to be recovered to obtain significant savings in energy and resources.
To remind you that you must collaborate with a selective collection scheme, the symbol shown appears on the product warning you not to dispose of it in traditional refuse containers.
For further information, contact your local authority or the shop where you bought the product.
1.DESCRIPTION DU PRODUIT (Fig.1)
2. MEPbI INPEIOCTOPOXKHOCTN
PaHbIe Yem IcNoJIb3OBAt b 3ToT pIn6Op BnepBbIe, IpOuHTaIte BHIMaTeJIbHO 3Tu INHCTpyKUIO u COxpaHNTe ee dJa NocLeNyUoUxK OHcyJIbTaU.
PaHbIe Yem IcNIOJIb3OBAbT 3OT Tnp6Op npOBepTe COOTBeTcByET JIN HApJxKeHne cETn HApJxKeHnU yKa3aHHOMy Ha 3TOM annapate.
- Pocne pacnakOBKn annapaTa, y6eHntEcB
-TO OH HAXOINTC B OTJNUHOM COCTOHNI,
-BCJYuec COMHeHNI ObpaTNTEcB
-6JIIXKaIyUo MaCTepCKyUo IPOpeMOHTy
-ITexHHueckOMy OcCJyKJBAHIO
-aHaJIoNHybIX yCTpOiCTB.
3IeMeHTbI ynaKOBKn (PiactMaccOBbie KynbkN, NeHONJaCT N.T.D.) He DoJIxHbIX XpaHITcB MecTax DoCTyHbIX DnI DeTei, TAK KaK OHN - ICTOUYHKn ONaCHOCTN.
- 3TOT annapa TOnJKeH NcNoIb3OBAbTaCToJIbKO DnI DAOMaUHeRo NOpIb3OBAHnIa.
JIIO6oeIpyroeeroICNOJb3OBAHne 6ydet He aJeKBaTHbIM IN ONaChbIM.
Bcnyae HncnpabHocTn IINIIOXo npa60bI aannapata, BbIKJIOHTe Ipnp6Op n He NbTaIteCb OTpeMOHTnpoBaTb erO camocToTeJbHO. B cnyae Heo6xOIMOCTo pemOnTa 6paTInTeCb B TexHueckn IyKT PemOnTa 3JIeKTPnuecknx Ipn6bpOB, peKomeHIOBaHHbI Φa6pNkaHtOM n Tpe6yIteOT Hero 3aMeHy HncnpaBBbx DeTanei Ha opRHaJIbHbIe. He BblONJIHra 3TNX Tpe6oBaHn, Bbl He rapaHTnpyeTe 6e30NaChyU pa60Tu annapata.
- Пллььзовать He может проньдь 3амени злесческого Кабеля.Есион Ненригорен И наю erо заменьобразпесьВ Тхнчески Руков佩монта Злесчески пиборов,pekomehidobahньФабриканTom.Нльзутесь annapaTom y KOTOPORO Kaebь Или ЗлесческаяЛЯЮТСА NOВржДeнhhimN.
Φa6pNKaHT He Hcct OTBeTCBHeHOCtN 3a HeNCpPaBHocTn BO3HKnLne N3-3a HeNpaBnIbHOro IOnIb3OBAHnA aIIpaTOM NTOJa KOrJa eROpemOH BbIPOJIHeH He KBaINΦuCIPOBaHHbIMN JInCaMn.
- He donyckaTb KocanHn DInkxuyxcn deTaJe annapata. HnkOrda BpyHyu He BKlaDbBaTb npOdyKtbl NOJ HOX annapata.. Bcerda nCnoIb3oBaTb pnp6p dny pe3Kn B noJIHOCTbIO CO6paHHOM COCTOHN N IMeHOUeTo NoDHOC dNl PPOdyKTOB IN 3aUnTHbIX YCTPoINCTB.
Hox - ouheb ocTpo oToouen. Heo6xOIMo 6paTbcra TOnbko 3a ero ueHTpaJIbHbI 6oNT. Co6IIHOJaTe oc6byIO octopoxHocTb npn erO yNCTKe.
He npikacaTbca MOKpbIMN INI BIAxKhbIMnyKaMn HOrAmN K 3JIeKTPnueCeKOMy UHpy.
He noprpykaTb 3JIeKTpmoTOp B BOy u He paCnOJIoRaTb eRo IIOBDOIpPOBOHbIM KpaHOM.
-ДЯ BытackиBaHЯ эЛКТрОВИКИ N3 CETN, HNKOrJa He DepraTb 3a UHyp.
- OTKIIOUHTe npi6op, ecHne He 6yIeTe IM N0JIb3OBAtBcA, a TAK JKe paHbIe Yem erO CO6nPaTb -pa36apatb ININ YIcNTtB.
He pa3peaIte DeTm IOnb3OBAtbcAnnapaTOM.
He nCnoJIb3yIte aannapaT ha OTKpbITOM B03dyxe.
- 3TOT npnbop cnpoeKtnpOBaH nIy peXIma HnpepbBbHO pa60bI He npebbiuaIOuei5 MNHyT.
3TOT annapaT He npeHa3NaueHДЯ NCNoIb3OBaHnJIuCaMn COrpaHueHHbIMN DBIrTaTeJIbHbIMN JINYMCTBeHHbIMN CIOOC6HOCTaMn (B TOMUcCne DeTbMn), a TaKKe JInzAMn, He IMeOUIIMN COOTBeTCTBYUOnx 3HaHnIN OInbTa. Pa3pe7aetcnoJIb3OBaTbcra annapaTOM ToJbKO IOd Ha6JIIODeHHeM NINpykoBOIDCTBOM JInca, OTBeTCTBeHHORo 3aero 6e3OJaCHOe pImeHHeNe. - DeTAM 3aIpeUaetcraIrpTa b cAnnapaTOM.
Для NOвьшеня CTeнeни 6e3oNaChOcTn ИспОльзованя пибopa peKOMeHnyeTc Установka усточТВа 3aUПТHorO OTКЛЮченя (Y30) ДЯг сиbli TOKA, He превышалошу 30 mA. BocpoьзуTecb рп ЗTom COBETOM MOHTaЖнika.
3.ПОДГOTOBKAКПОЛьЗOBAHИО
IpejJe Yem IcnoJb30BaTb aannapat BnepBbIe, Heo6XoIMO OuCTNTb BCE JeTaJIN erO coCTOBJHOJIne. CMOTPte pa3dJI «YncTka».
- YctaHOBIne annapaT ha yCToYnBOI, poBHOn I cyXOn IOBepXHocTN.
- Ocbo6oJnte IopHoc IJIa Hape3Kn 15, KOtOpaI haoJntcB O BVHTpeHHHeYacTn OCHOBaHnI 11 npackpyTnte shHyp (Pnc.2).
- PackpoTe PnAToPm7 N yctaHOBnTe Ha ee HnXHHIO YacTb NpOHoc nIy Hape3Kn 15, NpO KpyrIbI HoK 3 (pnc.4).
3aKpeHnTe Ha nIaTfOpMy 7 noJHoc nIpyoNDyKTOB 6, BCTaBbBcBOI uTnΦB npope3b nIaTfOpMbI 7 (pnc.4).Pa3BepHnTe nIIOHOca npOdyKTOB 63auNTy 6oJIbWoTo naIbza pykn 8 nIpoBepbTe ee cKoJIbXKeHne IIO nIaTfOpMe.
- PackpoIte DepeKataIb IpoDyKTOB 5 n yctaHOBnTe erO Ha IpoHoc IJIЯ IpoDyKTOB (pnc.5).
- BbIbIpyTe TOnLIuHny Hape3Kn c NOMOuBOp yUKN 15, NOBOpaunBaJ ee No YacBOi CTpeJIke dJa yBeJIuYeHnE ToLIuHbI Hape3Kn I IpOTNb -ДЯ yMeHbIeHnE ToLIuHbI (pnc.6).
4.PABOTA
BHHMaHHe: IOnb3yIteCb BcERda noDnOcOM dI pyoDyKToB n depKaTeJeM npOdyKToB.
BknHouTe annapaT B 3neKtpocetb.
ПоДВинБтЕ ПОДнOC 6 ДЯ ПОДуКТOB 6ДИЖе K СЕБ И ПОДжNTe Ha HeRo ПОДуKT (KOTOpBiy XOTNTE Nope3aTb), TaKIM OБразOM,чTOбI ПОДуKT 6БЛВ K OKТаКTe C ПОДвИЖНо HANpaBJIЯHоцЕ TOnIuINHbI 9.
-Держател'mпордктов5приджьа'te\
пордкт 3a erо 3адию ча'tь и однοу\
pyкол пржмiteпордкт К hapраьноцей\
Толшны 9,дерka 6obшои палец\
pykn c3adn 3auntb 8.И друго руко\
наржмite на Вьклочать 10иВклоча\
Бьклочать 6ezoanachoctn 1(pnc.7).\
Motop зapавет Только в сflyа, ecn\
Два Вьклочателя (1и10) 6bydUT haЖаты.
CdbnraTe npHoc nI npOyKTOB B HnpaBJIeHne KHOxy. ChOba CdbNbTe npHoc 6JInke K ce6e N TaK HeCKoJIbKO pa3, c octopoxKHOCTbIO. CoXpaHЯTe npOyKT npIXKaTbIM K HnpaBJIHOUe TOnLIINbI, YTo6bl IOnyHTb JOMTNk paHO3NaHNoI TOJIuINbI.
Korda3aKoHHTe Hape3ky,OTKIOHHTe annapaT OCTn.ДЯ63Opanachocntu 3aUHTbI HOXA,NoCTaBbTe Ha «0» INHdNKATOP TOJIUNHBI 2.
5. UNCTKA
OTKIOHHTe annapaT ot cETN.
3TOT annapat nOHHCTbU pa3bpaetcIy IyIO6CTBa YnCTKn.
3a NCKIOUChEHNEM 3NEKTPo DVBraTeJIa
3a NCKIOUChEHNEM 3NEKTPo DVBraTeJIa,
OuICTne BCE DeTALn annapata, NcNOJb3yM
mRkyo ry6Ky u Cna6bI MOUoi pacTBOP.
BbITPte N pOcyuHtene TAEJIi.
HnKOrJa He NcNoJb3yIte MetaIIINueckne
UeTKn, HN MoUOne Oba3NBhIe BeIecCTBa
dIy MoKN dTeJIeI.
Motop-cBeMHbI.ДЯ erO yNCTKn,
NCNoJb3yTe CJIerKa BnaxHyTO TKAHb. He
NporpykaIte MOTop B BodY, He NOMEuaIte e
Iod KpaH C BOIo.
DeTANI 3TOrO aannapata HNOKDrA He KlaIIT
NocyDOMoeHuO MaunHy.
Дяболгдякчспку,在брпспспьогачacntи,ВОИСССнHOMПордк.Почстinte nIX,BbICyшInteиCHOBAnxCMOHTupyNTe B O6paTHOMPордкpe p36bpkn annapaTa.
Pa360pka.
IopHoc Ipy npOyKToB: CdbnHbTe
IepKaTeJI npOyKToB Do yNopa BCTOpOHy
IpoTbONIOJXHyIO HOxU N BblepHNTe
IepKaTeJI BBex (pnc.8).
KpynlbHnOx. Korda annapaT otKJIOueH ot CTn,OTKpyTInTe CEHTpaIbHbB BVNT HOxA B HApBaJIeHne IPOITIB YacOBoi CTpeIKN i OCTOpOXHO BItaUInTe HOX.IIra C6OpKn COBMeCTInTE BbICTyIb Ha raiKe C nPoPe3rMn HA MeCeYCTaHOBKn IOBepHInTe HOX NoacOBoi CTpeIKe (pnc.9).
3NeKtpo Motop. PnO tKJIuHcEHOM OT cETn annapaTe, HadaBnte Ha KhoNky 13 (pnc.1) Дя pa36JIoKIpOBKn 3IKNTp O BnrgaTeTЯ n BbTaUInTe erO n3 erO HnUn.Дя moTHaKa Ha CBOE MecTo ChauAna BCTaBbTe erO BbIPXHHO YacTb N IOTOM-HNXHIO (pnc.10).
BHHMaHHe! Pn CHaTmN MoHTaKe 3JIeKTpOMToPA CpKUJIrpHbI HOX DOJXeH 6bITb CHaTbIM.
HanpaBlyoouaToIuINbI. PnCHrTOM HOKe, NOBepHInTe pyKU yCTaHOBKn TOJIuINbI npTnB YacBOwC tpeIKN Do TEx nop Noka HapBaJIHOuAa He CHmEeTbcra (Pnc.11). IJe ee MoHTaKa, BCTaBe THe HApBaJIHOuYb BCBoN Pa3bI, CNo6 HoXKMnTe Ha Hee IN NobopauBaIte pyKU yCTaHOBKn ToJIuINbI No YacBOw CtpeJIke (Pnc.12).
Платформа.СложкITE ee,notOM notянITEКВерху санаюзOAДИн gee KOHeUи NOTOM-3aДругов.ДлЯ установкиHaMeCTO,yCTaHOBNTeСанаюеeeBbICTyblC OДНОCTOPOHbI,3aTeM-cdpyroi(pnc.13).
6. XPAHEHNE
CoBmecTne HappaBJIIOUHIO TOJIUINHbI C HOXOM.
CNoKNTe PnAToPOpMy.CkpyTne 3NeKtpoShyH Ra MeCTO NOD OBOUpe3KN UYCTaHOBNTe HApkpbI B ETOPODHOC IJRA Hape3KN. POnHoc DnI PNOyKTOB IN IX DEpXaTeJIb TOKe MoXHo CNoKNTb, YTObI OHN 3aHIMaII MHeBJe MecTa.
7. INΦOPMAÇU O IPIPABUNbHOY UTHJIM3AUÇM NJEKTPNUECKNX N 3JEKTPOHHbIX PIPB6POBO

Iocne oKoHuaHn cpoKa CnyXbI, DaHHbI pIn6Op He DOnJKeH yTININ3uPoBaTbc8 BMeCTe CbITOBbIM OTXdAMN. OH MoKeT 6bITb IpeDaH B CneUaJIbHbIe CEHTPbI DnΦΦepeHcUPOBaHHOrO
c6opaOTXoOB,HaxOJaIeCEBBeIDOMCTBE MyHnIaJIbHbIX BnACTe,INIaREHTaM, pa6oTaIOzIMB DaHHoCfpeye yCnyr. Pa3JeIbHaYtINJN3aZIg 6bITobix 3NEKTPoPnIP6OBPOB IO3BOJRAET N36EkaT B03MOXHbIX HeRaTNIBHbIX POCNeDCTBNI DnIg OKyJxAIOUe CpeDbI N3DOPOBBa JIODei,KOTOpbIe MOrYT IMeT MeCTO BCNeIcCTBnE HnIPaBnJIbHO YtINJN3aZIu,a TaKKe IIO3BOJLAE TOBTOH NOCPONBJ3OBA Tb MaTePnaJIb,BXODJUeB E COCTAB 3TNX np6OBpOB,NIOBtCBs,TAkIM O6pa3OM, CyueCTBeHNHO 3KOHOOMN 3HeRPM IN pecypcoB. UTo6blNoDyepKHyTB Heo6xoDImocTb pa3JeBHOYtINJN3aZIu,Ha DaHHOM pnp6ope HaHeceH 3NaK,PpeDyIpexKaIOUoO 3AnPeTe NCNOJB3OBAHN TpaDNIOHHbIX MycOpHBIX KOHTeHepOB. DnIpoLyueHn8 6Olee NoDpOboHoi INHΦopMaIcn CBxJNTECb C MeCTNbIM oprAhOM Bnactn INIcMarazIHOM,rDe Bbl npno6peNi daHHbI npOdyKT.
1 5
| ### | 1 |
| ### | 2 |
| ### | 3 |
| ### | 4 |
| ### | 5 |
| ### | 6 |
| ### | 7 |
| ### | 8 |
| ### | 9 |
| 0.1 | 10 |
| ### | 11 |
| ### | 12 |
| ### | 13 |
| ### | 14 |
| ### | 15 |
aayblal aaiall jyai yjgl 1s: ayablaal aaiall
auii
| JLALLI GOLI S# Lai# o## J#L#LLAL #Lai# W! J#is JLALLI B #A l S# ## Lai# A## jall y## ## ##l #ll# S# J#ll #J#ll J#LAI W! J#is J#JI#ALL J#ILL #S# J#LLAL #LAI W! J#is J#LL# C# ## ## #ill #J#ll #B# |
| JLALL A## J#LLAL #A## ## ## ## ## ## ## ## ## ## ## ## ## ## ## ## ## ## ## ## ## ## ## ## ## ## ## ## ## ## ## ## ## ## ## ## ## ## ## ## ## ## ## ## ## ## ## ## ## ## ## ## ## ## ## ## ## ## ## ## ## ## ## ## ## ## ## ## ## ## ## ## ## ## ## ## ## ## ## ## ## ## ## ## ## ## ## ## ## ## ## ## ## ## ## ## ## ## ## ## ## # # # # # # # # # # # # # # # # # # # # # # # # # # # # # # # # # # # # # # # # # # # # # # # # # # # # # # # # # # # # # # # # # # # # # # # # # # # # # # # # # # # # # # # # # # # # # # # # # # # # # J#LI# ALL J#LL I# J#ll #J#ll #J#ll #J#ll #J#ll #J#ll #J#ll #J#ll #J#ll #J#ll #J#ll #J#ll #J#ll #J#ll #J#ll #J#ll #J#ll #J#ll #J#ll #J#ll #J#ll #J#ll #J#ll #J#ll #J#ll #J#ll # J#ll #J#ll #J#ll #J#ll #J#ll #J#ll #J#ll #J#ll #J#ll #J#ll #J#ll #J#ll #J#ll #J#ll #J#ll #J#ll #J#ll #J#ll #J#ll #J#ll #J#ll #J#ll #J#ll #J#ll #J#ll # J#LI# ALL J#LL A## J#LLAL #J#ll #J#ll #J#ll #J#ll #J#ll #J#ll #J#ll #J#ll #J#ll #J#ll #J#ll #J#ll #J#ll #J#ll #J#ll #J#ll #J#ll #J#ll #J#ll #J#ll #J#ll #J#ll #J#ll #J#ll #J#ell #J#ell #J#ell #J#ell #J#ell #J#ell #J#ell #J#ell #J#ell #J#ell #J#ell #J#ell #J#ell #J#ell #J#ell #J#ell #J#ell #J#ell #J#ell #J#ell #J#ell #J#ell #J#ell #J#ell #J#ell #J#ll #J#ell #J#ell #J#ell #J#ell #J#ell #J#ell #J#ell #J#ell #J#ell #J#ell #J#ell #J#ell #J#ell #J#ell #J#ell #J#ell #J#ell #J#ell #J#ell #J#ell #J#ell #J#ell #J#ell #J#ll #J#ll #J#ell #J#ell #J#ell #J#ell #J#ell #J#ell #J#ell #J#ell #J#ell #J#ell #J#ell #J#ell #J#ell #J#ell #J#ell #J#ell #J#ell #J#ell #J#ell #J#ell #J#ell #J#ell #J#ll #J#ell #J#ll #J#ell #J#ell #J#ell #J#ell #J#ell #J#ell #J#ell #J#ell #J#ell #J#ell #J#ell #J#ell #J#ell #J#ell #J#ell #J#ell #J#ell #J#ell #J#ell #J#ell #J#ell #J#ell #J#ll #J#ll #J#ll #J#ell #J#ell #J#ell #J#ell #J#ell #J#ell #J#ell #J#ell #J#ell #J#ell #J#ell #J#ell #J#ell #J#ell #J#ell #J#ell #J#ell #J#ell #J#ell #J#ell #J#ell #J#ll #J#ell #J#ell #J#ll #J#ell #J#ell #J#ell #J#ell #J#ell #J#ell #J#ell #J#ell #J#ell #J#ell #J#ell #J#ell #J#ell #J#ell #J#ell #J#ell #J#ell #J#ell #J#ell #J#ell #J#ell #J#ll #J#ell #J#ll #J#ll #J#ell #J#ell #J#ell #J#ell #J#ell #J#ell #J#ell #J#ell #J#ell #J#ell #J#ell #J#ell #J#ell #J#ell #J#ell #J#ell #J#ell #J#ell #J#ell #J#ell #J#ell #J#ll #J#ll #J#ell #J#ll #J#ell #J#ell #J#ell #J#ell #J#ell #J#ell #J#ell #J#ell #J#ell #J#ell #J#ell #J#ell #J#ell #J#ell #J#ell #J#ell #J#ell #J#ell #J#ell #J#ell #J#ell #J#ll #J#ll #J#ll #J#ll #J#ll #J#ll #J#ll #J#ll #J#ll #J#ll #J#ll #J#ll #J#ll #J#ll #J#ll #J#ll #J#ll #J#ll #J#ll #J#ll #J#ll #J#ll #J#ll #J#ll #J#ill #J#ll #J#ll #J#ll #J#ll #J#ll #J#ll #J#ll #J#ll #J#ll #J#ll #J#ll #J#ll #J#ll #J#ll #J#ll #J#ll #J#ll #J#ll #J#ll #J#ll #J#ll #J#ll #J#ll #J#ll #J#all #J#all #J#all #J#all #J#all #J#all #J#all #J#all #J#all #J#all #J#all #J#all #J#all #J#all #J#all #J#all #J#all #J#all #J#all #J#all #J#all #J#all #J#all #J#all #J#all #J#ll #J#all #J#all #J#all #J#all #J#all #J#all #J#all #J#all #J#all #J#all #J#all #J#all #J#all #J#all #J#all #J#all #J#all #J#all #J#all #J#all #J#all #J#all #J#all #J#ll #J#ll #J#ll #J#ll #J#ll #J#ll #J#ll #J#ll #J#ll #J#ll #J#ll #J#ll #J#ll #J#ll #J#ll #J#ll #J#ll #J#ll #J#ll #J#ll #J#ll #J#ll #J#ll #J#ll #J#LL #J#LL #J#LL #J#LL #J#LL #J#LL #J#LL #J#LL #J#LL #J#LL #J#LL #J#LL #J#LL #J#LL #J#LL #J#LL #J#LL #J#LL #J#LL #J#LL #J#LL #J#LL #J#LL #J#LL #J#LL #J# LL #J#LL #J#LL #J#LL #J#LL #J#LL #J#LL #J#LL #J#LL #J#LL #J#LL #J#LL #J#LL #J#LL #J#LL #J#LL #J#LL #J#LL #J#LL #J#LL #J#LL #J#LL #J#LL #J#LL #J#LL #J#ll #J#LL #J#LL #J#LL #J#LL #J#LL #J#LL #J#LL #J#LL #J#LL #J#LL #J#LL #J#LL #J#LL #J#LL #J#LL #J#LL #J#LL #J#LL #J#LL #J#LL #J#LL #J#LL #J#LL #J# LL #J# LL #J# LL #J# LL #J# LL #J# LL #J# LL #J# LL #J# LL #J# LL #J# LL #J# LL #J# LL #J# LL #J# LL #J# LL #J# LL #J# LL #J# LL #J# LL #J# LL #J# LL #J# LL #J# LL #J# LL #J#LL #J# LL #J# LL #J# LL #J# LL #J# LL #J# LL #J# LL #J# LL #J# LL #J# LL #J# LL #J# LL #J# LL #J# LL #J# LL #J# LL #J# LL #J# LL #J# LL #J# LL #J# LL #J# LL #J# LL #J#LL #J#LL #J#LL #J#LL #J#LL #J#LL #J#LL #J#LL #J#LL #J#LL #J#LL #J#LL #J#LL #J#LL #J#LL #J#LL #J#LL #J#LL #J#LL #J#LL #J#LL #J#LL #J#LL #J# LL #J# LLC #J#LL #J#LL #J#LL #J#LL #J#LL #J#LL #J#LL #J#LL #J#LL #J#LL #J#LL #J#LL #J#LL #J#LL #J#LL #J#LL #J#LL #J#LL #J#LL #J#LL #J#LL #J#LL #J#LL #J#LL #J# LLC #J#LL #J#LL #J#LL #J#LL #J#LL #J#LL #J#LL #J#LL #J#LL #J#LL #J#LL #J#LL #J#LL #J#LL #J#LL #J#LL #J#LL #J#LL #J#LL #J#LL #J#LL #J#LL #J#LL #J# LL #J# CC |
y
A1111111
1.0 jll bbl all bla all 1
j 7 k j
abwglg lll g
a ball all wll ay wlll ball 1 a ball o
i
0
- SAFETY WARNINGS
- ADJUSTMENT
- OPERATION
- Important: Always use the food tray and the food support.
- CLEANING
- Dismantling the food slicer
- STORAGE
- INFORMATION FOR THE CORRECT DISPOSAL OF ELECTRICAL AND ELECTRONIC APPLIANCES
- 1.DESCRIPTION DU PRODUIT (Fig.1)
- MEPbI INPEIOCTOPOXKHOCTN
- 3.ПОДГOTOBKAКПОЛьЗOBAHИО
- 4.PABOTA
- BHHMaHHe: IOnb3yIteCb BcERda noDnOcOM dI pyoDyKToB n depKaTeJeM npOdyKToB.
- UNCTKA
- Pa360pka.
- XPAHEHNE
- INΦOPMAÇU O IPIPABUNbHOY UTHJIM3AUÇM NJEKTPNUECKNX N 3JEKTPOHHbIX PIPB6POBO
- 5
- auii
Brand : FAGOR
Model : CF-172
Category : Refrigerator