
GV-20 - Digital Camera CASIO - Free user manual and instructions
Find the device manual for free GV-20 CASIO in PDF.

| Product type | Compact digital camera |
| Brand | CASIO |
| Model | GV-20 |
| Sensor resolution | 2 megapixels (2.14 million pixels) |
| Sensor type | CCD |
| Lens | Fixed (fixed focal length) |
| Zoom | Digital |
| Screen | Built-in color monitor |
| Water resistance | Yes, IP66/IP67 (immersion up to 1 meter for 30 minutes) |
| Dust resistance | Yes |
| Shock resistance | Yes (G-SHOCK technology) |
| Shooting modes | Single, Burst, Self-timer, Video, Best Shot |
| Built-in flash | Yes |
| Storage media | CompactFlash memory card (CF Type I) |
| Power supply | 4 AA batteries (alkaline, lithium, Ni-MH) or optional AC adapter |
| Battery life (alkaline) | Approximately 130 minutes / 650 photos (continuous recording) |
| Connectivity | Mini USB port, video output (optional cable) |
| Special features | PC Camera mode, DPOF, PRINT Image Matching |
| Included software | Photo Loader 2, Photohands |
| Operating temperature | 0°C to 40°C |
| Cleaning and maintenance | Wash with clean water after exposure to sand or seawater; check O-rings regularly; replace O-rings every 2 years |
| Safety | Do not use underwater; do not open covers when water is present; avoid pointing the flash at eyes |
| Spare parts and repairability | O-rings replaceable by CASIO authorized service center; battery and AC adapter optional |
Frequently Asked Questions - GV-20 CASIO
User questions about GV-20 CASIO
0 question about this device. Answer the ones you know or ask your own.
Ask a new question about this device
Download the instructions for your Digital Camera in PDF format for free! Find your manual GV-20 - CASIO and take your electronic device back in hand. On this page are published all the documents necessary for the use of your device. GV-20 by CASIO.
USER MANUAL GV-20 CASIO
Thank you for purchasing this CASIO compact type digital camera with built-in color monitor you can use for both image recording and playback. Before using this camera, be sure to read the Safety Precautions contained in this User's Guide, and keep it in a safe place for future reference.
CASIO
INTRODUCTION
Unpacking
Check to make sure that all of the items shown below are included with your camera. If something is missing, contact your dealer as soon as possible.
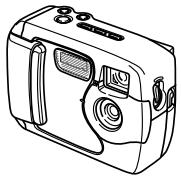
Camera
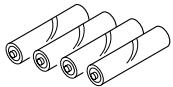
Alkaline batteries (4 AA-size batteries)
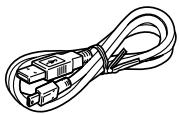
USB cable

Memory card (8 MB CompactFlash card )
Loaded in the camera when you purchase it.
Strap

Lens cap/cap holder

CD-ROM
Basic Reference
(Spanish, German, Portuguese, Chinese, Arabic)

User's Guide (English)


Bundled Software User's Manual
Contents
2 INTRODUCTION
Unpacking 2
Quick Reference 6
Getting Ready 6
Recording an Image 7
Playback 8
9
Features 11
Water Resistance and Dust Resistance 12
Operating Environment 13
Operating Precautions 13
Wipe the camera dry after it becomes wet. 14
Location Precautions 14
General Precautions 15
Inspecting the Cover O-rings 16
If you find dirt on an O-ring... 16
Before putting your camera away after using it... 17
Precautions 18
General Precautions 18
Data Error Precautions 19
Operating conditions 19
Condensation 20
About the camera's backlight... 20
Lens Precautions 20
22 GETTING ACQUAINTED
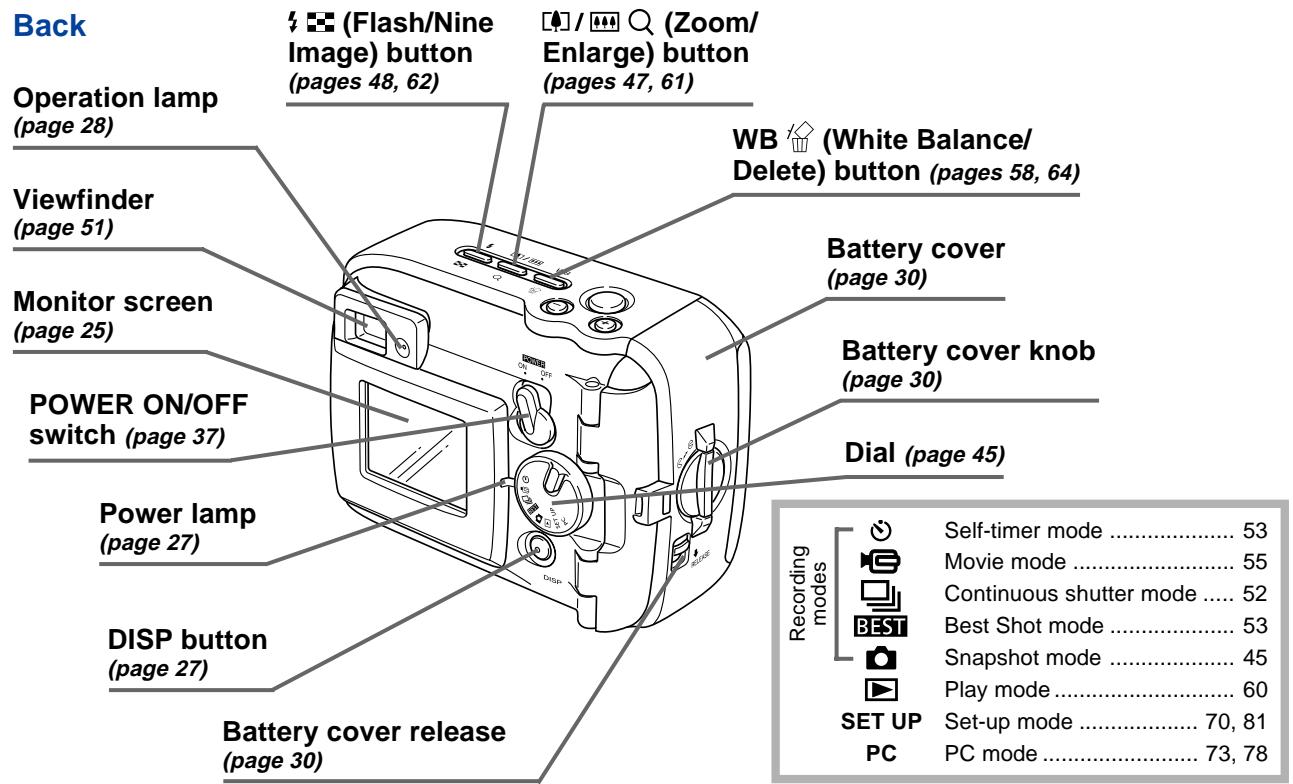
General Guide 22
Front 22
Back 23
Terminals and Ports 24
Bottom 24
Monitor Screen Indicators 25
Changing the Contents of the Monitor Screen 27
Indicator Lamps 27
Using the Bundled Accessories 28
Attaching the Strap 28
Attaching the Lens Cap 29
Power Requirements 30
Loading Batteries 30
Battery Handling Precautions 34
Low Battery Indicator 34
Using AC Power 35
Turning the Camera On and Off 37
Power Save Settings 37
Memory Cards 38
Inserting a Memory Card into the Camera 38
Removing a Memory Card from the Camera 39
41
Memory Card Precautions 42
Setting the Current Date and Time 42
Setting the Date and Time 43
Selecting the Date Format 44
INTRODUCTION
45 RECORDING IMAGES
Recording a Simple Snapshot 45
About the REC Mode Monitor Screen 46
Recording Precautions 46
Image Recording when Batteries are Low 47
Using Zoom 47
Using the Flash 48
Flash Status Indicators 49
Precautions when Using Flash 49
Recording Macro Images 50
Using the Optical Viewfinder 51
Recording Consecutive Images
(Continuous Shutter Mode) 52
Recording with the self-timer 53
Recording an Image Using a
Best Shot Mode Scene 53
Recording a Movie (Movie Mode) 55
Specifying Image Size and Quality 56
Exposure Compensation 57
Selecting White Balance 58
61 PLAYBACK
BasicPlaybackOperation 60
Playing a Movie 61
Enlarging the Playback Image 61
Displaying the 9-image View 62
Selecting a Specific Image in the 9-image View 63
65 DELETING IMAGES
Deleting the Displayed Image 64
Deleting All Images 65
67 MANAGING IMAGES
Folders and Files 66
66
Files 66
DPOF 67
To configure printing for a particular image 67
To print all images 68
PRINT Image Matching 69
INTRODUCTION
71 OTHER SETTINGS
Changing the Display Language 70
Turning the Confirmation Beep On and Off 70
Specifying the Opening Screen 71
Selecting the USB Mode 71
73 CONNECTING TO EXTERNAL EQUIPMENT
Transferring Images to a Computer 73
USB Connection 73
To connect to a computer 73
Disconnecting the USB Cable 75
Using a Memory Card to Transfer Image Data 75
Memory Card Data 76
DCF Protocol 76
Memory Card File Structure 77
Image Files Supported by the Camera 77
Precautions when Using a Memory Card on a
Computer 77
Using the Camera as a PC Camera 78
To connect to a computer 78
Other Requirements 79
PC Camera Mode Precautions 80
82 REFERENCE
SETUP Menu 81
Troubleshooting 82
Messages 85
Specifications 87
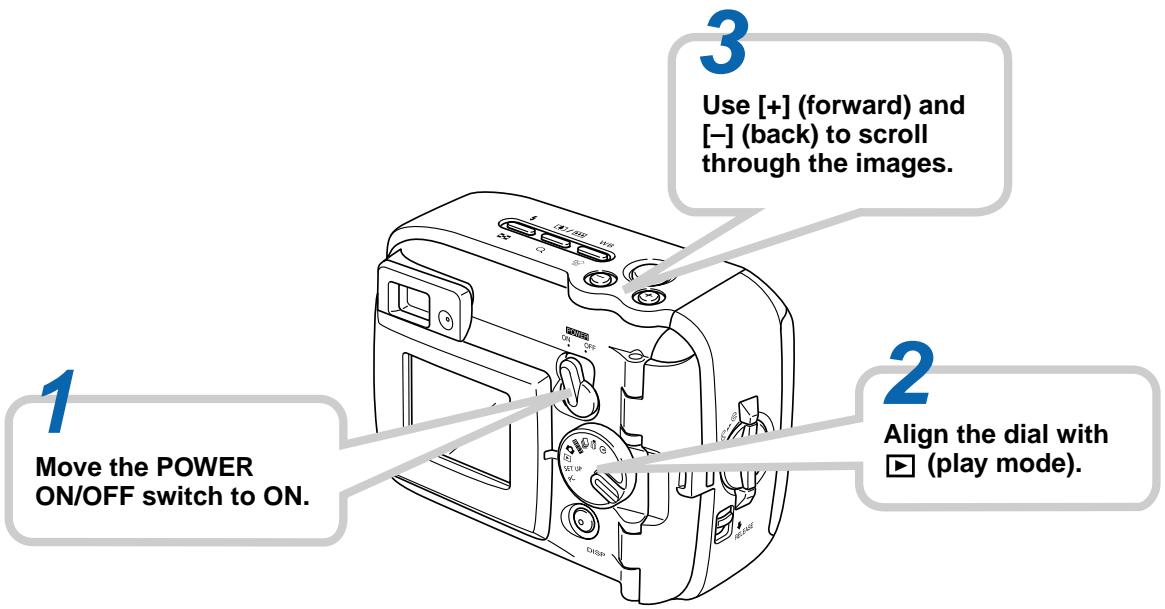
Quick Reference
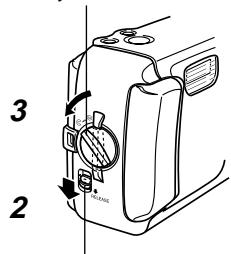
Getting Ready
1
Load batteries and the memory card.
(pages 30, 38)
1

2
3

4
5
6
- Check for and wipe any sand, dirt, or other foreign matter from the O-ring and its contact surfaces.
2
Set the current time and date.
(page 42)
Recording an Image (page 45)
3
Point the camera at the subject and use the monitor screen or optical viewfinder to compose the image.
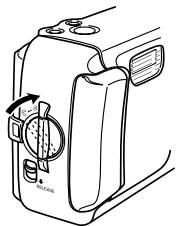
2
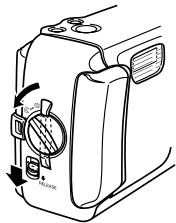
Align the dial with (snapshot mode).

4
Press the shutter release button.
1
Move the POWER ON/OFF switch to ON.
Playback (page 60)
Deleting Images (page 64)
3
Use [+] and [-] to display the image you want to delete.
5
Check to make sure you really want to delete the currently displayed image.
If you want to cancel the procedure, press DISP.
4
Press WB

6
Press the shutter release button to delete the image.
2
Align the dial with (play mode).
1
Move the POWER ON/OFF switch to ON.
INTRODUCTION
IMPORTANT!
- The contents of this manual are subject to change without notice.
- CASIO COMPUTER CO., LTD. assumes no responsibility for any damage or loss resulting from the use of this manual.
- CASIO COMPUTER CO., LTD. assumes no responsibility for any loss or claims by third parties which may arise through the use of the GV-20.
- CASIO COMPUTER CO., LTD. assumes no responsibility for any damage or loss caused by deletion of data as a result of malfunction, repairs, or battery replacement. Be sure to back up all important data on other media to protect against its loss.
- This digital camera makes it possible for you to record images for your own personal use. Never use it in a way that infringes upon the copyrights or other rights of others.
- Windows, Internet Explorer, and DirectX are registered trademarks of Microsoft Corporation.
- Macintosh is a registered trademark of Apple Computer, Inc.
- CompactFlash™ and logo are registered trademarks of SanDisk Corporation.
- The USB driver (mass storage) uses Phoenix Technologies Ltd. software.
Compatibility Software Copyright © 1997
Phoenix Technologies Ltd., All Rights Reserved.
- Other company, product and service names used herein may also be trademarks or service marks of others.
INTRODUCTION
Features
Water-resistant and dust-resistant
Your camera conforms to IEC 60529 [Degrees of protection provided by enclosures (IP Code)] IP66/IP67.
This means you can take the camera along just about anywhere, without needing to worry about it getting wet. In addition, the design of your camera is also shuts out sand, dust, and dirt.
- Tough, shock-resistant construction
G-SHOCK technology has been used to create one of the toughest cameras ever. Your new digital camera represents an exciting new development in the evolution of digital imaging.
Best Shot
The Best Shot feature includes new sample scenes that include ski and sea images. Simply select the sample scene that matches the type of image you are trying to record and the camera sets up automatically for beautiful pictures every time.
- 2-megapixel CCD
The 2-megapixel CCD (2.14 million total pixels) not only provides high resolution, it creates images that suited for easy editing and handing on a PC.
- Fixed focus lens for quick operation
Fixed focus eliminates the need for lens movement, which shortens startup time and shooting time. Zoom operations are performed digitally.
- Continuous Shutter and Movie Modes
A high-speed continuous shutter mode provides stop-action imaging, while a movie mode is just the thing for recording sports action.
Built-in PC Camera Mode
Connect with the USB cable to send real-time digital video images to your PC. Perfect for net meetings and other PC camera applications.
- Mini USB port
The camera's mini USB port supports a new USB standard for greatly expanded versatility. Connection is as easy as ever.
- Design rule for Camera File system (DCF)
DCF support provides better compatibility for images transferred between different devices.
- Digital Print Order Format (DPOF)
DPOF support lets you make print specifications for printing images using a digital DPE service.
- EPSON PRINT Image Matching
This product supports PRINT Image Matching. Combination of use PRINT Image Matching and PRINT Image Matching 2 enabled digital still cameras, printers and software help photographers to produce images which are more faithful to their intentions.
- Bundled with Photo Loader 2 and Photohands
Your camera comes bundled with the latest version of Photo Loader, the popular application that automatically loads images from your camera to your PC. Photo Loader includes a feature that automatically attaches images to e-mail messages. Also bundled with the camera is Photohands, an application that makes image retouching quick and easy.
Water Resistance and Dust Resistance
The camera is designed to conform to the following water resistance and dust resistance standard. However, performance is not guaranteed under the conditions described below.
IEC 60529
[Degrees of protection provided by enclosures (IP Code)] IP66/IP67
Water Resistance
- Water shall not enter the enclosure when it is immersed in a container of standard temperature still tap water to a depth of 1 meter (3.3') for approximately 30 minutes (immersion resistant).
- Direct jetting water from any direction shall not enter the enclosure.
Dust Resistance
- Particles with a diameter of 75 m or less shall not enter the enclosure.
Operating Environment
Since this camera is water-resistant, dust-resistant, and shock-resistant, you can handle it while your hands are wet, you can wash it with water, and even use it in the areas listed below.
- At the beach
- Around a pool
- On a river bank
- On a ski slope
In the rain
Operating Precautions
- Always make sure that the battery cover and terminal cover are closed securely.
Battery cover
Terminal cover
This is not an underwater camera!
Do not use this camera in areas where it is exposed to high water pressure, never wash it using high-pressure water, and never leave it submersed for long periods. Also, never immerse the camera in seawater, in swimming pool water, or in hot spring water.

Never immerse the camera in water that contains soap or detergent.

INTRODUCTION
Wipe the camera dry after it becomes wet.
- Water remaining on the camera after it becomes wet can collect in the seams between controls and the camera body, etc. Carrying the camera around while it is wet can cause water to leak from the seams and cause your clothing or bag to become wet. Make sure you carefully wipe all remaining water from the camera after it becomes wet.
Location Precautions
Note the following precautions whenever using the camera in the locations indicated.
- At the beach or around a swimming pool Never put the camera down directly on the sand. Should seawater, pool water, or sand ever get on the camera, rinse it off in a sink or other container filled with still tap water.
- In the rain
-
The camera is designed so it can withstand moderately strong rain ranging from about 10mm per hour or less to about 15mm per hour. Never open the battery cover or terminal cover while the camera is in the rain or while your hands are wet.
-
Washing
The camera can be washed with a relatively weak stream clean water from a standard household tap under the following conditions.
Outlet Diameter: 20mm (0.8^)
Maximum Pressure: 98kPa (1kgf / cm^2)
Rub the camera lightly with your hands, and never use a brush, or other implement.
IMPORTANT!
- The above precautions are not exclusive. Even following the above precautions does not guarantee that exposure to certain conditions will not cause problems with proper camera operation. Repair of the camera may be impossible or may be charged to you if it is determined that a problem is due to misuse of the camera by you.
INTRODUCTION
General Precautions
- Even very fine pieces of foreign matter (a single hair, a single grain of sand, etc.) on the battery cover or terminal cover O-ring can result in incomplete sealing and problems when the camera is immersed in water. Whenever closing a cover, use a soft, dry cloth to wipe off all water droplets, sand, dirt, etc.
- Whenever there is seawater, detergent, sand, mud, or other similar matter on the camera, rinse it in a off sink or other container filled with still tap water. Do not use running water from a tap, which creates the risk of dirt or sand working its way under buttons and into other openings. Always make sure that the battery cover and terminal cover are closed securely.
-
Use a soft, dry cloth to wipe any water remaining on the camera after it becomes wet.
-
Do not carry the camera around while it is wet. Doing so creates the risk of internal shorting.
- Moisture on the camera can freeze in very cold environments. Ice left on the camera can lead to malfunction. Do not allow moisture to remain on the camera under cold conditions.
-
Though the camera is designed to withstand the effects of dropping and impact occurring during normal daily use, very strong impact due to very rough handling such as throwing the camera or dropping it from excessive heights can result in serious damage. Even if a drop does not result in functional problems, it can cause scratching and other cosmetic damage to the camera.
-
To ensure proper water resistance, you should have the battery cover and terminal cover O-rings replaced every two years, regardless of their condition. Note that you will be charged for O-ring replacement. Contact your nearest authorized CASIO maintenance service provider to have the O-rings replaced.
Inspecting the Cover O-rings
The battery cover and terminal cover are fitted with rubber gaskets called "O-rings" that keep water from entering the camera. Even very fine pieces of foreign matter (a single hair, a single grain of sand, etc.) on an O-ring can result in incomplete sealing and allow water to leak inside. Note that water leaking inside the camera results in unrepairable damage. Make sure you periodically inspect the O-rings, O-ring grooves, and contact surfaces for cracks, deformation, dirt, and dust. Use a soft, dry cloth to wipe all dirt and dust from the O-rings and their contact surfaces.
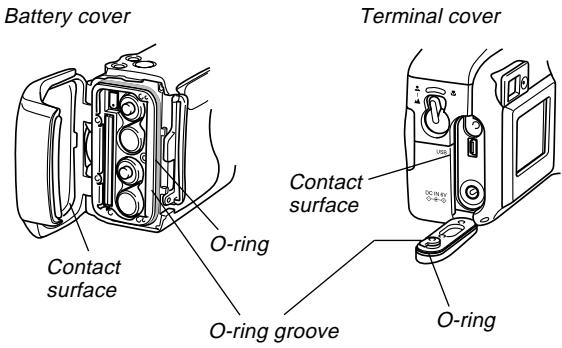
If you find dirt on an O-ring...
- Carefully remove the O-ring. Use a cotton swab moistened with water to wipe dirt from the O-ring groove and contact surface.
- Wash the O-ring in water, dry it off, and then replace it into the O-ring groove.
- Make sure the O-ring enters the groove securely, as far as it will go.
IMPORTANT!
- Never pull on an O-ring with excessive force or try to expand an O-ring.
- Never apply grease or oil to an O-ring.
- Never use a pointed object to remove an O-ring. Doing so can damage the O-ring and lead to leaking.
- Excessive twisting of an O-ring can cause leaking. Always handle O-rings with care.
- Have an O-ring replaced whenever it becomes cut, damaged, or deformed. You should also have O-rings replaced every two years, regardless of their condition. Take your camera to your nearest CASIO maintenance service provider to have O-rings replaced. Note that you will be charged for O-ring replacement. If you frequently use your camera where it is exposed to water, sand, or dust, we recommend that you have the O-rings replaced once a year.
INTRODUCTION
Before putting your camera away after using it...
After using your camera in a location where it was exposed to sand, mud, or water, you should wash it off before opening the battery cover or terminal cover.
IMPORTANT!
- Use plain tap water that is 30^ or lower to wash the camera.
- The interior of the camera is not water-resistant. Make sure that the battery cover and terminal cover are securely closed before washing the camera.
1. Immerse the camera in water and wash it.
- Fill a bucket or other container with water and immerse the camera. Rub the camera lightly with your fingers to remove dust, dirt, sand, and other matter.
- Never rub the surfaces of the lens, viewfinder, monitor screen, or flash while there is dirt on the camera.
2. Wipe the camera dry.
- Use a clean, dry, soft cloth to wipe off the camera, and leave it in a shady place to dry.
- Never leave the camera in direct sunlight to dry it off.
IMPORTANT!
- Never use detergent, hot water, or strongly running water to clean the camera. Doing so creates the risk of leaking and malfunction.
- Never swing the camera around to remove water, or use a dryer or other intense heat to dry it.
- Never try to wash the camera in a washing machine.
- If your camera becomes very dirty, contact your nearest authorized CASIO maintenance service provider.
Precautions
General Precautions
Be sure to observe the following important precautions whenever using the GV-20.
All references in this manual to "this camera" and "the camera" refer to the CASIO GV-20 Digital Camera.
- Never try to take pictures or use the built-in display while operating a motor vehicle or while walking. Doing so creates the danger of serious accident.
- Never try to open the case of the camera or attempt your own repairs. High-voltage internal components create the risk of electric shock when exposed. Always leave maintenance and repair work up to authorized CASIO service providers.
- Never fire the flash in the direction of a person operating a motor vehicle. Doing so can interfere with the driver's vision and create the danger of accident.
- Never fire the flash while it is too close to the subject's eyes. Intense light from the flash can cause eye damage if it is fired too close to the eyes, especially with young children. When using the flash, the camera should be at least one meter from the eyes of the subject.
-
Keep the camera away from water and other liquids, and never let it get wet. Moisture creates the danger of fire and electric shock. Never use the camera outdoors in the rain or snow, at the seashore or beach, in the bathroom, etc.
-
Should foreign matter or water ever get into the camera, immediately turn power off, unplug the AC adaptor from the power outlet, and contact your dealer or nearest CASIO service provider. Using the camera under these conditions creates the danger of fire and electric shock.
- Should you ever notice smoke or a strange odor coming out of the camera, immediately turn power off and unplug the AC adaptor from the power outlet. Using the camera under these conditions creates the danger of fire and electric shock. After making sure there is no more smoke coming from the camera, take it to your nearest CASIO service provider for repair. Never attempt your own maintenance.
- At least once a year, unplug the AC adaptor from the power outlet and clean the area around the prongs of the plug. Dust build up around the prongs can create the danger of fire.
- If the camera's case should ever become cracked due to dropping it or otherwise subjecting it to rough treatment, immediately turn power off, unplug the AC adaptor from the power outlet, and contact your nearest CASIO service provider.
- Never use the camera inside of an aircraft or in any other areas where its use is prohibited. Doing so can result in an accident.
-
Physical damage and malfunction of this camera can cause the image data stored in its memory to be deleted. Be sure to always keep backup copies of data by transferring them to personal computer memory.
-
Never open the battery compartment cover, disconnect the AC adaptor from the camera or unplug it from the wall socket while recording images. Doing so will not only make storage of the current image impossible, it can also corrupt other image data already stored in camera memory.
Data Error Precautions
-
Your digital camera is manufactured using precision digital components. Any of the following creates the risk of corruption of data in camera memory.
-
Opening the battery cover or disconnecting the AC adaptor while data is being saved
- Removing a memory card while image recording is in progress
- Removing batteries, unplugging the AC adapter, opening the battery cover, or removing the memory card while the operation lamp is still lit after camera power is turned off
- Disconnecting the data communication cable
Using low batteries - Other abnormal operations
Any of the above can cause a MEMORY CARD ERROR! message or NOT FORMATTED message to appear on the monitor screen. See page 85 for information about what you need to do when these messages appear.
Operating conditions
- This camera is designed for use in temperatures ranging from 0^ to 40^ .
- Do not use or keep the camera in the following areas.
In areas subject to direct sunlight
Near air conditioners, heaters, or other areas subject to temperature extremes
— Inside of a closed vehicle, especially one parked in the sun
In areas subject to strong vibration
Condensation
- When you bring the camera indoors on a cold day or otherwise expose it to a sudden change of temperature, there is the possibility that condensation can form on the exterior or on interior components. Condensation can cause malfunction of the camera, so you should avoid exposing it to conditions that might cause condensation.
- To keep condensation from forming, place the camera into a plastic bag before moving it into a location that is much warmer or colder than your current location. Leave it in the plastic bag until the air inside the bag has a chance to reach the same temperature as the new location. If condensation does form, remove the batteries from the camera and leave the battery cover open for a few hours.
About the camera's backlight...
- The camera is equipped with a fluorescent light source to provide the back lighting for its LCD.
- The normal service life of the backlight is approximately six years, when the camera is used for about two hours a day.
- Should the LCD image appear abnormally dark, take the camera to your dealer or an authorized CASIO service provider to have the light source replaced. Note that you will be charged for this replacement.
- Under very cold conditions, the backlight may require more time than normal to light, or reddish bands may appear in the displayed image. These conditions do not indicate malfunction, and normal operation should return at higher temperatures.
Lens Precautions
- Fingersprints, dust, or any other soiling of the lens can interfere with proper image recording. Never touch the lens with your fingers. You can remove dust particles from the lens surface by using a lens blower to blow them off. Next, wipe the surface of the lens with a soft lens cloth.
GUIDELINES LAID DOWN BY FCC RULES FOR USE OF THIS UNIT IN THE U.S.A. (not applicable to other areas).
This device complies with Part 15 of the FCC Rules. Operation is subject to the following two conditions: (1) this device may not cause harmful interference, and (2) this device must accept any interference received, including interference that may cause undesired operation.
NOTICE
This equipment has been tested and found to comply with the limits for a Class B peripheral, pursuant to Part 15 of the FCC Rules. These limits are designed to provide reasonable protection against harmful interference in a residential installation. This equipment generates, uses and can radiate radio frequency energy and, if not installed and used in accordance with the instructions, may cause harmful interference to radio communications. However, there is no guarantee that interference will not occur in a particular installation. If this equipment does cause harmful interference to radio or television reception, which can be determined by turning the equipment off and on, the user is encouraged to try to correct the interference by one or more of the following measures:
- Reorient or relocate the receiving antenna.
- Increase the separation between the equipment and receiver.
- Connect the equipment into an outlet on a circuit different from that to which the receiver is connected.
- Consult the dealer or an experienced radio/TV technician for help.
FCC WARNING
Changes or modifications not expressly approved by the party responsible for compliance could void the user's authority to operate the equipment.
Properly shielded cables with ferrite core must be used for connection to host computer and/or peripherals in order to meet FCC emission limits.
THE SPECIAL VIDEO CABLE THAT COMES WITH THE CAMERA
THE CAMERA TO A VIDEO IN TERMINAL OF A COMPUTER
THE SPECIAL CONNECTION CABLE THAT COMES WITH QV-Link SOFTWARE
THE CAMERA TO A PROPER TERMINAL OF A COMPUTER
Declaration of Conformity
Model Number: GV-20
Trade Name: CASIO COMPUTER CO.,LTD.
Responsible party: CASIO INC.
Address: 570 MT. PLEASANT AVENUE, DOVER, NEW JERSEY 07801
Telephone number: 973-361-5400
This device complies with Part 15 of the FCC Rules.
Operation is subject to the following two conditions:
(1) This device may not cause harmful interference, and
(2) this device must accept any interference received, including interference that may cause undesired operation.
CASIO COMPUTER CO.,LTD. GV-20

Tested To Comply
With FCC Standards
FOR HOME OR OFFICE USE
GETTING ACQUAINTED
This section contains important information you should know when trying to operate the camera.
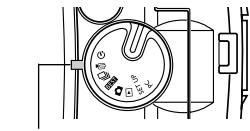
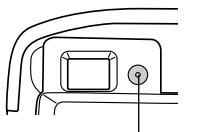
General Guide
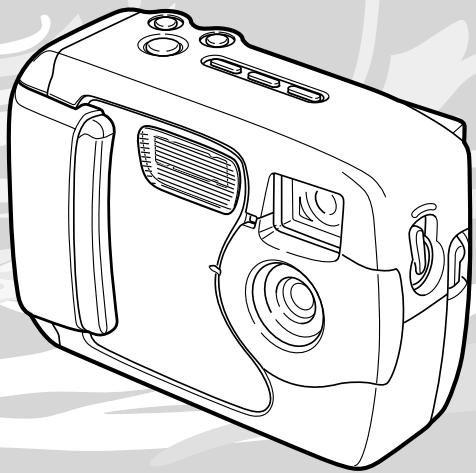
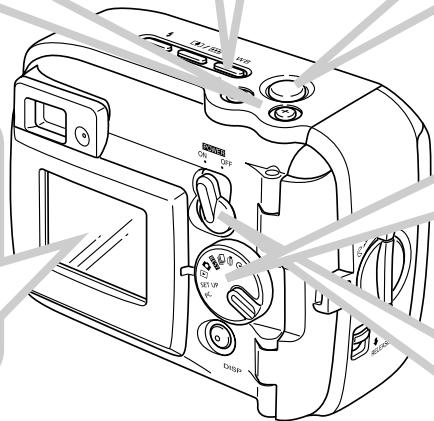
The following illustrations show the names of each component, button, and switch on the camera.
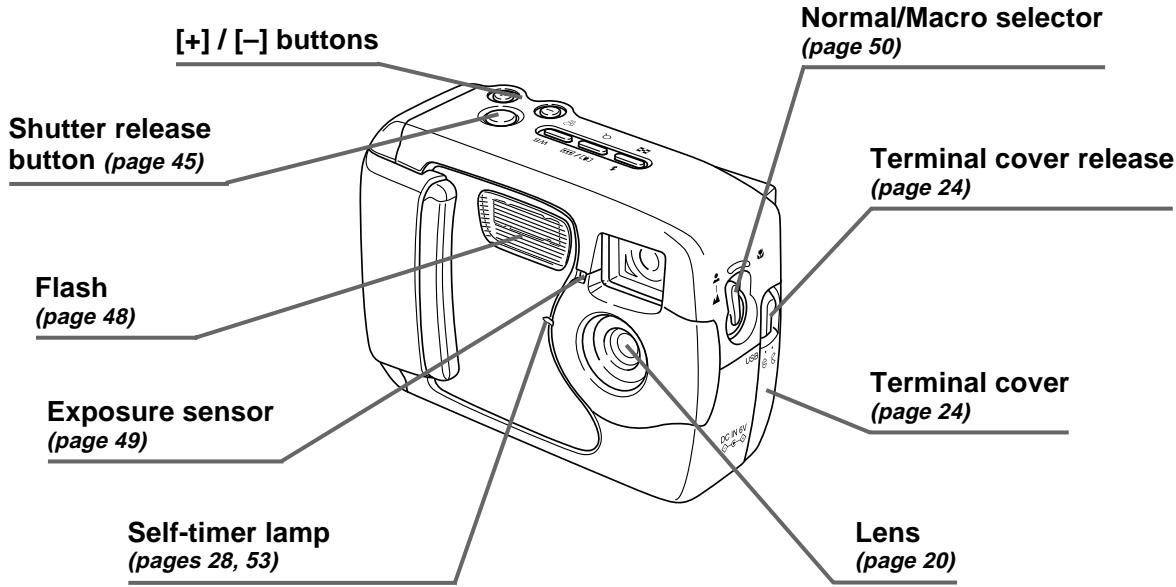
Front
GETTING ACQUAINTED
GETTING ACQUAINTED
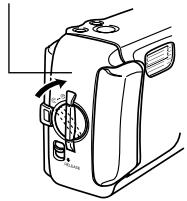
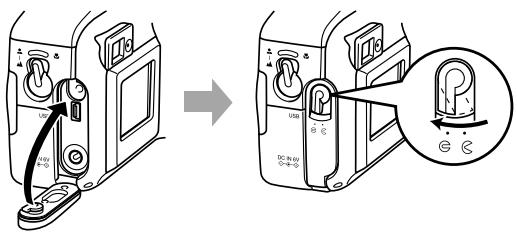
Terminals and Ports
Bottom
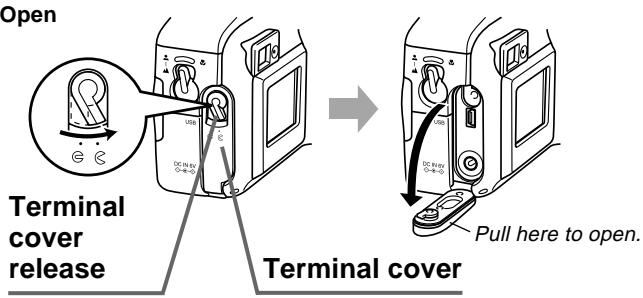
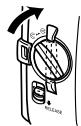
Opening and Closing the Terminal Cover
Open
Close
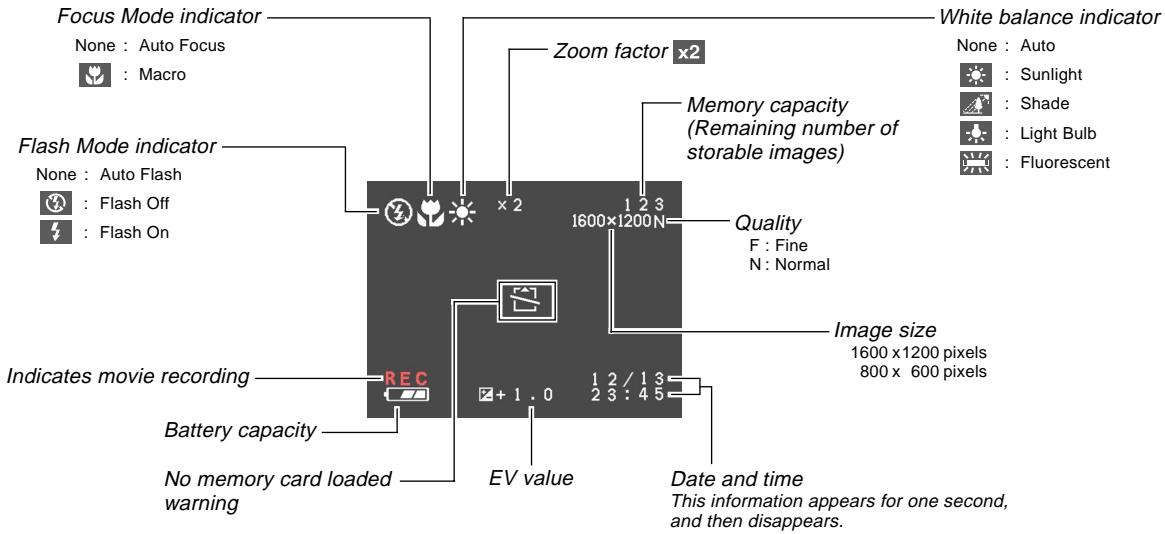
Monitor Screen Indicators
The following describes the different indicators and markings that appear on the camera's monitor screen.
Recording Modes
This camera is equipped with the following recording modes: snapshot mode, continuous shutter mode, self-timer mode, movie mode, Best Shot mode
GETTING ACQUAINTED
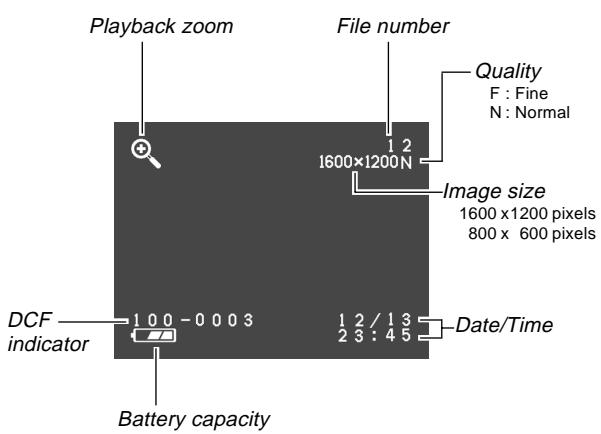
Play Mode
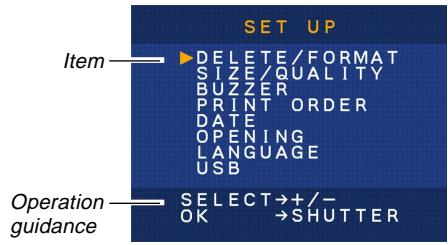
SETUPMode
Changing the Contents of the Monitor Screen
Each press of DISP in a recording mode or the play mode changes the contents of the monitor screen as shown below.
■ Recording Modes
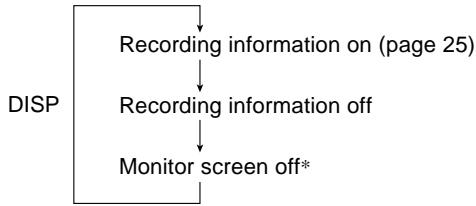
- You cannot turn off the monitor screen while in the macro mode, continuous shutter mode, or movie mode.
Play Mode

Indicator Lamps
The camera has three indicator lamps, an operation lamp, a power lamp, and a self-timer lamp. These lamps indicate the current operational status of the camera by lighting, flashing, and changing color.
Power Lamp
| When the lamp is this: | It means this: |
| Flashing green | Camera is powering up or powering down. |
| Lit green | Camera is on and ready to shoot. |
| Flashing red | Battery power is low. |
Power lamp
Operation Lamp
| When the lamp is this: | It means this: |
| Flashing amber | Flash unit is charging. |
| Lit amber | Flash is ready to fire. |
| Flashing green | Movie is recording or self-timer countdown is in progress. |
| Flashing red | Memory card problem |
Operation lamp
Self-timer Lamp
| When the lamp is this: | It means this: |
| Flashing red | Self-timer countdown is in progress. |
Self-timer lamp
Using the Bundled Accessories
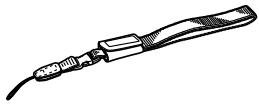
Attaching the Strap
Attach the strap to the strap bar as shown in the illustration.
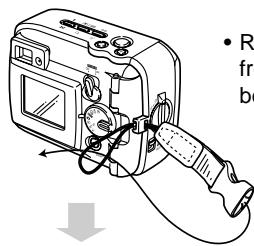
- Remove the strap from the buckle before installing.
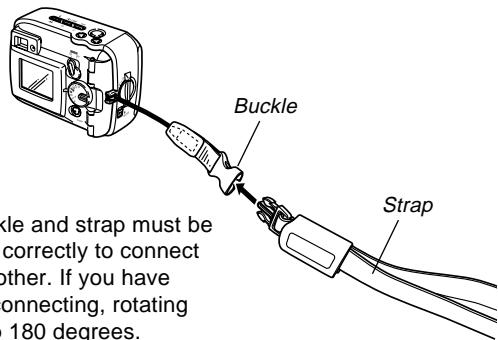
- The buckle and strap must be oriented correctly to connect to each other. If you have trouble connecting, rotating the strap 180 degrees.
Using the Strap
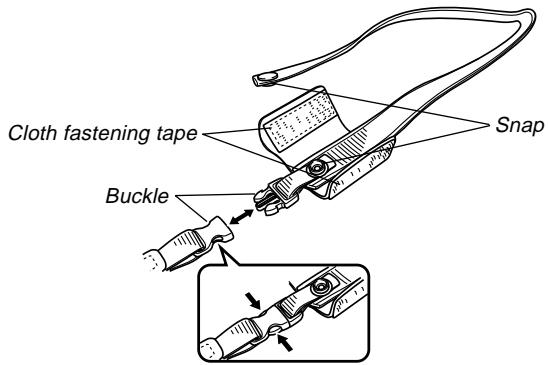
The strap easily connects to and disconnects from the buckle. The end of the strap also has a snap, which means you can disconnect it for attachment to a bag or other item.
IMPORTANT!
- When using the camera, always pass your hand through the strap to protect against accidentally dropping it.
- The supplied strap is intended for use with this camera only. Never use it for any other purpose.
- Never swing the camera around by its strap.
- The buckle and strap must be oriented correctly to connect to each other. If you have trouble connecting, rotating the strap 180 degrees.
Attaching the Lens Cap
Attach the lens cap to the lens whenever you are not using the camera.
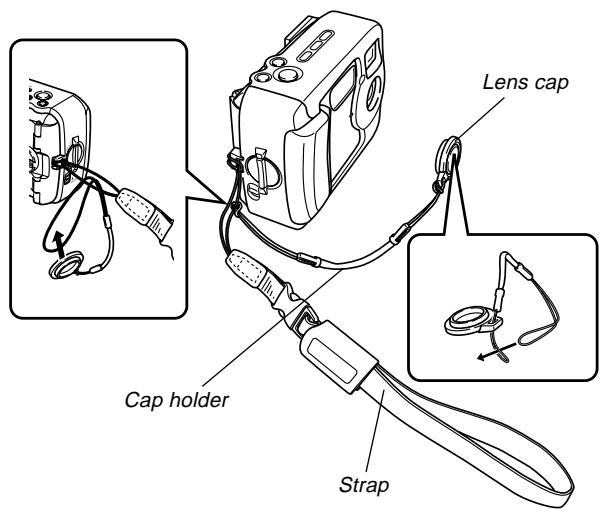
- Attaching the lens cap to the cap holder on the strap helps to prevent loss of the lens cap.
- Note that the water resistance of the camera is not affected by removing the lens cap.
Power Requirements
Your camera features a two-way power supply that lets you use either AA-size batteries or household AC current.
A set of AA-size alkaline batteries is supplied with the camera. The other items listed below are available separately.
Batteries
- Four AA-size alkaline batteries: LR6
- Four AA-size lithium batteries: FR6
- Four AA-size nickel-metal hydride rechargeable batteries: NP-H3
Household Current
- AC Adaptor: AD-C620/C630
- AC Adaptor/Charger: BC-3HA
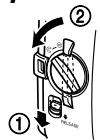
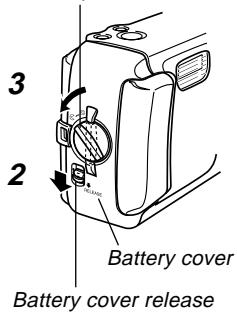
Loading Batteries
Make sure that camera power is turned off whenever loading or replacing batteries.
-
Before opening the battery cover, carefully wipe any sand or moisture from the camera to ensure that none of it gets inside the battery compartment.
-
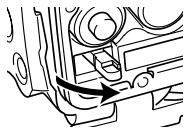
Slide the battery cover release in the direction indicated by the arrow.
-
Rotate the battery cover knob to the setting, and then open the cover.
-
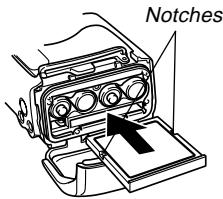
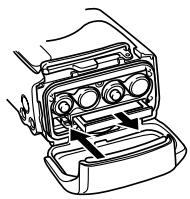
Load batteries as indicated in the illustration.
Battery cover knob
Battery cover release

GETTING ACQUAINTED
- Check to make sure the O-ring and contact surface of the battery compartment is not damaged and is free of dirt and dust.
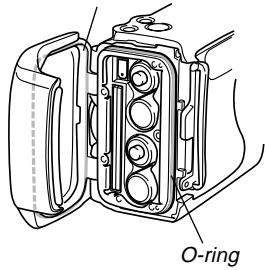
Contact surface
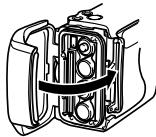
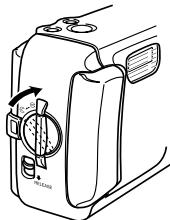
-
Securely close the battery cover and rotate the battery cover knob to the position.
-
Rotate the knob until the battery cover lock clicks securely into place.
See page 38 for information about loading the memory card.
IMPORTANT!
- Do not use manganese batteries to power this camera. Use only the specified types of AA-size batteries.
- Never open the battery cover while the operation lamp is flashing. Doing so can cause the image record operation to fail, and even damage the memory card.
- Never open the battery cover in an area where water is present. Doing so creates the risk of water getting inside the camera, resulting in unrepairable damage.
- Moving the camera from a warm room to the cold outdoors makes pressure build up inside the camera, which can make it difficult to open the battery cover.
- Using an O-ring that is damaged or soiled can result in a loss of water resistance, which can lead to water getting inside the camera and unrepairable damage.
- Whenever an O-ring becomes damaged or deformed, take your camera to the nearest authorized CASIO maintenance service provider to have it replaced. Note that you will be charged for O-ring replacement.
Battery Life Guidelines
The battery life guideline values given below indicate the amount of time at standard temperature (25^) until power automatically turns off due to battery failure. They do not guarantee that batteries will provide the amount of service indicated. Low temperatures and continued use reduce battery life.
| Type of Operation | AA-size Alkaline Batteries LR6 | AA-size Lithium Batteries FR6 | AA-size Ni-MH Batteries NP-H3 |
| ContinuousPlayback | 200 minutes | 340 minutes | 200 minutes |
| ContinuousRecording | 130 minutes(650shots) | 300 minutes(1500 shots) | 160 minutes(800 shots) |
- The above figures are approximations only.
- The above guidelines are based on the following battery types:
Alkaline: MX1500 (AA) DURACELL ULTRA
Lithium: Energizer
- Figures are based on continuous recording under the following conditions.
Flash turned off
Normal temperature (25^) -
Recording one image per minute under the above conditions reduces battery life to about one fifth of that noted above.
-
Battery life is greatly affected by how much you use flash, zoom and other functions, and how long you leave power turned on.
CAUTION!
- Battery life differs greatly by manufacturer. We recommend use of MX 1500 (AA) DURACELL ULTRA alkaline batteries with this product.
- Tips for Prolonging Battery Life
- Use to turn off the flash when you are not using it (page 48).
- You can also use the power save settings (page 37) to protect against wasting battery power when you forget to turn off the camera.
Alkaline Battery Life
The actual life of alkaline batteries is affected by a variety of factors, including the battery manufacturer, the amount of time the batteries spend in storage before you use them, temperature while you are recording, and photographic conditions. As a rule, we recommend the use of lithium batteries or Ni-MH batteries, which have longer lives than alkaline batteries.
GETTING ACQUAINTED
The following examples show how alkaline battery life changes under different conditions.
Example 1: Intermittent use of the camera shortens battery life.
Conditions
Temperature: 25^
- Repeat of a cycle of recording of one shot per minute for 10 minutes, followed by one minute of playback, and a nine minutes of power off
- Flash on
Approximate Battery Life: 160 minutes (146 shots)
Example 2: Low temperatures shorten battery life.
Conditions
Temperature: 0^
- Repeat of a cycle of recording of one shot per minute for 10 minutes, followed by one minute of playback, and a nine minutes of power off
- Flash on
Approximate Battery Life: 25 minutes (23 shots)
- About rechargeable batteries
Use only the nickel-metal hydride batteries (NP-H3) that are available from your dealer as options for this camera. Proper camera operation is not guaranteed when other rechargeable batteries are used.
AC Adaptor/Charger:BC-3HA
Nickel-metal hydride batteries (4-battery set)/Quick
Charger Set:BC-1HB4
Nickel-metal hydride batteries (4-battery set) : NP-H3P4
IMPORTANT!
- Be sure to keep all four batteries together as a set at all times, for both charging and powering the camera. Mixing batteries from different sets can shorten overall battery life and cause malfunction of the camera.
- Rechargeable batteries cannot be charged while they are loaded in the camera.
Battery Handling Precautions

Caution!
-
Incorrect use or handling of batteries can cause them to leak or burst and create the danger of serious damage to your camera. Be sure to note the following important precautions to avoid problems with batteries.
-
Always make sure that the plus (+) and minus (-) ends of the batteries are facing correctly, as noted by the markings on the camera itself. Improper loading of batteries can result in bursting or leaking of batteries, creating the danger of personal injury or soiling of objects nearby.
- Never mix old batteries with new ones. Doing so can result in bursting or leaking of batteries, creating the danger of fire or personal injury.
- Never mix batteries of different types.
-
Use only LR6 type alkaline or FR6 type lithium or Ni-MH (nickel-metal hydride) dry cell batteries with this camera.
-
Never recharge non-rechargeable type batteries, never allow direct connection between two ends of a battery, and never try to take batteries apart.
-
Do not expose batteries to direct heat or dispose of them by burning. Doing so can create the danger of explosion.
-
Dead batteries are susceptible to leakage, which can cause serious damage to your camera. Remove batteries from the camera as soon as you notice they are dead.
-
Remove batteries from the camera if you do not plan to use it for more than two weeks.
- The batteries that power the camera normally become warm as they discharge.
Low Battery Indicator
The following shows how the battery capacity indicator on the monitor screen and the indicator display changes as battery power is used. Replace all four batteries as soon as possible after they go dead. If you continue to use the camera while the battery level is l , camera power will automatically turn off.
| Battery Capacity | High | ←→ | Low |
| Monitor Screen | → | → |
Using AC Power
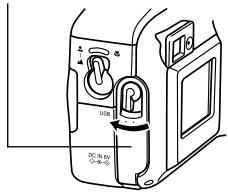
Use the adaptor as shown below to power the camera from a household power outlet.
- Before opening the terminal cover, carefully wipe any sand or moisture from the camera to ensure that none of it gets inside the camera.
- Move the terminal cover release to the position and then open the cover.
- Plug the AC adaptor to the DC IN 6V terminal.
IMPORTANT!
- Note that the camera is not water-resistant while the terminal cover is open. Keep it away from sand and water.
- After you are finished, make sure you securely close the terminal cover and then move the terminal cover release to .
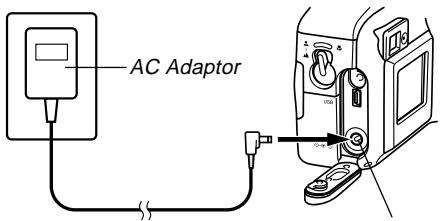
DC IN 6V
(AC power terminal)
- AC Adaptor: AD-C620/C630 (Option)
- AC Adaptor/Charger: BC-3HA (Option) The BC-3HA functions both as an AC adaptor and as a charger unit for AA-size nickel-metal hydride batteries. It comes complete with four rechargeable nickel-metal hydride batteries. This AC adaptor/charger unit can be used with any household power outlet rated for 100V to 240V AC.
AC Adaptor precautions

Caution!
- Never use an electrical outlet whose voltage is outside the rating marked on the AC adaptor. Doing so can create the danger of fire or electric shock. Use only the optional AC adaptor specified for this camera.
- Do not allow the AC adaptor power cord to become cut or damaged, do not place heavy objects on it, and keep it away from heat. A damaged power cord creates the risk of fire and electric shock.
- Never try to modify the AC adaptor power cord, or subject it to severe bending, twisting, or pulling. Doing so creates the risk of fire and electric shock.
- Never touch the AC adaptor while your hands are wet. Doing so creates the risk of electric shock.
- Do not overload extension cords or wall outlets. Doing so creates the danger of fire and electric shock.
-
Should the cord of the AC adaptor become damaged (exposed internal wiring), request a replacement from an authorized CASIO service provider. A damaged AC adaptor cord creates the danger of fire or electric shock.
-
Be sure to turn off power before connecting or disconnecting the adaptor.
- Always turn camera power off before disconnecting the AC adaptor, even if the camera has batteries installed. If you don't, the camera will turn off automatically when you disconnect the AC adaptor. You also run the risk of damaging the camera whenever you disconnect the AC adaptor without first turning power off.
- The AC adaptor may become warm to touch after extended periods of use. This is normal and is not cause for alarm.
- After using the camera, turn it off and unplug the adaptor from the AC outlet.
- The camera automatically switches over to AC adaptor powered operation whenever the AC adaptor is plugged into the camera.
- Always use the AC adaptor to power the camera whenever it is connected to a computer.
Turning the Camera On and Off
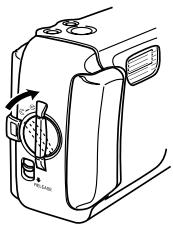
Use the POWER ON/OFF switch to turn the camera on and off.
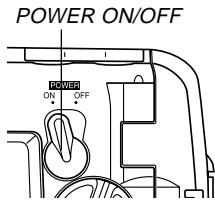
ON : Power on
OFF: Power off
IMPORTANT!
- If camera power is turned off by the Auto Power Off feature, move the POWER ON/OFF switch to OFF and then back to ON again to restore power.
Power Save Settings
Auto Power Off
Auto Power Off conserves battery power by automatically turning off the camera if you do not perform any operation for a preset amount of time. The amount of time depends on the mode the camera is in.
| Mode | Time to Power Down |
| Snapshot | 2 minutes |
| Continuous Shutter | |
| Self-timer | |
| Movie | |
| Play | 5 minutes |
| Set-up | |
| PC |
- Auto Power Off is automatically disabled under any one of the following conditions.
While the camera's USB port is connected to a computer or other external device, or while the camera is being controlled by an external device
While the AC adaptor is connected to the camera
Memory Cards
This camera supports use of a CompactFlash memory card (CF TYPE I) for image storage.
IMPORTANT!
Note that this camera does not support use of a Microdrive for image data storage.
- Make sure that the power of the camera is turned off before you insert or remove a memory card.
- When inserting a memory card into the camera, make sure that the card is oriented correctly. Make sure that the correct side of the card is facing up, and that you insert the correct end of the card into the camera.
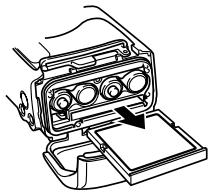
Inserting a Memory Card into the Camera
- Before opening the battery cover, carefully wipe any sand or moisture from the camera to ensure that none of it gets inside the camera.
- Slide the battery cover release in the direction indicated by the arrow.
- Rotate the battery cover knob to the setting, and then open the cover.
Battery cover knob
- Making sure that the notches in the memory card (indicating the back of the card) are facing towards the front of the camera, carefully insert the card into the slot as far as it will go.
-
Securely close the battery cover and rotate the battery cover knob to the position to secure it in place.
-
Make sure you always turn off the camera before inserting or removing a memory card.
- Be sure to orient the card correctly when inserting it. Never try to force a memory card into the slot when you feel resistance.
Removing a Memory Card from the Camera
- Before opening the battery cover, carefully wipe any sand or moisture from the camera to ensure that none of it gets inside the camera.
- Slide the battery cover release in the direction indicated by the arrow.
- Rotate the battery cover knob to the setting, and then open the cover.
- Press the card eject button at the point marked . This causes the eject button to extend from the camera.
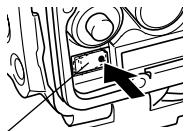
Eject button
GETTING ACQUAINTED
- Press the card eject button as far as it will go.
- Remove the memory card from the camera.
-
Securely close the battery cover and rotate the battery cover knob to the position to secure it in place.
-
Rotate the knob until the battery cover lock clicks securely into place.
IMPORTANT!
- Insert only memory cards into the memory card slot. Inserting any other type of card can cause malfunction.
- Should water or any other foreign matter get into the memory card slot, immediately turn off power, unplug the AC adaptor, and contact your dealer or nearest CASIO Service Provider.
- Never eject the memory card while the card slot is facing downwards. Doing so creates the danger of the memory card falling, which can corrupt image data on the card.
- Never remove a card from the camera while the operation lamp is flashing. Doing so can cause the image save operation to fail, and even damage the memory card.
GETTING ACQUAINTED
Formatting a Memory Card
You can format a memory card to delete all of the data stored on it.
IMPORTANT!
-
Data deleted by a memory card format operation cannot be recovered! Be sure to carefully check and confirm that you no longer need the data stored on a memory card before formatting it.
-
Turn on the camera, and then align the dial with SET UP.
- Use [+] and [-] to select "DELETE/FORMAT" and then press the shutter release button.
- Use [+] and [-] to select "FORMAT" and then press the shutter release button.
- Use [+] and [-] to select "YES" and then press the shutter release button.
| To do this: | Select this option: |
| Cancel the procedure without formatting | NO |
| Format the memory card | YES |
Memory Card Precautions
- Images cannot be recorded with this camera unless a memory card is installed in it.
- Be sure to use only CASIO brand CompactFlash cards. Proper operation with other memory cards is not guaranteed.
- Electrostatic charge, electrical noise, and other phenomena can cause data to become corrupted or even lost. Always make sure that you always back up important data on other media (MO disc, computer hard disk, etc.).
- If a memory card starts to behave abnormally, you can restore normal operation by reformatting it. However, we recommend that you always take along more than one memory card whenever using the camera far away from the home or office.
- We recommend that you format a memory card before using it for the first time after purchasing it, or whenever the card you are using seems to be the cause of abnormal images.
- Before starting a format operation, connect the AC adaptor for power or load a full set of fresh alkaline or lithium batteries. Power interruption during the format operation can result in improper formatting, and even damage the memory card and make it unusable.
Setting the Current Date and Time
Be sure to set the date and time on the camera before using it to record images.
The date and time kept by the camera's clock is used for file names, file information, and other purposes.
IMPORTANT!
- The time and date settings are cleared if the camera is left for about 24 hours without battery and AC power being supplied. If this happens, restore power and make new time and date settings before using the camera again.
- A flashing time display indicates that the time and date (clock) settings have been cleared. Use the procedure on the next page to make the correct time and date settings.
- If you do not set the camera's built-in clock to the current date and time, all images are recorded with the default date and time, which probably is not your correct current date and time. Be sure to correctly set the clock before you use the camera.
GETTING ACQUAINTED
Setting the Date and Time
- Turn on the camera, and then align the dial with SET UP.
- Use [+] and [-] to select "DATE" and then press the shutter release button.
- Use [+] and [-] to select "CLOCK" and then press the shutter release button.
- Select and adjust each item to set the date and time.

| To do this: | Press this button: |
| Move the highlighting between settings | Shutter release |
| Change the number at the currently highlighted position | [+] or [-] |
- Press DISP to register your settings.
Selecting the Date Format
- Turn on the camera, and then align the dial with SET UP.
- Use [+] and [-] to select "DATE" and then press the shutter release button.
- Use [+] and [-] to select "STYLE" and then press the shutter release button.
- Use [+] and [-] to select the style you want and then press the shutter release button.
Example: October 18
MONTH/DAY: 10/18
DAY/MONTH: 18/10