
Chrono GM5150 - Iron MOULINEX - Free user manual and instructions
Find the device manual for free Chrono GM5150 MOULINEX in PDF.


| Product type | Clothes iron |
| Brand | Moulinex |
| Model | Chrono GM5150 |
| Power | 2400 W |
| Soleplate | Ceramic soleplate |
| Water tank capacity | 300 ml |
| Continuous steam output | 30 g/min |
| Variable steam output | Yes |
| Vertical steam function | Yes |
| Anti-drip system | Yes |
| Anti-calc system | Self-cleaning |
| Automatic shut-off | Yes |
| Cord | 2 m, 360° swivel |
| Cord length | 2 m |
| Weight | 1.2 kg |
| Dimensions (L x W x H) | 28 x 12 x 15 cm |
| Color | White and black |
| Maintenance | Clean soleplate with damp cloth; descale regularly |
| Safety | Automatic shut-off after 8 minutes upright, 30 seconds horizontal |
| Spare parts | Available from Moulinex customer service |
Frequently Asked Questions - Chrono GM5150 MOULINEX
User questions about Chrono GM5150 MOULINEX
0 question about this device. Answer the ones you know or ask your own.
Ask a new question about this device
Download the instructions for your Iron in PDF format for free! Find your manual Chrono GM5150 - MOULINEX and take your electronic device back in hand. On this page are published all the documents necessary for the use of your device. Chrono GM5150 by MOULINEX.
USER MANUAL Chrono GM5150 MOULINEX
natural_image
Line drawing of a steam iron with a lever and handle, showing motion direction (no text or symbols)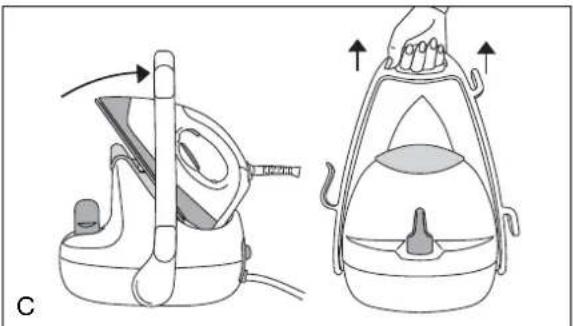
natural_image
Illustration of a hand operating a steam iron with a side view showing the handle and internal components (no text or symbols)
natural_image
Line drawing of a hand pouring liquid into a container with a bottle, labeled 'D' (no text or symbols on the diagram itself)
natural_image
Simple circular diagram with internal components and dots, no text or symbols present
natural_image
Illustration of hands washing a baby bottle from a sink, with no text or symbols present
natural_image
Two technical line drawings of a mechanical device with coiled wires and a handle, labeled 'H' (no text or symbols on the devices themselves)natural_image
Line drawing of a medical device with tubing and a central eye (no text or symbols)
natural_image
Line drawing of a hair iron device with attached tubing (no text or symbols)NOT CHRONO 016837 3/10/05 8:47 Page 34




(No text)
(No text)
(No text)
(No text)
(No text)
Français p. 4
Deutsch p. 8
English p. 12
Nederlands p. 16
Português p. 20
Italiano p. 24
Español p. 28
1. LERNEN SIE IHREN DAMPFGENERATOR KENNEN
- Thermostat light
- Steam control button
- Thermostat dial
- Iron soleplate
- Iron rest
- Boiler cap
- Boiler (inside the base-unit)
- Illuminated on/off switch
- Steam ready indicator
- Power cord
- Steam cord
- Steam flow adjustment dial (depending on model)
- Steam cord storage clip (depending on model)
- Built-in carrying handle (depending on model)
- Electric cord tidy hooks (depending on model)
2- SAFETY RECOMMENDATIONS
- For your safety, this appliance conforms to the applicable standards and regulations (Low Voltage, Electromagnetic Compatibility, Environmental Directives, as applicable...).
- Your steam generator is an electrical appliance. It should be used under normal conditions. It is intended for domestic use only.
- Your generator is fitted with 2 safety systems:
- A pressure release valve which, in the event of a malfunction, releases any excess steam.
- A thermal fuse to prevent the appliance from overheating.
- This appliance is not intended to be used by children or without supervision by persons whose physical, sensory or mental aptitude to use it in complete safety is impaired. Children must be supervised to ensure that they do not play with the appliance.
- The appliance must be used and placed on a flat, stable, heat-resistant surface.
- When you place the iron on the iron rest, make sure that the surface on which you place it is stable.
- Always plug your steam generator into :
- An electrical installation with voltage between 220V and 240V. Connecting to the wrong voltage may cause irreparable damage to the appliance and will invalidate your guarantee.
- An earthed socket. If you are using a mains extension lead, ensure that it is correctly rated (10A) with an earth, and is fully extended.
- Should the power cord or the boiler cord linking the iron to the base unit become damaged, it must be replaced by a MOULINEX approved service centre in order to avoid any danger.
BE CAREFUL!
The soleplate and generator iron-rest can become very hot and cause burns: never touch these parts.
If you store your appliance in a cupboard or confined space, make sure that you let it cool down before putting it away.
Your appliance gives off steam which can cause burns.
Handle your iron carefully, particularly when using the vertical function.
Never direct the steam towards persons or animals.
Never touch the electric cords with the soleplate of the iron.
Never leave the appliance unattended :
- when it is connected to the mains ;
- until it has cooled down (around 1 hour).
Do not unplug the appliance by pulling on the cord.
Always unplug your appliance :
- before filling or rinsing the boiler,
- before cleaning your generator,
- after each use.
In order to unscrew the boiler cap, always ensure that :
- either your generator is cold (that is, unplugged for over 1 hour);
- or there is no more pressure in the boiler (the iron does not produce any steam when the steam control button is activated).
In all other cases, never attempt to unscrew the boiler cap while it is in use: the strong steam pressure could cause burns.
BE CAREFUL!
If the boiler cap is dropped or severely knocked, have it replaced by a MOULINEX Approved Service Centre, as it may be damaged.
Never immerse your steam generator in water or any other liquid. Never hold it under the water tap.
While rinsing out the boiler, never fill it directly under the tap, use a jug.
The appliance must not be used if it has fallen to the floor, shows evidence of damage, leaks or fails to function correctly. Never dismantle your appliance. To avoid any danger, have it inspected in a MOULINEX approved service centre.
This appliance is designed for domestic use only. In the case of professional use, inappropriate use or failure to comply with the instructions, MOULINEX accepts no responsibility and the guarantee does not apply.
ENVIRONMENT PROTECTION FIRST !
Your appliance contains valuable materials which can be recovered or recycled.
Take it to a local civic waste collection point.

3. PREPARING YOUR STEAM GENERATOR
• INSTALL THE CARRYING HANDLE (DEPENDING ON MODEL)
- Position the carrying handle (14) facing the generator (electric cord reel to the left and steam cord storage clip to the right).
- Insert the carrying handle (14) into the slots provided on the base of the generator until you hear the "click" indicating that the handle is in place (Fig. A). Once the carrying handle (14) is installed, it can no longer be removed.
- Before beginning to iron, move the carrying handle (14) behind the base unit (Fig. B).
- After you have finished ironing or when you are transporting your iron, grip the handle (14), position it vertically above the iron and pull it upwards to lock it in the slots (Fig. C). This position allows you to transport the iron safely without dropping it unexpectedly.
- Place your steam generator on a flat, stable, heat-resistant surface.
- Check that your appliance is disconnected and cold.
- Unscrew the boiler cap (6).
- Using a water jug, fill with maximum 1 litre of water.
- Fill the boiler (7), taking care that the water does not spill over (Figure D).
If this occurs, remove the excess water.
- Replace the boiler cap (6), screwing on tightly.
Type of water to use?
Your steam generator has been designed to operate using untreated tap water.
If your water is very hard, mix it 50 % untreated tap water with 50 % distilled or demineralised water.
Types of water not to use?
Heat concentrates the elements contained in water during evaporation. The types of water listed below may contain organic waste, mineral or chemical elements that can cause spitting, brown staining or premature wear of the appliance: water from clothes dryers, scented or softened water, water from refrigerators, batteries, air conditioners, rain water, boiled, filtered or bottled water. These types of water should not be used in your MOULINEX iron. Also only use distilled or demineralised water as advised above.
4. SETTING UP YOUR STEAM GENERATOR
- Connect your generator to an earthed socket.
- Press the On/Off switch (8). The steam indicator (9) turns on and the boiler (7) heats up. When the indicator (9) goes out (after about 8 minutes), steam is ready.
During ironing the iron's thermostat light (1) and the steam indicator (9) will go on and off according to the temperature control.
BE CAREFUL!
The first time the appliance is used, there may be some fumes and smell but this is not harmful. They will not affect use and will disappear rapidly.
5- USING YOUR STEAM GENERATOR
- Place the iron's temperature control dial according to the type of fabric to be ironed (Figure E).
- The thermostat light (1) comes on.
Be careful: the steam generator and the iron are ready to use when both the iron's thermostat light (1) and the steam indicator (9) go out.
If necessary, you can also adjust the steam flow on the base unit (Fig. F) (depending on model). This takes effect a few minutes later.
| Set the steam flow temperature (depending on model) for the type of fabric to be ironed: | ||
| Type of fabric Temperature Setting dial | ||
| LINEN COTTON | ||
| WOOL SILK VISCOSE | ||
| SYNTHETIC Polyester, Acetate, Acrylic, Polyamide | ||
| Set the steam flow temperature (depending on model) for the type of fabric to be ironed: | ||
| Type of fabric Temperature Setting dial | ||
| LINEN COTTON | ||
| WOOL SILK VISCOSE | ||
| SYNTHETIC Polyester, Acetate, Acrylic, Polyamide | ||
To obtain steam, press on the steam control button on the iron handle (2).
The steam will stop when you release the button.
It is recommended that you start with fabrics to be ironed at a low temperature : synthetics (I)
For delicate fabrics (●), press the steam control button (2) (on the handle of the iron) intermittently to avoid possible water droplets appearing with the steam.
Recommendations:
- To prime the steam circuit, either before using the iron for the first time, or if you have not used the steam function for a few minutes, press the steam control button (2) several times in a row, holding the iron away from your clothes. This will enable any cold water to be removed from the steam circuit.
Iron temperature control dial setting (3):
- Start with the fabrics to be ironed at a low temperature (●) and finish with those which need higher temperatures (●●● or Max).
- Mixed fibre fabrics : set the ironing temperature to the setting for the most delicate fabric.
- Woollen garments : press repeatedly on the steam control button (2) to obtain short bursts of steam, without placing the iron on the garment itself. This will avoid making the fabric shiny.
Setting the steam flow dial (12):
- When ironing thick fabric, increase the steam flow.
- When ironing at low temperature, set the steam flow button at the low position.
To iron without using steam:
- Do not press on the steam control button (2) on the iron handle.
Ironing Board:
- For best results, a mesh type ironing board should be used to allow any excess steam to escape.
- If you are using starch, it should be sprayed onto the reverse side of the fabric to be ironed.
6- FILLING THE BOILER WHILE IN USE (WHEN THE BOILER IS EMPTY)
VERY IMPORTANT :
Before opening your boiler (7), ensure that there is no more steam left inside by pressing the steam control button (2) located on the handle of the iron and keep it pressed down until there is no more steam.
NEVER UNSCREW THE BOILER CAP WHILE THE IRON IS PRODUCING STEAM.
- Press the on/off switch (8) and disconnect the generator from the mains.
- Slowly unscrew the boiler cap (6).
- Using a water jug, fill with maximum 1 litre of water.
- Fill the boiler (7), taking care that the water does not spill over. If this occurs, remove the excess water.
- Replace the boiler cap (6), screwing on tightly, reconnect your generator to the mains, and switch it on.
- Wait until the boiler (7) heats up (about 8 minutes).
The generator and the iron are ready to use when both the iron's thermostat light (1) and the steam indicator (9) go out.
7- MAINTAINING YOUR STEAM GENERATOR
Before cleaning, ensure that your steam generator is unplugged and that the soleplate (4) and the iron rest (5) have cooled down.
- Do not use detergent or descaling products for cleaning the soleplate or the base unit.
- Never hold the iron or the base unit under the tap.
- Do not place the iron on a metal rest as this could damage it. Place it on the iron-rest (5) on the base unit: it has non-slip pads and has been designed to withstand high temperatures.
- The iron soleplate (4): Regularly clean the soleplate with a damp, non-metallic washing up pad.
- The base-unit: Clean the plastic parts of the appliance occasionally with a soft cloth.
8. RINSING OUT THE BOILER
BE CAREFUL!
To extend the life of your boiler (7) and to avoid the build up of scale, it is essential that you rinse out the boiler (7) after every 10 uses. If your water is hard, increase the frequency.
In particular, do not use descaling agents for rinsing out the boiler (7), as they could damage it.
- Check that the generator is cold and unplugged for more than 1 hour.
- With a jug, fill the boiler (7) 3/4 full with tap water.
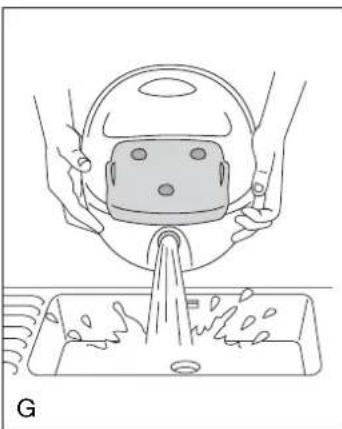
- Shake the base unit for a few moments and then empty it completely over your sink (Figure G).
To obtain the best results, we advise you to repeat this operation.
- Place the iron on the rest (5).
- Turn off at the main switch (8) and unplug.
- Leave the steam generator to cool down before putting it away if it is stored in a cupboard or confined space.
- For models equipped with a carrying handle (14):
- Store the cords using the steam cord storage clip (13) and the electric cord tidy hooks (15) (Fig. H).
- Position the handle (14) in transport mode (Fig. C) to move your generator safely to the desired place.
-
You can store your steam generator in complete safety.
-
IS THERE ANY PROBLEM
| PROBLEMS | POSSIBLE CAUSES | SOLUTIONS |
| Water runs through the holes in the soleplate. | The boiler is too full.The thermostat is not working: the temperature is always too low.You are using the steam control button before the iron is hot enough.Water has condensed in the pipes because you are using steam for the first time or you have not used it for some time. | Do not fill the boiler right up to the top.Contact an Approved Service Centre.Wait for the iron's thermostat light to come on and go off again before activating the steam control button.Depending on the model: decrease the steam flow rate when you iron at low temperatures (base unit dial 12).Press the steam control button away from your ironing board until the iron produces steam. |
| White steaks come through the holes in the soleplate. | Your boiler has a build-up of scale because it is not rinsed out regularly. | Rinse the boiler every 10 uses (see section 8). If your water is hard, increase the frequency. |
| Brown streaks come through the holes in the soleplate and stain the linen. | You are using chemical descaling agents or additives in the water for ironing.Your linen is not rinsed sufficiently or you have ironed a new garment before washing it. | Never add this type of product in the boiler (see our recommendation regarding water to be used).Ensure linen is rinsed thoroughly to remove any soap deposits or chemicals on new garments which have been sucked up by the iron. |
| The soleplate is dirty or brown and may stain the linen. | You are ironing at too high a temperature.You are using starch. | See our recommendations regarding temperature control setting.Always spray starch on the reverse side of the fabric to be ironed. |
| There is no steam. | The boiler is empty.The boiler is not yet ready.Depending on the model: the steam flow rate is set at the minimum. | Fill the boiler.After switching on, wait for the steam thermostat light to go out (about 8 minutes).Depending on the model: increase the steam flow rate (base unit dial 12). |
| Steam escapes from the boiler cap. | Cap screwed on incorrectly.The seal on the cap is damaged. | Screw the cap back on.Change the cap seal. |
| Steam escapes under the appliance. | The equipment is faulty. | Stop using the generator and contact an Approved Service Centre. |
NEVER DISMANTLE YOUR IRON: ALWAYS TAKE IT TO AN APPROVED SERVICE CENTRE.
HELPLINE
IF YOU HAVE ANY PRODUCT PROBLEMS OR QUERIES WITH YOUR PRODUCT, PLEASE TELEPHONE OUR CUSTOMER RELATIONS TEAM ON :
0845 602 1454 (UK) (CALLS CHARGED AT LOCAL RATE) - (01) 4751947 (IRELAND)
CONSULT OUR WEB SITE : www.moulinex.co.uk
NEDERLANDS
1- DE BELANGRIJKSTE ONDERDELEN VAN UW STOOMGENERATOR
- LERNEN SIE IHREN DAMPFGENERATOR KENNEN
- 2- SAFETY RECOMMENDATIONS
- BE CAREFUL!
- ENVIRONMENT PROTECTION FIRST !
- PREPARING YOUR STEAM GENERATOR
- • INSTALL THE CARRYING HANDLE (DEPENDING ON MODEL)
- Type of water to use?
- Types of water not to use?
- SETTING UP YOUR STEAM GENERATOR
- 5- USING YOUR STEAM GENERATOR
- Recommendations:
- Iron temperature control dial setting (3):
- Setting the steam flow dial (12):
- To iron without using steam:
- Ironing Board:
- 6- FILLING THE BOILER WHILE IN USE (WHEN THE BOILER IS EMPTY)
- VERY IMPORTANT :
- NEVER UNSCREW THE BOILER CAP WHILE THE IRON IS PRODUCING STEAM.
- 7- MAINTAINING YOUR STEAM GENERATOR
- RINSING OUT THE BOILER
- HELPLINE
- NEDERLANDS
- 1- DE BELANGRIJKSTE ONDERDELEN VAN UW STOOMGENERATOR
Brand : MOULINEX
Model : Chrono GM5150
Category : Iron