
Atoll 20 A EP2 - Iron MOULINEX - Free user manual and instructions
Find the device manual for free Atoll 20 A EP2 MOULINEX in PDF.


| Product Type | Steam Iron |
| Brand | Moulinex |
| Model | Atoll 20 A EP2 |
| Dimensions (L x W x H) | 30 x 15 x 20 cm |
| Weight | 1.2 kg |
| Power Supply | 220-240 V, 50-60 Hz |
| Power | 1800 W |
| Water Tank Capacity | 200 ml |
| Soleplate Type | Ceramic Soleplate |
| Main Functions | Continuous steam, vertical steam, spray, anti-drip |
| Anti-scale System | Self-cleaning System |
| Automatic Shut-off | Yes, after 8 minutes of inactivity |
| Cord | 2 m, swivel |
| Maintenance and Cleaning | Regular descaling with self-cleaning function |
| Safety | Automatic shut-off, thermal fuse |
| Spare Parts and Repairability | Tank, soleplate, buttons available from after-sales service |
| General Information | Domestic use, do not immerse |
Frequently Asked Questions - Atoll 20 A EP2 MOULINEX
Refer to the manual for more details.
User questions about Atoll 20 A EP2 MOULINEX
0 question about this device. Answer the ones you know or ask your own.
Ask a new question about this device
Download the instructions for your Iron in PDF format for free! Find your manual Atoll 20 A EP2 - MOULINEX and take your electronic device back in hand. On this page are published all the documents necessary for the use of your device. Atoll 20 A EP2 by MOULINEX.
USER MANUAL Atoll 20 A EP2 MOULINEX
natural_image
Line drawing of a steam iron with a handle and spout, shown from the side view (no text or symbols)AtoII


natural_image
Diagram of a hairdryer with red arrows indicating motion, no text or symbols present
natural_image
Illustration of a hand pouring liquid into a fan or socket, with red arrows indicating flow direction (no text or symbols)


flowchart
graph TD
    A["Stage ⑤"] --> B["Leaf with leaves"]
    C["Stage ⑥"] --> D["Leaf with leaves"]
    E["Stage ⑦"] --> F["Leaf with leaves"]
    B --> G["Red Arrow to E"]
    D --> H["Red Arrow to E"]
    F --> I["Red Arrow to E"]

flowchart
graph TD
    A["Left Parcel"] --> B["F"]
    C["Right Parcel"] --> B["F"]

natural_image
Illustration of a suit jacket emitting steam from a iron iron, no text or symbols present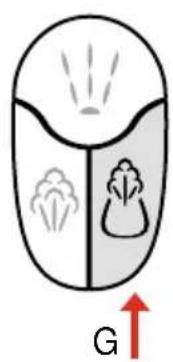

AtoII
Français p. 6
English p. 10
Deutsch S. 15
Nederlands p. 20
Español p. 24
Português p. 29
Italiano p. 33
Dansk s. 37
Norsk s. 42
Svenska s. 46
Suomi s. 50
Ελληνικάσ.55
Русский с.60
中文(繁體) 65 頁
عربي ص 73
Moulinex
Thank you for choosing an appliance from the Moulinex range.
Description
A Soleplate
B Spray
C Steam adjustment control
D Lid and water filling hole
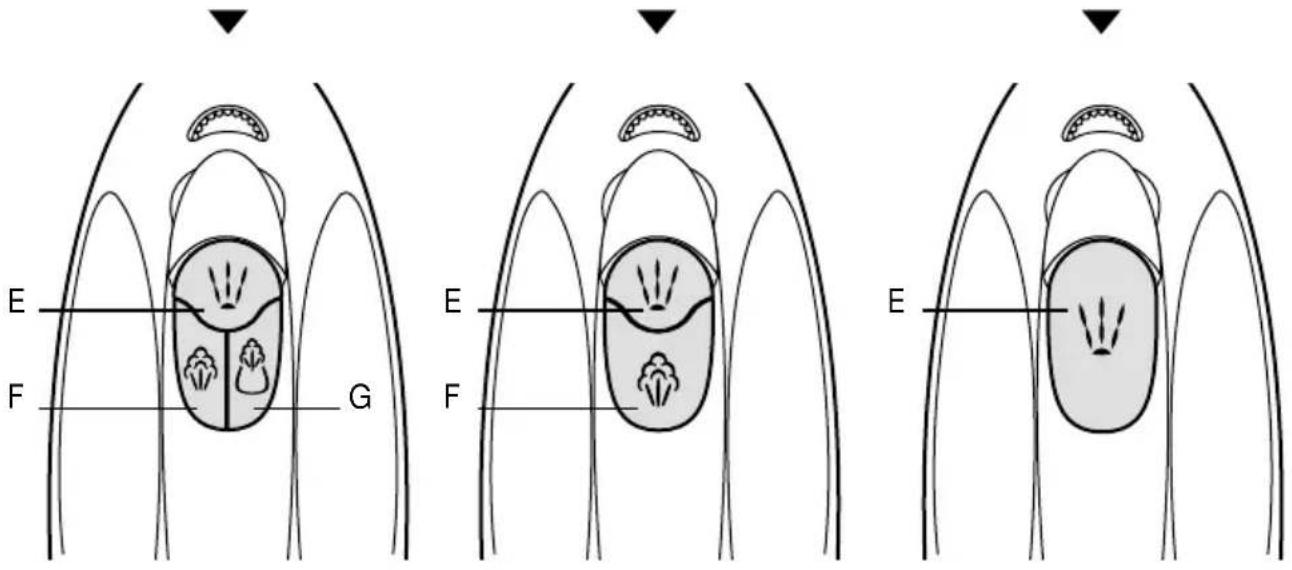
E Water spray button
F Pressing button
G «Perfectpoint» button
H Multi-directional power cable
I Temperature adjustment indicator
J Temperature adjustment control
K Water tank
L Maximum water fill mark for water tank
Safety recommendations
- Read the instructions for use carefully before using your appliance for the first time: any use which does not conform to the instructions will absolve Moulinex from any liability.
- Never leave the appliance within reach of children without supervision. The use of this appliance by young children or by disabled persons.
- Check that the power rating of your appliance does in fact match that of your household electrical wiring system.
- Make sure that the amperage indicated on your electricity meter and on your circuit breaker is at least 10 amps.
- It is essential that this appliance is connected to an earthed socket. If you use an extension, make sure it is of the bipolar 10 A type, with an earth conductor.
Wiring instructions for U.K and Ireland only :
APPLIANCES WITH FITTED PLUG
Important: For your convenience this appliance is supplied complete with a plug incorporating a 13 amp fuse.
In the event of replacing a fuse in the plug supplied, a 13 amp fuse approved by ASTA to BS1362 must be used.
If the socket outlets are not of the 13A BS 1363 type, and therefore do not accept the plug connected to this appliance, cut off the plug.
When cut off, this plug is a shock hazard if inserted into a socket outlet and must therefore be disposed of safely.
If the fuse cover is detachable, never use the plug with the cover omitted. Replacement
covers can be obtained from your service agent.
Fit the appropriate plug according to the instructions in paragraph «Fitting a plug». With alternative plugs a 15 amp fuse must be fitted either in the plug or adaptor or at the main fuse box.
APPLIANCES WITHOUT FITTED PLUG FITTING A PLUG - IMPORTANT
The wires in the mains lead are coloured in accordance with the following code:
GREEN & YELLOW : EARTH
BLUE : NEUTRAL
BROWN : LIVE
As the colours in the mains lead of this appliance may not correspond with the coloured markings identifying the terminals in your plug, proceed as follows:
The wire which is coloured GREEN & YELLOW must be connected to the terminal in the plug which is marked with the letter "E" or by the earth symbol ⊥ or coloured green or green and yellow. The wire which is coloured BLUE must be connected to the terminal which is marked with the letter "N" or coloured black. The wire which is coloured BROWN must be connected to the terminal which is marked with the letter "L" or coloured red.
This appliance is manufactured to conform to the Low Voltage Electrical Equipment (Safety) Regulations 1989 and is designed to comply with BS 3456. It complies with the requirements of the EEC Directive (89/336/EEC).
Any connection error will render the guarantee null and void.
- Your appliance is intended solely for domestic use and within the home.
- Do not use your appliance if it is not working correctly, or if it has been damaged. If this happens, you should contact an approved Moulinex service centre (see list in the service booklet).
- Any intervention other than cleaning and normal maintenance by the customer must be carried out by an approved Moulinex service centre.
- Never place the appliance, the power cable or the plug in water or in any other liquid.
- Do not allow the power cable to hang down within reach of children.
- The power cable must never be allowed to come close to or in contact with the hot parts of your appliance, close to a source of heat or rest on sharp edges.
- If the power cable or the plug are damaged, do not use the appliance. In order to prevent
any risk to yourself, these must be replaced by an approved Moulinex service centre.
- For your own safety, you should only use Moulinex accessories and spare parts which are suitable for your appliance.
- Unplug the appliance:
. before cleaning it
. before filling the water tank
. when you have finished ironing . during any interruption in ironing.
- Do not unplug the appliance by pulling on the power cable.
- Allow the iron to cool down before putting it away.
- Your iron is fitted with a thermal safety device, which will cut off the electrical circuit in the event of any anomaly.
Instructions for use
. How to use your appliance
- Make sure the steam adjustment control (C) is in position ⚙.
- Plug in the iron.
①- Set temperature using the temperature adjustment control (J). The temperature adjustment control (I) will come on. It will go out once the soleplate has reached the temperature selected.
On first use, a small amount of smoke may be given off. This is temporary and does not mean there is anything wrong with your iron.
. FILLING THE TANK
- Always unplug your iron before filling the tank.
- Make sure the steam adjustment control (C) is in fact set to position ⚙.
②- Open the lid (D) situated on the front of the iron and fill the tank via the opening.
- Never exceed the maximum level (L).
. STEAM IRONING
Depending on the model, the rate of steam flow from your iron is either fixed or variable.
③- If the flow of steam from your iron is fixed, select the setting ⚙️ on the steam adjustment control (C) (depending on model).
④- If the steam flow for your iron is variable, select this by setting the steam adjustment control (C) to the desired zone (depending on model).
Please note: Steam ironing is only possible in the steam zone indicated on the temperature adjustment control (J).
. DRY IRONING
- Adjust the steam adjustment control (C) to the setting ⚙️.
. SPRAY
⑤ - Press the spray button (E) in pulses. A spray of cold water enables you to dampen your laundry whether you are ironing dry or with steam. Very effective in getting rid of a crease!
. PRESSING (depending on model)
⑥ - Push the pressing button (F). Your iron will then instantly release a high-powered jet of steam.
Notes:
- Do not exceed 5 successive pulses, in order to prevent your iron from dripping.
- Always use this function in the steam zone indicated on the temperature adjustment control (J).
- When you use the pressing function for the first time, small fragments of scale may come out of with the jet of steam via the holes in the soleplate. We therefore advise that you do not make the first presses directly above your laundry.
. PERFECTPOINT (depending on model)
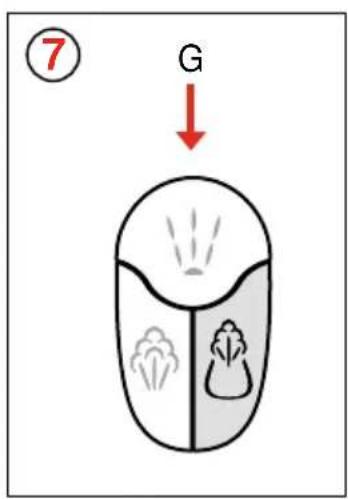
⑦- Press button (G). Your iron will instantly release a high-powered jet of steam, concentrated on the zone in front of the soleplate, for reaching difficult places (armholes, buttonholes, etc.).
⑧. VERTICAL CREASE REMOVAL (depending on model)
You also have the option of using your iron in the vertical position to remove creases from your clothes on a hanger, curtains, etc.
For models without the Perfectpoint system:
- Set the temperature adjustment control (J) to «MAX» setting.
- Hold the iron in the vertical position close to the fabric, without touching it. Push the pressing button (F) at the rate of not more than one pulse per second.
For models with the Perfectpoint system:
- Set the temperature adjustment control (J) to «MAX» setting.
- Hold the iron in the vertical position close to the fabric, without touching it. Press the Perfectpoint button (G) ⚙ at the rate of not more than one pulse per second.
Notes:
- You can use up to 5 pulses in the vertical position. Put down your iron for a few seconds before resuming crease removal.
- The steam produced is not always visible, but still retains its ability to remove creases.
Important: Never use this function for synthetic fibres. Keep the iron far away enough from the fabric to avoid any risk of scorching. As the steam produced is very hot, never remove creases from a garment which is being worn by someone - it must always be on a hanger.
. "AQUA STOP" (drip-stop system) (depending on model)
This system controls the temperature of the soleplate at all times. Below a certain temperature, the “Aqua Stop” system cuts off the flow of water and stops the iron from dripping onto the laundry.
. ANTICALC SYSTEM (anti-scale system) (depending on model)
This fixed system, located within the tank, reduces the problems linked with scale build-up.
To prolong the effectiveness of this system, we advise that you perform the following operation approximately once every 30 uses: The iron is cold and unplugged.
- Completely dissolve 1 tablespoon of salt (NaCl - cooking salt) in 1/2 litre of cold water.
- Fill the tank with this mixture and leave it to act for 15 minutes.
- Empty the tank.
- Repeat the same operation with the remaining mixture.
- Then fill the tank with fresh water to rinse and empty it.
Maintenance
. AUTO-CLEANING
In order to reduce the formation of scale, Moulinex has integrated an auto-cleaning system into your iron, which we advise you to operate at regular intervals. Please follow these steps:
- The iron should be cold and unplugged.
- Set the steam adjustment control (C) to position ✗.
-
Fill the tank up to the maximum level.
-
Set the temperature adjustment control (J) to MAX. Plug in the iron. As soon as the temperature adjustment indicator (I) goes out, unplug the iron and place it over the sink. Turn the steam adjustment control (C) to the auto-clean position A and hold down the control. Allow the tank to empty. The mixture of water/steam will carry away the scale residues contained in the soleplate.
- Then reset the steam adjustment control (C) to position ⚙.
- Using slow, deliberate movements, swing the iron from left to right to give the soleplate a good rinse and to remove the water remaining in the soleplate. Empty the iron.
- Plug in the iron again in order to dry the soleplate: perform this operation over a cloth (watch out for water splashes or steam being ejected).
- After this operation, unplug the iron once more.
- Clean the soleplate on a cloth made of thick, clean, damp cotton, before putting away the iron or before using it again (iron cold).
Storage
After each use:
- Unplug the iron.
- Empty the water tank.
- Set the steam adjustment control (C) to position ⚙.
- Allow the iron to cool down then wind the power cable by making a loop of about 10 cm starting from the iron.
- Store it on its heel.
What to do if your appliance does not work
| Problems Causes Solutions | ||
| The iron does not Faulty power supply Check the socket heat up | ||
| No steam and the Steam adjustment Adjustment is in adjustment control (C) is in adjustment control position (C) to the desired rate | ||
| No steam and the Soliron is hot ture adjust | teplate tempera- Set the ment too (J) to the ste low for «Aqua Stop» model | the thermostat zone, at the same time adjusting the temperature accor-ding to the type of fabric to be ironed. |
| Water is dripping out of the holes in the soleplate during use | Iron used for steam before the indicator light (I) has gone out | Wait for the adjust-ment indicator (I) to go out for the first time before going to steam position |
| Steam flow rate set R too high | Reduce the flow by adjusting the steam control (C) | |
| The spray, the pres-sing function or the Perfectpoint are not working | The tank is empty Fill | t with water |
| Large reduction in Iron the steam flow | n is starting to scale up | Perform an “auto-clean” |
| Tank almost empty | Fill it with water | |
| The iron is causing Brown marks on the laundry | The water used con- pains or did contain c organic residues | perform an “auto-ean” operation and change the water. To find out more, please refer to the section on “Recommended type of water” |
| Water is running out of the holes in the soleplate when it has been put away | Iron has been stored flat with water in the tank | Set the steam control (C) to ⚙ and store the iron standing on its heel.Empty the water from the iron. |
If you have followed all these instructions and your iron still does not work, please contact an approved Moulinex service centre (see list in the “Moulinex Service” booklet).
Ironing guide
WHAT TEMPERATURE TO USE
Please refer to the labels on your laundry to find out the composition of the fabrics or ironing instructions.
| Ironing Types of Thermostat instructions fabric | ||
 | Synthetic fibres: acrylic, polyamide, polyesterArtificial fibres: viscose | ■ |
 | Natural animal fibres: wool, silk | ■■ |
 | Natural vegetable fibres : ■■ cotton | |
| thick cotton, linen MAX | ||
 | Warning: Do not iron this article. | |
. If the fabrics are made of various types of textile, adjust the temperature control to the lowest recommended temperature. If you cannot determine the composition of the fabrics from the label, do a test on a part of the garment which will not be seen, starting at the lowest temperature.
. Sort your laundry before ironing, grouping the same types of textile. The iron heats up more quickly than it cools down, so start by ironing the laundry requiring the lowest temperature and continue to higher temperatures (see table above).
. Wool mixes can be steam-ironed. To prevent the soleplate of your iron coming into direct contact with the wool, place a dry cloth over the fabric to be ironed. You can also iron these items on the reverse.
. to avoid making delicate fabrics shiny (silk, velvet, viscose, etc.) or for fabrics with impressions (transfer, flocking, etc.), iron on the reverse.
. As some marks may be fixed by a high temperature, it is preferable only to iron your laundry once all marks and stains have been completely removed.
WHAT KIND OF WATER IS SUITABLE FOR USE IN YOUR STEAM IRON?
. Tap water, if it is not too hard (see equivalence table below):
Example of water considered to be hard
| France G | Germany United | Kingdom International | 3 mmol/l or 6 mEq/l |
| 30°f | 17°d | 21°e |
- To find out the precise hardness of your tap water, contact your Town Hall or your water company.
. Commercially available demineralised water.
. Commercially available distilled water. Our advice: distilled water or demineralised + tap water (half and half) if your water is hard. We strongly recommend that you do not use any other kind of water.
Do not put any additives into the water in your iron's tank.
PRACTICAL ADVICE
. Maintenance of the soleplate
- Clean it at regular intervals. The longer you wait to clean the soleplate, the harder it will be to remove any marks
- Never scratch the soleplate and do not use aggressive or abrasive products to clean it.
Traces of water, starch or lime
When the iron is cold, rub with a thick cotton cloth soaked in wine vinegar. Rinse immediately with water and dry.
Stuck-on textiles
- Allow your iron to cool (30 minutes at least) after unplugging it, then plug it in again and set the thermostat to the MAXI setting. Once the iron is hot, place on an ironing board a clean, thick cotton cloth and rub the soleplate of your iron on it vigorously. For greater effectiveness, you can place your cloth on the edge of the board. Do not forget to clean the sides of the soleplate.
Scratches
To keep the stainless steel, chrome or anti-stick soleplate of your iron in good condition and to avoid scratches and dirty marks:
- never put the soleplate down on a rough or abrasive surface
- do not iron the metallic parts (zips, etc.) of your laundry.
. Maintenance of the iron (autoclean function) for 3 hours of ironing per week:
- If your tap water is not very hard, Moulinex recommends that you perform this cleaning function at regular intervals about once every 3 months.
- Otherwise, we recommend that you mix your tap water with distilled or demineralised water and perform a cleaning operation once a month.
Note: When your water causes brown marks, this means it contains organic residues. You should then clean the iron. If these marks persist, it would be best to change the type of water you use.
Moulinex strongly recommends that you do not use descaling products (powder or liquid) to descale your iron.
. PÅFYLDNING AF VANDBEHOLDEREN
G "Perfectpoint"-knapp
H Leddet ledning
I Temperaturindikator
J Knapp for temperaturjustering
K Vanntank
L Maksimumsindikator for vannivå
G "Perfectpoint" knapp
H Multiledad sladd
I Temperaturindikator
J Temperaturreglage
K Vattentank
G "Perfectpoint" painike
- AtoII
- Description
- Safety recommendations
- APPLIANCES WITH FITTED PLUG
- APPLIANCES WITHOUT FITTED PLUG FITTING A PLUG - IMPORTANT
- Any connection error will render the guarantee null and void.
- Instructions for use
- How to use your appliance
- FILLING THE TANK
- STEAM IRONING
- DRY IRONING
- SPRAY
- PRESSING (depending on model)
- Notes:
- PERFECTPOINT (depending on model)
- For models without the Perfectpoint system:
- For models with the Perfectpoint system:
- "AQUA STOP" (drip-stop system) (depending on model)
- ANTICALC SYSTEM (anti-scale system) (depending on model)
- Maintenance
- AUTO-CLEANING
- - The iron should be cold and unplugged.
- Storage
- After each use:
- What to do if your appliance does not work
- Ironing guide
- WHAT TEMPERATURE TO USE
- WHAT KIND OF WATER IS SUITABLE FOR USE IN YOUR STEAM IRON?
- PRACTICAL ADVICE
- Maintenance of the soleplate
- Traces of water, starch or lime
- Stuck-on textiles
- Scratches
- PÅFYLDNING AF VANDBEHOLDEREN
Brand : MOULINEX
Model : Atoll 20 A EP2
Category : Iron