
Toucan DR2 - Deep fryer MOULINEX - Free user manual and instructions
Find the device manual for free Toucan DR2 MOULINEX in PDF.


| Product type | Electric deep fryer |
| Brand | Moulinex |
| Model | Toucan DR2 |
| Dimensions (L x W x H) | Approximately 35 x 25 x 30 cm |
| Weight | Approximately 3 kg |
| Power supply | 220-240 V, 50/60 Hz |
| Power | 1800 W |
| Oil capacity | 2.5 L |
| Frying capacity | Up to 1 kg of potatoes |
| Adjustable temperature | From 150 to 190 °C |
| Main functions | Frying, keep warm, automatic shut-off |
| Odor filter | Yes, integrated charcoal filter |
| Removable tank | Yes, removable stainless steel tank for easy cleaning |
| Basket | Metal basket with insulated handle |
| Cleaning | Tank and basket are dishwasher safe |
| Safety | Automatic shut-off in case of overheating, cool handles, non-slip feet |
| Non-slip feet | Yes, 4 non-slip feet |
| Color | White and red |
| Spare parts available | Basket, tank, filter, lid |
| Repairability | Repairability index: 7.2/10 |
Frequently Asked Questions - Toucan DR2 MOULINEX
User questions about Toucan DR2 MOULINEX
0 question about this device. Answer the ones you know or ask your own.
Ask a new question about this device
Download the instructions for your Deep fryer in PDF format for free! Find your manual Toucan DR2 - MOULINEX and take your electronic device back in hand. On this page are published all the documents necessary for the use of your device. Toucan DR2 by MOULINEX.
USER MANUAL Toucan DR2 MOULINEX


MISE EN PLACE DU CORPS GRAS
Your fryer is equipped with an automatic cooking system.
You can cook in automatic mode in 2 different ways:
. 1 ^st immersion: the basket rises and falls once automatically when cooking ingredients.
. Double dip function: the basket rises and falls twice automatically when cooking ingredients.
This function gives you the best results when cooking fresh fries (see "Cooking Chart").
It is possible to use the fryer in manual mode: the user controls the rise and fall of the basket.
Thank you for choosing an appliance from the Moulinex range, which is exclusively intended for cooking food.
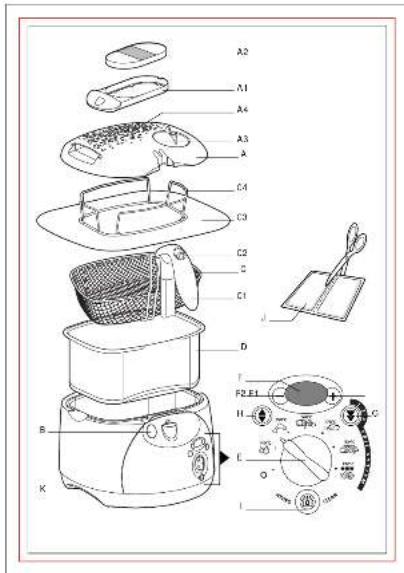
Description
A Lid with automatic opening
A1 "Clean Express" drawer
A2 Anti-odour filter with saturation indicator
A3 "Turn and Clean" window
A4 Odour filtration zone
B Lid release button
C Filter basket
C1 Basket handle
C2 Basket raising / lowering control button
C3 Paper filter (depending on model)
C4 Holder for paper filter (depending on model)
D Removable bowl with non-stick coating
E Function selector with the off setting at «0»
F Electronic display
F1 (+) button: increases cooking time
F2 (-) button: decreases cooking time
G Double immersion control
H Raising / lowering control
J Dose of cleanser (depending on model)
K Carrying handles
Safety recommendations
- Please read the instructions for use carefully before using your appliance for the first time: any use which does not conform to these instructions will absolve Moulinex from all liability.
- Never leave the appliance (whether or not it is in use) within reach of children without supervision. Never allow children to use the fryer on their own. The use of this appliance by disabled persons must only occur under supervision.
- Check that the voltage rating of your appliance corresponds to that of your household electrical wiring system, and that your electricity meter can support at least 10 amps.
Wiring instructions for U.K and Ireland only :
APPLIANCES WITH FITTED PLUG
Important : For your convenience this appliance is supplied complete with a plug incorporating a 13 amp fuse.
In the event of replacing a fuse in the plug supplied, a 13 amp fuse approved by ASTA to BS1362 must be used.
If the socket outlets are not of the 13A BS 1363 type, and therefore do not accept the plug connected to this appliance, cut off the plug if moulded type or remove the plug if connected by screw terminals.
When the plug is a moulded type and this is cut off from the appliance, the connected wires are a shock hazard. Do not under any circumstances connect a cut off plug into the electrical socket outlet. The cut off plug must be disposed of in a safe manner that prevents any form of connection.
If the fuse cover is detachable, never use the plug with the cover omitted. Replacement covers can be obtained from your service agent.
Fit the appropriate plug according to the instructions in paragraph "Fitting a plug". With alternative plugs a 15 amp fuse must be fitted either in the plug or adaptor or at the main fuse box.
APPLIANCES WITHOUT FITTED PLUG FITTING A PLUG - IMPORTANT
The wires in the mains lead are coloured in accordance with the following code:
GREEN & YELLOW : EARTH
BLUE : NEUTRAL
BROWN : LIVE
As the colours in the mains lead of this appliance may not correspond with the coloured markings identifying the terminals in your plug, proceed as follows:
The wire which is coloured GREEN & YELLOW must be connected to the terminal in the plug which is marked with the letter 'E' or by the earth symbol ⊥ or coloured green or green and yellow. The wire which is coloured BLUE must be connected to the terminal which is marked with the letter 'N' or coloured black. The wire which is coloured BROWN must be connected to the terminal which is marked with the letter 'L' or coloured red.
This appliance is manufactured to conform to the Low Voltage Electrical Equipment (Safety) Regulations 1989 and is designed to comply with BS 3456. It complies with the requirements of the EEC Directive (89/336/EEC).
Any connection error will render the guarantee null and void.
- It is essential that your appliance is connected by means of an earthed plug. Non-compliance with this obligation can cause an electric shock and may lead to serious injury. It is vital for your own safety that the earth socket corresponds to the electrical installation standards in force in your country. If your system does not include an earthed socket, it is vital that you call in an approved body before plugging in the appliance, in order to bring your electrical system up to standard.
- Your appliance is intended exclusively for domestic use and within your home.
- Never use your appliance if it is not working correctly, or if it has been damaged. If this happens, contact an approved Moulinex service centre (see list in service booklet).
- Any intervention other than cleaning and normal maintenance must be carried out by an approved Moulinex service centre.
- Unplug your appliance as soon as you have stopped using it and when you are cleaning it.
- Never put the appliance, the power cord or the plug into water or any other liquid.
- Never allow the power cord to hang down within reach of children. Always keep it well away from children.
- The power cord must never be in close proximity to or in contact with the hot parts of your appliance, close to a source of heat or rest on sharp edges.
- If the power cord or the plug are damaged, do not use your appliance. To avoid any risk, they must be replaced by an approved Moulinex service centre (see list in service booklet).
- For your own safety, use only accessories and spare parts which are suitable for your appliance.
- Place your fryer on a worktop which is well away from any source of heat and from any risk of water splashes and which is heat-resistant.
- A safety cut-out switch prevents your fryer from working if the removable bowl is not in place.
- Never operate your fryer without putting in the removable bowl filled with the necessary amount of oil or fat (for fryer function), or water («Hydro-Clean» function).
- The fryer is protected by a thermostatic safety device which automatically cuts off the
electrical power in the event of accidental over-heating.
- Never move your fryer while it is in use or while the oil or water are still hot. Hot oil or water can cause very serious burns.
- Use the carrying handles (K) to move the fryer, and under no circumstances should you use the basket handle or the openings underneath the lid to do this.
- It is essential that you wait until the oil or boiling water has cooled down before removing the bowl.
- Never obstruct the odour filtration zone (A4) located on the lid with your hand or any other object whatsoever (cloth, dish, plate, etc.), as you run the risk of being burnt.
- The min / max level indicators are provided for the oil or fat.
- Check that the level of the oil is above the «min» level indicated in the bowl.
- The min / max levels are indicated on the side of the bowl (D).
- Oil and grease are flammable products. If the oil or grease catches fire, unplug the appliance, cover it with its own lid or a plate to stifle the flame, but never use water.
. «Hydro-Clean» function
- The «Hydro» marking is the maximum amount of water to be used.
- Observe the «Hydro» level indicated inside the removable bowl (D).
. Doses of cleanser
- Keep out of the reach of children. It is irritating to the eyes. In the case of contact with the eyes, rinse immediately in plenty of water and consult a doctor or hospital.
- Not to be swallowed. If this happens, consult a doctor immediately (if possible, showing him the packaging or label).
Before first use
- Keep your guarantee card, which you will find on the packaging.
- Open the lid by pressing on the release button (B).
①- Remove the basket by lifting the handle. Press the control button (C2).
②- Remove paper filter holder (C4) by taking it out of the basket.
- Wash the basket and the filter paper holder with hot water and washing up liquid, rinse and dry carefully.
- Take out the bowl by raising it vertically and wash it. Rinse, dry and replace it.
- Plug in the appliance.
Using the appliance
PUTTING IN THE OIL OR FAT
. If you are using blocks of fat, (4 blocks of 500 g):
①- Take out the basket by pressing the control button (C2). Cut the blocks of fat into pieces and place these directly into the bowl without the basket.
- Never melt the blocks of fat in the basket.
- Close the lid by pushing until it clicks.
④- Melt the blocks by setting the function selector (E) to 140°C.
The display will blink until this temperature has been reached.
An acoustic signal will sound once the right temperature has been reached.
- Reset the temperature selector to the off position «0».
- When the blocks of fat have liquefied, replace the basket / handle assembly in the bowl by pressing the control button (C2).
③. If you are using oil:
- Pour it inside the bowl up to the level indicated inside between “mini” and “maxi” (2 to 2.2 litre of oil).
You can start using your fryer.
FRYING FOOD
. AUTOMATIC COOKING (1 - 2 IMMERSIONS):
④- Set the selector (E) to the selected temperature (see cooking charts).
The display shows a pre-programmed time. It is possible to increase or to decrease this time in steps of 1 minute by pressing the (+) or (-) controls (maximum 30 minutes).
Double immersion cooking
- Press control (G). A logo « 🍒 » appears on the left-hand side of the display.
First phase: pre-cooking takes about 2/3 of the time. The second phase finishes off the cooking.
The display flashes until cooking temperature has been reached.
An acoustic signal warns you that the basket is in the raised position.
- Open the lid and put in the food.
- Close the lid.
As soon as cooking temperature has been reached, the display becomes fixed. The basket is lowered automatically.
The cooking time will start to count down.
Notes:
. It is possible to alter the cooking time at any point during cooking by pressing the (+) or (-) controls.
It is also possible to raise the basket at any time by pressing the raising / lowering control (H).
. To resume the cooking which has already commenced (within a maximum of 20 minutes), press the raising / lowering control (H) again and cooking will be completed with the remaining time.
An acoustic signal will inform you when cooking is finished.
The display shows «0».
. Allow the food to drain.
. Open the lid and serve.
. Cooking several batches of food in succession:
- Place the food in the basket.
- Close the lid.
You can go back to the original pre-programmed cooking time by pressing once on the (+) control, or you can choose a different temperature using the selector.
- To use the double immersion function, press the double immersion control (G).
. Finishing cooking and turning off the appliance
- Set the temperature selector to the off position «0». The appliance will now switch off.
- The basket automatically returns to the lowered position.
- Unplug the appliance.
Notes:
. If you do not return the selector to the position «0»:
The basket will remain in the raised position. The display will show zero for about 20 minutes until the appliance goes into standby mode (4 horizontal dashes flashing in the display).
When the appliance is in standby mode, the temperature of the oil is maintained at a steady 140 ^ .
At the end of 10 minutes, the appliance switches itself off automatically: the display shows 4 horizontal fixed dashes.
The basket returns to the lowered position.
. Set the temperature selector (E) to the off position «0».
. Unplug the appliance.
. MANUAL COOKING
- Set the selector (E) to the selected temperature (see cooking charts). A time will be displayed.
- To cancel it, press on both the (+) and (-) controls at the same time.
The figure zero will flash until the right temperature has been reached.
The basket will rise automatically when the temperature of the oil allows it.
The display becomes fixed once the temperature selected has been reached, and this appears in the display.
- Open the lid and place the food in the basket.
- Close the lid.
- Press the raising / lowering control (H) to lower the basket.
- Monitor the cooking.
- At the end of cooking, press the raising / lowering control (H) to raise the basket.
- Allow the food to drain.
- Open the lid and serve.
. Finishing cooking and turning off the appliance
- Set the temperature selector (E) to the off position «0».
The basket returns to the lowered position. - Unplug the appliance.
Notes:
. If you do not return the selector to the position «0»:
The basket will remain in the raised position. The display will show zero for about 20 minutes until the appliance goes into standby mode (4 horizontal dashes flashing in the display). When the appliance is in standby mode, the temperature of the oil is maintained at a steady 140 °C.
At the end of 10 minutes, the appliance switches itself off automatically: the display shows 4 horizontal fixed dashes.
The basket returns to the lowered position.
. Set the temperature selector (E) to the off position «0».
. Unplug the appliance. If you forget about food being cooked, the basket automatically raises itself after 20 minutes.
Practical tips
1. Oil or fat
- Never operate your fryer without oil.
- Always use an oil which can withstand high temperatures.
- Do not mix oils of different qualities.
- Change the oil when it becomes brown (every 10 to 12 uses, depending on the cooking done).
Important: Before each use, make holes in the solid fat with a non-metallic spatula to the bottom of the bowl, in order to allow any water trapped under the fat to escape in the form of steam
2. Preparing foods for frying
- No matter what the recipe, food must be perfectly dry: this will prevent overflowing and extend the life of the oil.
- When dishes include raw potatoes (chips, crisps and potato straws), wash them in cold water to get rid of the starch. This will stop them from sticking together. Dry them carefully with paper kitchen towel.
- When preparing frozen foods, before cooking, remove any ice crystals on them by shaking the basket over the sink.
3. Using the paper filter
. If your fryer is equipped with a filter paper and its holder, you should only use these for frying foods in breadcrumbs (they prevent the crumbs from falling into the bath of oil).
Before putting the food in, you should:
⑤. Take out the basket, allow it to cool, remove the holder (C4) and hook the filter paper in place (C3) then refit the holder and its filter in the basket.
. Replace the handle / basket assembly.
Note:
- If you use a paper filter, replace it after every use.
4. Cooking
- Do not overfill the basket, or you will cause the temperature of the hot oil to drop too much, and this will make the food too greasy. The capacity of your appliance is limited to:
. 1.2 kg of fresh chips
. 1 kg of frozen chips
- Do not leave your appliance heating unnecessarily. Avoiding overheating when frying will extend the life of your oil.
- The appliance will automatically go into standby mode after about 20 minutes of non-use.
- Do not leave your cooked foods in the basket in the draining position for too long, as the steam may soften them.
5. Rotating window
You can monitor the cooking of your food using the rotating window (A3) when the basket is in the raised position.
Cooking charts
Cooking times are given by way of indication. You can adjust them according to your own taste.
Temperatures and cooking times Fresh products
| Max. Foods Time temperature (min) | ||
| 140°C Onions 4 - 6Mushrooms 4 - 6Vegetable fritters 4 - 6Cod pieces 5 - 6Fried smelt 6 - 8Prawns 6 - 8Fish balls 6 - 8 | ||
| 180 °C Breaded pork chops 7 - 10Veal cutletsMeatballs or offalFish filletsSardines 8 - 10Apple fritters | 7 - 107 - 105 - 65 - 6 | |
| 180°C Chips (1st immersion)(2ndimmersion) | 7 - 114 - 6 | |
| 190°C Potato crispsChicken sections | 5 - 812 - 15 |
For frozen foods, set the temperature selector (E) to setting ***. You will also need to adjust the cooking time as a function of the quantities and of your own tastes.
Weight and cooking time Frozen products
| Foods | Max. weight (g) | Time (min) |
| Chips (pre-cooked) | 500 | 6 - 8 |
| 1000 | 9 - 13 | |
| Potato chunks | 800 | 6 - 8 |
| Game chips | 300 | 6 - 8 |
| Cod in breadcrumbs | 400 | 6 - 8 |
| Hake in breadcrumbs | 400 | 6 - 8 |
| Fried smelt 400 8 - 10 | ||
| Fish fillets in batter | 350 | 6 - 8 |
| Battered scampi | 400 | 4 - 5 |
| Squid rings | 400 | 4 - 5 |
| Apple fritters | 300 | 4 - 5 |
| Breaded chicken escalopes | 400 | 8 - 10 |
| Breaded pork chops | 400 | 6 - 8 |
| Breaded veal chops | 400 | 6 - 8 |
| Beef meatballs | 400 | 6 - 8 |
Cleaning
1. Removing the oil or fat
After 10 - 12 frying sessions, you can use the
«Hydro-Clean» function which allows an initial de-greasing of the removable bowl.
- Remove the basket when you have finished cooking.
- Unplug your appliance and allow it to cool down.
- Allow the oil or fat to cool and then decant it into a metal or ceramic container.
. If the fat has solidified:
- Plug the appliance in again.
④ - Set the function selector (E) to 140 °C for a few seconds to unstick the block of fat from the walls of the bowl.
- Turn off the appliance by setting the temperature selector to «0».
- Remove the fat from the bowl using a fork.
. If the basket has been trapped by the solidified vegetable fat:
- Melt the fat by setting the function selector (E) to 140 °C.
You will need to cancel the pre-programmed time by pressing the (+) and (-) controls at the same time.
The figure zero will flash until the right temperature has been reached.
The basket will rise automatically when the temperature of the fat allows (melted blocks of fat).
- Unhook the basket by pressing the control button (C2).
- Turn off the appliance by setting the temperature selector to «0».
- Allow the fat to cool and harden. Once it has solidified, plug in the fryer again.
- Set the function selector (E) to 140 °C for a few seconds to unstick the block of fat from the walls of the bowl.
- Turn off the appliance by setting the temperature selector to «0».
- Remove the fat from the bowl using a fork.
Notes:
- Never pour vegetable fat down the sink. Once it has solidified, put it into a bin bag, lined with newspaper to absorb excess oil.
2. Hydro-Clean function (pre-degreasing of the bowl)
- Take out the bowl and empty it.
③ - Fill the removable bowl with water up to the «Hydro» level indicated on the interior of the bowl.
. Depending on model: . Add a dose of cleanser (J) to the water or . Add the equivalent of quarter of a tablet or a tablespoon of dishwasher powder or liquid to the water.
- Do not use any products other than those recommended.
- Never use a foaming product such as washing-up liquid or similar, scouring powder, or products containing bleach or ammonia.
- Replace the bowl without the basket.
- Leave the lid open.
④ - Press the «Hydro-Clean» control (I). The display indicates «HC» and 30, flashing. The countdown starts now.
The appliance switches itself off automatically after 30 minutes.
An acoustic signal informs you of the end of the pre-degreasing cycle.
The display goes out.
- Allow to cool and remove the bowl with care.
- Finish cleaning with hot water and washing-up liquid.
- Rinse at least twice and dry with care.
- Check that the temperature selector is in the «0» position.
Notes:
It is possible to stop the «Hydro Clean» function by pressing the control (I) again.
- Never use a scouring pad, any metallic object or scouring powder. You will risk damaging the coating of the bowl. Damage to the bowl by not following these guidelines is not covered in the guarantee.
Scratches inside the removable bowl or brown marks on the exterior may appear naturally if you use the appliance frequently.
3. Cleaning the other parts of the appliance
- Unplug the appliance. - Clean the exterior of the fryer with a damp cloth. Do not use an abrasive pad or alcohol. - Never immerse the appliance in water and never wash it under running water.
⑦- To clean the inside of the lid, remove the «Clean Express» drawer, use a damp sponge with washing up liquid, rinse and dry.
②- If you have used a paper filter, remove it. Wash the basket and the filter holder in hot water with washing up liquid, rinse and dry.
- Do not wash the lid or the basket in the dishwasher.
Maintenance
1. Changing the lid gaskets
- Open the lid.
⑥- Remove the lid by pushing it gently backwards and pulling upwards.
- Turn the lid over, remove the screws and take off the metal inner cover and the window.
- Clean the lid and the window with a damp sponge with washing up liquid. Rinse and dry.
- Replace the defective gaskets and reassemble.
2. Changing the anti-odour cartridge
- The activated-charcoal anti-odour cartridge is highly effective against odours and grease.
- Depending on the type and weight of the fried foods, it will remain effective for 40 to 50 uses.
⑧- When the saturation indicator which can be seen on the lid turns from pink to pale grey, change the filter.
- Wait for the fryer to cool down.
- Remove the «Clean Express» drawer (A1) and turn it upside down over the dustbin.
- Place the new filter in the drawer, black side down.
What to do if your appliance does not work
- First, check the connection and the power cord.
PRACTICAL ADVICE
| Problems Causes Solutions | ||
| Excessive odour. The oil has Replace deteriorated. the oil or fat. | ||
| The fat is not Use good quality appropriate for this oil or fat. Do not mix type of cooking. oils or fats of different qualities. | ||
| The cartridge is Change it. saturated. | ||
| Steam is escaping The lid is not closed Close the lid from under the lid. properly. correctly. | ||
| The gaskets are faulty. | ||
| Oil overflows. | Recommended quantities and times exceeded. | Do not fry more than the quantities indicated. |
| Oil overflows. The appliance has checked oil been filled inside the level removed by the maximum value limit. | level removed by the food. | Level removed by the food. |
| Foods overloaded Dry with water plunged completely. into hot oil. | the food is not hot. | |
| Food does not cook in time too Adjust the cooking brown. short. time. | time too Adjust the cooking | |
| Basket overloaded Adjust the cooking with food. greater than the weights indicated. | ||
| The oil is not hot. Check program-enough. ming. Consult your retailer or an approved Moulinex service centre. | ||
| Use of paper filter Remove the paper with other than filter. breaded foods. | ||
| Chips, potato straws and crisps stick together. | Unwashed food immersed in the oil. | Wash the potatoes and dry them carefully. |
| The oil does not have used as a product to use your retailer or an approved Moulinex service together. (The fuse needs changing). | ||
| Appliance does not work. | The bowl is not in the correct position. | Reposition the removable bowl. |
| An «E» followed by a number appears in the display (except «E5»). | Consult your retailer or an approved Moulinex service centre. | |
| «E5» appears in the display. | Unplug the appliance. Reset selector to «0». Plug in again after 5 secs. Recommence programming. | |
| The oil hasn't reached the correct temperature (display level), flashes after 20 minutes) | The oil level is too high (above the "maxi" | Adjust the oil level. |
Accessories
- Paper filters: ref. CV9
- Dose of degreaser: ref. AET7
- Anti-odour cartridge: ref. DA9
A1 Schubfach "Clean Express"
I Taste "HydroClean"
A1 "Clean Express" filtercassette
I "Hydro Clean" toets
A1 Cajón "Clean Express"
A3 "Turn and Clean"-vindu
A4 Luktfiltreringssone
H Kontroll for heving/senking
I "Hydro Clean"-kontroll
MANUELL TILBEREDNING
A3 "Turn and Clean" fönster
A4 Luktfiltreringszon
- Pappersfilter: ref. CV9
- Rengöringsmedel: ref. AET7
- Anti-lukt filter: ref. DA9
I "Hydro Clean"-painike
. AUTOMAATTINEN KYPSENNYS (KYPSENNYS 1 TAI 2 VAIHEESSA)
. MANUAALINEN KYPSENNYS

- MISE EN PLACE DU CORPS GRAS
- Description
- A Lid with automatic opening
- B Lid release button
- C Filter basket
- D Removable bowl with non-stick coating
- E Function selector with the off setting at «0»
- F Electronic display
- G Double immersion control
- H Raising / lowering control
- J Dose of cleanser (depending on model)
- Safety recommendations
- Wiring instructions for U.K and Ireland only :
- APPLIANCES WITH FITTED PLUG
- APPLIANCES WITHOUT FITTED PLUG FITTING A PLUG - IMPORTANT
- Any connection error will render the guarantee null and void.
- Before first use
- Using the appliance
- PUTTING IN THE OIL OR FAT
- FRYING FOOD
- Double immersion cooking
- The display flashes until cooking temperature has been reached.
- Notes:
- MANUAL COOKING
- Finishing cooking and turning off the appliance
- If you do not return the selector to the position «0»:
- Practical tips
- Oil or fat
- Preparing foods for frying
- Using the paper filter
- Before putting the food in, you should:
- Note:
- Cooking
- Rotating window
- Cooking charts
- Cleaning
- Removing the oil or fat
- Hydro-Clean function (pre-degreasing of the bowl)
- Cleaning the other parts of the appliance
- Maintenance
- Changing the lid gaskets
- Changing the anti-odour cartridge
- What to do if your appliance does not work
- Accessories
- I "Hydro Clean" toets
- H Kontroll for heving/senking
- MANUELL TILBEREDNING
Brand : MOULINEX
Model : Toucan DR2
Category : Deep fryer