
EG411X - Range hood Atag - Free user manual and instructions
Find the device manual for free EG411X Atag in PDF.


| Product type | Extractor hood |
| Brand | Atag |
| Model | EG411X |
| Width | 60 cm |
| Depth | 50 cm |
| Height | 65 cm (varies by installation) |
| Net weight | 10 kg |
| Power supply | 220-240 V ~ 50 Hz |
| Maximum power consumption | 200 W |
| Motor type | Induction motor |
| Number of speeds | 3 speeds + intensive |
| Maximum airflow | 650 m³/h |
| Noise level (max) | 62 dB(A) |
| Lighting | LED, 2 x 3 W |
| Filter type | Washable metal grease filter |
| Charcoal filter (optional) | Available for recirculation |
| Extraction mode | External extraction or recirculation |
| Outlet diameter | 150 mm |
| Controls | Push buttons |
| Protection rating | IPX4 |
| Energy class | A |
| Maintenance | Regular cleaning of filters and surface |
| Spare parts | Filters, LED bulbs, remote control (depending on model) |
| Repairability | Motor and controls accessible by a professional |
Frequently Asked Questions - EG411X Atag
User questions about EG411X Atag
0 question about this device. Answer the ones you know or ask your own.
Ask a new question about this device
Download the instructions for your Range hood in PDF format for free! Find your manual EG411X - Atag and take your electronic device back in hand. On this page are published all the documents necessary for the use of your device. EG411X by Atag.
USER MANUAL EG411X Atag
natural_image
3D illustration of a kitchen chimney with a curved base and ventilation slots (no text or symbols)ATAG
gebruiksaanwijzing/installatievoorschrift instructions for use/installation instructions mode d'emploi/instructions d'installation Gebrauchsanweisung/Installationsvorschrift Istruzioni per l'uso/Istruzioni per l'installazione brugsanvisning/installationsforskrifter oðnyíes χρήσης/oðnyíes εγκατάστασης
WG3/4/8X-EG3/4/8X Maxus
Motor of bediening defect.
Bel de Servicedienst.
kap ophangen
natural_image
Simple line drawing of a box with a vertical line above it and a small object inside, no text or symbols present.
motormodule
WA111B5U WA300B5U WA111C5U WA300C5U ASVM0021 AS000387 ASVM0025 ASVM0023
The extractor hood has been designed for domestic use and for the purposes stated. Atag extractor hoods are available in many different models, which fit elegantly into all interiors. The Atag range offers various types of hoods, some with built-in motors and others suitable for recirculation.
introduction
When you have read this manual, you will quickly be aware of all the facilities the appliance can offer you. You can read about safety and how you should look after the appliance. In addition you will find environmental tips and instructions that can help to save energy.
Keep the manual. Any later user of this appliance could benefit from them.
table of contentsforeword
general 1 - 2
introduction 1
for your safety 2
instructions for use 3 - 7
lighting 3
fan 3-4
faults 5
how to keep the appliance looking good 6 – 7
installation instructions 8 - 17
installation 8 – 10
assembly 10 - 16
technical data 17
disposal of packaging and appliances 17
for your safety
Please note
This appliance should be connected by a registered fitter. Damage arising from incorrect connection or incorrect fitting is not covered by the guarantee.
Disconnect the appliance before starting with cleaning or reparation. It is recommended that you do this by removing the plug from the socket or by setting the isolation switch to zero.
Never flambe under an extractor. The high flames can cause fire. Even if the ventilator is switched off.
When deep-frying, always keep a close watch.
If the appliance is used together with equipment which uses gas or other fuels, then a sufficient supply of fresh air must be ensured.
Switch the extractor hood on before starting to cook. After cooking, allow the extractor hood to continue to run for approx. 10 minutes. This can also be done automatically (see 'automatic continued running').
Clean the appliance regularly, as shown in 'maintenance'. This minimises the chance of a fire starting.
Switch off the electricity before replacing the light bulbs! Only use the same sort of light bulbs with the same Wattage.
In view of possible sharp edges on the chimney we advise you to wear working gloves when fitting the chimney.
lighting

switching on the appliance
First switch the appliance on using the on/off button. The light above the button lights up. You can now make use of the other function symbols.
switching on the lighting
Touch the symbol. The lighting switches on at setting 4. You can adjust the light intensity (1-4) by keeping your finger on the button. After a few seconds, the lighting jumps to the next setting (in the sequence 4-3-2-1-0-1-2-3-4). The number of indicator lights on above the symbol indicates the light intensity.
switching off the lighting
Touch the symbol and keep your finger on it until the indicator light above the symbol goes out. The lighting also goes out if you switch the appliance off using the on/off switch.
fan
switching on the appliance
Switch the appliance on using the on/off button ( )The light above the button lights up. You can now make use of the other function symbols.
Touch the ▶ Symbol and keep your finger on it until the setting you want has been reached. If you continue to keep your finger on the symbol, after a few seconds the setting will jump to the next setting (in the sequence 0-1-2-3-4-3-2-1-0). The indicator lamp above the symbol indicates the setting.
fan (continued)
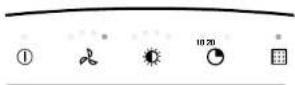
adjusting extractor capacity
Touching the ▶ symbol switches the fan to its next setting. The new setting is indicated by the indicator lights (0-4) lighting up.
intensive setting
Keep your finger on the ▶ symbol until the 4 indicator lights come on. Let go of the button and the setting is switched on.
Touch the ▶ symbol and keep your finger on it until all the indicator lights go out. When you let go of the button, the hood switches off.
automatic continued running
First select the fan setting desired. Touch the Symbol. You can choose whether the extractor hood is turned off after 10 or after 20 minutes. The light next to the time selected lights up.
The extractor hood automatically switches back from the setting chosen to 0. If the lighting was switched on during the automatic continued running, it will remain switched on.
cleaning the grease filter
If the grease filter symbol ( lights up, you should clean the filter immediately.
Put the filter back in place after cleaning and erase the electronic memory by touching the symbol and keeping your finger on it until the indicator light goes out.
faults
Please check the following points which may solve the problem, before calling the service department.
If the connection cable is damaged, it should be replaced by the service department of the manufacturer or similarly qualified persons in order to prevent dangerous situations from arising.
NB: Disconnect the appliance from the mains before starting any repairs, preferably by removing the plug from the socket or by setting the isolation switch to zero.
fault
Lighting does not work.
cause
Lamp defective.
solution
Pull the inner ring downwards using a screwdriver (see illustration).
NB:
Only use the same type of lamp with the wattage stated.
NB: the glass is loose! Pull the halogen lamp out of the fitting and replace it with a new 20 W halogen lamp (wall hoods) or 10 W halogen lamp (island hoods). Use a clean cloth to hold the new lamp.

Extractor hood makes a lot of noise.
Discharge duct too long or has too many bends.
Change the discharge duct (see installation instructions).
Motor defective.
Phone the Service department.
No extraction.
Motor or controls defective.
Phone the Service department.
Connection lead defective.
Phone the Service department.
maintenance
extractor hood
Clean the extractor hood as soon as the grease filter indicator light comes on.
The stainless steel on the outside of the hood can be cleaned with soapy water and a damp cloth. The stainless steel will regain its shine if you occasionally use a stainless steel care product or polish. The polish imparts a dirt-resistant layer to the stainless steel. Always clean the stainless steel in the direction of polishing.
Never use abrasive cleaning agents (such as Vim, green scouring pads or other scourers) or polishing cleaning products (such as liquid scourers and Jif).
Never use caustic cleaning agents. These can cause stainless steel to discolour.
maintenance (continued)
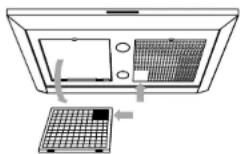
removing/replacing grease filters
Remove the filters as follows: switch the fan and the lighting off.
Push the filter at the edge of the niche to the back and pull the front end down. You can now remove the filter from the hood.
The filter can only be put back into place in one way. Take note of the correct position of the filter (see illustration). Hold the filter in such a way that the covered part of the underside is at the centre rear. This is recognizable on the outside by the pattern with the smaller holes.
Put the filter back into place by first pushing the rear side into the holder. Then push the front upwards until it cannot go any further and let the filter slide forwards. The filter is now once again in place. Erase the electronic memory by pressing the button for approx. 5 seconds.
cleaning the grease filters
You can clean the grease filters in the dishwasher. Allow the filter to drain well - through the slits in the side - before putting it back.
replacing the carbon filter
Replace the carbon filter twice a year. This only applies to recirculation hoods.
Put the carbon filter in the place intended for it above the filters.
installation
some preliminary remarks
An extractor hood should be installed in accordance with national and local regulations. The minimum distance between the underside of the extractor hood and the hob should be 65 cm.
The appliance should be connected by a registered fitter. Damage arising from incorrect connection or incorrect fitting is not covered by the guarantee.
NB:
If an extractor hood and a heat source (for example, gas-, oil- or coal-fired cookers) which take air from the same room are in use at the same time, there is a possibility that the extractor hood will cause an underpressure in that room. The maximum permitted underpressure is 4 Pa, so that no combustion gases from the heat source can find their way back into the room. For this reason, an air supply is required - to provide a constant supply of fresh air to the room.
electrical connection
The extractor hood's plug should be accessible after fitting or the extractor hood should be isolated by a bipolar switch with 3 mm plug pins.
When making the electrical connections, make sure that the socket is earthed and that the voltage and frequency correspond to the values given on the data plate.
If the connection cable is damaged, it should be replaced by the service department of the manufacturer or similarly qualified persons in order to prevent dangerous situations from arising.
installation (continued)
discharge
The discharge should not be connected to a duct which is also used for other purposes under any circumstances.
Bear in mind any local regulations concerning the ventilation of gas appliances.
The discharge may pass straight through the wall to the outside, provided that the wall opening is protected - by means of a grating - against rain, leaves, and the like getting in.
The passage of the discharge may not be restricted by the wall grating by more than 20%.
We advise the use of as large a discharge duct as possible. A duct with a smaller diameter will have a low extraction capacity and produce higher noise levels.
Bends produce resistance. Make sure that the duct has a smooth run and has as few bends as possible. Draw the flexible pipe out as far as possible.
Before starting to drill, check that there are no installed pipes present.
installation (continued)
The discharge stump has a diameter of 150 mm. It is best if the discharge pipe also has this diameter.
A reducing piece (150 mm to 125 mm) is supplied with the appliance for connection to a 125 mm discharge pipe.
ATAG supplies accessories for discharge ducts for extractor hoods. You will find an overview of the range with the appropriate type numbers in the price list.
assembly
building-in dimensions wall hood
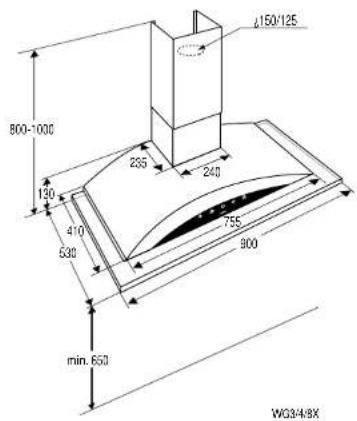
assembly (continued)

installation wall hood
The most important dimensions are shown on the previous page. You can set the height of the telescopic pipe. Take the allowable tolerances into account.
Position the discharge and the electrical connection in such a way that it will be easy to hook up the hood.
marking out and fitting fixing materials
Draw a vertical centre line on the wall (centre of the extractor hood).
Place the fastening clip against the wall so that it rests against the ceiling. The arrow on the flanged rim indicates the middle of the cooker hood. Mark the attachment holes to be drilled.
Drill the holes (ø 8 mm).
Put the plugs into the wall and fix the fixing bracket to the wall with the screws supplied (5 x 50 mm).
marking out and fitting motor module
Mark the position of the underside of the hood on the wall (bear in mind the minimum distance to the hob). Mark the (vertical) centre line.
Fold or cut the template depending on type and mark the upper fixing holes.
Drill the fixing holes (2 x ø 10 mm).
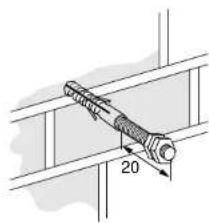
Fix the plugs. Screw two nuts onto the threaded ends in the opposite direction. Screw the threaded ends into the wall leaving 20 mm projecting (see illustration).
Remove the nuts.
assembly (continued)
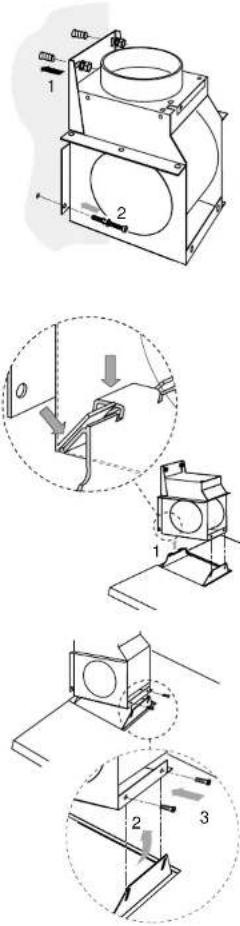
Suspend the motor module on the threaded ends (1). Screw the nuts on. Make sure that the motor module is exactly level.
Drill holes (2 x 6 mm) and secure the motor module with the fixing pins supplied (6 x 60) (2).
Fit the discharge duct.
Connect the motor module electrically.
fitting the hood
Fit the hood to the motor module.
First hook the rear of the hood into the motor module at the bottom (1).
Then lift the front up (2) so that the two bolts supplied (M5 x 12) can be screwed in (3). Use these bolts to level the hood.
Make the plug connections in the hood.
assembly (continued)

natural_image
Simple line drawing of a box with an upward arrow and diagonal lines above it (no text or symbols)fitting the telescopic pipe
NB: During recirculation (WG8), the ventilation slits must not be covered by the lower telescopic pipe.
Slide the flanged end of the upper telescopic pipe upwards between the fixing bracket and the wall, and slide the telescopic pipe against the ceiling. The telescopic pipe locks into position.
Hook the lower telescopic pipe onto the upper telescopic pipe and allow it to drop.
Put the filters in place and test the extractor hood.
assembly (continued)
building-in dimensions island hood
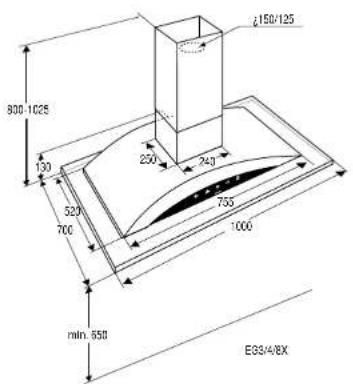
fitting island models
The most important dimensions are given above. You can adjust the height of the telescopic pipe. Bear in mind the permitted tolerances.
It is advisable to suspend the hood with the help of an assembly lift. If there is no lift present, it is advisable to carry out the mounting with more than one person.
Position the discharge and the electrical connection in such a way that it will be easy to hook up the hood.
marking
Mark the holes to be drilled on the ceiling by means of the stencil.
Drill the holes (4 x 10 mm).
assembly (continued)



natural_image
Simple line drawing of a mechanical assembly with no text or symbolsfitting the upper telescopic pipe
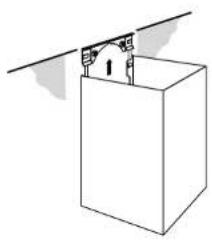
Fix the plugs and threaded ends in the ceiling. Screw two nuts onto the threaded ends in the opposite direction. Screw the threaded ends into the plugs in the ceiling, leaving 20 mm projecting.
Remove the nuts.
Place the upper telescopic pipe over the threaded ends. Put the washers on and tighten the nuts.
mounting socket
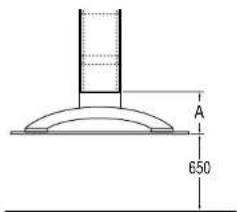
Slide the mounting socket into the upper pipe until the bottom edge is at the correct distance from the worktop (see illustration).
Dimension A = 340 mm
Fasten the mounting socket using the four bolts (M5 x 12), washers and nuts M5.
assembly (continued)
motor module
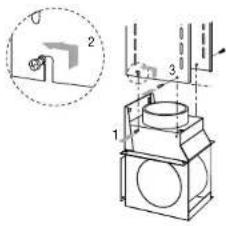
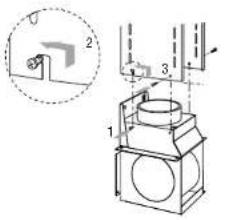
Screw two screws (4.2 x 9.5) halfway into the rear holes (1) in the motor module (see illustration).
Slide the motor module upwards in the mounting socket and pull the motor module backward slightly so that it catches in the mounting socket and remains suspended (2).
Fix the front two screws (4.2 x 9.5) as shown in the illustration (3). Then tighten the rear two screws (2).
Make the necessary plug connections.
Fit the discharge duct.
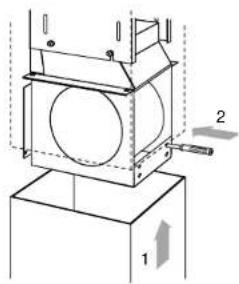
lower telescopic pipe
Slide the lower telescopic pipe upwards over the motor module (1).
Hold the pipe up by carefully pushing a pen or screwdriver into the hole that has been made for this purpose in the front of the motor housing (2).
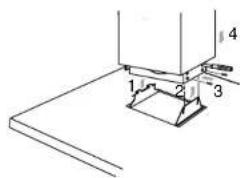
fitting the hood
Fit the hood to the motor module. First hook the rear of the hood into the motor module from underneath (1). Then push the front upwards (2), so that the two bolts supplied (M5 x 12) can be screwed in (3). Level the hood using these bolts.
Make the plug connections in the hood.
Allow the lower telescopic pipe to drop (4) so that it slides into the edge of the hood.
Put the filters in place and test the extractor hood.
technical data
type number: see data plate in the hood power supply: 230 V - 50 Hz
connected load: see data plate
dimensions (h x w x d); see 'fitting dimensions' approvals mark: Kema
This appliance complies with the CE directives.
external motors
NB: For appliances with an external motor. ATAG recommends the use of the following types of external motors:
WA111B5U WA300B5U
WA111C5U WA300C5U
ASVM0021 AS000387
ASVM0025 ASVM0023
disposal of packaging and appliances
The packaging of the appliance is recyclable. It can be made up of:
-cardboard
– polyethylene
– CFC free polystyrene (PS rigid foam)
– polypropylene straps around the box
Please dispose of these materials in a responsible way in accordance with the regulations of your local authority.
Your local authority will also be able to give you information about disposing disused household appliances in a responsible way.
installation (suite)
installation (suite)
natural_image
Technical line drawing of a mechanical component with dimension标注 (no text or symbols)

natural_image
Simple line drawing of a box with an upward arrow and two vertical lines above it (no text or symbols)Dimension A = 340 mm.
natural_image
Pure technical diagram showing a mechanical assembly with no text, numbers, or symbolsmontage (suite)


module moteur
Installation (Forts.)
Installation (Forts.)
Haube aufhängen

Motormodul
natural_image
Simple line drawing of a box with an upward arrow and diagonal lines above it (no text or symbols)natural_image
Technical diagram showing a mechanical assembly with a bracket and a separate box, no text or symbols present.

modulo motore
ventilator (fortsat)

regulere sugekapaciteten
installation (fortsat)
aftræk
installation (fortsat)
natural_image
Technical line drawing of a mechanical component with dimension标注 (no text or symbols)natural_image
Technical diagram showing a mechanical assembly with a magnified inset view of a component (no text or symbols present)ophænge hætte
DK 12
montering (fortsat)
natural_image
Simple line drawing of a 3D box with an upward arrow inside, no text or symbols present.ophænge teleskoprør
natural_image
Technical diagram showing a mechanical assembly with a bracket and a box, no text or symbols presentmotormodul
Skru to skruer (4,2 x 9.5) halvvejs ind i de bageste huller (1) i motormodulet (se illustrationen).
natural_image
Technical line drawing of a mechanical component with dimension标注 (no text or symbols)natural_image
Technical diagram showing a mechanical assembly with a magnified inset view of a component (no text or symbols present)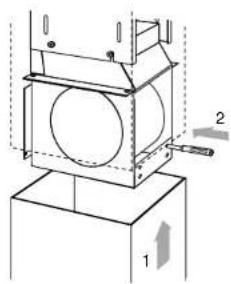

μοτέρ



- ATAG
- kap ophangen
- motormodule
- introduction
- table of contentsforeword
- for your safety
- Please note
- lighting
- switching on the appliance
- switching on the lighting
- switching off the lighting
- fan
- adjusting extractor capacity
- intensive setting
- automatic continued running
- cleaning the grease filter
- faults
- fault
- cause
- solution
- NB:
- maintenance
- extractor hood
- maintenance (continued)
- removing/replacing grease filters
- cleaning the grease filters
- replacing the carbon filter
- installation
- some preliminary remarks
- electrical connection
- installation (continued)
- discharge
- assembly
- assembly (continued)
- installation wall hood
- marking out and fitting fixing materials
- marking out and fitting motor module
- fitting the hood
- fitting the telescopic pipe
- fitting island models
- marking
- fitting the upper telescopic pipe
- mounting socket
- motor module
- lower telescopic pipe
- technical data
- external motors
- disposal of packaging and appliances
- installation (suite)
- montage (suite)
- module moteur
- Installation (Forts.)
- Haube aufhängen
- Motormodul
- modulo motore
- ventilator (fortsat)
- regulere sugekapaciteten
- installation (fortsat)
- aftræk
- ophænge hætte
- montering (fortsat)
- ophænge teleskoprør
- μοτέρ
Brand : Atag
Model : EG411X
Category : Range hood