
CoolFreeze CFX 40 W - Refrigerator DOMETIC - Free user manual and instructions
Find the device manual for free CoolFreeze CFX 40 W DOMETIC in PDF.


| Product type | Portable refrigerator-freezer |
| Brand | Dometic |
| Model | CoolFreeze CFX 40 W |
| Capacity | 40 liters |
| Temperature range | -22°C to +10°C (adjustable) |
| Power supply | 12/24 V DC and 100-240 V AC |
| Power consumption | approx. 45 W (compressor) |
| External dimensions | (W) 627 x (D) 398 x (H) 445 mm |
| Weight | approx. 18 kg |
| Climate class | N/T |
| Insulation | High-density polyurethane foam |
| Compressor | Danfoss/Secop (variable) |
| Main functions | Eco mode, digital display, battery protection |
| Maintenance and cleaning | Regular cleaning with damp cloth, manual defrosting |
| Safety | Thermal fuse, automatic shutdown in case of overheating |
| Spare parts and repairability | Available through Dometic after-sales service (repairability) |
| Included accessories | 12 V cable, mains charger, carrying handle |
Frequently Asked Questions - CoolFreeze CFX 40 W DOMETIC
User questions about CoolFreeze CFX 40 W DOMETIC
0 question about this device. Answer the ones you know or ask your own.
Ask a new question about this device
Download the instructions for your Refrigerator in PDF format for free! Find your manual CoolFreeze CFX 40 W - DOMETIC and take your electronic device back in hand. On this page are published all the documents necessary for the use of your device. CoolFreeze CFX 40 W by DOMETIC.
USER MANUAL CoolFreeze CFX 40 W DOMETIC
natural_image
Exterior view of a modern DOMETIC device with multiple internal modules (no visible text or symbols on the devices themselves)CFX28, CFX35W, CFX40W, CFX50W, CFX65W, CFX65DZ, CFX100W
EN Compressor Cooler Operating manual....6
2
CFX28, CFX35W, CFX40W CFX50W, CFX65W, CFX65DZ

natural_image
Technical line drawing of a mechanical device with labeled component (no text or symbols present)
natural_image
Technical line drawing of a mechanical device with labeled component (no text or symbols present)CFX100W





Please read this operating manual carefully before starting the device. Keep it in a safe place for future reference. If the device is passed on to another person, this operating manual must be handed over to the user along with it.
The manufacturer cannot be held liable for damage resulting from improper usage or incorrect operation.
Contents
1 Explanation of symbols 7
2 Safety instructions ....8
2.1 General safety 8
3 Scope of delivery....10
3 Scope of delivery....10
4 Accessories....10
5 Intended use....11
6 Function description....12
6.1 Scope of functions....12
6.2 Operating and display elements .....13
7 Operation 14
7.1 Before initial use .....14
7.2 Energy saving tips....15
7.3 Connecting the cooler .....15
7.4 Using the battery monitor....16
7.5 Using the cooler .....18
7.6 Setting the temperature .....19
7.7 Enabling WiFi signal for optional app (all except CFX28 and CFX65DZ) 20
7.8 Set brightness of display....21
7.9 Using the emergency switch (where fitted) .....21
7.10 USB port for power supply .....21
7.11 Switching off the cooler 22
7.12 Defrosting the cooler 22
7.13 Replacing the device fuse 22
7.14 Replacing the plug fuse (12/24 V) 23
7.15 Replacing the light PCB.... 23
8 Cleaning and maintenance 24
9 Guarantee....24
10 Troubleshooting 25
11 Disposal 26
12 Technical data 26
1 Explanation of symbols

WARNING!
Safety instruction: Failure to observe this instruction can cause fatal or serious injury.

CAUTION!
Safety instruction: Failure to observe this instruction can lead to injury.

NOTICE!
Failure to observe this instruction can cause material damage and impair the function of the product.

NOTE
Supplementary information for operating the product.
2 Safety instructions
2.1 General safety

WARNING!
- Do not operate the device if it is visibly damaged.
- If this device's power cable is damaged, it must be replaced by the manufacturer, customer service or a similarly qualified person in order to prevent safety hazards.
- This device may only be repaired by qualified personnel. Improper repairs can lead to considerable hazards.
- This device can be used by children aged 8 years or over, as well as by persons with diminished physical, sensory or mental capacities or a lack of experience and/or knowledge, providing they are supervised or have been taught how to use the device safely and are aware of the resulting risks.
- Cleaning and user maintenance must not be carried out by children without supervision.
• Children must not play with the device. - Children must be supervised to ensure that they do not play with the device.
- Always keep and use the device out of the reach of children under the age of 8 years.
- Do not store any explosive substances such as spray cans with a flammable propellant in the device.

CAUTION!
- Disconnect the device from the power supply
– before each cleaning and maintenance - after every use
- Food may only be stored in its original packaging or in suitable containers.

NOTICE!
- Check that the voltage specification on the type plate corresponds to that of the energy supply.
- Only connect the device as follows:
- With the DC cable to a DC plug socket in the vehicle (e. g. cigarette lighter)
- Or with the AC connection cable to the AC mains supply
- Never pull the plug out of the socket by the cable.
- If the cooler is connected to the DC socket: Disconnect the cooler and other power consuming devices from the battery before connecting the quick charging device.
- If the cooler is connected to the DC socket: Disconnect the cooler or switch it off when you turn off the engine. Otherwise you may discharge the battery.
- The cooling device is not suitable for transporting caustic materials or materials containing solvents.
- The cooling device contains inflammable cyclopentane in the insulation. The gases in the insulation material require special disposal procedures. Deliver the device at the end of its life-cycle to an appropriate recycling.
2.2 Operating the device safely

CAUTION!
- Before starting the device, ensure that the power supply line and the plug are dry.

NOTICE!
- Do not use electrical devices inside the cooler unless they are recommended by the manufacturer for the purpose.
- Do not place the device near naked flames or other heat sources (heaters, direct sunlight, gas ovens etc.).
• Danger of overheating!
Ensure at all times that there is sufficient ventilation so that the heat that arises during operation does not build up. Make sure that the device is sufficiently far away from walls and other objects so that the air can circulate.
- Ensure that the ventilation openings are not covered.
- Do not fill the inner container with ice or fluid.
- Never immerse the device in water.
- Protect the device and the cable against heat and moisture.
3 S c o p e o f d
The scope of delivery is shown in fig. 1, page 2.
Item Quantity Description
| 11 Cooler | ||
| 2 | 1 | Connection cable for 12/24 V--- connection |
| 3 | 1 | Connection cable for 100 - 240 V~ connection |
| -1 Operating manual | ||
4 A c c e s s o r i
Available as accessory (not included in scope of delivery):
Designation Ref. no. Model
| Universal fixing kit (belt system) CFX-UFK 9108300002 suits all models | ||
| Quick release fixing kit CFX-QFK | 9600000166 | CFX28 only |
| Wireless display CFX-WD | 9600000164 | suits CFX28, CFX65DZ and older models without WIFI app function |
Visit the Dometic website (see back page) for information about a WiFi app with control-, display- and alarm functions (all except CFX28 and CFX65DZ). Note that the app may not be available in your country.
5 Intended use
The cooler is suitable for cooling and freezing foods. The device is also suitable for use on boats.
The device is designed to be operated from a 12 V--- or 24 V--- on-board supply socket of a vehicle (e. g. cigarette lighter), boat or caravan as well as from a 100 – 240 V AC mains.
The cooling device is intended to be used in household and similar applications such as
- staff kitchen areas in shops, offices and other working environments
- farm houses
- clients in hotels, motels and other residential type environments
• bed and breakfast type environments
• catering and similar non-retail applications

CAUTION! Health hazard!
Please check if the cooling capacity of the device is suitable for storing the food or medicine you wish to cool.
6 Function description
The cooler can chill products, keep them cool as well as freeze them. A low maintenance refrigerant circuit with compressor provides the cooling. The generous insulation and powerful compressor ensure efficient and fast cooling.
The cooler is portable.
The cooler can withstand a heel (inclination) of 30irc , for example when used on boats.
6.1 Scope of functions
- Power supply with priority circuit for connecting to the AC mains
- Three-level battery monitor to protect the vehicle battery
- Display with temperature gauge in °C and °F switches off automatically at low battery voltage
• Temperature setting: With two buttons in steps of 1irc C ( 2irc F) - Integrated WiFi transmitter hence controllable using an app (all except CFX28 and CFX65DZ)
- Foldable carrying handles
• USB port for power supply
• Emergency switch (where fitted) - Removable wire basket
6.2 Operating and display elements
Latch for lid: fig. 2 1, page 2
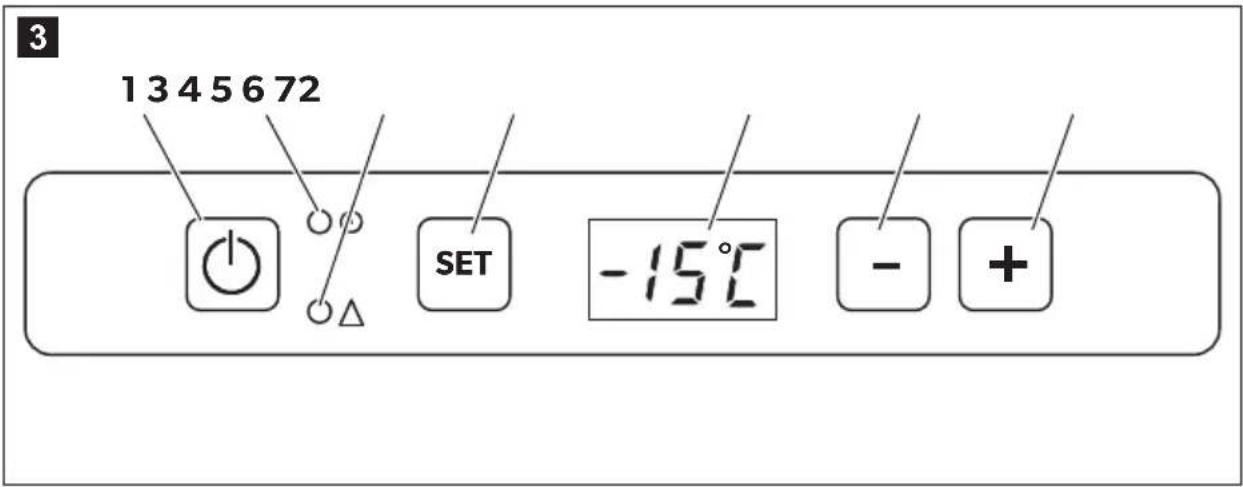
Operating panel (fig. 3, page 3)
| Item Description Explanation | ||
| 1 | ON | Switches the cooler on or off when the button is pressed for between one and two seconds |
| OFF | ||
| 2 | POWER “” | Status indication |
| LED lights up green: Compressor is on | ||
| LED lights up orange: Compressor is off | ||
| LED flashes orange: display switched off automatically due to low battery voltage | ||
| 3 | ERROR LED flashes red: Device is switched on but not ready for operation | |
| 4 | SET Selects the input mode | |
| Display, shows the information | ||
| 6 | DOWN- | Press once to decrease the value |
| 7 | UP+ | Press once to increase the value |
Connection sockets (fig. 4, page 3)
| Item Description |
| 1 Connection socket AC voltage supply |
| 2 Fuse holder |
| 3 Emergency switch (when fitted) |
| 4 USB port for power supply |
| 5 Connection socket DC voltage supply |
7 O p e r a t i o n
7.1 Before initial use

NOTE
Before starting your new cooler for the first time, you should clean it inside and outside with a damp cloth for hygienic reasons (please also refer to the chapter "Cleaning and maintenance" on page 24).
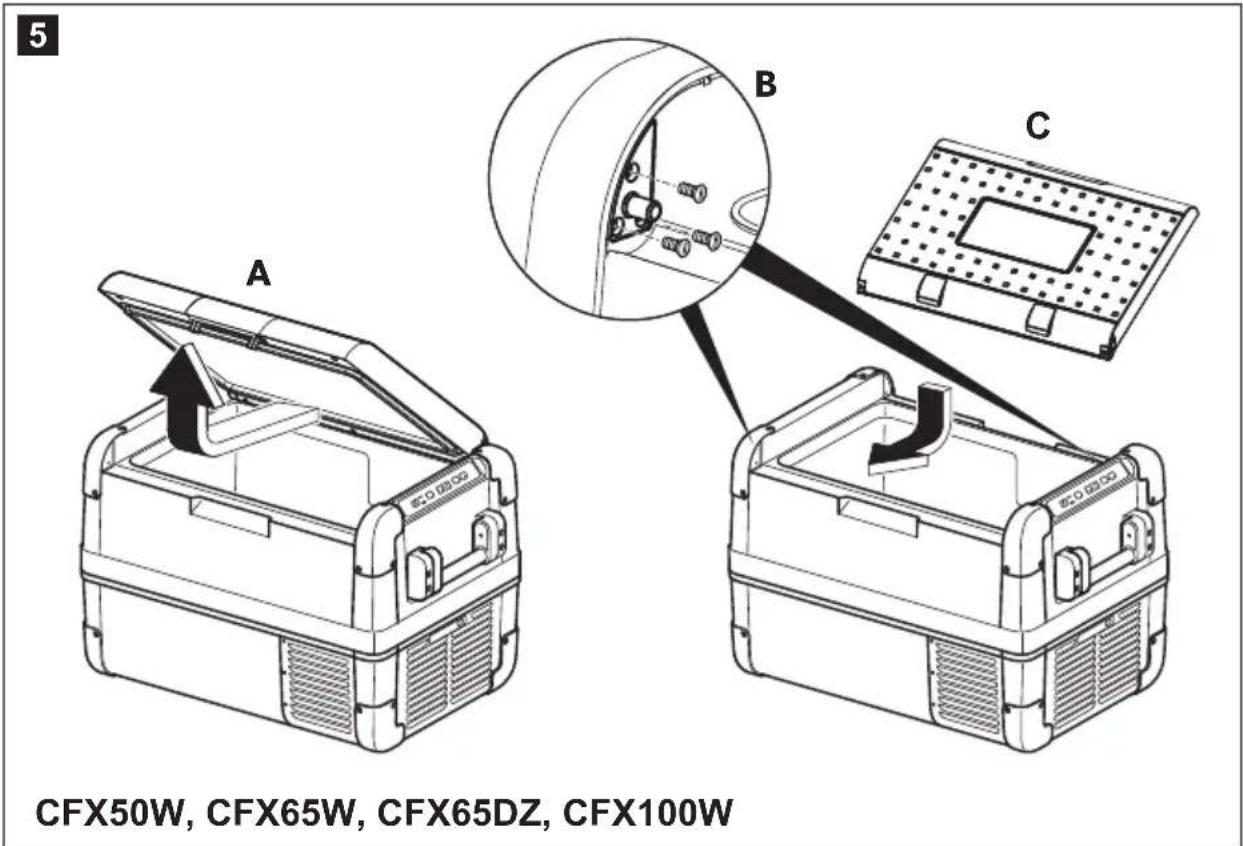
Reversing the lid opening direction (CFX50W, CFX65W, CFX65DZ)
The lid hinges can be moved to the opposite side if you want to open the lid from the opposite direction. To do this, proceed as follows:
▶ Open the lid and remove it (fig. 5 A, page 4).
Remove 3 screws per hinge (fig. 5 B, page 4) and take off hinges.
▶Remove plastic covers from new hinge positions with a small screwdriver and re-fit to old hinge positions.
▶Re-fit hinges in new positions.
▶ Insert the lid in the hinges on the opposite side (fig. 5 C, page 4) (CFX50W, CFX65W, CFX65DZ only).
Additionally the centre hinge has to be changed (CFX100W only):
Remove two plastic covers from the centre hinge (fig. 6 A, page 4).
Remove four screws from the centre hinge (fig. 6 B, page 4) and take off the hinge.
Remove the plastic cover from new centre hinge position with a small screw-driver and re-fit to old hinge position (fig. 6 C, page 4).
▶Re-fit centre hinge in new position.
▶ Insert the lids in the hinges on the opposite side (fig. 6 D, page 4).
Selecting the temperature units
Temperature display units can be switched between Celsius and Fahrenheit as follows:
▶Switch on the cooler.
▶ Press the "SET" button (fig. 3 4, page 3) twice.
▶ Use the "UP+" (fig. 3 7, page 3) or "DOWN-" (fig. 3 6, page 3) buttons to select Celsius or Fahrenheit.
√The selected temperature units then appear in the display for a few seconds. The display flashes several times before it returns to the current temperature.
7.2 Energy saving tips
- Choose a well ventilated installation location which is protected against direct sunlight.
- Allow warm food to cool down first before placing it in the cooling device to keep cool.
- Do not open the cooling device more often than necessary.
- Do not leave the cooling device open for longer than necessary.
- Defrost the cooler once a layer of ice forms.
- Avoid unnecessarily low temperatures.
7.3 Connecting the cooler
Connecting to a battery (Vehicle or boat)
The cooler can be operated with 12 V or 24 V=.

NOTICE! Danger of damage!
Disconnect the cooler and other consumer units from the battery before you connect the battery to a quick charging device.
Overvoltage can damage the electronics of the device.
For safety reasons the cooler is equipped with an electronic system to prevent polarity reversal. This protects the cooler against short-circuiting when connecting to a battery.
Plug the 12/24 V connection cable (fig. 1 2, page 2) into the device DC voltage socket and also into a 12 V or 24 V cigarette lighter socket.
Connecting to a 100 - 240 V AC mains (E.g. in the home or office)

DANGER! Danger of electrocution!
- Never handle plugs and switches with wet hands or if you are standing on a wet surface.
- If you are operating your cooler on board a boat from a mains connection of 100 – 240 V\~, you must install a residual current circuit breaker between the 100 – 240 V\~ mains and the cooler. Seek advice from a trained technician.
The coolers have an integrated multi-voltage power supply with priority circuit for connecting to an AC voltage source of 100 – 240 V. The priority circuit automatically switches the cooler to mains operation, if the device is connected to a 100 – 240 V AC mains, even if the 12/24 V connection cable is still attached.
▶Plug the 100 – 240 V connection cable (fig. 1 3, page 2) into the device AC voltage socket and connect it to the 100 – 240 V AC voltage mains.
7.4 Using the battery monitor
The device is equipped with a multi-level battery monitor that protects your vehicle battery against excessive discharging when the device is connected to the on-board 12/24 V supply.
If the cooler is operated when the vehicle ignition is switched off, the cooler switches off automatically as soon as the supply voltage falls below a set level. The cooler will switch back on once the battery has been recharged to the restart voltage level.

NOTICE! Danger of damage!
When switched off by the battery monitor, the battery will no longer be fully charged. Avoid starting repeatedly or operating current consumers without longer charging phases. Ensure that the battery is recharged.
In "HIGH" mode, the battery monitor responds faster than at the levels "LOW" and "MED" (see the following table).
| Battery monitor mode LOW MED HIGH | |||
| Switch-off voltage at 12 V | 10.1 V | 11.4 V | 11.8 V |
| Restart-voltage at 12 V | 11.1 V | 12.2 V | 12.6 V |
| Switch-off voltage at 24 V | 21.5 V | 24.1 V | 24.6 V |
| Restart voltage at 24 V | 23.0 V | 25.3 V | 26.2 V |
The battery monitor mode can be selected as follows:
▶Switch on the cooler.
▶ Press the "SET" button (fig. 3 4, page 3) three times.
▶ Use the "UP +" (fig. 3 7, page 3) or "DOWN -" (fig. 3 6, page 3) buttons to select the battery monitor mode.
√Display will be as follows:
Lo (LOW), d (MED), Hi (HIGH)
√The selected mode then appears in the display for a few seconds. The display flashes several times before it returns to the current temperature.

NOTE
When the cooler is supplied by the starter battery, select the battery monitor mode "HIGH". If the cooler is connected to a supply battery, the battery monitor mode "LOW" will suffice.
7.5 Using the cooler

NOTICE! Danger of overheating!
Ensure at all times that there is sufficient ventilation so that the heat that generated during operation can dissipate. Ensure that the ventilation slots are not covered. Make sure that the device is sufficiently far away from walls and other objects so that the air can circulate.
▶Place the cooler on a firm foundation.
Make sure that the ventilation slots are not covered and that the heated air can dissipate.

NOTE
Place the cooler as shown (fig. 1, page 2). If you operate the box in a different orientation it can be damaged.
▶Connect the cooler, see chapter "Connecting the cooler" on page 15.

NOTICE! Danger from excessively low temperature!
Ensure that the only those objects are placed in the cooler that are intended to be cooled at the selected temperature.
▶ Press the "ON/OFF" button (fig. 3 1, page 3) for between one and two seconds.
√ The LED "⏻" lights up (fig. 3 2, page 3).
√ The display (fig. 3 5, page 3) switches on and shows the current cooling temperature.

CAUTION! Health hazard!
CFX65DZ:
If the temperature in the freezer compartment (fig. 8 1, page 5) is very low (-22 °C), the temperature range in the cooling department (fig. 8 2, page 5) can be below freezing as well.

NOTE
Displayed temperature
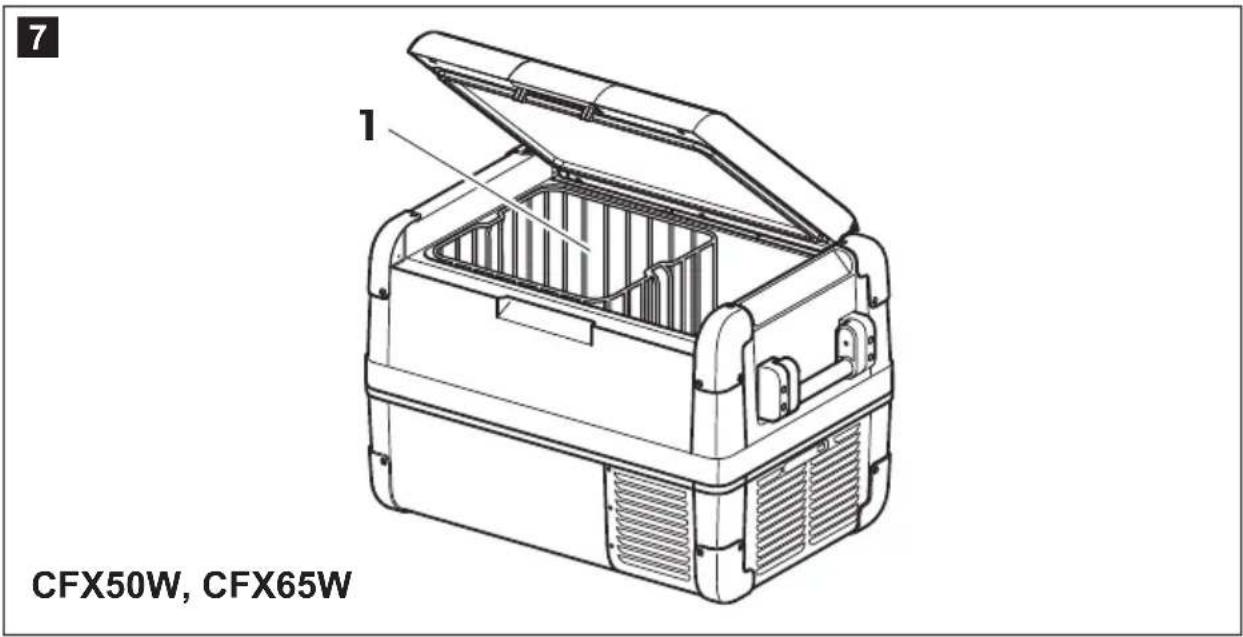
- CFX28, CFX35W, CFX40W, CFX50W, CFX65W, CFX100W: The temperature displayed is that of the large interior compartment (e.g. CFX50W, CFX65W: fig. 7 1, page 5).
- CFX65DZ:
- With fridge/freezer divider in: The temperature displayed is that of the freezer compartment (fig. 8 1, page 5). - With fridge/freezer divider out: The actual compartment temperature will be considerably warmer than the displayed temperature
√The cooler starts cooling the interior.

NOTE
When operating with the battery, the display switches off automatically if the battery voltage is low. The LED “⏻” flashes orange.
Latching the cooler lid
▶Close the lid.
▶ Press the latch (fig. 2 1, page 2) down, until it latches in place audibly.
7.6 Setting the temperature
▶ Press the "SET" button (fig. 3 4, page 3) once.
▶ Use the "UP +" (fig. 3 7, page 3) and "DOWN -" (fig. 3 6, page 3) buttons to select the cooling temperature.
√The cooling temperature appears in the display for a few seconds. The display flashes several times and then the current temperature is displayed again.
7.7 Enabling WiFi signal for optional app (all except CFX28 and CFX65DZ)
The cooler can be controlled via WiFi using an app that you can install on a compatible device. The app has control, display and alarm functions.
For further information go to the Dometic website for your country (see back page). Note that the app may not be available in your country.
The WiFi name of the compressor cooler begins with "CFX". The preset password is "00000000". You can change the WiFi name and password individually.
Switching the WiFi signal on or off
▶ Press the "SET" button (fig. 3 4, page 3) five times.
▶ Use the "UP +" (fig. 3 7, page 3) and "DOWN−" (fig. 3 6, page 3) buttons to switch the WiFi signal on or off.
√The desired setting appears in the display for a few seconds. The display flashes several times and then the current temperature is displayed again.

NOTE
- The default setting for the WiFi transmitter is off. For first time use and whenever power to the device is interrupted, switch on the WiFi transmitter to use the app.
- The WiFi transmitter uses a small amount of power. For optimal energy performance switch the WiFi transmitter off if it is not being used.
Resetting the WiFi to factory settings
In case you have personalized the WiFi settings of your cooling device using the WiFi app and forgotten your password, you can reset to the factory settings as follows:
▶ Press the "SET" button (fig. 3 4, page 3) five times.
▶ Hold the "UP +" (fig. 3 7, page 3) button for at least five seconds.
√ In both displays "rES" will blink several times before returning to the previous display.
√The WiFi settings have been reset to factory settings.
For additional information visit the Dometic website from which you downloaded the app.
7.8 Set brightness of display
The display brightness can be dimmed for low ambient light conditions. To set the dimming level of the display proceed as follows:
▶Switch on the cooler.
▶ Press the "SET" button (fig. 3 4, page 3) four times.
▶ Use the "UP +" (fig. 3 7, page 3) or "DOWN -" (fig. 3 6, page 3) buttons to set the brightness of the display.
√Display will be as follows:
d0 (default), d1 (medium), d2 (dark)
√The display shows the set mode for some seconds. The display flashes several times before it returns to the current brightness.

NOTE
- The factory setting of brightness of the display is d0 (default).
- If a fault occurs, the brightness automatically is d0 (default). After troubleshooting the set brightness is reactivated.
7.9 Using the emergency switch (where fitted)
The emergency switch (fig. 4 3, page 3) is located below the control panel on all models except CFX28 where it is located above the power inlet sockets. For normal operation the switch is in the “NORMAL USE” position.
If an electronic control failure occurs, slide the switch to "EMERGENCY OVERRIDE" position

NOTE
If the switch is in the "EMERGENCY OVERRIDE" position, the cooler runs with full cooling capacity and may freeze.
7.10 USB port for power supply
USB port allows you to charge small devices like mobile phones and mp3-players.
To use your cooling box with any USB devices, simply connect a USB cable (not included) to your device.

NOTE
Ensure that any small device connected to the USB port is compatible with 5 V/500 mA operation.
7.11 Switching off the cooler
▶ Empty the cooler.
▶Switch the cooler off.
▶ Pull out the connection cable.
If you do not want to use the cooler for a longer period of time:
Leave the cover slightly open. This prevents odour build-up.
7.12 Defrosting the cooler
Humidity can form frost in the interior of the cooling device or on the evaporator. This reduces the cooling capacity. Defrost the device in good time to avoid this.

NOTICE! Danger of damage!
Never use hard or pointed tools to remove ice or to loosen objects which have frozen in place.
To defrost the cooler, proceed as follows:
▶Take out the contents of the cooling device.
▶If necessary, place them in another cooling device to keep them cool.
▶Switch off the device.
▶Leave the lid open.
▶Wipe off the defrosted water.
7.13 Replacing the device fuse

DANGER! Danger of electrocution!
Disconnect the power supply and the connection cable before you replace the device fuse.
▶Disconnect the power supply to the device.
▶ Pull off the connection cable.
▶ Pry out the fuse insert (fig. 4 2, page 3) with a screwdriver.
▶ Replace the defective glass fuse with a new one that has the same rating (4 A, 250 V).
▶Press the fuse insert back into the housing.
▶Reconnect the power supply to the device.
7.14 Replacing the plug fuse (12/24 V)
▶ Unscrew the contact pin housing (fig. 9 3, page 5) from the plug (fig. 9 1, page 5).
▶ Replace the defective fuse (fig. 9 2, page 5) with a new fuse that has the same rating (3AG, 15 A).
▶Re-assemble the plug in reverse order.
7.15 Replacing the light PCB
▶Disconnect the power supply to the device.
▶ Pry out the transparent cover with a screwdriver (fig. 10 1, page 5).
▶ Unscrew the PCB mounting screws (fig. 10 2, page 5).
▶ Pull out the plug from the PCB (fig. 10 3, page 5).
▶Replace the defective light PCB with a new one.
▶Fit new PCB using reverse of removal instructions.
▶Press the transparent cover back into the housing.
▶Reconnect the power supply to the device.
8 Cleaning and maintenance

WARNING!
Always disconnect the device from the power supply before you clean and service it.

NOTICE! Risk of damage
- Never clean the cooler under running water or in dish water.
- Do not use abrasive cleaning agents or hard objects during cleaning as these can damage the cooler.
▶Occasionally clean the device interior and exterior with a damp cloth.
▶ Make sure that the air inlet and outlet vents on the device are free of any dust and dirt, so that heat can be released and the device is not damaged.
9 G u a r a n t e e
The statutory warranty period applies. If the product is defective, please contact the manufacturer's branch in your country (see the back of the instruction manual for the addresses) or your retailer.
For repair and guarantee processing, please include the following documents when you send in the device:
• A copy of the receipt with purchasing date
- A reason for the claim or description of the fault
10 Troubleshooting
Fault Possible cause Suggested remedy
| Device does not function, LED does not glow. | There is no voltage present in the 12/24 V socket (cigarette lighter) in your vehicle. | The ignition must be switched on in most vehicles to apply current to the cigarette lighter. |
| No voltage present in the AC voltage socket. | Try using another plug socket. | |
| The device fuse is defective. | Replace the device fuse, see chapter “Replacing the device fuse” on page 22. | |
| The integrated mains adapter is defective. | This can only be repaired by an authorised repair centre. | |
| The device does not cool (plug is inserted, “POWER” LED is lit). | Defective compressor. | This can only be repaired by an authorised customer services unit. |
| The device does not cool (plug is inserted, “POWER” LED flashes orange, display is switched off). | Battery voltage is too low. | Test the battery and charge it as needed. |
| When operating from the 12/24 V socket (cigarette lighter): The ignition is on and the device is not working and the LED is not lit.Pull the plug out of the socket and make the following checks. | The cigarette lighter socket is dirty. This results in a poor electrical contact. | If the plug of your cooler becomes very warm in the cigarette lighter socket, either the lighter socket must be cleaned or the plug has not been assembled correctly. |
| The fuse of the 12/24 V plug has blown. | Replace the fuse (15 A) in the 12/24 V plug, see chapter “Replacing the plug fuse (12/24 V)” on page 23. | |
| The vehicle fuse has blown. | Replace the vehicle’s 12/24 V socket fuse (usually 15 A). Please refer to your vehicle’s operating manual. | |
| The display shows an error message (e.g. “Err1”) and the appliance does not cool. | The appliance has switched off due to an internal fault. | This can only be repaired by an authorised repair centre. |
11 Disposal
Place the packaging material in the appropriate recycling waste bins wherever possible.

If you wish to finally dispose of the product, ask your local recycling centre or specialist dealer for details about how to do this in accordance with the applicable disposal regulations.
12 Technical data
| CFX28 CFX35W CFX40W | |||
| Ref. no.: 9600000468 | 9600000469 | 96000004709600000471 | 96000004729600000473 |
| Connection voltage: | 12/24 V--- and 100 - 240 V~ | ||
| Rated current: | 12 V---: 6,5 A24 V---: 3,2 A100 V~: 0,75 A240 V~: 0,32 A | 12 V---: 7,0 A24 V---: 3,2 A100 V~: 0,86 A240 V~: 0,42 A | |
| Cooling capacity: | +10 °C to -22 °C (+50 °F to -8 °F) | ||
| Category: | 1 | ||
| Energy efficiency class: | A++ | ||
| Energy consumption: | 61 kWh/annum | 62 kWh/annum | 64 kWh/annum |
| Gross volume: | 28 l | 34.5 l | 41 l |
| Storage volume: | 26 l | 32 l | 38 l |
| Climate class: | N, T | ||
| Ambient temperature: | +16 °C to +43 °C | ||
| Noise emission: | 34 dB(A) | 42 dB(A) | |
| USB: | 5 V---, 500 mA | ||
| Refrigerant quantity: | 38 g | 33 g | 38 g |
| CO2 equivalent: | 0.054 t 0.047 t 0.054 t | ||
| Global warming poten-tial (GWP): | 1430 | ||
| CFX28 | CFX35W CFX40W | ||
| Dimensions(W x H x D) in mm(including handles): | 342 x 425 x 620 | 398 x 411 x 692 | 398 x 461 x 692 |
| Weight: 13 kg 17.5 kg 18.5 kg | |||
| CFX50W CFX6 | 5W CFX65DZ | ||
| Ref. no.: 9600000474 | 9600000475 | 96000004769600000477 | 96000004789600000479 |
| Connection voltage: | 12/24 V--- and 100 - 240 V~ | ||
| Rated current: | 12 V---: 7,8 A24 V---: 3,6 A100 V~: 0,95 A240 V~: 0,46 A | 12 V---: 8,2 A24 V---: 3,8 A100 V~: 1,0 A240 V~: 0,48 A | 12 V---: 5,5 A24 V---: 2,6 A100 V~: 0,75 A240 V~: 0,37 A |
| Cooling capacity: | +10 °C to -22 °C (+50 °F to -8 °F) | ||
| Category: | 1 | ||
| Energy efficiency class: | A++ | A+ | |
| Energy consumption: | 66 kWh/annum | 69 kWh/annum | 115 kWh/annum |
| Gross volume: | 50 l | 65 l | with divider: 61 lwithout divider: 65 l |
| Storage volume: | 46 l | 60 l | 53 l |
| Climate class: | N, T | ||
| Ambient temperature: | +16 °C to +43 °C | ||
| Noise emission: | 42 dB(A) | ||
| USB: | 5 V---, 500 mA | ||
| Refrigerant quantity: | 43 g | 57 g | 31 g |
| CO2 equivalent: | 0.062 t | 0.082 t | 0.044 t |
| Global warming potential (GWP): | 1430 | ||
| Dimensions(W x H x D) in mm(including handles): | 725 x 471 x 455 | 725 x 561 x 455 | 725 x 561 x 455 |
| Weight: | 20.4 kg | 22.3 kg | 23.2 kg |
| CFX100W | |
| Ref. no.: 9600000536 | 9600000650 |
| Connection voltage: | 12/24 V--- and 100 - 240 V~ |
| Rated current: 12 V---: 10,5 A | 24 V---: 5,0 A100 V~: 1,25 A240 V~: 0,48 A |
| Cooling capacity: | +10 °C to -22 °C (+50 °F to -8 °F) |
| Category: 1 | |
| Energy efficiency class: A+ | |
| Energy consumption: 98 kWh/annum | |
| Gross volume: 100 l | |
| Storage volume: 88 l | |
| Climate class: N, T | |
| Ambient temperature: | +16 °C to +43 °C |
| Noise emission: | 37 dB(A) |
| USB: | 5 V---, 500 mA |
| Refrigerant quantity: | 64 g |
| CO2 equivalent: | 0.092 t |
| Global warming poten-tial (GWP): | 1430 |
| Dimensions(W x H x D) in mm(including handles): | 957 x 472 x 530 |
| Weight: | 32 kg |

NOTE
If the ambient temperature is above +32 °C (+90 °F), the minimum temperature cannot be attained.
Test/certificates:

The coolant circuit contains R134a.
Contains fluorinated greenhouse gases
Hermetically sealed equipment
- CFX28, CFX35W, CFX40W, CFX50W, CFX65W, CFX100W:
- CFX28, CFX35W, CFX40W, CFX50W, CFX65W, CFX100W :
Activer/désactiver le signal WLAN
- CFX28, CFX35W, CFX40W, CFX50W, CFX65W, CFX100W:
- CFX28, CFX35W, CFX40W, CFX50W, CFX65W, CFX100W:
PASS PÅ! Fare for overoppheting!
- CFX28, CFX35W, CFX40W, CFX50W, CFX65W, CFX100W:
- CFX28, CFX35W, CFX40W, CFX50W, CFX65W, CFX100W:
- CFX28, CFX35W, CFX40W, CFX50W, CFX65W, CFX100W:
- CFX28, CFX35W, CFX40W, CFX50W, CFX65W, CFX100W:
Dometic Australia Pty. Ltd.
1 John Duncan Court
Varsity Lakes QLD 4227
1800 212121
+61755076001
Mail: sales@dometic.com.au
AUSTRIA
Dometic Austria GmbH
Neudorferstraße 108
A-2353 Guntramsdorf
+43 2236 908070
+43 2236 90807060
Mail: info@dometic.at
BENELUX
Dometic Branch Office Belgium
Zincstraat 3
B-1500 Halle
+32 2 3598040
+32 2 3598050
Mail: info@dometic.be
BRAZIL
Dometic DO Brasil LTDA
Avenida Paulista 1754, conj. 111
SP 01310-920 Sao Paulo
+551132513352
+551132513362
Dometic Group Asia Pacific
Suites 2207-11 · 22/F · Tower 1
The Gateway · 25 Canton Road,
Tsim Sha Tsui · Kowloon
+852 2 4611386
+852 2 4665553
Mail: info@waeco.com.hk
HUNGARY
Dometic Zrt. Sales Office
Kerékgyártó u. 5.
H-1147 Budapest
+3614684400
+3614684401
Dometic Italy S.r.l.
Via Virgilio, 3
I-47122 Forlì (FC)
+39 0543 754901
+390543754983
Mail: vendite@dometic.it
JAPAN
Dometic KK
Maekawa-Shibaura, Bldg. 2
2-13-9 Shibaura Minato-ku
Tokyo 108-0023
+81 3 5445 3333
+81354453339
Mail: info@dometic.jp
MEXICO
Circuito Médicos No. 6 Local 1
Colonia Ciudad Satélite
CP 53100 Naucalpan de Juárez
Estado de México
+52 55 5374 4108
+52 55 5393 468
Mail: info@dometic.com.mx
NETHERLANDS
Dometic Benelux B.V.
Ecustraat 3
NL-4879 NP Etten-Leur
+31 76 5029000
+31765029019
Mail: info@dometic.nl
NEW ZEALAND
Dometic New Zealand Ltd.
PO Box 12011
Penrose
Auckland 1642
+6496221490
+6496221573
Mail: customerservices@dometic.co.nz
NORWAY
Dometic Norway AS
∅sterøyveien 46
N-3232 Sandefjord
+47 33428450
+47 33428459
Mail: firmapost@dometic.no
POLAND
Dometic Poland Sp. z o.o.
Ul. Puławska 435A
PL-02-801 Warszawa
+48 22 414 3200
+48 22 414 320
Mail: info@dometic.pl
PORTUGAL
Dometic Spain, S.L.
Komsomolskaya square 6-1
RU-107140 Moscow
+7 495 780 79 39
+7 495 916 56 53
Mail: info@dometic.ru
SINGAPORE
Dometic Pte Ltd
18 Boon Lay Way 06-140 Trade Hub 21
Singapore 609966
+65 6795 3177
+65 6862 6620
Mail: dometic@dometic.com.sg
SLOVAKIA
Dometic Slovakia s.r.o. Sales Office Bratislava
Nádražná 34/A
900 28 Ivánka pri Dunaji
+421 2 45 529 680
Mail: bratislava@dometic.com
SOUTH AFRICA
Dometic (Pty) Ltd.
Regional Office
South Africa & Sub-Saharan Africa
2 Avalon Road
West Lake View Ext 11
Modderfontein 1645
Johannesburg
+27114504978
+27114504976
Mail: info@dometic.co.za
SPAIN
Dometic Spain S.L.
Avda. Sierra del Guadarrama, 16
E-28691 Villanueva de la Cañada
Madrid
+34 91 833 60 89
+34 900 100 245
Mail: info@dometic.es
SWEDEN
Dometic Scandinavia AB
Gustaf Melins gata
Dometic Switzerland AG
Riedackerstrasse 7a
CH-8153 Rümlang
+41 44 8187171
+41 44 8187191
Mail: info@dometic.ch
UNITED ARAB EMIRATES
Dometic Middle East FZCO
P.O.Box17860
S-D 6, Jebel Ali Freezone
Dubai
+97148833858
+97148833868
Mail: info@dometic.ae
UNITED KINGDOM
Dometic UK Ltd.
Dometic House, The Brewery
Blandford St. Mary
Dorset DT11 9LS
+44 344 626 0133
+44 344 626 0143
Mail: customerservices@dometic.co.uk
USA
Dometic RV Division
1120 North Main Street
Elkhart, IN 46515
+1574-264-2131
- Contents
- Explanation of symbols
- WARNING!
- CAUTION!
- NOTICE!
- NOTE
- Safety instructions
- General safety
- Operating the device safely
- S c o p e o f d
- A c c e s s o r i
- Intended use
- CAUTION! Health hazard!
- Function description
- Scope of functions
- Operating and display elements
- Connection sockets (fig. 4, page 3)
- O p e r a t i o n
- Before initial use
- Reversing the lid opening direction (CFX50W, CFX65W, CFX65DZ)
- Selecting the temperature units
- Energy saving tips
- Connecting the cooler
- Connecting to a battery (Vehicle or boat)
- NOTICE! Danger of damage!
- Connecting to a 100 - 240 V AC mains (E.g. in the home or office)
- DANGER! Danger of electrocution!
- Using the battery monitor
- Using the cooler
- NOTICE! Danger of overheating!
- NOTICE! Danger from excessively low temperature!
- CFX65DZ:
- Displayed temperature
- - CFX65DZ:
- Latching the cooler lid
- Setting the temperature
- Enabling WiFi signal for optional app (all except CFX28 and CFX65DZ)
- Switching the WiFi signal on or off
- Resetting the WiFi to factory settings
- Set brightness of display
- Using the emergency switch (where fitted)
- USB port for power supply
- Switching off the cooler
- Defrosting the cooler
- Replacing the device fuse
- Replacing the plug fuse (12/24 V)
- Replacing the light PCB
- Cleaning and maintenance
- NOTICE! Risk of damage
- G u a r a n t e e
- Troubleshooting
- Disposal
- Activer/désactiver le signal WLAN
- PASS PÅ! Fare for overoppheting!
- - CFX28, CFX35W, CFX40W, CFX50W, CFX65W, CFX100W:
- Dometic Australia Pty. Ltd.
- AUSTRIA
- Dometic Austria GmbH
- BENELUX
- Dometic Branch Office Belgium
- BRAZIL
- Dometic DO Brasil LTDA
- Dometic Group Asia Pacific
- HUNGARY
- Dometic Zrt. Sales Office
- Dometic Italy S.r.l.
- JAPAN
- Dometic KK
- MEXICO
- NETHERLANDS
- Dometic Benelux B.V.
- NEW ZEALAND
- Dometic New Zealand Ltd.
- NORWAY
- Dometic Norway AS
- POLAND
- Dometic Poland Sp. z o.o.
- PORTUGAL
- Dometic Spain, S.L.
- SINGAPORE
- Dometic Pte Ltd
- SLOVAKIA
- Dometic Slovakia s.r.o. Sales Office Bratislava
- SOUTH AFRICA
- Dometic (Pty) Ltd.
- Regional Office
- South Africa & Sub-Saharan Africa
- SPAIN
- Dometic Spain S.L.
- SWEDEN
- Dometic Scandinavia AB
- Dometic Switzerland AG
- UNITED ARAB EMIRATES
- Dometic Middle East FZCO
- UNITED KINGDOM
- Dometic UK Ltd.
- USA
- Dometic RV Division
Brand : DOMETIC
Model : CoolFreeze CFX 40 W
Category : Refrigerator