
SA10.EU - Tumble dryer Bimar - Free user manual and instructions
Find the device manual for free SA10.EU Bimar in PDF.


| Type de produit | Product type |
| Marque | Brand |
| Modèle | Model |
| Dimensions (L x P x H) | 60 x 60 x 85 cm |
| Poids net | Net weight |
| Alimentation électrique | Power supply |
| Puissance absorbée | Power consumption |
| Capacité de séchage maximale | Maximum drying capacity |
| Type de séchage | Drying type |
| Nombre de programmes | Number of programs |
| Fonctions principales | Main functions |
| Niveau sonore | Noise level |
| Classe énergétique | Energy class |
| Consommation annuelle d'énergie | Annual energy consumption |
| Longueur du cordon d'alimentation | Power cord length |
| Entretien et nettoyage | Maintenance and cleaning |
| Sécurité | Safety |
| Pièces détachées et réparabilité | Spare parts and repairability |
| Garantie | Warranty |
Frequently Asked Questions - SA10.EU Bimar
User questions about SA10.EU Bimar
0 question about this device. Answer the ones you know or ask your own.
Ask a new question about this device
Download the instructions for your Tumble dryer in PDF format for free! Find your manual SA10.EU - Bimar and take your electronic device back in hand. On this page are published all the documents necessary for the use of your device. SA10.EU by Bimar.
USER MANUAL SA10.EU Bimar
natural_image
Simple line drawing of a blank board with a checkmark on top (no text or symbols)Fig.2
natural_image
Simple line drawing of a blank whiteboard with three legs and a 'X' mark above (no text or symbols on the board)Please read these instructions carefully before using the appliance, and instruct other persons using it, too, when necessary. KEEP BOOKLET HANDY FOR FURTHER USE.
If when reading this instructions manual certain parts should remain difficult to understand, or if there is any confusion, contact the company indicated on the last page before using the product.
WARNING: This appliance is intended exclusively for drying garments that were washed in water.
GENERAL RECOMMENDATIONS
- This appliance is destined only to the heating of internal domestic or similar environments and in compliance with these instructions. This appliance is intended exclusively for drying wet garments. It is intended for domestic, not commercial, use in compliance with the present instructions. The total load of wet garments should not exceed 10kg. Make sure the garments are well squeezed or that the spin cycle has been run before they are put in the structure, so that garments do not drip. It can be considered only a supplementary source of heating and not as a central heating element.
This appliance is intended to be used in household and similar applications such as:
- staff kitchen in shops, offices and other working environments;
- farm houses
- by clients in hotels, motels and other residential type environments
- bed and breakfast type environments
The appliance must not be used in dusty environments or in the presence of extremely volatile materials which could obstruct grids or heat exchanger, nor in very damp environments, in the presence of inflammable products, or out of doors in the open. Any other use is to be considered inappropriate and therefore dangerous. The manufacturer cannot be held responsible for eventual damage caused by inappropriate, improper or irresponsible use and/or for repairs made to the product by unauthorised personnel.
- The appliance gets hot when working; so only touch the handle and plastic Knobs. Avoid contact with the heating element.
- Ensure that the appliance does not come into contact with water or other liquids. If this should happen, never immerse hands in the liquid but remove the plug from the socket first of all. Dry the appliance carefully and check that all the electric parts are dry. If in doubt, call a qualified expert.
- If the appliance should fall over or shows signs of faulty operation, disconnect the electrical cable immediately. Check that no part is damaged and switch it on after the appliance has been thoroughly checked: in case of doubt, contact qualified professional personnel.
- CAUTION: Some parts of this product can become very hot and cause burns. Particular attention has to be given where children and vulnerable people are present.
- This appliance can be used by children aged from 8 years and above and persons with reduced physical, sensory or mental capabilities or lack of experience and knowledge if they have been given supervision or instruction concerning use of the appliance in a safe way and if they understand the hazards involved. Children shall not play with the appliance. Cleaning and user maintenance shall not be made by children without supervision.
- Attention: when using electric appliances, the basic safety precautions must always be observed to avoid risks of fire, electric shocks and physical injury.
• This appliance should only be used with the cloth provided.
• Unplug the appliance when not in use.
- The fireguard of this heater is intended to prevent direct access to heating elements and must be in place when the heater is in use, but the fireguard does not give full protection for young children and for infirm person.
- Do not move the appliance when it is in function.
- That the user must not leave the appliance unattended while it is connected to the supply.
- Do not touch the heater with wet hands or feet.
- Do not expose the appliance to the weather (sun, rain, etc.).
- Do not pull on the power cord or the appliance to unplug the appliance from the wall socket. Never move the appliance by pulling the cord.
• The appliance must not be positioned immediately under a socket.
- The power socket must be easy to reach so the plug can be removed quickly in case of emergency.
- If the electric cord is damaged, it has to be replaced by the supplier or an authorized service center or a professionally qualified, to avoid any risks.
INSTALLATION
- After removing the packing materials, check the integrity of the heater; if you are unsure, do not use it and ask for qualified professional help. The packing materials (plastic bags, polystyrene foam, nails, etc.) must be kept out the reach of children because they are potential sources of danger.
- Before connecting the appliance, check that the voltage shown on the data plate matches that of your electricity (220-240V\~50z) and that the electric plug is grounded. In the event of incompatibility between the electric outlet and the plug of the appliance, have the outlet replaced with another more suitable type by professionally qualified personnel, who will make sure that the section of the wires of the outlet is appropriate for the absorbed power of the appliance. In general, the use of adapters or extension cords is not recommended; if their use is indispensable, they must conform to existing safety standards and their current capacity (amperes) must not be less than the maximum of the appliance.
Attention: before use the appliance remove the detachable coupon to stick the handle.
- Before each use, verify that the appliance is in good condition and that the electrical cord is not damaged: in the case of doubt, ask for professionally qualified help.
- Make sure that the cable is correctly positioned and that it is not in contact with hot parts or sharp edges, nor wrapped around the device or twisted.
- Position the appliance far from other sources of heat, inflammable materials (curtains, carpets, etc.), inflammable gases or explosive materials (spray cans) and from materials that can deform on exposure to heat. Make sure that there is 150 cm of free space in front of the fan heater and 150 cm on the sides. Do not use the heater in the immediate vicinity of a bathtub, shower or swimming pool (to avoid drops of water falling on the heater or the heater falling in the water), or in places where it could be subject to shocks.
- Make sure that the appliance is working correctly: if not, turn the heater off and have it checked by professionally qualified personnel.
- Make sure that the air-intake grid is not obstructed by objects, fabrics or anything else to avoid the heater overheating or breaking.
- Do not use the appliance with a timer or a programmer or with a system that can switch on the appliance automatically, to avoid risk of fire, since a fire risk exists if the heater is covered or
positioned incorrectly. Check that no other high absorption appliances are connected to the same power source.
- In the case of a breakdown or fault, switch off the appliance and have it checked by a professionally qualified technician; repairs made by unqualified persons can be dangerous and render void the warranty.
ASSEMBLING
Warning: the appliance can only be used after complete and correct assembling, including legs, rod and cloth. In case you have any doubt, have the device checked or assembled by qualified personnel.
Warning: before assembling the appliance, make sure it is unplugged from the socket.
For assembling, proceed as described and use the figures as a reference.
-
Place the engine body (thermofan grid side) on a plain and even surface to prevent any damage or scratch to the air exhaust grid; insert the three support legs in the relevant holes on the bottom, insert the legs (F) applying some pressure.
-
Turn the engine body upside down (A) with its legs down and make sure they are all in contact with the surface.
-
Insert the lower rod (C) in the engine body by screwing it clockwise until it becomes tightened.
-
Insert the lid (E) completely on the lower rod in order to cover the grid.
-
Screw the upper rod clockwise on the lower rod and tighten.
-
To open the arms, lift the structure (like when opening an umbrella), until the arms are in completely horizontal position. A click sound will tell you that the structure is locked in that position.
-
Place the garments on clothes hangers (not included). We recommend to use small hangers made of heat-resistant plastic or metal. Then hang the clothes hangers to the hooks on the arms.
-
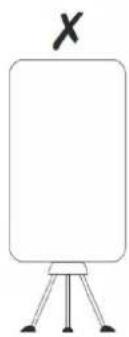
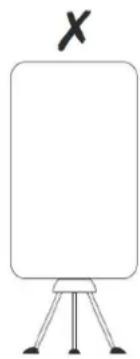
Open all the zippers of the cloth provided, place the cloth over the structure and close all the zippers. The lower part of the cloth must be positioned where the air exhaust grid is, above the green ring (like in figure 1). Never position the cloth like in figure 2, (engine completely covered) otherwise the device CANNOT be used.
-
Warning: Make sure that the cloth is positioned properly and that safety holes in the upper part of the cloth are not occluded during operation.
Fig.1
Fig.2

natural_image
Simple line drawing of a blank whiteboard with a checkmark on top (no text or symbols)
natural_image
Simple line drawing of a blank whiteboard with three legs and a 'X' mark above it (no text or symbols on the board)Advice for Drying
- Check the garments labels to be sure they are suitable for drying.
• Make sure the garments you want to dry can withstand a temperature of at least 75^ C.
- The garments must have already undergone the spin cycle or been squeezed well if handwashed. It will allow for faster drying and less water collected at the base of the device.
- For faster drying:
- place the garments at a certain distance from one another (around 3 to 4 cm)
- place the garments with different dimensions one next to the other (for example: place a shirt next to a pair of trousers) so as to allow better air circulation thanks to the distance between them
• Do not overload the structure, never exceed 10Kg load.
OPERATION
Prior to any use, make sure the appliance is in good condition and that the electrical cable is not damaged: if the power cable is damaged, it must be replaced by the manufacturer or by the technical support service, or by someone having a similar qualification in order to prevent any risk.
1) Insert the plug in the socket.
2) The appliance is equipped with a timer that allows automatic power off once the set time has expired; to set the time, turn the timer knob (D) clockwise to reach the desired operation time (180 minutes); to operate the appliance for a longer time, with no timer control, turn the knob anti-clockwise and set it on "ON".
3) To switch off the appliance, turn the knob in position "0" and unplug the cable.
If the device is not used for a long time, unplug it from the power socket.
CLEANING AND MAINTENANCE
Warning: before cleaning the appliance, turn it off, remove the plug from the outlet and wait for it to cool.
- For proper operation of the appliance, make sure the air exhaust grid is not occluded by fluff: this action must be carried out after unplugging the appliance.
- Use a soft, slightly damp cloth to clean the body; do not use metal scouring pads or abrasive products.
- To clean and maintain of the grid, it is possible vacuum cleaner paying attention not to damage the electrical resistance.
- In the case of long time without operation, we recommend to disassemble the appliance and insert it in the original packaging to safeguard it from dust and moisture, store in a dry place.
- If you decide not to use the appliance, we recommend that you make it inoperative by cutting the power cord (but first make sure you have removed the plug from the electrical outlet), and make those parts harmless that are dangerous when played with by children.
IMPORTANT INFORMATION FOR CORRECT DISPOSAL OF THE PRODUCT IN ACCORDANCE WITH EC DIRECTIVE 2011/65/EC.
At the end of its working life, the product must not be disposed of as urban waste. It must be taken to a special local authority differentiated waste collection centre or to a dealer providing this service. Disposing of a household appliance separately avoids possible negative consequences for the environment and health deriving from inappropriate disposal and enables the constituent materials to be recovered to obtain significant savings in energy and resources. As a reminder of the need to dispose of household appliances separately, the product is marked with a crossed-out wheeled dustbin.


natural_image
Simple line drawing of a blank whiteboard with three legs and a checkmark on top (no text or symbols)Fig.2

natural_image
Simple line drawing of a blank whiteboard with three legs and a 'X' mark on top (no text or symbols on the board)natural_image
Simple line drawing of a blank whiteboard with a checkmark on top (no text or symbols)Fig.2

natural_image
Simple line drawing of a blank board with three legs and an 'X' mark above (no text or symbols on the board itself)natural_image
Simple line drawing of a blank whiteboard with a checkmark on top (no text or symbols)Fig.2
natural_image
Simple line drawing of a blank board with three legs and an 'X' mark above (no text or symbols on the board itself)A. Motor body
B. Coloumn higher
C. Coloumn inferior
D. Timer Knob
E. Cover
F. Feet
G. Telo
H. Structure
A. Corps moteur
B. enchères plus
C. enchères inférieure
D. Bouton minuterie
E. couverture
F. Pieds
G. Telo
H. Structure
Brand : Bimar
Model : SA10.EU
Category : Tumble dryer