
BM 1000 - Bread maker IMETEC - Free user manual and instructions
Find the device manual for free BM 1000 IMETEC in PDF.


| Product Type | Bread Maker |
| Brand | Imetec |
| Model | BM 1000 |
| Power | 650 W |
| Voltage | 220-240 V |
| Frequency | 50-60 Hz |
| Maximum Bread Weight | 1000 g (2.2 lb) |
| Number of Programs | 12 |
| Crust Control | 3 Settings (Light, Medium, Dark) |
| Delay Timer | Up to 13 Hours |
| Keep Warm Function | Yes, up to 1 hour |
| Non-Stick Pan | Yes, removable |
| Viewing Window | Yes |
| Dimensions (HxWxD) | 30 x 25 x 35 cm |
| Weight | 5.5 kg |
| Main Material | Stainless Steel and Plastic |
| Cord Length | 1.0 m |
| Safety Features | Automatic shut-off, overheat protection |
| Cleaning | Wipe with damp cloth, pan dishwashable |
| Spare Parts Availability | Contact Imetec support |
| Warranty | 2 years |
Frequently Asked Questions - BM 1000 IMETEC
User questions about BM 1000 IMETEC
0 question about this device. Answer the ones you know or ask your own.
Ask a new question about this device
Download the instructions for your Bread maker in PDF format for free! Find your manual BM 1000 - IMETEC and take your electronic device back in hand. On this page are published all the documents necessary for the use of your device. BM 1000 by IMETEC.
USER MANUAL BM 1000 IMETEC
Instructions for use
Bedienungsanleitung
[M] [N]

[L]

DATI TECNICI / TECHNICAL DATA / TECHNISCHE DATEN / DATOS TÉCNICOS
IMETEC
TYPE N0001
220-240 V 50/60 Hz 550 W
TENACTA GROUP S.p.A.
VIA PIEMONTE 5
IT - 24052 AZZANO S. P.
www.imetec.com


INTRODUZIONE
Dear customer, thank you for choosing our product. We feel certain you will appreciate its quality and reliability as it was designed and manufactured with customer satisfaction in mind. These instructions for use are compliant with the European Standard EN 82079.

WARNING! Instructions and warnings for safe use.
Before using this appliance, carefully read the instructions for use and in particular the safety notes and warnings, which must be complied with. Keep this manual together with its illustrative guide for future consultation. Should you transfer the appliance to another user, make sure you hand over this documentation as well.
NOTE: should any part of this manual be difficult to understand or any doubt arise, contact the company at the address indicated on the last page before using the appliance
NOTE: partially sighted persons can consult the digital version of these instructions for use on the website www.tenactagroup.com
CONTENTS
| Introduction page 15 | Delayed start | page 25 | |
| Safety notes page 15 | Cleaning and maintenance | page 26 | |
| Key to symbols used page 18 | Protection in the case of a power failure | page 26 | |
| Description of the appliance and accessories page 19 | Handy tips | page 26 | |
| Contact with food page 19 | Troubleshooting | page 27 | |
| Cleaning before first use page 19 | Disposal | page 28 | |
| Quantities page 20 | Customer support and warranty | page 28 | |
| Programs | page 20 | Illustrative guide page I-II-III | |
| Use | page 22 | Technical data page III | |
| Partial programs for kneading or baking only | page 25 | ||
SAFETY NOTES
- After unpacking, make sure the appliance is intact, complete with all its parts as shown in the illustrative guide and with no sign of damage. If in doubt, do not use the appliance. Contact an authorised service centre.

CAUTION! Remove any communication material such as labels, tags etc. from the appliance before use.

WARNING! Risk of suffocation.
Children shall not play with the packaging. Keep the plastic bag out of reach of children.
- This appliance must be used only for the purpose for which it was designed, namely as a breadmaker for home use. Any other use is considered not compliant with the intended use and therefore dangerous.

WARNING! Any misuse of the appliance may lead to injuries.
- Before connecting the appliance to the mains supply, make sure that the voltage and frequency indicated on the technical data of the appliance correspond to those of the mains supply. The rating is on the appliance or on the power supply unit, if any (see illustrative guide).
- This appliance can work automatically at a frequency of 50 Hz or 60 Hz.
- This appliance can be used by children aged from 8 years and above and persons with reduced physical, sensory or mental capabilities or lack of experience and knowledge if they have been given supervision or instruction concerning use of the appliance in a safe way and understand the hazards involved. Children shall not play with the appliance. Cleaning and user maintenance shall not be made by children without supervision.

WARNING! Keep the appliance and its cord out of reach of children less than 8 years.
- DO NOT use the appliance with wet hands, damp feet or barefoot.
- DO NOT pull the supply cord or the appliance itself to remove the plug from the socket.
- DO NOT pull or lift the appliance by the supply cord.
- DO NOT allow the supply cord to hang over the edge of the support surface. If pulled by the cord the appliance may fall and cause injuries or burns.
- DO NOT expose the appliance to humidity, to the effects of weather (rain, sun, etc.) or to extreme temperatures.
- The appliance is not to be used outdoors.
- DO NOT leave the appliance unattended while in operation.
- DO NOT leave the appliance unattended while it is connected to the power supply.
- Always disconnect the appliance from the mains supply before cleaning or performing maintenance and when the appliance is not in use.
- If the appliance is faulty or malfunctions, switch it off and do not tamper with it. Contact an authorised technical service centre for any repairs.
- If the supply cord is damaged it must be replaced by an authorised technical service centre, so as to prevent all risks.
- The electrical safety of this appliance is only guaranteed when it is correctly connected to an effective earthing system, as required by the electrical safety standards in force. Make sure that the mains power supply used meets this vital safety requisite before connecting the appliance to mains power. If in doubt request a thorough check of the system by a qualified technician.
- This appliance shall not come into contact with water, other liquids, spray, steam. For any cleaning and maintenance operation refer to the instructions in the relevant chapter.
- DO NOT use this appliance near a washbasin full of water. During use the appliance must be placed in such a way that it cannot fall in the washbasin or the sink.
- DO NOT leave this appliance in contact with materials and surfaces that are easily flammable or may be damaged by heat.
- This appliance must be placed on a flat, stable surface.
- For the features of the appliance, refer to the external packaging.
- Use the appliance only with the supplied accessories that are an essential part of the appliance.
- This appliance is not intended to be operated by means of an external timer or separate remote-control system or any other similar system.
- DO NOT use near a hob. The supply cord shall not come into contact with hot, incandescent surfaces, open flames, pots and other utensils.
- DO NOT touch, block or cover the hot air outlet grids.
- DO NOT leave food in contact with the appliance for any longer than is necessary for preparation.
- DO NOT use extension cords or adaptors.
KEY TO SYMBOLS USED
 | Warning |  | Prohibition |
 | light browning medium browning |  | |
 | dark browning weight selection 700 g |  | |
 | weight selection 900 g Increase |  | |
 | Decrease |  | connection to the mains supply |
 | machine working |
DESCRIPTION OF THE APPLIANCE AND ACCESSORIES
Refer to the illustrated guide on pages I and II to check that your appliance is complete with all accessories.
- Lid
1a. Viewing window
1b. Steam vent grid
1c. Flaps to open the lid
- Control area
- Power cable with plug
- Main body
- Baking chamber
- Heating element
- Gears
- Technical data
Control area
- Display
-
START/STOP button
-
Weight selection button

- Machine ON LED
-
- and - buttons
-
Mains connection LED
-
BROWNING button
-
MENU button
Accessories
- Loaf container
17a. handle
17b. pin
17c. mixing blade
- Moulds
- Mould support
- Blade removal hook
- Recipe book


CONTACT WITH FOOD
To ensure safe use of the device, respect the indications in this table which shows:
- parts of the appliance intended for contact with food; the parts of the appliance not indicated in the table are not meant to come into contact with food.
- the types of food which may be used in this appliance.
- the maximum period of time for which foodstuffs may remain in contact with the parts of the appliance intended for contact with food.
- the maximum permissible temperature of food used in the appliance.
| List of parts Food Max | Maximum time Max | Maximum temperature | |
| Loaf container | All | 240 minutes 150°C | |
| Pin | |||
| Mixing blade | |||
| Moulds | |||
| Blade removal hook 30 seconds | ds 100°C |
CLEANING BEFORE FIRST USE

WARNING! Before use, wash all parts which will come into contact with food.
Unpack the appliance and remove all the accessories and manuals from the baking chamber.
| Accessory | Under running water at a temperature not exceeding 60°C | Wipe with a dampened and thoroughly squeezed out sponge |
| Loaf container √ - | ||
| Mixing blade, moulds √ - | ||
| Main body - √ | ||
| Lid and viewing window - √ | ||
| Mould support √ - |
- Dry with a dry cloth.
When used for the first time, the machine may emit a little smoke and odour caused by possible manufacturing residues. Perform a baking cycle, making a type of bread to be thrown out.
QUANTITIES
- Do not exceed the quantities indicated by the recipes in the recipe book, according to the mould used.
- When creating your own recipe (not in the book), bear in mind the following limits:
- loaf container: do not exceed a total of 560 g flour
- moulds for bread rolls: do not exceed a total of 320 g flour
If the bread has a filling, reduce the quantities.
- Never exceed the maximum yeast quantities shown in the table below:
| Flour Fresh brewer's yeast | Freeze-dried brewer's yeast | Baking powder for desserts |
| 560 g 16 g 5 g 20 g |
- To make a loaf with smaller quantities than those given in the recipe, you are advised to select "light" browning for a shorter baking phase. Do not reduce the quantity of ingredients by more than 20% in order not to jeopardise the good outcome of the dough and the final result.
- For more handy bread-making advice, refer to the general tips in the recipe book supplied with the machine.
PROGRAMS
- White bread
- Crusty bread
- Wholemeal bread
- White bread rolls
- Sweet bread
-
Gluten-free bread
-
Quick
- Kneading
- Jam
- Cakes
- Wholemeal bread rolls
- Baking
These programs differ in terms of the time and type of kneading, the number of rising stages and the temperature conditions for both rising and baking.
EN
| Weight (g) | Length of 1st kneading (m) | Length of 1st rising (m) | Length of 2nd kneading (m) | Length of 2nd rising (m) | Pause for mould transfer (m) | Length of 3rd rising (m) | Blade extraction after (m) | Baking (m) | Keep warm (m) | ||
| 1 White bread | 700 11 | 20 17 | 25 - 40 | 103 75 60 | |||||||
| 900 12 | 20 18 | 25 - 40 | 105 80 60 | ||||||||
| 2 Crusty bread | 700 18 | 40 22 | 30 - 45 | 145 80 60 | |||||||
| 900 20 | 40 25 | 30 - 45 | 150 85 60 | ||||||||
| 3 Wholemeal bread | 700 11 | 25 21 | 35 - 60 | 142 75 60 | |||||||
| 900 12 | 25 23 | 35 - 60 | 145 80 60 | ||||||||
| 4 White bread rolls | 320 12 | 20 18 | 20 30 15 | - 50 60 | |||||||
| 5 Sweet bread | 700 12 | 5 23 30 | - 40 10 | 0 75 60 | |||||||
| 900 12 | 5 23 30 | - 40 10 | 0 80 60 | ||||||||
| 6 Gluten-free bread | 700 12 | 5 13 30 | - 40 90 | 85 60 | |||||||
| 900 12 | 10 13 | 30 - 40 9 | 5 85 60 | ||||||||
| 7 Quick | 700 13 | - 5 25 | - 33 65 | 60 | |||||||
| 900 13 | - 5 30 | - 38 70 | 60 | ||||||||
| 8 Kneading - 25 - | 30 - 35 | --- | |||||||||
| 9 Jam - - 15 45 - | - 20 - | ||||||||||
| 10 Cakes | 7 | 4 10 9 | - 20 80 | 60 | |||||||
| 11 Wholemeal bread rolls | 320 12 | 25 23 | 30 30 15 | - 50 60 | |||||||
| 12 Baking - - - - - - | - 10-60 | 60 | |||||||||
The times shown here can help you to manage the recipe in the best way:
Mould transfer: indicates after exactly how long (from the program start) the transfer of the dough to the moulds will be requested. There is an acoustic signal (5 beeps + 10 beeps at the end of the 30 minutes envisaged for the operation).
For program no.4, 70 minutes after the start
For program no.11, 90 minutes after the start
NOTE: the time needed for mould transfer cannot be reduced. DO NOT PRESS ANY BUTTONS DURING THE PAUSE IN THE PROGRAM.
Blade extraction: indicates the exact moment when the mixing blade can be taken out in programs with the "loaf" accessory, or seeds can be added to the surface of the bread.
The fact of taking out the blade makes it easier to remove the bread or cake from the container at the end of the baking phase. In bread programs, the time indicated corresponds to the beginning of the last
rising phase, just after the movement of the mixing blade to reduce the volume of the dough. For the cake program, it corresponds exactly to the end of the kneading phase.
Program end: Indicates the total recipe execution time at the various browning levels. For certain programs, the execution end can be delayed by up to 13 hours.
EN
USE


WARNING! This appliance is not to be used if it has been dropped or if there are visible signs of damage.
WARNING! Risk of burn. DO NOT touch the external surfaces during operation and until the appliance has completely cooled down.
WARNING! The bread may burn and produce flames and / or smoke. DO NOT use water. Disconnect the appliance and use a damp cloth to put out any flames.



WARNING! DO NOT touch the mixing blade with your hands or utensils while it's operating.
WARNING! DO NOT touch the mixing blade with your hands or utensils while it's operating.
WARNING! The mixing blade must be removed in the exact moment indicated in the programs table. If it is removed sooner, the dough may rise too much and come out from the container while baking.


WARNING! Risk of scalding. Heat and steam come out from the cooking chamber when opening the lid of the appliance.
WARNING! Risk of scalding. Always wear oven gloves to open the lid and to remove containers.
WARNING! Risk of crushing. The lid may close accidentally.
WARNING! Risk of scalding. DO NOT move the appliance while it is in operation.
Programs from no.1 to no.11 carry out the various kneading, rising and baking phases autonomously. For some of them, the intervention of the user may be necessary.
These programs cannot be used consecutively: there must be a pause (of about 30') to let the machine cool down completely. If you want to speed up this process, move the machine to a cool, airy place.
- Open the lid.
- Take out the loaf container by lifting the handle and turning it anti-clockwise (Fig. A). Pay special attention to the lid, to make sure it doesn't close on your hands: you are advised to hold it still with your free hand.
- Insert the mixing blade on the pin.
- Insert the ingredients in the loaf container, following the order indicated in the recipe. Weigh the ingredients carefully, using scales with 1-gram marks.
- Put the loaf container in the machine, rotating it clockwise until it's firmly locked in place (Fig. A).
- Insert the power cable plug in the power socket.
NOTE: the loaf container must always be used in the first kneading and rising phase, even for programs that use different moulds.
SETTING THE MACHINE
- Press the MENU button several times to select the required program (Fig. C). The number of the program and the relative duration are shown on the display.
- Press the WEIGHT button to select the weight of the loaf (Fig. D).
- Press the BROWNING button □ several times to select the required browning level
• LIGHT, MEDIUM or DARK (Fig. E).
- Longer baking time: select DARK browning.
- Shorter baking time: select LIGHT browning.
NOTE: to stop any active program, press the START/STOP button for a few seconds.
FOLLOWING THE RECIPE
- Press the START/STOP button to begin the program (Fig. G); the remaining time is updated on the display.
The machine automatically carries out the various bread-making phases.
It's important not to open the lid during the baking phase, as this might affect the result.
1st phase: KNEADING
During this phase, all the programs emit 4 beeps after 30 minutes so that any additional ingredients can be inserted. No button must be pressed: simply open the lid and add the ingredients.
During this phase, the lid can be left open to control the process.
2nd phase: RISING
There are three or four rising phases, depending on the program.
Keep the lid closed during leavening so the machine can guarantee the optimal temperature.
Only for loaves (1,2,3,5,6,7): mixing blade extraction.
For loaves, the mixing blade can be taken out at the beginning of the last rising phase: the exact moment is shown in the TIMES TABLE chapter, under the heading “Mixing blade extraction”, and is calculated from the moment the program is launched with the START button:
e.g. for program no.1, 103 minutes after the start.
- Open the lid and hold it still to make sure it doesn't close on your hands.
• Take the loaf container out by rotating the handle anti-clockwise as far as the lock. - Tilt the loaf container to one side then, after sprinkling flour onto your hand, move the dough past the first mixing blade.
• Take out the mixing blade. - Redistribute the dough and level it off.
- Put the loaf container back in the baking chamber and close the lid.
Only for programs that require the use of moulds (no. 4 and 11): transferring the dough to the moulds
After the first rising phase, the machine emits 5 beeps and then goes into standby for 30 minutes. Once this time has elapsed, the machine emits 10 beeps to mark the start of the baking phase.
- Open the lid and hold it still to make sure it doesn't close on your hands.
• Take the loaf container out by rotating the handle anti-clockwise as far as the lock.
• Take out the dough and transfer it to the moulds:
- divide the dough into four equal parts (Fig. I) and transfer it to the moulds after greasing them with olive oil or butter and flour (cakes).
- Insert the moulds on the mould support (Fig. L). Insert the mould support in the baking chamber (Fig.M).
- Close the lid.
- After 30 minutes, the machine will emit 10 beeps. The program starts additional leavening and continues automatically.
NOTE: the time needed for mould transfer cannot be reduced. DO NOT PRESS ANY BUTTONS DURING THE PAUSE IN THE PROGRAM.
3rd phase: BAKING
The length of this phase depends on the program chosen.
End of the bread-making
- At the end of the bread-making phase, the machine emits 10 beeps; the initial screen appears on the display.
Take the plug out of the socket. - Open the lid carefully as the hot air might hit you in the face.
Loaf:
- Hold the lid still with one hand, to make sure it doesn't close on your hands.
- Put on an oven mitt and grip the handle, rotating it anti-clockwise as far as the lock.
- Tip the loaf container over and strike it on the base to remove the bread.
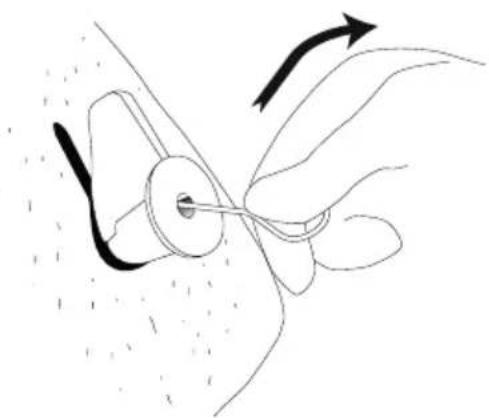
- If the mixing blade is still in the bread, remove it by inserting the relative hook (20) in the hole in the blade and levering slightly on the wall inside the hole [Fig. N].
Moulds:
- Wearing an oven mitt, grip the handles of the support to take it out.
- Remove the moulds from the support.
- Tip the mould over to remove the bread.
PARTIAL PROGRAMS FOR KNEADING OR BAKING ONLY
The machine has a specific program for the kneading and rising phase only, and a program for the baking phase only.
The baking program can be used straight away after the kneading and rising phases.
Kneading program (no. 8)
This program carries out the kneading phase only, followed by two rising phases.
- Use the MENU button to select program 8.
- Press the START/STOP button (10): the kneading will begin, followed by the first rising phase.
Baking program (no. 12)
This program uses the baking phase only. It can be used to extend a bread-making phase that has just finished.
- Use the MENU button to select program 12.
- Set the required baking time (from 10 to 60 minutes) using the + and - buttons.
- Press the START/STOP button: the baking phase will begin straight away.
DELAYED START
The delayed start can be used with certain programs in order to have the bread ready up to 13 hours later. You are advised not to use this function with perishable ingredients or gluten-free flours.
The delayed start function is only active with programs no. 1,2,3,4,5,6,8,10 and 11.
- Place the ingredients in the loaf container in this order: liquid ingredients, yeast, flour, salt and sugar. The last two elements must not come into contact either with each other or with the water.
- Select the program, weight and required baking level as specified in the USE chapter.
- Press the + button. The display will show the maximum delay time 13:00 (hours).
- Press the - button to reduce the delay time (but not beyond the minimum required by the program).
- Press the + button to increase the delay time in the event of an error (but not beyond the minimum required by the program); the time will change by 10' every time the + or - button is pressed.
- Press the START/STOP button (Fig. H).
- the machine will remain in standby for the programmed time.
CLEANING AND MAINTENANCE

WARNING! Always take out the plug and make sure the appliance has fully cooled down before cleaning or carrying out maintenance.

WARNING! Risk of crushing. Remove the lid before any cleaning operation.

WARNING! Risk of fire. Wait for the appliance to cool completely before storing it.
Take the plug out of the socket and wait until the appliance is completely cold.
- Clean the lid, baking chamber and heating element with a soft, damp cloth that has been well wrung out. Do not use detergents or abrasives and do not pour in any liquids.
- Wash the loaf container, mixing blade, moulds, support and mixing blade removal hook by hand, using a soft sponge, hot water and detergent. If the mixing blade doesn't come out easily, leave it soaking in hot water for a few minutes.
- Clean the main body with a damp cloth that has been well wrung out.
- Dry well.
- Put the containers back in place, taking care not to scratch them. Proceed as follows after having assembled the appliance.
PROTECTION IN THE CASE OF A POWER FAILURE
The machine is provided with a protection that, in the case of a power failure (max. 10 minutes) keeps the memory active and guarantees that the recipe will be continued.
HANDY TIPS
To learn how to use the bread maker, to begin with you are advised to follow the recipes without altering the ingredients or quantities. In this way, you will get to know the various programs and accessories so it will then be easier to try out variations with ingredients to your own taste, or more suitable for your own type of diet.
- When experimenting with new ideas, you are advised to replace just one ingredient at a time (e.g. a different flour, oil instead of butter, etc.), so you can more easily note the difference compared with the original recipe you have already tried. When you want to make a more significant change (e.g. a different type of yeast from the one indicated in the recipe), or even try out a recipe of your own that's very different from those in the book, it's important to keep the rising and baking phases under control to avoid any risk of the dough seeping out of the containers.
TROUBLESHOOTING
If one of the following problems occurs, adopt the solution indicated:
| Problem Solution | |
| No electricity supply. | The machine keeps the programming in its memory for 10 minutes. If the electricity supply is restored within this time, the recipe will be carried out. Once the 10 minutes have elapsed, the programming is deleted. |
| The selected program does not start. | A delayed start has been set, or the START/STOP button has not been pressed. |
| The selected program does not start, and the error HHH appears on the display. | The machine is still hot because bread was just made.Wait for the machine to cool down completely (approx. 40 minutes). |
| The selected program does not start, and the error LLL appears on the display. | The machine is too cold. Take it to a warmer place. |
| A program for sandwiches or ciabattas does not restart after the transfer. | More than 30 minutes have passed since the 10 beeps indicating the moment for transfer. |
| White smoke comes out of the baking chamber, and there is a burning smell. | Dough residue in the bottom of the baking chamber.Turn off the machine, take out the plug and let the machine cool down completely before cleaning the baking chamber.∅ NEVER use water. |
| Steam emerges from the baking chamber. | It's normal for steam to come out during the baking phase. |
| The motor runs, but kneading does not start. | The mixing blade is not inserted.Stop the machine and insert the mixing blade properly. |
| Noise during rotation. | The loaf container is not inserted properly.Stop the machine and insert the loaf container or mixing blade properly. |
| The loaf container (17) slips out of its seat during kneading. | The loaf container is not well inserted. Stop the machine and insert it correctly. |
| An error code appears on the display:Err. | The machine continuously emits a warning beep.To stop the beeping, press the START/STOP button.Take the machine to an authorised Imetec service centre, indicating the error code. |
DISPOSAL

The packaging of the appliance is made of recyclable materials. Dispose of it in compliance with the environmental protection standards.

In accordance with article 26 of Italian Legislative Decree 49 of 14 March 2014, for the "Implementation of EU Directive 2012/19 on waste electrical and electronic equipment (WEEE)", the crossed waste bin symbol on the appliance or on the packaging of the appliance indicates that the product must be disposed of separately from other refuse at the end of its life.
The user is required to take the appliance at the end of its life to suitable public facilities for the differentiated collection of electric and electronic waste materials. Alternatively, instead of handling the disposal, the user can hand over the appliance to the retailer when a new, equivalent one is purchased.
The user can hand over electronic products measuring less than 25 cm to retailers of electronic products having a sales area of at least 400 m2 free of charge and with no obligation to buy.
The appropriate differentiated collection of the appliance at the end of its life for subsequent recycling and environmentally compatible waste treatment and/or disposal contributes to avoiding the harmful effects of waste on the environment and health, and allows the materials of which the appliance is made to be reused for other applications.
CUSTOMER SUPPORT AND WARRANTY
This appliance is guaranteed for a period of two years from the date of delivery to the customer. This date is taken as the date on the receipt/invoice (as long as it is clearly legible), unless the purchaser can prove that delivery was made at a later date. In the event of a product flaw already present at the time of delivery, the cost-free repair or replacement of the appliance is guaranteed unless one of the two solutions is out of proportion with the other. The purchaser is responsible for informing an Authorised Assistance Centre about the conformity flaw within two months of discovering it.
The warranty does not cover parts that may be faulty due to:
a. damage during transportation or caused by an accidental fall
b. incorrect installation or an inadequate electrical system
c. repairs or modifications made by unauthorised personnel
d. cleaning and maintenance not carried out, or carried out badly
e. normal wear of the appliance and/or its parts, and consumables,
f. failure to observe the appliance operating instructions, or negligent/careless use
The above list is merely an example; it is not complete, as this warranty in any case does not cover circumstances that cannot be traced back to manufacturing flaws. In addition, this warranty is not considered valid in cases of improper appliance use or professional use. The manufacturer cannot be held liable for any direct or indirect damage to property or injuries to persons or pets attributable to the failure to follow any of the directions given in this handbook on the installation, use and maintenance of the appliance. This does not apply to contract warranty actions in relation to the seller.
Assistance
Appliance repairs must be carried out by an authorised Service Centre. If the faulty appliance is under warranty, it must be sent to the Assistance Centre along with a proof of purchase showing the date of purchase or delivery.
EINFÜHRUNG

- IMETEC
- INTRODUZIONE
- WARNING! INSTRUCTIONS AND WARNINGS FOR SAFE USE
- SAFETY NOTES
- DESCRIPTION OF THE APPLIANCE AND ACCESSORIES
- CONTROL AREA
- ACCESSORIES
- CONTACT WITH FOOD
- CLEANING BEFORE FIRST USE
- QUANTITIES
- PROGRAMS
- USE
- SETTING THE MACHINE
- FOLLOWING THE RECIPE
- 1ST PHASE: KNEADING
- 2ND PHASE: RISING
- ONLY FOR PROGRAMS THAT REQUIRE THE USE OF MOULDS (NO. 4 AND 11): TRANSFERRING THE DOUGH TO THE MOULDS
- 3RD PHASE: BAKING
- END OF THE BREAD-MAKING
- LOAF
- MOULDS
- PARTIAL PROGRAMS FOR KNEADING OR BAKING ONLY
- KNEADING PROGRAM (NO. 8)
- BAKING PROGRAM (NO. 12)
- DELAYED START
- CLEANING AND MAINTENANCE
- PROTECTION IN THE CASE OF A POWER FAILURE
- HANDY TIPS
- TROUBLESHOOTING
- DISPOSAL
- CUSTOMER SUPPORT AND WARRANTY
- ASSISTANCE
- EINFÜHRUNG
Brand : IMETEC
Model : BM 1000
Category : Bread maker