
Blend-X pro BLP900 - Hand blender KENWOOD - Free user manual and instructions
Find the device manual for free Blend-X pro BLP900 KENWOOD in PDF.


| Product Type | Hand Blender |
| Brand | Kenwood |
| Model | Blend-X pro BLP900 |
| Power | 1000 W |
| Voltage | 220-240 V, 50-60 Hz |
| Variable Speed | Yes, with 15 speeds + turbo boost |
| Blending Shaft Material | Stainless steel |
| Attachments Included | Blending arm, whisk, 500 ml chopper |
| Capacity (Chopper) | 500 ml |
| Dimensions (H x W x D) | 41 x 8 x 10 cm (approx.) |
| Weight | 1.2 kg (approx.) |
| Cord Length | 1.5 m |
| Dishwasher Safe Parts | Yes, shaft and attachments |
| Safety Features | Auto-off when overheated, locking system |
| Non-Slip Base | Yes, on motor unit |
| Warranty | 2 years |
Frequently Asked Questions - Blend-X pro BLP900 KENWOOD
User questions about Blend-X pro BLP900 KENWOOD
0 question about this device. Answer the ones you know or ask your own.
Ask a new question about this device
Download the instructions for your Hand blender in PDF format for free! Find your manual Blend-X pro BLP900 - KENWOOD and take your electronic device back in hand. On this page are published all the documents necessary for the use of your device. Blend-X pro BLP900 by KENWOOD.
USER MANUAL Blend-X pro BLP900 KENWOOD
natural_image
Line drawing of a blender with control panel and brand mark (BLEN-D-X), no text or symbols presentEnglish 2 - 8
Nederlands 9 - 16
Français 17 - 24
Deutsch 25 - 32
Italiano 33 - 40
Português 41 - 48
Español 49 - 56
Dansk 57 - 63
Svenska 64 - 70
Norsk 71 - 77
Suomi 78 - 84
Türkçe 85 - 91
Česky 92 - 99
Magyar 100 - 107
Polski 108 - 116
Ελληνικά 117 - 126
Slovenčina 127 - 134
HEAD OFFICE: Konwood Limited, 1-3 Konwood Business Park, New Lane, Havant, Hampshire PO8 2NH
kenwoodworld.com
KENWOOD
CREATE MORE
133171/1

English
safety
- Read these instructions carefully and retain for future reference.
- Remove all packaging and any labels.
- If the cord is damaged it must, for safety reasons, be replaced by KENWOOD or an authorised KENWOOD repairer.
• DO NOT process hot ingredients. - SCALD RISK: Hot ingredients must be allowed to cool to room temperature before placing in the goblet or before blending.
- Switch off and unplug:
- before fitting or removing parts;
- when not in use;
- before cleaning.
- Always unplug the appliance before putting your hands or utensils in the goblet.
- Always take care when handling the blades and avoid touching the cutting edge of the blades when cleaning.
- Never let the power unit, cord or plug get wet.
- Never use a damaged appliance. Get it checked or repaired: see 'service and customer care'.
- Never use an unauthorised attachment.
- Never leave the appliance unattended when it is operating.
- When removing the blender from the power unit wait until the blades have completely stopped.
- Never run the blender empty.
- Never blend more than the maximum capacity stated in the recommended usage chart.
- To ensure long life of your blender, do not run it continuously for longer than 3 minutes. Processing for longer periods can damage your appliance.
- Only operate the blender with the lid in place.
- The blender lid must be fitted when using the stir stick in the goblet.
- Only use the stir stick ⑯ for processing cold ingredients and to prevent overheating do not operate for more than 60 seconds.
- Smoothie recipes - never blend frozen ingredients that have formed a solid mass during freezing, break it up before adding to the goblet.
- Do not process hard spices such as Nutmeg or Turmeric root as they may damage the blade.
- Do not use the blender as a storage container. Keep it empty before and after use.
- Always use the blender on a secure, dry level surface.
- Never place this appliance on or near a hot gas or electric burner or where it could touch a heated appliance.
- Children should be supervised to ensure that they do not play with the appliance.
- This appliance shall not be used by children.
- Keep the appliance and its cord out of reach of children.
- Misuse of your blender can result in injury.
- Appliances can be used by persons with reduced physical, sensory or mental capabilities or lack of experience and knowledge if they have been given supervision or instruction concerning use of the appliance in a safe way and if they understand the hazards involved.
- Only use the appliance for its intended domestic use. Kenwood will not accept any liability if the appliance is subject to improper use, or failure to comply with these instructions.
before plugging in
● Make sure your electricity supply is the same as the one shown on the underside of the appliance.
- This appliance conforms to EC Regulation 1935/2004 on materials and articles intended to come into contact with food.
before using your Kenwood appliance
- Wash the parts: see ‘care and cleaning’.
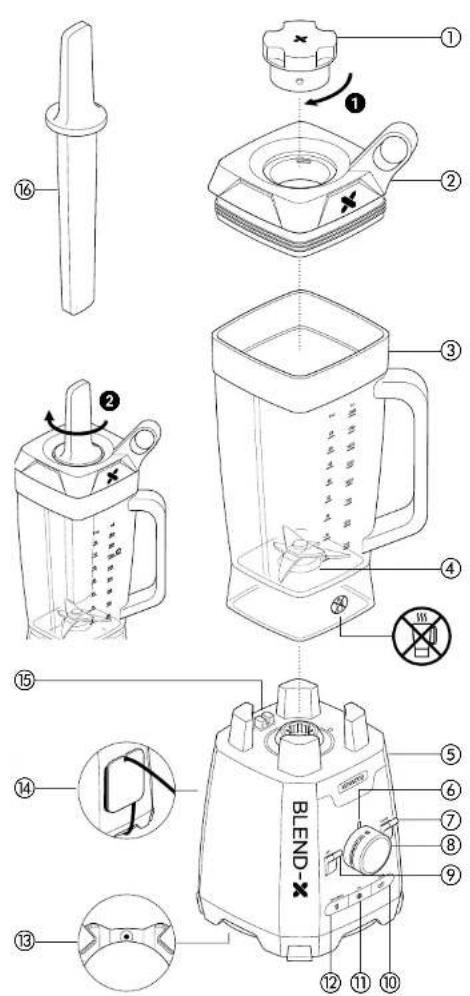
key
① filler cap
② lid
③ goblet
④ fixed blades
⑤ power unit
⑥ power on indicator light
⑦ pulse lever
⑧ variable speed control
⑨ ON/OFF lever
⑩ soup programme button
⑪ ice crush programme button
⑫ smoothies programme button
⑬ overload protection reset button
⑭ cord wrap
⑮ interlock button
⑯ stir stick
to use your blender
1 Put your ingredients into the goblet.
2 Fit the filler cap to the lid and turn in a clockwise direction to lock ①.
3 Fit the lid to the goblet by pushing down until secure.
4 Place the blender onto the power unit ⑤.
- The appliance will not work if the blender is incorrectly fitted.
5 Plug in and the indicator light ⑥ will remain unlit whilst in the 'OFF' position or the goblet is not fitted.
6 Choose one of the following options and refer to the recommended usage chart:
- Programme buttons - Push the ON/OFF lever ⑨ down to the 'On' position and the Power On indicator light ⑥ and all 3 programme buttons will light up. Press the required programme button and the lights on the other buttons will go out and the programme will start. The blender will switch off automatically at the end of the programme time. If you wish to stop before the programme time has elapsed, press the selected programme button again.
- Manually select a speed by turning the speed control ⑧ until the required speed is reached. At the end of blending return the speed control to "O" before removing the blender.
- (P) Pulse – operates the motor in a start/stop action. The pulse will operate for as long as the lever is held down.
- Do not remove the goblet until the blades have stopped rotating and the speed control is in the 'O' position.
Note: If the blender is removed from the power unit whilst a speed is selected the Indicator light will go out and the motor will stop. When the blender is replaced onto the power unit the Power On light will flash. The speed control will need to be turned to the 'O' position before blending can be resumed.
- Refer to the troubleshooting section if you experience any problems with the operation of the blender.
to use the stir stick
1 Fit the lid to the goblet and remove the filler cap. DO NOT use the stir stick in the goblet without the lid fitted.
2 Insert the stir stick ⑯ and move it round the goblet slowly whilst the motor is operating ②.
3 Use the stir stick to help move ingredients around the goblet and prevent clogging during processing.
hints
- To blend dry ingredients - cut into pieces, remove the filler cap, then with the machine running, drop the pieces down one by one. Keep your hand over the opening. For best results empty regularly.
- The processing of spices is not recommended as they may damage the plastic parts.
- For best results do not process for longer than 60 seconds. Operating the blender for longer may cause the temperature of the ingredients to increase.
- When making mayonnaise, put all the ingredients, except the oil, into the blender. Remove the filler cap. Then, with the appliance running, add the oil slowly through the hole in the lid.
- Thick mixtures, e.g. nut butters and dips, may need scraping down. If the mixture is difficult to process, add more liquid and use the stir stick.
| Recommended Usage Chart (Programme Buttons)A change in speed will be noted during the programs – this is normal | |||
| Programme | Usage/Food items Max. | Recommended Quantity | Programme time |
Smoothies Cold liquids | Drinks & fruit juice | 2 litres 45 secs | |
| Milkshakes and milk based drinks | 1.5 litre | ||
| SmoothiesPlace the fresh fruit and liquid ingredients in first (includes yoghurt, milk and fruit juices).Then add ice or frozen ingredients (includes frozen fruit, ice or ice cream) | 2 litres(1 litre liquid) | ||
Ice crush Ice | crushing - Automatic pulsing action. A change in speed will be noted - this is normal. | 200g(10 ice cubes) | 30 secs |
| Frozen fruit juice cubes | |||
Soup Stock | based soups 2 litres 30 secs | ||
| Soups using milk 1.5 litre | |||
| DO NOT process hot ingredientsSCALD RISK:Hot ingredients must be allowed to cool to room temperature before placing in the goblet or before blending | |||
| Recommended Usage Chart (Variable Speed Control) | |||
| Usage/Food items | Recommended Qty Speed Time | ||
| Almond milk 150g almonds700mls cold water | Max 60 secs | ||
| Avocado dip 350g yoghurt2 ripe avocado | Max 25 secs | ||
| Hummus 400g chickpeas Max 30 – 60 secs | Stir stick | ||
| Mayonnaise | Max 3 eggs | Max 60 secs | |
| Fruit purees | 300 – 500g | Max | 15 – 30 secs |
care and cleaning
- Always switch off, unplug and dismantle before cleaning.
Overload Protection
Your blender is fitted with an overload protection device which will stop the blender operating if the unit is overloaded.
If this happens, switch off, unplug and remove excess ingredients from the blender.
Allow the blender to rest for a few minutes. Then press the reset button ⑬ located on the underside of the power unit.
power unit
● Wipe with a damp cloth, then dry.
- Do not immerse the power unit in water.
- Store excess cord around the bracket ⑭ at the back of the power unit.
goblet with fixed blades
1 Fill with warm water, fit the lid and filler cap, then switch on for 20-30 seconds.
2 Empty, then rinse, if further cleaning is required, use a brush.
3 Wipe, then leave to air-dry.
- Do not dishwash the goblet.
lid/filler cap/stir stick
- Wash by hand, then dry.
- Do not place any parts in the dishwasher.
service and customer care
- If you experience any problems with the operation of your appliance, before requesting assistance refer to the “troubleshooting guide” section in the manual or visit www.kenwoodworld.com.
- Please note that your product is covered by a warranty, which complies with all legal provisions concerning any existing warranty and consumer rights in the country where the product was purchased.
- If your Kenwood product malfunctions or you find any defects, please send it or bring it to an authorised KENWOOD Service Centre. To find up to date details of your nearest authorised KENWOOD Service centre visit www.kenwoodworld.com or the website specific to your Country.
- Designed and engineered by Kenwood in the UK.
- Made in China.

IMPORTANT INFORMATION FOR CORRECT DISPOSAL OF THE PRODUCT IN ACCORDANCE WITH THE EUROPEAN DIRECTIVE ON WASTE ELECTRICAL AND ELECTRONIC EQUIPMENT (WEEE)
At the end of its working life, the product must not be disposed of as urban waste.
It must be taken to a special local authority differentiated waste collection centre or to a dealer providing this service.
Disposing of a household appliance separately avoids possible negative consequences for the environment and health deriving from inappropriate disposal and enables the constituent materials to be recovered to obtain significant savings in energy and resources. As a reminder of the need to dispose of household appliances separately, the product is marked with a crossed-out wheeled dustbin.
troubleshooting guide
| Problem Cause Solution | ||
| The Blender will not operate. Light not illuminated. | No Power/Power On Light not illuminated.Interlock not activated.Goblet not fitted. | Check blender plugged in.Check goblet is located to power unit correctly. |
| Blender not operating but Power On indicator light on. | Goblet fitted and ON/OFF lever in ON position but speed or programme not selected. | Either select a speed manually or press a programme button. |
| Power On indicator light flashing. | Goblet refitted whilst variable speed selected. | Turn the speed control to the ‘O’ position and reselect a speed. |
| Motor stops during operation. | Overload protection operated.Operate for too long. | Switch off, unplug and remove excess ingredients from the blender.Allow the blender to rest for a few minutes. Then press the reset button 13located on the underside of the power unit.Do not operate continuously for longer than 3 minutes. |
| Poor blending result. Mix too dry and clogging.Insufficient processing time.Mix overprocessed. | Add more liquid.Use the stir stick.Increase the speed or operating time.Stop the blender when the required consistency is achieved. | |
| Ingredients warm in goblet. | Blender operated for longer than 60 seconds causing the temperature of the ingredients to increase.Insufficient liquid added or over processed. | Do not overprocess and stop the blender when the required consistency is achieved.Do not exceed the recommended operating time and use the correct speed. |
| If none of the above solve the problem see “Service & Customer Care”. | ||
Nederlands
Protection de surcharge
| الحل | المشكلة السبIP المحتمل | |
| تأكدي من توصيل มาزج بمصدر التيaryl الكهربي.تأكدي من تركيب الدورق على وحدة الطاقة (الموتور) بشكل صحيع. | المازج لا يعمل. لا توجد طاقة/ downside مؤشر تشغيل الطاقة لا يضى.لم يتم تفعتيل إحكام demographics.لم يتم تركيب الدورق. | |
| حديد سرعة تشغيل يدوياً أو اختاري أي من برامج تشغيل. | تم تركيب الدورق مع توجيه ON/OFF ( District / UN/OFF) ( District) ( District) ( District) ( District) ( District) ( District) ( District) ( District) ( District) ( District) ( District) ( District) ( District) ( District) ( District) ( District) ( District) ( District) ( District) ( District) ( District) ( District) ( District) ( District) ( District) ( District) ( District) ( District) ( District) ( District) ( District) ( District) ( District) ( District, District) ( District, District) ( District, District) ( District, District) ( District, District) ( District, District) ( District, District) ( District, District) ( District, District) ( District, District) ( District, District) ( District, District) ( District, District) ( District, District) ( District, District) ( District, District) ( District, District) ( District, District) ( District, District) ( District, District) ( District) ( District, District) ( District, District) ( District, District) ( District, District) ( District, District) ( District, District) ( District, District) ( District, District) ( District, District) ( District, District) ( District, District) ( District, District) ( District, District) ( District, District) ( District, District) ( District, District) ( District, District) ( District, District) ( District, District), ( District, District) ( District, District) ( District, District) ( District, District) ( District, District) ( District, District) ( District, District) ( District, District) ( District, District) ( District, District) ( District, District) ( District, District) ( District, District) ( District, District) ( District, District) ( District, District) ( District, District) ( District, District) ( District, District) ( District, District), ( District of the United States, United States, United States, United States, United States, United States, United States, United States, United States, United States, United States, United States, United States, United States, United States, United States, United States, United States, United States, United States, United States, United States, United States, United States, United States, United States, United States, United States, United States, United States, United States, United States, United States, United States, U.S. (District of the United States, United States, United States, United States, United States, United States, United States, United States, United States, United States, United States, United States, United States, United States, United States, United States, United States, United States, United States, United States, United States, United States, United States, United States, United States, United States, United States, United States, United States, United States, United States, United States, United S. (District of the United States, United States, United States, United States, United States, United States, United States, United States, United States, United States, United States, United States, United States, United States, United States, United States, United States, United States, United States, United States, United States, United States, United States, United States, United States, United States, United States, United States, United States, United States, United States, United S. (District of U.S. (District of U.S. (District of U.S. (District of U.S. (District of U.S. (District of U.S. (District of U.S. (District of U.S. (District of U.S. (District of U.S. (District of U.S. (District of U.S. (District of U.S. (District of U.S. (District of U.S. (District of U.S. (District of U.S. (District de U.S. (District de U.S. (District de U.S. (District de U.S. (District de U.S. (District de U.S. (District de U.S. (District de U.S. (District de U.S. (District de U.S. (District de U.S. (District de U.S. (District de U.S. (District de U.S. (District de U.S. (District de U.S. (District de U.S. | |
| لفي مفتاح التحكم في السرعت المتف girlsة إلى الوسعية «» ثمAgوي Trinidad سرعة teensville. | تم إعاده تركيب الدورق مع Equipment-O (>م Expected) (الشغيل) | |
| أوقفي تشغيل มาزج وافصليه عن presentsات التيار الكهربي وأزلياني كويات الزئدة من المكونات اتركي มาزج لتنخض درجة حراسته لمدة ضع د Caقاق. THI اضغطي على زر إعاده التعبين الموجود في الجابب السفلي من وحدة الطاقة (الموتوير).لا تشغلي الجهاز لفرتة زمنية متواصلة أトル من ٣ دCaقاق. | تم تشغيل وظيفة الحماية Sudan فرط التحميل.تم تشغيل الجهاز لفرتة زمنية طويلة جداً. | |
| أضivi في مزيد من السوائل.استخدمي ع Pizza التقي Libya.ارفعي سرعة teensville أو زيدي زمن المعالجة.أوقفي تشغيل มาزج عند حصوك على القوام المطلوب. | الخليط جاف جداً {. } {. } {. } {. } {. } {. } {. } {. } {. } {. } {. } {. } {. } {. } {. } {. } {. } {. } {. } {. } {. } {. } {. } {. } {. } {. } {. } {. } {. } {. } {. } {. } {. } {. } {. } {. } {. } {. } {. } {. } {. } {. } {. } {. } {. } {. } {. } {. } {. } {. } {. }\n\n\n\n\n\n\n\n\n\n\n\n\n\n\n\n\n\n\n\n\n\n\n\n\n\n\n\n\n\n\n\n\n\n\n\n\n\n\n\n\n\n\n\n\n\n\n\n\n\n\n\n\n\n\n\n\n\n\n\n\n\n\n\n\n\n\n\n\n\n\n\n\n\n\n\n\n\n\n\n\n\n\n\n\n\n\n\n\n\n\n\n\n\n\n\n\n\n\n\n\n |

- English
- safety
- before plugging in
- before using your Kenwood appliance
- key
- to use your blender
- to use the stir stick
- hints
- care and cleaning
- Overload Protection
- power unit
- goblet with fixed blades
- lid/filler cap/stir stick
- service and customer care
- IMPORTANT INFORMATION FOR CORRECT DISPOSAL OF THE PRODUCT IN ACCORDANCE WITH THE EUROPEAN DIRECTIVE ON WASTE ELECTRICAL AND ELECTRONIC EQUIPMENT (WEEE)
- Nederlands
- Protection de surcharge
Brand : KENWOOD
Model : Blend-X pro BLP900
Category : Hand blender