
PC-AE 1069 - Juicer PROFICOOK - Free user manual and instructions
Find the device manual for free PC-AE 1069 PROFICOOK in PDF.


| Product type | Slow juicer |
| Brand | ProfiCook |
| Model | PC-AE 1069 |
| Dimensions (L x W x H) | 30 x 20 x 40 cm |
| Weight | 5.2 kg |
| Power supply | 220-240 V, 50/60 Hz |
| Power | 200 W |
| Pulp container capacity | 1.5 L |
| Juice container capacity | 1 L |
| Speed | 60 rpm |
| Main functions | Juicing fruits and vegetables, pulp separation |
| Maintenance and cleaning | Removable parts dishwasher safe |
| Safety | Safety lock, automatic shut-off in case of overload |
| Spare parts and repairability | Filter, pusher, cleaning brush available |
| Warranty | 2 years |
| Certifications | CE, GS |
Frequently Asked Questions - PC-AE 1069 PROFICOOK
User questions about PC-AE 1069 PROFICOOK
0 question about this device. Answer the ones you know or ask your own.
Ask a new question about this device
Download the instructions for your Juicer in PDF format for free! Find your manual PC-AE 1069 - PROFICOOK and take your electronic device back in hand. On this page are published all the documents necessary for the use of your device. PC-AE 1069 by PROFICOOK.
USER MANUAL PC-AE 1069 PROFICOOK
CONTROLEER NOGMAALS OF ALLE ON-DERDELEN JUIST GEPLAATST ZIJN VOOR U HET APPARAAT AANZET.
Thank you for selecting our product. We hope that you will enjoy use of the appliance.
Symbols in this user manual
Important notes for your safety are marked distinctively. Pay absolute attention to them to avoid accidents and damage to the device:

WARNING:
Warns of dangers for your health and indicates potential risks of injury.

CAUTION:
Indicates potential dangers for the device or other objects.

NOTE:
Highlights tips and information for you.
Contents
Overview of the Components ....3
General Notes 40
Special safety instructions for this unit......41
Supplied parts 42
Parts description 42
Intended use 42
Unpacking the appliance....42
Preparations....42
Operation of the Juicer 43
Cleaning 44
Storage....44
Troubleshooting......45
Noise development 45
Technical Data....45
Disposal....45
General Notes
Read the operating instructions carefully before putting the appliance into operation and keep the instructions including the warranty, the receipt and, if possible, the box with the internal packing. If you give this device to other people, please also pass on the operating instructions.
- The appliance is designed exclusively for private use and for the envisaged purpose. This appliance is not fit for commercial use.
- Do not use it outdoors. Keep it away from sources of heat, direct sunlight, humidity (never dip it into any liquid) and sharp edges. Do not use the appliance with wet hands. If the appliance is humid or wet, unplug it immediately.
- The device and the mains lead have to be checked regularly for signs of damage. If damage is found the device must not be used.
• Use only original spare parts. - In order to ensure your children's safety, please keep all packaging (plastic bags, boxes, polystyrene etc.) out of their reach.

WARNING:
Don't let small children play with foils for danger of suffocation!
Special safety instructions for this unit
WARNING: Risk of injury!
- Before replacement of accessories or additional parts which move during operation, the device must be switched off and cut off from the mains.
• Risk of cut injuries! The centrifugal sieve is very sharp!
• If the rotating sieve is damaged, the appliance must not be used.
• Always use the supplied tamper. Never insert your fingers or tools into the filling neck!
• Always disconnect the appliance from the supply if it is left unattended and before assembling, disassembling or cleaning. - Do not repair the device by yourself. Please contact authorized personnel. In order to avoid hazards, a damaged mains cable must be replaced with an equivalent cable by the manufacturer, our customer service or any other qualified specialist.
• This appliance shall not be used by children. - Keep the appliance and its cord out of reach of children.
• Children shall not play with the appliance. - Appliances can be used by persons with reduced physical, sensory or mental capabilities or lack of experience and knowledge if they have been given supervision or instruction concerning use of the appliance in a safe way and if they understand the hazards involved.
CAUTION:
Do not immerse the device into water for cleaning. Please follow the instructions as stipulated in the chapter "Cleaning".
• Do not manipulate safety switches.
Supplied parts
1 base device with motor 1 centrifuge sieve
1 transparent cover 1 centrifuge housing
1 tamper 1 pomace container
Parts description
1 Tamper
2 Filler opening
3 Transparent cover
4 Centrifugal sieve
5 Centrifuge casing
6 Drive wheel
7 Safety bracket
8 Switch
9 Base device with motor
10 Pomace containerr
Intended use
This appliance is intended for juicing fruits and vegetables.
Do not insert any hard foodstuffs such as nuts or chocolate.
It is exclusively intended for this purpose and may be only used appropriately.
It may only be used in the manner described in these operating instructions.
You may not use the appliance for commercial purposes.
Use for any other purpose is considered improper and not for the intended purpose and can result in damage to property and personal injury.
The manufacturer shall not be liable for damages caused by not intended use.
Unpacking the appliance
- Remove the device from its packaging.
- Remove all packaging materials like foils, filling materials, cable holders, and carton packaging.
-
Check the scope of deliveries for completeness.
-
If the packaging content should be incomplete or if damages should be noticeable, do not operate the appliance. Return it to the distributor immediately.
i NOTE:
There may still be dust or production remains on the device. We recommend that you clean the device as described under "Cleaning".
Preparations
For assembly, also refer to the illustrations on page 3.
- Set the device so that the switch points towards you.
- Tilt the safety handle to the right.
- Attach the pulp container on the left side. In the next step it is secured by the collar of the centrifuge casing.
- Attach the centrifuge casing on top of the base casing.
The juicer outlet must face to the right.
⚠ WARNING RISK OF CUTS! THE CEN- TRIFUGAL SIEVE IS SHARP!
- Place the centrifugal sieve on top of the drive wheel. Press it down. It clicks in place on the drive wheel.
- Check the centrifugal sieve! Feel under the sieve edge. It should not loosen under slight tension.
- Attach the transparent cover. It reaches all the way over the pulp container.
i NOTE:
YOUR APPLIANCE IS EQUIPPED WITH A SAFETY SWITCH. IT PREVENTS ACCIDENTAL MOTOR START. CHECK THE CORRECT ATTACHMENT OF ALL COMPONENTS, CENTRIFUGAL SIEVE AND TRANSPARENT COVER.
- Lock the safety bracket over the transparent cover.
- Place the juice jug to the right of the appliance.
- Ensure that the control knob is set to "0" position.
Electric Connection
- Before inserting the power plug into the outlet, check that the mains voltage to be used matches that of the device. You can find the required information on the nameplate.
- Connect the device only to a correctly installed safety socket.
Operation of the Juicer
Switch Settings
• 0 = Off.
- Turn the switch to the "P" position to start the appliance immediately at the highest speed.
- Turn the switch to "1" or "2" to select low or high speed respectively.
Which level to select for which fruit?
Please see the following overview to answer this question.
| 1 1 2 2 2 | ||||
| Tomatoes, Melons | Plums, Pears (soft), Peaches, Mangoes (peeled), Kiwis (peeled) | Oranges (peeled) | Cucumber Pineapple | (peeled), Pears (hard), Carrots, Celery, Apples |
- Wash the fruit to be processed.
• Cut the fruit in pieces to fit through the filler opening. - Remove larger pips and stems.
Extracting Juice
i NOTE:
The appliance is intended for short-term use. Stop the appliance for 1 minute after operating for 3 minutes.
△ CAUTION:
CHECK ALL ACCESSORIES AGAIN FOR PROPER ATTACHMENT BEFORE SWITCHING THE APPLIANCE ON.
- Set the switch to the desired position. The motor starts running.
- Insert the fruit pieces in the filler opening and push them down with the tamper. Please note! The tamper has a guideway in the filler opening.
- The juice flows out at the right side of the casing. The pulp is collected in the pulp container.
i NOTE:
- Observe the juice jug. Stop operation in time to prevent overflowing.
- Berries and citrus fruits (such as gooseberries, grapes, oranges) are usually not juiced but pressed.
- When juicing these fruits with their high juice content, splashing of juice from the area of the pomace container may occur. In this case, we recommend that the pomace container is emptied more frequently.
Stop Operation And Disassembly
- Set the control knob to "0" position and wait until the centrifugal sieve has come to a complete standstill.
- Disconnect from mains power supply.
- Take the juice jug to the side and open the safety bracket.
-
Remove the transparent cover.
-
Remove the centrifugal sieve with the centrifuge casing. Use both hands to lift the centrifuge casing up.
WARNING RISK OF CUTS! THE CENTRIFUGAL SIEVE HAS SHARP KNIVES! ONLY LIFT IT ON THE OUTER EDGE.
- Lift the centrifugal sieve out of the centrifuge casing.
Cleaning
WARNING:
• Before cleaning always disconnect from mains power supply.
- Under no circumstances should you immerse the device in water for cleaning purposes. Otherwise this might result in an electric shock or fire.
CAUTION:
- Do not use a wire brush or any abrasive items.
- Do not use any acidic or abrasive detergents.
- Do not leave the pulp to dry on the centrifugal sieve. The fine pores will clog and become useless.
Tip
- Remove residues in the centrifugal sieve immediately under running water. Use a dish-washing brush.
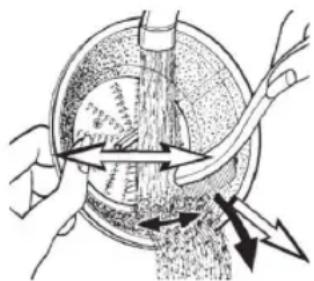
- For cleaning the outside of the machine use only a damp washing-up cloth.
Plunger, Transparent Cover, Centrifuge Sieve, Centrifuge Housing, Juice/Pulp Container
⚠ WARNING IN REGARD TO RISK OF CUTS! THE CENTRIFUGE SIEVE IS SHARP!
• Clean these components in a rinsing bath.
- Clean the centrifugal sieve with a dishwashing brush. See Figure.
- Rinse with clean water.
Storage
- Clean the device as described. Let the accessories dry completely.
• We recommend that you store the device in its original packaging when it is not to be used for a longer period.
• Always store the device at a well ventilated and dry place outside the reach of children.
Troubleshooting
| Malfunction Possible cause Remedy | ||
| The device does not function. | The device is not supplied with power. | Check the outlet with a different device. |
| Insert the power plug correctly. | ||
| Check your domestic fuse. | ||
| The safety handle has not been closed. | Check if all components were properly attached. | |
| The device is defective. Contact our Service or a specialist. | ||
| The juice quantity is small. | Wrong fruit type. Select a fruit type | producing more juice. |
| Juice cannot be extracted from small berries in the centrifuge. | ||
| Too much residue in the centrifuge sieve. | Clean the centrifuge sieve. | |
| Loud noise and imbalance during operation. | Bad assembly. Check that all components have been installed correctly. | |
| Too much residue in the centrifuge sieve. | When processing larger quantities clean the centrifugal sieve in-between. | |
Noise development
The sound pressure level in the ear of an operator (LpA) was measured according to DIN EN ISO 3744.
Technical Data
Model: PC-AE 1069
Power supply: 220-240 V\~ 50/60 Hz
Power consumption : 800 W
Sound pressure level: 72.0 dB(A)
Protection class:....II
Short-time operation/Pause: 3/1 minutes
Net weight: ....approx. 3.90 kg
The right to make technical and design modifications in the course of continuous product development remains reserved.
This device complies with all current CE directives, such as electromagnetic compatibility and low voltage directive and is manufactured according to the latest safety regulations.

Disposal
Meaning of the "Wheelie Bin" Symbol
Take care of our environment, do not dispose of electrical appliances via the household waste.
Dispose of obsolete or defective electrical appliances via municipal collection points.
Please help to avoid potential environmental and health impacts through improper waste disposal.
You contribute to recycling and other forms of utilization of old electric and electronic appliances.
Your municipality provides you with information about collecting points.
Instrukcja obsługi
CTC Clatronic Sp. z o.o
Hlučnost: 72,0 dB(A)
• ل'Entzǐf Ma'kǐnìe m'n l'Alxārj, A'st'cèdm q'q'p'q'q'q'q'q'q'q'q'q'q'q'q'q'q'q'q'q'q'q'q'q'q'q'q'q'q'q'q'q'q'q'q'q'q'q'q'q'q'q'q'q'q'q'q'q'q'q'q'q'q'p'q'p'p'p'p'p'p'p'p'p'p'p'p'p'p'p'p'p'p'p'p'p'p'p'p'p'p'p'p'p'p'p'p'p'p'p'p'p'p'p'p'p'p'p'p'p'p'p'p'p'p'w • قماش منداة بالماع.
تنبيه △

- SYMBOLS IN THIS USER MANUAL
- WARNING
- CAUTION
- NOTE
- CONTENTS
- GENERAL NOTES
- SPECIAL SAFETY INSTRUCTIONS FOR THIS UNIT
- WARNING: RISK OF INJURY
- SUPPLIED PARTS
- PARTS DESCRIPTION
- INTENDED USE
- UNPACKING THE APPLIANCE
- I NOTE
- PREPARATIONS
- ⚠ WARNING RISK OF CUTS! THE CEN- TRIFUGAL SIEVE IS SHARP
- ELECTRIC CONNECTION
- OPERATION OF THE JUICER
- SWITCH SETTINGS
- WHICH LEVEL TO SELECT FOR WHICH FRUIT
- EXTRACTING JUICE
- △ CAUTION
- STOP OPERATION AND DISASSEMBLY
- CLEANING
- TIP
- ⚠ WARNING IN REGARD TO RISK OF CUTS! THE CENTRIFUGE SIEVE IS SHARP
- STORAGE
- NOISE DEVELOPMENT
- TECHNICAL DATA
- DISPOSAL
- MEANING OF THE "WHEELIE BIN" SYMBOL
- INSTRUKCJA OBSŁUGI
- تنبيه △
Brand : PROFICOOK
Model : PC-AE 1069
Category : Juicer