
CDC3350FD - Voice recorder SALORA - Free user manual and instructions
Find the device manual for free CDC3350FD SALORA in PDF.


| Product Type | Digital Voice Recorder |
| Brand | Salora |
| Model | CDC3350FD |
| Dimensions | 10.5 x 3.0 x 1.2 cm |
| Weight | 55 g (without batteries) |
| Power Supply | 2 AAA batteries (not included) or built-in rechargeable battery |
| Storage Capacity | 8 GB internal memory, expandable via microSD up to 32 GB |
| Audio Formats | MP3, WAV (recording and playback) |
| Main Functions | Recording, playback, pause, stop, fast forward/rewind, file deletion |
| Advanced Functions | Silence detection, noise reduction, recording scheduling |
| Display | Backlit LCD screen |
| Connectivity | USB 2.0 port (Micro-USB), 3.5 mm headphone jack, built-in microphone |
| Battery Life | Approximately 20 hours of continuous recording (AAA batteries) |
| Maintenance and Cleaning | Clean with a soft, dry cloth. Do not use abrasive products. |
| Safety | Do not expose to moisture, extreme temperatures, or strong shocks. |
| Spare Parts and Repairability | Earphones, USB cable, batteries. Parts not user-repairable. |
| General Information | 1-year warranty. Made in China. Manual available online. |
Frequently Asked Questions - CDC3350FD SALORA
User questions about CDC3350FD SALORA
0 question about this device. Answer the ones you know or ask your own.
Ask a new question about this device
Download the instructions for your Voice recorder in PDF format for free! Find your manual CDC3350FD - SALORA and take your electronic device back in hand. On this page are published all the documents necessary for the use of your device. CDC3350FD by SALORA.
USER MANUAL CDC3350FD SALORA
natural_image
Line drawing of a digital camera with hexagonal frame and circular lens (no text or symbols)b. Functietoetsen
Aan/Uit Toets
natural_image
Line drawing of a camera with a circular lens and two buttons, labeled 'TF' with an arrow pointing to it (no text or symbols on the device itself)natural_image
Black-and-white sketch of a car driving on a road with trees and streetlights (no text or symbols)
natural_image
Technical line drawing of a camera with a magnified inset showing the lens and frame (no text or symbols)natural_image
Black-and-white sketch of a car driving on a multi-lane road with streetlights and trees in the background (no text or symbols)
natural_image
Line drawing of a digital camera with X, Y, Z and directional arrows (no text or symbols on body)7
f. Video Modus
Product Specifications
natural_image
Line drawing of a digital camera with hexagonal frame and circular lens (no text or symbols)natural_image
Technical line drawing of a cylindrical device with a textured base and side arm (no text or symbols)3.0 introduction Support:
natural_image
Line drawing of a camera with a circular lens and two buttons, labeled 'TF' with an arrow pointing to it (no text or symbols on the device itself)b. Installation CPL (optionnel)
natural_image
Black-and-white sketch of a car driving on a multi-lane road with trees and streetlights (no text or symbols)
natural_image
Technical line drawing of a camera with a magnified inset showing the ring (no text or symbols)natural_image
Black-and-white sketch of a car driving on a multi-lane road with trees and streetlights (no text or symbols)natural_image
Line drawing of a digital camera with X, Y, Z, and OX coordinate axes (no text or symbols on the device itself)e. Mode Vidéo
natural_image
Line drawing of a digital camera with hexagonal frame and circular lens (no text or symbols)- 1080P full HD •WDR Function (Wide Dynamic Range) •Lighting Keyboard •CPL& UV Lens available
Product pictures& Function
a Device Introduction.

| 1. TF Card Slot 2. HDMI Port 3. LED Light | |
| 4. Lens 5. Speaker 6. Status Light (Blue) | |
| 7. Charging Light (Red) 8. Menu Button 9. File Protection Button | |
| 10. Mode Button 11. LCD Display 12. Up Button | |
| 13. OK Button 14. Down Button | 15. Power Button |
| 16. Holder Connector | 17. Photo Button |
| 19. Reset Button | 20. Microphone |
b. Functietoetsen
Power Button:
Press this button for 2 - 3 sec. to turn on/off the device.
Photo Button:
In video mode, press this button to take picture. In playback mode, when replaying video, press this button to take picture from current video.
Reset Button:
When the device has crashed, press this button to shut down the device.
Menu Button:
Press this button during standby status or playback mode, menu list of current mode will appear. When the device is recording, press this button to set the flash light status (auto/off/on).
File Protection Button:
In video mode, press this button to set the recording video to be protected manually, so as to prevent it from being overwritten by loop recording. When file protection is active, the icon will appear on LCD display.
Mode Button:
The device only offers two modes: video mode and playback mode. Press this button during standby status to switch between video mode and playback mode. When the device is recording, press the button to open/close the display.
Up Button:
Press this button during standby status or video mode to switch to dual camera mode (only available on rear camera). In menu setting, press this button to go upwards. In playback mode, press this button to select the previous file. In playback mode, when playing a video file, press this button for backward playing.
OK Button:
In video mode, press this button to start/stop recording. In playback mode, press this button to play/pause video file. In menu setting, press this button to confirm the menu setting.
Down Button:
In video mode, press this button to open/close the recorded sounds. In playback mode, press this button to select the next file. In playback mode, when playing a video file, press this button for forward playing.
c. LED Light Status List
| LED Light Status Meaning | ||
| Status Light (Blue) On | Device is standby or on Playback Mode | |
| Flash Device is recording | ||
| Off Device is off | ||
| Charging Light (Red) On | On Charging Battery | |
| Off | Fully charged | |
d. Product Accessories
| 1. Car DVR*1 2. Car Charger*1 3. Camera Holder*1 4. 3M Sticker*1 | |
| 5. Suction Cup mount*1 6. USB Cable*1 7. User's Manual*1 |
Basic Operation
a. TF Card Installation
Install the TF card into TF car slot as shown on this picture:

natural_image
Line drawing of a camera with a circular lens and two buttons, labeled 'TF' with an arrow pointing to it (no text or symbols on the device itself)b. CPL Installation (Optional)
CPL: Circular-Polarizing Filters, could reduce the reflection of the inside of the car on the car window.
Without CPL

natural_image
Black-and-white sketch of a car driving on a road with trees and streetlights (no text or symbols)
natural_image
Technical illustration of a camera with a circular inset showing the lens (no text or symbols present)Install CPL onto the device through the screw on the device camera.
With CPL

natural_image
Black-and-white sketch of a car driving on a road with streetlights and trees in the background (no text or symbols)
After the installation of the CPL onto the device and the installation of the device onto the car window, rotate the adjustment circle ring on the CPL to get a good polarized effect.
d. Power Supply.
Connect USB port and car lighter with the car charger, then start the engine, the device will automatically switch on and start recording. Connect the device to the available USB port.
Note: there are two mini USB ports; one is on the device, another is on the camera holder.
e. G-Sensor Function
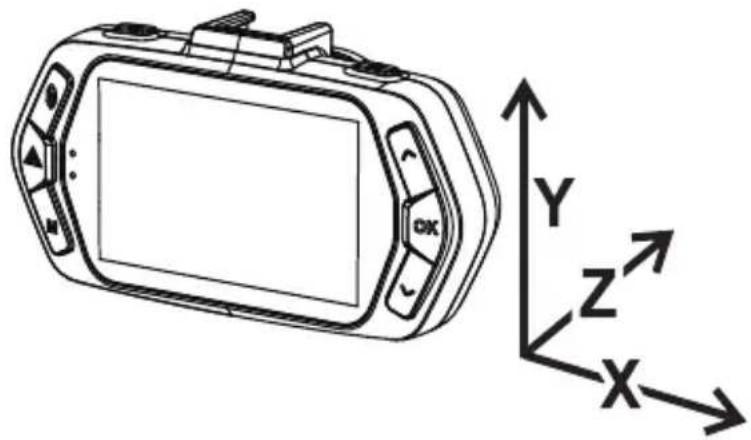
When there is a collision, the Gravity Sensor (G-Sensor) can register the direction and exact data of the collision. Meanwhile, according to the set value in G-sensor sensitivity, the device determines whether to switch the video that is recording to the protection mode or note. This will not be overwritten by loop recording.
G-Sensor direction as in the picture below:
natural_image
Line drawing of a digital camera with X, Y, Z and directional arrows (no text or symbols on the device itself)f. Video Mode
In the video mode, in standby status, the LCD display will look as shown below:

In the video mode, in recording status, the LCD display will look as shown below:

Note: only when connected with the rear camera, the LCD display will shown 720P and picture in picture (without the rear camera being switched on, there will be no display).
g. Take a picture
In the video mode, press the photo button to take a picture (can be done anytime).
In the playback mode, when playing a video, press the photo button to take a snapshot of the current video.
i. Playback mode
Press the mode button to enter the playback mode, then press the menu button to preview a video or picture file. Use the direction button to control playback.
| Preview | |
| Up Button Previous file | |
| Down Button Next file | |
| OK Button Confirm | |
| Mode Button Switch mode | |
| Play | |
| Up Button Playback | |
| Down Button Forward playing | |
| OK Button Confirm | |
| Menu Button Enter menu list (delete/protect/slide show) | |
| Mode Button Back to nine grids preview | |
Menu Setting
The device offers two modes: the Video Mode and Playback Mode a. Video mode
| Video Menu Item | Remark | |
| Video Resolution | 1080p/720p/WVGA Set video resolution | solution |
| Loop Setting 2 min | min/3 min/5 min Set recording time | |
| Picture Resolution | 12M/8M/5M/2MHD Set picture resolution | resolution |
| Exposure -2.0 to + | 2.0 Set + to make exposure stronger; set – to make exposure weakness | |
| White Balance Auto | Daylight/Cloudy/Tungsten/ Fluorescent | In normal conditions, choose auto. When the colors are unnatural, please set the white balance depending on the light condition. |
| WDR Off/On Set WDR off/on | ||
| Motion Detection Off/Low/Medium/High Set motion detection | ||
| Parking Monitor Off/On Set parking monitor off/on | ||
| G-SENSOR SET Off/Low/Medium/High Set G-sensor | ||
| Record Audio | Off/On Set record auto off/on | |
| Date Stamp | Off/On Set date stamp off/on | |
| Number plate on movie | AAAAAA | Set number plate |
| Car Plate Stamp | Off/On Set car plate stamp | |
| Image Rotation | Off/On Set image rotation | |
| Setup Menu Item | Remark | |
| Date YY-MM-DD | Set date/time | |
| Power on delay Off | 10sec/20sec/30sec Set power | on delay |
| Power off delay Off | 10sec/20sec/30sec Set power | off delay |
| Auto Power Off Off | 1 min/3 min/5 min Set this item, | in standby status, to turn the device off automatically when no motion is detected. |
| Beep Sound Off/On | Set beep sound off/on | |
| Screen savers | Off/30 sec/60 sec | Set this item to close the screen off when no motion is detected during the set time. Pushing the free button can start again. Note: press the up button to manually activate this mode; press a random button to start again. |
| Keyboard backlight | Auto/Off/On To set the key light function. In the auto mode, the light will be synchronized with the LCD screen (LCD screen on, key light on; LCD screen off; key light off). When this mode is switched on, the key light will be on all the time. When this mode is switched off, the key light will be off all the time. | |
| Lamp setting Auto | Off/On Set lamp setting auto/on/off | |
| TV Mode | NTSC/PAL | Set TV mode |
| Frequency | 50Hz/60Hz | Set frequency |
| Language | English/Russian/etc | Set language |
| Format | Cancel/OK | Format; all data will be deleted |
| Default Setting | Cancel/OK | Return menu setting to defaults |
b. b. In Playback mode:
| Delete File | No/Only this/All | Delete current file or all unlocked files (locked files have to be unlocked first to be deleted) |
| File Protection Protect current file/Unprotect current file | Protect all files/unprotect all files | |
| Slide Show 2 sec/5 sec/8 sec When switched on, the videos will be played automatically one by one. | ||
Connection
A. Connect to TV
The device can be connected to the TV or a monitor to playback data or adjust settings.
- Insert SD card to the device.
- Connect the HDMI cable to the video equipment (TV or monitor) and the device.
- Switch on the device.
-
Adjust the channel of the video equipment to HDMI input.
-
Installation completed.
Note: When connected with the TV, the LCD screen of the device will automatically shut down.
B. Connect to Computer
- Insert SD card to the device.
- Connect the USB cable to the device and computer. "Memory/Video" will be shown on screen. Choose memory to show the removable disk on the computer.
- Enter the removable disk. You can replay a picture or video file.
- Connect your computer with the device. Choose memory to set the device to standard mode.
Product Specification
| Chipset NTK96650 | ||
| Camera | Resolution 3M | Mega CMOS Sensor, AR0330 |
| View Angle 160° Diagonal Angle in 1080P | ||
| Video | Standard MOV file, H.264 | |
| Resolution 1920x1080 30fps / 1280*720 30fps | ||
| Auto Built-in Microphone; can be switched off by menu or button | ||
| Still Image 4032*3024 / 3264*2448 / 2592*1944 / 2048*1536 / 1920*1080 | ||
| LCD 2.7 inch LCD | Display | |
| G-Sensor | When a grave accident takes place, the device will automatically protect the latest recorded files, so it cannot be deleted | |
| Filter Lens (Optional) | CPL: Circular-Polarizing Filters, could reduce the reflection of the inside of the car on the car window. UV Lens: protect the DVR lens. | |
| Other Functions | Light Keyboard for Night Operation | |
| Uninterrupted Cycle Recording. Over-write first file when emory is full, no interruption in Video File. | ||
| File Protection Function. Once the file is protected, it cannot be deleted during cycle recording. | ||
| Automatic recording when car is started. | ||
| SD Card Slot Support | Micro SD Card, up to 32 GB | |
| OSD Language English/Chinese/Russian/Dutch/etc. | |
| Interface | USB USB 2.0 |
| AV Terminal HDMI | |
| Battery 250mA/h Battery | |
| Power 12-24 V Car Charger | |
| Color Black | |
| Size 103*51*41 mm | |


- b. Functietoetsen
- Aan/Uit Toets
- f. Video Modus
- b. Installation CPL (optionnel)
- e. Mode Vidéo
- Product pictures& Function
- Power Button:
- Photo Button:
- Reset Button:
- Menu Button:
- File Protection Button:
- Mode Button:
- Up Button:
- OK Button:
- Down Button:
- Basic Operation
- b. CPL Installation (Optional)
- d. Power Supply.
- e. G-Sensor Function
- f. Video Mode
- g. Take a picture
- i. Playback mode
- Menu Setting
- Connection
- Connect to TV
- Connect to Computer
Brand : SALORA
Model : CDC3350FD
Category : Voice recorder