
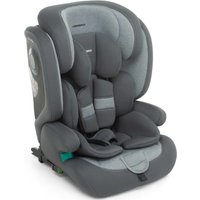
Dinamyk 9-36 - Car seat Foppapedretti - Free user manual and instructions
Find the device manual for free Dinamyk 9-36 Foppapedretti in PDF.


| Product type | Car seat (Group 1/2/3, 9-36 kg) |
| Brand | Foppapedretti |
| Model | Dinamyk 9-36 |
| Dimensions (approx.) | 44 x 54 x 68 cm |
| Weight (approx.) | 10 kg |
| Power supply | None (manual operation) |
| Installation | Using vehicle seat belt (3-point) and ISOFIX anchors |
| Harness type | 5-point harness with adjustable shoulder straps |
| Headrest adjustment | Multi-position adjustable headrest |
| Recline positions | Multiple recline positions for comfort |
| Side impact protection | Integrated side impact protection system |
| Safety certifications | ECE R44/04 (Group 1/2/3) or i-Size (ECE R129) compliant |
| Usage direction | Forward-facing for groups 2/3, rear-facing for group 1 (optional) |
| Cleaning instructions | Remove cover and hand wash at 30°C; wipe plastic parts with damp cloth |
| Maintenance | Regularly check harness and buckle for proper function; clean with mild soap |
| Spare parts availability | Contact Foppapedretti customer service for replacement parts (covers, buckles, etc.) |
| Warranty | Standard 2-year warranty (details in manual) |
| Country of origin | Italy (manufactured by Foppapedretti) |
| User manual languages | Multiple languages including EN, IT, FR, ES, DE, PT, HR, RO, EL |
Frequently Asked Questions - Dinamyk 9-36 Foppapedretti
User questions about Dinamyk 9-36 Foppapedretti
0 question about this device. Answer the ones you know or ask your own.
Ask a new question about this device
Download the instructions for your Car seat in PDF format for free! Find your manual Dinamyk 9-36 - Foppapedretti and take your electronic device back in hand. On this page are published all the documents necessary for the use of your device. Dinamyk 9-36 by Foppapedretti.
USER MANUAL Dinamyk 9-36 Foppapedretti
natural_image
Exterior view of a modern baby car seat with gray and black panels (no text or symbols visible)Gruppo - Gruop - Grupo - Grupo - Oμάδα - Grupa 1 9-18 kg
Gruppo - Gruop - Grupo - Grupo - Oμάδα - Grupa 2 15-25 kg
Gruppo - Gruop - Grupo - Grupo - Oμάδα - Grupa 3 22-36 kg
This product conforms to ECE R44.04
Group 1-2-3 child car seat. Suitable for children from 9kg to 36kg(approx 9 months to 12 years old)
Instructions: Please read carefully and keep for future reference. Your child's safety may be affected if you do not follow these instructions.
natural_image
Line drawing of a car seat with a visible seatbelt and seat, showing no text or symbols.natural_image
Illustration of two different seatbelt buckle designs, showing a correct and incorrect assembly (no text or symbols present)natural_image
Illustration of a child seated in a car seat under two different loading conditions, with no text or symbols present.natural_image
Top-down diagram of a car seat with two horizontal arms and directional arrows indicating forward and backward motion (no text or symbols)natural_image
Line drawing of a car seat assembly with no text or symbolsnatural_image
Illustration of a seated car seat with a curved seat and arrow indicating motion (no text or symbols)natural_image
Simple icon of a pen with a circular button labeled 'J' (no text or symbols beyond the label)

natural_image
Diagram of a car seatbelt mechanism with labeled component M (no text or symbols beyond label)natural_image
Diagram of a mechanical component with a central shaft and flange, showing internal structure (no text or symbols)natural_image
Diagram of a mechanical component with an arrow indicating force or direction (no text or symbols present)natural_image
Illustration of a child seated in a car seat with an upward arrow indicating motion (no text or symbols)natural_image
Line drawing of a car seat with labeled section A (no text or symbols on the diagram itself)natural_image
Diagram of a car seat with a circular component labeled B, showing mechanical parts and directional arrows (no text or symbols beyond labels)natural_image
Line drawing of a car seat assembly with no text or symbolsnatural_image
Diagram of a Y-shaped mechanical component with two blades and a central hub (no text or symbols)natural_image
Illustration of hands using a tool to adjust a component inside a car gear (no text or symbols visible)- This car seat is a “Universal” child restraint system. It has been approved in accordance with regulation N°44/04, and is suitable for general use in vehicles and is compatible with the majority (some exceptions) of vehicle seats.
- A correct fit is likely if the vehicle manufacturer has declared in the vehicle hand book that the vehicle is capable of accepting a 'Universal' child restraint for this group.
- The child car seat is a 'Universal' child restraint; it conforms to regulation ECE-R44/04 for general use in vehicles. It will fit most, but not all vehicle seats.
- This child car seat has been declared ‘Universal’ under more stringent conditions than those applied to earlier designs, which do not carry the ‘Universal’ mark.
- The child car seat must only be used in vehicles which are fitted with a three point seatbelt system that has been approved by regulation ECE-16 or similar.
- Child car seats can mark vehicle seat upholstery. The manufacturer cannot be held responsible for damage or marking to vehicle seats.
- The following situations could be illegal and will invalidate the warranty:
1) Any modifications or change of use of the child car seat that have not been authorised or advised by the manufacturer.
2) Any failure to fit the child car seat in strict accordance with the instructions. - The manufacturer accepts no liability for issues arising from unauthorised modifications, uses or fitting.
- Please keep this manual safe for any possible queries you may have in the future.
- You will need to keep your proof of purchase. We recommend you keep them together.
GETTING STARTED Read Carefully Before Attempting to Fit the Child Car Seat
Warning: NEVER leave your child unattended – your child's safety is your responsibility.
Warning: The child car seat must be fitted in accordance with the manufacturer's instructions. Incorrect installation could be dangerous.
Warning: If you have a doubt concerning the installation and correct usage of your seat, please contact the manufacturer of the child restraint system.
Warning: This installation must only be performed by a competent adult.
Warning: Always ensure that new or occasional users [e.g. grandparents] have read the instructions or been taught the correct installation by someone who has read and understood the instructions.
Warning: Always keep this instruction manual with the child car seat, or in the vehicle in which you are carrying the child car seat. Some models of child car seat have a pocket to store the instructions.
Warning: If in doubt, consult either the child restraint manufacturer or the retailer.
Notices
BEFORE STARTING
Attention: Do not carry the child car seat using the red seatbelt guides! This may damage or break them.
Warning: Do not fit the child car seat on a side or rear facing vehicle seat.
Warning: Only install your car seat on a forward facing seat that has a 3-point safety belts that are either fixed that have been approved compliant with the ECE R 16 or other equivalent standards.
Warning: Before installing the child car seat ensure that the passenger seat you are using is locked in the upright position.
Warning: Do not use the child car seat in the home - it has only been designed to be used in the car.
Warning: Only install this restraint system on vehicle seats classified as "Universal", see the vehicle manual.
Warning: Do not leave loose/unsecured objects on the back seat of your car or the parcel shelf. They may be dangerous to your child if you are forced to brake suddenly.
Which is the safest passenger seat to fit your child car seat to? THE CENTRE REAR PASSENGER SEAT
If your centre rear passenger seat is fitted with a three point seatbelt system then you should use it.
If your centre rear passenger seat does not have a three point seatbelt system (i.e. no seatbelt at all, or only a lap belt)
- then you should use the rear left passenger seat or the rear right passenger seat.
The front passenger seat can only be used if it DOES NOT have an airbag and is fitted with a three point seatbelt system.
EXTREME HAZARD
NEVER USE IN FRONT PASSENGER SEATS EQUIPPED WITH AIRBAGS (SRS) THIS CAN INCLUDE REAR PASSENGER SEATS THAT ARE EQUIPPED WITH AIRBAGS\*
*Consult car manufacturer for suitability. Children's bodies are not able to withstand the forces exerted on them by a deploying air-bag
WHEN USING THE CHILD CAR SEAT
Warning: Make sure that the child car seat is placed somewhere so that rigid items and plastic parts do not become trapped in doors or movable seat units when the seat is in everyday use.
Notices
Warning: Always use the vehicle's door child safety lock system, if one is available, to make it impossible for the child to open the car doors from inside.
Warning: Allow the child a break during long car journeys and make sure they don't get out of the car unaided and without supervision.
Warning: Stop the car at regular intervals to check that the child car seat is in the correct position and that both the car seatbelt AND the child car seat harness (if fitted) are still taut and latched.
Warning: The child car seat must be fitted securely to the passenger seat. Ensure that it is not loose or wobbly after you have fitted it. If it is loose, re-fit it.
Warning: Ensure that the child car seat is secured to the car seat at all times - even when not in use.
Warning: The child car seat must not be used without its original cover.
Warning: The original cover is essential for the safe operation of the child car seat.
Warning: In the event of an emergency it is important to be able to release the child quickly (as defined by British Standards). This means that the seat buckle cannot be
fully tamper proof and you should actively discourage your child from playing with or using the buckle.
Warning: If you travel with passengers using both the front and the rear passenger seats, the lighter occupants should be in the rear and the heavier occupants in the front.
Warning: If you have no option other than to put your child car seat on a rear passenger seat next to side airbags:
- Consult with your vehicle manufacturer for side airbag details. It may not be safe.
- Make sure your child does not lean into the area immediately around the airbag.
Warning: Do not place anything under the child car seat (e.g. a towel or cushion) as this could affect the performance of the seat in an accident.
Warning: Avoid winter clothing bundling - Bulky clothing can lead to incorrect harness tightening. In an accident, the child can slip right out of the extra padding
- and thus out of the seat. Let the car warm up or cool down prior to placing your child in there if possible. If your child is cold, place a blanket over the top of the harness.
SEAT/BELT
Warning: NEVER use any load bearing contact points other than those described in these instructions or marked on the child car seat.
Warning: Ensure that the lap section of the seatbelt or harness is worn low down, so that the pelvis is firmly engaged.
Warning: Make sure that ALL the passengers in your vehicle have their seatbelts fastened, as unrestrained people can be very dangerous to the child in an accident.
Warning: NEVER use a seatbelt routing scheme that differs from these instructions.
Warning: The lap and diagonal seatbelt (and harness if fitted) must be used at all times when your child is in the child car seat.
Warning: Make sure that there are no twists in the seatbelt.
Warning: You should regularly check that the harness is not showing signs of wear; check in particular the harness points, the seams and the adjustment devices.
Warning: Always remember to check that there are no scraps of food or other remains in either the harness buckle or the central adjuster.
Warning: Always buckle up yourself for your child's example.
Warning: Always check that the seat belt has been fastened properly.
SUNLIGHT/HOT DAYS
Warning: Do not leave your child in the child car seat while parked in direc sunlight or on a hot day.
Warning: Do not subject the child car seat to prolonged direct sunlight as this may be dangerous for the child (the metal and plastic fitting could be hot) and may cause the fabric to fade. You can reduce this problem by covering the child car seat with a sheet when not in use.
BACK OF THE SEAT/HEADREST
Warning: Ensure that the child car seat is as close as possible to the backrest of the car seat.
Warning: REMOVE the head rest of the passenger seat being used if it obstructs the proper installation of the child car seat.
REMEMBER car seat has been removed.
SECOND HAND OR DAMAGED CHILD CAR SEATS AND SEATBELTS
Warning: Never buy a second hand child car seat. It may have unseen damage.
Warning: The manufacturer only guarantees this product when the original owner uses it.
Warning: You MUST replace the child car seat and your vehicles seatbelts if they becomes badly worn or damaged.
Warning: You MUST replace the child car seat if it is involved in an accident – it may have unseen damage and may not protect your child as well as they should.
At the very least send the child car seat to the manufacturers for inspection together with the accident report.
Contents
Welcome 31
Parts checklist 31
Positioning the seat 32
Four-position seat recline 32
Installing for GROUP 1 (9-18kg) 32
Adjusting the headrest and harness height 35
Placing your child in the seat - GROUP 1 (9-18kg) 35
Converting for GROUPS 2 (15-25kg) + GROUPS 3 (22-36kg) 37
Installing for GROUPS 2 (15-25kg) + GROUPS 3 (22-36kg) 40
Removing the seat cover 41
Replacing the seat cover 42
Replacing the harness 43
Maintenance and cleaning 46
Welcome!
Thank you for purchasing the car seat. Please read these instructions carefully before use to ensure safe and satisfactory operation of this product. Your child's safety is your responsibility. If you have a query with this product or require replacement parts, please contact your nearest retail store.
Parts checklist

1 GROUP 3 Belt guide slot
2 GROUP 2 Belt guide slot
3 Installation bar
4 Rear shell
5 Side Protection System (SPS)
6 Lap belt hook
7 Belt yoke
8 Base
9 Headrest
10 Front shell
11 Belt guide hole
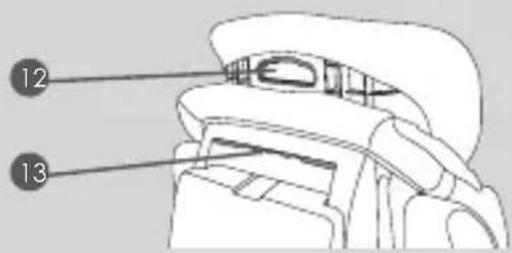
12 Headrest and harness height adjuster handle
13 Carry handle
14 Seat cover
15 Shoulder strap
16 Waist strap
17 Buckle pad & crotch strap
18 Adjuster button cover
19 Recline adjuster handle
20 Head cushion
21 Harness shoulder pads
22 Central buckle
23 Booster cushion insert
24 Harness adjuster button
25 Harness adjuster strap
Positioning the seat

The child car seat can only be used with an automatic 3-point safety belt (A) and NOT with a 2-point lap belt (B).
The child car seat can be secured in a forward-facing position in the rear seats of the vehicle by using the existing seatbelts. However, on some seats, if the installation is not properly secured, we suggest you try another seat in your vehicle.
Although not recommended, the child car seat can be used on a passenger side front seat, so long as there is no active airbag in place.
WARNING: Never use in a seat with an active airbag.
Seat recline

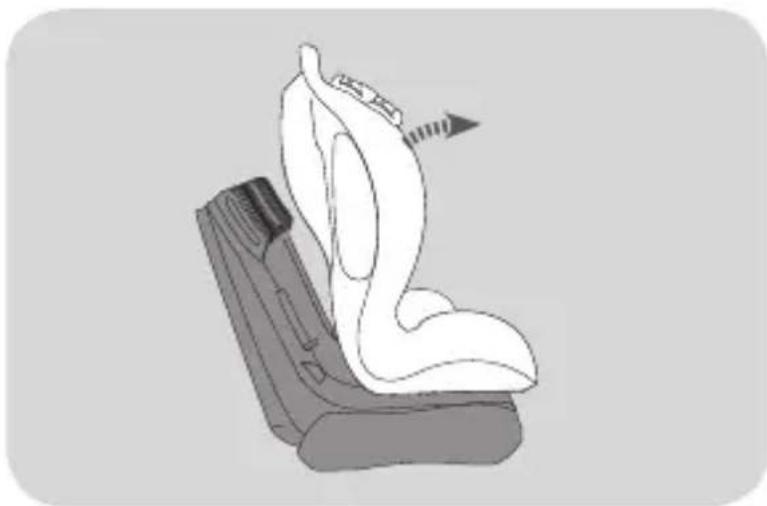
In Group 1 (9-18 kg) and Group 2 (15-25 kg), the seat of the car seat can be reclined in 4 different positions, from the vertical position to the most reclined one.
Press the adjustment handle located under the front of the car seat and, holding it down, pull or push the seat forwards or backwards. Release the
handle when the seat is in the desired position and make sure that it is locked correctly; you will hear a "click" when the seat has attached.

WARNING: in Group 3 (22-36kg) the seat of the car seat can be reclined only in 2 positions, Vertical position (1) and the position n. 2. Other positions are not allowed.
Installing for GROUP 1 (9-18kg)

natural_image
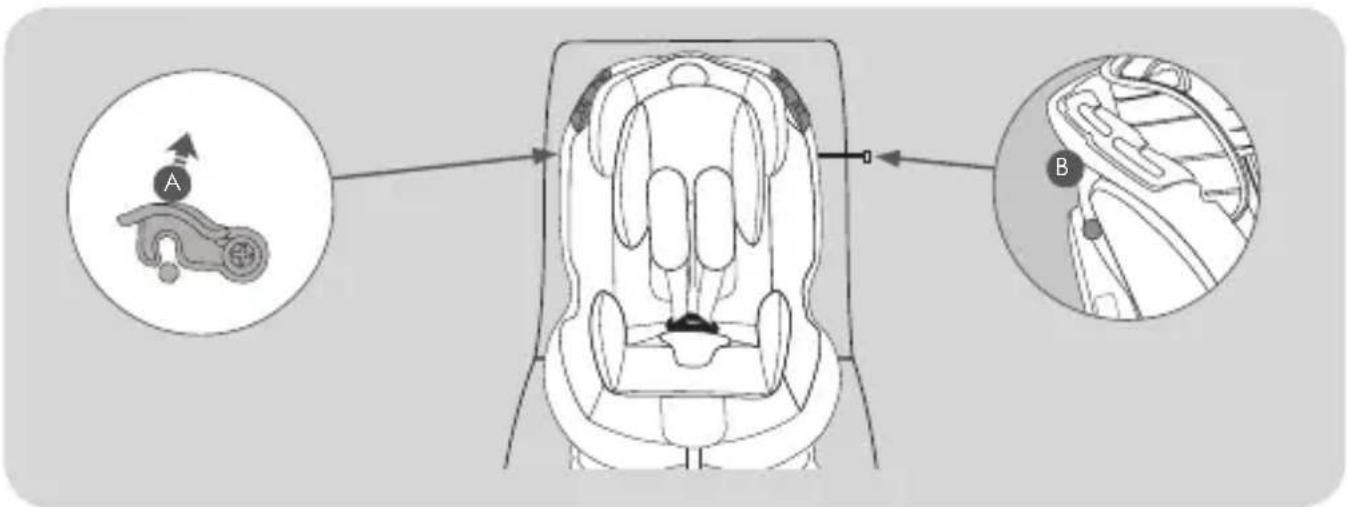
Line drawing of a car seat assembly with a directional arrow indicating motion (no text or symbols)Place the child car seat on a suitable passenger seat. Pull the recline adjuster handle under the front of the shell and adjust the shell to its fully reclined position. Release catch (A) on the top left hand side of the shell and remove the installation bar (B).
Tilt the seat shell forwards, feed the seatbelt between the seat and the base and plug the
buckle in ensuring the seatbelt is not twisted.
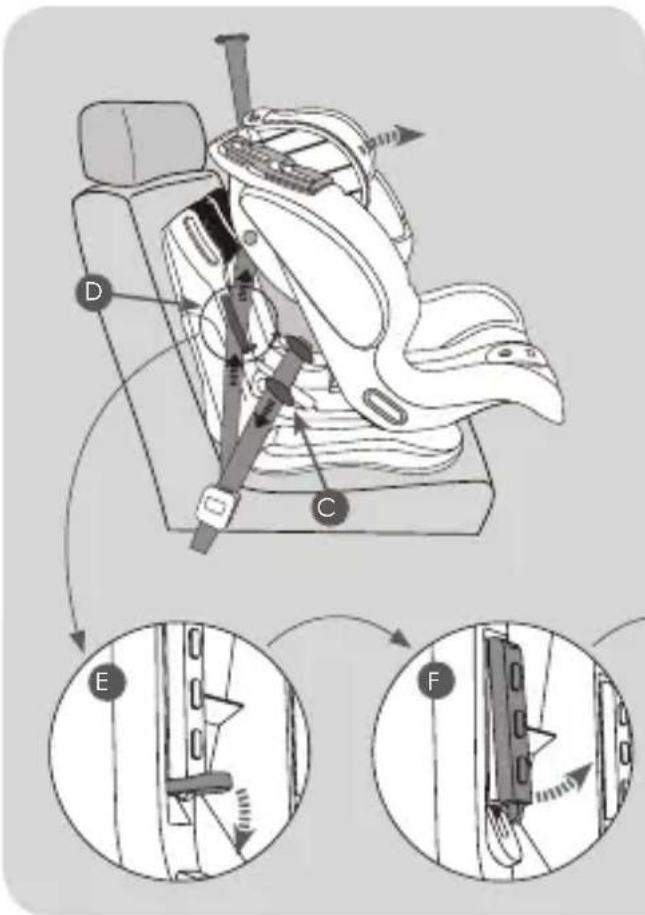
Push the child car seat back into the passenger seat ensuring a good fit. Thread the horizontal lap belt section under both hooks (C) and remove all the slack by pulling up on the diagonal section of seatbelt. Thread the diagonal section through the lock off device (D) that is nearest to the seatbelt.
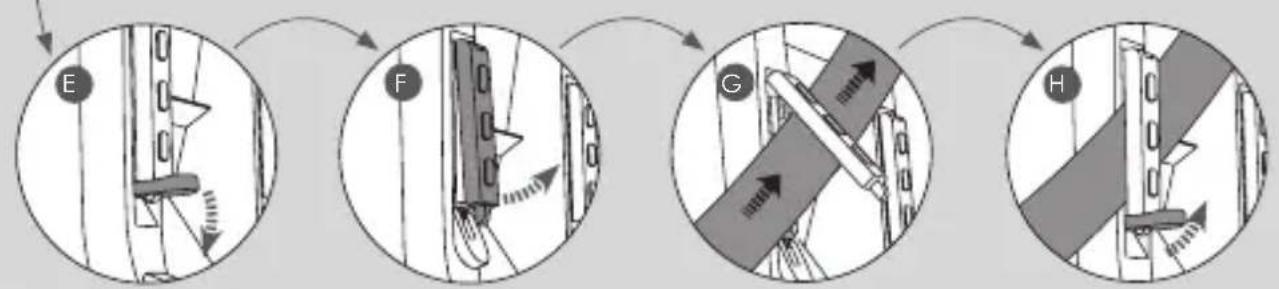
To operate the lock-off device: Pull down on tab (E) to open the locking device. Lift up the latch (F). Pass the seatbelt under the latch and pull the belt tight (G). Close
flowchart
graph TD
    E["Step E"] --> F["Step F"]
    F --> G["Step G"]
    G --> H["Step H"]
Installing for GROUP 1 (9-18kg)
the latch and fasten the tab (H) whilst holding the diagonal section of seatbelt tight.

Return the shell to its original position (I) (taking care not to trap the diagonal shoulder belt) and thread the installation bar back through the seat (J).
Secure the catch on the top right hand side of the child car seat (K).
Pull the installation bar to ensure it is securely locked in place.
natural_image
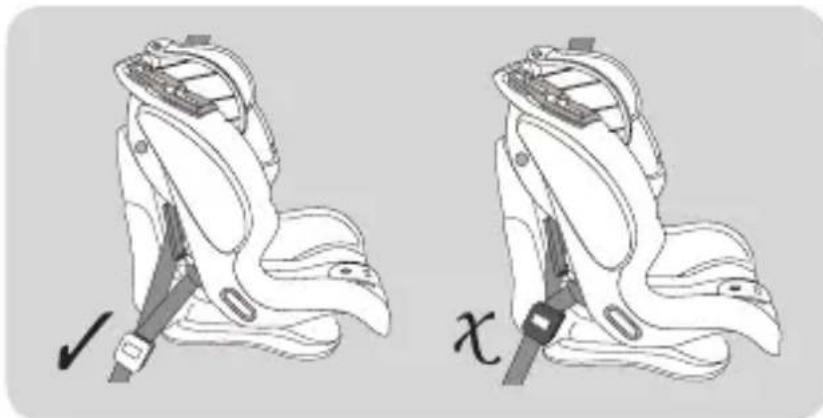
Illustration of two different types of seatbelt buckle designs, showing a correct and incorrect assembly (no text or symbols present)NOTE: If you are having difficulty replacing the installation bar - first ensure you have not trapped the diagonal seatbelt in the way, then jiggle the installation bar to help work it through the shell.
With your child car seat now buckled in, check it is
secure by pulling forward from both harness straps, there should be little or no movement. Next check that the vehicle's seatbelt buckle is NOT resting against the child car seat shell. This is called 'buckle crunch' and could cause the child car seat to work loose or the seatbelt to come undone in an accident. If you find you are experiencing 'buckle crunch' then this child car seat is not suitable for your vehicle.
WARNING: The child car seat should always be strapped in using the vehicle's seatbelt, whether a child is seated in the child car seat or not.
Adjusting the headrest and harness height
natural_image
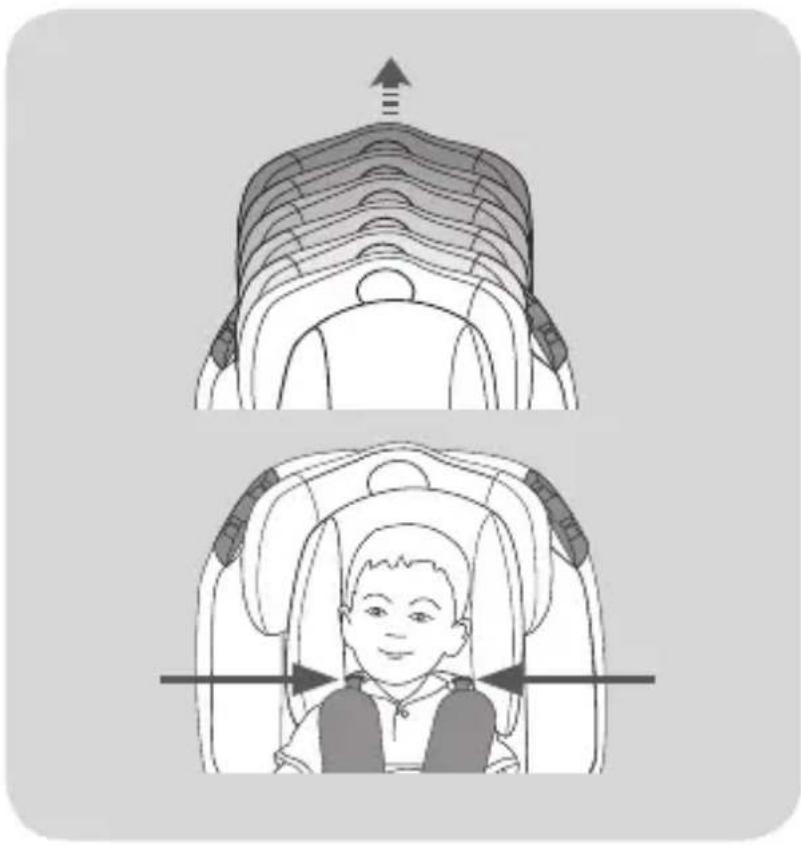
Illustration of a child seated in a car seat with an upward arrow indicating motion (no text or symbols)Adjust the headrest by pulling the adjuster handle on the back of the headrest and raising or lowering according to your child's height.
It is necessary to adjust the position of the harness straps according the height of the shoulder of your child in order to adapt the restraint system to the child's size.
The harness strap slots should be level with your child's shoulders.
Placing your child in the seat - GROUP 1 (9-18kg)

Ensure that you have first installed the child car seat correctly, following the steps under 'Installing for Group 1 (9-18kg).
Press button (A) and pull forward on the shoulder straps (not the shoulder pads) to loosen the straps.
Press the red 'buckle release' button (B) and unbuckle the harness.
IMPORTANT: DO NOT pull the shoulder pads or the straps above the shoulder pads.
Placing your child in the seat - GROUP 1 (9-18kg)

natural_image
Top-down line drawing of a car seat with two horizontal bars and arrows indicating seat positions (no text or symbols)Place the harness straps over the side of the shell, position your child in the child car seat ensuring no toys or other hard objects are in the seat.

After placing your child in the child car seat, match the two halves of the harness buckles together and insert them into the crotch buckle.
Make sure the shoulder straps fit your child snugly by pulling the adjuster belt (C).

The harness should allow 1 finger-width (1cm) of space at the top of the shoulders. This is the ideal tightness.
NOTE : check that the buckle is secured by tugging the shoulder and waist straps.
Converting for GROUPS 2 - 3 (15-36kg)
It is recommended that you use the 5-point harness for as long as possible. Try removing the booster cushion as this could allow you to use the seat in group I configuration for longer.

When your child has outgrown the group 1 (9-18kg) configuration and you wish to use the seat for a child in either group 2(15 - 25kg) or group 3 (22-36kg) then you will need to remove the child car seat's integral 5-point harness.
Lift the fabric adjuster cover at the front of the car seat and whilst pressing button (A), pull forwards on the shoulder straps (not the shoulder pads) to completely loosen the harness straps and shorten the adjuster strap (B) as much as possible. Any remaining strap can be rolled up and stored under the red plastic cover (C).
IMPORTANT: DO NOT pull the shoulder pads.
natural_image
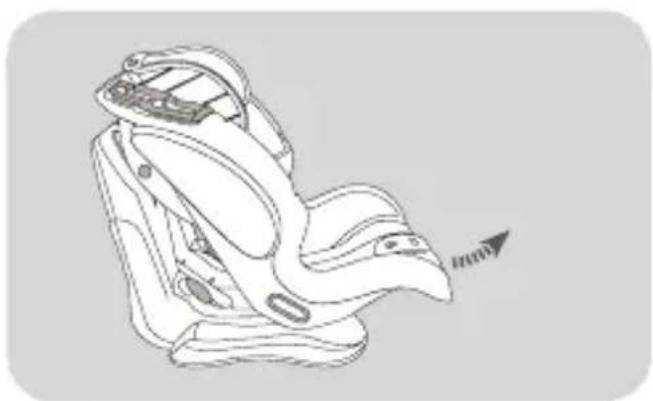
Line drawing of a car seat assembly with a directional arrow indicating movement (no text or symbols)Pull the recline adjuster handle under the front of the shell and whilst holding it, pull the shell forwards to its most reclined position.

Release catch (D) on the top left hand side of the shell and remove the installation bar (E).
Converting for GROUPS 2 - 3 (15-36kg)

natural_image
Illustration of a white object resembling a shoe or cushion with a black handle, resting on a dark base (no text or symbols)Pull and hold the shell forward.

Unhook the shoulder pad straps from shoulder pad connector (F). Unhook the shoulder harness straps from yoke (G).
Pass the shoulder straps through the slots in the back of the shell (H).

Undo the two Velcro® tabs on each side of the back of the head hugger (I) and remove.
Converting for GROUPS 2 - 3 (15-36kg)

Locate the two metal retainer buckles (J) under the seat cover at points (1) and (2). Pass the metal buckles on the waist harness from the front of the shell, through the inner slots (K) on the back of the shell and back out the outer slots (L), to the front to remove the harness.

natural_image
Anatomical illustration of a human hand and foot with a labeled mass (M), showing internal organs without any text or symbols beyond the label.Remove the booster cushion insert (M) from the crotch strap.
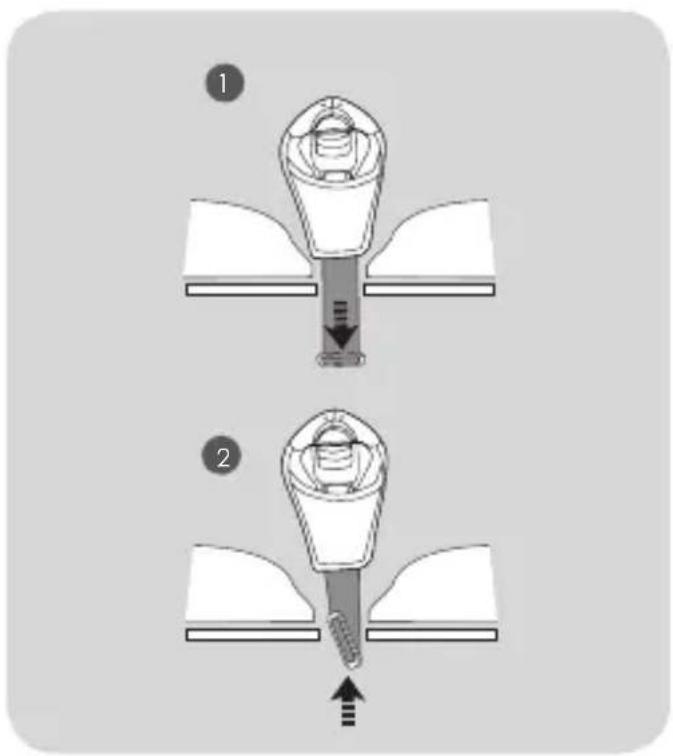
To remove the crotch strap, ensure the child car seat is in a fully reclined position.
- Push the crotch strap down through the slot.
- Whilst holding the strap locate the metal retainer buckle underneath the car seat shell, turn the retainer buckle and post through the letter box opening and remove the crotch strap.
Converting for GROUPS 2 - 3 (15-36kg)

Return the shell to its original position and re-insert the installation bar (N) and secure the catch (O).
The child car seat can now be placed into your vehicle.
WARNING: The child car seat should always be strapped in using the vehicle's seatbelt, whether a child is seated in the child car seat or not.
Installing for GROUP 2 (15-25kg) - GROUP 3 (22-36kg)

natural_image
Illustration of a child seated in a car seat with an upward arrow indicating motion (no text or symbols)Ensure that you have first removed the child car seat's integral 5-point harness, following the steps under 'Converting to group 2 - 3 (15-36kg) pages 9-12,
You can use the booster cushion insert if your child needs it.
Position your child in the child car seat, adjust the headrest by pulling the headrest and harness height adjustment handle on the back of the headrest and raise or lower according to your child's height.

Place the seatbelt shoulder strap through the most suitable belt guide slot (A): Use the lower strap hook for children in group 1 (15 - 25kg).
Use the higher strap hook for children in group 2 (22 - 36kg).
Place the lap belt over your child's lap and thread through the belt guide hole (B) on the side nearest the seatbelt buckle (C). Fasten the seatbelt buckle (C) and remove all slack from both the lap and diagonal sections of seatbelt.
WARNING: The child car seat should always be strapped in using the vehicle's seatbelt, whether a child is seated in the child car seat or not.
Removing the seat cover
natural_image
Line drawing of a car seat with labeled point A (no text or symbols on the diagram itself)WARNING: The cover is a safety feature. Never use the child car seat without it.
Remove the harness straps, crotch strap, head pad and seat pad see 'Converting to group 2 - 3 (15-36 kg)'.
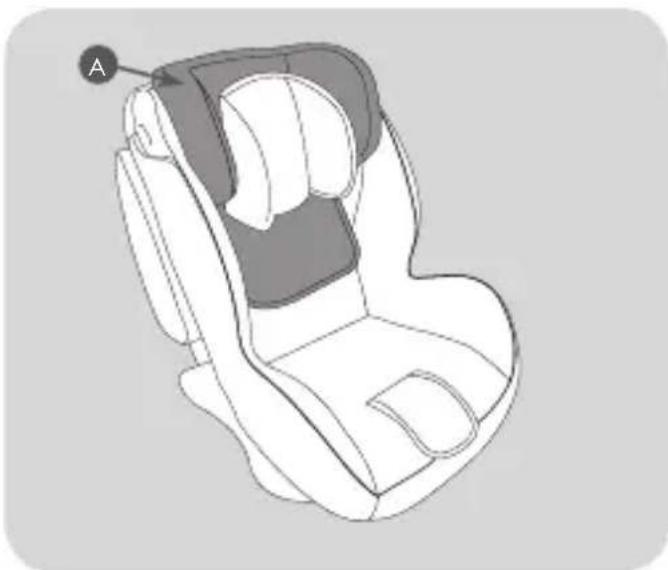
Remove the headrest cover (A) by grasping the elasticed band and pulling the cover off.
Removing the seat cover

natural_image
Diagram of a car seat with a circular component labeled B, showing mechanical parts and directional arrows (no text or symbols beyond labels)Pull the two (SAP) Side Armour Protection systems (B) in the direction of the arrows to unclip them from the shell and remove their covers.
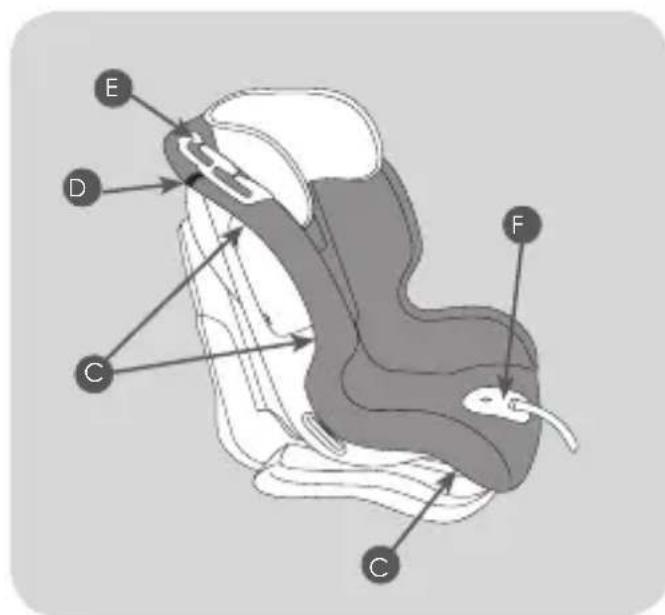
The main cover is held in place by a series of hooks (C) located on the back and underside of the shell. Unhook the cover's elastic from the hooks. Undo the Velcro® tabs (D) on the shoulders of the shell, work the cover from under the strap hooks (E) and from around the plastic adjuster panel (F) and remove the cover.
Replacing the seat cover

WARNING: The cover is a safety feature. Never use the child car seat without it.
Place the main seat cover over the child car seat and stretch the elasticed band around the shell, taking care as you work the cover over and around the plastic parts. Ensure the Velcro® tabs (A) pass under the strap hooks (B).
Once in place secure the cover on the hooks (C) located on the back and underside of the shell.
Replacing the seat cover

Stretch the side covers over the two (SAP) Side Armour Protection systems (D) and clip them back on to the shell. Once clipped on jiggle them to ensure the are firmly clipped on.
Stretch the headrest cover (E) over the headrest and tuck the lower part of the headrest cover (F) behind the main seat cover.
Replacing the harness

natural_image
Line drawing of a car seat assembly with no text or symbolsAdjust the shell to its most reclined position.
Pull the recline adjuster handle under the front of the shell and whilst holding it, pull the shell forwards to its most reclined position.

Release catch (A) on the top left hand side of the shell and remove the installation bar (B).
Replacing the harness

Take the two harness shoulder straps with the buckle clips and crotch strap and match the buckle tongue sections together and insert into the buckle.

natural_image
Diagram of a Y-shaped mechanical component with two blades and a central hub (no text or symbols)With the buckle connected you will have something similar to the illustration opposite.

Insert waist strap retainer buckles (C) through the two slots (1) and (2) on the cover and out through the outer slots on the back of the shell then back through the inner slots. Insert crotch strap retainer buckle (D) through slot (3).
Replacing the harness
Adjust the headrest so that when you lift up the headrest fabric you are able see the metal bar (E) through the backrest.

Slide the shoulder pads (F) over the shoulder harness straps (G), ensuring the seams of the shoulder pads are facing outwards.
Push the shoulder pad and harness straps through slots (1 & 2) on the head hugger (H) (if fitted) and the headrest fabric. Lift up the fabric and take the straps through the shell over the metal bar (I).
ATTENTION: The shoulder pad and harness straps MUST pass over the metal bar, failure to do so will result in an incorrect installation.


natural_image
Illustration of a hand holding a tool near a small object inside a vehicle (no text or symbols visible)Connect the narrow shoulder pad straps to the shoulder pad connector (J). Connect the wider shoulder harness straps to the yoke (K).
ATTENTION: Check that the harness straps are correctly attached to the yoke and ensure the straps are not twisted.
Replacing the harness

Return the shell to its original position and re-insert the installation bar (L) and secure lock (M).
Maintenance and cleaning
Storage
1) Store this child car seat in a safe place when not in use.
2) DO NOT place heavy objects on top of it.
3) Always store the child car seat in a dry environment.
4) DO NOT store the child car seat near a direct heat source such as a radiator.
Covers
1) The seat cover is easily removable and should be handwashed with a pH neutral soap and cold water.
2) Do not press, iron, dry clean, tumble dry or wring the covers.
3) Do not use solvents, caustic or abrasive cleaning materials.
4) Dry flat, away from direct heat and sunlight.
5) If the seat covers need to be replaced only use Bolenn Hug certified parts. They are the only ones that are guaranteed to have been safety tested and designed to fit this seat.
Plastic/Metal Parts
1) Wipe clean using a mild soap and warm water.
2) You must not remove, dismantle or alter any part of the seat shell.
3) You must not oil or lubricate any part of the seat shell.
Inspection
1) Check your child car seat regularly for wear and tear.
2) The child car seat may have a slight rattle when not in use, this is normal. If in any doubt, contact Bolenn Hug immediately.
3) Check the adjustable parts of your child seat at intervals of about 6 months to ensure it is still fit correctly for your growing child.
Advertencia

natural_image
Line drawing of a car seat assembly with a directional arrow indicating motion (no text or symbols)
natural_image
Diagram of a mechanical component with labeled parts and directional arrows (no readable text or symbols)
natural_image
Diagram of a mechanical component with force arrows and a labeled point F (no readable text or symbols)
natural_image
Diagram showing mechanical components with directional arrows, no readable text or symbols
natural_image
Diagram of a mechanical assembly with labeled components and directional arrows (no readable text or symbols)natural_image
Illustration of two different seatbelt buckle designs, showing a correct and incorrect assembly (no text or symbols present)natural_image
Illustration of a child inside a car seat with an upward arrow indicating motion (no text or symbols)natural_image
Top-down line drawing of a car seat with two horizontal bars and arrows indicating side arm positions (no text or symbols)natural_image
Line drawing of a car seat assembly with a curved seat and side arm, no text or symbols presentnatural_image
Illustration of a white anatomical structure with arrow indicating a specific region, mounted on a gray base (no text or symbols)natural_image
Diagram of a human torso with a circular inset showing a specific anatomical view (no text or labels)natural_image
Anatomical illustration of a human hand and foot with a labeled mass (M), showing internal organs without any text or symbols beyond the label.natural_image
Illustration of a child seated in a car seat with an upward arrow indicating motion (no text or symbols)natural_image
Line drawing of a car seat with labeled point A (no text or symbols on the diagram itself)natural_image
Diagram of a car seat with a circular component labeled B, showing no text or symbols beyond the label.natural_image
Line drawing of a car seat assembly with no text or symbolsSuelte la manija.
natural_image
Diagram of a V-shaped mechanical component with two blades and a central hub (no text or symbols)natural_image
Illustration of a hand using a tool to adjust or install a component, showing no text or symbols present.natural_image
Line drawing of a car seat assembly with no text or symbolsnatural_image
Illustration of two different seatbelt buckle designs, showing a correct and incorrect assembly (no text or symbols present)natural_image
Illustration of a child seated in a car seat under two different scenarios, with no text or symbols present.natural_image
Top-down diagram of a car seat with two horizontal bars and arrows indicating seat positions (no text or symbols)natural_image
Line drawing of a car seat assembly with no text or symbolsnatural_image
Illustration of a car seat with a curved seat and arrow indicating motion (no text or symbols)natural_image
Simple icon of a pen with a circular button labeled 'J' (no text or symbols beyond the label)
natural_image
Line drawing of a mechanical component with two labeled parts (1 and 2), no text or symbols present.
natural_image
Diagram of a car seatbelt mechanism with labeled component M (no text or symbols beyond label)natural_image
Diagram of a mechanical component with a central shaft and flange, showing internal structure (no text or symbols)natural_image
Diagram of a dental implant with an arrow indicating force or direction (no text or labels)natural_image
Illustration of a child seated in a car seat with an upward arrow indicating motion (no text or symbols)natural_image
Line drawing of a car seat assembly with labeled component A (no text or symbols beyond label)natural_image
Diagram of a car seat with a circular component labeled B, showing mechanical parts and directional arrows (no text or symbols beyond labels)natural_image
Line drawing of a car seat assembly with no text or symbolsnatural_image
Diagram of a Y-shaped mechanical component with two blades and a central hub (no text or symbols)natural_image
Illustration of a hand inserting a card into a car interior (no text or symbols)DINAMYK 9-36
natural_image
Line drawing of a car seat assembly with no text or symbolsnatural_image
Illustration of two different seatbelt configurations with a checkmark indicating the correct position (no text or symbols present)natural_image
Illustration of a child seated in a car seat with an upward arrow indicating motion or pressure (no text or symbols)natural_image
Top-down diagram of a car seat with two horizontal bars and arrows indicating seat positions (no text or symbols)natural_image
Line drawing of a car seat assembly with no text or symbolsnatural_image
Illustration of a seated car seat with a curved seat and arrow indicating motion (no text or symbols)natural_image
Simple icon of a pen with a circular button labeled 'J' (no text or symbols on the pen itself)
natural_image
Diagram of a mechanical component with two labeled parts (1 and 2), showing internal structure without any text or symbols.
natural_image
Diagram of a car seatbelt mechanism with labeled component M (no text or symbols beyond label)natural_image
Diagram of a mechanical component with a central cylindrical part and two flanged ends, no visible text or symbolsnatural_image
Diagram of a mechanical component with a threaded rod and base, showing force direction (no text or symbols)natural_image
Illustration of a child seated in a car seat with an upward arrow indicating motion (no text or symbols)natural_image
Line drawing of a car seat with labeled point A (no text or symbols on the diagram itself)natural_image
Diagram of a car seat with a circular component labeled 'B' and directional arrows indicating motion (no text or symbols beyond label)natural_image
Diagram of a car seat with a circular component labeled 'D' and directional arrows indicating movement or force (no text or symbols beyond labels)
natural_image
Line drawing of a car seat assembly (no text or symbols)natural_image
Diagram of a Y-shaped mechanical component with two blades and a central hub (no text or symbols)natural_image
Illustration of a hand using a tool to adjust a component, showing a black circular object and a rectangular block (no text or symbols)
natural_image
Diagram of a mechanical belt drive assembly with labeled components J and K (no text or symbols beyond labels)natural_image
Line drawing of a car seat assembly with a directional arrow indicating movement (no text or symbols)natural_image
Illustration of two different seatbelt buckle designs, one with a checkmark and the other with a handle (no text or symbols)natural_image
Illustration of a child seated in a car seat with an upward arrow indicating motion or pressure (no text or symbols)natural_image
Top-down diagram of a car seat with two horizontal bars and arrows indicating seat positions (no text or symbols)natural_image
Line drawing of a car seat assembly with a directional arrow indicating movement (no text or symbols)natural_image
Illustration of a white and gray object resembling a stylized letter 'L' or abstract form, placed on a dark base (no text or symbols)natural_image
Simple icon of a pen or stylus inside a circle, no text or symbols present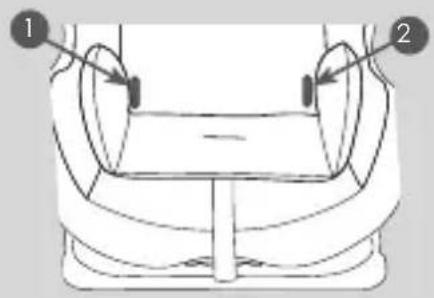
natural_image
Line drawing of a mechanical component with two labeled parts (1 and 2), no text or symbols present.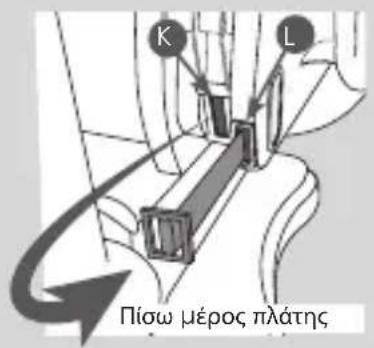
natural_image
Diagram of a car's seat and dashboard with labeled component M (no text or symbols beyond label)natural_image
Diagram of a mechanical component with a central shaft and flange, showing internal structure (no text or symbols)natural_image
Diagram of a mechanical component with an arrow indicating force or direction (no text or symbols present)natural_image
Illustration of a child seated in a car seat with an upward arrow indicating motion (no text or symbols)natural_image
Line drawing of a car seat with labeled component A (no text or symbols beyond label)natural_image
Diagram of a car seat with a circular component labeled B, showing mechanical parts and directional arrows (no text or symbols beyond labels)natural_image
Line drawing of a car seat assembly with no text or symbolsnatural_image
Diagram of a Y-shaped mechanical component with two blades and a central hub (no text or symbols)natural_image
Diagram of hands using a tool to adjust or install a component inside a vehicle (no text or symbols visible)1 Vodilica za pojas – grupa 3
2 Vodilica za pojas – grupa 2
3 Instalacijska prečka
4 Stražnji oklop
5 Bočni zaštitni sustav (SPS)
6 Gornji pojas
7 Kuka središnjeg pojasa
8 Baza
9 Naslon za glavu
10 Prednji oklop
11 Vodilica za pojas
12 Ručica za reguliranje visine naslona za glavu i pojasa
13 Ručka za nošenje
14 Presvlaka
15 Naramenica
16 Pojas za struk
17 Štitnik kopče i međunožni pojas
18 Poklopac regulacijskog gumba
19 Ručica za reguliranje nagiba naslona
20 Jastučić za glavu
21 Jastučići za ramena
22 Središnja kopča
23 Prostor za „booster“ jastuk
24 Regulacijski gumb za pojas
25 Regulacijska traka za pojas
Postavljanje sjedala
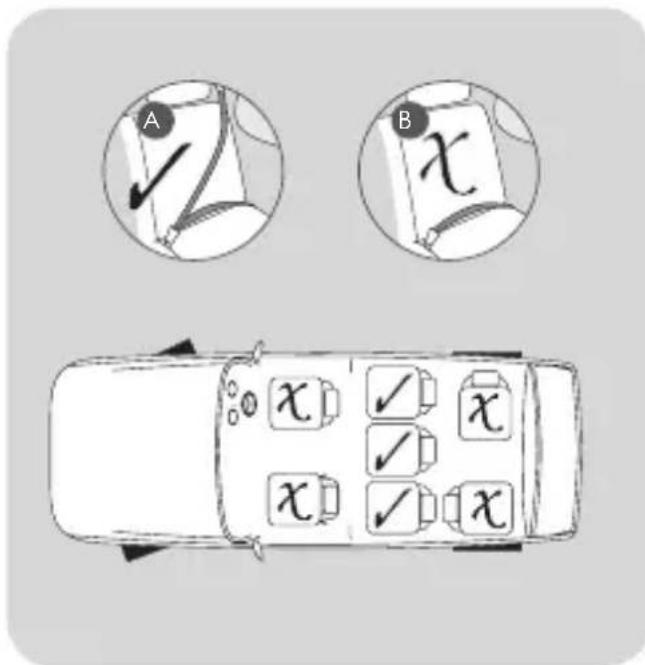
U grupi 1 (9-18 kg) i grupi 2 (15-25 kg), autosjedalica može se nasloniti u 4 različita položaja, od vertikalnog do najstrožeg položaja.
Povucite ručicu za podešavanje nagiba (A) ispod prednjeg dijela školjke i povucite školjku naprijed ili natrag, pustite ručicu u željeni položaj kada čujete poseban klik.

UPOZORENJE: u grupi 3 (22-36kg) autosjedalica se može nasloniti samo u 2 položaja, okomitom položaju (1) i položaju n. 2. Drugi položaji nisu dopušteni.
natural_image
Line drawing of a car seat assembly with an arrow indicating direction (no text or symbols)Vratite školjku u prvobitan položaj (I) (pazeći da ne uhvatite dijagonalnipojas preko ramena) i provucite instalacijsku šipku nazad kroz sjedalo (J).
natural_image
Illustration of two different seatbelt buckle designs, showing a switch and angle (no text or symbols)Vratite školjku u prvobitan položaj (I) (pazeći da ne uhvatite dijagonalnipojas preko ramena) i provucite instalacijsku šipku nazad kroz sjedalo (J).
natural_image
Illustration of a child seated in a car seat with an upward arrow indicating motion or pressure (no text or symbols present)natural_image
Top-down line drawing of a car seat with two side seats and diagonal straps (no text or symbols)Postavite remenje preko bočne strane školjke, postavite dijete u autosjedalicu i pripazite da se nikakve igračke ili drugi tvrdi predmeti ne nalaze u sjedalici.

Nakon postavljanja vašeg djeteta u autosjedalicu, spojite dvije polovice kopče i umetnite ih u glavnu kopču. Pazite da remenje preko ramena budu prikladni za vaše dijete povlačeći pojas za podešavanje (C).

Remen bi trebao omogućiti 1 širinu prsta (1 cm) prostora na vrhu ramena. Ovo je idealna čvrstina.
NAPOMENA: Provjerite je li kopča pričvršćena povlačenjem ramena i struka.
Pretvaranje u grupe II i III
natural_image
Line drawing of a car seat assembly with no text or symbolsOtpustite kvaku (D) na gornjoj lijevoj strani školjke i skinite instalacijsku šipku (E).
Pretvaranje u grupe II i III
natural_image
Illustration of a seated car seat with a curved seat and arrow indicating motion (no text or symbols)Otpustite dva Velcro čička na svakoj strani stražnjeg dijela glave (I) i uklonite ih.
Pretvaranje u grupe II i III

natural_image
Simple icon of a pen or stylus inside a circle, no text or symbols present
natural_image
Diagram of a car seat assembly with two labeled parts (1 and 2), showing no text or symbols.
natural_image
Diagram of a car seatbelt mechanism with labeled component M (no text or symbols beyond label)natural_image
Diagram of a mechanical component with a central shaft and flange, showing internal structure (no text or symbols)Da biste uklonili remen, osigurajte da je sjedalo za dijete u položaju zaustavljanja.

natural_image
Diagram of a mechanical component with an arrow indicating force or direction (no text or symbols present)- Gurnite trakicu kroz utor prema dolje.
- Dok držite remen, pronađite metalnu držač kopče ispod školjke sjedala automobila, okrenite kopču držača i postavite kroz otvor otvora i uklonite remen.
Pretvaranje u grupe II i III
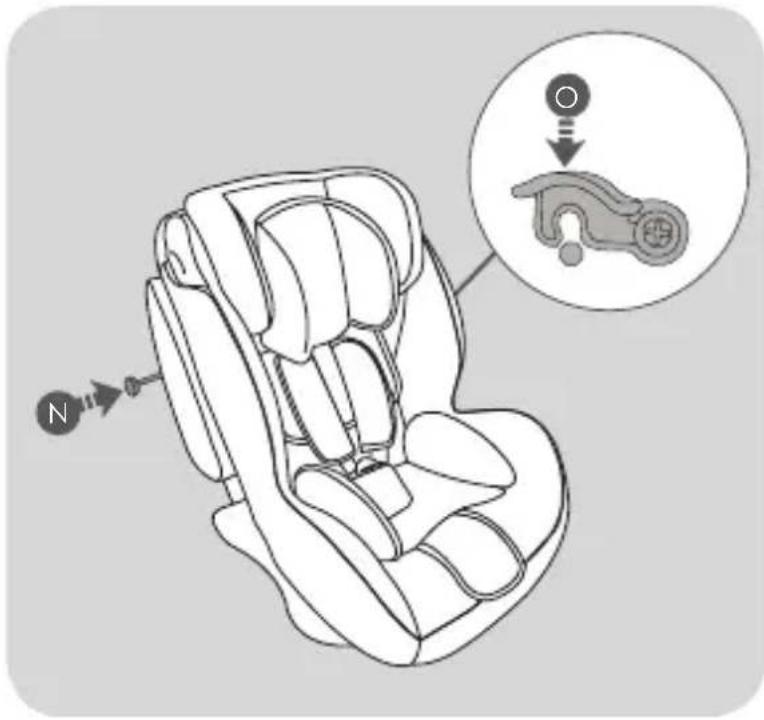
Vratite školjku u prvobitni položaj i ponovno umetnite instalacijsku šipku (N) i učvrstite kopču (O). Autosjedalica se sada može postaviti u Vaše vozilo.
natural_image
Illustration of a child seated in a car seat with an upward arrow indicating motion (no text or symbols)natural_image
Line drawing of a car seat with labeled section A (no text or symbols on the diagram itself)UPOZORENJE: Presvlaka je sigurnosna značajka.
natural_image
Diagram of a car seat with a circular component labeled B, showing mechanical parts and directional arrows (no text or symbols beyond labels)natural_image
Line drawing of a car seat assembly with no text or symbolsnatural_image
Diagram of a Y-shaped mechanical component with two blades and a central hub (no text or symbols)Umetnite remen za držanje struka (C) kroz dva utora (1) i (2) na navlaci i provucite kroz vanjski prorez na stražnjoj strani školjke, a zatim natrag kroz unutrašnje otvore.
Umetnite kopču pričvrsnog remena (D) kroz utor (3).
Zamjena remenja
Podesite naslon za glavu tako da kad podignete nosač naslona za glavu toliko da možete vidjeti metalnu šipku (E) kroz naslon sjedala.
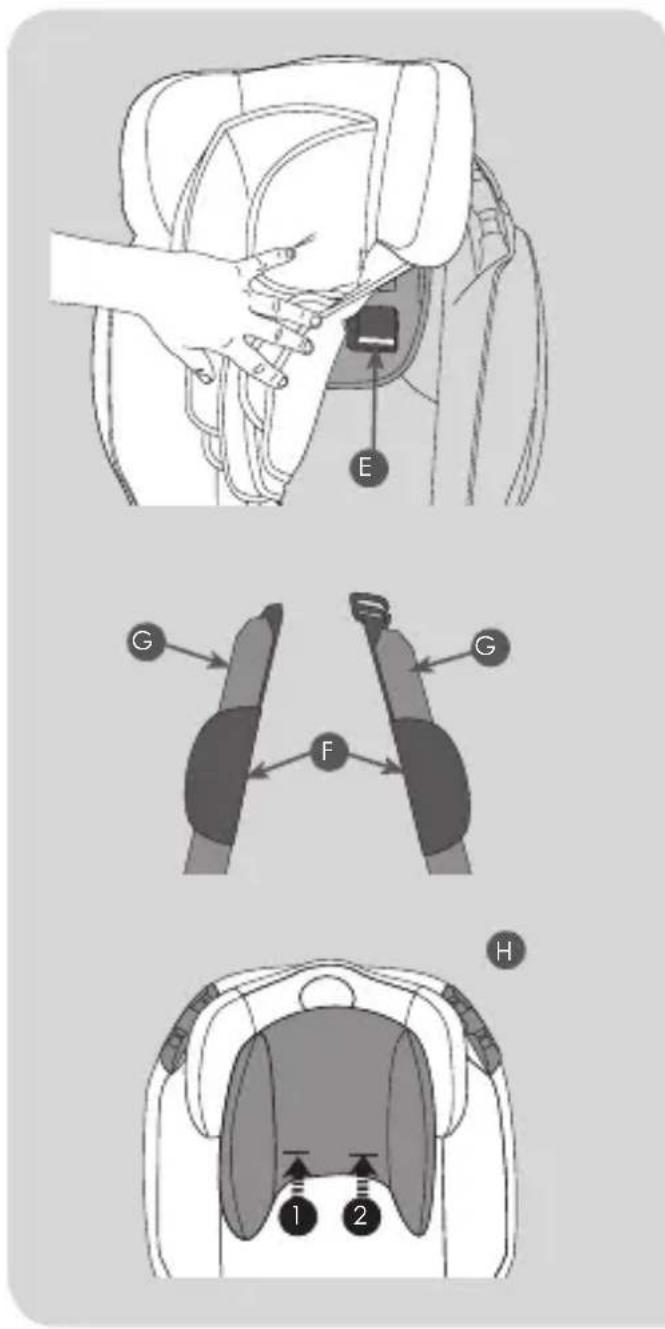
Gurnite remenja (F) preko remena za nošenje ramena (G), osiguravajući da su šavovi jastučića okrenuti prema van.
Gurnite jastučiće i remenje trake preko utora (1 i 2) na glavu (H) (ako postoji) i tkaninu naslona za glavu. Podignite tkaninu i povucite remenje kroz školjku preko metalne šipke (I).
natural_image
Illustration of hands using a tool to adjust a component inside a car seat (no text or symbols visible)Spojite uske remenje ramena na priključak ramena (J).
Spojite šire remenje za ramena na jaram (K).


- GETTING STARTED Read Carefully Before Attempting to Fit the Child Car Seat
- Notices
- BEFORE STARTING
- Which is the safest passenger seat to fit your child car seat to? THE CENTRE REAR PASSENGER SEAT
- EXTREME HAZARD
- NEVER USE IN FRONT PASSENGER SEATS EQUIPPED WITH AIRBAGS (SRS) THIS CAN INCLUDE REAR PASSENGER SEATS THAT ARE EQUIPPED WITH AIRBAGS\*
- WHEN USING THE CHILD CAR SEAT
- SEAT/BELT
- SUNLIGHT/HOT DAYS
- BACK OF THE SEAT/HEADREST
- SECOND HAND OR DAMAGED CHILD CAR SEATS AND SEATBELTS
- Contents
- Welcome!
- Parts checklist
- Positioning the seat
- Seat recline
- Installing for GROUP 1 (9-18kg)
- Adjusting the headrest and harness height
- Placing your child in the seat - GROUP 1 (9-18kg)
- Converting for GROUPS 2 - 3 (15-36kg)
- Installing for GROUP 2 (15-25kg) - GROUP 3 (22-36kg)
- Removing the seat cover
- Replacing the seat cover
- Replacing the harness
- Maintenance and cleaning
- Storage
- Covers
- Plastic/Metal Parts
- Inspection
- Advertencia
- Postavljanje sjedala
- Pretvaranje u grupe II i III
- Zamjena remenja
Brand : Foppapedretti
Model : Dinamyk 9-36
Category : Car seat