
RI9301 - Coffee machine GAGGIA - Free user manual and instructions
Find the device manual for free RI9301 GAGGIA in PDF.


| Product type | Espresso coffee machine |
| Brand | Gaggia |
| Model | RI9301 |
| Dimensions (W x D x H) | 28 x 25 x 33 cm |
| Weight | 8 kg |
| Power supply | 220-240 V, 50/60 Hz, 1200 W |
| Water tank capacity | 1.4 L |
| Pump pressure | 15 bars |
| Milk frother | Integrated, swivel |
| Heating system | Aluminum thermoblock |
| Main functions | Ground coffee or ESE pods, steam for milk |
| Filter holder | ESE pods and ground coffee filter |
| Automatic shut-off | After 20 minutes of inactivity |
| Maintenance and cleaning | Descaling recommended every 2-3 months |
| Spare parts | Available (filters, seals, frother) |
| Repairability | Repairability index: 7.5/10 |
| Included accessories | Filter holder, measuring spoon, user manual |
Frequently Asked Questions - RI9301 GAGGIA
User questions about RI9301 GAGGIA
0 question about this device. Answer the ones you know or ask your own.
Ask a new question about this device
Download the instructions for your Coffee machine in PDF format for free! Find your manual RI9301 - GAGGIA and take your electronic device back in hand. On this page are published all the documents necessary for the use of your device. RI9301 by GAGGIA.
USER MANUAL RI9301 GAGGIA
natural_image
Exterior view of a modern Gaggia coffee machine with two cups (no visible text or symbols on the device itself)ISTRUZIONI PER L'USO
OPERATING INSTRUCTIONS
GEBRAUCHSANWEISUNG
MODE D'EMPLOI
INSTRUCCIONES DE USO
GEBRUIKSAANWIJZING
INSTRUCÇÕES E MODO DE EMPREGO
CE
|
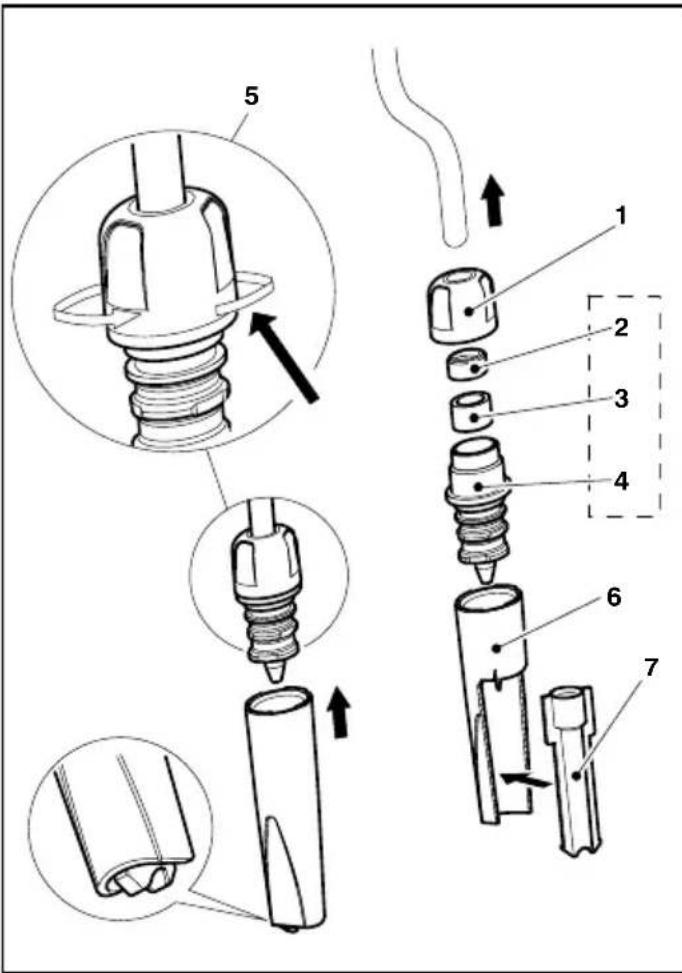
- Slide the Ring Nut 1 onto the steam hose.
- Place the Gasket 3 into the Injector 4, and place the Gasket Press 2 over the Gasket 3. Slide the assembly 2-3-4 over the steam hose.
- Screw the Ring Nut 1 onto the Injector 4. Tighten 5.
- Attach the external housing 6 as shown in the Figure.
- The internal sleeve 7 must be correctly installed, by protruding the lower part of the external sleeve, as shown in figure.
D
Congratulations on your wise choice!
As the proud owner of the Gaggia machine, you can now experience the taste of a delicious cup of espresso or cappuccino in the comfort of your own home.
Espresso coffee, originally created in Italy, is made by rapidly forcing water that has been
heated to the correct brewing temperature, through a special finely ground coffee. The heart of the espresso machine is a precision engineered pump. The pump and water flow is easily controlled with just a fl switch.

CAUTION:
This appliance is for household use
Any repairs or servicing operations, with the exception of normal cleaning and maintenance operations undertaken by an authorized service centre.
- Check voltage to be sure that the voltage indicated on the plate agrees with your voltage.
- Never use warm or hot water to fill the water tank. Use cold water only.
- Keep your hands and the cord away from hot parts of the appliance during operation.
- Never clean with scouring powders or hard implements.
- To prevent limescale from building up, natural mineral water may be used. Please follow the instructions given in the "Descaling" section.
- Do not immerse the machine in water.
- Never direct jets of overheated steam and/or hot water towards yourself or others. Always use the handles or knobs provided.
- Do not disconnect (remove) the pressurized filter holder during coffee brewing. Hot water drips may spill out of the brew group during the warming phase.
IMPORTANT SAFEGUARDS

When using electrical appliances, basic safety precautions should always be followed to reduce the risk of fire, electric shock, and/or injury to persons, including the following:
1 Read all instructions and information in this instruction book and any other literature included in this packaging referring to this product before operating or using this appliance.
2 Do not touch hot surfaces. Use handles or knobs.
isk To protect against fire, electric shock and personal injury do not immerse cord, plugs, or appliance in water or other liquid.
4 Close supervision is necessary when any appliance is used by or near children.
5 Unplug from outlet when not in use and before cleaning. Allow to cool before putting on or taking off parts and before cleaning the appliance.
6 Do not operate any appliance with a damaged cord or plug or in the event of appliance faults or damages. Return appliance to the nearest authorized service centre for must examination, repair or adjustment.
7 The use of accessory attachments not recommended by the appliance manufacturer may result in fire, electric shock or personal injury.
8 Do not use outdoors.
9 Do not let cord hang over edge of table or counter, or touch hot surfaces.
10 Do not place on or near a hot gas or electric burner, or in a heated oven.
11 Always turn appliance to "Off", then plug cord into the wall outlet. To disconnect, turn switch to "Off", then remove plug from wall outlet.
12 Do not use appliance for other than intended household use.
13 Use extreme caution when using hot steam.
14 This appliance is not intended for use by persons (including children) with reduced physical, sensory or mental capabilities, or lack of experience and knowledge, unless they have been given supervision or instruction concerning use of the appliance by a person responsible for their safety. Children should be supervised to censure that they do not play with the appliance.
15 Save these instructions
Description of parts:
FIG. 01
1 Main switch
2 Hot water/brew switch (pump)
3 On/off light
4 Steam switch (temperature)
5 Correct temperature light
6 Removable water tank
7 Steam/hot water knob
8 Turbo frother steam nozzle (removeable)
9 Filterholder
10 "Perfect crema" pod fi Iter
11 "Perfect crema" filter for ground coffee
12 Basin (removable)
13 Frothing jet device
14 Brewing head
15 Filterholder gasket
16 Shower disc holder
17 Shower disc
18 Tamper
19 Power cable and plug
20 Measuring spoon
21 Delivery spout
22 Tank cover
23 Grid (removable)
24 Cappuccino maker kit (OPTION)
25 Overfl owing protection hole
26 Level indicator for the basin
Instructions for the power supply cord
A A short power-supply cord is provided to reduce risks of getting tangled up or tripping over a longer cord.
B Longer extension cords are available and may be used if care is exercised in their use.
C If a long extension cord is used:
1 the marked electrical rating of the extension cord should be at least as great as the electrical rating of the appliance.
2 if the appliance is of the grounded type, the extension cord should be a grounding-type 3-wire cord, and the longer cord should be arranged so that it will not drape over the counter top portable
top where it can be pulled on by children or tripped over;
3 If the power supply cord has a polarized plug (one blade is wider than the other), as a safety feature, this plug will fit in a polarized outlet only one way. If the plug does not fit fully in the outlet, reverse the plug. If it still does not fit, contact a qualified electrician. Do not attempt to defeat the safety feature.
4 If damaged, the power cord must be replaced by the manufacturer or an authorised service centre.
Preparation:
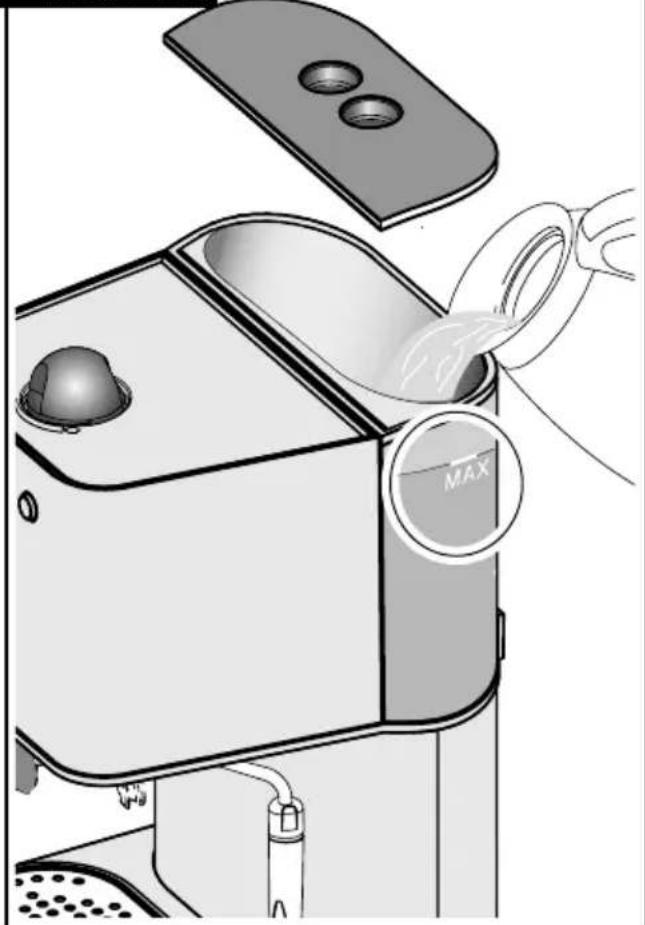
- Remove the water tank cover (22) and fill with cold water to the MAX line indicated on tank (6). See FIG. 2.
N.B.: Near the word MAX on the tank there is the overflowing safety hole (25) in case of tank overfilling.
The water tank can also be removed, after removing the tank cover (22) using the handle.
Re-install tank with water and cover (22). - Insert plug (19) into a suitable wall outlet (see point 1 under "Caution").
- Turn the power switch (1) to "On". The on/off light (3) will switch on.
Make certain that the hot water/coffee switch (2) and that the steam switch (4) are in the "Off" position.
Circuit Priming
N.B.: Upon first use, after dispensing steam or when the water tank is empty, the machine's water circuit must always be primed.
This machine, featuring a pump to brew coffee, is equipped with a self-priming system. Place an empty cup under the brewing head (14), do not insert filter holder and press hot water/coffee switch (2) (pos. "On").
You will hear the sound of the operating pump and after few seconds, water will start to escape from the brewing head (14).
Once cup is filled, set coffee switch (2) onto pos "Off".
NOTE: It may happen that the self-priming feature of the pump fails to work temporarily due to an air lock.
In this case water does not flow from brewing head (14), and the following procedure should be followed:
a) Place a small frothing pitcher or mug under the steam nozzle (8).
b) Turn the steam knob (7) counter-clockwise to open the steam/hot water valve, and turn the steam switch (4) and the hot water/brew (2) to "On" to activate the pump.
c) Alter a few seconds, a steady stream of water will emerge from the steam nozzle. Allow about one cup of water to fill the pitcher. Shut the steam/hot water valve and turn hot water/brew switch and the steam switch (4) to "Off".
d) NOTE: The temperature ready-light (5) will automatically fl ash as the machine boiler heats.
After switching on the machine for the first coffee, wait 6 minutes until the machine has fully heated up, while for all subsequent coffees the machine will be ready to use.
Another feature of the machine is the "no-drip system", eliminating most of dripping from brewing head (14). After coffee brewing, however, a little dripping may occur due to wet coffee grinds in the fi lter-holder.

Caution: Never operate pump without water in machine as damage to the pump may occur. Damage of pump run without water is not covered by warranty.
Using the machine for the first time or after a period of inactivity
This simple operation ensures an optimum brewing and must be performed:
- at first start-up;
- when the machine remains inactive for a long time (more than 2 weeks).
NOTE: Dispensed water must be emptied into an adequate drain. It is not suitable for food use. If the container fills up, stop dispensing water during the cycle and empty it before resuming the operation.
A (Fig.02) - Rinse the tank and fill it again with fresh drinking water.
B (Fig.03) - Place a container under the steam wand (Pannarello). Open the knob (7) slowly by turning it clockwise. Press the hot water/brew button (2) and steam button (4).
C Dispense the whole water tank from the steam/hot water wand. To stop dispensing, press the hot water/brew button (2) and the steam button (4) again. Then close the knob (7) by turning it counter-clockwise.
D (Fig.02) - Fill the water tank with fresh drinking water.
E Insert the filter holder into the brew unit from the bottom (14) and turn it from left to right until it locks into place.
F Place a suitable container under the filter holder.
G Press the brew button (2) and dispense all the water in the water tank. Once the tank is empty, stop dispensing by pressing the brew button again (2). At the end, empty the container.
H Remove the fi lter holder from the unit by turning it from right to left and rinse it with fresh drinking water.
The machine is now ready to be used.
For further information on how to dispense hot water, please refer to sections "How to brew a good Espresso Coffee" and "Making Hot Water".
Important to know.....
- The taste of your coffee depends on the characteristics of the beans from which it is made, the type of bean, where it was grown and processed. The coffee beans that are roasted for a longer period of time and at higher temperatures will be much darker in colour. Darker beans will produce a richer cup of coffee than the lightly-roasted beans.
- A variety of dark roasts are available from which you can choose to brew your espresso. Each of these roasts is a blend of coffee beans that are roasted at a specific temperature producing a specific type of flavour. There are decaffeinated beans that have up to 98% of the caffeine content removed. The next time you purchase coffee for your espresso maker, experiment with one of the many kinds of coffee being sold. You may just find that it tastes better than the blend you have been using.
- A fine "espresso grind" for pump-driven machines must be used. Be sure to ask for this when buying coffee or when having beans ground. Do not use a blade-type grinder because it makes too much coffee dust and produces an irregular grind.
- The mark of real espresso is its dark color, rich taste and the light brown, natural froth called "crema" in Italian.
- Cappuccino is simply a combination of espresso and hot, frothy milk. Cappuccino is usually topped with cinnamon, nutmeg or cocoa powder.
- Espresso Coffee should be served immediately after it is made.
- Espresso is served in 2 to 2 ½ oz. demitasse cups. A 4 or 6 oz. cup or glass is used for cappuccino
- Ideally, coffee beans should be ground immediately before using. Remember, it must be an "espresso grind" for pump-driven espresso machines.
- It's best to store ground coffee or beans in an container in the freezer of your refrigerator. Ground coffee tends to absorb food odours.

Warning! Never brew coffee when the steam function is on, as the temperature is too high and there is a risk of burns.
How to make a good Espresso coffee:
1 Follow the procedure described under "Preparation".
2 Insert the frothing jet device (13) into the fi Iter holder (9).
Insert the "Perfect aroma" filter for ground coffee (11) into the filter holder, both for brewing 1 or 2 coffee cups.
Insert the filter holder (9) into the brew group (14) from the bottom and wait for it to heat up.
3 Place a container under the fi lter holder (9). Preheat the fi lter holder by placing the hot water/brew button (2) on "on" (this operation is only necessary for the fi rst coffee).
Water will start coming out.
4 Once 150 cc of water have been dispensed, bring the hot water/brew button (2) onto "off".
5 Wait until the machine has reached the correct temperature with fi lter holder inserted (heating time of about 6 minutes).
Use this time to set table, prepare cups, coffee, milk, etc
6 After the warm-up period, remove the warm fi Iter-holder (9) from the brewing head and fi ll with correctly ground espresso coffee using the measuring spoon provided.
Place one level measure of coffee in basket for each cup of espresso.
Do not overfi ll.
Gently tamp down coffee with the tamper (18) provided.
Do not compress too firmly.
7 Clean any excess coffee from the rim of fi liter holder (9). Insert fi liter holder into brew head by holding handle approximately 45 degrees to the left as you face machine. When properly aligned, move handle firmly to the right to lock into position. The handle should point to the front of the machine or slightly to the right.
ENGLISH
8 Place one or two espresso cups on the drip plate to line up with the spouts of the filter holder. Depress hot water/brew switch (2) to pos. "On". Espresso will start to flow into cups.
9 When cups are 3/4 full, release brew switch to "Off".
Coffee will be as strong as the quantity of dis water.
The more water you allow to flow, the weaker the coffee. When properly made, the espresso will have a light brown foam "crema" floating on the top.
If not, refer to "In the event of faulty function".
10 Remove cups and serve.
11 To make more espresso, carefully and slowly remove the filter holder by moving handle to the left. Be careful as hot water will be on top of the coffee grinds in the holder. Some water will continue to drip from brewing head as filter holder is removed. That is normal and due to the pump pressure in the system. Knock out used coffee grinds from filter. For more espresso repeat steps 6 to 10 above
Using Coffee Pods
To use coffee pods, remember to only use the "Perfect crema" pod fi liter (10).
N.B.: If present, remove the "Perfect crema" filter for ground coffee (11).
1 Follow the procedure described in section "Preparation".
2 Insert the frothing jet device (13) into the fi Iter holder (9). Then, insert the "Perfect crema" pod fi Iter (10).
3 Insert the filter holder (9) into the brew group (14) from the bottom and wait for it to heat up.
4 Place a container under the fi lter holder (9). Preheat the fi lter holder by placing the hot water/brew button (2) on "on" (this operation is only necessary for the fi rst coffee).
Water will start coming out.
5 Once 150 cc of water have been dispensed, bring the hot water/brew button (2) onto "off".
6 After the warming phase, remove the fi lter holder (9) and insert the pod; make sure the paper of the pod does not overhang the fi lter holder.
7 Insert the fi lter holder into the machine with a 45° movement towards the left.
8 Rotate it onto the right to tighten it into position. The filter holder handle shall be perpendicular to the machine or slightly tilted towards the right.
"Place a cup under the fi Iter holder. Place the hot water/brew button (2) on "on". Coffee will start coming out.
10 When the cup is 3/4 filled, bring the brew button onto "off".
Remove the cup and serve.
11 To brew more coffee, slowly remove the fi lter holder with caution, moving it towards the left. Make sure to not get burnt with the water from coffee grounds. Once the fi lter holder has been removed, some water will still drop.
This is due to the water pressure in the system. Remove the grounds from the filter. To brew more coffee, repeat the procedure from step 6 to 10.
Important note: Filters should be kept clean to guarantee perfect results. Clean daily after use.
If you experience a malfunction in the coffee brewing process, leave the Filters in a metal container of hot boiling water for 10 minutes, then rinse them in running water and perform another brewing.
For a deeper cleaning of the filters, we recommend using the cleaning tablets specifically designed to maintain the efficiency of the machine.

When preparing to make a cappuccino, have all of the ingredients at hand as well as a frothing pitcher (or mug) halffi lled with skimmed or low-fat milk and cups that are larger (6 oz.) than those used for espresso.
Frothing Milk:
The higher the fat content in the milk the denser the froth will be. The Turbo-Frother (8) or the cappuccino maker pos.24 will give you all the froth required but don't let milk come to a boil.
It may require two or three attempts to "become an expert" but you will be successful at frothing milk if you chance. Swivel the Turbo-Frother steam nozzle (or milk frother) slightly outward so that you can get the frothing pitcher under the nozzle without knocking the base of the machine.
Turbo frother steam nozzle version:
Steam can be used to froth the milk for cappuccinos and also to heat beverages.

Caution! Scalding hazard! Splashing may occur at the start — scalding hazard! The hot water nozzle and pipe can reach high temperatures: touching it directly with your hands.
1 Make espresso (in a large cups) as described above
2 With the machine ready to deliver coffee, convey the pipe over the drip tray (12), open the "Hot water/steam" tap knob (7) for a few seconds so to let the remaining water come out of the steam pipe; after a few seconds only steam will come out.
3 Close the steam/hot water tap knob(7).
4 Position steam switch (4) to "On".
5 After 15 to 20 seconds or, when temperature ready-light (5) goes on, place the frothing pitcher halffi lled with low-fat milk under Turbo Frother steam nozzle so that tip is just under the surface of the milk. See Fig.03.
6 Slowly turn steam valve knob (7) counter clockwise to release steam.
IMPORTANT. The more you turn the knob, the greater the steam pressure for frothing.
N.B.: Dispensing should not exceed 60 seconds.
7 Move pitcher in circular motion keeping the tip of steam nozzle just under surface of milk as it begins to froth. Do not let milk come to a boil since it will not froth.
8 When you have made enough froth, turn steam knob clockwise to shut off steam and remove pitcher. Put steam switch (4) to pos. "Off".
9 Spoon the froth onto the espresso in each cup and gently pour the hot milk along the side of the cup. Top each cup of cappuccino with a dash of cinnamon, cocoa and nutmeg. Serve.
10 NOTE: If you want to make more espresso immediately give after steaming milk, the machine boiler must be refi lled with water and temperature brought down to a brewing temperature. Otherwise, espresso may taste "burned".

Warning! If coffee is brewed without reducing the temperature through water dispensing, you may get burnt!
To do this: place an empty cup on drip plate.
Do not insert fi lter holder. Turn hot water/brew switch (4) to "On" letting cup fi ll with water. Turn bre switch "Off". You many now proceed to make more espresso.
Making hot water:
- Follow the procedure described under "Preparation".
- Turn the power switch (1) to "On".
- Allow about 6 minutes for the machine to reach its proper operating temperature.
- Place a pitcher under the steam nozzle (8).
5 Slowly turn the steam knob (7) anticlockwise so that the hot water and put the hot water/brew switches (2) and the steam switch (4) to "On" can be released.
N.B.: Dispensing should not exceed 60 seconds.
6 Once the desired quantity of hot water is obtained, turn the steam knob clockwise and put the hot water/brew switches (2) and the steam switch (4) to "Off" to stop the water release.
ENGLISH
7 NOTE: If you want to make espresso imme after making hot water, the temperature of the machine boiler must be brought down to a brewing temperature. Otherwise, espresso may taste "burned".
To do this: place an empty cup on drip plate. Do not insert filter holder. Put the hot water/brew switches (2) and the steam switch (4) to "On", letting cup fill with water. Turn brew switch "Off".
You may now proceed to make espresso.
Keeping it clean:
1 IMPORTANT: the steam nozzle should be cleaned after each use in order to avoid build up of milk deposits that are very difficult to clean. Cleaning is made easy as can be seen in the DESCRIPTION OF PARTS. The outer part of nozzle can be removed by pulling downward.
The outside of the steam pipe can be cleaned with a damp cloth.
The steam jet is cleaned by running a shot of steam through it.
The hole in the steam nozzle must be kept open. A needle may be used.
2 Clean filter holder and filter in warm water after use.

3 Wipe body of machine with a damp cloth as required.
4 Remove basin and grid (12, 23) and rinse with water. Do not use abrasive substances.
5 eClean the seal (15) inside of the brewing head (14) and keep it clean.
6 The shower disc (17) should be unscrewed and cleaned periodically depending on frequency of use.
7 If the machine is not used for a long period of time, discharge the water from the boiler by turning the steam knob clockwise (25), and put the hot water/coffee switch on "On". Let a quantity of water equal to two cappuccino cups come out of the frother. Close the steam knob (25) and put the hot water/coffee and the steam switch on "Off". Turn off the machine.
Never operate pump unless there is water in tank.
8 NOTE: It is very normal for an espresso machine to emit steam and drip occasionally as the water pressure changes during use.
Be certain to empty drip tray (12) as required.
Descaling
Limescale normally builds up with the use of the appliance. The machine needs descaling every 1-2 months (if used) and/or whenever a reduction in water flow is noticed. Use the GAGGIA descaling product only.
NOTE: In case of conflict, priority must be given to what is indicated in the operation and maintenance manual over the instructions provided on separately sold accessor and materials.
NOTE: Use the GAGGIA descaling product only. Its formula has been designed to ensure better machine performance and operation for its whole operating life. If correctly used, it also avoids alterations in the brewed product. The descaling solution is to be dispos according to the manufacturer's instructions and/or regulations in force in the country of use.

NOTE: Never drink the descaling solution or any products dispensed until the cycle has finished. Never use vinegar as a descaling solution.
1 Insert the fi lter holder into the brew unit from the bottom (14) and turn it from left to right until it locks into place.
2 Remove and empty the water tank.
3 (Fig.02) - Pour HALF the content of the GAGGIA concentrated descaling solution into the water tank, and then fill the tank with fresh drinking water up to the MAX level.
4 Remove the Pannarello (or Cappuccinatore) installed on the steam wand, if any.
5 Switch on the machine by pressing the ON/OFF button (1).
(Fig.03) - Fill up (as described in the Section "Making hot water" of the manual) two cups of water (about 150 ml each) from the steam/hot water wand and turn off the machine by pressing the ON/OFF button (1).
6 Leave the descaling solution to descale for approx.15-20 minutes with the machine turned off.
7 Switch on the machine by pressing the ON/OFF button (1).
(Fig.03) - Fill up (as described in the Section"Making hot water" of the manual) two cups of water (about 150 ml each) from the steam/hot water wand. Then turn the machine off by means of the ON/OFF button (1) and leave it off for 3 minutes.
8 Repeat the operations as described in step 7 until the water tank is completely empty.
9 (Fig.02) - Rinse the tank and fill it again with fresh drinking water.
10 (Fig.03) - Place a container under the steam wand (Pannarello). Open the knob (7) slowly by turning it clockwise. Press the hot water/brew button (2) and steam button (4).
11 Dispense the whole water tank from the steam/hot water wand. To stop dispensing, press the hot water/brew button (2) and the steam button (4) again. Then close the knob (7) by turning it counter-clockwise.
12 (Fig.02) - Fill the water tank with fresh drinking water.
13 Place a suitable container under the fi lter holder.
14 Press the brew button (2) and dispense all the water in the water tank. Once the tank is empty, stop dispensing by pressing the brew button again (2). At the end, empty the container.
15 Remove the fi lter holder from the unit by turning it from right to left and rinse it with fresh drinking water.
16 Repeat the operations once again from point (9) for a total of 4 tanks. The machine is now ready to be used.
The descaling cycle is now complete.
(Fig.03) - Fill the tank again with fresh water. If necessary, prime the circuit as described in Section "Starting up" of the manual.
Once fi nished, reposition the Pannarello (or Cappuccinatore) on the steam wand.
In the event of faulty function
| Problem: Check to ensure against the following: | |
| Coffee does not flow. Water is in tank. | Filter basket clogged because coffee is too fine or compressed too firmly.Shower disc requires cleaning. |
| Coffee flows too quickly. Coffee is ground too coarsely.Coffee is not pressed down with tamper. | |
| Pump makes loud noise. No water in tank. | Pump not primed.Coffee is ground too coarsely. |
| Water leaking excessively from filter holder. | Filter holder not properly inserted in brew head.Gasket in brewing head dirty or worn.Coffee grinds not cleaned off the rim of filter holder. |
| Espresso has little creamy froth. Coffee is ground too coarsely.Coffee is not pressed down with tamper.Coffee is too old or dried out. | |
| Espresso is too cold. Machine is not warmed up (6 min). | Coffee is ground too coarsely.Coffee has been brewed in cold cups. It is recommended to always warm cups. |
| Not enough milk froth. Steam nozzle and/or air intake hole clogged.Milk is too hot. | |
10 Tirar as xicaras e servir.
This product complies with EU Directive 2002/96/EC.

The symbol 🐘 on the product or on its packaging indicates that this product may not be treated as household waste. Instead it shall be handed over to the applicable collection point for the recycling of electrical and electronic equipment.
By ensuring this product is disposed of correctly, you will help prevent potential negative consequences for the environment and human health, which could otherwise be caused by inappropriate waste handling of this product. For more detailed information about recycling of this product, please contact your local city offi ce, your household waste disposal service or the shop where you purchased the product.
GAGGIA S.p.a. reserves the right to carry out all modifications which might be considered necessary.
COD. 15002752 - Rev. 00 - 15-10-10
FIG.02FIG.
natural_image
Illustration of a microwave oven with a hand pouring liquid into it, showing no text or symbols.
natural_image
Illustration of a kitchen appliance with a faucet spraying water into a drain, alongside a hand operating the kitchen (no text or symbols present)FIG.03


- |
- D
- Congratulations on your wise choice!
- CAUTION:
- IMPORTANT SAFEGUARDS
- Description of parts:
- 01
- Instructions for the power supply cord
- Preparation:
- Circuit Priming
- Using the machine for the first time or after a period of inactivity
- Important to know.....
- How to make a good Espresso coffee:
- ENGLISH
- Using Coffee Pods
- Frothing Milk:
- Turbo frother steam nozzle version:
- Making hot water:
- Keeping it clean:
- Descaling
Brand : GAGGIA
Model : RI9301
Category : Coffee machine