
HCAM6 - Action Camera HYUNDAI - Free user manual and instructions
Find the device manual for free HCAM6 HYUNDAI in PDF.

| Product type | Action camera |
| Brand | HYUNDAI |
| Model | HCAM6 |
| Screen | LCD 1.5" |
| Lens | f/2.4mm, 120° wide angle, 4-element hemispherical glass lens |
| Maximum video resolution | 1080P (1920x1080) at 25 FPS |
| Photo resolution | 3 MP |
| Video formats | AVI, H.264 compression |
| Supported memory | microSD / microSDHC / microSDXC card up to 32 GB (Class 10 minimum) |
| Battery type | Rechargeable lithium-ion |
| Battery capacity | 900 mAh |
| Recording autonomy | Approximately 1h50 at 720P |
| Charging time | Approximately 1h30 |
| Power supply | 5V 1A via micro USB port |
| Interface | USB 2.0 |
| Dimensions | 59.27 x 41.13 x 29.28 mm |
| Weight | Approximately 75 g |
| Available languages | English, French, Spanish, Portuguese |
| Main functions | Video recording, photo capture, playback mode |
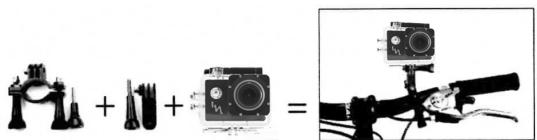
| Included accessories | Mounts (bike tubular, loop, flat adhesives, straps, suction cup), micro USB cable |
| Certifications | RoHS, R&TTE directive |
| Maintenance and cleaning | Clean the waterproof seal with fresh water after use in salt water; do not wipe with a cloth to avoid lint |
| Safety | Do not disassemble, avoid shocks, use only the provided accessories, do not expose to heat sources or water without sealing |
| General information | Full manual available in PDF at notice-facile.com |
Frequently Asked Questions - HCAM6 HYUNDAI
User questions about HCAM6 HYUNDAI
0 question about this device. Answer the ones you know or ask your own.
Ask a new question about this device
Download the instructions for your Action Camera in PDF format for free! Find your manual HCAM6 - HYUNDAI and take your electronic device back in hand. On this page are published all the documents necessary for the use of your device. HCAM6 by HYUNDAI.
USER MANUAL HCAM6 HYUNDAI
Congratulations on your purchase and thank you for the confidence you have shown in T'nB. Our products comply with the regulations and standards currently in force. Before using this device we recommend that you read the instructions and safety advice carefully and retain this manual.
FR
The power supply used with your device must correspond to its original requirements.
- Never use your device in the rain, in a wet environment or close to sources of water without its waterproof case.
- Never place an inflammable object, explosive substance or dangerous object close to your device.
Only use the accessories and connectors supplied. The use of any other type of accessory not specifically designed for the purpose may cause irreparable damage to your device.
- Only use and keep your device in an environment that has the temperature of at least 35^ - Keep away from the reach of children
- Do not dismantle your device or try to repair it yourself.
- Do not use your device if it has been subject to impact or damage.
- To avoid any risk of electrification, unplug your device from the main power supply.
FR - CONSIGNES DE SECURITÉ IMPORTANTES
H. tropoepodi: The, tchukouk, et, tachy, tel, tel, tel, tel, tel, tel, tel, tel, tel, tel, tel, tel, tel, tel, tel, tel, tel, tel, tel, tel, tel, tel, tel, tel, tel, tel, tel, tel, tel, tel, tel, tel, tel, tel, tel, tel, tel, tel, tel, tel, tel, tel, tel, tel, tel, tel, tel, tel, tel, tel,
- My pungoromote more my tuckoud aoc
- I am the best friend of my brother, I love him very much.
27 Mythofetretic Eupaeia atyuvilektae, 146-147 Mythofetretic Eupaeia atyuvilektae, 205-206 KOTY OTM OUKKU 2013
XApOIOaIaOTae ATOAeIOUaTa Ta TApOeOVAe OApTgTA Ka BOpTa. H XApOe KAtAou ToMauo eOeAoou Mauo Sey Eke, OeApOEtAeY L'Autiv Nv ouKoeu KIoVbEuei VpOePcIeavEvNtAOBnUT
Xylopontamine was carried out by using a 100 μL pipette (10 μL) and a 20 μL pipette (20 μL).
Ф导AOTETI TIV DUKEUN OAC AE HEOPC ATOPOIO TAOIIADIA
Mv anoxyapolyeneviy vynovu kruak chur 1000000000000000000000000000000000000000000000000000000000
Myny xynjatotaleye mny ouekneonoc ox ov Ekeu utootei yutma n Hya.
F. atta atyamoteppe Kebbe kivko Nkapeke TnK 10000000000000000000000000000000000000000000000000000
TR - GÜVENLIKLE ILGILÖNEMLI TALIMATLAR
- Chazimzin beslimes balsangica ongoruben onijil- gezilkeliere uoyu olmadir.
- Chazmuzi su reczmig ilkh madan edskii nekishin.
- Chazmuzi su kizhmi arshamatlana vya suyuni yibere kuldaryannan.
- Chazinznin yakina yanic, patalyo veya tehlikeli bir madeve vesne koymavim.
- Sadea chinza brikfte verlen asseusiaru al baglantian kullun. B amac qing ongsimulej deri hueras asseusar kuniannilas chiznau onanlamavacak sekildehaser veribellir.
- Chazimizi sadee ismin 0°C lie 35^ arasinda oldubu dir or batta kumalanu va mefuzaha edin.
-Chazinizi cocuklian erisenyecci bir yerde muhafaza edin. - Chiazinizi sokmeyin ve kendiniz onarmaya calismavin.
- Chizimaz eiger dar bireyame ranu kalmi veya hasar gormusse kullannayin.
- Her türfu elektronikte theläkesige englernéck im chazinizin ana bestemelye an领导班子inis ker.
SR - (RS BA HR ME) - VAZNE MERE BEZBEDNOSTI
- Napajanje aparata mora odovarati originalim providenikarnakerkisiklama.
- Nikad no kori bilaseapan aari kiwi, u vizi strompiema illu kori bilise izovara vore bez vodone prepuosipana
- Ne ostiavlaj zapalne predmete, eksplozine superstanci na opasne predmete u blizni aparata
- Koristike ijsikluvo dodatke i konketore koju si us-poruenu. Upoterebrom svagrokup tipa dokate koju njie previden za tu smvho molezra trojno osleti aparat.
- Koristite i Ivuaţei ajateiISKlujivo u sredniu o kujoi se temperatură crede od' 0°C al'dašil'ce
- Cuvajte Va aparat van dohvata dece.
Nemoite demonstratir aparat i ne pokušavajé da ga.
sam papirovate.
Nemoite koristiti aparat koji je udaren il ostecen. - Das bzie iste agesi svaki rizik od ekleninog urada, iskijukate aparit z ekleninog mreze.
RO - MASURI IMPORTANTE DE SIGURANTÀ
- Alimentare apatularii trebue s corespundca cacterisliciter de origine prevalez initial.
- Nu utilizedi niocodai aparatal in ploiae. In locuri emede sau in appropiere una epie fhus aenias.
- Nu punejic nodicata obsectate infaillamable, substancee infaillamable.
- Su sce abscissa periculicne in propriemc parapatus.
- Utilizati nuiu acomnoscii si concentoarele furnizate.
- Utilizarea oricariul alt tip de ascesori carue nu est prevazul in acsic scop spoale produire deliorarea aparalutii in mod immediabil.
Utilizati pi sipralat aparatal numui Intra-un mediu in care temperature easa coprinsa n 0oC to 35^
Prajñar aparatal astfel incàs su nu lie la indemnāa cooplor. - Nematodiatiapanatui 山 niNecarcaj sIJI reparajumdueneaovostia Insvia.
- Nu utilized aparatal dacà acestà a suferit un soc sau a fost deteriorar.
Pentu a eiva orice risc de electrocutare, deco- necta) aparatul de la alimentarnea principal.
RU -BAKHNE T6eB0AHN NO TEKHKE 6eONACNCTO
- Tintahme annapata Doinko KCOO CETBCT800BtS 3280KDMK APAKKTCHKTHN.
Hinokida e hnoiye yana anmat 63 repemre
Hinokida e hnoiye yana anmat 63 repemre, no bialanixn me
tacn xh n bnns no doenno
He nomoiaté le homin et anapata
The homin et anapata, 358
Anapata with on
Onchus beige du CEA
TlOJIy3eBcTeN ToHko npnIaegMaBM B COMMKTEKNE AKECKCYPAMINs
nepeoxidnKAMN. Icno3082hny ApyrTOy TNYA kHexceCayOB, he NpeCyDmOTPeHNHXH H30TOrBHTENM, MOKET Heo5bATMHO npoeiDy annapat.
Mcnocyls37 anapan x npahre o tolo k B mecte ctemepatoyo 0^ do 35
XaHnIe annapat 8 Mecte, HEDOCTYINOM DIAI DETei.
- 3aapnueaataa 04aBmPb ananpat a camcctotretnhoNPOK83DHTe EPOMOTH.
- 3panepaetcaN noBtO8aTn apamATOn, NOBpEeBnUHmY dApamM NnOBpeKHeHMn
Bo-3696kanabe onochochn 5tnepti4030 anokanea antapat o chOBOHO tectHNO
AR
a aaaaaaaaaaaaaaaaaaaaaaaaaaaaaaaaaaaaaaaaaaaaaaaaaaaaaaaaaaaaaaaaaaaaaaaaaaaaaaaaaaaaaaaaaaaaaaaaaaaaaaaaaaaaaaaaaaaaaaaaaaaaaaaaaaaaaaaaaaaaaaaaaaaaaaaaaaa aa
j jlll 1i j j j j j j j j
g 1000000000000000000000000000000000000000000
yjzjxjxjxjxjxjxjxjxjxjxjxjxjxjxjxjxjxjxjxjxjxjxjxjxjxjxjxjxjxjxjxjxjxjxjxjxjxjxjxjxjxj
y
j j k k k k k k k k k k k k k k k k k k k k k k k k k k k k k k k k k k k k k k k k k k k k k k k k k k k k k k k k k k k
j,j,j,j,j,j,j,j,j,j,j,j,j,j,j,j,j,j,j,j,j,j,j,j,j,j,j,j,j,j,j,j
125b51,10a1c1LaaSlae
aaiylll ailll aaii l
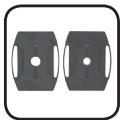
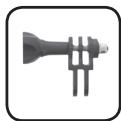
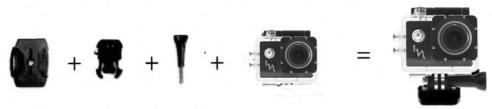
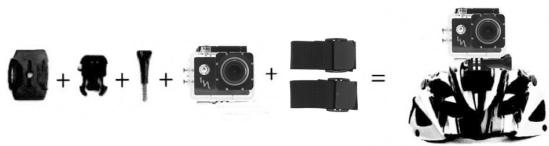
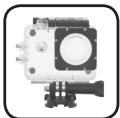
Accessoires
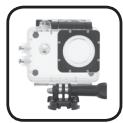
Boitier étanche
Mode configuration (Setup)
FR

SETUP
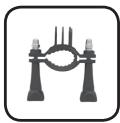
Tubular camera mount for bicycle
Vertical surface buckle mount
Buckle
Flat adhesive mounts
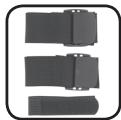
Straps


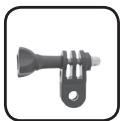
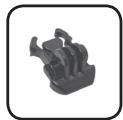
Mounting system
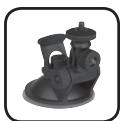
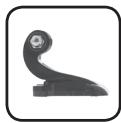
Suction cup
Examples

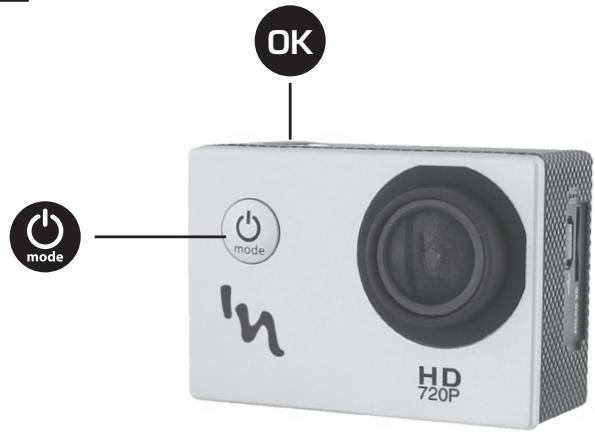
Features of the Camera (front)
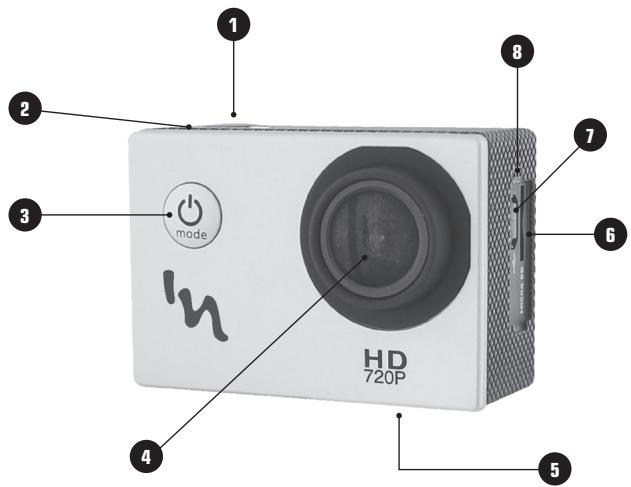
1 - Record button / OK button
2 - Functioning indicator light
3 - On / off button / Mode selector dial
4-Lens
5-Battery
6 - Memory card slot
7 - Micro USB port
8-Microphone
Features of the Camera (back)
EN
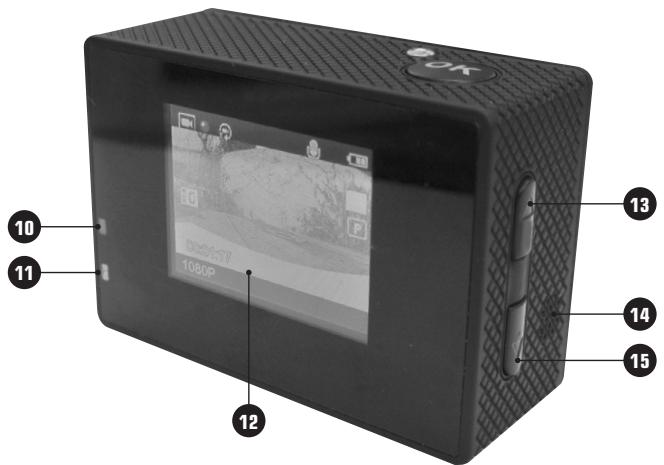
10 - Battery indicator light
11 - Functioning indicator light
12 - Screen
13 - Top
14 - Loudspeaker
15 - Bottom
25
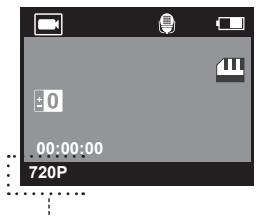
LCD status screen of the camera
The LCD displays the following information regarding the modes and settings:
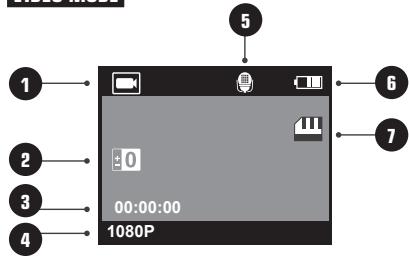
VIDEO MODE
1- Camera mode
2- Exposure
3- Remaining recording capacity
4- Resolution in thousands of pixels
5-Microphone
6-Battery status
7-Micro SD Card OK
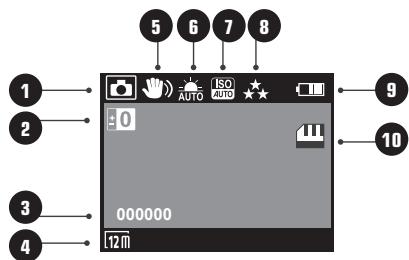
PHOTO MODE
1- Photo Mode
2- Exposure
3- Remaining capacity of shot
4- Resolution in thousands of pixels
5-Stabilizer
6-White balance
7-ISO standard
8-Quality
9-Battery status
10-Micro SD Card OK
PLAYBACK MODE
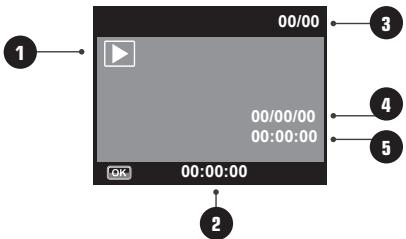
1- Video playback mode
2-Duration of the video sequence
3- Video sequence number
4- Date of the video sequence
5-Time of the video sequence
SETUP MODE
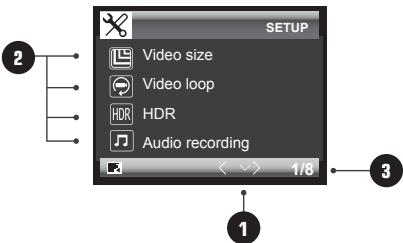
1- List of settings
2- Different settings
3- Indication of the settings page
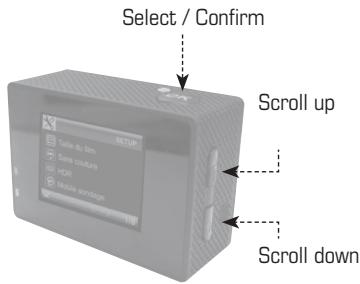
How to scroll?
With buttons 13 and 14
How to validate?
With the OK button
How to return to the previous menu?
button
Basic principles
TO START
Before using your Camera « Adrenalin » for the first time :
Insert a microSD, microSDHCTM or microSDXCTM card into the slot of the card with the label facing the front. We recommend using the card of Class 10 or higher speed.
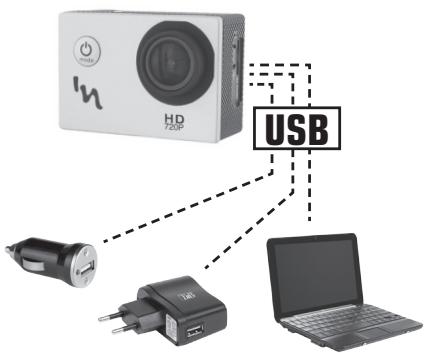
Charge the battery. The lithium-ion battery comes partially charged.
To charge it, connect the USB cable that is provided for this purpose to the camera and the other end of the cable to a power supply such as a computer or a USB charger.
To maximise your battery life, operate a full charge before the first use.
To charge the battery :
- Connect the camera to a computer or a source of USB power supply by using 1 micro USB / USB cable.
- The red battery indicator light stays on when the battery is charging.
- The battery indicator light turns off when the battery is fully charged.
Basic principles
EN
ON AND OFF
To turn on the device :
Press and release the pressure. A home screen lights up, accompanied by an audible indicator.
To turn off the device :
Press for two seconds and release the pressure. The home screen is turned off, accompanied by an audible indicator.
Basic principles
OVERVIEW
Your camera « Adrenalin » offers several features.
To switch from one mode to another, short press on

The modes are in the following order :
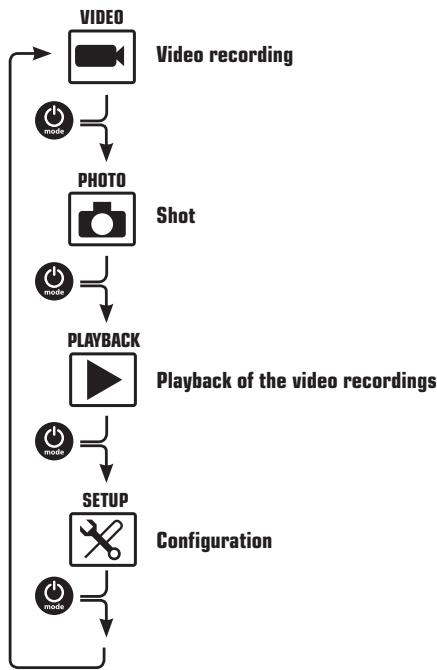
VIDEO mode
EN

VIDEO
To record a video, make sure that the camera is in video mode.
If the Video icon is not displayed on the LCD screen of your camera, press multiple times until it appears.
To start recording :
Press OK and release the pressure. The camera emits a beep and the red and green status indicator lights blink during the recording, a red dot also appears on the LCD screen.
To stop recording :
Press OK and release the pressure. The camera emits a beep and the red and green status indicator lights stay on, but do not blink, the recording is then interrupted.
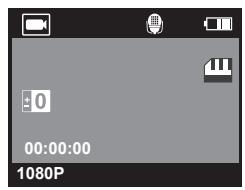
VIDEO mode display Without recording (no red dot)
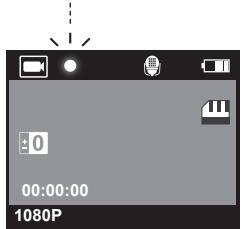
VIDEO mode display During recording (appearance of a blinking red dot)
31
You can modify the size of the display format
Setup > Film size > 1080p or 720p

Film size
Full HD - 1080p
Film size
HD-720p

Shot Mode (Photo)

PHOTO
To take a Photo, make sure that the camera is in Photo mode. If the Photo icon is not displayed on the LCD screen of your camera, press multiple times until it appears.
To take a photo :
Press OK and release the pressure. The camera emits a beep, the red status indicator light blinks for each captured shot.
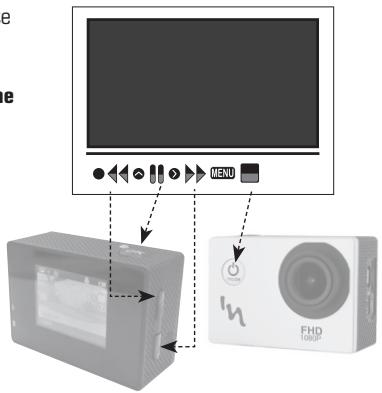
Playback mode
EN

PLAYBACK
To view the videos and photos, make sure that the camera is in Playback mode.
If the Playback icon is not displayed on the LCD screen of your camera, press ** multiples times until it appears.
To read a sequence :
Press OK and release the pressure. The camera will start the playback of the selected file
During the playback of a sequence, you can accelerate the reading, go back, pause or stop.
The opposite diagram shows you the connections of the buttons to be activated for the choice of your actions.
(P.S: The OK button has the double function «Playback» and «Pause»)
Configuration mode (Setup)

SETUP
To access the list of the different possible configuration options, press multiple times until the settings page appears.
Scroll through the options, select, and activate the ones that you want.
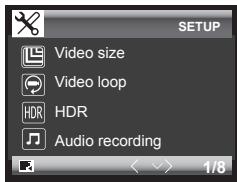

Date stamp

Resolution

Exposure
If you want to exit the configuration menu, press on the button.
EN
Specifications
| LCD Screen | 1.5" |
| Lens | f/2.4mm Glass hemispherical lens 4 elements / Wide angle 120° |
| Languages | English, French, Spanish, Portuguese |
| Video Resolutions | 1080P (1920*1080) 25FPS 720P (1280*720) 30FPS |
| Video Format | AVI |
| Video compression format | H.264 |
| Resolution of Photos | 3MP |
| Memory | Micro SD Card up to 32 GB (not included) |
| Photo modes | Trigger : single shot |
| Frame frequency | 50Hz / 60Hz |
| USB interface | USB2.0 |
| Power supply | 5V 1A |
| Battery capacity | 900mAh |
| Recording time | 720p/ about 1hour and 30 minutes |
| Charging time | About 1hour and 50 minutes |
| Operating System | Windows XP/Vista or Above/Win7/Mac OS |
| Dimension of the camera | 59.27*41.13*29.28 |
Note : the specifications are subject to change as part of product improvement.
Notice to users:
EN
The device delivers exceptional images and videos. Therefore, only the micro SD cards of minimum class 10 are accepted by the device
Prevention of damage due to the water in your camera
The rubber seal that covers the inside of the housing forms a waterproof barrier that protects your sport camera in wet conditions and under the water. Make sure that the rubber seal remains clean. A single hair or a grain of sand can cause a leak. After each use in the salt water, you must rinse the outside of the housing with some fresh water and dry it. Otherwise, the pivot may rust and the salt accumulates in the seal, which can cause some failures. To clean the seal, rinse it in the fresh water and shake it dry (wiping with a cloth may leave fluff and compromise the seal). Reinstall the seal into the slot of the back door of the housing.
CAUTION: If you do not follow these precautions whenever you use your sport camera, the leaks can damage or destroy your camera. The warranty does not cover the damage caused by user error.
Accesorios
ES
Caja hermética
ENGLISH: This symbol indicates that this product conforms to RoHS specifications, which restricts the level of substances known to be dangerous and harmful to the environment, in all electrical and electronic devices.
EXCUS: WARNING: You should not dispose of this device with your household waste. A system of selective collection has been set up by the local authorities for this type of product and you should find out where such sites are located from your city/town hall. In effect, electric and electronic products may contain dangerous substances that have harmful effects on the environment or human health and must be recycled. The symbol opposite indicates that electrical and electronic equipment is subject to selective collection; it shows a waste bin on wheels with a cross through it.
Customer satisfaction is important to us. You may contact us at info@t-nb.com. Maintenance, repair or product information, consult our website: www.t-nb.com.
FR-BESOIN D'AIDE?
Jus Jusagallaljge Jusgallal jay
jww.1-t-nb.com: 2
.info@t-nb.com: 念 2SNJLg


RoHS LSDEEE

C