
LP 3.8 - Battery charger AEG - Free user manual and instructions
Find the device manual for free LP 3.8 AEG in PDF.


| Product Type | Battery Charger |
| Brand | AEG |
| Model | LP 3.8 |
| Dimensions (approx.) | 100 x 70 x 30 mm |
| Weight (approx.) | 150 g |
| Power Supply | 220-240 V ~ 50 Hz, mains adapter |
| Output Voltage | 1.2 V per battery (AA/AAA) |
| Number of Slots | 4 (for AA/AAA batteries) |
| Charge Current | 200-300 mA (estimated) |
| Main Functions | Charging of NiMH/NiCd batteries, end-of-charge detection, overcharge and short-circuit protection |
| LED Indicators | Indicator light for each slot: charging/complete |
| Maintenance and Cleaning | Unplug before cleaning; use a dry, soft cloth |
| Safety | Automatic shutdown, overvoltage and reverse polarity protection |
| Operating Temperature | 0-40 °C |
| Compatible Batteries | AA (LR6) and AAA (LR03) rechargeable NiMH/NiCd |
Frequently Asked Questions - LP 3.8 AEG
User questions about LP 3.8 AEG
0 question about this device. Answer the ones you know or ask your own.
Ask a new question about this device
Download the instructions for your Battery charger in PDF format for free! Find your manual LP 3.8 - AEG and take your electronic device back in hand. On this page are published all the documents necessary for the use of your device. LP 3.8 by AEG.
USER MANUAL LP 3.8 AEG
natural_image
Black AEG electric vehicle charging device with red control buttons and cable (no visible text or symbols beyond branding)INHALT
Einleitung 4
Lieferumfang 4
Sicherheit 4
line
| Condition | Voltage (V) | Current (A) | |---|---|---| | Diagnose und Abhilfe | 10.5 | 7.5 | | Lapung mit hoher Rate | 3.8 | 9.5 | | Lapung mit mittelhoher Rate | 3.0 | 9.5 | | Absorption | 0.8 | 9.5 | | Puffer-ladung | 100 mA | 9.5 | | Instandhaltungs-ladung | 0.8 | 9.5 | | Hauptladung | 14.1 | 11.5 | | Transitions: Dispersed by Impuls; Dispersed by Adhilfe; Dispersed by Abhilfe; Impuls; Transitions by Instandhaltungs-ladung; Transitions by Instandhaltungs-ladung; Transitions by Puffer-ladung; Transitions by Puffer-ladung; Transitions by Umpuls; Transitions by Umpuls; Transitions by Umpuls; Transitions by Umpuls; Transitions by Umpuls; Transitions by Umpuls; Transitions by Umpuls; Transitions by Umpuls; Transitions by Umpuls; Transitions by Umpuls; Transitions by Umpuls; Transitions by Umpuls; Transitions by Umpuls; Transitions by Umpuls; Transitions by Umpuls; transitions by Umpuls; transitions by Umpuls; transitions by Umpuls; transitions by Umpuls; transitions by Umpuls; transitions by Umpuls; transitions by Umpuls; transitions by Umpuls; transitions by Umpuls; transitions by Umpuls; transitions by Umpuls; transitions by Umpuls; transitions by Umpuls; transitions by Umpuls; transitions to the right of the chart: Transitions are labeled as 'Hauptladung' (appearing twice) and 'Instandhaltungs-ladung' (appearing twice). The diagram shows a stepwise increase in voltage with each subsequent measurement point.General safety guidelines 14
Safety notices for chargers 14
Product description. 16
Intended use 16
Performance characteristics ..... 16
Product overview 16
Technical data 17
Fuse 17
Indications / Charging modes ..... 17
Connecting 18
Connecting a battery that is permanently connected to a vehicle 18
Connect a battery that is not connected to a vehicle 18
Operation 18
Prior to charging a battery 18
Charging procedure....18
Recovering a used battery 19
Charging phases 19
Charging mode and time 20
Safety functions 20
Cleaning, care and service 21
Service 21
Disposal 21
Service 21
INTRODUCTION

Always follow these instructions when using this product.
Include all documentation when transferring
the product to other users.
Images may slightly deviate from the actual product. Subject to change in the interest of technical advances. Decorations not included.
Contents
Be sure to verify contents immediately upon opening the product. Check the product and all parts for damage. Do not use a defective product or parts.
1 Charger
■Terminal cable with terminal clamps
+ (positive, red) and - (negative, black)
■Terminal cable with ring terminals
+ (positive, red) and - (negative, black)
1 Operating manual
SAFETY
General Safety Guidelines
Read all safety guidelines and instructions. Non-compliance with safety guidelines and instructions can cause electric shock, fire and / or serious injury. Keep all safety guidelines and instructions for future reference.

Warning!

Life-threatening danger to infants and children!
Never leave children unsupervised with the
packing material as this can cause suffocation.
This device is not intended for use by persons (including children) with reduced physical, sensory or mental abilities or who lack experience and / or knowledge, unless they are supervised by a person who is responsible for their safety or unless they receive instructions from this person on how the equipment is to be used. Children must be supervised in order to ensure that they do not play with the device.
The manufacturer is not responsible for damages caused by:
■Improper connection and / or operation.
■Exterior force, damage to the device and / or damage to parts of the device caused by mechanical impact or overload.
■Any type of modification to the device.
■Use of the device for purposes that are not described in this instruction manual.
■Consequential damages caused by non-intended and / or improper use, and / or defective batteries.
■Moisture and / or insufficient ventilation.
■The unauthorised opening of the device. This will void the guarantee.
Safety notices for chargers
- Keep the device away from children. Children do not understand or perceive possible risks when handling electrical devices. Children must be supervised to ensure that they do not play with the charger.
■Ensure that the device is always stored in a safe place. Do no expose the device to rain or wet conditions. Avoid pouring or dripping water or other liquids over it. If water penetrates electrical devices, the risk of electric shock increases.
- Ensure that all plugs and cables are free of moisture. Never connect the device to the mains with wet or moist hands.
- Do not touch the battery poles, the battery clamps or the ring connectors while the device is connected to the mains.
■Remove all device cables from the battery before attempting to drive your vehicle.
■Always disconnect the device from the mains when you are not using it.
■Always disconnect the device by pulling out the power plug, never by unclamping a connecting cable.
If the cables need to be run through walls with sharp edges, for example metal sheets, use tubes or cable ducts to prevent damage to the cables. Lay electrical cables in such a way that it is not possible to stumble over them, thereby preventing damage.
Never place the device over or close to the battery to be charged. Gases from the battery make the charger corrode and damage it. Set up the charger as far away from the battery as the direct current cable allows.
■Do not cover the device while charging.
Never pull the cable or use it to carry the device. Damaged cables increase the risk of electric shock.
- Only operate the device if all cables and the casing are intact.
■If the supplied cables are damaged they must be replaced by qualified specialists to prevent hazards.
Never operate the device if it has been dropped or damaged in any other way. For inspection and repair, take it to a qualified electrician.
- All maintenance work must be conducted by qualified electricians.
Never disassemble the device. In correct assembly may cause electric shock or fire.
Never short circuit the device or connect the inlets and outlets of the device using metal objects. Only use the supplied connecting cables to connect the device to a battery.
If an extension cable is used, the cable diameter must be sufficient for the power required by the device.
- Check the input voltage (220 - 240 V AC) and ensure that it corresponds to the mains voltage; otherwise the device may be damaged.
■Always make sure that the device is disconnected from the mains when you connect it and disconnect it to a battery.
■Always connect the positive clamp (red) to the positive battery pole (not connected to the chassis of the car, marked with P or +).
■Then connect the negative clamp (black) to the car chassis, away from the battery casing of the car, away from the battery and the fuel line. The charger can then be connected to a suitable power socket.
■After charging, first disconnect the charger from the power supply. Then, in this sequence, disconnect the cable to the car chassis (-), and then the battery connection (+).
- Do not look at the battery when connecting the charger to the power supply.
Warning!
- Never try to charge damaged, non-rechargeable or frozen batteries.
This charger is only suitable for the listed batteries (maintenance-free, sealed, lead-acid batteries (SLA) or gel batteries) and may not be used to charge non-rechargeable, NiCd or other types of batteries. Do not use it for any other purposes. - Do not use the charger to charge dry cell batteries. These may explode and cause injury to persons or material damage to property.
- Do not use the device as a power supply for an electrical low voltage system.
- Ensure that you have read and understood the instruction manual and all safety instructions that were supplied with the battery to be charged or the vehicle.
■Avoid all contact with battery electrolyte acid. If your skin comes into contact with battery fluid, rinse it thoroughly under running water and contact your doctor. Should your eyes come into contact with battery acid, rinse them with running water for at least five minutes and contact your doctor.
■Always pay attention to the correct polarity if you connect the device to a battery.
■This charger was not designed to supply RVs with power.
■This charger was not designed to be installed as an accessory in the vehicle.
Warning!
■Explosion HAZARD! When charging, bubbles may form due to the release of gas. This gas is inflammable and explosive!
Never charge the battery close to an open fire or in places where sparks may occur.
■Always ensure sufficient ventilation.
- Only connect and disconnect the battery connecting cables when the charger is disconnected from the mains.
PRODUCT DESCRIPTION
Intended use
The charger is intended for charging, float charging and regenerating 12 V direct current batteries (only rechargeable, maintenance-free, sealed batteries or lead-acid batteries (SLA)), as they are installed in cars, ships, trucks and other vehicles. This includes different types of lead-acid:
■wet cell batteries / sealed leadacid batteries (liquid electrolyte)
-gel batteries (gel-like electrolyte)
■AGM batteries (electrolyte in fibreglass fleece)
■maintenance-free batteries and VRLA batteries (lead-acid batteries with overpressure valve)
The charger can be connected directly to the battery using the clamps. The charger is not designed to charge any batteries other than those stated above. It is exclusively certified for private use. Any other use or modification to the device is considered as non intended and bears considerable dangers. The manufacturer accepts no responsibility for any damages arising from non-intended use.
Performance characteristics
■With micro-processor
- Charger for all common 12 V vehicle batteries
■3800 mA maximum charging capacity
■Intelligent 5-level charge cycle (IIIUolUp characteristic)
■Not necessary to uninstall the battery
■Fully automated charging, diagnosis, recovery and maintenance function
■With comfort connection
■deal for seasonal vehicles such as convertibles or motorcycles
■Safe and easy application
Product Overview
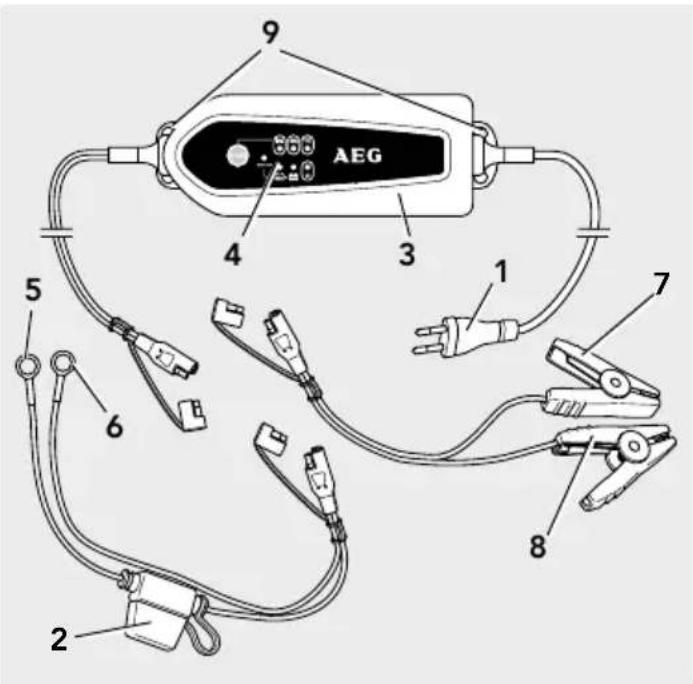
- Power plug
- Fuse
- Battery charger
- Control and display panel
-
Terminal cable (+) (red) with ring terminal
-
Terminal cable (-) (black) with ring terminal
- Terminal cable (+) with clamp (red)
- Terminal cable (-) with clamp (black)
- Mounting apertures
Technical data
| Maximum charging capacity | 3800 mA |
| Charging characteristic | 5-level (IIIUolUp characteristic) |
| For battery types | Gel, AGM, lead acid, maintenance-free and low-maintenance batteries |
| Battery voltage 12 V | |
| Operating voltage | 230 V AC |
| Recommended for battery capacity | 1.2 - 120 Ah |
| Display LED (charging progress etc.) | |
| Safety features | Overloading, short circuit, overheating and voltage reversal protection as well as anti-spark and electronic-proof (no damage of sensitive on-board electronics) |
Fuse
The (+) pole connector cable (red) with a ring connector is secured with a flat plug-in fuse (10 A). It is activated in the case of short circuits or voltage peaks and must be replaced subsequently.
Change fuse:
Attention! Do not install a stronger fuse. Otherwise the electronics could be damaged.
- Open the protective casing
- Remove the defective flat plug-in fuse
- Insert a new flat plug-in fuse of the same size (10 A) into the slot
- Close the protective casing once again
INDICATIONS / CHARGING MODES
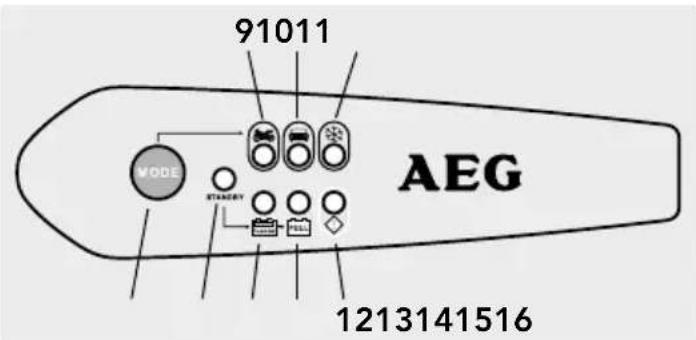
| 9 Cha |  | mode 14.4 V / 0.8 A maxSuitable for chargingsmall batteries < 14 Ah |
| 10 |  | Charging mode 14.4 V / 3.8 A maxSuitable for charging large batteries innormal conditions (normally used forWET, MF and most GEL batteries). |
| 11 |  | Charging mode 14.7 V / 3.8 A maxSuitable for charging large batteriesin sub-zero temperatures and severalAGM batteries with capacity of morethan 14 Ah. |
| 12 |  | Fault!Incorrect polarity |
| 13 |  | Fully charged |
| 14 |  | Charging in progress |
| 15 | STANDBY | Before charging mode selection andin case of open circuit, short circuit orreverse connection. |
| 16 |  | „Mode“ selection button |
CONNECTING
Warning!
Danger of electric shock! Always ensure that the charger is not connected to the 230 V mains socket when you connect it to a battery.
Ensure that the area around the battery is well ventilated.
- Connect the required pole connector cable (with ring connectors or terminals) to the plug on the charger.
Connecting a battery that is permanently connected to a vehicle
- Check the polarity of the battery. Verify which pole is connected to the vehicle chassis for earthing. Usually this is the negative pole.
■Mount the charger with the apertures (9) for permanent installation.
Negatively earthed battery:
- Connect the red (+) pole connector cable to the positive pole of the battery.
- Connect the black (-) pole connector cable to the vehicle chassis. Warning! The cable should not be in direct contact with the battery or the fuel line!
Positively earthed battery:
- Connect the black (-) pole connector cable to the positive pole of the battery.
- Connect the red (+) pole connector cable to the vehicle chassis. Warning! The cable should not be in direct contact with the battery or the fuel line.
Connect a battery that is not connected to a vehicle
- Connect the red (+) pole connector cable to the positive pole of the battery.
- Connect the black (-) pole connector cable to the negative pole of the battery.
OPERATION
Prior to charging a battery
If the battery needs to be removed from the vehicle prior to charging, always remove the ground connection from the battery first. Also, ensure that all other electrical loads in the vehicle are turned off.
■Ensure there is sufficient ventilation to allow the escape of poisonous vapours or gases.
■Ensure that the battery poles are clean. If the battery has a removable ventilation cap, fill every battery cell with distilled water up to the level recommended by the manufacturer. Do not overfill the cells.
If the battery has no caps, refer to the manufacturer's recommendations regarding charging and charging speed.
Charging procedure
- Connect the charger to the battery as described above.
- Connect the plug (1) to a power socket.
■The charger automatically starts in STANDBY mode.
In STANDBY mode the charger is automatically resets to the basic settings.
- Select the appropriate charging mode by pressing the MODE key (16) until the LED for the corresponding charging mode (9, 10 or 11) lights up (see "Charging mode and charging time").
■By repeatedly pressing the MODE key (16) the charging mode switches to the next operating mode and starts respectively.
- Charging will start directly in the selected mode. The CHARGE LED (14) will light up.
■The CHARGE LED (14) is on during the whole charging procedure and switches off once charging is completed.
■The battery is fully charged when the FULL LED (13) lights up and the CHARGE LED (14) switches off.
■As soon as the FULL LED (13) lights up, buffer charging will start in order to maintain the power and protect the battery (see CHARGING PHASES).
Recovering a used battery
■The charger can save most used batteries with voltages up to at least 7.5 ± 0.5 V
■Before starting the charging procedure the charger automatically identifies the battery voltage
■Thanks to the safety circuit the charger does not start charging if the voltage is below 7.5 ± 0.5 V
In the voltage area of 7.5 ± 0.5 V to 10.5 ± 0.5 V the charger initiates an impulse charging procedure
■If the voltage increases to more than 10.5 ± 0.5 V, the charger switches to the previously selected normal mode for faster and safer charging.
CHARGING PHASES
The charger performs a fully automated 5-level charge cycle.

line
| Time Segment | Voltage (V) | | ------------ | ----------- | | Main charging | 14.1 | | below 12.8 | 14.4 | | Impulse | 10.5 | | Charging with a high rate | 3.8 | | Charging with an intermediate rate | 3.0 | | Absorption | 0.8 | | Buffer charging 100 mA | - | | Maintenance charging 0.8 A | - |Step 1: Diagnosis and corrective actions
Diagnosis function during which the battery status is automatically checked and the voltage identified.
Step 2: Main charging
Charging to 80 % of power:
- The charger provides the battery with a constant charging capacity of max. 3.8 A until the terminal voltage reaches a value of 12.8 V.
- The charger provides the battery with a constant charging capacity of max. 3.0 A until the terminal voltage reaches a value of 14.1 V. By reducing the maximum available charging capacity, the heating of the battery is minimised. This leads to a reduction of gas build-up within the battery.
Step 3: Absorption
The charger provides the battery with a constant charging capacity of max. 0.8 A until the terminal voltage has reached a value of 14.4 V. The battery is fully charged. Subsequently, the charger automatically switches to the buffer charging phase.
Step 4: Buffer charging
Buffer charging starts after the battery is completely charged (LED FULL (13) lights up).
In this mode the connected battery is constantly charged with approx. 100 mA power. As soon as the terminal voltage of the battery monitored by the charger falls below 12.8 V, maintenance charging is automatically activated.
Step 5: Maintenance charging
In this mode the connected battery is constantly charged with approx. 800 mA power until the terminal voltage reaches 14.4 V. After reaching this terminal voltage the charger will automatically switch back to buffer charging.
This procedure continues cyclically for as long as possible, depending on the monitored terminal voltage and is not terminated until the charger is disconnected. Due to this change of the charge cycle the battery is kept at the highest possible charging level.
CHARGING MODE AND TIME
| Battery size (Ah) | Mode | For about 80% charge (hours) | |
| 2 |  | small batteries < 14.4 A | 2 |
| 8 | 8 | ||
| 20 |  | large batteries, normal conditions | 4.5 |
| 60 14 | |||
| 100 23 |  | large batteries, temperatures below 0 °C | |
| 120 28 | |||
SAFETY FUNCTIONS
■The charge is protected from user error and prevents damage to the connected battery.
■No risk of overcharging!
■The charger will not damage the electronics in your vehicle.
| Protection Description | |
| Abnormal Operation | To avoid damage to charger and battery, the charger will turn off its own electronic system and will immediately reset the system to basic settings in the case of       |
| Protection Description | |
| Overheat The | charger is protected by NTC(negative temperature coefficient)control to protect itself from damage.During the charging process, if the charger becomes too hot or due to high ambient temperature, the power output is automatically reduced.The charger continues to trickle charge and automatically starts increasing power when the temperature drops. |
| MCU Control | Fully controlled by internal Micro-Computer-Unit (MCU), which assures a faster, powerful, reliable and smarter charging process.Plugged in, the charger detects the state of charge of the battery.initiates charging process. |
| Spark To eliminate the possibility of sparks,the charger will not begin operation upon connection to the battery, unless charging mode has been selected.Housing protection dust and splash proof (IP65) double insulated | |
CLEANING, CARE AND SERVICE
Your charger can be kept functional for years with minimum care.
■After the charging process is completed, clean the clamps. To prevent corrosion, wipe off any battery fluid that has come into contact with the clamps.
- Roll up the cables properly when you store the charger. This helps to prevent damage to the cables and the charger.
- Occasional cleaning of the charger casing with a soft cloth keeps the surface shiny and helps to prevent corrosion.
■Store the charger in a clean and dry location.
Caution!
Only qualified technical personnel should change the plug or the connecting cables.
This will guarantee the safety of the device is maintained.
If the product is no longer suitable for use dispose of it in an environmentally friendly manner in accordance with your local ordinances.
Disposal

Do not dispose of packaging or the product through your household waste! The product and packaging are made from recyclable
materials (plastics, metals, paper).
If the product is no longer suitable for use dispose of it in an environmentally friendly manner in accordance with your local ordinances.
Service
Should you have any questions regarding commissioning or operating in spite of studying these operating instructions, or if a problem should occur against all expectations, please get in contact with your specialist supplier.
CONTENU
Introduction 24
Phases de charge....29
Protection Description
www.aeg-automotive.com
AEG is a registered trademark used under license from AB Electrolux (publ)



- INHALT
- INTRODUCTION
- Contents
- SAFETY
- General Safety Guidelines
- Warning!
- Safety notices for chargers
- PRODUCT DESCRIPTION
- Intended use
- Performance characteristics
- Fuse
- INDICATIONS / CHARGING MODES
- CONNECTING
- Connecting a battery that is permanently connected to a vehicle
- Connect a battery that is not connected to a vehicle
- OPERATION
- Prior to charging a battery
- Charging procedure
- Recovering a used battery
- CHARGING PHASES
- Step 1: Diagnosis and corrective actions
- Step 2: Main charging
- Step 3: Absorption
- Step 4: Buffer charging
- Step 5: Maintenance charging
- CHARGING MODE AND TIME
- SAFETY FUNCTIONS
- CLEANING, CARE AND SERVICE
- Caution!
- Disposal
- Service
- CONTENU
Brand : AEG
Model : LP 3.8
Category : Battery charger