
Smyle Avorio - Heating ARGO - Free user manual and instructions
Find the device manual for free Smyle Avorio ARGO in PDF.


| Product type | Electric space heater |
| Model | Smyle Avorio |
| Brand | ARGO |
| Category | Heating |
| Dimensions (L x W x H) | 50 x 30 x 70 cm |
| Weight | 5 kg |
| Power supply | 220-240 V ~ 50 Hz |
| Maximum power | 2000 W |
| Heating type | Convection |
| Temperature adjustment | Adjustable thermostat |
| Power levels | 2 levels + standby |
| Safety | Anti-tip, overheat protection |
| Material | Steel and plastic |
| Color | Avorio (ivory) |
| Control | Touch panel and remote control |
| Timer | 24h programmable |
| Energy class | B |
| Maintenance and cleaning | Clean with a soft, dry cloth |
| Spare parts and repairability | Fuse, switch available; repairability index 7/10 |
Frequently Asked Questions - Smyle Avorio ARGO
User questions about Smyle Avorio ARGO
0 question about this device. Answer the ones you know or ask your own.
Ask a new question about this device
Download the instructions for your Heating in PDF format for free! Find your manual Smyle Avorio - ARGO and take your electronic device back in hand. On this page are published all the documents necessary for the use of your device. Smyle Avorio by ARGO.
USER MANUAL Smyle Avorio ARGO
Environment and recycling
Please help us to protect the environment by disposing of the packaging in accordance with the national
regulations for waste processing.
Recycling of obsolete appliances
Appliances with this label must not be disposed off with the general waste. They must be collected separately and disposed off according to local regulations.
-E-
natural_image
Exterior view of a portable electric heater with a logo (argo) above it, showing its grille and control panel (no text-heavy elements)Smyle
- I - TERMOVENTILATORE
- NL - WARMELUCHTBLAZER
- FR - RADIATEUR SOUFFLANT
- D - HEIZLÜFTER
- GB - FAN HEATER
-E-CALEFACTOR

Si prega di conservare con cura questo libretto di istruzioni per future consultazioni.
Bewaar deze gebruiksaanwijzing zorgvuldig voor toekomstig gebruik.
□ Conserver cette notice pour toute consultation ultérieure.
Es wird gebeten, diese Gebrauchsanleitung für ein zukünftiges Nachschlagen sorgfältig aufzubewahren.
☐ Please retain these instructions in a safe place for future reference.
☐ Conservar las instruccione de uso.
-- I -- ISTRUZIONI D'USO
6.1 ALGEMENE BESCHRIJVING
4. Installation murale
Before operating the heater, please read these instructions thoroughly to avoid damage and hazardous situations. Any use of this heater other than that stipulated in this instruction manual may cause fire, electric shock or injury, and voids all warranties.
Warranty does not apply to any defect, deterioration, loss, injury or damage caused by, or as a result of, the misuse or abuse of this heater. The rights dictated by State law are not prejudiced. None of the terms of this warranty are to be taken as excluding any conditions or warranties implied by State law, which cannot be excluded or modified.
1. Your product
The product is sold without accessories.
☐ Depending on the version, a bracket for wall mounting may be present on the back of the product. To fix it to the wall we suggest you use 2 6 x 30mm nylon rawplugs with 2 3.5 x 25mm cross head screws (not included).
Contact your dealer immediately if the product is damaged or the bracket missing.
2. For your own safety
☐ This heater provides an additional source of heating, and must solely be used for this purpose.
☐ Make sure that your supply rating corresponds to what is specified on the rating plate, e.g. 230V AC, 50Hz.
☐ Don't leave your home while the appliance is in operation: always ensure that the switch is on the OFF position (the "Off" indication is on the upper left hand side of the display).
Switch off the product and unplug it if you are not going to use it for long periods;
While in operation, place the heater in a safe position:
- at least 1.0m away from inflammable objects or furniture;
- if wall mounted, not fixed to synthetic or plastic surfaces;
- leaving the air outlets free: 1m free space in front of the heater and 50cm free space behind it;
Do not let animals or children touch or play with the appliance. Carefull The air outlet grille becomes very hot during operation (over 80°C/176°F).
WARNING: in order to avoid overheating, never cover the heater. Do not hang anything on the heater and do not cover it while it's working. This is clearly written on the product or shown by the symbol

Do not use the heater in the presence of explosive gases, solvent or varnish vapors or, in any case, inflammable vapors/cases.
☐ If the cable is damaged and you have to change it, do not do the job yourself! Take the product to an authorized repair center as the repair must be carried out by a specialist, in order to avoid any risk of damage.
☐ Do not use this heater close to showers, baths, water basins or swimming pools.
☐ Do not clean the product while plugged in, and never immerse it in water.
Do not wind the cable around the device when it is in operation, or pull it across sharp edges. The appliance must be positioned so that the plug is always accessible.
3. Safe positioning
☐ Only ever use the appliance in an upright position;
☐ When portable, always maintain a distance of at least 1m between the product and any inflammable object/surface.
☐ When the product is wall mounted, make sure that the minimum distances are respected: 50cm from side walls/furniture and ceiling.
As the heater is a class 2 product, earth connection is not required.
☐ The heater has an IPX1 protection level against water and, if wall mounted may be installed in bathrooms. In any case you have to respect the national installation standard and safety requirements valid in your State.
☐ Never install/use this appliance in the Zones 0, 1 or 2 illustrated in the following picture:
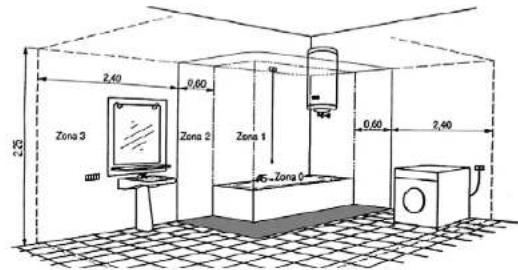
On no account must any switch / button be accessible by people in the shower or in the bathtub.
4. Wall mounting
☐ Drill the holes on the wall, insert the raw/plugs and fix the wall brackets firmly. Note that the distance between the two holes is 60mm.
Hang the heater on the wall bracket.
IMPORTANT FOR FRANCE:
If the product is wall mounted, the electrical connection must be made according to the enclosed drawing, cutting the cable and using a connection block between the product cable and the electricity supply. Phase = brown

In humid rooms, bathrooms or kitchens, this connection block must be installed at least 25 cm from the floor. The electrical connection must also include the use of a 2-pole switch with a contact opening distance of at least 3 mm.
5. Cable storage
While the product is not in use, you can store the cable pushing it into the base of the product. Note that while the product is in operation, the cable must always be completely pulled out.
6. Use of the heater
6.1 GENERAL DESCRIPTION
The electronic circuit provides the following functions:
24h time control;
Electronic thermostat measurement for greater comfort;
Power control management.
6.2 DISPLAY
| Off Man Auto | 38°C |
| 88:88 | 38°C |
Current time HH:MM
Room temperature *
XX c
Desired temperature
XX aC
Power mode Off Man Auto
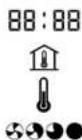
* Careful: the temperature measuring equipment is optimized to measure the room temperature while the product is functioning, is heating the air and is positioned on the floor. Depending on the product's positioning and on the presence of other objects/furniture:
- when the product is turned off, the display may show a slightly higher temperature. This is not a fault and the temperature sensor reading will soon correct itself.
- the display may show a higher temperature than the actual room temperature if the product is wall mounted, due to the overheated air present between the product and the wall;
- the display may show a lower temperature than the actual room temperature if the product is switched off or if the cold air function is in operation, due to the absence of a flow of hot air on the basis of which the system is optimized.
Laboratory tests confirm that the selected parameters ensure the utmost user comfort.
6.3 MEMBRANE SWITCHES

6.4 FUNCTIONING
MAIN SWITCH
The button bearing the symbol "0" controls both the product and the electronic circuit. If you switch the product off using this button, you will lose all the data previously set. TO SWITCH ON THE PRODUCT PRESS THE BUTTON AND WAIT APPROX. 3 SECONDS BEFORE THE DISPLAY STARTS UP.
TIME SETTING
When the product is connected to the power supply and switched on:
the display shows a flashing 00:00 and the time must be set by using the "h" and "m" buttons and the TIME button to confirm:
the desired temperature is set at a default value of 23°C:
the room temperature is registered by the product:
the green led on the "▽" button switches on (manual mode);
□ the display shows the "Off" status in the upper left hand corner.
" 🔊" MANUAL MODE
This button has to be used for entering the manual mode.
□ When pressed, the incorporated led switches on and the Ⓗ/ ⊗ led goes off.
By pressing the + - power button, it is possible to select the power. See the power selection section for further information.
In manual mode, the functioning of the heater depends on the "power" setting defined by the user and the temperature desired (* - 1 + 6) (of course the heater only works if the desired temp is higher than the room temp!). The cold air function is INDEPENDENT of the thermostat setting.
☐ If the product is in operation, by pressing this button the heater switches off. The "Off" sign appears in the LCD.
“- ” +” TEMPERATURE SELECTORS
☐ Button for thermostat temperature adjustments. The temperature can be adjusted between 5°C and 30°C. By keeping the two buttons pressed, the value changes rapidly, for a greater ease of setting. The selected temperature appears on the LCD near the symbol "1".
"- 5 + " POWER SELECTORS
These two buttons have to be used to set the power of the heater (6 positions are possible):
Off
Cold Air
Quiet Mode
Mid Power
1. Full Power
Full Power
Auto
To each setting corresponds a symbol, which is shown on the display.
AUTO MODE HAS BEEN SPECIFICALLY DESIGNED SO THAT THE POWER IS AUTOMATICALLY SELECTED ON THE BASIS OF THE CONDITIONS OF USE. WE SUGGEST ALWAYS USING AUTO MODE FOR BETTER PERFORMANCE AND CONSUMPTION OPTIMIZATION.
“😊” SMILE FUNCTION
☐ JUST PRESS THE BUTTON AND LET THE PRODUCT SET THE MOST COMFORTABLE AND EFFICIENT PARAMETERS.
☐ By pressing the SMILE button the power is automatically set to Auto mode and the desired temperature to 23°C.
"R" TIMER MODE
This button allows the user to set the internal timer:
☐ Two different programs are available for setting the starting time, duration and power and temperature conditions;
☐ If no other mode is selected, the set programs remain active, even on subsequent days.
☐ Pressing the Timer button activates the program mode as described in the relating paragraph:
While in operation, the relating led blinks.
"TIME" BUTTON - SETTING THE TIME AND THE PROGRAM
This button is used for setting the time or for programming the "timer" function.
☐ To set the time, it is sufficient to press the TIME button until the writing on the display starts flashing (this is not necessary if the writing is already flashing). Set the time and minutes using the relevant buttons and press TIME to enter the data;
In timer mode, the TIME button enters the selected value and allows you to pass on to the next value. Refer to the programming section of this manual for further information.
6.5 PROGRAMMING
☐ The timer function allows two distinct programs to be set. These will automatically be activated at the set time. All the parameters may be regulated, making the heater versatile and effective.
☐ If the product is not disconnected or tampered with by the user, the programs will be repeated for an indefinite period of time every day of the week.
☐ All programs need the time to be set, therefore they will not operate if the clock is flashing (see the TIME button description for further information).
In order to simplify the programming procedure, an initial preset program has been memorized with the following parameters:
Starting time: 06:30 Duration: 30 minutes Power setting: Auto mode Desired temperature: 23°C
NOTE: When changed, the new values will become the default values until the product is disconnected or switched off using the general switch. The preset program is automatically activated by pressing the timer button ONCE and waiting 5 seconds until the word "Set" disappears from the display.
IF THE PRESET PROGRAM DOESN'T FIT YOUR NEEDS, PROCEED AS INDICATED IN THE FOLLOWING DIAGRAM TO ACTIVATE YOUR CUSTOMIZED PROGRAM:
| 1 | Activate the timer function by pressing the specific button TWICE | The "set" indication disappears and the default start time 08:30 starts flashing | Auto R°06:30 23° |
| 2 | Set the starting hour byusing the h button(e.g. 08). | h | The display shows the desiredstarting hour |
| ↓ | Skip to next step toaccept the preset hour |
| 3 | Set the starting minutes by using the m button (e.g. 20)Skip to next step to accept the preset | m | The display shows the desired starting hour and minute | 08:20 23°C |
| 4 | Press the TIME button to confirm the starting time.Now you can set the desired duration. | TIME | The previous indication disappears and the default period of 30min starts flashing | Auto | R°C |
| 00:30 | 23°C |
| 5 | Set the duration hour byusing the h button(e.g. 01)Skip to next step toaccept the preset value. | h | The display shows the desiredduration hour |
| 6↓ | Set the duration minutes by using the m button (e.g. 15)Skip to next step to accept the preset value. | m | The display shows the desired duration hours and minutes | Auto0:1:1523° |
| 7↓ | Press the TIME button to confirm the duration.Now you can set the desired power. | TIME | The default power "Auto" mode starts flashing | Auto0:1:1523° |
| 8↓ | Set the power by pressing the + - buttons (e.g. quiet mode) | + - | The Power indication shows the quiet mode | A0:1:1523° |
| 9↓ | Press the TIME button to confirm the power. Now you can set the desired temperature | TIME | The default temperature of 23°C starts flashing | A0:1:1523° |
| 10↓ | Set the desired temperature by pressing The + - buttons (e.g. 24°C) | + - | The display shows the desired temperature | A0:1:1524° |

PRESS TIMER Ⓡ TO ACTIVATE THE PROGRAM
To set the second program "B", press the TIME button instead of the "timer" one, and restart programming from step N° 2
① If you have pressed the TIME button by mistake but you don't want to use/set the second program "B", just press "timer" to activate program "A" alone.

☐ It is possible, at all times, to press the timer button and activate the timer function using the set values. Default values will be taken as valid for any parameters that have not been customized. ☐ If you make a mistake while programming, exit by pressing the manual mode button and start again. ☐ If you have previously set a program and you don't want to run it any more, re-enter the programming mode and set the power to Off.
7. Safety in the event of the product not functioning normally
☐ In the event of overheating, the safety system will automatically turn off the heating elements and the motor. If this happens:
- switch off the fan heater using the main switch;
- remove the cause of overheating (i.e. obstacles in front of the air inlet or air outlet grilles, unusual accumulations of dirt, etc);
- let the heater cool down for 15/20 minutes;
- switch on the fan heater and check it is functioning properly.
In the event of overheating, the display will keep showing the symbol of the power that would have been in use in normal conditions. This is not a fault. Simply proceed as described above to solve the problem.
8. Maintenance
☐ This heater does not require any particular maintenance.
☐ We recommend you clean the air inlet and air outlet grilles at least twice a year with a vacuum cleaner, to remove dust from the motor and the heating elements.
☐ If the heater needs to be repaired, please contact an authorized center.
☐ If the cable is to be changed, please remember that a 2 × 1 m2 H05VV-F
9. F.a.q.
Q: If I use the main switch will I maintain the set timer programs?
A: No. When you disconnect the product, electronic circuits are no longer supplied and memory is erased.
Q: Why does the indicated room temperature sometimes change after the product is switched on / off? R: Because the thermostat is very sensitive, to ensure better performance.
Q: Why does the display show *—* instead of the room temperature?
A: Because the temperature is higher than 39irc C or lower than 5irc C.
Q: Is the appliance working properly if the thermostat doesn't operate when the power mode is on "Cold air"?
A: Yes, it is. In heating appliances, the ventilation mode is not expected to be under the thermostat's control.
Q: The display shows the "err" message. What does it mean?
A: The temperature sensor is broken. Contact your dealer or a qualified technical assistance centre.
Q: In timer mode, the led blinks but the product doesn't works. Why?
A: Because you are inside the program period, but the desired temperature has already been reached. The product will turn on again if the room temperature falls below the value set.
Q: Why am I not able to activate the timer function after all the parameters have been set (the manual mode led turns on instead)?
A: Check that the power setting for the A and B programs are not both set to "Off".


- -E-
- Smyle
- -- I -- ISTRUZIONI D'USO
- ALGEMENE BESCHRIJVING
- Installation murale
- Your product
- For your own safety
- Safe positioning
- Wall mounting
- Cable storage
- Use of the heater
- GENERAL DESCRIPTION
- DISPLAY
- MEMBRANE SWITCHES
- FUNCTIONING
- MAIN SWITCH
- TIME SETTING
- " 🔊" MANUAL MODE
- “- ” +” TEMPERATURE SELECTORS
- "- 5 + " POWER SELECTORS
- “😊” SMILE FUNCTION
- "R" TIMER MODE
- "TIME" BUTTON - SETTING THE TIME AND THE PROGRAM
- PROGRAMMING
- PRESS TIMER Ⓡ TO ACTIVATE THE PROGRAM
- Safety in the event of the product not functioning normally
- Maintenance
- F.a.q.
Brand : ARGO
Model : Smyle Avorio
Category : Heating