
KooZzzi - Heated blanket PRINCESS - Free user manual and instructions
Find the device manual for free KooZzzi PRINCESS in PDF.


| Product type | Heating blanket |
| Brand | Princess |
| Model | KooZzzi |
| Dimensions | 150 x 200 cm |
| Weight | 1.5 kg |
| Supply voltage | 220-240 V ~ 50/60 Hz |
| Power | 120 W |
| Number of heat levels | 3 adjustable levels |
| Automatic shut-off | Yes, after 3 hours |
| Material | Soft fleece |
| Machine washable | Yes (disconnect cord before washing) |
| Safety | Overheating protection |
| Certifications | CE |
| Cord length | 2 m |
| Warranty | 2 years |
Frequently Asked Questions - KooZzzi PRINCESS
User questions about KooZzzi PRINCESS
0 question about this device. Answer the ones you know or ask your own.
Ask a new question about this device
Download the instructions for your Heated blanket in PDF format for free! Find your manual KooZzzi - PRINCESS and take your electronic device back in hand. On this page are published all the documents necessary for the use of your device. KooZzzi by PRINCESS.
USER MANUAL KooZzzi PRINCESS
natural_image
Line drawing of a cylindrical object with a looped neck and base, resembling a lamp or bell (no text or symbols)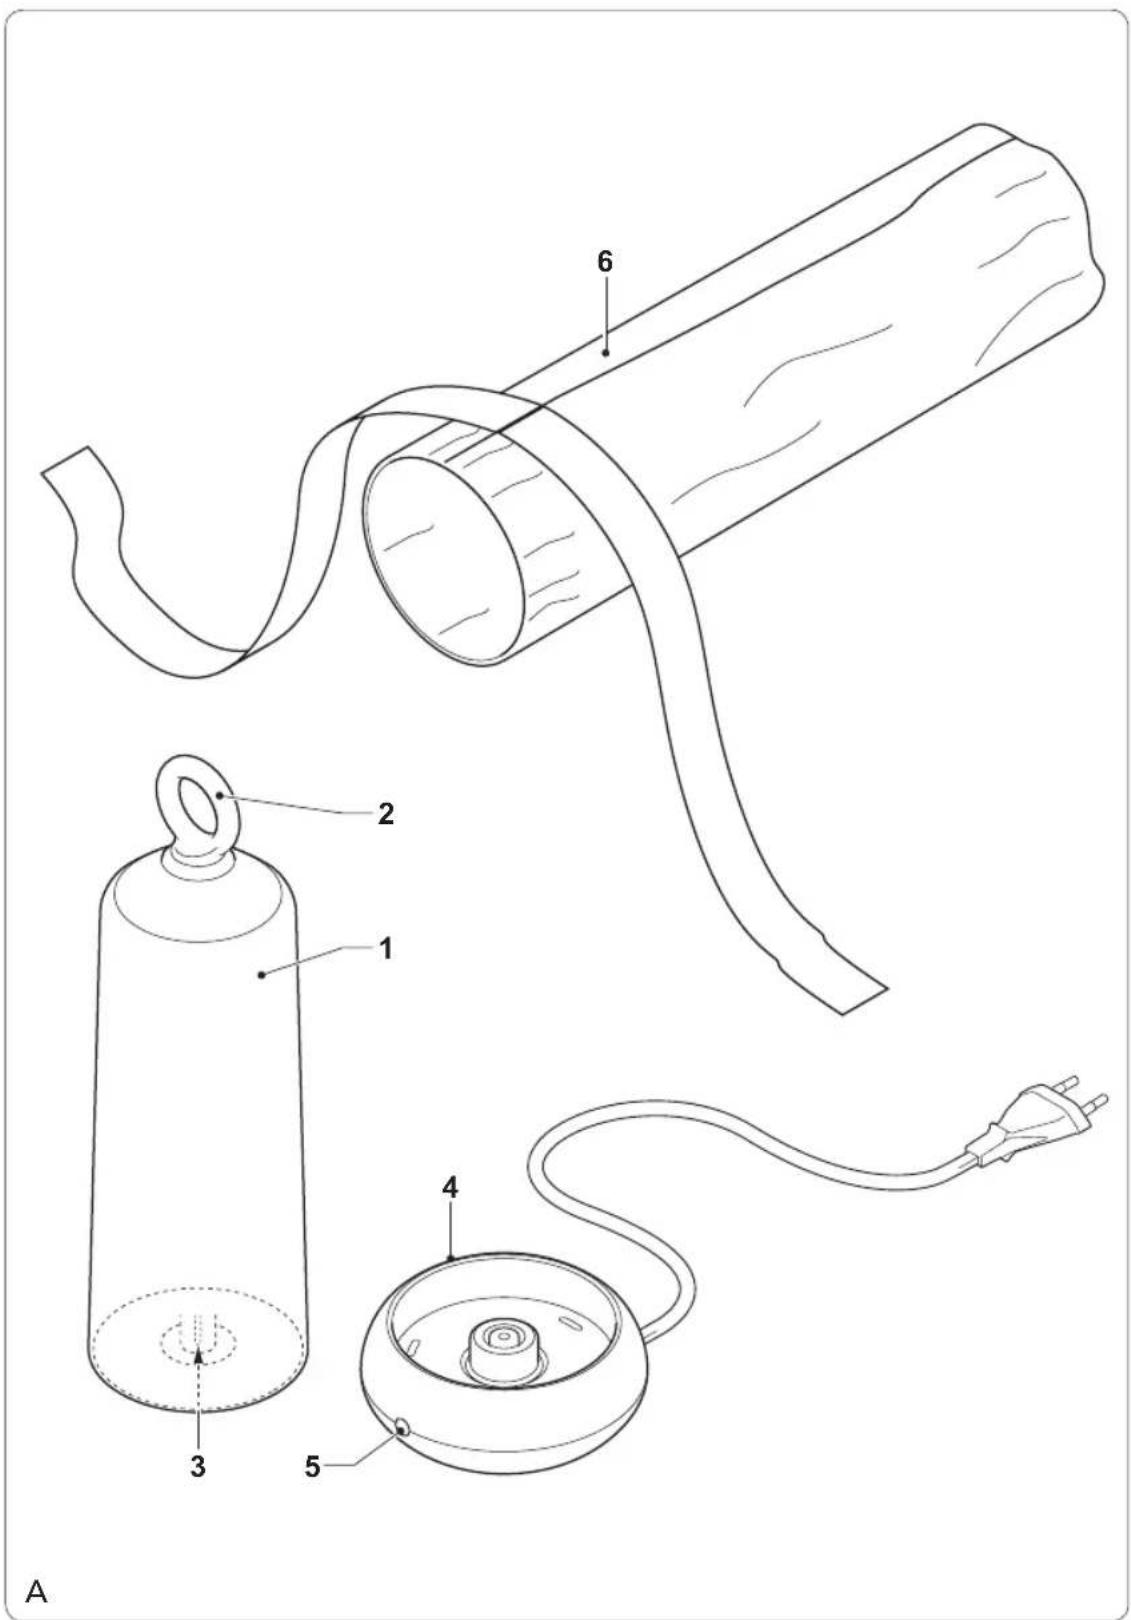
KOOZZZI.


natural_image
Illustration of a rope being inserted into a wooden post, showing the process from pinning to final packaging (no text or symbols)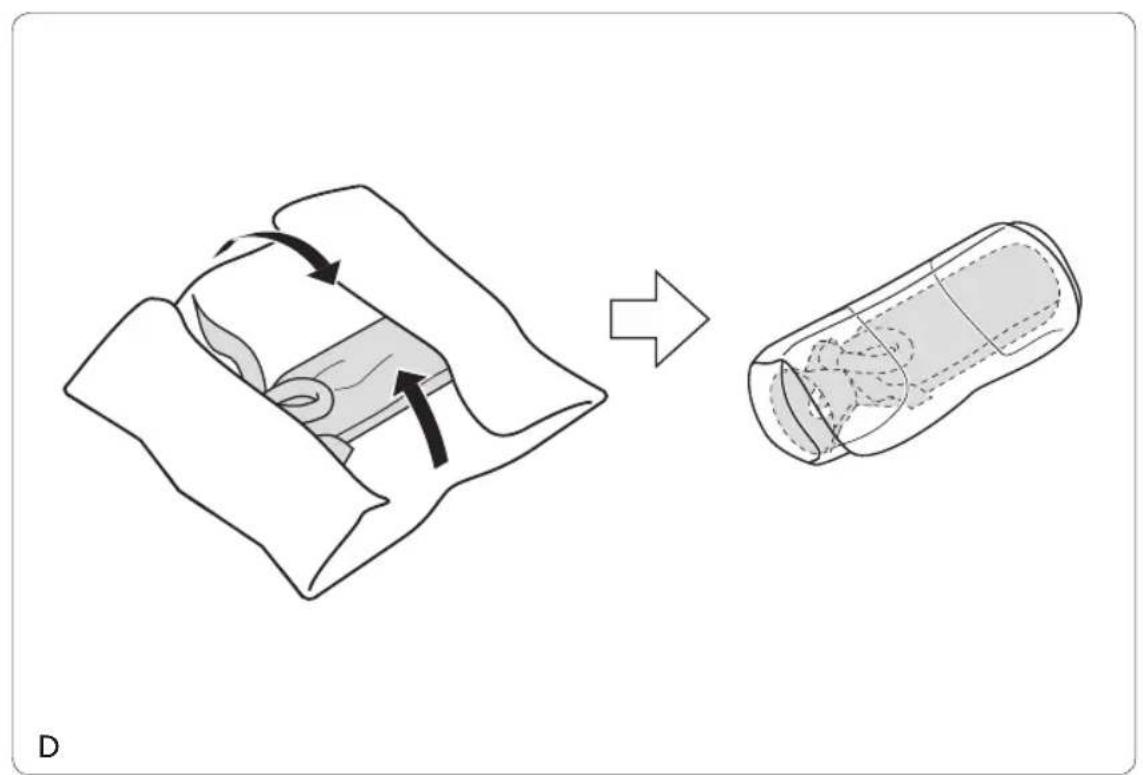
natural_image
Diagram showing a mechanical assembly transforming into a cylindrical component, with no visible text or symbols.KOOZZZI.
Gefeliciteerd!
You have purchased a KooZzzi product. Our aim is to provide quality products with a tasteful design and at an affordable price. We hope that you will enjoy this product for many years.
Description (fig. A)
Your 549015 KooZzzi rechargeable bed warmer has been designed for various wellness purposes for adults, such as providing warmth to specific parts of the body (e.g. cold feet), relieving tension from the neck-shoulder area and releasing abdominal pain to stimulate peristalsis.
The bed warmer does not require any liquids. The integrated heating element heats up the internal ceramic material in the bottle. The bottle has a rubber coating which feels comfortable and must be wrapped in a pouch and a towel. The bed warmer provides heat for many hours, depending on the use of a towel, the use of a blanket or a duvet, and the room temperature.
The bed warmer comes with a standard pouch, but other pouches are available.
The bed warmer is suitable for indoor use only. The bed warmer is suitable for domestic use only.
- Bottle
- Handgrip
- Charging connection
- Charging station
- Power indicator
- Pouch
Initial use
Clean the bottle. Refer to the section • "Cleaning and maintenance".
Clean the pouch. Refer to the section • "Cleaning and maintenance".
Clean the charging station. Refer to the section "Cleaning and maintenance".
Use
Charging the bed warmer (fig. A & B)
The bed warmer must be charged for approximately 10 minutes.
Before you proceed, we need you to pay attention to the following notes:
- Do not use the charging station for other purposes than charging the bed warmer.
- Do not move the bed warmer during the charging process.
- Do not leave the bed warmer unattended when it is placed in the charging station and the mains plug is connected to the mains. Only charge the bed warmer in a room where it is visible at all times. If the bed warmer has been charged completely, remove it from the charging station and disconnect the mains plug from the mains.
Place the charging station (4) on a stable and flat surface.
Insert the mains plug of the charging • station (4) into the wall socket. The power indicator (5) comes on.
Place the bottle (1) with the charging • connection (3) into the charging station (4). A buzzer will sound for 3 seconds to indicate the correct position. The charging process starts automatically.
If the process is completed, a buzzer will sound 10 times after approximately 7-8 minutes. After a few seconds, the buzzer will sound another 20 times. The charging process stops automatically.
Note: The bottle will not feel warm directly after the charging process. The bottle will only feel warm after approximately 5 minutes after the charging process is completed.
The maximum temperature will only be reached if the pouched bottle is wrapped in a towel and placed under the bedclothes.
Immediately remove the bottle (1) from the charging station (4).
If the bottle (1) is not removed • immediately after the charging process, take the following actions:
- If the bottle (1) is still warm, allow it to cool down for at least 15 minutes.
- Remove the bottle (1) from the charging station (4).
- Wait a few seconds to reset the bed warmer automatically.
- Place the bottle (1) into the charging station (4).
Note: If the bottle is still warm, the charging process will take less than 7-8 minutes. If the process is completed, a buzzer will sound 10 times. After a few seconds, the buzzer will sound another 20 times.
Remove the mains plug of the charging • station (4) from the wall socket. The power indicator (5) goes off.
Hints for use (fig. A - D)
Before you proceed, we need you to pay attention to the following notes:
- Do not use the bottle without the pouch.
- If your skin is sensitive to heat or if direct contact with the pouched bottle is not comfortable, wrap a towel around the pouched bottle.
Charge the bed warmer. Refer to the section "Charging the bed warmer".
Wrap the bottle in the pouch and tie the • ribbon (fig. C).
If necessary, wrap a towel around the • pouched bottle (fig. D).
Use the pouched bottle, with or without towel, for your wellness purposes.
Cleaning and maintenance
Before you proceed, we need you to pay attention to the following notes:
- Before cleaning or maintenance, remove the mains plug from the wall socket and wait until the bed warmer has cooled down.
- Do not immerse the bed warmer in water or any other liquids.
Before you proceed, we would like you to focus your attention on the following notes:
- Do not use aggressive or abrasive cleaning agents to clean the bed warmer.
- Do not use sharp objects to clean the bed warmer.
- Do not clean the bottle in the dishwasher.
Regularly remove fluff, dust, etc. from the charging connection and from the charging station. Use a non-metallic object, such as a wooden cocktail stick or a toothpick, to remove fluff, dust, etc.
Clean the bottle with a damp cloth. • Thoroughly dry the bottle with a clean, dry cloth.
Clean the pouch in a washing machine • (max. 40 °C). Allow the pouch to dry naturally.
Clean the charging station with a damp • cloth. Thoroughly dry the charging station with a clean, dry cloth.
Storage
Store the bottle, the pouch and the charging station in the original packaging. Store the packaging in a dry and frost-free place, out of the reach of children.
Safety instructions
General safety
Read the manual carefully before use. • Keep the manual for future reference. Only use the appliance and the accessories • for their intended purposes. Do not use the appliance and the accessories for other purposes than described in the manual.
- Do not use the appliance if any part or any accessory is damaged or defective. If a part or an accessory is damaged or defective, it must be replaced by the manufacturer or an authorised repair agent.
• Children should be supervised to ensure that they do not play with the appliance. - The use of this appliance by children or persons with a physical, sensory, mental or motorial disability, or lack of experience and knowledge can give cause to hazards. Persons responsible for their safety should give explicit instructions or supervise the use of the appliance.
Do not use the appliance near bathtubs, showers, basins or other vessels containing water. Do not immerse the appliance in water or other liquids. If the appliance is immersed in water or other liquids, do not remove the appliance with your hands. Immediately remove the mains plug from the wall socket. If the appliance is immersed in water or other liquids, do not use the appliance again.
Electrical safety
Before use, always check that the mains voltage is the same as the voltage on the rating plate of the appliance. The appliance is not intended to be operated by means of an external timer or separate remote-control system. Make sure that water cannot enter the contact plugs of the mains cable. Always fully unwind the mains cable. Make sure that the mains cable does not hang over the edge of a worktop and cannot be caught accidentally or tripped over. Keep the mains cable away from heat, oil and sharp edges. Do not use the appliance if the mains cable or the mains plug is damaged or defective. If the mains cable or the mains plug is damaged or defective, it must be replaced by the manufacturer or an authorised repair agent. Do not pull the mains cable to disconnect the mains plug from the mains. Disconnect the mains plug from the mains when the appliance is not in use, before assembly or disassembly and before cleaning and maintenance.
Safety instructions for rechargeable bed warmers
Do not use the bed warmer outdoors. Do not use the bed warmer in humid surroundings. Keep the bed warmer away from heat sources. Make sure that the bed warmer does not come into contact with flammable material.
- Beware of hot parts. The bottle will become hot during the charging process. Only use the handgrip to hold the bottle when it is hot.
U.K. Wiring instructions
The wires in the mains lead are coloured in accordance with the following code:
As the colours of the wire in the mains lead of this appliance may not correspond with the colour markings identifying the terminals on your plug, proceed as follows: The wire which is coloured BLUE must be connected to the terminal which is marked with the letter N or coloured black. The wire which is coloured BROWN must be connected to the terminal which is marked with the letter L or coloured red. If a 13Amp (BS1363) plug is used, a 13Amp (BS1362) fuse must be fitted, or if any other type of plug is used, a 13Amp fuse must be fitted, either in the plug or adaptor, or on the distribution board. This is a double-insulated appliance and does not need an earth connection.
Warning! On no account should either the live or neutral wires be connected to the earth terminal.
Disclaimer
Subject to change; specifications can be changed without further notice.
Félicitations!



- Gefeliciteerd!
- Description (fig. A)
- Initial use
- Use
- Charging the bed warmer (fig. A & B)
- Hints for use (fig. A - D)
- Cleaning and maintenance
- Storage
- Safety instructions
- General safety
- Electrical safety
- Safety instructions for rechargeable bed warmers
- U.K. Wiring instructions
- Disclaimer
- Félicitations!
Brand : PRINCESS
Model : KooZzzi
Category : Heated blanket