
PDM1035 - Saw Ferm - Free user manual and instructions
Find the device manual for free PDM1035 Ferm in PDF.


| Product type | Circular saw |
| Brand | Ferm |
| Model | PDM1035 |
| Power supply | Electric, 230 V ~ 50 Hz |
| Power | 1200 W |
| Blade diameter | 185 mm |
| Cutting depth at 90° | 65 mm |
| Cutting depth at 45° | 45 mm |
| No-load speed | 4500 rpm |
| Weight | 4.5 kg |
| Cable length | 2 m |
| Protection class | II |
| Sound pressure level | 95 dB(A) |
| Sound power level | 106 dB(A) |
| Vibration | 2.5 m/s² |
| Protective guard | Yes |
| Parallel guide | Yes |
| Dust bag | Included |
| Dimensions (L x W x H) | 350 x 250 x 300 mm |
| Maintenance and cleaning | Clean the ventilation slots regularly. Sharpen or replace the blade if it is dull. |
| Safety | Wear gloves and protective goggles. Never disable the protective guard. |
| Spare parts | Available via Ferm after-sales service. |
| Warranty | 2 years |
Frequently Asked Questions - PDM1035 Ferm
User questions about PDM1035 Ferm
0 question about this device. Answer the ones you know or ask your own.
Ask a new question about this device
Download the instructions for your Saw in PDF format for free! Find your manual PDM1035 - Ferm and take your electronic device back in hand. On this page are published all the documents necessary for the use of your device. PDM1035 by Ferm.
USER MANUAL PDM1035 Ferm
natural_image
Ferm machine with blue and black components, no visible text or symbols on the machine itselfFig. 2

Fig. 3

natural_image
Technical line drawing of a vehicle's front compartment showing dashboard, steering wheel, and gear assembly (no text or symbols)Fig. 4
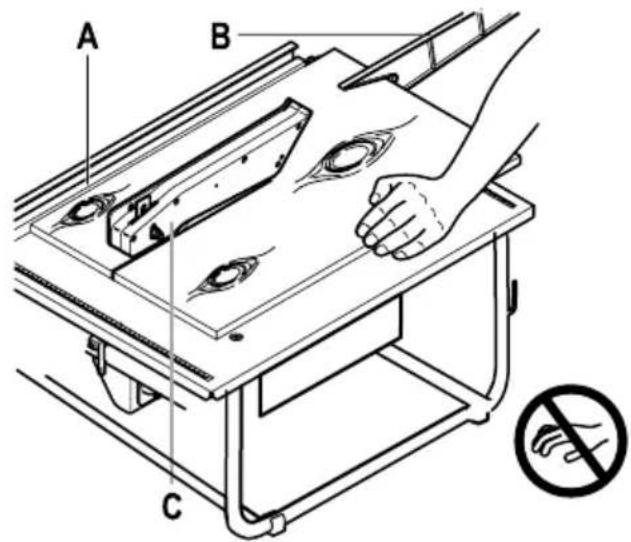
Fig. 5

Fig. 9
SAW BENCH
Thank you for buying this Ferm product.
By doing so you now have an excellent product, delivered by one of Europe's leading suppliers. All products delivered to you by Ferm are manufactured according to the highest standards of performance and safety. As part of our philosophy we also provide an excellent customer service, backed by our comprehensive warranty. We hope you will enjoy using this product for many years to come.
The numbers in the following text refer to the pictures on page 2-4

Read the operating instructions carefully before using this device. Familiarise yourself with its functions and basic operation. Service the device as per the instructions to ensure that it always functions properly. The operating instructions and the accompanying documentation must be kept in the vicinity of the device.
Applications
You may use the saw bench to saw workpieces with a maximum thickness of 45 mm.
Contents
- Machine data
- Safety instructions
- Assembly instructions
- Operation
- Maintenance
1. Machine data
Technical specifications
| Voltage 230 V, 50 Hz | |
| Input power 800 W (S2 = 10 min) | |
| Speed, no load 2950/min | |
| Saw blade dimensions ∅200 x 2.4 x ∅16 mm | |
| Max.cutting depth 90° 45 mm | |
| Max.cutting depth 45° 27 mm | |
| Diam. dust extraction 40 mm | |
| Cutting angle 0-45° | |
| Machine weight 11.3 kg | |
| Lpa Sound pressure level 96.6+3 dB(A) | |
| Lwa Sound power level 109,6+3 dB(A) | |
| Vibration frequency < 2.5 m/s2 |
Load factor
A load factor of S2 = 10 min (intermittent periodic duty) means that you may operate the motor continuously at its nominal power level for no longer than the time stipulated on the specifications label (10 minutes ON period). If you fail to observe this time limit the motor will overheat. During the OFF period the motor will cool again to its starting temperature.
Vibration level
The vibration emission level stated in this instruction manual has been measured in accordance with a standardised test given in EN 61029; it may be used to compare one tool with another and as a preliminary assessment of exposure to vibration when using the tool for the applications mentioned
- using the tool for different applications, or with different or poorly maintained accessories, may significantly increase the exposure level
- the times when the tool is switched off or when it is running but not actually doing the job, may significantly reduce the exposure level
Protect yourself against the effects of vibration by maintaining the tool and its accessories, keeping your hands warm, and organizing your work patterns
Contents of the package
1 Saw bench
1 Push stick
1 Mitre guide
1 User manual
1 Warranty card
1 Safety instructions
Check the machine, loose parts and accessories for transport damage.
Product information
Fig.1
- Table surface
- Protective hood
- Push stick
- Saw blade
- Riving knife
- Insert piece
- On/off switch
- Motor
- Mains cable
- Frame
-
Rip fence
-
Interlocking knob
- Mitre guide
- Nut
- Screw
- Spindle
2. safety instructions
Explanation of symbols

Denotes risk of personal injury, loss of life or damage to the tool in case of non-observance of the instructions in this manual.

Indicates the presence of an electrical voltage.

Keep bystanders away.

Wear eye and ear protection.

Wear a dust mask protection
Before using the appliance
- Make sure that the saw bench is adequately and effectively illuminated.
- When you use strip lighting you should be aware of the so-called stroboscopic effect. This may cause a rotating saw blade to appear to be stationary. One solution is to use two fittings in order to create
• phase displacement. - Check the following points:
- Does the voltage of the motor and any fuse employed correspond with the mains voltage? Appliances with a voltage of 230 V\~ may be connected without problems to a mains voltage of 220 V\~.
- Are the feeder cable and plug in good condition: sturdy, without loose bits or damage?
- Has the saw blade lost any teeth or is it displaying cracks or fractures? If so, replace the saw blade immediately.
-
The protective hood may not be set higher than required to let the workpiece pass.
-
The riving knife should be narrower than the saw cut and broader than the saw blade.
- Do not exercise lateral pressure on the saw blade as it may cause it to break.
- Check the wood for knots, nails, cracks and waste residues.
• These irregularities may cause the workpiece to kick back dangerously. - Ensure that no objects get into the extraction system.
- These objects may come into contact with the saw blades resulting in potentially hazardous situations.
Using the appliance
- Push the workpiece that you are going to saw securely to the table surface.
- Hold at the same time the section of the workpiece that has been sawed to prevent it breaking off. The hand t hat secures the sawed section should remain behind the saw blade and move away from it. Make sure that the hand that you use to secure the workpiece does not cross the hand that you use to operate the appliance.
- Use the push stick supplied with the appliance.
- Use the push stick to guide smaller workpieces past the saw blade.
- Do not use long extension cables.
- Allow the appliance to cool off before moving it.
- Do not remove wood residues in the vicinity of the saw by hand.
- When wood residues are trapped between stationary and moving parts switch the appliance off and remove the plug from the electrical socket. Only then remove the residues.
- Select the appropriate saw blade.
- Select the saw blade (with the correct teeth) and the correct speed of rotation and slip appropriate for the material to be sawed and fit the saw blade carefully. This will not only increase the lifetime of the saw blade but also prevent cracks and fissures with their attendant hazards. Fit only recommended saw blades that meet European standard EN847.
- Do not saw pegs or sharp-cornered workpieces.
- This is hazardous. Saw pegs or sharp-cornered workpieces with an appliance
designed for that purpose (a peg cutter or milling machine) and not with a saw bench.
- Exercise care when sawing waste or firewood.
- Waste or firewood often requires less careful sawing, so there is a danger that you may not be quite so alert to irregularities in the wood and impose too much pressure on the saw.
- Use a table extender for large workpieces.
- When sawing large workpieces, support the workpiece at table level with a table extender.
Examples of problems arising from improper use of the saw bench
- Contact with rotating saw blade
- This can occur when the protective elements (such as the protective hood, the protection under the table surface, the riving knife, the push stick) are missing or are used improperly. Improper operation of the protective elements can result in accidents. When the machine is switched off, the saw blade may continue to rotate. There is a risk of your not noticing this because the appliance falls silent. That is why the protective hood is so important.
• Recoil of the workpiece -
When the workpiece recoils it may hit those in the surrounding area at high speed. This may result in serious or even fatal injury. The workpiece may recoil for the following reasons (or a combination of them):
-
The saw does not protrude far enough above the table surface, causing the workpiece to be guided directly into contact with the teeth of the saw that is itself moving in the direction of the user.
- The workpiece seizes on the saw because the riving knife is not fitted or incorrectly adjusted.
- There is no auxiliary saw rip fence (straight edge) or it is adjusted incorrectly. Because of this the wood may become stuck between the main rip fence and the rotating saw blade.
- Rotating saw blade breaks
• This can be caused by the following factors:
• An improper sawing procedure;
• An improperly adjusted saw blade;
• An improper method of operation;
- Processing material that is unsuitable for the saw bench.
• Metal parts under voltage
Defective electrical installation may result in metal parts coming under voltage and causing fire.
- Damage to hearing when noise level is too high
A noise level that is too high may cause damage to the hearing of persons who are often close to the saw bench.
- Release of harmful wood dust.
Release of harmful wood dust or glue vapours may pose health risks. Connect a vacuum cleaner to the saw bench.
Turn the appliance off immediately in the event of:
- A faulty mains plug, mains flex or flex damage.
- A faulty switch.
- Smoke or smell from scorched insulation.
- Seizing of the saw.
Electrical safety
When using electric machines always observe the safety regulations applicable in your country to reduce the risk of fire, electric shock and personal injury. Read the following safety instructions and also the enclosed safety instructions.

Always check that the power supply corresponds to the voltage on the rating plate.

Class II machine. Your machine is double insulated; therefore no earthwire is required.
Replacing cables or plugs
Immediately throw away old cables or plugs when they have been replaced by new ones. It is dangerous to insert the plug of a loose cable in the wall outlet.
Using extension cables
Only use an approved extension cable suitable for the power input of the machine. The minimum conductor size is 1.5 mm^2 . When using a cable reel always unwind the reel completely.
3. Assembly instructions
Selecting the saw blade
Select a saw blade that meets European standard EN847. Make sure that it has the proper teeth.
In general you will be able to saw faster and less precisely with coarse teeth than with fine teeth. Make sure that the saw blade is sharp at all times in order to realize an optimum result.
Changing saw blades
Fig. 2

Check before fitting the saw blade that the mains plug has been removed from the electrical socket.
To change the saw blade proceed as follows:
- Loosen the two screws (A) from the sawdust collection bin (B).
- Remove the sawdust collection bin.
- Loosen the nut (C) from the saw blade with a spanner.
- Secure the spindle with a second spanner.
- Remove the flange (D).
- Remove the saw blade, moving it diagonally downwards.
- Check that the flange (E) behind the saw blade is in its correct position before fitting a new saw blade.
- Fit a new saw blade and carry out the foregoing procedure in reverse sequence.

Check when fitting the saw blade that the arrow on the saw blade is pointing in the same direction as the arrow on the sawdust collection bin.
Adjusting the riving knife
Fig. 3
Sawing will reduce the diameter of the saw blade. The space between saw blade and riving knife must however remain more or less constant. This means that you will have to re-adjust the riving knife from time to time.
To adjust the riving knife you should proceed as follows:
- Remove the inset piece (A) by loosening the screws (B).
- Loosen the screws (C) of the riving knife.
- Adjust the riving knife (D) so that the separation between the upper edge of the knife and the saw blade is at least 3 mm and at most 5 mm.
- Re-adjust the riving knife whenever the separation exceeds 5 mm.
• Re-tighten the screws (C).
• Refit the inset piece (A).
Adjusting angle of saw cut
Fig. 4
It is possible with the saw bench to saw at various angles, to a maximum of 45^ .
The saw-cut angle is set as follows:
- Loosen the knobs (A). These are located opposite one another on the sides of the saw bench.
- Adjust the saw blade to the angle required. The saw angle is displayed on the protractor (B).
- Tighten the knobs (A) once more securely.
4. Operation
When you depress the red off switch the saw bench will switch off. Depressing the green on switch will activate the saw bench. Should the mains power fail or when the plug is removed from the electrical socket, the safety switch will switch the appliance off immediately. The appliance will not activate automatically when the power is turned on again. The appliance will operate only when you depress the green on switch.
Dust collection
To keep the work surface clean, the saw bench is equipped with a connection for dust extraction. You can connect your vacuum cleaner to this.
Sawing
Fig. 5

Take care to keep your hands away from the saw blade when sawing.
When sawing proceed as follows:
- Loosen the knobs of the rip fence (A) on the table surface.
- Set the rip fence to the correct distance.
• Re-tighten the knobs of the rip fence securely. - Set the protective hood (C) to the appropriate height.
- Switch on the saw bench.
- Feed the workpiece, without imposing pressure on it, towards the saw blade. Support the section of the workpiece that has already passed the saw to ensure that it does not fall.
- When the rear edge of the appliance comes close to the saw blade, use the push stick (B)
to feed the workpiece further. Use at all times the push stick for small workpieces.
- Switch off the saw bench when you have sawed the workpiece.
Mitre guide
Fig. 6
The mitre guide (A) allows you to place the workpiece on the table at an angle of 45^ allowing diagonal saw cuts to be made. You can for this purpose secure the mitre guide to the guide (B) (Fig. 6).
5. Maintenance

During maintenance and cleaning always remove the mains plug from the socket. Never use liquids when cleaning electrical parts of the saw bench.
The machines have been designed to operate over a long period of time with a minimum of maintenance. Continuous satisfactory operation depends upon proper machine care and regular cleaning.
Malfunctions
The electric motor becomes hot.
- The motor is being overloaded by workpieces that are too big.
- Saw at a lower speed so that the motor can cool down.
- The ventilation grid of the motor is blocked.
• Clean the ventilation grid
• The motor is defective.
- Please contact the service address on the warranty card.
The appliance does not work when connected.
- The motor has been switched off by the thermal cutout.
- Allow the appliance to cool down and switch it on again.
• The mains connection has been broken.
• Check the mains connection for faults.
• The switch is damaged.
- Please contact the service address on the warranty card.
It is very difficult to move the workpiece along
the saw blade in a straight line and the saw cut is uneven.
• The saw blade is warped or blunt.
- Replace the saw blade.
• The rip fence is not properly secured.
- Clean the rip fence and secure it in the correct way.
The workpiece starts to vibrate violently during sawing.
• The saw blade is overheated or distorted.
- Replace the saw blade.

Maintain the saw bench on a regular basis as this will prevent unnecessary problems.
The following will ensure that your appliance remains in optimum condition:
- Empty the dust-collection bin regularly. You can remove the bin readily by loosening the two attachment screws.
- Keep the saw blade clean to avoid irregularities in the saw cut.
- Inspect the saw blade regularly for cracks, fractures and broken or blunt teeth. Replace damaged saw blades immediately.
- Keep the ventilation grid of the motor clean to avoid the motor becoming overheated.
- Replace the inset piece when it is worn.
Cleaning
Keep the ventilation slots of the machine clean to prevent overheating of the engine. Regularly clean the machine housing with a soft cloth, preferably after each use. Keep the ventilation slots free from dust and dirt. If the dirt does not come off use a soft cloth moistened with soapy water. Never use solvents such as petrol, alcohol, ammonia water, etc. These solvents may damage the plastic parts.
Lubrication
The device does not need any additional lubrication.
Defects
If a defect appears due to a part wearing out, please contact the service center on the warranty card. At the end of these instructions there is an exhaustive overview of the parts that can be ordered.
Environment
To prevent damage during transport, the appliance is delivered in a solid packaging which consists largely of reusable material. Therefore please make use of options for recycling the packaging.

Damaged and/or disposed of electrical or electronic devices must be dropped off at recycling stations intended for that purpose.
Warranty
Read the warranty conditions on the separately supplied warranty card.
The product and the user manual are subject to change. Specifications can be changed without further notice.
TISCHKREISSÄGE
- De motor is defect.
STOLOVÁ KOTOUČOVÁ PILA
DECLARATION OF CONFORMITY FZB200/800 TABLE SAW TSM1032
(GB) We declare under our sole responsibility that this product is in conformity and accordance with the following standards and regulations:
(DE) Der Hersteller erklärt eigenverantwortlich, dass dieses Produkt den folgenden Standards und Vorschriften entspricht:
(NL) Wij verklaren onder onze volledige verantwoordelijkheid dat dit product voldoet aan, en in overeenstem ming is met, de volgende standaarden en reguleringen:
(FR) Nous déclarons sous notre seule responsabilité que ce produit est conforme aux standards et directives suivants:
(ES) Declaramos bajo nuestra exclusiva responsabilidad que este producto cumple con las siguientes normas y estándares de funcionamiento:
(CS) Na naši vlastní zodpovědnost prohlašujeme, že je tento výrobek v souladu s následujícími standardy a normami:
It is our policy to continuously improve our products and we therefore reserve the right to change the product specification without prior notice.
Ferm BV • Lingenstraat 6 • 8028 PM • Zwolle The Netherlands
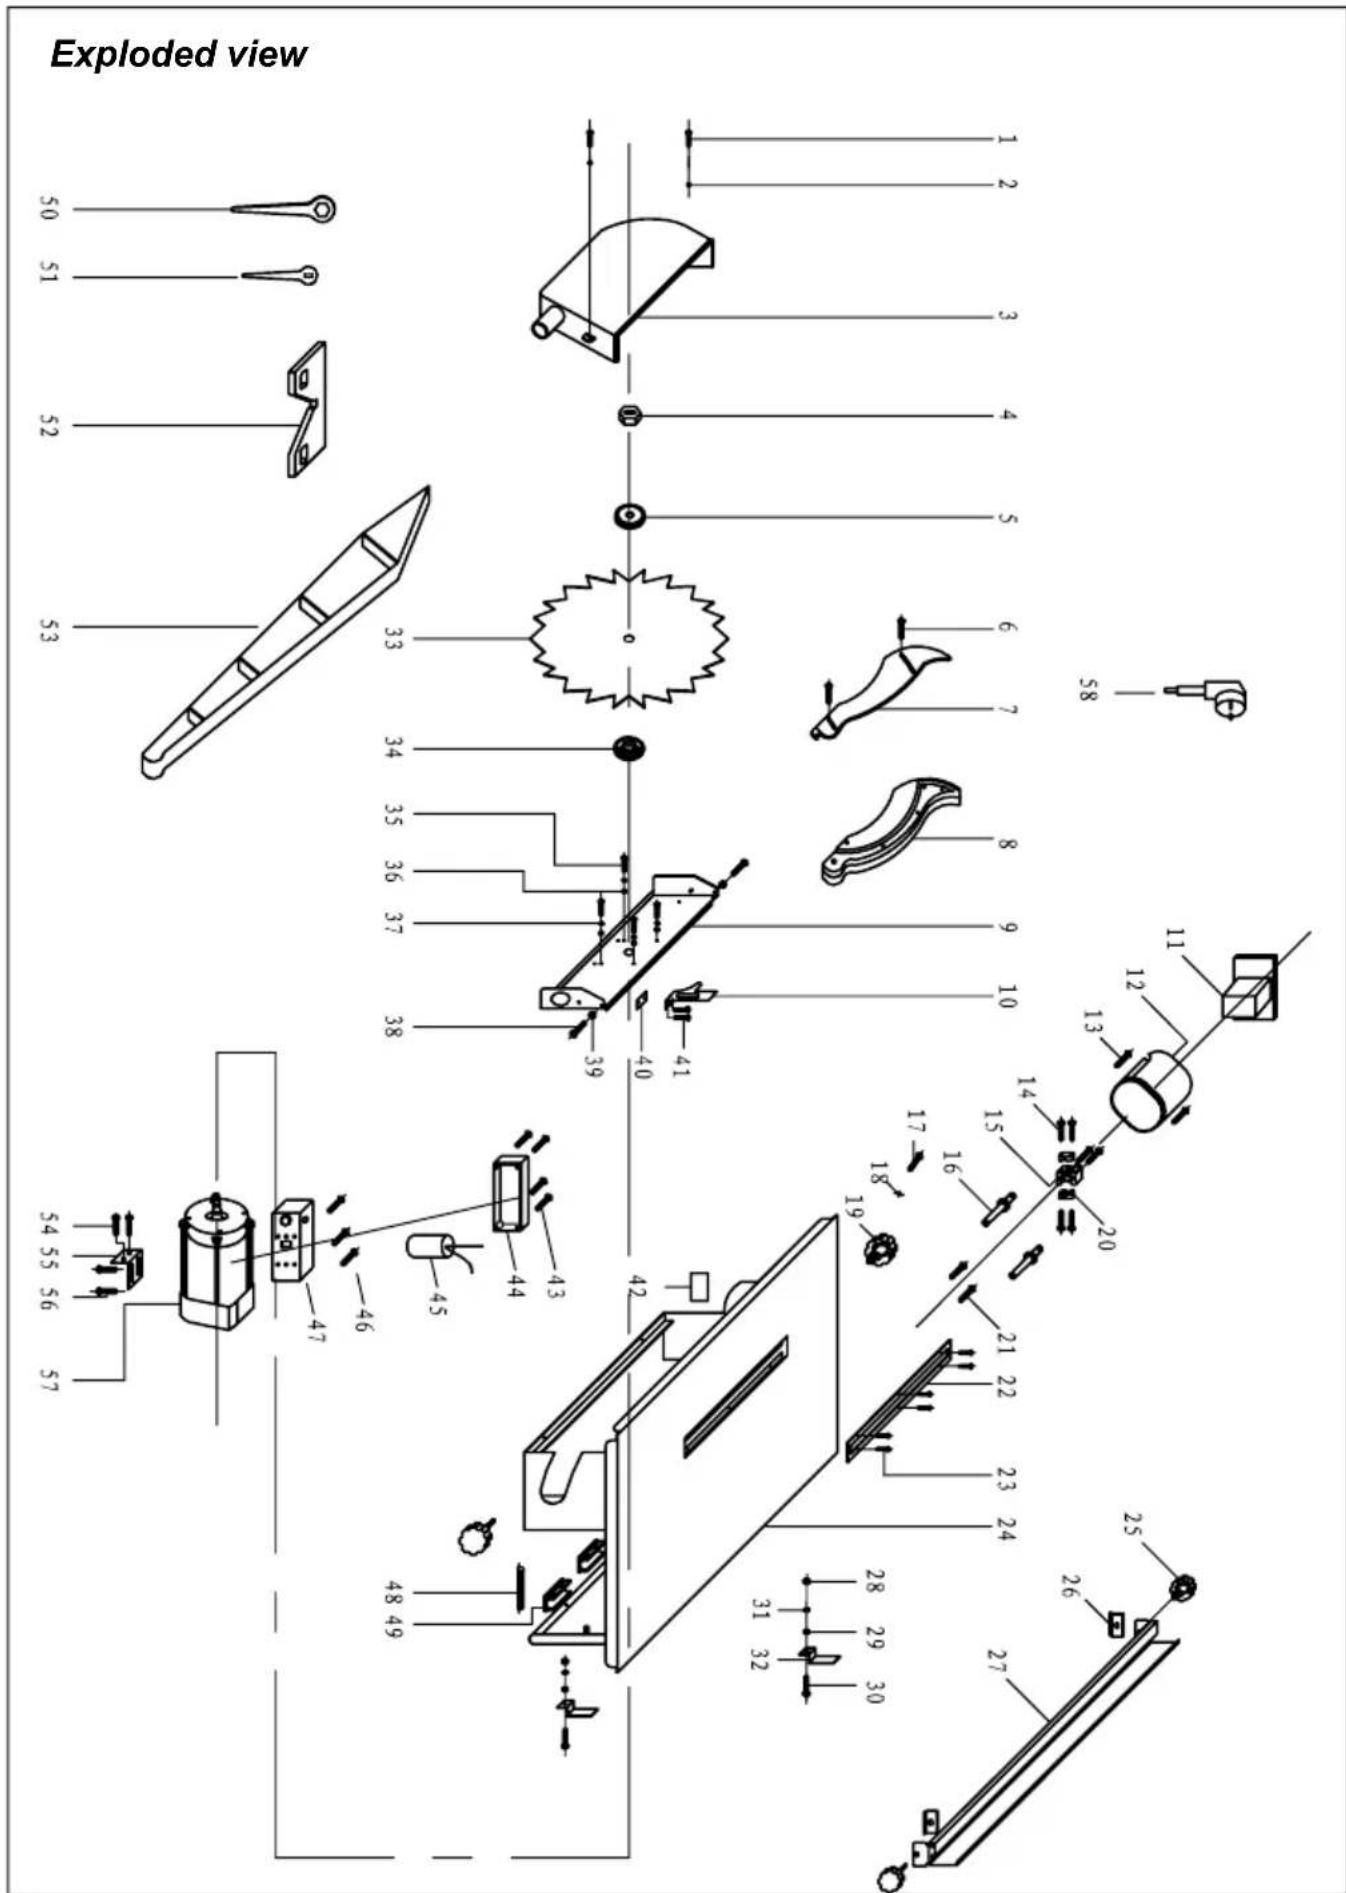
Spare parts list
No. Description Position
| 105053 | Sawblade nut 4 |
| 105054 | Flange set 5 + 34 |
| 105055 | Guard 6 TILL 8 |
| 105056 | Riving knife 10 + 41 |
| 105057 | Switch 11 |
| 105058 | Table insert 22 |
| 105059 | Guide 25 TILL 27 |
| 105060 | Capacitor 45 |


- SAW BENCH
- Thank you for buying this Ferm product.
- The numbers in the following text refer to the pictures on page 2-4
- Applications
- Contents
- Machine data
- Load factor
- Vibration level
- Contents of the package
- Product information
- Fig.1
- safety instructions
- Explanation of symbols
- Before using the appliance
- Using the appliance
- Examples of problems arising from improper use of the saw bench
- Electrical safety
- Replacing cables or plugs
- Using extension cables
- Assembly instructions
- Selecting the saw blade
- Changing saw blades
- Adjusting the riving knife
- Adjusting angle of saw cut
- Operation
- Dust collection
- Sawing
- Mitre guide
- Fig. 6
- Maintenance
- Malfunctions
- The electric motor becomes hot.
- The appliance does not work when connected.
- the saw blade in a straight line and the saw cut is uneven.
- The workpiece starts to vibrate violently during sawing.
- Cleaning
- Lubrication
- Defects
- Environment
- Warranty
- TISCHKREISSÄGE
- STOLOVÁ KOTOUČOVÁ PILA
- DECLARATION OF CONFORMITY FZB200/800 TABLE SAW TSM1032
- Spare parts list
Brand : Ferm
Model : PDM1035
Category : Saw