
PNY555 - Monitor SHARP - Free user manual and instructions
Find the device manual for free PNY555 SHARP in PDF.


| Product Type | LCD Monitor |
| Brand | Sharp |
| Model | PNY555 |
| Screen Size | 21.5 inches (54.6 cm) |
| Resolution | 1920 x 1080 pixels (Full HD) |
| Refresh Rate | 60 Hz |
| Aspect Ratio | 16:9 |
| Connectivity | 1x HDMI, 1x VGA, 1x headphone jack |
| Power Supply | 12V, 2.5A power adapter |
| Power Consumption | 25 W (typical), 0.5 W (standby) |
| Dimensions with stand (W x H x D) | 50.2 x 39.0 x 18.0 cm |
| Weight | 3.2 kg |
| Viewing Angle | 170° horizontal, 160° vertical |
| Brightness | 250 cd/m² |
| Typical Contrast | 1000:1 |
| Main Features | Brightness, contrast, volume adjustments, OSD menu |
| Care and Cleaning | Use a soft, dry cloth, avoid abrasive products |
| Safety | Do not open the casing, unplug before cleaning |
| Spare Parts and Repairability | Spare parts available from the manufacturer, repair by a professional |
| General Information | Indoor use only, operating temperature: 5°C to 35°C |
Frequently Asked Questions - PNY555 SHARP
User questions about PNY555 SHARP
0 question about this device. Answer the ones you know or ask your own.
Ask a new question about this device
Download the instructions for your Monitor in PDF format for free! Find your manual PNY555 - SHARP and take your electronic device back in hand. On this page are published all the documents necessary for the use of your device. PNY555 by SHARP.
USER MANUAL PNY555 SHARP
MANUEL D'INSTALLATION
Information on the Disposal of this Equipment and its Batteries

IF YOU WISH TO DISPOSE OF THIS EQUIPMENT OR ITS BATTERIES, DO NOT USE THE ORDINARY WASTE BIN, AND DO NOT PUT THEM INTO A FIREPLACE!
Used electrical and electronic equipment and batteries should always be collected and treated SEPARATELY in accordance with local law. Separate collection promotes an environment-friendly treatment, recycling of materials, and minimizing final disposal of waste. IMPROPER DISPOSAL can be harmful to human health and the environment due to certain substances! Take USED EQUIPMENT to a local, usually municipal, collection facility, where available. Remove USED BATTERIES from equipment, and take them to a battery collection facility; usually a place where new batteries are sold. If in doubt about disposal, contact your local authorities or dealer and ask for the correct method of disposal. ONLY FOR USERS IN THE EUROPEAN UNION, AND SOME OTHER COUNTRIES; FOR INSTANCE NORWAY AND SWITZERLAND: Your participation in separate collection is requested by law. The symbol shown above appears on electrical and electronic equipment and batteries (or the packaging) to remind users of this. If 'Hg' or 'Pb' appears below the symbol, this means that the battery contains traces of mercury (Hg) or lead (Pb), respectively. Users from PRIVATE HOUSEHOLDS are requested to use existing return facilities for used equipment and batteries. Batteries are collected at points of sale. Return is free of charge. If the equipment has been used for BUSINESS PURPOSES, please contact your SHARP dealer who will inform you about take-back. You might be charged for the costs arising from take-back. Small equipment (and small quantities) might be taken back by your local collection facility. For Spain: Please contact the established collection system or your local authority for take-back of your used products.
SAFETY PRECAUTIONS....2
SAFETY INSTRUCTION....4
MOUNTING PRECAUTIONS....4
Supplied Components....5
Preparing the Remote Control Unit....5
Connections....6
Turning Power On/Off....7
Specifications 8
Mounting Precautions
(For SHARP dealers and service engineers)......8
Read the manuals in the provided CD-ROM. (Adobe Reader is required to view the manuals.)
IMPORTANT INFORMATION
WARNING: TO REDUCE THE RISK OF FIRE OR ELECTRIC SHOCK, DO NOT EXPOSE THIS PRODUCT TO RAIN OR MOISTURE.
CAUTION
RISK OF ELECTRIC SHOCK DO NOT OPEN

CAUTION: TO REDUCE THE RISK OF ELECTRIC SHOCK, DO NOT REMOVE COVER. NO USER-SERVICEABLE PARTS INSIDE. REFER SERVICING TO QUALIFIED SERVICE PERSONNEL.

The lightning flash with arrowhead symbol, within a triangle, is intended to alert the user to the presence of uninsulated “dangerous voltage” within the product’s enclosure that may be of sufficient magnitude to constitute a risk of electric shock to persons.

The exclamation point within a triangle is intended to alert the user to the presence of important operating and maintenance (servicing) instructions in the literature accompanying the product.
FOR CUSTOMERS IN U.K. IMPORTANT
The wires in this mains lead are coloured in accordance with the following code:
GREEN-AND-YELLOW:
Earth
BLUE:
Neutral
BROWN:
Live
As the colours of the wires in the mains lead of this apparatus may not correspond with the coloured markings identifying the terminals in your plug proceed as follows:
- The wire which is coloured GREEN-AND-YELLOW must be connected to the terminal in the plug which is marked by the letter E or by the safety earth 12 or coloured green or green-and-yellow.
- The wire which is coloured BLUE must be connected to the terminal which is marked with the letter N or coloured black.
- The wire which is coloured BROWN must be connected to the terminal which is marked with the letter L or coloured red.
Ensure that your equipment is connected correctly. If you are in any doubt consult a qualified electrician.
"WARNING: THIS APPARATUS MUST BE EARTHED."
DEAR SHARP CUSTOMER
Thank you for your purchase of a SHARP LCD product. To ensure safety and many years of trouble-free operation of your product, please read the Safety Precautions carefully before using this product.
SAFETY PRECAUTIONS
Electricity is used to perform many useful functions, but it can also cause personal injuries and property damage if improperly handled. This product has been engineered and manufactured with the highest priority on safety. However, improper use can result in electric shock and/or fire. In order to prevent potential danger, please observe the following instructions when installing, operating and cleaning the product. To ensure your safety and prolong the service life of your LCD product, please read the following precautions carefully before using the product.
- Read instructions — All operating instructions must be read and understood before the product is operated.
- Keep this manual in a safe place — These safety and operating instructions must be kept in a safe place for future reference.
- Observe warnings — All warnings on the product and in the instructions must be observed closely.
- Follow instructions — All operating instructions must be followed.
- Cleaning — Unplug the power cord from the AC outlet before cleaning the product. Use a dry cloth to clean the product. Do not use liquid cleaners or aerosol cleaners.
- Attachments — Do not use attachments not recommended by the manufacturer. Use of inadequate attachments can result in accidents.
- Water and moisture — Do not use the product near water. Do not install the product in a place where water may splash onto it. Be careful of equipment which drains water such as an air-conditioner.
- Ventilation — The vents and other openings in the cabinet are designed for ventilation.
Do not cover or block these vents and openings since insufficient ventilation can cause overheating and/or shorten the life of the product. Do not place the product on a sofa, rug or other similar surface, since they can block ventilation openings. Do not place the product in an enclosed place such as a bookcase or rack, unless proper ventilation is provided or the manufacturer's instructions are followed. - Power cord protection — The power cords must be routed properly to prevent people from stepping on them or objects from resting on them.
- The LCD panel used in this product is made of glass. Therefore, it can break when the product is dropped or applied with impact. Be careful not to be injured by broken glass pieces in case the LCD panel breaks.
- Overloading — Do not overload AC outlets or extension cords. Overloading can cause fire or electric shock.
- Entering of objects and liquids — Never insert an object into the product through vents or openings. High voltage flows in the product, and inserting an object can cause electric shock and/or short internal parts.
For the same reason, do not spill water or liquid on the product. - Servicing — Do not attempt to service the product yourself. Removing covers can expose you to high voltage and other dangerous conditions. Request a qualified service person to perform servicing.
- Repair — If any of the following conditions occurs, unplug the power cord from the AC outlet, and request a qualified service person to perform repairs.
a. When the power cord or plug is damaged.
b. When a liquid was spilled on the product or when objects have fallen into the product.
c. When the product has been exposed to rain or water.
d. When the product does not operate properly as described in the operating instructions.
Do not touch the controls other than those described in the operating instructions. Improper adjustment of controls not described in the instructions can cause damage, which often requires extensive adjustment work by a qualified technician.
e. When the product has been dropped or damaged.
f. When the product displays an abnormal condition. Any noticeable abnormality in the product indicates that the product needs servicing. - Replacement parts — In case the product needs replacement parts, make sure that the service person uses replacement parts specified by the manufacturer, or those with the same characteristics and performance as the original parts. Use of unauthorized parts can result in fire, electric shock and/or other danger.
- Safety checks — Upon completion of service or repair work, request the service technician to perform safety checks to ensure that the product is in proper operating condition.
- Wall mounting — When mounting the product on a wall, be sure to install the product according to the method recommended by the manufacturer.
- Heat sources — Keep the product away from heat sources such as radiators, heaters, stoves and other heat-generating products (including amplifiers).
- Batteries — Incorrect use of batteries may cause the batteries to burst or ignite. A leaky battery may corrode the equipment, dirty your hands or spoil your clothing. In order to avoid these problems, make sure to observe the precautions below:
- Use the specified batteries only.
- Install the batteries with due attention to the plus (+) and minus (-) sides of the batteries according to the instructions in the compartment.
- Do not mix old and new batteries.
- Do not mix batteries of different types. Voltage specifications of batteries of the same shape may vary.
- Replace an exhausted battery with a new one promptly.
- If you will not use the remote control for a long time, remove the batteries.
- If leaked battery fluid gets on your skin or clothing, rinse immediately and thoroughly. If it gets into your eye, bathe your eye well rather than rubbing and seek medical treatment immediately. Leaked battery fluid that gets into your eye or your clothing may cause a skin irritation or damage your eye.
- Usage of the monitor must not be accompanied by fatal risks or dangers that, could lead directly to death, personal injury, severe physical damage or other loss, including nuclear reaction control in nuclear facility, medical life support system, and missile launch control in a weapon system.
SAFETY PRECAUTIONS (Continued)
- Do not stay in contact with the parts of the product that become hot for long periods of time. Doing so may result in low-temperature burns.
- To prevent fire or shock hazard, do not expose this product to dripping or splashing.
No objects filled with liquids, such as vases, should be placed on the product. - This product must only be connected to a 100-240V, 50/60Hz, grounded (3-prong) outlet.
WARNING:
1) This is a Class A product. In a domestic environment this product may cause radio interference in which case the user may be required to take adequate measures.
2) Batteries shall not be exposed to excessive heat such as sunshine, fire or the like.
3) To prevent injury, this apparatus must be securely attached to the floor/wall in accordance with the installation instructions.
4) An apparatus with CLASS I construction shall be connected to a MAIN socket outlet with a protective earthing connection.
To maintain compliance with EMC regulations, use shielded cables to connect to the following terminals: DVI-D input/output terminals, HDMI input terminal, D-sub input terminal and RS-232C input/output terminals.
If a monitor is not positioned in a sufficiently stable location, it can be potentially hazardous due to falling. Many injuries, particularly to children, can be avoided by taking simple precautions such as:
- Using fixing devices like wall mount brackets recommended by the manufacturer.
- Only using furniture that can safely support the monitor.
- Ensuring the monitor is not overhanging the edge of the supporting furniture.
- Not placing the monitor on tall furniture (for example, cupboards or bookcases) without anchoring both the furniture and the monitor to a suitable support.
- Not standing the monitors on cloth or other materials placed between the monitor and supporting furniture.
• Educating children about the dangers of climbing on furniture to reach the monitor or its controls.
Especially for child safety
- Don't allow children to climb on or play with the monitor.
- Don't place the monitor on furniture that can easily be used as steps, such as a chest of drawers.
Remember that children can become excited while watching a program, especially on a "larger than life" monitor. Care should be taken to place or install the monitor where it cannot be pushed, pulled over, or knocked down. - Care should be taken to route all cords and cables connected to the monitor so that they cannot be pulled or grabbed by curious children.
WARNING:

To prevent the spread of fire, keep candles or other open flames away from this product at all times.
SAFETY INSTRUCTION
- Do not use the monitor where there is a lot of dust, where humidity is high, or where the monitor may come into contact with oil or steam. Do not use in an environment where there are corrosive gases (sulfur dioxide, hydrogen sulfide, nitrogen dioxide, chlorine, ammonia, ozone, etc.). As this could lead to fire.
- Ensure that the monitor does not come into contact with water or other fluids. Ensure that no objects such as paper clips or pins enter the monitor as this could lead to fire or electric shock.
- Do not place the monitor on top of unstable objects or in unsafe places. Do not allow the monitor to receive strong shocks or to strongly vibrate. Causing the monitor to fall or topple over may damage it.
- Do not use the monitor near heating equipment or in places where there is likelihood of high temperature, as this may lead to generation of excessive heat and outbreak of fire.
-
Do not use the monitor in places where it may be exposed to direct sunlight.
-
Please be sure to constantly remove dust and garbage that has attached to the ventilation opening. If dust collects in the ventilation opening or the inside of the monitor, it may lead to excessive heat, outbreak of fire, or malfunction. Please request a cleaning of the inside of the monitor from an authorized SHARP servicing dealer or service center.
- The AC outlet shall be installed near the equipment and shall be easily accessible.
The Power Cord
- Use only the power cord supplied with the monitor.
- Do not damage the power cord nor place heavy objects on it, stretch it or over bend it. Also, do not add extension cords. Damage to the cord may result in fire or electric shock.
- Do not use the power cord with a power tap. Adding an extension cord may lead to fire as a result of overheating.
- Do not remove or insert the power plug with wet hands. Doing so could result in electric shock.
- Unplug the power cord if it is not used for a long time.
- Do not attempt to repair the power cord if it is broken or malfunctioning. Refer the servicing to the service representative.
MOUNTING PRECAUTIONS
• This product is for use indoors.
- A mounting bracket compliant with VESA specifications is required.
- Since the monitor is heavy, consult your dealer before installing, removing or moving the monitor.
- Mounting the monitor on the wall requires special expertise and the work must be performed by an authorized SHARP dealer. You should never attempt to perform any of this work yourself. Our company will bear no responsibility for accidents or injuries caused by improper mounting or mishandling.
- Use the monitor with the surface perpendicular to a level surface. If necessary, the monitor may be tilted up to 20 degrees upward or downward.
- This monitor should be used at an ambient temperature between 32^ (0^) and 104^ (40^) . Provide enough space around the monitor to prevent heat from accumulating inside.
For the monitor in landscape orientation
![7-7/8 [200] 2 50 2 [50] Unit: inch [mm] 2 50 5/16 [7]](/content/2026/06/1280353/images/90bf09cf3f9beafdb35ce959b8ac198d739ede1e214597d8e12db7acc1549b9b.jpg)
For the monitor in portrait orientation
![7-7/8 [200] 2 [50] 2 [50] 2 [50] Unit: inch [mm] 5/16 [7] Power LED](/content/2026/06/1280353/images/ac15d8bb4370d7b1378b0107b81e0c9acbf285df18933005d2000c2af1282d10.jpg)
- If it is difficult to provide sufficient space for any reason such as the installation of the monitor inside a housing, or if the ambient temperature may be outside of the range of 32^ (0^) to 104^ (40^) , install a fan or take other measures to keep the ambient temperature within the required range.
- Do not block any ventilation openings. If the temperature inside the monitor rises, this could lead to a malfunction.
- Do not place the monitor on a device which generates heat.
- Adhere to the following when installing the monitor in its portrait orientation. Failing to adhere to the following may cause malfunctions.
Install the monitor such that the power LED is located on the bottom side.
- Set the THERMAL SENSOR SETTING on the SETUP menu to PORTRAIT. (See OPERATION MANUAL.)
- Use the supplied vertical sticker when you install the monitor in portrait orientation.
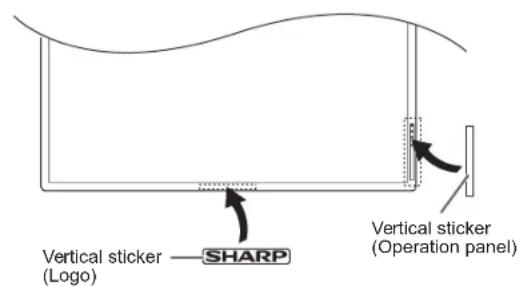
Do not remove the factory-affixed sticker but affix the sticker over it. Be careful not to cover the remote control sensor or buttons.
Supplied Components
If any component should be missing, please contact your dealer.
□ Liquid Crystal Display Monitor: 1
□ Remote control unit: 1
□ Cable clamp: 2
□ Power cord
☐ R-6 battery ("AA" size): 2
☐ CD-ROM (Utility Disk for Windows): 1
□ Setup Manual (this manual): 1
□ Vertical sticker (Logo): 1
☐ Vertical sticker (Operation panel): 1
□ USB flash drive cover: 1
☐ USB flash drive cover screw: 1
□ Model Name / Serial No. label: 1
Indicates the model name and serial number.
□ Cover SHARP logo: 1
□ Stand hole protection cover: 2
Place this sticker onto the SHARP logo to cover the logo.
* SHARP Corporation holds authorship rights to the Utility Disk program. Do not reproduce it without permission.
* For environmental protection!
Do not dispose of batteries in household waste. Follow the disposal instructions for your area.
Preparing the Remote Control Unit
- Press the cover gently and slide it in the direction of the arrow.

natural_image
Diagram of a device casing with internal components and a handle (no text or symbols)-
See the instructions in the compartment and put in the supplied batteries (R-6 ("AA" size) x 2) with their plus (+) and minus (-) sides oriented correctly.
-
Close the cover.
Connections
!Caution
- Be sure to turn off the main power switch and disconnect the plug from the power outlet before connecting/disconnecting cables. Also, read the manual of the equipment to be connected.
- Be careful not to confuse the input terminal with the output terminal when connecting cables. Accidentally reversing cables connected to the input and output terminals may cause malfunctions and the other problems.

For power outlet
- AC input terminal
- HDMI input terminal
- DVI-D input terminal
- DVI-D output terminal
- LAN terminal
- D-sub input terminal
- USB port
- RS-232C input terminal
- RS-232C output terminal
- Audio1 input terminal
- Audio output terminals
- Audio2 input terminals
TIPS
- The audio input terminals used in each input mode are factory-set as follows.
| Input mode Audio input terminal | |
| DVI-D Audio1 input terminal | |
| HDMI[PC], HDMI[AV] HDMI input terminal / Audio1 input terminal | |
| D-SUB[RGB] Audio1 input terminal | |
| D-SUB[COMPONENT], D-SUB[VIDEO] Audio2 input terminals | |
| USB USB port |
- The terms HDMI and HDMI High-Definition Multimedia Interface, and the HDMI Logo are trademarks or registered trademarks of HDMI Licensing LLC in the United States and other countries.
Turning Power On/Off
!Caution
- Turn on the monitor first before turning on the PC or playback device.
Turning on the main power
When the main power is turned on, the power LED lights. Wait until the screen is displayed.

!Caution
- The main power must be turned on/off with the main power switch. Do not connect/disconnect the power cord or turn the breaker on/off while the main power switch is on.
- When switching the main power switch or the POWER button off and back on, always wait for at least 5 seconds. Risk of failure or malfunctioning if the interval is too short.
- For a complete electrical disconnection, pull out the main plug.
■Operation mode
When the monitor is turned on for the first time after being shipped from the factory, the operation mode setting screen will be displayed. Set it to MODE1 or MODE2.
MODE1 ... OFF IF NO OPERATION is set to ON, and STANDBY MODE is set to LOW POWER. (These settings can not be changed.) If there is no operation for 4 hours or more, the monitor automatically enters standby mode. Power consumption in standby mode is also minimized.
MODE2 ... Will perform standard operation. OFF IF NO OPERATION is set to OFF, and STANDBY MODE is set to STANDARD. These settings can be changed.
Even after being set, changes can be made using OPERATION MODE, located in the menu of the monitor. (See OPERATION MANUAL.)
■Date/time setting
- If the time has not been set, such as when the monitor is first turned on, set the date and time in DATE/TIME SETTING of the SETUP menu. Be sure to set the date and time.
TIPS
- Set the time on a 24-hour basis.
- The clock stops if the main power remains off for about 1 week.*
(* Approximate time. The actual time varies depending on the state of the monitor.)
Turning power on/off
Press the POWER button to turn the power ON/OFF.
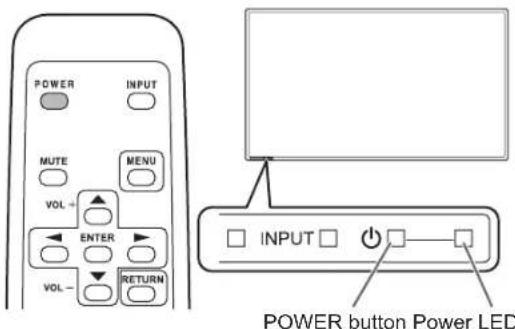
| Status Status of the monitor | |
| Green lit Power on | |
| Orange lit Power off (Standby mode) | |
| Green flashing Input signal waiting mode | |
Specifications
| Model PN-Y555 PN-Y475 PN-Y425 | |||
| Power requirement | AC 100 - 240 V, 1.7 A, 50/60 Hz | AC 100 - 240 V, 1.5 A, 50/60 Hz | AC 100 - 240 V, 1.4 A, 50/60 Hz |
| Operating temperature * 32°F to 104°F (0°C to 40°C) | |||
| Operating humidity 20% to 80% (no condensation) | |||
| Power consumption 150 W 135 W 120 W | |||
| Dimensions (excluding protrusions) inch (mm) | Approx. 49-3/16 (W) x 2-5/8 (D) x 28-5/16 (H) (1249 x 66 x 719) | Approx. 42-3/8 (W) x 2-5/8 (D) x 24-1/2 (H) (1077 x 66 x 622) | Approx. 38-1/8 (W) x 2-5/8 (D) x 22-1/16 (H) (968 x 66 x 561) |
| Weight lbs. (kg) | Approx. 55.2 (25.0) Approx. 36.4 (16.5) Approx. 32.0 (14.5) | ||
* Temperature condition may change when using the monitor together with the optional equipments recommended by SHARP. In such cases, please check the temperature condition specified by the optional equipments.
As a part of our policy of continuous improvement, SHARP reserves the right to make design and specification changes for product improvement without prior notice. The performance specification figures indicated are nominal values of production units. There may be some deviations from these values in individual units.
Mounting Precautions (For SHARP dealers and service engineers)
- When installing, removing or moving the monitor, ensure that this is carried out by at least 2 people.
- Be sure to use a wall-mount bracket designed or designated for mounting the monitor.
- This monitor is designed to be installed on a concrete wall or pillar. Reinforced work might be necessary for some materials such as plaster / thin plastic board / wood before starting installation.
- This monitor and bracket must be installed on a wall which can endure at least 4 times or more the weight of the monitor. Install by the most suitable method for the material and the structure.
- To attach a VESA-compliant mounting bracket, use M6 screws that are 5/16 inch (8 mm) to 3/8 inch (10 mm) longer than the thickness of the mounting bracket.
- Do not use an impact driver.
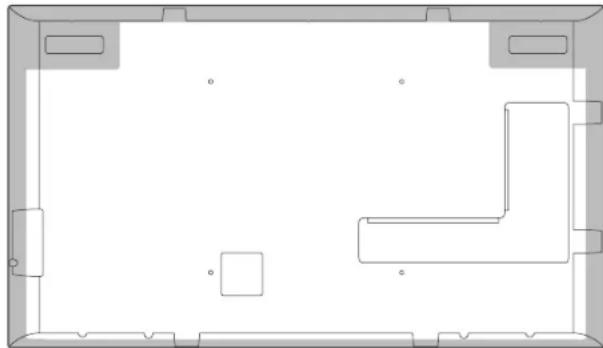
- When moving the monitor, hold the parts marked by ____ below. Do not hold the LCD panel. This may cause product damage, failure, or injury.
natural_image
Top-down schematic of a room layout with furniture and doorways (no text or labels)• After mounting, please carefully ensure the monitor is secure, and not able to come loose from the wall or mount.
- Do not use any screw holes other than VESA holes for installation.
Table des matières
[FRANÇAIS]
INFORMATION IMPORTANTE....1
CHER CLIENT....1
PRÉCAUTIONS DE SÉCURITÉ ......2
MESURES DE SÉCURITÉ....4
PRÉCAUTIONS POUR LE MONTAGE....4
Composants fournis....5
natural_image
Diagram of a device casing with internal components and a handle (no text or symbols)natural_image
Top-down schematic of a room layout with furniture and doorways (no text or labels)natural_image
Diagram of a device casing with internal components and an arrow indicating direction (no text or symbols)!Precaución
natural_image
Top-down schematic of a room layout with furniture and doorways (no text or labels)natural_image
Line drawing of a device casing with a handle and internal components (no text or symbols)natural_image
Top-down schematic of a room layout with furniture and doorways (no text or labels)natural_image
Diagram of a device casing with internal components and a directional arrow (no text or symbols)natural_image
Top-down schematic of a room layout with furniture and doorways (no text or labels)This is a Class A product. In a domestic environment this product may cause radio interference in which case the user may be required to take adequate measures.
WARNUNG

- Information on the Disposal of this Equipment and its Batteries
- IMPORTANT INFORMATION
- CAUTION
- FOR CUSTOMERS IN U.K. IMPORTANT
- DEAR SHARP CUSTOMER
- SAFETY PRECAUTIONS
- SAFETY PRECAUTIONS (Continued)
- WARNING:
- Especially for child safety
- SAFETY INSTRUCTION
- The Power Cord
- MOUNTING PRECAUTIONS
- Supplied Components
- Preparing the Remote Control Unit
- Connections
- !Caution
- TIPS
- Turning Power On/Off
- Turning on the main power
- ■Operation mode
- ■Date/time setting
- Specifications
- Mounting Precautions (For SHARP dealers and service engineers)
- Table des matières
- [FRANÇAIS]
- !Precaución
- WARNUNG
Brand : SHARP
Model : PNY555
Category : Monitor