
SBM-4705 - Bread maker SINBO - Free user manual and instructions
Find the device manual for free SBM-4705 SINBO in PDF.


| Product type | Bread machine |
| Brand | Sinbo |
| Model | SBM-4705 |
| Dimensions (L x W x H) | 30 x 30 x 35 cm |
| Weight | 5 kg |
| Power supply | 220-240 V, 50/60 Hz, 600 W |
| Pan capacity | Up to 1.5 kg of bread |
| Number of programs | 12 automatic programs |
| Main functions | Bread baking, pizza dough, jam, cake, yogurt, leavened dough |
| Delay timer | Yes, up to 15 hours |
| Crust control | 3 levels: light, medium, dark |
| Keep warm | Yes, up to 60 minutes |
| Display | LCD screen with backlight |
| Pan material | Non-stick |
| Included accessories | Baking pan, kneading paddle, removal hook, measuring cup, spoon |
| Care and cleaning | Wash the baking pan and kneading paddle with warm soapy water; wipe the housing with a damp cloth |
| Safety | Overheat protection, automatic shutdown in case of overload |
| Spare parts and repairability | Baking pan and kneading paddle available; repair by authorized after-sales service |
| General information | 1-year warranty, CE certified, user manual included |
Frequently Asked Questions - SBM-4705 SINBO
User questions about SBM-4705 SINBO
0 question about this device. Answer the ones you know or ask your own.
Ask a new question about this device
Download the instructions for your Bread maker in PDF format for free! Find your manual SBM-4705 - SINBO and take your electronic device back in hand. On this page are published all the documents necessary for the use of your device. SBM-4705 by SINBO.
USER MANUAL SBM-4705 SINBO

for Turkey
Değerli Müşterimiz,
Children being supervised not to play with the appliance.
This appliance is not intended for use by persons (including children) with reduced physical, sensory or mental capabilities, or lack of experience and knowledge, unless they have been given supervision or instruction concerning use of the appliances by a person responsible for their safety. Children should be supervised to ensure that they do not play with the appliance.
This device can only be used by children older than 8 years old or physically disabled or hearing-impaired or people with lessen mental faculties or the inexperienced or ignorant people after providing sufficient information for secure utilization and by informing about the possible hazards or under supervision. Children should not play with this device. The cleaning and maintenance activities carried by children should be under supervision.
ATTENTION: Charcoal and other similar flammable fuels should not be used!
5) Fişin takılması
IMPORTANT SAFETY INSTRUCTIONS
General safety measures shall be followed while operating this machine as well as all electrical appliances. In addition to personal injury there is a risk of damaging the device and impairing the features of the devices. These two issues are specified with the following phrases:
CAUTION: Risk of personal injury
IMPORTANT: Risk of damaging the device
Also, the following safety recommendations shall be observed.
Position of the Appliance
- Do not place the device on the edge of worktops.
- Operate the device on level and stable surfaces.
- Do not use the appliance outdoors.
Cables
- The cable shall reach to the device from the socket without tensioning the connection points.
- Do not let the mains cable hang over the edge of worktops and keep it out of children's reach.
- Do not keep the cable stretched between the socket and an open surface (for instance, between a socket located at a low level and table).
- Do not place the cable on hot surfaces which can damage it.
Safety measures;
CAUTION: Do not touch hot surfaces! Use oven gloves to lift the hot cooking pan. Do not cover the steam vents.
CAUTION: Avoid contacting moving parts!
- Do not immerse the appliance, cable and plug in water or other liquids.
- Pay utmost attention when carrying appliances which have hot content in them.
- Do not use the bread maker to store utensils; do not keep kitchen utensils inside the appliance to avoid any risk of fire or electric shock.
- Do not operate the appliance with wet or moist hands.
Children
Never allow children to use this appliance. When left unattended while appliances are running and cooking process is being carried out, children can be exposed to risks.
Teach the children about the risks contained in kitchen and warn them not to attempt to reach areas which they cannot see properly.
OTHER SAFETY ISSUES
- Do not operate the appliance if the power cable is damaged for any reason. Refer to the nearest technical service center to replace the cable with the original spare one.
- Do not use accessories with the appliance since they may damage the appliance.
- Do not place the appliance on or near gas/electric burners or hot ovens.
- Do not place the cooking pan or any other item on the appliance to avoid damaging the appliance.
- Do not use scouring pads for cleaning. Do not wash cooking pan, kneading blade, scale cup or spoon in the dishwasher.
- Protect the appliance and cable against heat, direct sunlight, humidity, sharp objects etc.
- Place the cooking pan properly before operating the appliance.
- Always remove the plug from the socket whenever the device is not in use, when attaching accessories to the device, cleaning the device or whenever a trouble occurs. To unplug the appliance hold the plug and do not pull the cable.
KNOWING YOUR SÍNBO BREAD MAKER
You can cook tasty, hygienic and healthy breads with SINBO bread makers. Cooking bread will not be a hassle since this computer assisted appliance will do most of the work for you.
Bread Maker is as easy as the following three steps:
- Add the ingredients.
- Choose the suitable program from the menu and press start button.
- Wait until the bread is ready.
Note: Do not stop the appliance while cooking process is going on. Capable of cooking varieties of bread in addition to wholemeal bread, this appliance enables you to prepare dough for your sandwiches and pizzas and to cook cakes and jams. Everything is easy and as tasty as a homemade dish.
Things that you should know prior to the first use
Take a few minutes to read this manual before operating the appliance and keep the manual in a safe place for future reference. Pay duly attention to observe the safety instructions.
- Unpack the bread maker carefully and remove all packaging material.
- Clean off the dust which may have occurred during packaging.
- Lubricate the cooking pan with oil, butter or margarine before using it for the first time.
- Clean it once more.
-
Fix the kneading blade on the shaft of the cooking pan.
-
Wipe the cooking pan, kneading blade and outer surface of the bread maker with a clean and damp cloth. Surface of the cooking pan is coated with a non-stick material. Never apply scouring pads or any adhesive material on any part of the bread maker.
Note: Some of the components of the device are lubricated during manufacturing. Therefore, it is normal that small amount of smoke is produced when the device is operated for the first time.
FEATURES
Operating the timer
The bread is preferred to be ready at a later hour timer settings can be used. Maximum timer setting is 13 hours. Availability of these settings according to the problems are referred in "Cooking cycle times" section. These settings shall not be used while applying recipes which include ingredients that can spoil easily such as eggs, fresh milk, sour cream or cheese.
- Upon deciding the time to have the bread ready, calculate the time difference between the current time and target time. For instance, if you like to have the bread ready at 08:00 in the morning and the current time is 19:30; the time difference in between is 12 hours and 30 minutes. Therefore, timer buttons will be used until 12:30 digits appear on the information display.
- The time is entered by time digit increase and decrease buttons. Timer buttons enable you to increase and decrease the value in 10 minute periods. When "Start" button is pressed ":" symbol will start to flash.
- If the time information you have entered is incorrect keep "stop" button pressed for 2 seconds. Timer setting will be cancelled and normal program will be restored. Repeat steps 1 and 2 to specify the time again.
- Timer setting can be adjusted up to 13 hours. This time includes the period from the completion of the cooking process of the bread and being ready to eat.
Warning signal tone
Warning signals are heard in the following conditions:
- When a button is pressed.
- When the program is completed
- When keep warm time has elapsed.
- When ingredients such as wheat, fruit, nuts etc. are required to be added to the dough prior to the second kneading phase. Open the lid of the appliance to add the ingredients and close the lid again.
Power cut offs
After a short power cut off:
- Press "start" button in the case that the program has not entered the rising stage yet; this way, the appliance continues to run the automatic repeat function again.
- In the case that the power failure occurs during rising stage, the dough is left for fermentation and rising; then the baking program is selected to resume baking the risen dough. This way the dough does not spoil.
Ambient temperature
Bread maker can operate in environments with different temperature levels; however, sizes of breads cooked in a warm room and a cold room can vary. Recommended ambient temperature is at the range of 15-34°C.
Power Requirement
Ensure that the voltage rating printed on the appliance corresponds to the AC (alternative current) mains supply at your house. In the case that the sockets in your house are not compatible with the plug of the device, the plug can be replaced with the compatible one.
CAUTION: This appliance shall only be used with an earthed socket.
Cleaning and Maintenance of the Appliance
- CAUTION: Unplug the appliance before cleaning in order to avoid electric shock hazard.
- Let the bread maker to cool down.
IMPORTANT: Never immerse the device or its lid in any liquid to avoid electric shocks and damage to the appliance. - Exterior cleaning: Wipe the lid and external surface of the appliance with a damp or slightly wet cloth.
- Interior cleaning: Use a damp cloth or sponge to wipe the interior of the appliance.
- Cooking pan: Wash the cooking pan with lukewarm water; it is not obligatory to use soap for cleaning. Take care not to scratch the non-stick surface. Let the cooking pan to dry before inserting it inside the housing of the appliance.
- Cooking pan, measuring scale and spoon and kneading blade shall not be cleaned in dishwasher.
- Cooking pan shall not be immersed in water for extended periods since operating problems may occur with the bottom axis. Especially, the outer bottom part of the pan shall not contact with water.
- You can store the appliance after it has completely cooled down.
Do not use following chemicals for cleaning:
- Painting thinner
- Gasoline
- Steel wool pad
- Buffing powder
- Chemical dust cloth
Be careful when cleaning the non-stick surface. Avoid damaging the coating and do not use metal utensils such as scraper, fork or knife. Color of the coating of the pan may change upon long term use, however, this is only caused by humidity and steam and does not impair the performance of the appliance or the quality of the bread. The opening on the kneading blade shall be cleaned and attached to the rotating axle in the pan upon lubricating with a drop of edible oil. This process prevents the blade from sticking.
- Avoid the holes and openings of the appliance to be clogged with dust.
Storing the appliance
You can store the appliance after all parts including the viewing window are completely dry. Do not place anything on the lid.
Steam Discharge Rack: It is inserted in the bottom slot on the front part of the device.
Bar: It is used to remove the blade from the bread in case it is stuck into it.

Control Panel Buttons, Information Display and Functions
Information display overview;
- Indicates the selected crust color level.
- Indicates the selected weight.
- Indicates the selected program number.
- Indicates the remaining time of the cooking process.
For instance (3:20 means "3 hours 20 minutes left"; 0:20 means "20 minutes left").
- Indicates the temperature warning (See "Troubleshooting" section).
Warning display
- In the case that "H: HH" is displayed on the screen (See Figure 1) upon starting the program, interior temperature is very high. In this case the program shall be stopped. The lid shall be opened and the appliance shall be left to cool down for 10-20 minutes.
- In the case that In the case that "E: EE" is displayed on the screen (See Figure 2) upon starting the program, there is temperature sensor connection failure. Sensors shall be checked carefully by an authorized service technician.
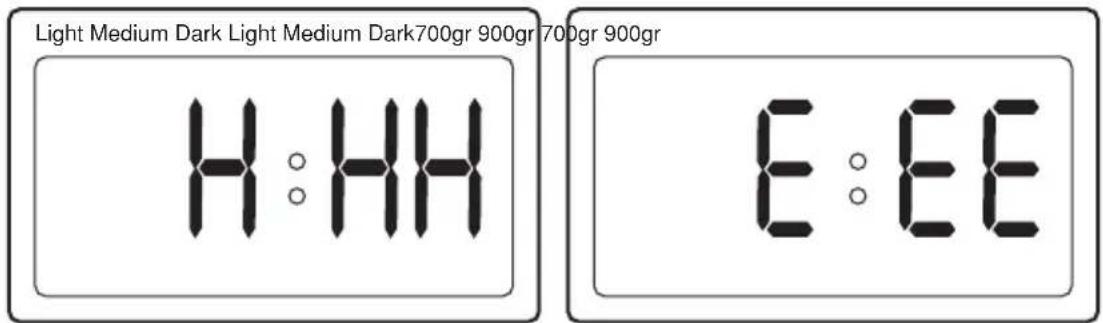
Figure 1 Figure 2
Timer buttons
They adjust the bread cooking time. It is available for all programs except for "Fast cooking". For instance; in the case that ingredients are placed in the appliance at 20:30 in the evening and the bread is required to be ready at 07:00 in the morning; timer buttons are pressed until the value of 10:30 is achieved since the time difference in between is 10:30 and the appliance is operated. The appliance is programmed to make the bread ready at 07:00 following that hour.
Crust color button
It is used for selecting light, medium and dark crust options in the concerning programs. When the button is pressed repeatedly the selected level is displayed on the information screen as light, medium and dark.
Start/Stop button
When the button is pressed for 1 second (:) symbol is displayed on the screen after beep sound and the program starts to operate. Similarly, when the button is pressed for 2 seconds the program is terminated with beep sound.
Loaf size button
When the bread maker is operated the loaf size is adjusted for crispy bread. For regularly baked loafs (700 and 900 g. sizes) press loaf size button for once.
Menu button
It is used to select one of the different cooking programs ranging 1-12.
Opening Button
Used to open and close the lid.
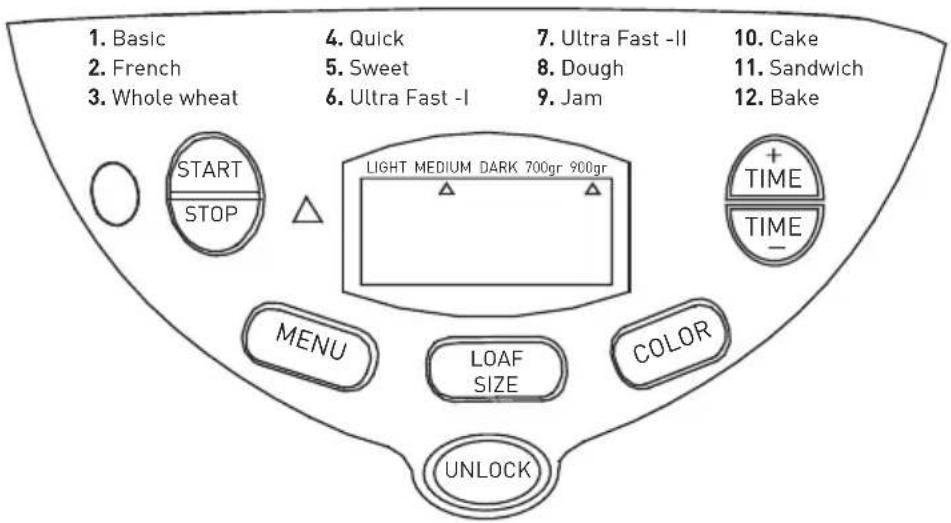
Program Definitions
Following program types can be selected using the menu button.
1. Basic
(3:00 and 2:53) is used for baking regular white bread. This program can also be used for other types of breads. Cooking time is 2 hours and 53 minutes for 700 g loaf and 3 hours for 900 g loaf.
2. French
(3:50 and 3:40) Its specialty is longer kneading and cooking time. It has a lighter color compared to white bread. Has a softer texture. Cooking time is 3 hours and 40 minutes for 700 g loaf. Cooking time is 3 hours and 50 minutes for 900 g loaf.
3. Whole Wheat
(3:40 and 3:32) This program is used to cook breads which contain specific amount of wheat skin. This program employs a longer rising period to soak wheat skin with water and expand it. Timing adjustments are not recommended using timer buttons in this program since the results will be unfavorable. Cooking time is 3 hours and 32 minutes for 700 g loaf and 3 hours and 40 minutes for 900 g loaf.
4. Quick
(Quick Bread [1:40] Used for cooking white bread in a short time. This program is used to cook denser and smaller bread.
5. Sweet
(2:55 and 2:50) Used for cooking bread that is crispier and sweeter compared to the ones cooked with normal settings. Caramelized sugar gives a crispy crust to the bread. Cooking time is 2 hours and 50 minutes for 700 g loaf and 2 hours and 55 minutes for 900 g loaf.
6. Ultra Fast -I
Kneading, rising and baking processes for a 700 g loaf are completed in a short time. Cooked bread does not rise too much, becomes soft and white.
7. Ultra Fast -II
Kneading, rising and baking processes for a 900 g loaf are completed in a short time. Cooked bread does not rise too much, becomes soft and white.
8. Dough (1:30)
This setting option is only used for kneading dough and not used for cooking bread. The dough is removed from the pan and shaped into sandwiches, pizza etc. All types of dough can be obtained using this program. Quantity of ingredients shall not exceed 900 grams.
9. Jam (1:20)
This program is used to prepare jam using fruit. Do not exceed the maximum amount of ingredients and avoid the jam to boil in the bread pan and to leak in the housing of the device due to overflowing. Stop the device in such case. Lift the pan carefully and clean it when it cools down to a certain extent.
10.Cake (2:50)
This setting mixes the ingredients and cooks them for a certain while. Before adding the ingredients to the appliance two different groups of ingredients shall be mixed in different containers (refer to your recipe).
11. Sandwich (3:00 and 2:55)
It cooks softer loafs with a lighter texture having the taste of sandwich bread. Cooking time is 2 hours and 55 minutes for 799 g loaf and 3 hours for 900 g loaf.
12. Bake (1:00)
This setting is only intended for cooking process and used to increase the cooking time on the selected setting. This function is very useful to increase consistency of jams and marmalades. Set time is 1 hour (1:00) when the operation commences and it counts down in 1 minute intervals.
Upon completion of baking (additional cooking) process you shall turn off this function by pressing "stop" button. It is recommended to check the cooked bread or jam after the first 10 minutes and following 10 minute intervals. Cooking time can be increased in 10 minute intervals by pressing timer setting button. In the case that the baking program is selected right after completion of another program and "H:HH" is displayed on the screen; open the lid and remove the pan and let it cool down for 10 minutes. Upon cooling, place the cooking pan and the content in the pan, set the program and press "start" button.
Using the Bread Maker
1) Removing the cooking pan
Upon opening the lid of the device, remove the cooking pan by holding it from the handle and rotating it counterclockwise and leave it on the bench (Adding the ingredients while the pan is outside the device is important to avoid the ingredients to spill in the housing where heating elements are located).
2) Installing the kneading blade
Fix the kneading blade on the rotating shaft by pushing it down.

3) Measuring the ingredients
Measure the ingredients and add them one by one in the cooking pan according to the sequence In the list (Refer to "Measuring the ingredients" section on the following pages for further information).
- Ensure that the yeast you have added in the pan does not contact with water or other ingredients; otherwise, the yeast will be activated instantly.
- Use lukewarm water at the temperature of approximately 21-28 °C (cold water in summer, lukewarm water in winter).
Place the pan inside the appliance and fix it in its place by rotating it clockwise. Close the lid upon this process.
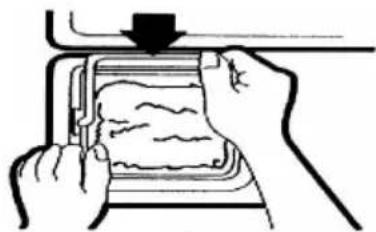
5) Inserting the plug
When you insert the plug in the socket the appliance will be automatically set to normal Bread Maker menu and normal period.
- When pressing any button on the device a "beep" sound is heard indicating that the button is operated.
6) Selecting program
You can select one of the 12 different programs of the appliance by pressing the menu button.
7) Loaf size selection
When loaf size button is pressed selection is made between crispy and 700 g and 900 g. When the appliance is operated every time it is adjusted for crispy bread.
8) Selecting crust color level
Color of the crust is adjusted by pressing "Color" button. It can be adjusted as light, medium or dark.
9) Adjusting the timer
If you don't want the machine to operate immediately or require the bread to be ready at a specific time you can use the timer program.
10) Staring the cooking process
Press "Start/Stop" button to operate the appliance. Remaining time is displayed on the screen by counting down in one minute intervals.
11) Operation
Processes carried out with the bread maker are operated according to the program phases indicated in "Cooking cycle times" section, automatically. In the case that the appliance is set to two stage kneading process, it warns the user with a beep sound when the time for adding other ingredients such as fruit/nuts comes.
- Steam may come out of the openings on the device during cooking process and this is a normal condition.
12) Completion of the cooking process
In the case that the program is completed and the bread is cooked 0:00 is displayed on the screen and the user is warned with beep sound.
13) Keep warm operation
Using the keep warm function how air inside the device is circulated in the machine for an additional period of 60 minutes (see "Cooking cycle times" section). To ensure a good cooking result cooking pan shall be removed from the appliance during warm keeping process or upon completion of the cooking program. When keep warm time has elapsed beep sound is signaled for 10 times.
14) Removing the pan from the appliance
Press "Stop" button and open the lid.
CAUTION: Use protective gloves to lift the bread pan if it is too hot.
15) Removing the bread from the pan
Let the bread cool down in the pan for 15 minutes and tip the pan over and hit its bottom a couple of times. Place the bread on a corrugated surface which provides ventilation from the bottom. Pour lukewarm water inside the pan to avoid the kneading blade stick to the rotating shaft.
- Sometimes the blade sticks to the bread loaf. In this case let the loaf to cool down and remove is using the bar supplied with the appliance without scratching the surface or use a wooden or plastic kitchen utensil to avoid scratching the non-stick surface.
NOTE: Lid of the device shall not be opened during cooking process. This affects the quality and rising level of the bread badly. Open the lid only when the selected program requires addition of other ingredients.
CAUTION: Unplug the appliance when not in use.
Measuring the ingredients
The most important phase in using the bread maker is precise and accurate measurement of the ingredients; otherwise the cooking results will not be favorable. Ingredients shall be added in the cooking pan in quantities and using the method specified in the recipes. Measurement of liquid and dry ingredients are as follows:
Measuring liquids
Use the supplied measuring cup. Measuring cup shall be placed on a level surface and the level of the liquid shall be brought to the measuring mark. Quantities shall not be measured approximately since this may exceed the critical levels specified in the recipes.
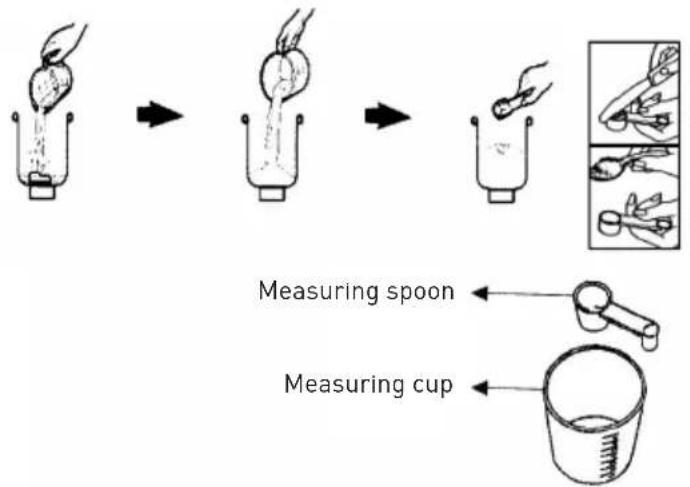
- Liquids (Water, oil, milk) 2. Dry (Flour, sugar, salt) except for yeast 3. Yeast
Measuring dry ingredients
Dry ingredients shall be measured with the supplied measuring cup and spoon. Dry ingredients shall be measured by filling the measuring cup with the ingredient using spoon and leveling off the excess using a knife. Additional ingredients may impair the proportions of the recipe. Do not add additional flour unless specified. Use the measuring spoon to measure small quantity ingredients (yeast, sugar, salt, milk powder, honey, molasses). Measurements shall be made accurately.
Otherwise, small variances will effect the obtained result. Plastic measuring spoon supplied with the appliance is sized as tablespoon for larger end and teaspoon for the smaller end.
NOTE: PRACTICE AND EXPERIENCE MAKES BETTER.
QUESTIONS AND ANSWERS
QUESTION 1: Can the shape and height of the bread vary?
ANSWER 1: Yes it can. This can change depending on the ambient temperature. The bread may rise excessively or may not rise well in extremely hot and cold environments. Also, in the case that ingredients such as fruit, nuts, grains etc. added to the bread is in excessive quantities unlike specified in the recipe, the appearance and height of the bread is affected. Measure the ingredients you use precisely and ensure that they are fresh. Why are wholemeal breads always small? It is normal that wholemeal breads are smaller and denser compared to regular bread types. Since whole wheat flour is heavier than white bread flour, it does not rise as much during Bread Maker process.
QUESTION 2: Why does not the bread rise?
ANSWER 2: If you fail to add yeast or prepare the bread without installing the mixing hook the bread will not rise. In the case that the yeast is not enough or fresh the bread does not rise and remains small. Pay particular attention to the type, quantity and freshness of the yeast. Do not use yeasts which are expired or unpacked for a long time.
QUESTION 3: Why does the bread smell bad?
ANSWER 3: Excessive amount of yeast and stale ingredients cause bad odor. Odor may occur in fast bread program particularly, since large quantity of yeast is used.
QUESTION 4: Why is the middle part of the bread hollow?
ANSWER 4: Air may collect here during kneading. In the case that this gas is not discharged during fermentation the bread cooks with that air.
QUESTION 5: Can the mixing hook come out with the bread?
ANSWER 5: This is a normal condition. You can remove the hook from the bread using a plastic or non-abrasive utensil.
QUESTION 6: What is the reason for timer settings to be within the range of 4 and 13 hours?
ANSWER 6: The entire process takes at last 3:00 hours. In the case that time is set to more than 13 hours the ingredients may spoil.
QUESTION 7: Is it possible to multiply or divide the quantities of ingredients specified in the recipes?
ANSWER 7: No. Ensure that the quantities specified in the recipe are observed and the ingredients are measured accurately.
QUESTION 8: Can noise be heard during night when using time setting?
ANSWER 8: Yes. You can hear the motor operating at night when the appliance kneads the dough.
QUESTION 9: What shall be done when the appliance does not work upon completion of Bread Maker process, and sound alarm is heard continuously and HHH is displayed on the screen?
ANSWER 9: The appliance will not operate since it is hot. Press start/stop button at first and turn off the appliance, open the lid of the appliance and remove the cooking pan outside and let it to cool down.
QUESTION 10: What shall I do if LLL is displayed on the screen and signal sound is heard when start button is pressed?
ANSWER 10: The appliance will not operate since the ambient temperature is too low. Turn off the device by pressing start/stop button. Leave it in a warmer environment.
Optimal ambient temperature is within the range of (15 °C-25 °C).
QUESTION 11: What shall I do if EEE is displayed on the screen and signal sound is heard when start button is pressed?
ANSWER 11: The appliance will not operate since the ambient temperature is too high. Turn off the device by pressing start/stop button. Leave it in a cooler environment.
QUESTION 12: Why is the outer surface and bottom of the loaf humid?
ANSWER 12: In the case that the loaf is left in the appliance for extended periods longer than the required time the loaf becomes humid since the steam inside cannot be discharged. It will turn into normal if you remove the bread and keep it on a grill.
QUESTION 13: What shall I do if (0:00) is displayed on the screen upon completion of the Bread Maker process?
ANSWER 13: This signal sound indicates that the Bread Maker process is completed and warm keeping program is being executed. You can turn off the appliance and remove the bread if you like.
QUESTION 14: What shall I do if I smell a slight burning odor and see smoke coming out?
ANSWER 14: If ingredients are placed in the pan while it was in the appliance, residues getting in the appliance and on the resistor causes smoke and odor during cooking process. Place the ingredients in an order while the pan is outside of the appliance.
QUESTION 15: Sometimes, there is flour on the outer surface of the loaf, what is its reason?
ANSWER 15: Sometimes the dough sticks to the pan if the flour quantity is not sufficient, in this case extra flour shall be added. You can add extra flour in the pan using utensils that do not scratch the surface. This way you can avoid flour residues on the pan edges. If you forget to mix in the extra flour you have added in, you can cut the section with flour residue on the outer surface of the bread using a sharp knife.
QUESTION 16: How can I preserve the bread upon cooking?
ANSWER 16: Let the bread to cool down on a corrugated surface upon completion of the cooking process. If you slice the bread while it is still hot you will cause deformation and the texture will lose its good quality. You can carry out cutting process using a sharp knife or electric powered knife. Keep bread loafs in whole or in slices in an airtight envelope. You can keep bread in refrigerator and heat it up for 15-20 minutes using the baking function of the appliance before serving.
QUESTION 17: What shall I do in case of power failures?
ANSWER 17: In the case of extended power failures restart the program if the power failure has occurred during kneading. In the case that power failure has occurred in the beginning of the rising process do not operate the appliance and wait until it rises, bake the risen dough using the baking function using the program selection button. In the case that the power failure has occurred during cooking process run the baking function again and cook for the specified length.
QUESTION 18: Why does the dough not mix and strange noises come from the motor?
ANSWER 18: Kneading blade or cooking pan is not installed correctly. Ensure that the pan contacts to the bottom of the interior of the appliance housing and ensure that it clicks in to its position.
QUESTION 19: Why shall I not use timer function to cook bread with fresh milk?
ANSWER 19: If the waiting time set on the appliance is too long the milk will spoil. Extended timing functions shall not be used with recipes which contain ingredients which are easily spoiled such as milk and eggs.
QUESTION 20: Why shall I add the ingredients in the cooking pan in a specific order?
ANSWER 20: This enables the bread maker to mix the ingredients in the most effective way. This also ensures that yeast and liquids do not contact with each other prior to kneading process (especially with extended timer settings).
QUESTION 21: How can I remove the kneading blade that is stuck with the cooking pan?
ANSWER 21: Kneading blade can stick to its position upon cooking process. If you pour warm or hot water on the knife it will be easily removed. If you still cannot remove it let it rest for 30 minutes in hot water.
QUESTION 22: Can I wash the cooking pan in dishwasher?
ANSWER 22: No. You shall wash cooking pan and kneading blade manually.
QUESTION 23: When shall I add ingredients such as raisins, nuts etc. in the dough?
ANSWER 23: While entering the second kneading cycle beep sound is heard for 10 times to alert you that you shall add the auxiliary ingredients such as raisins, nuts etc. You shall add them at this time.
QUESTION 24: The bread shrinks in the middle part or shrinks completely after a while upon swelling. Why?
ANSWER 24: The bread may have swollen too much. Reduce the amount of yeast to reduce the rate of swelling. The bread may shrink if the consistency of the bread is low (too much water content), use ingredients in specified quantities.
QUESTION 25: Is it important that the ingredients to be added in the cooking pan to be at room temperature?
ANSWER 25: Ingredients shall be neither too hot nor too cold; in brief, they shall be at room temperature. Water temperature shall be at 21-28 °C.
QUESTION 26: Can I mix yeast and water beforehand?
ANSWER 26: Absolutely not. The yeast shall be kept dry and shall be mixed in the mixture at the last step by adding it on right top of the flour pile while filling the pan. Importance of this issue becomes more significant especially in cases that cooking will be delayed using timer function.
QUESTION 27: I mixed in mashed oatmeal, pumpkin seed, nuts etc. ingredients in the bread and the bread comes out very dry. Why?
ANSWER 27: Soak the dry ingredients you are going to add in the bread dough 1 hour before hand in water and let them become absorbed. If you don't apply this method, ingredients you add absorb the water of the dough and this results in a dry dough and low quality breads. Also, as specified in the concerning sections of the operating manual, you shall add these ingredients in the dough in the further steps.
QUESTION 28: Inside of the bread is too dense and there is no pore or bubble. Inside of the bread becomes sticky when I press on it. Why?
ANSWER 28: The bread shall contain different sizes of pores, however, this depends on the type of flour and bread. The bread shall not be sticky and restore its form when released. If it remains stuck this means that the dough is not thoroughly mixed, cooked or not enough time is given for the fermentation process. You won't generally experience such problems with the bread maker you are using in normal conditions; the problem possibly results from the failure to measure the ingredient quantities correctly.
QUESTION 29: Inside of the bread I have cooked is not white as bought from bakery shops and it is yellowish.
ANSWER 29: Inside of the bread shall be in light yellowish color, therefore, it is ideal to use yellowish white wheat bread flour which is not whitened with chemicals. Pores in the bread shall be bright and not matt.
SPECIFICATION
- Loaf sizes selection : 750-900 g
- With 12 digital programs and speed button for fast program
• 13 hours programmable delay timer - 60 minutes keep warm function
- Adjustable crust control: light, medium or dark
- Dishwasher safe, non-stick bread pan & kneading blade
- Removable bread pan for easy cleaning
- Cool-touch walls
- Non-slip feet
- Includes measuring cup & spoon
- AC230V, 50Hz, 600W
SINBO SBM 4705 MACHINE À PAIN
MODE D'EMPLOI
CONSIGNES DE SÉCURITÉ IMPORTANTES
3) Zutatenmessung
BITNE SIGURNOSNE UPUTE
Tipke kontrolne ploče, Informacijski zaslon i Funkcije
Informacijski zaslon op 'cenito;
- Pokazuje odabranu razinu zape^cenosti;
- Pokazuje odabranu te zinu;
- Pokazuje broj odabranog programa;
- Pokazuje preostalo vrijeme pe^cenja kruha;
Na primjer; (3:20 “ostalo su jo‘s 3 sata 20 minuta”; 0:20 “ ostalo je jo‘s 20 minuta).
- Pokazuje toplotno upozorenje (Pogledaj u dio “Rje savanje Problema”).
Zaslon upozorenja
- Ako se nakon početka programa na zaslonu pojavi poruka "H:HH" (vidi Sliku) to znači da je unutrašnja temperatura previsoka. U tom slučaju treba zaustaviti program. Podignite poklopac i sačekajte da se aparat ohladi 15-20 minuta.
- Ako se nakon početka programa na zaslonu pojavi poruka "E:EE" (vidi Sliku 2) to znači da je temperatura izgubila kontakt sa senzorom. U tom slučaju potrebna je pažljiva kontrola senzora od strane ovlaštenog tehničara.

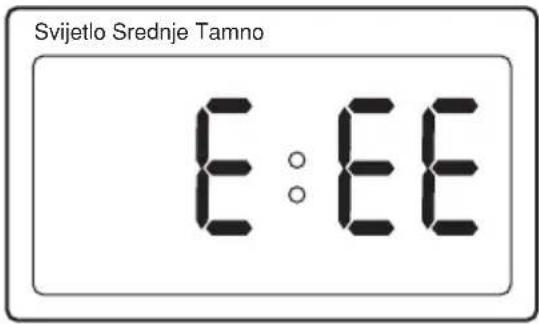
Sliku 1 Sliku 2
3) Mjerenje sastojaka
Izmjerite potrebne sastojke i prema redosljedu na listi dodajte jedan po jedan u posudu za pečenje (Proučite dio "Mjerenje sastojaka" na jednoj od narednih stranica u kom se nalaze detaljni podaci).
5) Umetanje utika^ca
Nakon umetanja utika ca u uti cnicu aparat 'ce automatski biti pode sen za izradu normalnog kruha i normalno vrijeme pe' cenja.
- Pritiskom na bilo koji gumb na aparatu oglasi'ce se zvuk "bip" 'sto ozna' cava da on radi.
6) Izbor programa
Pritiskom na gumb izbornik/menu odaberite jedan od 12 razli citih programa na aparatu.
7) Izbor veli^cine vekne/somuna
Pritiskom na gumb za veličinu vekne/somuna možete izvršiti izbor između hrskavog kruha ili kruha veličine od 700 gr i 900 gr. Uvijek kada uklju cite stroj on je pode sen za izradu hrskavog kruha.
(3) وزن المقالير
- TEDARİKÇİ FİRMA / EXPORTER - United Favour Development Limited Unit B, 10/F Lee May Building 788-790 Nathan Road, Mongkok, Kowloon, HK.
- UYGUNLUK BEYANI / CE CONFORMITY - Intertek Testing Services Shenzhen Ltd. Guangzhou Branch
Block E, No.7-2, Guangdong Software Science Park, Caipin Road, Guangzhou Science City, GETDD, Guangzhou, China JGZ0208025-R7

- DEĞERLI MÜŞTERIMIZ
- CHILDREN BEING SUPERVISED NOT TO PLAY WITH THE APPLIANCE
- FIŞIN TAKILMASI
- IMPORTANT SAFETY INSTRUCTIONS
- POSITION OF THE APPLIANCE
- CABLES
- SAFETY MEASURES
- CHILDREN
- OTHER SAFETY ISSUES
- KNOWING YOUR SÍNBO BREAD MAKER
- BREAD MAKER IS AS EASY AS THE FOLLOWING THREE STEPS
- THINGS THAT YOU SHOULD KNOW PRIOR TO THE FIRST USE
- FEATURES
- OPERATING THE TIMER
- WARNING SIGNAL TONE
- POWER CUT OFFS
- AMBIENT TEMPERATURE
- POWER REQUIREMENT
- CLEANING AND MAINTENANCE OF THE APPLIANCE
- DO NOT USE FOLLOWING CHEMICALS FOR CLEANING
- CONTROL PANEL BUTTONS, INFORMATION DISPLAY AND FUNCTIONS
- WARNING DISPLAY
- TIMER BUTTONS
- CRUST COLOR BUTTON
- START/STOP BUTTON
- LOAF SIZE BUTTON
- MENU BUTTON
- OPENING BUTTON
- PROGRAM DEFINITIONS
- BASIC
- FRENCH
- WHOLE WHEAT
- QUICK
- SWEET
- ULTRA FAST -I
- ULTRA FAST -II
- DOUGH (1:30)
- JAM (1:20)
- 10.CAKE (2:50)
- SANDWICH (3:00 AND 2:55)
- BAKE (1:00)
- USING THE BREAD MAKER
- REMOVING THE COOKING PAN
- INSTALLING THE KNEADING BLADE
- MEASURING THE INGREDIENTS
- INSERTING THE PLUG
- SELECTING PROGRAM
- LOAF SIZE SELECTION
- SELECTING CRUST COLOR LEVEL
- ADJUSTING THE TIMER
- STARING THE COOKING PROCESS
- OPERATION
- COMPLETION OF THE COOKING PROCESS
- KEEP WARM OPERATION
- REMOVING THE PAN FROM THE APPLIANCE
- REMOVING THE BREAD FROM THE PAN
- MEASURING LIQUIDS
- MEASURING DRY INGREDIENTS
- QUESTIONS AND ANSWERS
- SPECIFICATION
- SINBO SBM 4705 MACHINE À PAIN
- MODE D'EMPLOI
- CONSIGNES DE SÉCURITÉ IMPORTANTES
- ZUTATENMESSUNG
- BITNE SIGURNOSNE UPUTE
- TIPKE KONTROLNE PLOČE, INFORMACIJSKI ZASLON I FUNKCIJE
- ZASLON UPOZORENJA
- MJERENJE SASTOJAKA
- UMETANJE UTIKA^CA
- IZBOR PROGRAMA
- IZBOR VELI^CINE VEKNE/SOMUNA
Brand : SINBO
Model : SBM-4705
Category : Bread maker