
THROUGH HULL - Sonar transducer NAVMAN - Free user manual and instructions
Find the device manual for free THROUGH HULL NAVMAN in PDF.
| Product Type | Through Hull Sonar Transducer |
| Brand | NAVMAN |
| Model | THROUGH HULL (sensor series) |
| Available Materials | Plastic or bronze depending on model |
| Mounting Types | Removable or fixed |
| Drilling Diameter | 22 mm to 63.5 mm depending on model |
| Maximum Hull Thickness | Up to 110 mm (depending on model) |
| Cable Length | 8 m to 10 m depending on model |
| Available Connectors | Audio RCA, LT 6-pin, LT 8-pin, Fuji 4-pin |
| Main Functions | Depth measurement, water temperature, speed (on dedicated models) |
| Power Supply | Powered by the navigation instrument via the cable |
| Installation | Drilling the hull, bonding with polyurethane sealant (Sikaflex 252 recommended) |
| Maintenance and Cleaning | Clean with a damp cloth or mild detergent. Do not use solvent, gasoline, or high-pressure cleaner |
| Safety | Choose a location that is constantly submerged without turbulence, forward of the keel. |
| Spare Parts and Repairability | Extension cables (4 m, 20 m), paddlewheel, hull fitting. Removable sensors are replaceable; fixed sensors require full replacement. |
| Hull Compatibility | Plastic not compatible with wooden hulls; bronze not compatible with metal hulls |
| Warranty | See Navman NZ Limited terms |
Frequently Asked Questions - THROUGH HULL NAVMAN
User questions about THROUGH HULL NAVMAN
0 question about this device. Answer the ones you know or ask your own.
Ask a new question about this device
Download the instructions for your Sonar transducer in PDF format for free! Find your manual THROUGH HULL - NAVMAN and take your electronic device back in hand. On this page are published all the documents necessary for the use of your device. THROUGH HULL by NAVMAN.
USER MANUAL THROUGH HULL NAVMAN
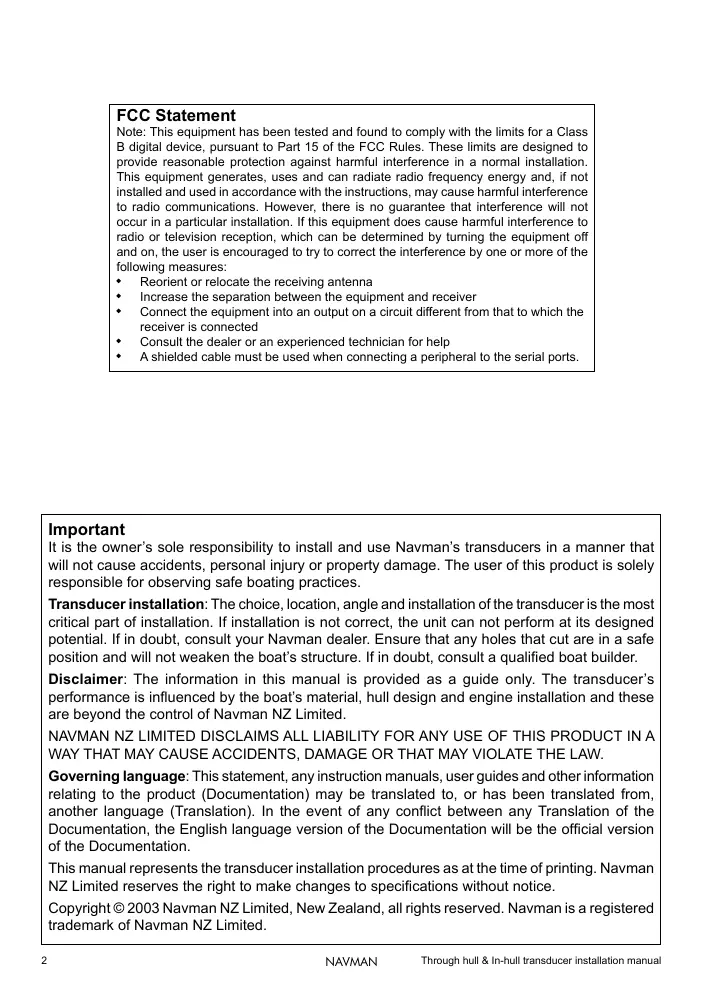
Note: This equipment has been tested and found to comply with the limits for a Class B digital device, pursuant to Part 15 of the FCC Rules. These limits are designed to provide reasonable protection against harmful interference in a normal installation. This equipment generates, uses and can radiate radio frequency energy and, if not installed and used in accordance with the instructions, may cause harmful interference to radio communications. However, there is no guarantee that interference will not occur in a particular installation. If this equipment does cause harmful interference to radio or television reception, which can be determined by turning the equipment off and on, the user is encouraged to try to correct the interference by one or more of the following measures:
Reorient or relocate the receiving antenna
- Increase the separation between the equipment and receiver
- Connect the equipment into an output on a circuit different from that to which the receiver is connected
- Consult the dealer or an experienced technician for help
- A shielded cable must be used when connecting a peripheral to the serial ports.
Important
It is the owner's sole responsibility to install and use Navman's transducers in a manner that will not cause accidents, personal injury or property damage. The user of this product is solely responsible for observing safe boating practices.
Transducer installation: The choice, location, angle and installation of the transducer is the most critical part of installation. If installation is not correct, the unit can not perform at its designed potential. If in doubt, consult your Navman dealer. Ensure that any holes that cut are in a safe position and will not weaken the boat's structure. If in doubt, consult a qualified boat builder.
Disclaimer: The information in this manual is provided as a guide only. The transducer's performance is influenced by the boat's material, hull design and engine installation and these are beyond the control of Navman NZ Limited.
NAVMAN NZ LIMITED DISCLAIMS ALL LIABILITY FOR ANY USE OF THIS PRODUCT IN A WAY THAT MAY CAUSE ACCIDENTS, DAMAGE OR THAT MAY VIOLATE THE LAW.
Governing language: This statement, any instruction manuals, user guides and other information relating to the product (Documentation) may be translated to, or has been translated from, another language (Translation). In the event of any conflict between any Translation of the Documentation, the English language version of the Documentation will be the official version of the Documentation.
This manual represents the transducer installation procedures as at the time of printing. Navman NZ Limited reserves the right to make changes to specifications without notice.
Copyright © 2003 Navman NZ Limited, New Zealand, all rights reserved. Navman is a registered trademark of Navman NZ Limited.
Contents
1 Introduction 3
1-2 Cleaning and maintenance 3
1-1 Wiring 3
2 Through hull transducers 4
2-1 Positioning a through hull transducer 6
2-2 Installing a through hull transducer 6
3 In-hull depth transducer 8
3-1 Positioning an in-hull transducer 8
3-2 Installing an in-hull depth transducer 9
1 Introduction
This manual describes how to install:
Navman's range of through hull depth and speed/temperature transducers
Navman's in-hull depth transducer.
Accessories
These accessories are available from your Navman dealer:
4 m (13 ft) speed/temperature transducer extension cable
4 m (13 ft) depth transducer extension cable for both single and dual frequency units
- Replacement speed/temperature transducer hull fitting
- Replacement speed/temperature transducer paddlewheel
20 m (65 ft) dual frequency depth transducer extension cable.
1-1 Wiring
Each transducer has a cable to connect it to the navigation instrument. When fitting this cable:
- Keep the cable away from other cables and equipment (for example fluorescent lights, power inverters and VHF transmitters.)
- Do not cut the cable on any depth transducer
If necessary, extend the cable by adding a Navman 4 m (13 ft) extension cable (a
maximum of one cable can be used). For dual frequency transducers, a 20m (65 ft) extension cable is available.
Ensure no cable connectors lie in the bilge
- Secure the cable at regular intervals
Refer to the navigation instrument's installation manual for instructions on how to connect the cable to the instrument.
1-2 Cleaning and maintenance
Clean a transducer with a damp cloth or mild detergent. Avoid abrasive cleaners and petrol or other solvents.
When repairing the hull, cover or remove any speed transducers. Do not paint the transducer.
Do not use a high pressure water blast on the speed transducer paddlewheel as it may damage the bearings.
2 Through hull transducers
Depth transducers:
| Part # - Europe | 25983 | 26032 | 31357 | 31358 | Not available |
| Part # - Rest of World | Not available | AA002155 | Not available | AA002106 | AA000043 |
| Material | Plastic | Plastic | Plastic | Bronze | Bronze |
| Type (1) | Insertable | Fixed | Fixed | Fixed | Fixed |
| Connector | RCA phono | RCA phono | RCA phono | RCA phono | RCA phono |
| Hull hole diam. | 17/8" (48 mm) | 15/8" (42 mm) | 2" (51 mm) | 2" (51 mm) | 7/8" (22 mm) |
| Max. hull thickness | 23/8" (60 mm) | 15/8" (42 mm) | 7/8" (22 mm) | 23/8" (60 mm) | 25/8" (92 mm) |
| Cable length | 26.2 ft (8 m) | 26.2 ft (8 m) | 26.2 ft (8 m) | 26.2 ft (8 m) | 29.5 ft (9 m) |
| Flush or long stem | Flush | Flush | Flush | Flush | Long stem |
| Part # - Europe | 47535 | 47512 | Not available |
| Part # - Rest of World | AA002108 | AA002107 | AA002109 |
| Material | Bronze | Plastic | Bronze |
| Type (1) | Fixed (Dual freq.) | Fixed (Dual freq.) | Fixed (Dual freq.) |
| Connector | 6-pin LT | 6-pin LT | 6-pin LT |
| Hull hole diam. | 2½" (63.5 mm) | 2½" (63.5 mm) | 1 1/6" (27 mm) |
| Max. hull thickness | 3¼" (80 mm) | 2¼" (56 mm) | 4¾" (110 mm) |
| Cable length | 33 ft (10 m) | 33 ft (10 m) | 33 ft (10 m) |
| Flush or long stem | Flush | Flush | Long stem |
Notes
1 With an insertable transducer, the transducer element can be removed, leaving the hull fitting in place in the hull. With a fixed transducer, the transducer element and hull fitting can not be separated.
Caution
- Plastic through hull transducers are not suitable for wooden hulls.
- Bronze transducers are usually unsuitable for metal hulls.
Speed/temperature transducers:
| Part # - Europe | 25982 | 40640 | 26017 | 40641 |
| Part # - Rest of World | Not available | Not available | AA002150 | AA002082 |
| Material | Plastic | Plastic | Plastic | Bronze |
| Type (1) | Insertable | Insertable | Insertable | Insertable |
| Connector | 4-pin Fuji | 8-pin LT | 4-pin Fuji | 8-pin LT |
| Hull hole diam. | 17/8" (48 mm) | 17/8" (48 mm) | 15/8" (42 mm) | 15/8" (42 mm) |
| Max. hull thickness | 23/8" (60 mm) | 23/8" (60 mm) | 15/8" (42 mm) | 15/8" (42 mm) |
| Cable length | 26.2 ft (8 m) | 26.2 ft (8 m) | 26.2 ft (8 m) | 26.2 ft (8 m) |
| Flush or long stem | Flush | Flush | Flush | Flush |
| Same as 25982, but with 8-pin LT connector | Same as AA002150 / 26017, but with 8-pin LT connector |
| Part # - Europe | 31359 | 47552 |
| Part # - Rest of World | AA000055 | AA002151 |
| Material | Bronze | Bronze |
| Type (1) | Insertable | Insertable |
| Connector | 4-pin Fuji | 8-pin LT |
| Hull hole diam. | 2" (51 mm) | 2" (51 mm) |
| Max. hull thickness | 2½" (55 mm) | 2½" (55 mm) |
| Cable length | 29.5 ft (9 m) | 29.5 ft (9 m) |
| Flush or long stem | Flush | Flush |
| Same as AA000055 / 31359, but with 8-pin LT connector | ||
Notes
1 With an insertable transducer, the transducer element can be removed, leaving the hull fitting in place in the hull. With a fixed transducer, the transducer element and hull fitting can not be separated.
Caution
- Plastic through hull transducers are not suitable for wooden hulls.
- Bronze transducers are usually unsuitable for metal hulls.
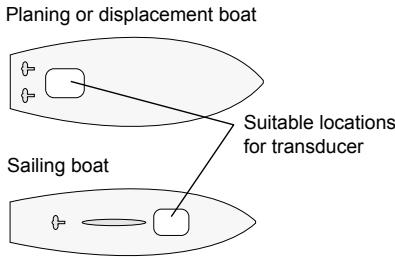
2-1 Positioning a through hull transducer
This transducer will be fitted in a hole drilled in the bottom of the boat. Select a position for the transducer that has a smooth flow of clear water over the transducer surface at all times. This means that the transducer should be ahead of any keel, hull projections, hull openings, paddle wheel transducers, propellers or propeller wash. If the bottom of the boat is painted and the boat has been used, do not mount the transducer where the paint is eroded (an indication of turbulence).
In addition, position the transducer:
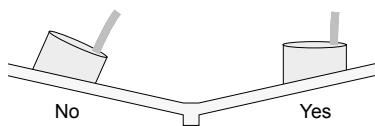
- as close to the middle line of the hull as possible and as deep as possible
where the deadrise angle is small
with sufficient space inside the hull for access and wiring
so that it will not interfere with launching or retrieving the boat
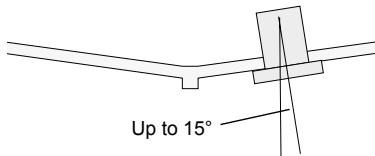
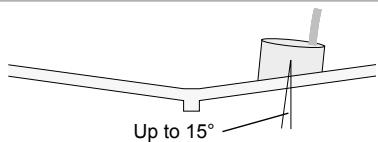
Ideally a depth transducer should be fitted so that its axis is vertical, however it can be up to 15^ off vertical.
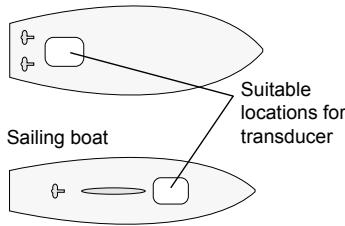
Planing or displacement boat
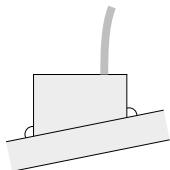
2-2 Installing a through hull transducer
1 Select a suitable position for the transducer (see section 2-1).
If the hull panel is too thin or the panel might not be strong enough, consider fitting a reinforcing pad on the inside of the hull.
2 Find the hole size required for the transducer from the table above. Drill or cut the hole in the hull. The hole must be perpendicular to the hull surface.
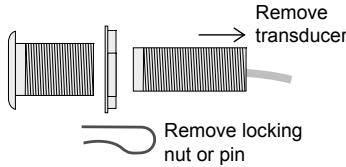
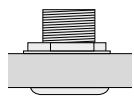
3 For an insertable transducer:
remove the locking nut or pin rom the fitting
ii pull the transducer out from the hull fitting
iii unscrew the nut from the hull fitting.
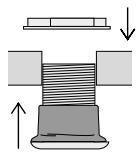
For a fixed transducer:
i unscrew the nut from the hull fitting
ii hold the nut just inside the hole in the hull
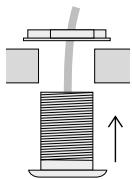
ii feed most of the transducer cable through the hole in the hull (from the outside) and through the nut.
4 Apply a thick layer of flexible bedding compound (such as Sikaflex) to the
Insertable transducer
Fixed transducer
hull fitting on the inside face of the flange and on the exterior threads where they pass through the hull.
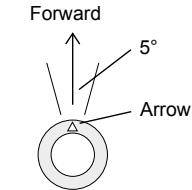
5 Insert the hull fitting into the hull from outside. For a speed/temperature transducer, rotate the fitting until the arrow on the outside lip points forward to within 5^ .
6 Fit and tighten the nut on the hull fitting. For a plastic fitting, hand-tighten the nut and do not over tighten. For a bronze fitting, tighten with slip-joint pliers. Tighten the nut until excess bedding compound is squeezed out from under the nut and the face of the hull fitting. Remove the excess bedding compound.
7 For a speed/temperature transducer, check that the arrow on the hull fitting still points forward.
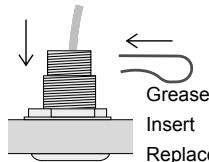
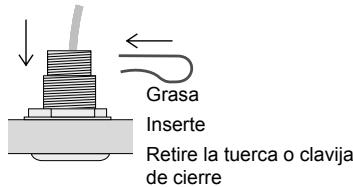
8 For an insertable transducer: i ensure there is a thin layer of silicone grease or O-ring lubricant on the transducer O-rings ii insert the transducer back into the hul fitting, rotating the transducer so that the arrow on the transducer mates with the notch on the fitting iii replace the locking nut or pin.
9 Wait for the bedding compound to dry.
10 Before leaving the boat unattended, check that there is no water ingress from around the transducer.

Bedding compound
View from bottom
Arrow faces forward to within 5^
Insertable transducer
Grease Insert
Replace locking nut or pin
3 In-hull depth transducer
One in-hull transducer is available, a depth transducer.
| Part # - Europe | 27948 |
| Part # - Rest of World | AA002161 |
| Material | Plastic |
| Connector | RCA phono |
| Max. hull thickness | 3¼" (20 mm) |
| Cable length | 26.2 ft (8 m) |
Caution
In-hull depth transducers are only suitable for solid GRP hulls up to 14 (20 mm) thick, without air pockets, beads or voids. They are not suitable for wooden, metal or sandwich hulls. Compared to other types of transducer, in-hull depth transducers generally have lower performance because power is absorbed in the hull.
3-1 Positioning an in-hull transducer
This transducer will be glued to the inside of the bottom of the boat. Select a position for the transducer that has a smooth flow of clear water under the transducer at all times. This means that the transducer should be ahead of any keel, hull projections, hull openings, paddle wheel transducers, propellers or propeller wash. If the bottom of the boat is painted and the boat has been used, do not mount the transducer where the paint is eroded (an indication of turbulence).
In addition, position the transducer:
- as close to the middle line of the hull as possible and as deep as possible
with sufficient space inside the hull for access and wiring
where the inside surface of the hull is flat and smooth and there will be no gaps between the face of the transducer and the hull.
The face of the transducer is angled. When fitting the transducer, rotate the transducer so that the axis of the transducer is as close to vertical as possible.
Ideally the transducer should be rotated so that its axis is vertical, however it can be up to 15^ off vertical.
3-2 Installing an in-hull depth transducer
1 Select a suitable position for the transducer and establish how the transducer should be rotated so that the axis is as vertical as possible (see section 2-1).
2 Test the transducer at this position with the boat in the water before mounting it permanently:
i Partially fill a thin plastic bag with water, place the transducer inside and close it tightly around the cable with a tie-wrap.
ii Install the depth instrument as described in the instrument's Installation and Operation manual.
iii Wet the surface of the hull and press the transducer against the inside of the hull where you plan to mount the transducer.
iv Check that the instrument measures depth correctly and consistently, up to the maximum depth specified for the instrument. If necessary, move the bag around the hull to find the best position.
3 Choose an adhesive or sealant to glue the transducer to the hull. Hard epoxies transmit the transducer signals best but temperature changes and hull flexing can cause delamination. As a compromise, use a viscous slow cure, fairly rigid epoxy or Sikaflex 252 sealant.
4 Ensure the inside of the hull where the transducer will be mounted is flat. Clean, degrease and dry:
the inside of the hull where the transducer will be mounted
the sloping face of the transducer
5 Fit the transducer:
i Apply the epoxy or sealant to the middle of the transducer face.
ii Press the transducer into place on the hull.
iii Twist the transducer back and forth to expel any trapped air and to expel as much glue as possible from the joint.
The finished joint should be as thin as possible and not contain any air bubbles.
Leave the transducer rotated to the correct angle.
iv Temporarily secure the transducer in place with tape and wait for the glue to cure for 24 hours.

Glue
Important
Transducer insertable
Appendix - How to contact us
www.navman.com
NORTH AMERICA
Navman USA Inc.
30 Sudbury Rd, Acton, MA
01720
Toll Free: +1 866 628 6261
Fax: +1 978 897 8264
e-mail:
sales@navmanusa.com
web: www.navman.com
AUSTRALIA
Navman Australia Pty. Limited
Unit 2 / 5-13 Parsons St.
Rozelle, NSW 2039. Australia.
Ph: +61 2 9818 8382
Fax: +61 2 9818 8386
e-mail: sales@navman.com.au
web: www.navman.com
OCEANIA
New Zealand
Absolute Marine Ltd.
Unit B, 138 Harris Road,
East Tamaki, Auckland.
Ph: +64 9 273 9273
Fax: +64 9 273 9099
e-mail:navman@absolutema
fine.co.nz
Papua New Guinea
Lohberger Engineering,
Lawes Road, Konedobu.
PO Box 810, Port Moresby.
Ph: +675 321 2122
Fax: +675 321 2704
e-mail: loheng@online.net. pg
web: www.lohberger.com/pg
SOUTH AMERICA
Argentina
Costanera Uno S.A.
Peaceful Marine Electronics
Co.Ltd.
Guangzhou, Hong Kong
Dalian, Qingdao, Shanghai
1701 Yanjiang Building
195 Yan Jiang Zhong Rd.
510115
Guangzhou, China.
Ph: +86 20 3869 8839
Fax: +86 20 3869 8780
e-mail: sales@peaceful-
marine.com
web: wwwpeaceful
marine.com
India
Access India Overseas Pvt. Ltd.
A-98, Sector 21
Noida - 201 301, India.
Ph: +91 120 244 2697
TeleFax:+91 120 253 7881
Mobile: +91 98115 04557
e-mail:
vkapil@del3.vsnl.net.in
Esmario Export Enterprises
Block No. F-1, 3rd Floor, Surya
Towers
Sardar Patel Rd, Secunderbad
500003
Ph: +91 40 2784 5163
Fax: +91 40 2784 0595
e-mail:
gjfeee@hd1.vsnl.net.in
web: www.esmario.com
Indonesia
Polytech Nusantara.
Graha Paramita 2nd Floor
Jin Denpasar Raya Blok D2
Kav 8 Kuningan, Jakarta
12940
Ph: +62 21 252 3249
Fax: +62 21 252 3250
e-mail:
polytech@transavia.co.id
Korea
Kumhomarine Technology
Co.Ltd
604-842.2F,1118-15
Janglim1-Dong.
Saha-Gu, Busan, Korea.
Ph: +82 51 293 8589
Fax: +82 51 265 8984
e-mail:
info@kumhomarine.com
web: www.kumhomarine.com
Maldives
Maizan Electronics Pte. Ltd.
Henveyru, 08 Sosunmagu.
Male', Maldives.
Mobile: +960 78 24 44
Ph: +960 32 32 11
Fax: +960 3257 07
e-mail:
ahmed@maizan.com.mv
Singapore, Malaysia, Brunei
Indonesia and Phillipines
RIQ PTE Ltd.
Blk 3007,81 Ubi Road 1,#02-
440, Singapore 408701.
Ph: +65 6741 3723
Fax: +65 6741 3746
e-mail: riq@postone.com
Taiwan
Seafirst International
Corporation
No.281,Hou-An Road,Chien
Chen Dist. Kaohsiung, Taiwan
R.O.C.
Ph: +886 7 831 2688
Fax: +886 7 831 5001
e-mail: seafirst@seed.net.tw
web: www.seafirst.com.tw
Thailand
Thong Electronics (Thailand)
Co.Ltd
923/588 Ta Prong Road.
Mahachai, Muang.
Samutsakhon 74000, Thailand.
Ph: +66 34 411 919
Fax: +66 34 422 919
e-mail: sales@thongelectro
nics.com
admins@thongelectronics.com
m
web:
www.thongelectronics.com
Vietnam
Haidang Co. Ltd
1763 Le Hong Phong St.
Ward 12
District 10, Ho Chi Minh City.
Ph: +84 8 863 2159
Fax: +84 8 863 2124
e-mail: sales@haidangvn.com
web: www.haidangvn.com
MIDDLE EAST
Lebanon and Syria
Balco Stores
Balco Building, Moutran Street,
Tripoli (via Beirut). - Lebanon
P.O.Box:622
Ph: +961 6 624 512
Fax: +961 6 628 211
e-mail: balco@cyberia.net.lb
United Arab Emirates
Kuwait, Oman, Iran, Saudi
Arabia, Bahrain
Abdullah Moh'd Ibrahim
Trading, opp Creak Rd. Baniyas
Road, Dubai.
Ph: +971 4 229 1195
Fax: +971 4 229 1198
e-mail: sales@amitdubai.com
AFRICA
South Africa
Pertec (Pty) Ltd (Coastal)
Division)
16 Paarden Eiland Road
Paarden Eiland, 7405
PO Box 527
Paarden Eiland, 7420
Cape Town, South Africa.
Ph: +27 21 508 4707
Fax: +27 21 508 4888
e-mail: info@kfa.co.za
web: www.pertec.co.za
EUROPE
France, Belgium and
Switzerland
Plastimo SA
Hamilton Business Park
Bailey Road, Hedge End
Southampton, Hants S030
2HE
Ph: +44 01489 778 850
Fax: +44 0870 751 1950
e-mail: sales@plastimo.co.uk
web: www.plastimo.co.uk
Sweden, Denmark, Finland
and Norway
Navimo Nordic
Lundenvagen 2,
473 21 Henan
Ph: +46 304 360 60
Fax: +46 304 307 43
e-mail: info@plastimo.se
web: www.plastimo.se
Spain
Navimo Espana
Other countries in Europe
Plastimo International
56325 Lorient Cedex, France.
Ph: +33 2 97 87 36 59
Fax: +33 2 97 87 36 29
e-mail:
plastimointernational@plas
timo.fr
web: www.plastimo.com
REST OF WORLD/
MANUFACTURERS
Navman NZ Limited
13-17 Kawana St
Northcote
P.O.Box 68155
Newton.
Auckland.
New Zealand.
Ph: +64 9 481 0500
Fax: +64 9 481 0590
marine.sales@navman.com
web: www.navman.com
- Important
- Contents
- Introduction 3
- Through hull transducers 4
- In-hull depth transducer 8
- Introduction
- Accessories
- 1-1 Wiring
- 1-2 Cleaning and maintenance
- Through hull transducers
- Notes
- Caution
- 2-1 Positioning a through hull transducer
- 2-2 Installing a through hull transducer
- In-hull depth transducer
- 3-1 Positioning an in-hull transducer
- 3-2 Installing an in-hull depth transducer
- Appendix - How to contact us
- www.navman.com
- NORTH AMERICA
- AUSTRALIA
- OCEANIA
- New Zealand
- Papua New Guinea
- SOUTH AMERICA
- Argentina
- India
- Indonesia
- Korea
- Maldives
- Taiwan
- Thailand
- Vietnam
- MIDDLE EAST
- Lebanon and Syria
- United Arab Emirates
- Kuwait, Oman, Iran, Saudi
- Arabia, Bahrain
- AFRICA
- South Africa
- EUROPE
- France, Belgium and
- Switzerland
- Sweden, Denmark, Finland
- and Norway
- Spain
- REST OF WORLD/
- MANUFACTURERS
Brand : NAVMAN
Model : THROUGH HULL
Category : Sonar transducer