LU 105 HF - Motion detector THEBEN - Free user manual and instructions
Find the device manual for free LU 105 HF THEBEN in PDF.
| Product type | Bidirectional wireless infrared motion detector |
| Brand | THEBEN |
| Model | LU 105 HF |
| Power supply | 12 V DC 200 mA mains adapter |
| Rated voltage | 12 V DC |
| Transmission range | Approx. 50 m (outdoor) |
| Transmission frequency | 433.92 MHz |
| Modulation | ASK |
| Channel setting | 32 combinations (coding selector) |
| Detection range | 2 m (maximum in wall mounting) |
| Operating temperature | 0 °C to +45 °C |
| Protection rating | IP 40 |
| Mounting | On door, wall, table, ceiling (max. 2.5 m height) |
| Main functions | Bidirectional motion detection, emission of 2 different signals according to direction, LED indication, range adjustment by rotating the body |
| Package contents | Transmitter, user manual, 12 V DC 200 mA adapter, bracket, 2 wood screws dia. 4x25.4 mm |
| Maintenance and cleaning | Clean with a soft, dry cloth. Do not use abrasive products or solvents. |
| Safety | Complies with EU directives (LVD & EMC) and R&TTE |
| Compatibility | Compatible with other Theben HF products at 433.92 MHz (e.g., REC 100 HF receiver) |
| Intended use | Offices, small businesses, homes, etc. |
Frequently Asked Questions - LU 105 HF THEBEN
User questions about LU 105 HF THEBEN
0 question about this device. Answer the ones you know or ask your own.
Ask a new question about this device
Download the instructions for your Motion detector in PDF format for free! Find your manual LU 105 HF - THEBEN and take your electronic device back in hand. On this page are published all the documents necessary for the use of your device. LU 105 HF by THEBEN.
USER MANUAL LU 105 HF THEBEN
- Transmitter Frequency:
Approx. 50M (in open air).
Modulation:
433.92MHz.
- Channel:
ASK
Detection Range:
32 combinations.
Operation Temperature:
2M.
- Environment Protection:
0^ C +45^ C .
IP 40
CONTENU DE L'EMBALLAGE
| Pattern | |||||
| Item | Transmitter | Manual | Adaptor 12V DC 200mA | Table stand | Wood screwø 4x25,4 mm |
| Quantity | 1 | 1 | 1 | 1 | 2 |
INTRODUCTION
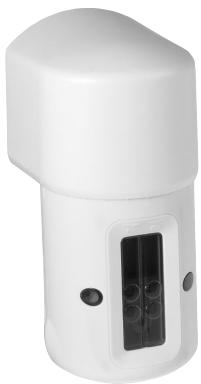
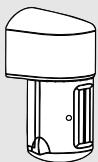
LU 101/105 HF is a transmitter that combines two-way infrared sensor and wireless feature. To be installed on the door, it can transmit two different channel signals to Receiver according to different directions. Then Receiver sends out two different sounds to notify users the visitors' coming or the family members' going out, also can announce the visitors' arrival with flash light. In these ways, users can show welcome to guests timely, conveniently, and politely.
Apart from the features above, Transmitter LU 101/105 HF has other remarkable functions as following:
- Send out different signals according to the objects detected in different directions.
- Easy installation on ceiling, wall, table, etc, and simple operation.
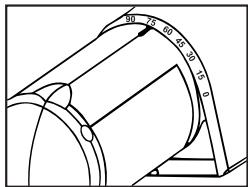
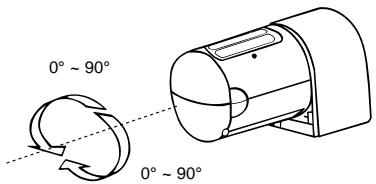
- Adjust the detection range by rotating sensor body 90^ to right or left.
Full compatibility with all HF Theben products. - Wire free and convenient.
- Apply to different locations: offices, small-scaled stores and homes, etc.
16
CHANNEL SET-UP
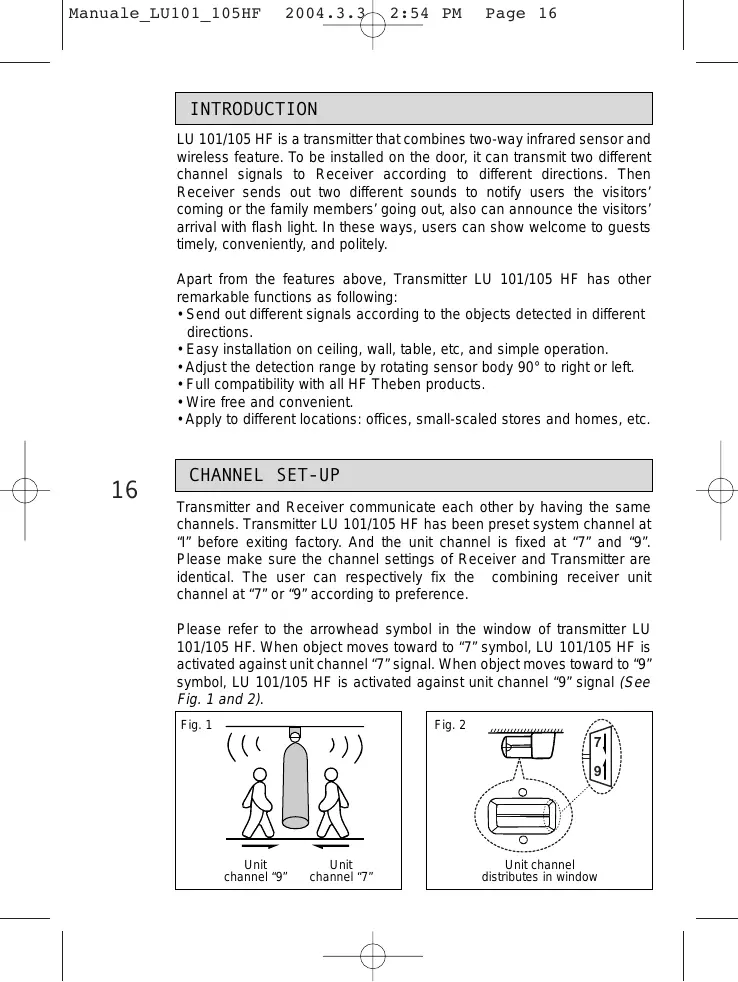
Transmitter and Receiver communicate each other by having the same channels. Transmitter LU 101/105 HF has been preset system channel at "I" before exiting factory. And the unit channel is fixed at "7" and "9". Please make sure the channel settings of Receiver and Transmitter are identical. The user can respectively fix the combining receiver unit channel at "7" or "9" according to preference.
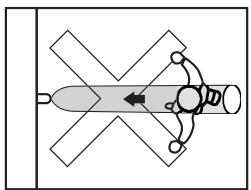
Please refer to the arrowhead symbol in the window of transmitter LU 101/105 HF. When object moves toward "7" symbol, LU 101/105 HF is activated against unit channel "7" signal. When object moves toward "9" symbol, LU 101/105 HF is activated against unit channel "9" signal (See Fig. 1 and 2).
Fig. 1
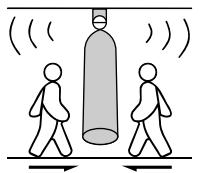
Unit channel "9"
Fig. 2
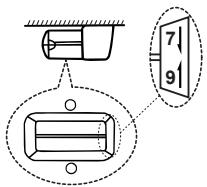
Unit channel distributes in window
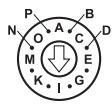
Please make sure receiver system channel accord to the preset of the transmitter (See Fig. 4). However, if the user finds LU 101/105 HF and the receiver have the same channel setting with other wireless device around them, the user DEFINITELY needs to change them to a new channel.
Please follow the steps below to change the channel setting of Transmitter LU 101/105 HF.
- Pull the hook of cover and remove the bottom cover (See Fig. 3).
- Adjust system channel to the desired position with a screwdriver (See Fig. 4).
- Replace the bottom cover.
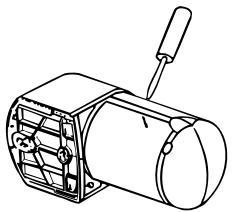
Fig. 3

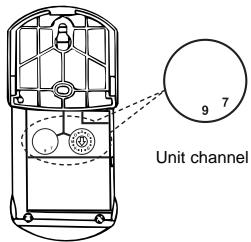
Fig. 4
System channel (House channel)
INSTALLATION
A. Helpful Tips For a Better Transmission
- LU 101/105 HF is suitable to be installed on the wall, door or put on the table.
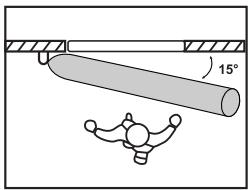
- Movement of door open and close can trigger the sensor, and LU101-105HF can be adjusted by rotating 15^ to right or left when it is installed on the door or door side, and the calibration line points at 75^ (See Fig. 5 and 6).
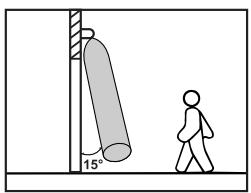
Fig. 5
Door gate mount
Door side mount
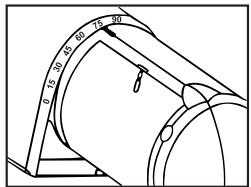
Fig. 6
Rotate 15^ to right or left
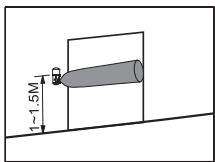
- Make sure the height from the floor is 2.5M max. or 1.5M max. when it is installed on the door gate or on door side (See Fig.7 and 8).

Fig. 7
Door gate mount
FIG.7
Door side mount
FIG.8
Fig. 8
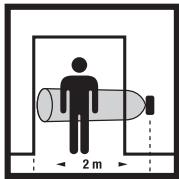
4.The max. detection range is 2M when it is installed on the wall.
5. Please note that the door open/close movement will cause false trigger to the LU 101/105 HF sensor, therefore select a proper location to install the sensor is important to avoid nuisance triggering (See Fig. 9 and 10).
Fig. 9
Install the sensor at a proper place without Influence by the door open/close movement.
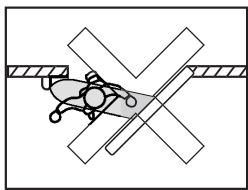
Fig. 10
Avoid installing the sensor at the place where will be activated by the door open/close movement easily.
- Measure the distance between the Transmitter and the Receiver before installation. Make sure Transmitter LU 101/105 HF is mounted in effective working range.
- Avoid installing Transmitter LU 101/105 HF near aluminum alloy or thick metal that will shorten the transmission distance. Keep it away at least 1M.

19
B. Select a Proper Location
1. Detection range
(1) Choose a proper installation position for Transmitter LU 101/105 HF where it can work excellently with the combined Receiver.
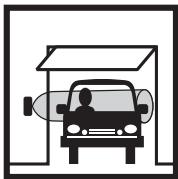
(2) LU 101/105 HF can be mounted on the door, wall, put on the table (1 ~ 1.5M height from the floor) and ceiling (Max. 2.5M height from the floor) (See Fig.11).
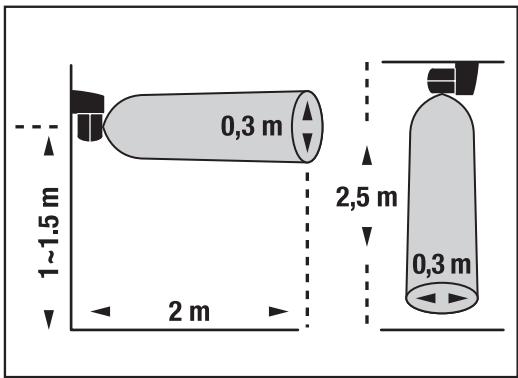
Fig. 11
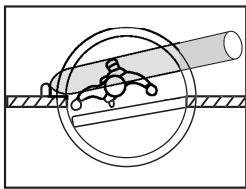
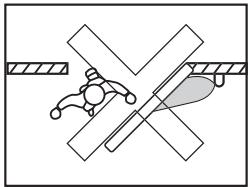
2. Avoid Nuisance Triggering
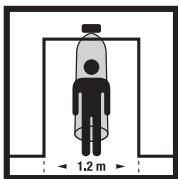
- Avoid moving directly toward the sensor but move across it to obtain more sensitivity (See Fig.12).
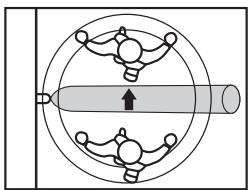
Fig. 11
More sensitive
Less sensitive
- Avoid any kind of lighting sources aiming directly to the window of sensor (See Fig.13).

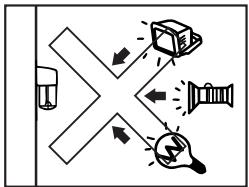
Fig. 13
- Avoid mounting the sensor toward the lighting source or any angles which might reflect the lighting back.
- Make sure to mount the sensor horizontally on the door gate (See Fig.14). Or to mount the sensor vertically on the door side (See Fig.15 and 16), wall, or put on table (See Fig.17).

Fig. 14
Door gate mount
Fig. 15
Door side mount
21
Fig. 16
Door side mount

Fig. 17
Put on the Table
- The effective detection range is within 2M when LU 101/105 HF is installed on the door side (See Fig.15).
- Make sure the best detection height is 1 1.5M from the floor when LU 101/105 HF is vertically installed on the door side, wall or put on the table.
C. Two Installation Methods For LU 101/105 HF:
- Fix Transmitter LU 101/105 HF on the installation surface with screws.
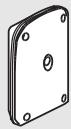
(1) Unscrew the base with screwdriver (See Fig.18).
(2) Remove the base (See Fig.19).
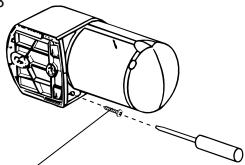
Fig. 18
Stainless steel Screw
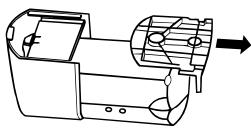
Fig. 19
(3) Fix the base on the installation surface with screws (See Fig. 20).
(4) For easy installation, please fasten one screw firstly on the top of the wall, then hang the mounting base on the fixed screw and fasten the second screw orderly (See Fig. 21).
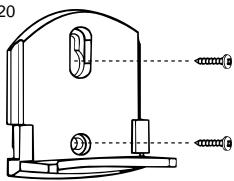
Fig. 20
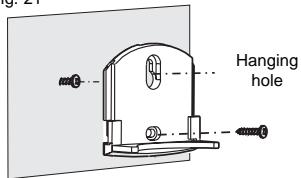
Fig. 21
(5) Insert the main body of Transmitter LU 101/105 HF into the fixed base tightly (See Fig. 22).
(6) Firmly fasten the screw of the base and main body with a screwdriver (See Fig. 23).
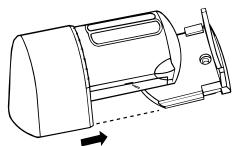
Fig. 22
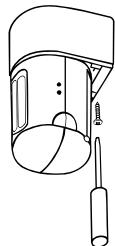
Fig. 23
- When put Transmitter LU 101/105 HF on the table, insert the main body directly on the table stand, then it can work (See Fig. 24). If you want to take apart the table stand, turn over LU 101/105 HF and put outward the valve in the bottom of the table stand, using another hand to take out the main body of Transmitter LU 101/105 HF (See Fig. 25).
- When users want to adjust the detection position, hold the sensor head of Transmitter LU 101/105 HF and rotate it to left or right at the angle of 90^ until reach the desired detection angle (See Fig. 26).

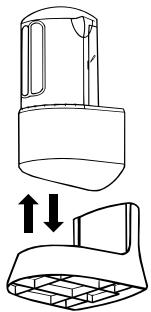
Fig. 24
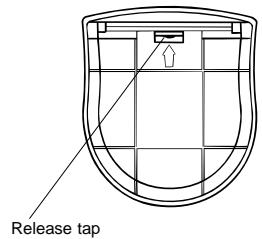
Fig. 25
23
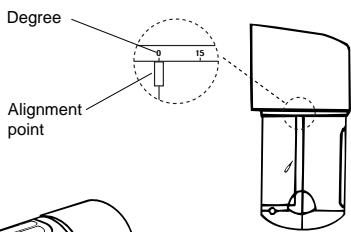
Fig. 26
ADAPTOR INSTALLATION
It is workable to insert adaptor in DC socket that provides power to make the control unit work normally.
- Remove the bottom cover with a flat-head screwdriver (See Fig. 3).
- Insert adaptor in DC socket from the bottom cover and make sure LED of LU 101/105 HF works normally (See Fig. 27).
- Punch the reserved knock hole of bottom cover with a long nose pliers (See Fig. 28).
- Replace bottom cover, and make sure the wires go through from the reserved knock hole (See Fig. 29).
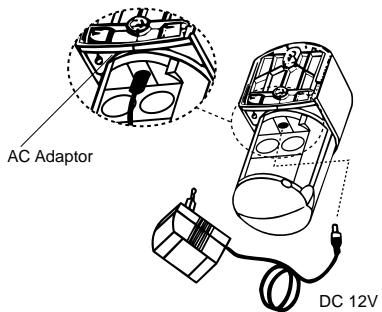
Fig. 27
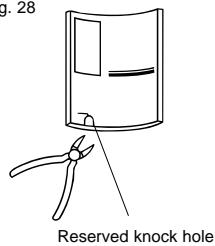
Fig. 28
Fig. 29
TEST AND ADJUSTMENT

A. LED Function
LED is mainly designed as the Indicator while sensor is working normally. When moving object is across the detection zone, LU 101/105 HF Transmitter is triggered with LED ON for about 2 seconds and then turn off (See Fig. 30).
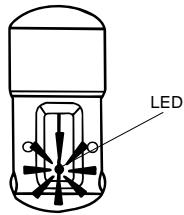
Fig. 30
B. Walk Test
LU 101/105 HF automatically works when power turns on.
If necessary, you can use Walk Test to test and adjust the detection zone, which helps to make it work properly.
25
Procedures of Walk Test:
- Aim the Transmitter LU 101/105 HF across the desired detection zone.
- Warm up the Transmitter for about 30 seconds.
- Make sure whether Transmitter and the combined Receiver have been set with the same channel.
- Make sure LED of Transmitter LU 101/105 HF works normally.
- Have someone walk across from outside to the detection zone until LED turns on.
- When Transmitter LU 101/105 HF is triggered at the first time, LED will turn on for about 2 seconds, then turn off. The next test won't start until the LED is off for about 4 seconds from the last test.
- Repeat step 6 to step 8 until the detection zone meets your requirement.
TROUBLE SHOOTING
When Transmitter LU 101/105 HF fails to work normally, check presumptive problems and suggested solutions in following table that will be hopeful to solve your problem.
| Problem | Possible cause | Suggested solutions |
| LU 101/105 HF LED does not turn on. | 1. Adaptor is inserted incorrectly. No power supplies. 2. LU 101/105 HF works abnormally. | 1. Make sure adaptor is inserted correctly and power supplies. 2. Make sure the sensor works normally. |
| Receiver can’t receive signals. | 1. Different channel setting of Transmitter and Receiver. 2. Exceeding effective working range. | 1. Make sure Transmitter and Receiver are set at the same channel. 2. Make sure Transmitter and Receiver are in effective working range. |
Being note it is less sensitivity when LU 101/105 HF detects black clothes or objects.
EXTENSION OF LU 101/105 HF
Transmitter LU 101/105 HF is fully compatible with other RF series product whose frequency at 433.92MHz that allows the user to integrate any desired quantities either same or different Receiver from HF Theben series. Transmitter LU 101/105 HF combines a specific user network of transmitters and receivers at home, office and small-scaled store or factory. Please refer to the following chart which are some illustrations of typical combination between the transmitter of LU 101/105 HF & HF Theben Receiver.
Transmitter
LU 101/105 HF
Bi-directional sensor transmitter
Receiver
REC 100 HF
Outdoor / Indoor 10A Receiver
C∈APPROVAL
C∈0560①
| N | DK | SF | IS | S |
| E | D | F | P | I |
| B | NL | L | GR | GB |
| IRL | CH | A |
Remarks:
- Theben HF products are allowed to sell to all EU and EFTA countries.
- The receiver complies with essential safety and radio frequency with CE (LVD & EMC) and R & TTE directives.
LU 101/105 HF
RILEVATORE DI MOVIMENTO HF
TRASMETTITORE BIDIREZIONALE