
Latitude 12 Rugged Tablet - Tablet DELL - Free user manual and instructions
Find the device manual for free Latitude 12 Rugged Tablet DELL in PDF.


| Product type | Rugged tablet |
| Brand | DELL |
| Model | Latitude 12 Rugged Tablet |
| Screen | 12 inches, touchscreen, rugged |
| Dimensions (W x D x H) | 305 x 203 x 24 mm |
| Weight | Approximately 1.5 kg |
| Power | 4-cell lithium-ion battery |
| Battery life | Up to 10 hours |
| Storage | 128 GB SSD (removable) |
| RAM Memory | 8 GB |
| Processor | Intel Core i5 |
| Operating system | Windows 10 Pro |
| Connectivity | Wi-Fi, Bluetooth, USB 3.0, HDMI |
| Durability | Drops up to 1.2 m, IP65 waterproof |
| Maintenance | Clean with a soft dry cloth |
| Security | Kensington lock, TPM |
| Spare parts | Battery, SSD, detachable keyboard |
| Repairability | Battery and SSD user-replaceable |
| Warranty | 3 years (varies by country) |
Frequently Asked Questions - Latitude 12 Rugged Tablet DELL
User questions about Latitude 12 Rugged Tablet DELL
0 question about this device. Answer the ones you know or ask your own.
Ask a new question about this device
Download the instructions for your Tablet in PDF format for free! Find your manual Latitude 12 Rugged Tablet - DELL and take your electronic device back in hand. On this page are published all the documents necessary for the use of your device. Latitude 12 Rugged Tablet by DELL.
USER MANUAL Latitude 12 Rugged Tablet DELL
Dell Latitude 12 Rugged Tablet - 7202
Getting Started Guide
Notes, cautions, and warnings

NOTE: A NOTE indicates important information that helps you make better use of your computer.

CAUTION: A CAUTION indicates either potential damage to hardware or loss of data and tells you how to avoid the problem.

WARNING: A WARNING indicates a potential for property damage, personal injury, or death.
Copyright © 2015 Dell Inc. All rights reserved. This product is protected by U.S. and international copyright and intellectual property laws. Dell™ and the Dell logo are trademarks of Dell Inc. in the United States and/or other jurisdictions. All other marks and names mentioned herein may be trademarks of their respective companies.
2015 - 06
Rev. A00
Contents
1 Finding Information and Resources.... 4
2 Front and Back View....5
3 Quick Setup....7
4 Removing and Installing Components....9
Removing the Battery....9
Installing the Battery....10
Installing the SIM Card....10
5 Dell Rugged Control Center Application....11
Using the Settings Option in Rugged Control Center.... 13
Installing the Dell Rugged Control Center....14
Enabling or Disabling the Keyboard Backlight.... 15
Changing the Keyboard Backlight Colors 15
6 Stealth Mode....16
Turning Stealth Mode On/Off Using Optional Accessory Keyboard ....16
Turning Stealth Mode On/Off Using RCC....16
Modifying the Stealth Mode Settings....17
7 Enabling and Disabling Wireless (WiFi) Feature.... 18
Enabling or Disabling Wireless (WI-Fi) Feature Using Optional Keyboard Accessory....18
Enabling and Disabling Wireless (WiFi) Feature Using RCC....18
8 Smart Cards....20
9 Specifications.... 21
10 Contacting Dell....25
1
Finding Information and Resources
See the safety and regulatory documents that shipped with your computer and the regulatory compliance website at www.dell.com/regulatory_compliance for more information on:
- Safety best practices
• Regulatory certification - Ergonomics
See www.dell.com for additional information on:
- Warranty
- Terms and Conditions (U.S. only)
• End User License Agreement
Additional information on your product is available at www.dell.com/support/manuals
2
Front and Back View

- Microphone
- Camera status light
- Camera
- Camera shutter switch
- Ambient light sensor
- Stylus
- Power button
- Micro serial port
- USB 3.0 connector with PowerShare
- Power connector
- User programmable button 3
-
User programmable button 2
-
User programmable button 1
- Windows button
- Docking-pogo pins
- Volume buttons
- Radio frequency pass-through connector
- Screen-rotate lock button
- Dock-guide slots
- Security-cable slot
- QuadCool vent-output
- Memory-card reader
- HDMI Port
- Headset connector
- Microphone
- Contactless smart card reader
- Fingerprint reader
- Smart card reader
- Rear camera
- Camera shutter switch
- Camera flash light
- Expansion module pogo pins
- Service tag label
- QuadCool vent-intake
- SIM slot (remove battery to access)
- Battery release latch
- Battery life meters
- Battery

WARNING: Your Dell Rugged Tablet is designed to prevent damage due to dust or dirt entering the QuadCool intake vent. It is however recommended to keep QuadCool vents clean and unobstructed for optimal performance.
3
Quick Setup
WARNING: Before you begin any of the procedures in this section, read the safety information that shipped with your computer. For additional best practices information, see www.dell.com/regulatory_compliance
WARNING: The AC adapter works with electrical outlets worldwide. However, power connectors and power strips vary among countries. Using an incompatible cable or improperly connecting the cable to the power strip or electrical outlet may cause fire or equipment damage.
CAUTION: When you disconnect the AC adapter cable from the computer, grasp the connector, not the cable itself, and pull firmly but gently to avoid damaging the cable. When you wrap the AC adapter cable, ensure that you follow the angle of the connector on the AC adapter to avoid damaging the cable.
NOTE: Some devices may not be included if you did not order them.
- Connect the AC adapter to the AC adapter connector on the computer and to the electrical outlet.

natural_image
Illustration of a USB connector with a separate button and a separate plug (no text or symbols)Figure 1. AC Adapter
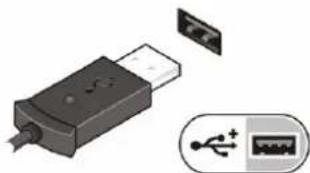
- Connect USB devices, such as a mouse or keyboard (optional).
natural_image
Illustration of a USB connector with an external port and its internal socket (no text or symbols)Figure 2. USB Connector
- Press the power button to turn on the computer.

Figure 3. Power Button
NOTE: It is recommended that you turn on and shut down your computer at least once before you install any cards or connect the computer to a docking device or other external device, such as a printer.
Removing and Installing Components
This section provides detailed information on how to remove or install the components from your computer.
Removing the Battery
WARNING: Using an incompatible battery may increase the risk of fire or explosion. Replace the battery only with a compatible battery purchased from Dell. The battery is designed to work with your Dell tablet. Do not use a battery from any other tablet with your tablet.
WARNING: Before removing or replacing the battery, turn off the tablet, disconnect the AC adapter from the electrical outlet and the tablet, disconnect the modem from the wall connector and tablet, and remove any other external cables from the tablet.
WARNING: Not for use in hazardous locations. See installation instructions.
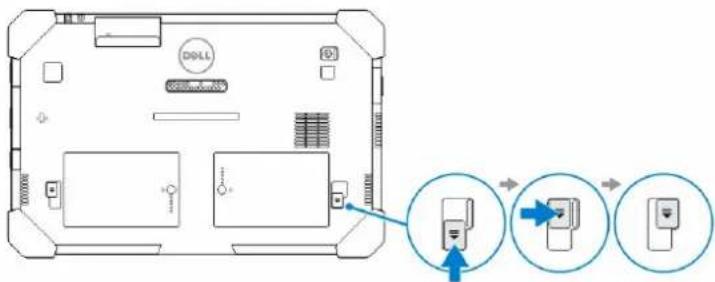
- To remove the battery:
a. Unlock the battery release latch by sliding towards the battery. b. Push the button in a downward direction to unlatch the battery bay.

flowchart
graph TD
    A["左图标"] --> B["USB Port"]
    B --> C["右图标"]
    C --> D["USB Port"]
    style A fill:#f9f,stroke:#333
    style B fill:#ccf,stroke:#333
    style C fill:#cfc,stroke:#333
    style D fill:#fcc,stroke:#333
NOTE: There are two battery release buttons for removing Battery 1 and Battery 2 on the tablet.
- Lift the batteries away from the tablet.

natural_image
Diagram of a computer chassis showing two labeled storage units with blue arrows indicating ports or connections (no text or symbols present)Installing the Battery
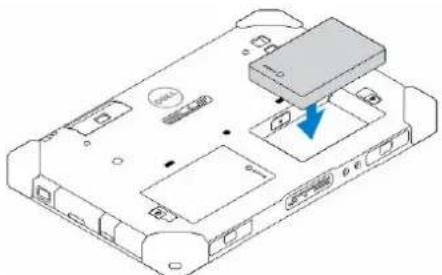
-
Slide the battery into its slot until it clicks into place.
-
Lock the battery by sliding the latch away from it.
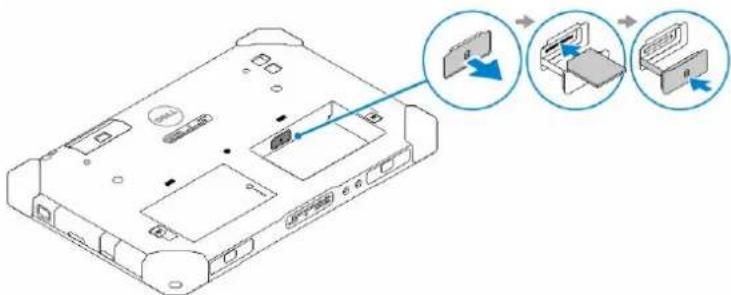
Installing the SIM Card

NOTE: The SIM card slot is located underneath the battery 2 slot.
- Remove the battery.
- To install the SIM card:
a. Press the SIM latch and pull it in an outward direction.
b. Insert the SIM card into the slot.
c. Push the SIM release latch inwards to lock it.
- Install the battery into the battery bay.
natural_image
Isometric technical diagram of a device casing with internal components and a blue arrow indicating a specific area (no text or symbols present)- Slide the battery release latch in an upwards direction, and then to the right to lock it.
5
Dell Rugged Control Center Application
The Dell Rugged Control Center (RCC) is an application designed for your Dell Latitude 12 Rugged Tablet, which enables you to perform several important tasks on the tablet. After you install the Dell Rugged Control Center application on your tablet, you can view all the basic features, such as Wi-Fi, Bluetooth, camera, volume, brightness, and so on.
In addition, this application also enables you to add a shortcut of any feature onto it. By using this application, you can directly control or adjust all the important features on your tablet.
You can launch the application by clicking the Rugged Control Center icon, available on the desktop. You can also start the RCC application from the bottom-right corner of the taskbar.

The following table shows the feature description of the Rugged Control Center Application:
Feature Description


Allows you to enable or disable the airplane mode.
Allows you to enable or disable the WLAN.
NOTE: To connect to the WLAN, make sure you have your network configured.
Feature Description
 | Allows you to enable or disable the WWAN / Mobile broadband service (if configured). | |
 | Allows you to enable or disable Bluetooth. | |
 | Allows you to turn on or off the built-in flashlight. | |
 | Allows you to enable or disable the Automatic Light Sensor. | |
 | Launches the camera application. | |
| Camera | ||
 | Launches the GPS control panel, which allows you to enable or disable the GPS. If you enable the GPS, the control panel will also show your current location, along with the time, date, latitude, and longitude. | |
| GPS Tool | ||
 | Launches the Window panel to select the display option, if you have connected to an external monitor or to any other source. | |
| Project | ||
 | Allows you to increase or decrease the brightness in the display. | |
 | Allows you to increase or decrease the volume of the speakers. |
Camera
GPS Tool
Project

NOTE: The options that are displayed in the RCC home screen are the default options. You can add
a feature to the application, by clicking the + icon.
Using the Settings Option in Rugged Control Center
You can also touch the option from the top-right corner of the RCC application to explore more options.
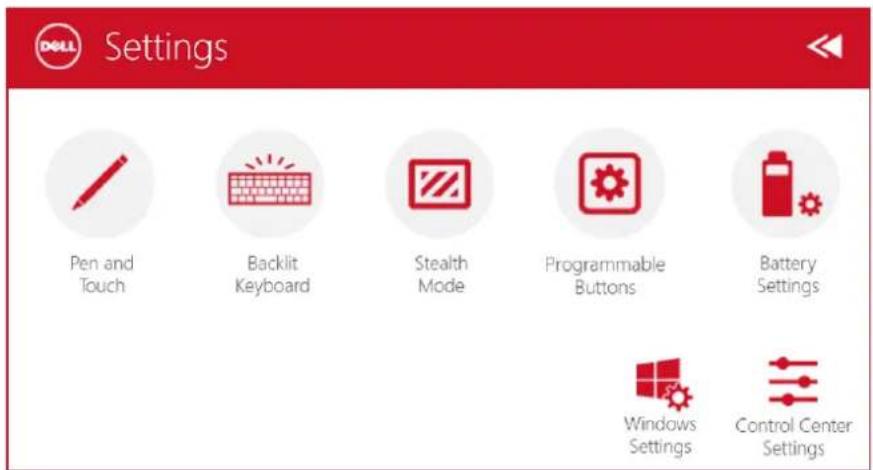
The following table shows the feature description available in the Settings option of the RCC Application:
Feature Description



Launches the Windows control panel for pen and touch settings.
NOTE: This option is compatible only if you have the optional keyboard accessory for your tablet.
Launches a control panel to adjust settings for the optional backlit keyboard accessory (if configured with the optional keyboard accessory). The control panel also allows you to set backlight colors and adjust brightness and timeout settings.
Launches a control panel to adjust Stealth Mode settings. The control panel also allows you to set which functionality is disabled when you enter Stealth Mode.
Feature Description
| Launches a control panel to assign actions to the 3 programmable buttons on the front of the tablet. | |
| Programmable Buttons | |
| Launches the Windows control panel for battery settings. | |
| Battery Settings | |
| Launches the Windows control panel. | |
| Windows Settings | |
| Launches the control panel to adjust settings of the RCC application. | |
| Control Center Settings |
Installing the Dell Rugged Control Center

NOTE:
- Dell Rugged Control Center is compatible only with Windows 8 or higher versions of operating systems.
- Before you install this application, make sure you that have the latest version of the setup file from the Dell.com/support page for Dell Latitude 12 Rugged Tablet 7202.
-
After you install or uninstall the Dell Rugged Control Center application on your tablet, a reboot is recommended.
-
Double-click the executable file.
The Setup Wizard page appears.
- Click Next.
The Language Selection page appears.
- Select the language from the drop-down menu and click Next.

NOTE: The default language is English.
-
Click Install.
-
Click Yes to provide the administrator rights to begin the installation process.
The installation process will now begin.
- After the installation is successful, click Finish.
You can now see the Rugged Control Center icon on your desktop.
Enabling or Disabling the Keyboard Backlight

NOTE: This feature can be used only if the tablet is connected to an external keyboard accessory (sold separately).
- Launch the Rugged Control Center application.
- Press the Settings button on the top-right corner.

Backlit
-
Press the Backlit Keyboard button to access the Backlit Keyboard control panel.
-
Adjust the required parameters for Backlight settings and Backlight colors.

Changing the Keyboard Backlight Colors
- Press
+ keys to cycle through the available backlight colors.

NOTE: Press

- Press
+ < F10> keys to adjust the brightness.
Stealth Mode
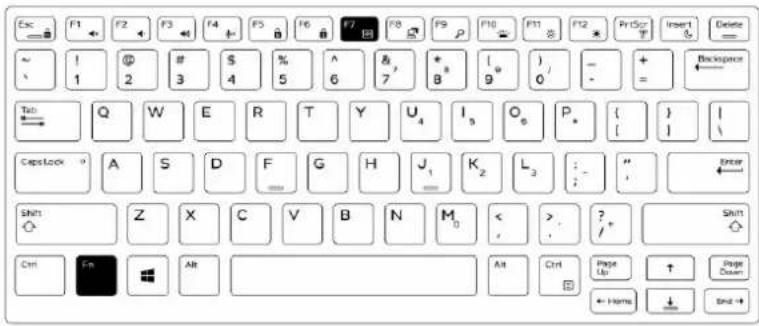
Latitude fully rugged products come equipped with a Stealth mode. Stealth mode allows you to turn off the Display, all the LED lights, internal speakers, the fan and all wireless radios with a single key combination.

NOTE: This mode is aimed at using the tablet in covert operations. When the stealth mode is activated, the tablet remains functional but will not emit any light or sound.
You can activate the Stealth Mode, using the Rugged Control Center application and using the optional keyboard accessory.
Turning Stealth Mode On/Off Using Optional Accessory Keyboard

NOTE: The following steps are applicable only if you have attached the optional accessory keyboard to your tablet. Stealth mode can be setup within the tablet by using the Rugged Control Center (RCC) application pre-loaded on the device.
- Press the
+ key combination ( key not needed if Fn lock is activated) to turn on stealth mode.

NOTE: Stealth mode is a secondary function of the
-
All the lights and sounds are turned off.
-
Press the
+ key combination again to turn off the stealth mode.
Turning Stealth Mode On/Off Using RCC
- Launch the Rugged Control Center application on your tablet.
-
From the main screen, press the Settings button > Programmable Buttons.
-
Set any 3 programmable buttons to enable or disable the Stealth Mode.
- Use the selected programmable buttons to enable or disable the Stealth Mode.
Modifying the Stealth Mode Settings
You can also modify your desired features to disable in the stealth mode settings. To modify the stealth mode settings:
-
Launch the Rugged Control Center application on your tablet.
-
From the main screen, press the Settings button > Stealth Mode.
- Select the features that you want to disable in the stealth mode. For example: Volume, Wireless, Display, and so on.
7
Enabling and Disabling Wireless (WiFi) Feature
You can enable or disable the wireless (Wi-Fi) feature, using the optional keyboard accessory and using the programmable buttons in RCC application.

NOTE: WiFi can also be enabled/disabled by using the user defined programmable buttons on the tablet.
Enabling or Disabling Wireless (WI-Fi) Feature Using Optional Keyboard Accessory
- Press the
+ keys to enable wireless feature. - Press the
+ < PrtScr> keys again to disable wireless feature.

Enabling and Disabling Wireless (WiFi) Feature Using RCC
- Launch the Rugged Control Center application on your tablet.
- Press the Settings button on the top-right corner.

- Press Programmable buttons
Programmable Buttons
- Set any of the 3 programmable buttons to Wireless on/off.

Programmable Buttons
Button P1
Night Vision Mode on/off
Camera Shutter Release
Camera Flash on/off
Flashlight on/off
Wireless on/off
Microphone Mute
Button P2
Night Vision Mode on/off
Camera Shutter Release
Camera Flash on/off
Flashlight on/off
Wireless on/off
Microphone Mute
Button P3
Stealth Mode on/off
Night Vision Mode on/off
Camera Shutter Release
Camera Flash on/off
Flashlight on/off
- Use the programmed button to Enable/Disable Wireless networks on the tablet.
Smart Cards
There are two main types of Smart or Common Access Cards (CAC):
-
Enclosed Smart Cards — These cards have a contact area with many gold plated connection pads. When inserted into a card reader, the information from the chip can be read and written Insert the card into the smart card slot with the gold contact pad facing upward and pointing toward the smart card slot. Slide the card into the slot until it is fully seated in its connector.
-
Contactless Smart Cards — These cards do not require any physical contact with the reader. The chip communicates with the card reader through RFID induction technology.
These cards require only close proximity to an antenna of a card reader to complete transactions.
Specifications

NOTE: Offerings may vary by region. The following specifications are only those required by law to ship with your computer. For more information about the configuration of your computer, go to Help and Support in your Windows operating system and select the option to view information about your computer.
System Information
Chipset Integrated in the CPU
DRAM bus width 128 bit (64-bits x 2 channels)
Flash EPROM 128 Mbit Quad-SPI
Processor
Type Intel Broadwell Y SOC
External bus frequency SOC no external bus connected chipset
Memory
Memory capacity 4 GB / 8 GB
Memory type LPDDR3
Memory speed 1600 MHz
Minimum memory 4 GB
Maximum memory 8 GB
Audio
Type Side firing
Stereo conversion 24-bit
Speakers AAC 25 x 9 x 3 mm, 1 W, speaker
Video
Video type integrated
Data bus integrated
Video controller iGPU GT2 graphics
Communications
Network adapter WLAN, LTE, HSPA+
Wireless BT, NFC
- Bluetooth 4.0 LE

NOTE: The optional I/O expansion module, if purchased with the tablet, comes equipped with an additional Network port (Ethernet).
Ports and Connectors
Audio one 3.5 mm jack
USB one USB 3.0 connector
Memory-card reader one microSD card reader
Docking port
- one docking port
• one WWAN RF passthrough
• one WLAN RF passthrough
Subscriber Identity Module (SIM) one micro SIM slot port
Smart card one smart card reader
Serial one micro serial connector
Modular Expansion one pogo pin modular expansion port

NOTE: The optional expansion dock, if purchased with the tablet comes equipped with two additional USB 3.0 ports.
Display
Feature Specification
Type white Light Emitting Diode (WLED) display, HD (1366 x 768)
Size 11.6 inches
Dimensions:
Height 158.5 mm (6.24 inches)
Width 268.0 mm (10.59 inches)
Diagonal 29.38 mm (1.15 inches)
Active area (X/Y) 256.12 mm×144 mm
Maximum resolution 1366 x 768 pixels
Maximum Brightness 730 nits
Operating angle 0^ (closed) to 180^
Refresh rate 60 Hz
Display
Feature Specification
Minimum viewing angles:
Horizontal
• +/- 40° for HD
• +/- 60° for FHD
Vertical
• +10°/-30° for HD
• +/-50° for FHD
Pixel pitch 0.2265 mm
Front camera
Type OV 2724 (2 MP)
Resolution 1366 x 768 pixels
Rear camera
Type IMX 134 (8 MP)
Resolution 3264 pixels x 2448 pixels
Storage
Storage M.2 SSD 128 GB / 256 GB / 512 GB
Battery
Type 2-cell lithium ion (26 WHr)
Dimensions
Length 103.60 mm (4.08 inches)
Height 15.00 mm (0.59 inch)
Width 62.70 mm (2.47 mm)
Weight 145.50 g (typical) (0.32 lb)
Voltage
• 7.4 VDC (nominal)
• 8.7 VDC (maximum)
Temperature range
Operating 0 °C to 50 °C (32°F to 158°F)
Non-Operating -20 °C to 65 °C (4 °F to 149 °F)
Coin-cell battery 3 V CR2025 lithium ion
AC Adapter
Type
Input voltage 100 VAC to 240 VAC
AC Adapter
Input current (maximum) 0.60 A
Input frequency 50 Hz to 60 Hz
Output power 45 W
Output current (45 W) 2.31 A
Rated output voltage 19.5 VDC
Temperature range:
Operating 0 °C to 40 °C (32 °F to 104 °F)
Non-operating -40 °C to 70 °C (-40 °F to 158 °F)
Physical
Typical
Width 312.20 mm (12.29 inches)
Height 203.00 mm (7.99 inches)
Thickness 24.40 mm (0.96 inch)
Maximum
Width 318.20 mm (12.53 inches)
Height 209.00 mm (8.23 inches)
Thickness 28.90 mm (1.14 inches)
Weight (minimum) 1620 grams (3.57 lb)
Environmental
Temperature:
Operating -29 °C to 63 °C
Storage -51 °C to 71 °C
Relative humidity (maximum):
Operating Operating 10% to 90% (noncondensing)
Storage Storage 5% to 95% (noncondensing)
Altitude (maximum):
Operating - 16 m to 12192 m (- 50 ft to 40000 ft)
Non-operating -15.20 m to 12192 m (-50 ft to 40,000 ft)
Airborne contaminant level G1 as defined by ISA-71.04–1985
Contacting Dell
NOTE: If you do not have an active Internet connection, you can find the contact information on your purchase invoice, packing slip, bill, or Dell product catalog.
Dell provides several online and telephone-based support and service options. Availability varies by country and product, and some services may not be available in your area. To contact Dell for sales, technical support, or customer service issues:
Go to dell.com/contactdell.
natural_image
Illustration of a plug with two pins and a battery icon (no text or symbols)natural_image
Illustration of a USB connector with an external port and a separate USB symbol (no text or labels)natural_image
3D diagram of a computer chassis showing two storage compartments with blue arrows indicating direction (no text or symbols)natural_image
Isometric technical diagram of a computer chassis with labeled components and a blue arrow indicating a specific area (no text or symbols present)5
Application Rugged Control Center de Dell.
Night Vision Mode on/off
Camera Shutter Release
Camera Flash on/off
Flashlight on/off
Wireless on/off
Microphone Mute
Button P2
Night Vision Mode on/off
Camera Shutter Release
Camera Flash on/off
Flashlight on/off
Wireless on/off
Microphone Mute
Button P3
Stealth Mode on/off
Night Vision Mode on/off
Camera Shutter Release
Camera Flash on/off
Flashlight on/off
Mémoire minimale 4 Go
Mémoire maximale 8 Go
Audio
natural_image
Illustration of a plug with two pins and a battery icon (no text or symbols)natural_image
Illustration of a USB connector with an external port and a separate USB symbol (no text or labels)natural_image
Diagram of a computer chassis showing two storage compartments with blue arrows indicating movement or force (no text or symbols present)natural_image
Isometric technical diagram of a device casing with labeled components and a blue arrow indicating a specific area (no text or symbols present)5
Dell Rugged Control Center Toepassing
Night Vision Mode on/off
Camera Shutter Release
Camera Flash on/off
Flashlight on/off
Wireless on/off
Microphone Mute
Button P2
Night Vision Mode on/off
Camera Shutter Release
Camera Flash on/off
Flashlight on/off
Wireless on/off
Microphone Mute
Button P3
Stealth Mode on/off
Night Vision Mode on/off
Camera Shutter Release
Camera Flash on/off
Flashlight on/off
natural_image
Illustration of a handheld electronic device with a separate close-up of its internal components (no text or symbols)natural_image
Illustration of a USB connector with an external port and a separate USB port icon (no text or symbols)natural_image
Diagram of a computer rear panel with two labeled storage compartments and directional arrows indicating movement (no text or symbols present)Einsetzen des Akkus
natural_image
Isometric technical diagram of a computer chassis with labeled components and a blue arrow indicating a specific area (no text or symbols present)Night Vision Mode on/off
Camera Shutter Release
Camera Flash on/off
Flashlight on/off
Wireless on/off
Microphone Mute
Button P2
Night Vision Mode on/off
Camera Shutter Release
Camera Flash on/off
Flashlight on/off
Wireless on/off
Microphone Mute
Button P3
Stealth Mode on/off
Night Vision Mode on/off
Camera Shutter Release
Camera Flash on/off
Flashlight on/off
natural_image
Illustration of a plug with a connector and a battery icon (no text or symbols)natural_image
Illustration of a USB connector with an external port and a separate USB symbol (no text or labels)natural_image
Diagram of a computer chassis showing two labeled storage units with blue arrows indicating ports (no text or symbols present)natural_image
Isometric technical diagram of a device casing with internal components and a blue arrow indicating a specific area (no text or symbols present)Night Vision Mode on/off
Camera Shutter Release
Camera Flash on/off
Flashlight on/off
Wireless on/off
Microphone Mute
Button P2
Night Vision Mode on/off
Camera Shutter Release
Camera Flash on/off
Flashlight on/off
Wireless on/off
Microphone Mute
Button P3
Stealth Mode on/off
Night Vision Mode on/off
Camera Shutter Release
Camera Flash on/off
Flashlight on/off

- Dell Latitude 12 Rugged Tablet - 7202
- Getting Started Guide
- Notes, cautions, and warnings
- Contents
- 1
- Finding Information and Resources
- 2
- Front and Back View
- 3
- Quick Setup
- Removing and Installing Components
- Removing the Battery
- Installing the Battery
- Installing the SIM Card
- 5
- Dell Rugged Control Center Application
- Feature Description
- Using the Settings Option in Rugged Control Center
- Installing the Dell Rugged Control Center
- NOTE:
- Enabling or Disabling the Keyboard Backlight
- Changing the Keyboard Backlight Colors
- Stealth Mode
- Turning Stealth Mode On/Off Using Optional Accessory Keyboard
- Turning Stealth Mode On/Off Using RCC
- Modifying the Stealth Mode Settings
- 7
- Enabling and Disabling Wireless (WiFi) Feature
- Enabling or Disabling Wireless (WI-Fi) Feature Using Optional Keyboard Accessory
- Enabling and Disabling Wireless (WiFi) Feature Using RCC
- Programmable Buttons
- Smart Cards
- Specifications
- System Information
- Processor
- Memory
- Audio
- Video
- Communications
- Ports and Connectors
- Display
- Feature Specification
- Front camera
- Rear camera
- Storage
- Battery
- AC Adapter
- Physical
- Environmental
- Contacting Dell
- Application Rugged Control Center de Dell.
- Dell Rugged Control Center Toepassing
- Einsetzen des Akkus
Brand : DELL
Model : Latitude 12 Rugged Tablet
Category : Tablet