
PAC 2600 S - Air Conditioning TROTEC - Free user manual and instructions
Find the device manual for free PAC 2600 S TROTEC in PDF.


| Brand | Trotec |
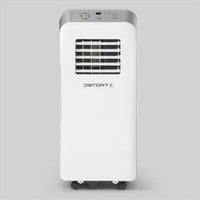
| Model | PAC 2600 S |
| Product type | Mobile monoblock air conditioner |
| Dimensions (H x W x D) | 70 x 45 x 40 cm |
| Weight | 27 kg |
| Power supply | 230 V ~ 50 Hz |
| Cooling capacity | 2 600 W (9 000 BTU/h) |
| Power consumption | 900 W |
| Refrigerant | R290 (0.18 kg) |
| Main functions | Cooling, dehumidification, ventilation, 24-hour timer |
| Maintenance and cleaning | Clean air filter every 2 weeks; removable water tank |
| Safety | Frost protection, automatic shut-off when tank full, child safety |
| Spare parts and repairability | Air filter, remote control, exhaust hose available |
| General information | Noise level: 62 dB(A); air flow: 300 m³/h; energy class A |
Frequently Asked Questions - PAC 2600 S TROTEC
User questions about PAC 2600 S TROTEC
0 question about this device. Answer the ones you know or ask your own.
Ask a new question about this device
Download the instructions for your Air Conditioning in PDF format for free! Find your manual PAC 2600 S - TROTEC and take your electronic device back in hand. On this page are published all the documents necessary for the use of your device. PAC 2600 S by TROTEC.
USER MANUAL PAC 2600 S TROTEC
Table of Contents
(●): Stand-by button
①: Timer button
😊: Sleep button


These operating instructions must be kept in close proximity to either the unit itself or the place where the unit is located. This publication replaces all previous publications. No part of this publication may be reproduced, processed using electronic systems, replicated or distributed in any way without prior written authorisation by us. Subject to technical modifications. All rights reserved. These operating instructions were compiled with all due care and attention. We accept no liability for errors or omissions. © TROTEC®
01. Safety instructions
This product has undergone stringent material and function tests and extensive quality checks before leaving our premises. We must, however, point out that using this device can constitute a hazard when used by people who have not been instructed in its proper use or when used for purposes other than those for which it was intended!
The following instructions must be observed at all times:
- This unit is not suitable for outdoor use.
- Do not install or use this unit in rooms where there is a risk of explosion.
- Keep away from flammable objects. Please ensure that a sufficient safety distance is maintained at all times.
- Please ensure that a minimum distance of 1m is maintained to any TVs or radios in order to avoid electromagnetic interference.
- Do not install or use in atmospheres containing oil, sulphur or salt.
- Keep away from drapes, curtains, net curtains etc. Please ensure that a minimum distance of 50 cm (19.7 ins) is maintained at all times.
- Do not place the unit in direct sunlight as this could lead to a discolouring of the housing.
- Please make sure that the air intake and outlet ducts are not obstructed and free of foreign objects.
- Please make sure that the unit is placed on a flat and level and stable surface.
- The unit may only be used in an upright position.
- Do not put or force any objects into the air intake and outlet ducts.
- Do not place any warm or heavy objects on the unit.
- Do not clean with a hose and or subject to jets of water.
- Only use within the permissible operating ranges: special attention should be paid to the surrounding temperature.
- The unit will work more efficiently in certain rooms and at certain locations (see Technical Data).
- Only connect to properly installed, fused and earthed sockets 230 V / 50 Hz, fuse 10 A.
- Do not pull at the cord. Make sure that the cord is not kinked, bent or trapped. This could easily damage the cord!
- Wait 5 minutes before putting into operation after transport. This will protect your unit against damage.
- Use the on/off (power) key to switch the unit off. Do not pull out the plug to power off.
- Do not transport or carry while in operation.
- Do not lay the unit on its side.
- Protect all electric cords and leads against damage, including damage by animals.
- Empty the water collection tray when you are not planning on using the unit over a longer period. This simple but effective step ensures a longer product life span.
- Make sure that any extension cords used are suitable for this purpose, are of sufficient length and conform with the connected load.
- Do not lay cords under carpets.
Please make sure that the unit has been unplugged before any cleaning or approved maintenance work is carried out on the unit or the unit is cleaned with water.
Do not use any chemical solvents (e.g., benzol or cleaning agents containing alcohol) to clean the unit as these could prove to be too aggressive for the housing and damage your unit.
Empty the condensation water collection tank before you move the unit from one place to another.
Please make sure that your unit is turned off and unplugged before the air intake grille is removed.
Do not use without air filter!
Do not direct the discharged air at persons!
Do not, on any account, open the housing. There is a very high risk of electrocution.
Any work that has to be carried out on the refrigerant unit or the electrical circuits may only be performed by an authorized and certified specialist dealer.
Please remove the batteries when the product has reached the end of its life cycle.
Please dispose of the batteries in an orderly and safe way.
This unit may only be used for the purposes described in the operating instructions. The warranty expires immediately if these instructions are not observed. In such cases, we also accept no liability.
02. Transport and Packaging
Quality checks are carried out constantly on all our products. All products are packed with the utmost care before they leave our premises. This unit will be delivered to you in a specially-designed, sturdy cardboard box. Please check your delivery immediately upon receipt. Make a note of any signs of damage or missing pieces on the delivery note and contact your carrier and your contract partner. We are unable to accept responsibility for any complaints made at a later date.
The following instructions must be observed during transport:
- Switch off the unit at the control panel and remove the plug from the socket.
- Transport upright only.
- When moving over short distances: the unit has four castors and can be wheeled from one location to another. There are two grip moulds for easier carrying.
- Your air conditioning unit extracts excess moisture from the air and collects the condensate in a specially-designed built-in tank. We therefore recommend that you empty the tank prior to transporting the unit via, for example, the condensate drain outlet at the back of the unit.
03. Model Description
Description of the Individual Components
Front view

- Control panel
- Cold air outlet
- Signal receiver
- Remote control
- Carry handle
Rear view
- Air discharge hose
- Evaporator air intake
- Secondary drain outlet
- Power supply unit
- Secondary drain outlet
All the graphics displayed in these operating instructions show a standard model. It is therefore possible that the model you have selected is different in form to the one depicted.
04. Description of the Individual Components
Control Panel
The following section explains how to safely put the air conditioner into operation.
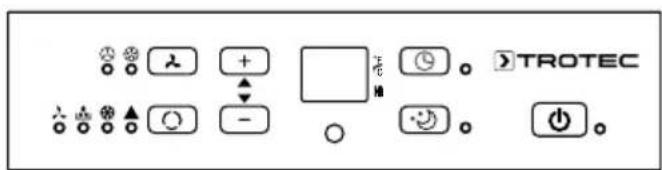
(●): Stand-by mode ① : Timer-mode 😊: Sleep-mode 2: Fan speed Mode-key 💡: low fan speed : high fan speed + : Timer/Temperature up — : Timer/Temperature down ▲: Automatic ☀️: Cooling : Dehumidifying 2: Fan mode
Operating the Control Panel
Automatic, Cooling, Dehumidifying, Fan speeds
- Powering the Unit On
a) Connect the unit to a power supply. The unit emits a beep tone.
b) Press the ⏻ key. The unit is on.
The LED shows the room temperature. The unit is switched to automatic mode.
- Selecting an Operating Mode
Press the Ⓧ key to select one of the modes depicted below.

- Setting the Temperature
The temperature can be set within an operating range of 15°C to 31°C in increments of 1°C.
Press + or — to increase or lower the temperature by 1°C. The LED displays the temperature you have set for 5 seconds before showing the room temperature again.
- Fan speed
Press the ↗ key to select a fan speed as shown below.

- Stand-by Mode
If you press the ⏻ key again, the unit switches to stand-by.
Description of the Individual Modes
▲-Mode
- When you select ▲ mode, the temperature sensor monitors the room climate and automatically selects ✕ or √ operating mode.
- When the room temperature is ≥24°C, the unit automatically switches to ✕ operating mode.
- When the room temperature is <24°C, the unit automatically switches to λ operating mode.
-Mode
- The upper fan runs at a low speed. The speed cannot be adjusted.
- The compressor and the lower fan switch off after 8 minutes. The fan switches itself on again after 6 minutes.
- The unit switches to a constant temperature and relative humidity. The temperature cannot be adjusted.
-Mode
- When the room temperature is higher than the temperature you have selected, the compressor switches itself on.
- When the room temperature is lower than the temperature you have selected, the compressor switches itself off and the upper fan runs at the speed you have selected.
2-Mode
- The upper fan runs at the speed you have selected and the compressor switches itself on. The lower fan does not run.
- The temperature cannot be adjusted.
-Mode
- Press the Timer key while the unit is running to activate the auto power off function.
- Press the Timer key while the unit is on stand-by to activate the auto power on function.
- Both the auto power on and the auto power off function can be set from 1 to 24 hours. Press the Timer/Temperature Up or the Timer/Temperature Down key to shorten or prolong the power on or the power off time.
-Mode
- The 😊 mode can only be activated in ⚙ mode.
- When you press the ⚙ key in ⚙ mode, the unit operates in Sleep mode. The fan runs automatically at the lowest speed. The temperature increases by 1°C after 1 hour and by 2°C after 2 hours. The unit powers off after 6 hours.
The electronic has a memory function which enables the unit to save the last setting. This means that you do not have to select the same mode again after you have powered up the unit. (This function is not available when the unit is in ▲ mode.).
Remote Control
The remote control allows operating the appliance even from a distance.

1 ⏻ -key
Press this key to power the unit on/off.
2 -key
Press this key to select an operating mode.
3 2-key
Use these keys to select the fan speed.
4 ▲ / ▼
The selection keys can be used to select a Timer or Temperature setting.
5 -key
Press this key to switch the Sleep mode on/off.
6 -key
Press this key to activate the power on/power off time.
Changing the battery
- Placing the batteries in the battery compartment.

- Remove the battery compartment lid.
Slide the battery compartment lid backwards away from the unit.
- Place the new batteries into the battery compartment. Please ensure that the poles are properly aligned.
- Close the battery compartment.
NOTE:
- The positive pole and the negative pole of the battery must be aligned with the “+” and “−” signs on the remote control.
- Do not use new batteries together with old ones.
- Remove the batteries from the battery compartment when you are planning on not using your unit over a longer period of time.
- Please make sure that you dispose of your old batteries in a safe and proper manner. By doing so you are providing a valuable contribution towards protecting and saving the environment.
Using the Remote Control
Point the remote control at the unit's signal receiver to operate the unit. When used correctly, the remote control will send signals to the unit over a distance of 7 metres (23 feet).
Overload Protection

Operating Status
The unit powers off automatically when the automatic overload protection is activated in the following cases:
| Cooling The room temperature is over 43°C (109°F)The room temperature is lower than 15°C (59°F) |
| Dehumidifying The room temperature is lower than 15°C (59°F) |
When the air conditioner runs in cooling or drying mode over a longer period when a window is open and the relative humidity is more than 80%, condensation can form at the outlet.
Operation of the overload protection
In the following cases the overload protection was activated:
- At a restart when the appliance was switched off before or the mode was changed while it operated. Here you have to wait 3 minutes.
- When the unit is unplugged, the unit returns to the original mode. The Timer has to be reset.
Condensation Water
There is a closed circuit on the inside of the unit which treats the condensation water that forms when the unit is in operation. The condensation water is partially treated in the machine. When the condensation level falls below the mark, the pump stops working. When the water level reaches the mark, this triggers the float (1) and the pump starts to work again. When the water continues to rise and reaches the upper mark, the float (2) is triggered and the water collector indicator shows the water collector is full and needs to be emptied. Power off and then unplug the unit. Place the unit somewhere where the water can run off without being impeded and pull out the rubber stops to drain off the condensation water. Don't forget to replace the rubber stoppers, as the water could otherwise run out of the unit and cause potentially a great deal of water damage.
You may also wish to attach a hose to the drain outlet and allow the water to run off into a drain or sump.
Cleaning and Maintenance
Cleaning the Unit
- Unplug the unit
- Clean the unit with a dry, soft cloth. Clean the unit with lukewarm water (not warmer than 40°C (104°F)) if the unit is soiled or dirty.
⚠ Do not use benzene or similar cleaning agents to clean the unit!
Make sure that the unit does not come into contact with water. There is the risk of electrocution!
Cleaning the Filter
The air filter has to be cleaned approx. every 100 operating hours.
Clean the air filter as follows:
- First switch off the appliance and then release the filter.

- Clean the air filter and put it back in again. If the air filter is heavily contaminated with dust and dirt, then use a gentle cleaning agent and lukewarm water to clean. Leave the filter to dry in a cool place, out of the sun, and replace it again when dry.
The air filter has to be cleaned every 2 weeks at the latest when the unit is used in environments with high levels of dust.
Proper Storage of Your Unit
- If you are not planning on using your unit over a longer period, then remove the rubber stoppers from the primary and secondary water outlets (see Description of Unit) to allow any water which may still be inside the unit to drain off properly.
- Switch on the unit and leave to run for approx. 12 hours on a warm, sunny day. This prevents mould from forming on the inside.
- Switch off the unit and pull out the plug. Remove the batteries from the battery compartment and store the unit in a safe and dry place.
- Clean the air filter and place it back into the unit.
- Disconnect the hose and close the hole.
Troubleshooting
If you think that your unit is not working properly, you may find that the problem you are having is not necessarily a fault and does therefore not need to be repaired by a specialist. Please consult the table below before you contact a specialist in order to see if a solution to your problem can be found first.
| Possible Fault Possible Solution | |
| The unit is not running. | The overload protection has been activated or the fuse has melted. |
| Wait 3 minutes to see if the overload protection has been activated. | |
| The batteries in the remote control are exhausted and need to be replaced. | |
| The plug of the unit has not been plugged in properly | |
| The unit runs for a short time only. | The temperature you have selected is too close to current room temperature. Select a higher or lower temperature if necessary. |
| The air outlet is blocked. Remove the obstruction. | |
| The unit is running but not cooling. | A door or window is open. |
| Another appliance, e.g. a strong lamp or a heater is producing heat at the same time. | |
| The air filter is extremely dirty and needs to be cleaned. | |
| The air intake or outlet is blocked. Remove the obstruction. | |
| The temperature you have selected is too high. | |
| Water runs out of the unit while it is being moved from one location to another. | Drain off the condensation water first. |
| Place the unit on a flat surface to prevent water from running out and causing damage to carpets and flooring. | |
| The unit is not running and the water container full indicator (E4) is on. | Remove the rubber stop-pers from the back of the unit and allow the water to drain off. |
| Please contact a qualified technician if this problem occurs repeatedly. |
Troubleshooting
| Fault Cause Solution | ||
| The unit does not power on | The unit does not have a power supply:1. The unit is not plugged in.2. The plug or the socket is damaged.3. The fuse has melted. | 1. Plug in the unit.2. Have the mains cable or socket replaced by an electrician.3. Have a specialist change the fuse if necessary. (Specification: 3.15A/230VAC) |
| The unit switches itself off | 1. The auto power off mode has been activated.2. The temperature you selected has been reached. | 1. Switch the unit back on again.2. Wait until the unit automatically switches itself back on again. |
| The unit does not cool in cooling mode | 1. The room temperature is lower than the temperature you have selected.2. The unit has switched to frost protection mode. | 1. The unit will start to cool again when the temperature that has been selected is lower than the room temperature.2. The unit will start to cool again when the frost protection mode is completed. |
| LED indicates fault message E2 | The sensor for the room temperature is defect or damaged. | The sensor must be replaced with a new sensor. |
| LED indicates fault message E3 | The sensor for the evaporator oil pipe is defect or damaged. | The sensor must be replaced with a new sensor. |
| LED indicates fault message E4 | The water tank is full. | Drain off the water. |
| LED indicates fault message E5 | The sensor for the condensator oil pipe is defect or damaged. | The sensor must be replaced with a new sensor. |
05. Installation
Installation Accessories
- Air discharge hose
- Connecting piece, air discharge hose
- Adapter for air outlet
- Remote control
- Cap for air outlet adapter

Installing the Unit
• Install the unit next to a door, a window or French doors. - Make sure that there is a minimum distance of 60cm between the air outlet at the back of the unit and any walls, cupboards or any other furniture or objects. - Connect the air discharge hose to the air outlet at the back of the unit. - Extend the hose to its entire length to see if it is long enough to pass through a door or window or a hole which might have been made to accommodate the hose. - Make sure that the air outlet is not blocked and free of any obstructions.
Connecting the Air Discharge Hose and the Adapter
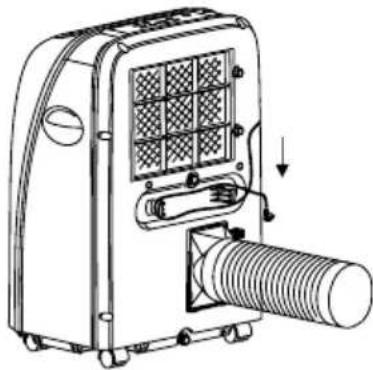
Connect the air discharge hose to the air outlet
- Hold both ends of the air discharge hose and extend the hose to its full length.

- Screw the air discharge hose onto the connecting piece.

- Connect the window adapter to the air discharge hose.

- Connect the air discharge hose with the connected connecting piece to the air outlet.
- Technical Data
| Model PAC 2600 S | |
| Cooling performance (Btu/h)/(W) | 9000 Btu/h/2600 W |
| Dehumidification capacity (l/h) | 1,1 l/h |
| Power input Mains voltage/Amperage | 950 W/4,1 A |
| Air flow volume (m3/h) 400 m3/h | |
| Rated voltage/Frequency (V/Hz) | AC220-240 V / 50 Hz |
| Sound level pressure (dB (A)) ≤54 dB (A) | |
| Net weight (kg) 24 kg | |
| Dimensions Housing (mm) T x B x H | 305 x 420 x 636 mm |
| Packaging (mm) 490 x 370 x 770 mm | |
| Refrigerant R410a | |
| Room size (m2) ~30 m2 | |
| Miniature fuse 3,15 A 250 V | |

In the European Union electronic equipment must not be treated as domestic waste, but must be disposed of professionally in accordance with Directive 2002/96EU of the European Parliament and Council of 27th January 2003 concerning old electrical and electronic equipment. At the end of its life please dispose of this instrument in a manner appropriate to the relevant legal requirements.
Table of Contents
Overload protection
Device status
(●): Standby button Timer button 😊: Sleep mode


- TABLE OF CONTENTS
- SAFETY INSTRUCTIONS
- THE FOLLOWING INSTRUCTIONS MUST BE OBSERVED AT ALL TIMES
- TRANSPORT AND PACKAGING
- THE FOLLOWING INSTRUCTIONS MUST BE OBSERVED DURING TRANSPORT
- MODEL DESCRIPTION
- DESCRIPTION OF THE INDIVIDUAL COMPONENTS
- CONTROL PANEL
- OPERATING THE CONTROL PANEL
- DESCRIPTION OF THE INDIVIDUAL MODES
- ▲-MODE
- MODE
- 2-MODE
- REMOTE CONTROL
- 1 ⏻ -KEY
- 2 -KEY
- 3 2-KEY
- 4 ▲ / ▼
- 5 -KEY
- 6 -KEY
- CHANGING THE BATTERY
- NOTE
- USING THE REMOTE CONTROL
- OVERLOAD PROTECTION
- OPERATING STATUS
- OPERATION OF THE OVERLOAD PROTECTION
- CONDENSATION WATER
- CLEANING AND MAINTENANCE
- CLEANING THE UNIT
- CLEANING THE FILTER
- PROPER STORAGE OF YOUR UNIT
- TROUBLESHOOTING
- INSTALLATION
- INSTALLATION ACCESSORIES
- INSTALLING THE UNIT
- CONNECTING THE AIR DISCHARGE HOSE AND THE ADAPTER
- DEVICE STATUS
Brand : TROTEC
Model : PAC 2600 S
Category : Air Conditioning