
STBT50 RD - Docking Station Sunstech - Free user manual and instructions
Find the device manual for free STBT50 RD Sunstech in PDF.


| Product Type | Docking station |
| Brand | Sunstech |
| Model | STBT50 RD |
| Dimensions | Approximately 20 x 10 x 8 cm |
| Weight | Approximately 500 g |
| Power Supply | 5V/2A power adapter or USB port |
| Bluetooth | Version 5.0 with 10 meter range |
| Output Power | 10 W RMS (2 x 5 W) |
| Main Functions | Wireless audio playback, device charging (USB), AUX input, FM radio |
| Connectivity | Bluetooth, USB (charging), AUX 3.5 mm, FM antenna |
| Compatibility | Smartphones, tablets, MP3 players, computers |
| Device Charging | USB output port 5V/1A for charging |
| FM Radio | Integrated with automatic station search |
| Maintenance and Cleaning | Soft dry cloth; do not use harsh chemicals |
| Safety | Do not expose to moisture; use the provided charger; do not open the device |
| Spare Parts and Repairability | Not user-serviceable; contact Sunstech customer service |
| General Information | Full manual available online; 2-year warranty |
Frequently Asked Questions - STBT50 RD Sunstech
User questions about STBT50 RD Sunstech
0 question about this device. Answer the ones you know or ask your own.
Ask a new question about this device
Download the instructions for your Docking Station in PDF format for free! Find your manual STBT50 RD - Sunstech and take your electronic device back in hand. On this page are published all the documents necessary for the use of your device. STBT50 RD by Sunstech.
USER MANUAL STBT50 RD Sunstech
natural_image
Black rectangular device with a circular button and handle, no visible text or symbolsINSTRUCTION MANUAL PLEASE READ ALL INSTRUCTIONS CAREFULLY AND RETAIN FOR FUTURE USE
SAFETY PRECAUTIONS
Read the following recommended safety precautions carefully.
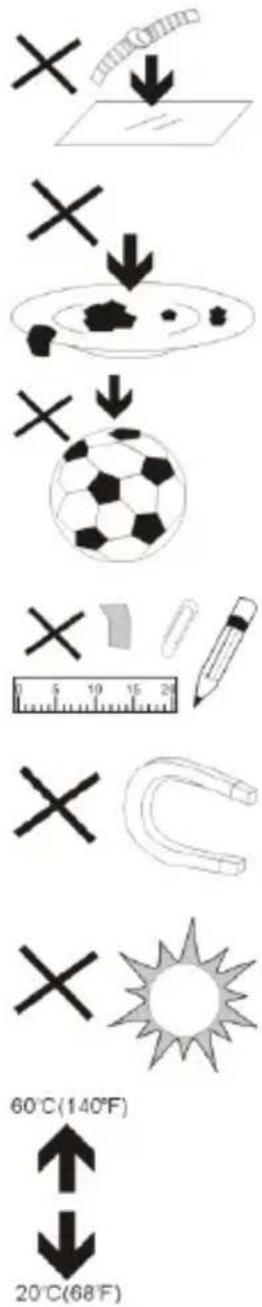
-
DO NOT place objects on top of the device, as objects may scratch the device.
-
DO NOT expose the device to dirty or dusty environments.
-
DO NOT place the device on an uneven or unstable surface.
-
DO NOT insert any foreign objects into the device.
-
DO NOT expose the device to strong magnetic or electrical field.
-
DO NOT expose the device to direct sunlight as it can damage the device. Keep it away from heat sources.
-
DO NOT store your device in temperatures higher than 40^ C(104°F). The internal operating temperature for this device is from 20^ C(68°F) to 60^ C(140°F).

-
DO NOT use the device in the rain.
-
Please check with your Local Authority or retailer for proper disposal of electronic products.
-
The device and adaptor may product some heat during normal operation of charging. To prevent discomfort or injury from heat exposure, DO NOT leave the device on your lap.
-
POWER INPUT RATING: Refer to the rating label on the device and be sure that the power adaptor complies with the rating. Only use accessories specified by the manufacturer.
-
Clean the device with a soft cloth. If needed, dampen the cloth slightly before cleaning. Never use abrasives or cleaning solutions.
-
Always power off the device to install or remove external devices that do not support hot-plug.
-
Disconnect the device from an electrical outlet and power off before cleaning the device.
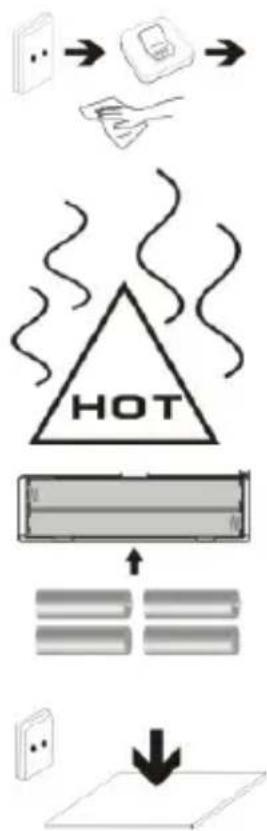
flowchart
graph TD
    A["Input Air"] --> B["Hot Air"]
    B --> C["Cooling"]
    C --> D["Discharge"]
    D --> E["Downsample"]
-
DO NOT disassemble the device. Only a certified service technician should perform repair.
-
The device has apertures to disperse heat. DO NOT block the device ventilation, the device may become hot and malfunction as a result.
-
Risk of explosion if battery replaced by an incorrect type. Dispose of used batteries according to the instruction.
-
PLUGGABLE EQUIPMENT: the socket-outlet shall be installed near the equipment and shall be easily accessible.
European Union: Disposal Information
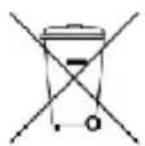
The symbol above means that according to local laws and regulations your product and/or its battery shall be disposed of separately from household waste. When this product reaches its end of life, take it to a collection point designated by local authorities. The separate collection and recycling of your product and/or its battery at the time of disposal will help conserve natural resources and ensure that it is recycled in a manner that protects human health and the environment.
Getting Started
- Remove the unit from the box.
- Remove any packaging from the product.
- Please retain all packaging for future reference.
Package Contents
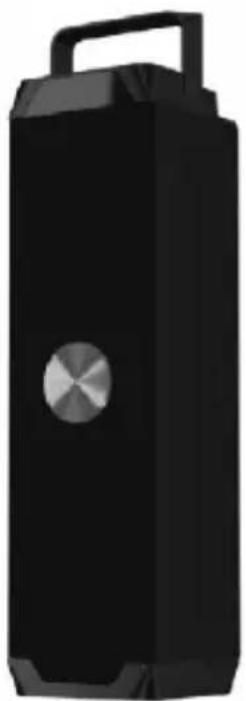
• Tabletop Rechargeable Tower Speaker
- Adaptor
• 3.5mm Auxiliary cord
- Remote Controller (CR2025 Button Cell Battery Included)
- Instruction Manual
Key Features
- Tabletop Rechargeable Tower Speaker – Streams music wirelessly from any audio device like iPod, iTouch, iPhone, iPad or Android Smartphone's, Tablets, Laptop Computers & more.
- LED Display Panel
- Great Sound
• Elegant, Portable Design with sturdy carry handle - Syncs in Seconds
• Built-in rechargeable battery
• Built-In FM radio, USB drive slot and AUX jack
• Remote control included
Safety Instructions
- Keep the unit away from heat sources, direct sunlight, humidity, water and any other liquids.
- Do not operate the unit if it has been exposed to water, moisture or any other liquids to prevent against electric shock, explosion and/or injury to yourself and damage to the unit.
- Do not use the unit if it has been dropped or damaged in any way.
- Repairs to electrical equipment should only be performed by a qualified electrician. Improper repairs may place the user at serious risk.
- Do not use the unit with wet hands.
- Do not put objects into any of the openings.
- Keep the unit free from dust, lint etc.
- Do not use this unit for anything other than its intended use.
- Keep the unit out of reach of children.
• This appliance is not a toy. - Do not use the handset at excessive levels as damage to hearing may occur.
- Batteries (battery pack or batteries installed) shall not be exposed to excessive heat place, such as sunshine, fire or the like.
DESCRIPTION OF PARTS (Speaker):

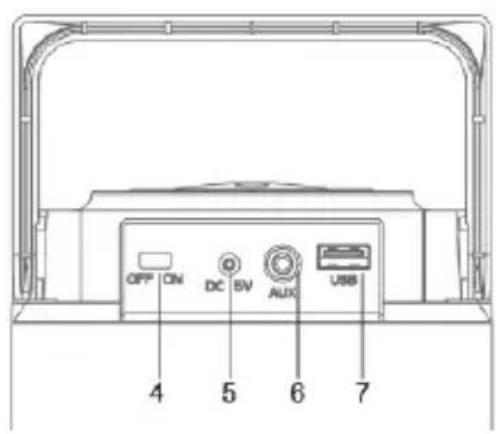
| 1. Carry Handle | 5. DC IN 5V |
| 2. LED Display Panel | 6. Auxiliary Port |
| 3. Speakers | 7. USB Port |
| 4. ON/OFF Switch |
REMOTE CONTROL:

| No | Function | Operation |
| 1 | POWER BUTTON | To turn ON the speaker or turn the speaker to standby mode |
| 2 | Short press the button to the previous track.In FM mode, short press will scan backward | |
| 3 | SEARCH | In FM mode, short press once for initiate automatic channel search and store in memory. |
| 4 | VOL+ | Press and hold the button to increase the volume |
| 5 | VOL- | Press and hold the button to decrease the volume |
| 6 | +1 | Short press the button each time to select “+1” songs. |
| 7 | MODE | Choose from Bluetooth / USB / FM / AUX |
| 8 | MUTE | Short press once to MUTE, short press again to UNMUTE. |
| 9 | Short press to stop the music and the press again to resume the music. | |
| 10 | Short press the button to skip to next track.In FM mode, short press will scan forward. | |
| 11 | SEEK- | In FM mode, short press once to search and play a new channel (from high to low channel). |
| 12 | SEEK+ | In FM mode, short press once for search and play a new channel (from low to high channel). |
| 13 |  | In USB drive operation, short press once to repeat the playing song with “ONE” showing on the LED display panel. |
| 14 |  | In USB drive operation, short press once to repeat the lists of playing songs with “ALL” showing on the LED display panel. |
| 15 | MEM- | In FM mode, short press to the previous FM station in memory. |
| 16 | MEM+ | In FM mode, short press to the next FM station in memory. |
| 17 | +10 | Short press the button each time to select “+10” songs. |
| 18 | +100 | Short press the button each time to select “+100” songs. |
Note: Some buttons are not workable when the product is operated in Bluetooth mode, radio mode or in Auxiliary Mode.
INSTRUCTIONS FOR USE
Charging the speaker
The device has built-in rechargeable battery. When the battery is drained, device would turn OFF automatically. You would have to recharge the battery.
a. With the POWER “ON/OFF” switch at the back of the speaker at OFF position. Using DC Adaptor to charge the speaker. This takes around 3 hours to fully charge the speaker.
b. With the POWER “ON/OFF” switch at the back of the speaker at ON position. Using DC adaptor, both red standby indicator light and red battery symbol will illuminate on the LED display panel. This takes around 3 hours to fully charge the device. Once the device is fully charged, red battery symbol would turn OFF.
Batteries Installation
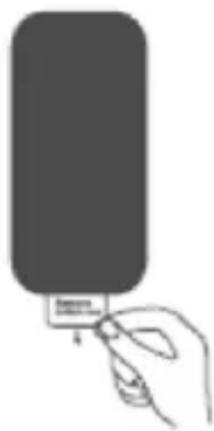
In first time use, remove the insulation tab from the battery compartment of the Remote Control.
natural_image
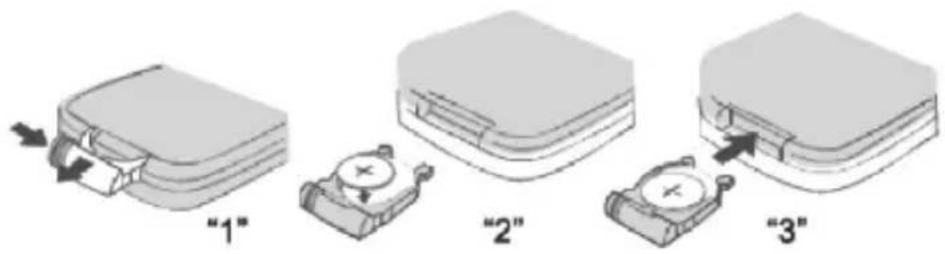
Hand holding a small card with a label, no visible text or symbols on the card or backgroundRemote Control includes the battery (1 CR2025 Lithium battery); when battery is drained, replace battery as below:
-
Pull the battery tray out of the battery compartment of Remote Control.
-
Place new CR2025 button cell battery in the tray slot, as per the indicated polarity.
-
Close the battery tray.
Effective Distance of Remote Transmitter
-
When there is an obstacle between the speaker & the remote control, the transmitter may not operate.
-
When there is direct sunlight or an incandescent lamp, fluorescent lamp or any other strong light hits the Remote Control Sensor of the unit, the remote operation may not work well.
Turn On/Off the Speaker
-
To Turn “ON”, powering on the speaker by sliding the POWER “ON/OFF” switch at the back to ON position. Red standby indicator light will illuminate on the LED display panel. Then, short press the MODE button of remote control to turn on the speaker with “BT” displayed on the LED display panel.
-
To Turn "OFF", slide the POWER "ON/OFF" switch at the back to OFF position.
Pairing your device with Bluetooth Speaker
Your Bluetooth Speaker can wirelessly stream audio from any Bluetooth enabled device within 26-33
Feet. Simply follow the below steps.
- Turn ON the speaker and you would see "BT" displayed on the LED display panel.
- “b t” will flash and this indicates that the speaker is now in pairing mode.
-
Turn on the Bluetooth on your Mobile Phone or Tablet or Computer.
-
It will search for various devices.
-
The pairing name of our Bluetooth Speaker is “STBT50”, pair it with this device.
-
Select it from the list of Searched Devices.
-
If required, en ter the passw ord '00 00' to conf irm to fina lize pairing.
-
Once pai re successfully, an indication tone will be heard and “bt” will s tay on with out flashing.
-
If you fail to pa iit within the time frame or you want to pair it with a new device, please repeat the st eps outli ned above.
-
Select your favourite song from the Bluetooth device and music would now stream through Bluetooth speaker.
Listening to Music Wirelessly
Please ensure that your device (iPhone, Tablet or Other Smart Phone) is paired with the Bluetooth Speaker to stream music wirelessly. Once it is paired, play music from your device.
| Function | Operation | Button |
| Increase Volume | Playing music | Turn the Volume Up / Down knob clockwise to increase the volume |
| Decrease Volume | Playing music | Turn the Volume Up / Down knob counter-clockwise to decrease the volume |
| Pause | Playing music | Short press Play / Pause button to pause the music |
| Play | Pausing | Short press Play / Pause button to resume the music |
| Next Track | While playing music | Short press the Next Track button to skip to the next track |
| Previous Track | While playing music | Short press the Previous Track button to skip to the previous track |
Note: The above functions only can be used in Bluetooth mode only. In Aux mode, you may need to control through your source device.
FM Function
- Tu rn O N the speaker.
- Short press MODE button on remote control each time until it reaches FM radio function with frequency between 87.5 to 108MHz displayed on the LED display panel.
- Press SEARCH button on the remote control for 1-2 seconds for automatic channel searching and storing in memory.
- Short press the Next Station or Pervious Station button to listen next or previous radio station.
- Turn the Volume Up / Down knob to increase / decrease the volume.
Aux function of the Speaker (to play music from non-Bluetooth devices)
- Tu rn ON the speaker.
- Short press MODE button on remote control each time until it reaches Aux function with "AU" displayed on the LED display panel.
3.P lug the 3.5 mmauxili aryc ord(includ ed)to the auxili ary p or of the spea ker.A nd, conn ectthe ot her e nd of thec ord to an au diodev ice(s uch asMP3 Pl ayer,compu t ev tab letetc.). - Select your favorite song at the source device and play.
- Turn the Volume Up / Down knob to increase / decrease the volume.
Listening to Music using USB drive slot
- Tu rn ON the speaker.
- Insert USB flash drive into the USB drive slot. Music would be automatically streamed with "USB" displayed on the LED display panel.
- Press Next Track or Previous Track button to move forward or backward on your playlist.
- Press Play/Pause button to Play or Pause a track.
- Turn the Volume Up / Down knob to increase / decrease the volume
Tips!!
-
Pr esst he “MOD E” butt on toswit ch differe ntfunctio ns of the speak er. The functio ns are Bluetooth / USB drive / FM Radio / AUX.
-
When the unit is not in use, turn OFF the device to save the battery power.
Do's and Don'ts
Do not play music at excessive levels as it may impact hearing ability and/or equipment adversely. Do not use in wet or in damp surroundings.
Specification
Bluetooth version : 2.1+EDR
Bluetooth range : 8-10 meters
Speaker output : 2x3W (RMS)
Working time : music up to 3 hours
Charging input voltage : DC 5V
Charging time : around 3 hours
Size : 5" x 5" x 18-1/4"
Weight : 3.4 lb
Note: Battery life & charging time may vary based on usage & types of devices used.
Troubleshooting
| Problem Possible Cause Solution | ||
| Low sound level | Source (Tablet, Mobile Phone, Laptop, etc.) volume too low. | Adjust source volume. |
| No sound at all. | Source (Tablet, Mobile Phone, and Laptop.) turned off.Speaker turned off.Volume turned down source.Media paused on source. | Turn the source on.Turn the speaker on.Adjust volume source.Play media from source. |
| Cannot Pair Bluetooth | Disconnected | Turn OFF the Speaker; and then Turn ON the speaker after about 30seconds.Keep your Bluetooth Speaker and Bluetooth enabled device within 3 feet of each other during the pairing process.After a successful pairing, the Ÿbtý LED indicator light will become solid in colour. |
Care and Maintenance
Clean the unit with a soft, damp cloth. Never use chemicals or hard abrasives.
Keep this unit away from wet or damp surroundings.
The crossed out wheelie bin symbol on this item indicates that this product needs to be disposed of in an environmentally friendly way when it becomes of no further use or has worn out. Contact your local authorities for details of where to take the item for recycling.
Note: iPod and iPhone are trademarks of Apple Inc, registered in the US, and other countries.
Made in China
Warranty conditions
- The warranty of this product is for 2 years since the purchase date.
- The warranty will exclude breakdowns caused by bad use of the product, wrong installation or installation in not desirable places for a proper maintenance of the product, rips, updates of the products that are not the supplied by the brand, pieces wore away for its use or for not domestic or inappropriate use. Also are excluded breakdowns caused for manipulations of the products by people or companies.
- For any request regarding the warranty terms, the purchase receipt must be attached.

correct disposal of this Product
(Waste Electrical & Electronic Equipment( WEEE) Your product is designed and manufactured with high quality materials and components which can be recycled and reused.
This symbol means that electrical and electronic equipment, at their end of life should be disposed of separately from your household waste.
Please dispose of this equipment at your local community waste collection/recycling centre.
In the European Union there are separate collection systems for used electrical and electronic products. Please help us to conserve the environment we live in!
DECLARATION OF CONFORMITY
Council Directive(s) to which conformity is declared:
Directive (1999/5/EC) - R&TTE
Directive (2004/108/EC) - EMC
Directive (2006/95/EC) - LVD
Directive (2011/65/EU) - RoHS
Application of the Standards:
EN 55013:2013
EN 55020:2007+A11:2011
EN 61000-3-2:2006+A1:2009+A2:2009
EN 61000-3-3:2013
EN 300 328 V1.8.1(2012-06)
EN 62479:2010
EN 301 489-1 V1.9.2(2011-09)
EN 301 489-17 V2.2.1(2012-09)
Manufacturer's name: AFEX SUNS, S.A.
Manufacturer's address: c/Metall 6-8, 08110, Montcada i Reixac
Type of equipment: Portable speaker
Trade: SUNSTECH
Model no.: STBT50
We, the undersigned, hereby declare under our sole responsibility that the specified equipment is in conformity with the above Directive(s) and Standard(s)
Place: Barcelona
(Signature)
Víctor Planas Bas
(Full name)
Date: 7 - April - 2016
General Manager
(Position)
sunstech ^1/2
ALTAVOZ DE SOBREMESA RECARGABLE CON RADIO FM
MODELO N°: STBT50
natural_image
Black rectangular device with a circular button and handle, no visible text or symbols
natural_image
Hand holding a small object with a label, resembling a battery or plug (no text or symbols visible)Directiva(1999/5/EC)-R&TTE
Directiva (2004/108/EC) - EMC
Directiva (2006/95/EC) - LVD
Directiva (2011/65/EU) - RoHS
natural_image
Black rectangular device with a circular button and handle, no visible text or symbolsMANUEL D'INSTRUCTIONS
VEUILLEZ LIRE TOUTES LES INSTRUCTIONS AVEC ATTENTION ET CONSERVEZ POUR UNE UTILISATION FUTURE
PRÉCAUTIONS DE SÉCURITÉ

natural_image
Hand holding a small card with 'Bayer' label, no visible text or symbols on the card itselfDÉCLARATION DE CONFORMITÉ
Directive (1999/5/EC) - R&TTE
Directive (2004/108/EC)- EMC
Directive(2006/95/EC)-LVD
Directive (2011/65/EU)- RoHS
natural_image
Black rectangular device with a circular button and handle, no visible text or symbolsMANUAL DE INSTRUÇÕES LEIA TODAS AS INSTRUÇÕES ATENTAMENTE E GUARDE- AS PARA UM USO FUTURO
PRECAUÇÕES DE SEGURANÇA
flowchart
graph TD
    A["Power supply"] --> B["Reactor unit"]
    B --> C["Hand cooling device"]
    C --> D["Hot air heating system with hot air triangle"]
    D --> E["Electric heater with cooling unit"]
    E --> F["Electric fan with cooling unit"]
    F --> G["Electric switch with cooling unit"]
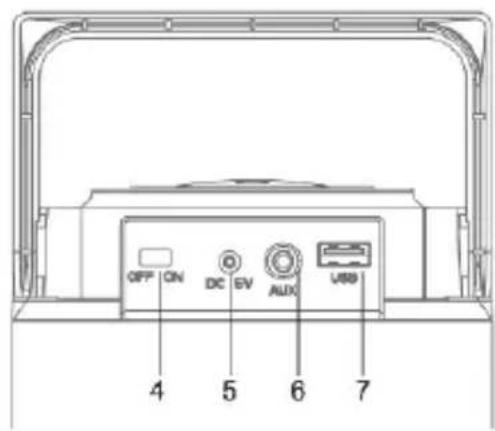
| 1. Asa de transporte | 5. DC IN 5V |
| 2. Painel de Visor LED | 6. Porta Auxiliar |
| 3. Altifalantes | 7. Porta USB |
| 4. Interruptor On/Off (ligar/desligar) |
CONTROLO REMOTO:

natural_image
Hand holding a small label with 'Benson' written on it, no other text or symbols visiblechemical
Chemical symbol for lead (Pb) with two identical molecular structures and crossed arms


- SAFETY PRECAUTIONS
- Getting Started
- Package Contents
- Key Features
- Safety Instructions
- DESCRIPTION OF PARTS (Speaker):
- INSTRUCTIONS FOR USE
- Charging the speaker
- Batteries Installation
- Remote Control includes the battery (1 CR2025 Lithium battery); when battery is drained, replace battery as below:
- Effective Distance of Remote Transmitter
- Turn On/Off the Speaker
- Pairing your device with Bluetooth Speaker
- Listening to Music Wirelessly
- FM Function
- Aux function of the Speaker (to play music from non-Bluetooth devices)
- Listening to Music using USB drive slot
- Tips!!
- Do's and Don'ts
- Specification
- Care and Maintenance
- Warranty conditions
- correct disposal of this Product
- DECLARATION OF CONFORMITY
- sunstech 1/2
- PRÉCAUTIONS DE SÉCURITÉ
- DÉCLARATION DE CONFORMITÉ
- PRECAUÇÕES DE SEGURANÇA
- CONTROLO REMOTO:
Brand : Sunstech
Model : STBT50 RD
Category : Docking Station