
Fidelio B1 - Soundbar PHILIPS - Free user manual and instructions
Find the device manual for free Fidelio B1 PHILIPS in PDF.


| Brand | Philips |
| Model | Fidelio B1 |
| Product type | Soundbar |
| Dimensions (W x H x D) | 1044 x 56 x 88 mm |
| Weight | 3.45 kg |
| Power supply | 100-240 V AC, 50/60 Hz |
| Power consumption | 30 W (standby <0.5 W) |
| Output power | 200 W RMS |
| Number of channels | 2.1 (virtual surround) |
| Subwoofer | Wireless, 150 W RMS |
| Connectivity | Bluetooth 4.2, NFC, HDMI ARC, optical, 3.5 mm audio input |
| Supported audio formats | Dolby Digital, DTS, MP3, PCM |
| Maintenance and cleaning | Wipe with a soft, dry cloth. Do not use abrasive products. |
| Safety | Do not expose to moisture. Use only the supplied adapter. |
| Spare parts and repairability | Available on the Philips website. Repairability score: 7.8/10. |
| Box contents | Soundbar, wireless subwoofer, remote control, power adapter, HDMI and optical cables, documentation. |
Frequently Asked Questions - Fidelio B1 PHILIPS
User questions about Fidelio B1 PHILIPS
0 question about this device. Answer the ones you know or ask your own.
Ask a new question about this device
Download the instructions for your Soundbar in PDF format for free! Find your manual Fidelio B1 - PHILIPS and take your electronic device back in hand. On this page are published all the documents necessary for the use of your device. Fidelio B1 by PHILIPS.
USER MANUAL Fidelio B1 PHILIPS

EN User manual
Care for your product 3
Care of the environment 3
Compliance 3
Help and support 3
2 Your product 4
Main unit 4
Remote control 5
Connectors 5
Wireless subwoofer 6
3 Connect 7
Placement 7
Pair up with the subwoofer 7
Connect audio from TV 8
Connect audio from other devices 9
Connect digital devices through HDMI 9
4 Use your product 10
Set clock 10
Auto standby 11
Adjust the volume 11
Choose your sound 11
Play audio through Bluetooth 11
MP3 player 12
USB storage devices 12
Set display brightness 13
Apply factory settings 13
5 Update software 13
Check software version 13
Update software via USB 13
6 Product specifications 14
7 Troubleshooting 15
1 Important
Read and understand all instructions before you use your product. If damage is caused by failure to follow instructions, the warranty does not apply.
Safety
Risk of electric shock or fire!
- Before you make or change any connections, make sure that all devices are disconnected from the power outlet.
- Never expose the product and accessories to rain or water. Never place liquid containers, such as vases, near the product. If liquids are spilt on or into the product, disconnect it from the power outlet immediately. Contact Consumer Care to have the product checked before use.
- Never place the product and accessories near naked flames or other heat sources, including direct sunlight.
- Never insert objects into the ventilation slots or other openings on the product.
- Where the mains plug or an appliance coupler is used as the disconnect device, the disconnect device shall remain readily operable.
- Batteries (battery pack or batteries installed) shall not be exposed to excessive heat such as sunshine, fire or the like.
- Disconnect the product from the power outlet before lightning storms.
- When you disconnect the power cord, always pull the plug, never the cable.
- Use the product in tropical and/or moderate climates.
Risk of short circuit or fire!
- For identification and supply ratings, see the type plate at the back or bottom of the product.
- Before you connect the product to the power outlet, ensure that the power voltage matches the value printed on the back or bottom of the product. Never connect the product to the power outlet if the voltage is different.
Risk of injury or damage to this product!
- Never place the product or any objects on power cords or on other electrical equipment.
- If the product is transported in temperatures below 5°C, unpack the product and wait until its temperature matches room temperature before connecting it to the power outlet.
- Parts of this product can be made of glass. Handle with care to avoid injury and damage.
Risk of overheating!
- Never install this product in a confined space. Always leave a space of at least four inches around the product for ventilation. Ensure curtains or other objects never cover the ventilation slots on the product.
Risk of contamination!
- Do not mix batteries (old and new or carbon and alkaine, etc.).
- Danger of explosion if batteries are incorrectly replaced. Replace only with the same or equivalent type.
- Remove batteries if they are exhausted or if the remote control is not to be used for a long time.
- Batteries contain chemical substances, they should be disposed of properly.
Risk of swallowing batteries!
- The product/remote control may contain a coin/button type battery, which can be swallowed. Keep the battery out of reach of children at all times! If swallowed, the battery can cause serious injury or death. Severe internal burns can occur within two hours of ingestion.
- If you suspect that a battery has been swallowed or placed inside any part of the body, seek immediate medical attention.
- When you change the batteries, always keep all new and used batteries out of reach of children. Ensure that the battery compartment is completely secure after you replace the battery.
- If the battery compartment cannot be completely secured, discontinue use of the product. Keep out of reach of children and contact the manufacturer.

This is CLASS II apparatus with double insulation, and no protective earth provided.
AC voltage
Care for your product
Use only microfiber cloth to clean the product.
Care of the environment
Disposal of your old product and battery

Your product is designed and manufactured with high quality materials and components, which can be recycled and reused.

This symbol on a product means that the product is covered by European Directive 2012/19/EU.

This symbol means that the product contains batteries covered by European Directive 2013/56/EU which cannot be disposed of with normal household waste.
Inform yourself about the local separate collection system for electrical and electronic products and batteries. Follow local rules and never dispose of the product and batteries with normal household waste. Correct disposal of old products and batteries helps prevent negative consequences for the environment and human health.
Removing the disposable batteries
To remove the disposable batteries, see battery installation section.
Compliance
This product complies with the radio interference requirements of the European Community.
Hereby, Gibson Innovations declares that this product is in compliance with the essential requirements and other relevant provisions of Directive 2014/53/EU. You can find the Declaration of Conformity on www.p4c.philips.com.
Help and support
For extensive online support, visit www.philips.com/support to:
- download the user manual and the quick start guide
- watch video tutorials (available only for selected models)
• find answers to frequently answered questions (FAQs) - email us a question
- chat with our support representative.
Follow the instructions on the website to select your language, and then enter your product model number.
Alternatively, you can contact Consumer Care in your country. Before you contact, note down the model number and serial number of your product. You can find this information on the back or bottom of your product.
2 Your product
Congratulations on your purchase, and welcome to Philips! To fully benefit from the support that Philips offers(e.g. notification of product software upgrade), register your product at www.philips.com/welcome.
Main unit
This section includes an overview of the main unit.

①

Select an input source for this product.
②
- Switch this product on or to standby.
- When this product is in standby, the standby indicator turns red.
③
Display panel
④
+/- (Volume)
Increase or decrease volume.
Remote control
This section includes an overview of the remote control.

①
Switch this product on or to standby.
② Source buttons
- AUDIO IN: Switch your audio source to the AUDIO IN or AUX connection (3.5mm jack).
- HDMI IN: Switch your source to the HDMI IN connection.
• HDMI ARC: Switch your source to HDMI ARC connection.
• OPTICAL: Switch your audio source to the optical connection.
• USB: Switch to USB mode.
• : Switch to Bluetooth mode.
③ ◀ ▶
Skip to the previous or next track.
④ ▶ II
Start, pause or resume play.
⑤ BASS +/-
Increase or decrease bass on the main unit.
⑥ Volume control
• +/-: Increase or decrease volume.
• : Mute or restore volume.
⑦ Sound mode control
VOICE: Select voice clarity sound mode.
MUSIC: Select stereo sound mode.
MOVIE: Select surround sound mode.
⑧ AUDIO SYNC +/-
Increase or decrease audio delay.
⑨ DIM
Set the brightness of the display panel for this product.
⑩ NIGHT
Turn night mode on or off.
⑪ TREBLE +/-
Increase or decrease treble on the main unit.
⑫
Set clock or display clock.
Connectors
This section includes an overview of the connectors available on this product.

① HDMI OUT (ARC) - TO TV
Connect to the HDMI input on the TV.
② HDMI IN
Connect to the HDMI output on a digital device.
③ USB
- Connect to a USB storage device for audio media play.
- Upgrade software of this product.
④ AUDIO IN
Connect to an audio output on a device via AUDIO IN or AUX source (by pressing repeatedly AUDIO IN on the remote control).
⑤ DC IN
Connect to the power supply.
⑥ OPTICAL IN
Connect to an optical audio output on the TV or a digital device.
- During wireless pairing between the subwoofer and the main unit, the indicator blinks white quickly.
- When the pairing succeeds, the indicator lights up white.
- When the pairing fails, the indicator blinks white slowly.
- When wireless connection is disconnected for 1 minute, the indicator turns off.
③ SERVICE
For service center use only.
④ AC MAINS\~
Connect to the power supply.
Wireless subwoofer
This product comes with a wireless subwoofer.

① PAIRING (pairing)
Press to to enter the pairing mode for the subwoofer.
② Subwoofer indicator
- When the power is turned on, the indicator lights up.
3 Connect
This section helps you connect this product to a TV and other devices.
For information about the basic connections of this product and accessories, see the quick start guide.

Note
- For identification and supply ratings, see the type plate at the back or bottom of the product.
- Before you make or change any connections, make sure that all devices are disconnected from the power outlet.
Placement
See the quick start guide on how to place the subwoofer vertically or horizontally.

Note
- If you place the subwoofer vertically, install the supplied foot stand to prevent instability of the subwoofer.
- If you place the subwoofer horizontally, attach the four supplied rubber feet on the underside of the subwoofer to avoid subwoofer vibration.
- Ensure at least 10 cm (4 inches) clearance around the ventilation vents of the subwoofer to achieve adequate ventilation.
Place the subwoofer at least 1 meter (3 feet) away from the main unit, and 10 centimeters (4 inches) away from the wall.
For best results, place your subwoofer as shown below.

Pair up with the subwoofer
The wireless subwoofer automatically pairs up with the main unit for wireless connection when you turn on the main unit and the subwoofer.
If no audio from the wireless subwoofer can be heard, manually pair up the subwoofer.
1 Turn on the main unit and the subwoofer.
If the connection to the main unit is lost, the indicator on the subwoofer blinks white slowly.
2 Press the PAIRING (pairing) button on the subwoofer to enter the pairing mode.
→ The indicator on the subwoofer blinks white quickly.
3 In HDMI ARC mode (press HDMI ARC), on the remote control, within six seconds, press twice then Volume + once, and then hold down BASS +.
If the pairing succeeds, the indicator on the subwoofer lights up white.
If the pairing fails, the indicator on the subwoofer blinks white slowly.
4 If the pairing fails, repeat the steps above.

Note
- If the wireless dis-connection or pairing up lasts 1 minute, the subwoofer automatically switches to standby and the LED on the subwoofer turns off.
Connect audio from TV
Connect this product to a TV. You can listen to audio from TV programs through the speakers of this product.
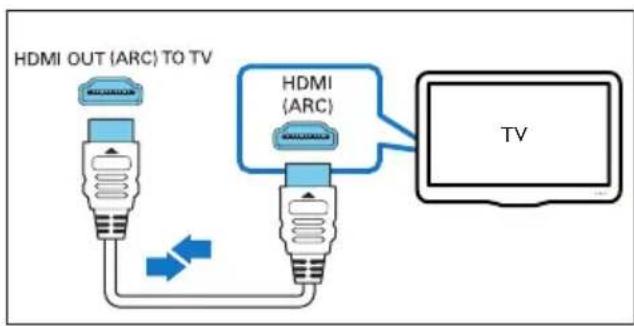
Option 1: Connect to TV through HDMI (ARC)
Best quality audio
This product supports HDMI with Audio Return Channel (ARC). With the ARC feature, you can hear the TV audio through this product by using a single HDMI cable.
What you need
• A High Speed HDMI Cable.
- Your TV supports both HDMI ARC and HDMI-CEC (see the TV user manual for details).
- For some TV models, enable the external speaker output from the TV setting menu (see the TV user manual for details).
flowchart
graph TD
    A["HDMI OUT (ARC) TO TV"] --> B["HDMI (ARC)"]
    B --> C["TV"]
1 Using a High Speed HDMI cable, connect the HDMI OUT (ARC) - TO TV connector on this product to the HDMI ARC connector on the TV.
- The HDMI ARC connector on the TV might be labeled differently. For details, see the TV user manual.
2 On your TV, turn on HDMI-CEC operations.
- For HDMI-CEC issues on your TV, see the TV user manual to make sure that the HDMI-CEC setup is correct, or contact the TV manufacturer if needed.
3 Press HDMI ARC on the remote control of this product to enable the HDMI ARC connection.

Note
- 100% interoperability with all HDMI-CEC devices is not guaranteed.
- If your TV is not HDMI ARC compliant, connect an audio cable to hear the TV audio through this product.
Option 2: Connect to TV through optical cable
Best quality audio

1 Using an optical cable, connect the OPTICAL IN connector on this product to the optical output on the TV.
- The digital optical output on the TV might be labeled OPTICAL OUT, SPDIF or SPDIF OUT.
2 Press OPTICAL on the remote control of this product to enable the optical connection.
Option 3: Connect to TV through analog audio cables
Basic quality audio

1 Using an analog cable, connect the AUDIO IN (3.5mm jack) on this product to the analog audio output (red and white) on the TV.
• The analog audio output on the external device might be labeled AUDIO OUT.
2 Press repeatedly AUDIO IN on the remote control until AUX is displayed on the display panel.
Connect audio from other devices
You may also play audio from other devices through the speakers of this product.
Option 1: Connect to other device through optical cable
Best quality audio

1 Using an optical cable, connect the OPTICAL IN connector on this product to the optical output on the external device.
- The digital optical output on the external device might be labeled OPTICAL OUT, SPDIF or SPDIF OUT.
2 Press OPTICAL on the remote control of this product to enable the optical connection.
Option 2: Connect to other device through analog audio cables
Basic quality audio

1 Using an analog cable, connect the AUDIO IN (3.5mm jack) on this product to the analog audio output (red and white) on the external device.
• The analog audio output on the external device might be labeled AUDIO OUT.
2 Press repeatedly AUDIO IN on the remote control until AUX is displayed on the display panel.
Connect digital devices through HDMI
Connect a digital device such as a set-top box, DVD/Blu-ray player, or games console to this product through a single HDMI connection. When you connect the devices in this way and play a file or game, the
• video is automatically displayed on your TV, and
- audio is automatically played on this product.
1 Using a High Speed HDMI cable, connect the HDMI OUT connector on your digital device to the HDMI IN on this product.
- A High Speed HDMI cable is recommended.
2 Connect this product to TV through HDMI OUT (ARC).
3 On the connected device, turn on HDMI-CEC operations.
4 Press HDMI IN on the remote control of this product to enable the HDMI IN connection.
- If the TV is not HDMI CEC compliant, select the correct video input on your TV.
- For HDMI-CEC issues on your TV, see the TV user manual and ensure the HDMI-CEC setup is correct, or contact the TV manufacturer if needed.
4 Use your product
This section helps you use this product to play media from a wide range of sources.
Before you start
• Make the necessary connections described in Quick start guide and User manual.
- Switch this product to the correct source for the other devices.
Set clock
Through clock setting, you may select a type of standby (ECO standby without clock display, or normal standby with clock display).
1 Switch this product to standby (press --:-- (or clock) is displayed.
2 Press and hold to activate the clock setting mode.
→ --:-- blinks.
3 Press Volume +/- to select 12 hour or 24 hour format, then press 🔒 to confirm.
→ The hour digits begin to blink
4 Press Volume +/- to set the hour; then press ⏻ to confirm.
→ The minute digits begin to blink.
5 Press Volume +/- to set the minute, then press ⏻ to confirm.
→ ECO begins to blink.
6 Press Volume +/- to select "ECO" or "CLOCK", then press ⏻ to confirm.
→ If you select "ECO", in standby, the clock is displayed for 1 minute then the display is switched off.
→ If you select "CLOCK", in standby, the clock is always displayed.
View clock
1 In ECO standby or operation mode, press ⏻.
In ECO standby mode, the clock is displayed for 1 minute, then the display is switched off.
In operation mode, the clock is displayed 10 seconds, then the display is switched to the current source information.

Note
- If AC power is disconnected, the clock time can only be retained for 12 hours.
- Extreme room temperature affects clock accuracy.
Auto standby
When playing media from a connected device, this product automatically switches to standby after 15 minutes of button inactivity and no audio/video play from a connected device.
Adjust the volume
1 Press Volume +/- to increase or decrease a volume level.
• To mute sound, press
- To restore the sound, press ✦ again or press Volume +/-
Choose your sound
This section helps you choose the ideal sound for your video or music.
Sound mode
Select predefined sound modes to suit your video or music.
- Press MOVIE to create a surround listening experience. Ideal for watching movie.
- Press MUSIC to create two-channel or multi-channel stereo. Ideal for listening to music.
- Press VOICE to create sound effect which makes human voice more clear and outstanding for listening.
Equalizer
Change the high frequency (treble) and low frequency (bass) settings of this product.
1 Press TREBLE +/- or BASS +/- to change the frequency.
Synchronize video and sound
If the audio and video are not synchronized, delay the audio to match the video.
1 Press AUDIO SYNC +/- to synchronize the audio with the video.
Night mode
For quiet listening, night mode decreases the volume of loud sounds when audio is played. Night mode is only available for Dolby Digital soundtracks.
1 Press NIGHT to turn night mode on or off.
- When night mode is turned on, ON NIGHT (night on) scrolls once on the display panel.
- When night mode is turned off, OFF NIGHT (night off) scrolls once on the display panel.
Play audio through Bluetooth
Through Bluetooth, connect this product with your Bluetooth device (such as an iPad, iPhone, iPod touch, Android phone, or laptop), and then you can listen to the audio files stored on the device through the speakers of this product.
What you need
- A Bluetooth device which supports Bluetooth profile A2DP, AVRCP and with Bluetooth version as 4.1.
- The maximum operational range between this product and a Bluetooth device is approximately 10 meters (30 feet).
1 Press on the remote control to switch this product to Bluetooth mode.
→ BT is displayed on the display panel, blinking.
2 On the Bluetooth device, switch on Bluetooth, search for and select Fidelio B1 to start connection (see the user manual of the Bluetooth device on how to enable Bluetooth).
→ During connection, BT on the display panel blinks.
3 Wait until this product beeps.
When the Bluetooth connection succeeds, BT is displayed on the display panel.
→ If the connection fails, BT on the display panel blinks continuously.
4 Select and play audio files or music on your Bluetooth device.
- During play, if a call is coming, music play is paused.
- If your Bluetooth device supports AVRCP profile, on the remote control you can press ◀/▶to skip to a track, or press ▶II to pause/resume play.
5 To exit Bluetooth, select other source.
- When your switch back to Bluetooth mode, Bluetooth connection remains active.

Note
- The music streaming may be interrupted by obstacles between the device and this product, such as wall, metallic casing that covers the device, or other devices nearby that operate in the same frequency.
- If you want to connect this product with another Bluetooth device, press and hold ⚙ on the remote control to disconnect the currently connected Bluetooth device.
MP3 player
Connect your MP3 player to play your audio files or music.
What you need
- An MP3 player.
• A 3.5mm stereo audio cable.
1 Using the 3.5mm stereo audio cable, connect the MP3 player to the AUDIO IN connector on this product.
2 Press repeatedly AUDIO IN on the remote control until AUDIO IN is displayed on the display panel.
3 Press the buttons on the MP3 player to select and play audio files or music.
USB storage devices
Enjoy audio on a USB storage device, such as an MP3 player and USB flash memory, etc.
What you need
- A USB storage device that is formatted for FAT or NTFS file systems, and complies with the Mass Storage Class.
1 Connect a USB storage device to this product.
2 Press USB on the remote control.
3 Use the remote control to control play.
- Press ▶II to start, pause or resume play.
- Press ◀/▶to skip to the previous or next track.
- During USB play, press USB to select one of the following play modes.
- When repeat mode is turned on, ALL REPEAT scrolls once on the display panel.
- When repeat mode is turned off, OFF REPEAT scrolls once on the display panel.

Note
- This product may not be compatible with certain types of USB storage device.
- If you use a USB extension cable, USB HUB, or USB multi-reader, the USB storage device may not be recognized.
- Digital camera PTP and MTP protocols are not supported.
- Do not remove the USB storage device while it is being read.
- DRM-protected music files (MP3) are not supported.
• Support a USB port: 5V—1A.
Set display brightness
You can press DIM repeatedly to select a different brightness level of the display panel on this product.
If you select AUTO OFF, LED message is switched off after 10 seconds of button inactivity.
Apply factory settings
In case of no response from this product, you can reset this product to the default settings programmed at the factory.
1 In HDMI ARC mode (press HDMI ARC), on the remote control, within six seconds, press twice then Volume - once, and then hold down BASS -.
When the factory settings restore is complete, the product automatically switches off and restarts.
5 Update software
To get the best features and support, update your product with the latest software.
Check software version
In HDMI ARC mode (press HDMI ARC), on the remote control, within six seconds, press twice then TREBLE - once, and then hold down BASS -.
→ The software version number is displayed on the display panel.
Update software via USB

Caution
- Do not turn off the power or remove the USB flash drive when the software update is in progress because you might damage this product.
1 Check the latest software version on www.philips.com/support.
- Search for your model and click on "Software and drivers".
2 Download the software into a USB flash drive.
① Unzip the downloaded file, and make sure that the unzipped file is named "B1.bin".
② Put the "B1. bin" file in the root directory.
3 Connect the USB flash drive to the USB connector on this product.
4 Switch this product to HDMI ARC source (press HDMI ARC).
5 On the remote control, within 6 seconds press twice then Volume + once, and then hold down MOVIE.
→ Then "UPG" (upgrade) is displayed on the display panel.
If a USB flash drive is not connected or invalid upgrade file is found, "ERROR" (error) is displayed on the display panel.
6 When "UPG" blinks, press on the remote control to start the upgrade.
7 Wait until the upgrade is completed.
→ If the upgrade is complete, this product automatically turns off and on again.

Note
• The upgrade time may take around 3 minutes.
6 Product specifications

Note
- Specifications and design are subject to change without notice.
Amplifier
• Total output power:
320W RMS (+/- 0.5 dB, 10% THD)
• Frequency response: 20 Hz-20 kHz / ±3 dB
• Signal-to-noise ratio: > 65 dB (CCIR) / (A-weighted)
- Input sensitivity:
- AUX: 1900 mV
• AUDIO IN: 900 mV
Audio
• S/PDIF Digital audio input:
- Optical: TOSLINK
USB
• Compatibility: Hi-Speed USB (2.0)
• Class support: USB Mass Storage Class (MSC)
- File system: FAT16, FAT32, NTFS
- Playable audio files: .aac, .mp3, .m4a,
Bluetooth
- Bluetooth profiles: A2DP, AVRCP
- Bluetooth version: 4.1
• Frequency band/Output power: 2400 - 2483.5 MHz / ≤ 20 dBm
• NFC frequency: 13.56 MHz
Wireless speaker link
• Frequency band: 5740-5840 MHz
- Output power: ≤ 14 dBm
Main unit
- Power supply:
-
Model (Philips branded AC power adapter): DYS602-210309W; AS650-210-AA309
• Input: 100-240 V\~, 50/60 Hz 1.5 A
• Output: 21V ==, 3.09A -
Standby without clock display: ≤ 0.5 W
- Standby with clock display: ≤ 1 W
• Dimensions (W × H × D): 408 × 56.7 × 115 mm - Weight: 1.3 kg
- Built-in speakers
- 2 × mylar tweeter (25mm/1", 8 ohm)
- 4 x racetrack full-range speaker (94.2mm/3.7" × 35.2mm/1.4", 8 ohm) for front/surround channel
Subwoofer
• Power supply: 220-240 V\~, 50-60 Hz
• Power consumption: 60 W
• Standby power consumption: ≤ 0.5 W
- Impedance: 3 ohm
- Speaker drivers: 69.4mm/2.9" x 201.5mm/7.9" woofer
• Dimensions (W × H × D): 430 × 85.5 × 538.5 mm
- Weight: 6.26 kg
Remote control batteries
- 1 × AAA-R03-1.5 V
Standby power management
- When the product remains inactive for 15 minutes, it automatically switches to standby or networked standby.
- The power consumption in standby or networked standby is less than 0.5W.
- To deactivate Bluetooth connection, press and hold the Bluetooth button on the remote control.
- To activate Bluetooth connection, enable Bluetooth connection on your Bluetooth device, or enable Bluetooth connection via the NFC tag (if available).
7 Troubleshooting

Warning
- Risk of electric shock. Never remove the casing of the product.
To keep the warranty valid, never try to repair the product yourself.
If you have problems using this product, check the following points before you request service. If you still have a problem, get support at www.philips.com/support.
Main unit
The buttons on this proudct do not work.
- Disconnect this product from the power supply for a few minutes, then reconnect.
Sound
No sound from the speakers of this product.
- Connect the audio cable from this product to your TV or other devices. However, you do not need a separate audio connection when:
• the product and TV are connected through HDMI ARC connection, or
- a device is connected to the HDMI IN connector on this product.
- Reset this product to its factory settings.
- On the remote control, select the correct audio input.
• Make sure that this product is not muted.
No sound from the wireless subwoofer.
- Wirelessly connect the subwoofer to the main unit.
Distorted sound or echo.
- If you play audio from the TV through this product, make sure that the TV is muted.
Audio and video are not synchronized.
- Press AUDIO SYNC +/- to synchronize the audio with the video.
Error message is displayed on the display panel.
- When "ERROR" is displayed, it indicates that an input audio format is not supported.
- When "ARC" blinks, it indicates that the connected TV is not HDMI ARC compliant or an unsupported audio format is detected.
Bluetooth
A device cannot connect with this product.
- The device does not support the compatible profiles required for this product.
- You have not enabled the Bluetooth function of the device. See the user manual of the device on how to enable the function.
- The device is not correctly connected. Connect the device correctly.
- This product is already connected with another Bluetooth device. Disconnect the connected device, then try again.
Quality of audio play from a connected Bluetooth device is poor.
- The Bluetooth reception is poor. Move the device closer to this product, or remove any obstacle between the device and this product.
The connected Bluetooth device connects and disconnects constantly.
- The Bluetooth reception is poor. Move the device closer to this product, or remove any obstacle between the device and this product.
- Turn off Wi-Fi function on the Bluetooth device to avoid interference.
- For some Bluetooth, the Bluetooth connection can be deactivated automatically to save power. This does not indicate any malfunction of this product.
Obsah
① HDMI OUT (ARC) - TO TV
flowchart
graph TD
    A["HDMI OUT (ARC) TO TV"] --> B["HDMI (ARC)"]
    B --> C["TV"]
① HDMI OUT (ARC) - TO TV
① PAIRING (parring)
Tryk for at starte subwooferens parringstilstand.
② Subwooferindikator
Parring med subwoofer
flowchart
graph TD
    A["HDMI OUT (ARC) TO TV"] --> B[" television"]
    C["HDMI (ARC)"] --> D[" television"]
1 Forbind HDMI OUT (ARC)-stikket på dette produkt med HDMI ARC-stikket på
①
① HDMI OUT (ARC) - TO TV
① PAIRING (Kopplung)
①
① HDMI OUT (ARC) -TO TV
① PAIRING (σύζευξη)
①
① HDMI OUT (ARC) - TO TV
① PAIRING (emparejamiento)
flowchart
graph TD
    A["HDMI OUT (ARC) TO TV"] --> B["ARCA"]
    B --> C["HDMI (ARC)"]
    C --> D["TV"]
①
①
HDMI OUT (ARC) - TO TV
①
① HDMI OUT (ARC) - TO TV
① PAIRING (couplage)
flowchart
graph TD
    A["HDMI OUT (ARC) TO TV"] --> B["HDMI (ARC)"]
    B --> C["TV"]
- Dimensions (I × H × P) : 408 × 56.7 × 115 mm
- Poids : 1,3 kg
①

① HDMI OUT (ARC) - TO TV
①
① HDMI OUT (ARC) - TO TV
flowchart
graph TD
    A["HDMI OUT (ARC) TO TV"] --> B["ARCU"]
    B --> C["HDMI (ARC)"]
    C --> D["TV"]
①
① HDMI OUT (ARC): TO TV
Energiebeheer in stand-by
Fare for overoppheting!


Velg en inngangskilde for dette produktet.


- Slå produktet på, eller sett det i standbymodus.
- Når dette produktet er i standbymodus, lyser standby-indikatoren rødt.

Displaypanel

+/- (Volum)
Hever eller senker volumet.
Fjernkontroll
Denne delen inneholder en oversikt over fjernkontrollen.

①
① HDMI OUT (ARC)-TO TV
Kobles til HDMI-inngangen på TVen.
② HDMI IN
Koble til HDMI-utgangen på en digital enhet.
③ USB
① PAIRING (paring)
flowchart
graph TD
    A["HDMI OUT (ARC) TO TV"] --> B["HDMI (ARC)"]
    B --> C["TV"]
1 Hvis du bruker en optisk kabel, kobler du OPTICAL-kontakten på produktet til den optiske utgangen på TV-en.
1 Hvis du bruker en optisk kabel, kobler du OPTICAL-kontakten på produktet til den optiske utgangen på den eksterne enheten.
- Den digitale optiske lydutgangen på den eksterne enheten kan være merket OPTICAL OUT, SPDIF eller SPDIF OUT.
①
① HDMI OUT (ARC) - TO TV
① PAIRING (parowanie)
flowchart
graph TD
    A["HDMI OUT (ARC) TO TV"] --> B["HDMI (ARC)"]
    B --> C["TV"]
① HDMI OUT (ARC) - TO TV
Ligar à entrada HDMI no televisor.
② HDMI IN
Emparelhar com o subwoofer
flowchart
graph TD
    A["HDMI OUT (ARC) TO TV"] --> B["Switch"]
    C["HDMI (ARC)"] --> D["Switch"]
    D --> E["TV"]
Subwoofer-ul wireless 6
3 Conectare 7
Pozitionare 7


① HDMI OUT (ARC) - TO TV
Subwoofer-ul wireless
① PAIRING (sincronizare)
flowchart
graph TD
    A["HDMI OUT (ARC) TO TV"] --> B["HDMI (ARC)"]
    B --> C["TV"]
①

① HDMI OUT (ARC) – TO TV
Pripojenie ku vstupu HDMI na televízore.
② HDMI IN
① PAIRING (párovanie)
Párovanie so subwooferom
flowchart
graph TD
    A["HDMI OUT (ARC) TO TV"] --> B["HDMI (ARC)"]
    B --> C["TV"]


① HDMI OUT (ARC) - TO TV
① PAIRING (Ihopparning)
Para ihop med subwoofern
flowchart
graph TD
    A["HDMI OUT (ARC) TO TV"] --> B["ARCU"]
    B --> C["HDMI (ARC)"]
    C --> D["TV"]
1 Anslut HDMI OUT (ARC)-kontakten på produkten till HDMI ARC-kontakten på TV:n med en HDMI-höghastighetskabel.
flowchart
graph TD
    A["HDMI OUT (ARC) TO TV"] --> B["HDMI (ARC)"]
    B --> C["TV"]
①
flowchart
graph TD
    A["HDMI OUT (ARC) TO TV"] --> B["HDMI (ARC)"]
    B --> C["TV"]
    A -->|Signal| B
4 Use your product 11
①

① HDMI OUT (ARC) - TO TV
①
① HDMI OUT (ARC) - TO TV
① PAIRING (жүптау)
Сабвуфермен жуптау
flowchart
graph TD
    A["HDMI OUT (ARC) TO TV"] --> B["ARC"]
    B --> C["HDMI (ARC)"]
    C --> D["TV"]
① PAIRING (페어링)
서브우퍼 페어링
flowchart
graph TD
    A["HDMI OUT (ARC) TO TV"] --> B["Hybrid"]
    C["HDMI (ARC)"] --> D["Hybrid"]
    B --> E["TV"]
    D --> E
1 HDMI ARC 모드(HDMI ARC
Manufactured under license from Dolby Laboratories. Dolby and the double-D symbol are trademarks of Dolby Laboratories.

dts
Digital Surround
For DTS patents, see http://patents.dts.com. Manufactured under license from DTS Licensing Limited. DTS, the Symbol, & DTS and the Symbol together are registered trademarks, and DTS Digital Surround is a trademark of DTS, Inc. © DTS, Inc. All Rights Reserved.
HDMI ^TM
HIGH-DIFFERATION MULTIMEDIA INTERFACE
The terms HDMI and HDMI High-Definition Multimedia Interface, and the HDMI Logo are trademarks or registered trademarks of HDMI Licensing LLC in the United States and other countries.

Bluetooth®
The Bluetooth ^® word mark and logos are registered trademarks owned by Bluetooth SIG, Inc. and any use of such marks by Gibson Innovations Limited is under license. Other trademarks and trade names are those of their respective owners.

Qualcomm aptX is a product of Qualcomm Technologies International, Ltd. Qualcomm is a trademark of Qualcomm Incorporated, registered in the United States and other countries, used with permission. aptX is a
trademark of Qualcomm Technologies International, Ltd., registered in the United States and other countries, used with permission.

Specifications are subject to change without notice
The Philips trademark and the Philips Shield Emblem are registered trademarks of Koninklijke Philips N.V. used under license.
Copyright © 2016 Gibson Innovations Limited. Revised Edition © 2017
This product has been manufactured by, and is sold under the responsibility of Gibson Innovations Ltd., and Gibson Innovations Ltd. is the warrantor in relation to this product.


- Your product 4
- Connect 7
- Use your product 10
- Update software 13
- Product specifications 14
- Troubleshooting 15
- Important
- Safety
- Risk of electric shock or fire!
- Risk of short circuit or fire!
- Risk of injury or damage to this product!
- Risk of overheating!
- Risk of contamination!
- Risk of swallowing batteries!
- Care for your product
- Care of the environment
- Removing the disposable batteries
- Compliance
- Help and support
- Your product
- Main unit
- Remote control
- Connectors
- Wireless subwoofer
- Connect
- Note
- Placement
- Pair up with the subwoofer
- Connect audio from TV
- Option 1: Connect to TV through HDMI (ARC)
- Best quality audio
- What you need
- Option 2: Connect to TV through optical cable
- Option 3: Connect to TV through analog audio cables
- Connect audio from other devices
- Option 1: Connect to other device through optical cable
- Option 2: Connect to other device through analog audio cables
- Connect digital devices through HDMI
- Use your product
- Before you start
- Set clock
- View clock
- Auto standby
- Adjust the volume
- Choose your sound
- Sound mode
- Equalizer
- Synchronize video and sound
- Night mode
- Play audio through Bluetooth
- MP3 player
- USB storage devices
- Set display brightness
- Apply factory settings
- Update software
- Check software version
- Update software via USB
- Caution
- Product specifications
- Amplifier
- Audio
- USB
- Bluetooth
- Wireless speaker link
- Subwoofer
- Remote control batteries
- Standby power management
- Troubleshooting
- Warning
- Sound
- Error message is displayed on the display panel.
- A device cannot connect with this product.
- Quality of audio play from a connected Bluetooth device is poor.
- The connected Bluetooth device connects and disconnects constantly.
- Obsah
- Parring med subwoofer
- Energiebeheer in stand-by
- Fare for overoppheting!
- Fjernkontroll
- Emparelhar com o subwoofer
- Conectare 7
- Subwoofer-ul wireless
- Párovanie so subwooferom
- Para ihop med subwoofern
- Use your product 11
- Сабвуфермен жуптау
- 서브우퍼 페어링
- HDMI ARC 모드(HDMI ARC
- dts
- Digital Surround
- HDMI TM
- Bluetooth®
Brand : PHILIPS
Model : Fidelio B1
Category : Soundbar