
One Touch Cappuccino EA8808 - Coffee machine KRUPS - Free user manual and instructions
Find the device manual for free One Touch Cappuccino EA8808 KRUPS in PDF.


| Product Type | Automatic espresso machine with integrated milk frother |
| Brand | Krups |
| Model | One Touch Cappuccino EA8808 |
| Dimensions (W x D x H) | 28 x 34 x 42 cm |
| Weight | 10 kg |
| Power Supply | Mains 220-240 V, 50-60 Hz |
| Power | 1450 W |
| Water Tank Capacity | 1.7 liters |
| Bean Container Capacity | 270 g |
| Pump Pressure | 15 bars |
| One Touch Cappuccino Function | Automatic cappuccino preparation with milk foam |
| Beverage Customization | Adjustable intensity, temperature, and volume |
| Frothing System | Integrated milk frother with automatic cleaning |
| Grinder | Steel conical grinder, 10 grind levels |
| Cleaning Program | Automatic descaling and rinsing cycle |
| Automatic Shut-off | Yes, programmable |
| Screen | LCD screen with touch controls |
| Spare Parts | Available (filters, seals, tank, etc.) |
| Repairability | Repairability index of 8.4/10 |
| Warranty | 2 years parts and labor |
Frequently Asked Questions - One Touch Cappuccino EA8808 KRUPS
User questions about One Touch Cappuccino EA8808 KRUPS
0 question about this device. Answer the ones you know or ask your own.
Ask a new question about this device
Download the instructions for your Coffee machine in PDF format for free! Find your manual One Touch Cappuccino EA8808 - KRUPS and take your electronic device back in hand. On this page are published all the documents necessary for the use of your device. One Touch Cappuccino EA8808 by KRUPS.
USER MANUAL One Touch Cappuccino EA8808 KRUPS












CAUTION: the safety precautions are part of the appliance. Read them carefully before using your new appliance for the first time. Keep them in a place where you can find and refer to them later on.
Congratulations on purchasing your Espresso Automatic Series EA88. This appliance allows you to prepare a wide variety of drinks, including espressos, coffees or ristrettos, totally automatically. You can also prepare milk drinks such as cappuccinos. It is designed to allow you to enjoy restaurant quality coffee at home, whatever the time of day or day of the week. You will appreciate both the quality of the coffee produced as well as the ease of use. You can choose the volume, strength and temperature of your drinks.
The Compact Thermoblock System with integrated percolation chamber, 15 bar pump and coffee granules that are freshly ground just before extraction, allows you to make ristrettos, espressos and coffees that are hot right from the first cup with maximum flavour and covered in a chamois coloured cream.
The new One Touch Cappuccino function allows you to make one or two cappuccinos or cafe lattes in no time at all to create drinks full of flavour.
Espressos are traditionally served in small porcelain cups that widen at the top, releasing all of the coffee's aromas. To obtain an espresso with the perfect temperature and with a small cream, we recommend heating the cups beforehand.
It will probably take several attempts before you find the coffee beans you prefer. By changing the mixture and/or roasting process, you will soon achieve the ideal result.
Espressos are more aromatic than a classic filter coffee. Despite its more distinct taste, which is very evident in the mouth and more persistent, an espresso contains less caffeine than a filter coffee (approximately 60 to 80 mg per cup compared to 80 to 100 mg per cup); this is due to shorter percolation time.
The quality of the water used is also a determining factor in terms of the quality of the drink achieved. Ideally, use water straight from the tap (so that it has not had time to stagnate on contact with the air); the water should also be free from any chloride odours and it should be cold.
The ergonomic and comfortable colour touch screen will help you navigate through the programmes. It will guide you through the stages, from preparing your drink to maintenance operations.
We hope you enjoy using your Krups appliance.
The Krups team

Here are some recommendations for making the most of your appliance and producing quality coffees:
- The quality of the water has a huge impact on the quality of the aromas. Limescale and chlorine can alter the taste of your coffee. We recommend that you use the Claris Aqua Filter System cartridge, or slightly mineralised water to preserve all the aromas of your coffee.
- To prepare ristretto, espresso and coffee recipes, we recommend that you use pre-heated (by running under hot water) tulip shaped porcelain cups, which are the correct size for the size of drink you want. For your cappuccino, latte and hot milk recipes, we recommend that you use thick glass cups for a delicious result.
- Roasted coffee beans can lose their flavour if they are not protected. We recommend that you use the quantity of beans required for the next four to five days. The quality of coffee beans varies and whether you like them or not is a matter of personal taste; however, we recommend that you use arabica rather than robusta coffee beans. It will probably take several attempts to find the coffee beans that you prefer. Finally, we recommend that you do not use oily or caramelised beans, which can damage the appliance.
- The quality and fineness of the ground beans will affect the aromas and quality of the cream. The finer the ground beans the creamier the cream. The grinding setting knob should be adjusted to the drink desired: fine for ristretto and espresso and coarser for coffee.
- You can use pasteurised or UHT milk, skimmed, semi-skimmed or whole milk, straight from the fridge (7°C). The use of special milks (microfiltered, unpasteurised, fermented, enriched, etc.) can produce less satisfactory results, in particular in terms of the quality of the froth and these are therefore not recommended.
TABLE OF CONTENTS
IMPORTANT INFORMATION ON THE PRODUCT AND INSTRUCTIONS 24
Guide to symbols used in the instructions 24
Products supplied with your appliance 24
TECHNICAL DATA 24
DESCRIPTION 25
OVERVIEW 25
Presentation of the different symbols 25
BEFORE FIRST USE 26
INSTALLATION 26
Initial settings 26
Installing the filter 27
Preparing the appliance.... 27
PREPARING DRINKS 27
Information on recipes 27
Preparing the grinder 27
Preparing coffee-based drinks.... 28
Preparing other drinks: Cappuccino/Latte, frothed milk, hot water....29
Favourites menu....30
OTHER FUNCTIONS: Prog button 30
Settings 30
Maintenance.... 31
Info 31
GENERAL MAINTENANCE 31
Emptying the coffee grounds collector, coffee drawer and the drip tray.... 31
Circuit rinsing 32
Automatic clean programmes 32
PROBLEMS AND CORRECTIVE MEASURES
34
IMPORTANT INFORMATION ON THE PRODUCT AND INSTRUCTIONS
This manual contains all the important information for setting up, using and maintaining your automatic coffee/espresso appliance.
Always read the instructions carefully before using your appliance for the first time and keep them for future use: any use which does not conform to these instructions will absolve Krups from any liability.
Guide to symbols used in the instructions
Symbols and associated words used in these instructions.

Danger: warning against risks of serious or fatal injuries. The flash symbol warns against electrical dangers.

Caution: warning against any malfunctions, damage to or destruction of the appliance.

Important: general or important comment on the functioning of the appliance.
Parts supplied with your appliance
Check the parts supplied with your appliance. If a part is missing, contact the hotline directly (see p. 24: Initial settings).
Parts provided:
- Espresso Automatic Series EA88
- 2 cleaning tablets
- 1 descaler sachet
- Milk suction pipe adaptable to the One Touch Cappuccino block
- Key for dismantling the steam nozzle
- Safety instruction booklet
- Claris – Aqua Filter System cartridge with screw accessory
- 1 stick to determine water hardness
- Instructions
- List of Krups After Sales Service Centres
- Guarantee documents
- 1 power cord
- 1 steam nozzle cleaning kit
TECHNICAL DATA
| Appliance: | Automatic Espresso Series EA88 | Coffee grounds tank: | 250 g |
| Electrical power supply: | 220-240V~ / 50 Hz | Pump pressure: | 15 bars |
| Energy consumption: | During operation: 1450 W | First use and storage: | indoors, in a dry place (free from frost). |
| Dimensions (H x l x P) : | 376 x 274 x 404 mm | ||
| Water tank: | 1.7 litre | Weight EA88: | 9.5 kg |
Under reserve of technical modifications.
DESCRIPTION
A Water tank lid B Water tank handle C Water tank D Coffee drawer E Coffee grounds collector F Height-adjustable coffee nozzles G Removable grid and drip tray H Lid for the coffee bean tank I Cup rest grid J One Touch Cappuccino block K Milk froth adjustment button L Milk suction pipe
M Water level indicator
1 Coffee beans tank
N Coffee grinding setting knob 0 Nozzle for cleaning tablet P Metal grinding wheel
2 Touch screen
Q Touch screen R Programme button S "Stop/start" button
Further information on:
The drip tray: allows you to collect water or coffee that may be produced from the appliance during/after preparations. It must always be left in the same place. Coffee drawer: allows you to collect excess ground coffee.
Important: read these instructions carefully and keep for future use. Please follow the safety instructions.
Manufacturer
SAS GSM
Rue Saint-Léonard
F-53104 Mayenne
France
OVERVIEW
Presentation of the different symbols

Allows you to validate the stage.

Allows you to move on to the next stage.

Allows you to go back to the previous stage.

Allows you to go back to the main menu.

Warns of an alert message.

Allows you to interrupt the preparation or action in progress.

FAVOURITES MENU

Access to the Favourites management menu.

Creating a favourite.
BEFORE FIRST USE INSTALLING THE APPLIANCE

Danger: The appliance should be plugged into a 230V - 240V AC socket outlet with an earth connection. Otherwise, you could be exposed to fatal injuries due to electric shock!
Respect the safety guidelines indicated in the “Safety guidelines” leaflet.
Initial settings
When using the appliance for the first time you are asked to perform certain settings. Follow the instructions that appear on the display. The aim of the following paragraphs is to give you some visual aids.
Turn on the appliance by pressing the On/Off (S) button. Let the appliance guide you.
These are the first settings requested:
Language
Select a display language by pressing on the arrows until the required language appears.
Press "OK" to validate.
Country
Select your county of residence by pressing the arrows until the country appears.
Press "OK" to validate.
If your country does not appear on the list, press OTHER.
The appliance will also ask you to set the following parameters:
Hotline number for your country of residence
If you do not know the hotline number for the country you entered in the list, you can search for it on the Internet site indicated on the screen.
Unit of measurement
You can select whether you would like to use oz or ml as your volume unit.
Date and time
To set the time, click on the required time format (24H or AM/PM).
Auto on / Auto off
It is possible to set the time at which you would like the appliance to turn on automatically every day. Select the time at which you would like the appliance to start automatically using the previously selected time format.
You can also choose the time after which your appliance will automatically switch off (time without use).
Water hardness
You must set your appliance based on the water hardness, between 0 and 4.
Information on water hardness:
Before using the appliance for the first time, determine the hardness of your water so that you can adjust the appliance to this hardness. You should also do this when you are using your appliance in a location where the water hardness is different or you notice a change in the water hardness. To determine the water hardness, use the strip supplied with the appliance or contact your water company.
The table below contains information on the different classes:
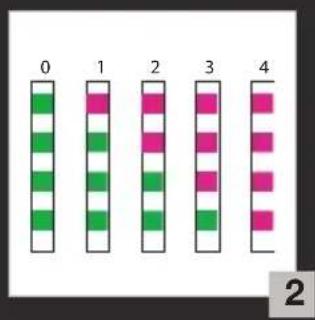
| Degree of hardness | Class 0 Very soft | Class 1 Soft | Class 2 Moderately hard | Class 3 Hard | Class 4 Very hard |
| ° dH | < 3° > 4° | >7° > 14° > 21° | |||
| ° e | < 3,75° > | 5° > 8,75° > 17,5° > 26,25° | |||
| ° f | < 5,4° > | 7,2° > 12,6° > 25,2° > 37,8° | |||
| Appliance setting | 0 | 1 | 2 | 3 | 4 |
Fill a glass with water and immerse the strip. Fig. 1
Read the water hardness after one minute. Fig. 2
Indicate the number of red zones when setting your appliance.
Coffee circuit rinse settings
You can choose whether or not to activate this when the machine is switched on.
Installing the filter
When turning on for the first time, the appliance will ask you if you want to install the filter. If you want to, press "YES" and follow the instructions on the screen.
Installing the cartridge in the appliance: screw the filter cartridge into the bottom of the water tank using the accessory supplied with the cartridge. Fig. 3.
Set the month in which the cartridge was installed (position 1 in the image, figure to the left of the opening) by turning the grey ring on the upper end of the filter. The month in which the cartridge needs replacing is indicated in position 2 of the image. Fig. 4.
Put a 0.6 litre container under the steam nozzle. Fig. 5.
The appliance should function regardless of whether a filter is installed or not. The water circuits must be refilled. To do this, follow the instructions on the screen. The appliance will begin by preheating the circuits, filling the water circuits and will then carry out a test followed by automatic rinsing.
The screen then displays the main drinks menu.
Preparing the appliance
Remove and fill the water tank. Fig. 6.
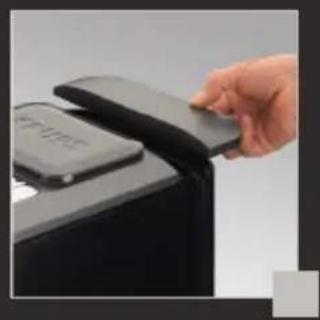
Close by placing the lid on the tank. Fig. 7.
Open the lid on the coffee beans tank and pour in the beans (250 g maximum). Fig. 8.
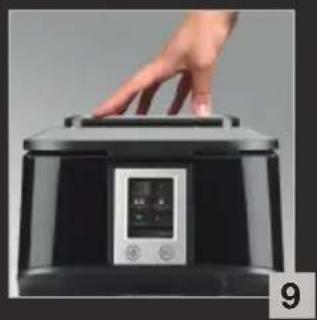
Close the lid on the coffee beans tank. Fig. 9.
PREPARING DRINKS
Information on recipes
Depending on the recipe selected, your Espresso Automatic EA88 will automatically adjust the quantity of ground coffee.
Preparing the grinder
You can adjust the strength of your coffee by adjusting the size of the ground coffee beans. In general, the finer the coffee grounds, the stronger and creamier the coffee; however, this depends on the type of coffee used.
Adjust the size of the ground beans by turning the 'Coffee grinding setting' knob (N) on the bean tank. You are advised to do this during the grinding process and gradually. After three preparations, you will notice a very distinctive difference in taste.
The grinding setting is useful when you change coffee type or if you would like a stronger or weaker coffee. It is not recommended that you perform this setting systematically.
Preparing drinks: Espresso
This chapter explains how this appliance operates using the examples of the "Espresso" and "Americano" functions.
Preparing an espresso
Press the "Espresso" button.
If the appliance detects a lack of water when you request a recipe, it will ask you to fill the tank.
Place the cup(s) under the coffee spouts.
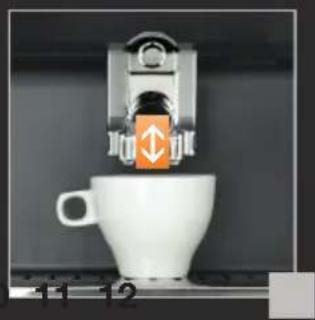
You can adjust the height of the coffee outlet depending on the size of your cup(s). Fig. 10.
Possible settings
The appliance lets you prepare one or two cups.
Selecting the strength: the more beans selected, the coarser the preparation. You can change the strength using the - and + buttons located to the left and right of the symbols. Press the "OK" button on the touch screen to launch the preparation.
The appliance grinds the beans, compacts the coffee grounds, and performs percolation.
It is possible to adjust the volume of coffee in preparation using the - and + buttons.
You can stop the preparation at any time by pressing "STOP". Caution: pressing stop causes an appliance resetting phase that can last up to 30 seconds. This is normal.
When a cycle is interrupted, the appliance does not stop immediately; the appliance will finish its cycle but the preparation will be cancelled.
Preparing an Americano
This drink was invented by the Americans, who, preferring filtered coffee, found the European espresso too intense. So, they began adding hot water to their espresso.
Select the "Americano" recipe on the screen. Place the cup(s) under the coffee nozzles.
You can change the height of the coffee nozzles to suit the size of your cup. Fig. 10.
You can change the quantity using the - and + buttons. Press the "OK" button on the touch screen to start the preparation.
You are still able to increase or decrease the amount of water for your drink during its preparation.
You can stop preparation at any time by pressing "STOP".
Warning: pressing stop begins the stop cycle which may last up to 30 seconds. This phase is normal.
! Caution! : Automatic rinsing of the coffee nozzle
Depending on the type of recipes prepared, the appliance may carry out an automatic rinsing operation when it is switched off.
The cycle lasts only a few seconds and will stop automatically.
Preparing other drinks:
THE "ONE TOUCH CAPPUCCINO" BLOCK
This "One Touch Cappuccino" block facilitates preparation of one or two cappuccinos or cafe lattes.
CAPPUCCINO/LATTE
- Preparing your appliance:
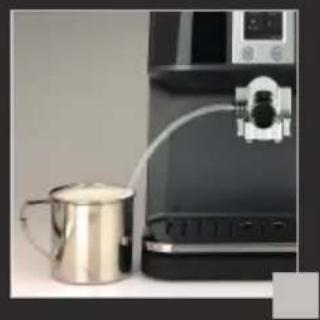
Connect the milk suction pipe on the left to the "One Touch Cappuccino" block. Place the other end in a container filled with milk (Fig. 11). You can prepare one or two cups with your appliance at the same time.
Position your cup or cups and set the button on the block to the desired position: cappuccino or latte (Fig. 12).
- Settings and making drinks
Press the "Cappuccino Latte" button (1 cup) or the "Cappuccino x 2" button (2 cups). All settings can be modified.
For each cappuccino, the machine will take into account the last recipe used.
Once the settings have been defined, press OK.
The steam is used to froth up the milk. As the production of steam requires a high temperature, the appliance has an additional pre-heating phase.
The following stages are automatically sequenced: frothing of the milk, grinding of the coffee and preparation of the coffee.
Your drink is ready for you to enjoy (Fig. 13).
FROTHED MILK
- Prepare your Appliance
Attach the milk suction pipe on the left-hand side of the "One Touch Cappuccino" block. Plunge the other end into a container filled with milk (Fig. 11).
Position the cup or cups and select cappuccino using the appliance's button. The steam is used to froth up the milk. As a higher temperature is required when producing steam than when making an espresso, the appliance will launch an additional pre-heating phase.
Select the Frothed Milk recipe on the screen. You can customise the frothing duration using the menu. You can change it using the + or - buttons, then press "OK". The latest frothing duration selection will be memorised for the next recipe.
RINSING THE "ONE TOUCH CAPPUCCINO" BLOCK
We advise you to rinse the "One Touch Cappuccino" block after every time you make a milk-based recipe.
Thus, at the end of the recipe, an alert appears on the screen to remind you.
To start rinsing, simply press the alert pictogram. If not, it will be carried out automatically when the coffee maker is switched off at the time when you decide to switch it off.
You can also start the rinsing through the maintenance menu. To do this, press the "Prog" button ==> Maintenance" ==> "Accessory rinsing".
HOT WATER
Select the Hot Water recipe on the screen. Place the cup(s) under the coffee nozzles.
You can change the height of the coffee nozzles to suit the size of your cup or cups. Fig. 10. You can change the quantity using the + or - buttons. Press the "OK" button to start the preparation.
You are still able to increase or decrease the amount of water for your drink during its preparation.
You can stop the preparation at any time by pressing "STOP". Warning: pressing stop begins the stop cycle which may last up to 30 seconds.
This phase is normal.
Favourites menu
The "Favourites" menu on your Espresso Automatic EA88 allows you to save your favourite recipes and customise them according to your taste.
The screens will guide you intuitively through the whole of this menu.
The criteria allowing customisation are, depending on the recipes: coffee volume, coffee strength, number of cups and milk frothing time.
This menu can be accessed by pressing the "Favourites" button on the home screen.
It can hold up to 10 recipes that you can pre-set. You simply have to select the chosen recipe for the preparation to be automatically started.
CREATING A FAVOURITE
In the "Favourites" menu, press the button "
+
Create your customised recipe or save the last recipe made (which will correspond to the "last recipe" button in the favourites list) and name it using the keyboard (max. 9 characters). You can then choose a colour to customise your favourite. After each stage, make sure you validate it so that you can move on to the next one. Your recipe has now been saved and appears on the recipe screen in the "Favourites" menu.
FAVOURITES MANAGEMENT
The "change favourites" button

in FAVOURITES gives you access to favourite
management. You can change them (recipe settings), rename or delete them.
OTHER FUNCTIONS: Prog button
You can access the menu for the appliance's other functions by pressing the Prog button.
Settings
The “Settings” menu allows you to make the necessary changes for your own optimum user comfort and preferences. Below are the main settings available.
| Date | The setting of the date is necessary in particular if using an anti-limescale cartridge. |
| Clock | You can select a 12 or 24 hour display. |
| Language | You can choose your preferred language from the suggestions. |
| Country | You can select your country of residence. |
| Unit of measurement | You can choose between ml and oz. |
| Screen brightness | You can adjust the screen contrast to your preference. |
| Coffee temperature | You can adjust the temperature of your recipes based on three levels. |
| Water hardness | You should adjust the water hardness between 0 and 4. See chapter “Measuring water hardness”. |
| Auto-on | You can set the automatic pre-heating to a certain time. |
| Auto-off | You can choose the time after which your appliance will automatically switch off (time without use). |
| Auto rinse | You can choose whether or not to activate automatic rinsing of the coffee nozzle when the coffee maker is switched on. |
| Recipe settings | You can also return to the default settings of the recipes. |
Maintenance
All these options allow you to start the selected programmes. You then have to follow the on-screen instructions.
| Rinsing | Allows you to access rinsing of the One Touch Cappuccino block or the appliance. |
| Cleaning | Allows you to access cleaning of the One Touch Cappuccino block or the appliance. |
| Descaling | Allows you to access the descale programme.This function is not active until the number of recipes made has been reached. |
| Filter | Allows you to access the filter programme. |
To exit the maintenance menu, press

Info
The “Info” menu allows you to access a certain amount of information on your use and certain stages in the life of your appliance. It also provides information on the appliance's maintenance. Below is the main information available.
| Drinks prepared | Display the total number of ristretto, espresso, coffee, cappuccino / latte, and the total recipes. |
| Coffee cleaning circuit | Indicates that it should be carried out every x quantity of cycles. |
| Descaling | Indicates that it should be carried out every x quantity of cycles. |
| Filter | Indicates that this should be changed after x days or x litres. |
GENERAL MAINTENANCE
Emptying the coffee grounds collector, coffee drawer and the drip tray
After a certain number of coffees, the machine will ask you to empty the coffee grounds collector and to clean the coffee drawer. Failure to perform these operations correctly can damage your appliance.
The drip tray collects the used water and the coffee grounds collector collects the used coffee grounds.
The coffee drawer allows you to remove any coffee grounds below the percolation chamber. If the message “Empty the two trays” is displayed, empty and clean the drip tray.
- Remove, empty and clean the coffee grounds collector. Fig. 14.
- Remove the coffee drawer.
Wait for at least 8 seconds, then first put the coffee drawer back in place and then the coffee grounds collector tray. Fig. 15.
The drip tray is equipped with a float indicating when it requires emptying.
The machine is programmed to ask for the drip tray to be emptied after a certain number of coffees, irrespective of the number of times you may have emptied the tray already.
Circuit rinsing
You can perform a rinse at any time by pressing Prog then maintenance. Depending on the types of recipes prepared, the appliance can perform an automatic rinse when switching off. It is also possible to set automatic rinsing on switch-on (see "Settings" section page 24).
Automatic clean programmes
Automatic clean programme for the coffee circuit
The appliance will tell you when a clean programme is required. This clean must take place every 360 preparations approximately.
To perform the clean programme, you will need a container with a capacity of at least 0.6 litre; this should be placed under the coffee outlets and you will need a KRUPS cleaning tablet.
Follow the instructions on-screen. It is also possible to launch cleaning via the maintenance menu.
Important: you do not have to perform the clean programme immediately when the appliance requests this; however, you should do this as soon as possible. If cleaning is delayed, an alert message will remain on the screen until the operation is performed.
The automatic clean programme includes two phases: a clean and a rinse cycle; the programme takes about 13 minutes.
Important: if you disconnect your appliance during cleaning or in the event of a power cut, the cleaning programme will resume the stage in progress during the incident. It will not be possible to delay this operation. It is mandatory due to water circuit rinse reasons. In this case, a new cleaning tablet may be required. Run the entire cleaning programme to eliminate all traces of cleaning product that may be harmful to health.
Do not place your hands under the coffee outlets during the cycle.
Cleaning the "one touch cappuccino" block
To carry out this cleaning programme, you will need two containers (minimum 600 ml) and some KRUPS cleaning liquid.
Turn the block button clockwise as far as it will go.
You can carry out the cleaning:
- By pressing the "Prog" button → "Maintenance" → "Block Cleaning". Follow the instructions on the screen.
Dismantling the "one touch cappuccino" block
In addition to rinsing, it is necessary to clean the block after each use.
To dismantle the block, follow these instructions:
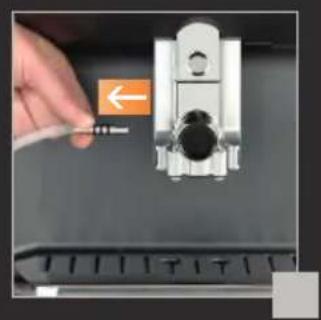
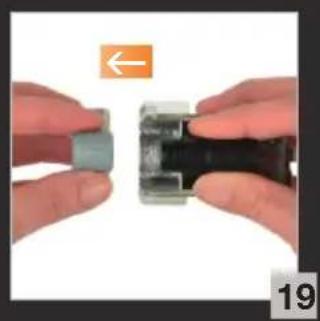
1 - Remove the plastic connection pipe from the block (Fig. 16). 2 - Press the button located above the block, which detaches it and allows you to slide it down to unhook it (Fig. 17). 3 - Remove the settings button (Fig. 18). 4 - Remove the milk/water nozzle; the engraved arrow indicates the disassembly direction (Fig. 19). To ensure this part is cleaned thoroughly, you should also remove the lid (Fig. 20). 5 - Remove the black plastic casing from the shell (Fig. 21). Remove the metal part located above the black plastic casing (Fig. 22). To clean this part thoroughly, rinse the flexible area while pinching it (Fig. 23); leave it to soak in hot water and some washing up liquid, then rinse.
The block is now completely dismantled (Fig. 24).
Once the parts have been washed and dried, put them back into place, and fit the block back onto the machine (Fig. 25).
Automatic descale programme for the steam circuit

Caution: if your appliance is fitted with our Claris - Aqua Filter System cartridge, please remove this before descaling.
The appliance will tell you when the descale programme is required. The frequency at which this programme needs to be run depends on the quality of the water used and whether the Claris Aqua Filter System filter is used or not (the more limescale in the water, the more descaling is required).

Important: you do not have to perform the descale programme immediately when the appliance requests this; however, you should do this as soon as possible. If descaling is delayed, an alert message will remain on the screen until the operation is performed.
Follow the instructions on-screen. It is also possible to launch descaling via the maintenance menu.
To carry out this descaling programme, you will need a container that can hold at least 0.6 litre, which must be placed under the One Touch Cappuccino block, and a sachet of KRUPS descaling agent (40 g).
The automatic descale programme includes three phases: one descaling cycle and two rinse cycles. The programme lasts approximately 20 min.

Important: if there is a power cut or you disconnect your appliance, the cycle will relaunch the stage in progress when the incident occurred; this operation cannot be delayed. Make sure the entire cycle is completed to remove any traces of descaling product that may be hazardous to your health.
PROBLEMS AND CORRECTIVE MEASURES
If any of the problems in the table below persist, call KRUPS customer service. See contact list enclosed.
| MALFUNCTION CORRECTIVE MEASURES | |
| The appliance indicates a fault, the software is frozen or your appliance is malfunctioning. | Switch off and unplug the appliance, remove the filter cartridge, wait for one minute and start the appliance again. |
| The appliance does not come on after pressing the Start/Stop button. | Check the fuses and wall socket.Check that the 2 lead connectors are correctly plugged into the appliance and into the wall socket. |
| The grinder is making a strange noise. | Foreign bodies are present in the grinder.Disconnect the appliance before any intervention.Check whether you can extract the foreign body using the suction from your vacuum cleaner. |
| The One Touch Cappuccino block does not suck up the milk.The One Touch Cappuccino block does not make any or makes little foam. | Check that the block is correctly assembled (particularly the froth setting button and the air end piece).Check that the steam nozzle is not blocked.Check that you have not forgotten to fit the nozzle, that it is correctly assembled, and that the flexible part is not stuck or obstructed. The air nozzle (Fig. 23) may be blocked; leave it to soak in hot water and some washing up liquid, and then rinse prior to reassembly.Check that the flexible hose is not obstructed, pierced or mis-shapen and that it is correctly connected to the block to avoid any air entering. Check that it is properly immersed in the milk.Rinse and clean the block (see chapters on rinsing and cleaning the One Touch Cappuccino block).For preparations made with milk:We recommend using very fresh, very cold pasteurised or UHT milk, and we also recommend using a cold container. |
| The steam nozzle on your machine appears to be partially or completely blocked. | Dismantle the end piece using the dismantling key.Fig. 26Start the rinsing cycle of the One Touch Cappuccino block to remove the rest of the deposits.Clean the steam nozzle and check that the hole in the end piece is not obstructed by milk or scale residue. Use the cleaning needle if necessary. |
| No steam comes out of the steam nozzle. | Check that the steam nozzle is not blocked.Empty the tank and temporarily remove the Claris cartridge.Fill the tank with calcium rich mineral water (>100 mg/l) and perform successive steam cycles (5 to 10) into a container until you obtain a constant flow of steam.Re-insert the Claris cartridge into the tank. |
| Steam comes out of the drip tray grid. | Depending on the type of recipe prepared, steam may come out of the drip tray grid. |
| The appliance is asking you to empty the drip tray even though it is not full. | The machine is programmed to ask for emptying of the drip tray after a certain number of coffees, irrespective of the number of times you may have already emptied the drip tray. |
| There is water under the appliance. | Before lifting off the tank, wait for 15 seconds after the coffee has run through so that the appliance finishes its cycle correctly.Check that the drip tray is correctly positioned on the appliance, it must always be in place, even when your appliance is not being used.Check that the drip tray is not full.The drip tray must not be removed during a cycle. |
| The milk or water is not flowing correctly into the cup or cups. | Check that the milk output lid is correctly positioned Fig. 25 |
| Traces of milk are present in an Americano or Hot Water recipe. | Perform an automatic rinsing cycle, or disassemble and clean the accessory, before launching the recipe. |
| When you turn off the appliance, hot water will come out of the coffee nozzles and the One Touch Cappuccino block. | According to the type of recipe prepared, the appliance can carry out an automatic rinsing operation when it is turned off. This cycle lasts only a few seconds and stops automatically. |
| After emptying the coffee grounds collector and cleaning the coffee drawer, the warning message is still displayed. | Correctly refit the coffee drawer and the coffee grounds collector, follow the instructions on the screen.Wait at least for 8 seconds before refitting them. |
| The coffee comes out too slowly. | When in operation, turn the grinding setting knob to the right for coarser coffee grounds (this can depend on the type of coffee used).Perform one or several rinse cycles. Launch a clean programme (see" Coffee circuit automatic cleaning programme" p.32).Change the Claris Aqua Filter cartridge (see "Filter installation" p.26). |
| After filling the water tank, the warning message remains on the screen. | Check that the tank is correctly positioned in the appliance.Check and unblock the float if necessary. The float at the bottom of the tank should move freely. |
| The grinding setting button is difficult to turn. | Only change the grinding setting when in operation. |
| The espresso or coffee is not hot enough. | Rinse the coffee circuit before starting to prepare your coffee.Increase the temperature of the coffee in the Settings menu.Heat the cup by rinsing with hot water before starting the preparation. |
| The coffee is too clear or not coarse enough. | Do not use oily, caramelised or aromatised coffees.Check that the bean tank contains coffee and that it descends correctly.Reduce the volume of the preparation, increase the strength of the preparation.When in operation, turn the grinding button to the left for finer coffee grounds.Prepare your coffee in two cycles using the two cup function. |
| No coffee is coming out of the appliance. | An incident has been detected during the preparation.The appliance is restarted automatically and is ready for a new cycle. |
| There is a power cut during the cycle. | The appliance restarts automatically when reconnected. |

Danger: Only a qualified technician is authorised to perform repairs on the power cord and the electrical network. If this instruction is not followed, you are at risk of death due to electric shock! Never use an appliance that is visibly damaged!
Dear Customer,
I Cup warming tray
J One Touch Cappuccino unit
DESCRIPTION OF THE APPLIANCE 57
OVERVIEW 57
INSTALLATION OF THE APPLIANCE 58
OTHER FUNCTIONS: Prog button 62
Settings 62
Maintenance 63
Info 63
GENERAL MAINTENANCE 63
DESCRIPTION OF THE DEVICE
OTHER FUNCTIONS: Prog button
PROBLEMS AND CORRECTIVE ACTIONS 98
PROBLEMS AND CORRECTIVE ACTIONS
If one of the problems indicated in the table persists, contact our KRUPS Consumer Contact Center.
2 Touch screen display
"ONE TOUCH CAPPUCCINO" ACCESSORY
INSTALLATION OF THE APPLIANCE 122
Initial settings 122
Installation of the filter 123
GENERAL MAINTENANCE 143
GENERAL MAINTENANCE
TABLE OF CONTENTS
IMPORTANT INFORMATION ABOUT THE PRODUCT AND INSTRUCTIONS FOR USE 152
OTHER FUNCTIONS: Prog selector


- THE KRUPS TEAM
- HERE ARE SOME RECOMMENDATIONS FOR MAKING THE MOST OF YOUR APPLIANCE AND PRODUCING QUALITY COFFEES
- TABLE OF CONTENTS
- IMPORTANT INFORMATION ON THE PRODUCT AND INSTRUCTIONS
- TECHNICAL DATA
- DESCRIPTION
- OVERVIEW
- BEFORE FIRST USE
- INSTALLATION
- PREPARING DRINKS
- OTHER FUNCTIONS: PROG BUTTON
- GENERAL MAINTENANCE
- PROBLEMS AND CORRECTIVE MEASURES
- GUIDE TO SYMBOLS USED IN THE INSTRUCTIONS
- PARTS SUPPLIED WITH YOUR APPLIANCE
- PARTS PROVIDED
- MANUFACTURER
- PRESENTATION OF THE DIFFERENT SYMBOLS
- FAVOURITES MENU
- BEFORE FIRST USE INSTALLING THE APPLIANCE
- INITIAL SETTINGS
- LANGUAGE
- COUNTRY
- HOTLINE NUMBER FOR YOUR COUNTRY OF RESIDENCE
- UNIT OF MEASUREMENT
- DATE AND TIME
- AUTO ON / AUTO OFF
- WATER HARDNESS
- COFFEE CIRCUIT RINSE SETTINGS
- INSTALLING THE FILTER
- PREPARING THE APPLIANCE
- INFORMATION ON RECIPES
- PREPARING THE GRINDER
- PREPARING DRINKS: ESPRESSO
- PREPARING AN ESPRESSO
- POSSIBLE SETTINGS
- PREPARING AN AMERICANO
- CAUTION! : AUTOMATIC RINSING OF THE COFFEE NOZZLE
- PREPARING OTHER DRINKS
- THE "ONE TOUCH CAPPUCCINO" BLOCK
- CAPPUCCINO/LATTE
- PREPARING YOUR APPLIANCE
- SETTINGS AND MAKING DRINKS
- FROTHED MILK
- PREPARE YOUR APPLIANCE
- RINSING THE "ONE TOUCH CAPPUCCINO" BLOCK
- HOT WATER
- CREATING A FAVOURITE
- FAVOURITES MANAGEMENT
- SETTINGS
- MAINTENANCE
- INFO
- EMPTYING THE COFFEE GROUNDS COLLECTOR, COFFEE DRAWER AND THE DRIP TRAY
- CIRCUIT RINSING
- AUTOMATIC CLEAN PROGRAMMES
- AUTOMATIC CLEAN PROGRAMME FOR THE COFFEE CIRCUIT
- CLEANING THE "ONE TOUCH CAPPUCCINO" BLOCK
- DISMANTLING THE "ONE TOUCH CAPPUCCINO" BLOCK
- AUTOMATIC DESCALE PROGRAMME FOR THE STEAM CIRCUIT
- DEAR CUSTOMER
- DESCRIPTION OF THE APPLIANCE
- INSTALLATION OF THE APPLIANCE
- DESCRIPTION OF THE DEVICE
- PROBLEMS AND CORRECTIVE ACTIONS
- ONE TOUCH CAPPUCCINO" ACCESSORY
- IMPORTANT INFORMATION ABOUT THE PRODUCT AND INSTRUCTIONS FOR USE
- OTHER FUNCTIONS: PROG SELECTOR
Brand : KRUPS
Model : One Touch Cappuccino EA8808
Category : Coffee machine