DS6000, DS6000 - Wet and dry vacuum cleaner KARCHER - Free user manual and instructions
Find the device manual for free DS6000, DS6000 KARCHER in PDF.
| Brand | KÄRCHER |
| Model | DS6000 / DS5800 |
| Product type | Water and dust vacuum cleaner |
| Rated voltage | 220-240 V, 50/60 Hz |
| Rated power | 900 W |
| Water tank capacity | 1.7 L (MIN/MAX marks) |
| Weight (without accessories) | 7.5 kg |
| Nominal width of accessories | 35 mm |
| Sound pressure level | 66 dB(A) |
| HEPA filter class | H13 (DS6000) / H12 (DS5800) according to EN 1822 |
| Filtration system | 3 levels: water filter, intermediate filter, HEPA filter |
| Intended use | Dry vacuuming and small amounts of liquid |
| Supplied accessories | Floor nozzle with inverter, crevice tool, upholstery nozzle, telescopic tube, suction hose, storage support |
| Option | Turbo brush (ref. 4.130-177.0), FoamStop defoaming fluid |
| Intermediate filter maintenance | Clean every 8 weeks, replace every 12 months |
| HEPA filter maintenance | Do not wash, replace every 12 months |
| Tank maintenance | Rinse and dry after each use |
| Environmental protection | Recyclable materials, disposal via appropriate channels |
| Warranty | According to distributor conditions, spare parts available |
| Safety | Automatic shut-off in case of overheating, protection against electric shock, limited use by untrained persons |
Frequently Asked Questions - DS6000, DS6000 KARCHER
User questions about DS6000, DS6000 KARCHER
0 question about this device. Answer the ones you know or ask your own.
Ask a new question about this device
Download the instructions for your Wet and dry vacuum cleaner in PDF format for free! Find your manual DS6000, DS6000 - KARCHER and take your electronic device back in hand. On this page are published all the documents necessary for the use of your device. DS6000, DS6000 by KARCHER.
USER MANUAL DS6000, DS6000 KARCHER
natural_image
Line drawing of a vacuum cleaner with attached hose and control panel (no text or symbols)Deutsch 5
English 12
Français 18
Italiano 25
Nederlands 32
Español 39
Português 46
Dansk 53
Norsk 59
Svenska 65
Suomi 71
Ελληνικά 77
Türkçe 84
Русский 90
Magyar 98
Čeština 105
Slovenščina 111
Polski 117
Românește 124
Slovenčina 131
Hrvatski 137
Srpski 143
Български 149
Eesti 156
Latviešu 162
Lietuviškai 168
Українська 174
Қазақша 181
العربية 195
Register and win! www.karcher.com
natural_image
Mechanical component diagram showing a valve inserted into a housing with an arrow indicating direction (no text or symbols)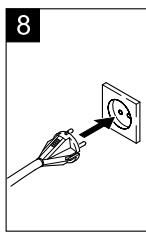
natural_image
Technical diagram of a car engine compartment showing internal components and a numbered section (no text or labels)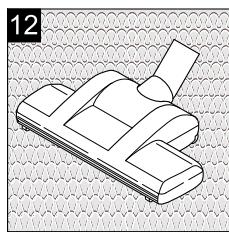
natural_image
Isometric line drawing of a mechanical component with a handle and base plate (no text or symbols)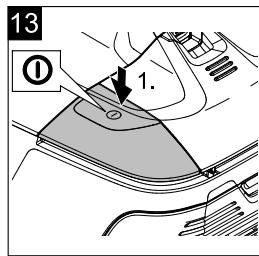
natural_image
Technical line drawing showing two views of a vacuum cleaner device with no visible text or symbols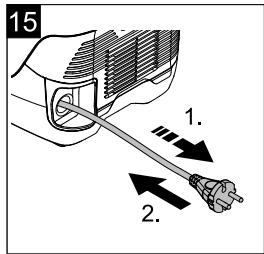

Inhaltsverzeichnis
Please read and comply with these original instructions prior to the initial operation of your appliance and store them for later use or subsequent owners.
Proper use
The appliance is intended for use as a dry vacuum cleaner corresponding to the descriptions given in these operating instructions and the safety notes.
As an option, small volumes of liquid can be vacuumed.
- Use this appliance only with a filled water filter container.
- Use this appliance only for personal use; use only the accessories and spare parts approved by KÄRCHER for such use.
Description and effectiveness
The three-step filter system of the water filter vacuum cleaner, which consists of a water filter, an intermediate filter and a HEPA filter, retains 99.99%* / 99.9%** of the particles taken up. The outgoing air is fresh and cleaned. As the water in the water filter binds the dirt particles, no dust is risen when emptying the water. Therefore, this appliance is also used for individuals suffering from allergies.
* DS 6.000 Waterfilter
** DS 5.800 Waterfilter
Environmental protection
The packaging material can be recycled. Please do not place the packaging into the ordinary refuse for disposal, but arrange for the proper recycling.
Old appliances contain valuable materials that can be recycled. Please arrange for the proper recycling of old appliances. Please dispose your old appliances using appropriate collection systems.
Notes about the ingredients (REACH)
You will find current information about the ingredients at:
www.kaercher.com/REACH
Disposing of the filter and contaminated water
The filters are made from environment-friendly materials. They can therefore be disposed off through the normal household garbage provided you have not sucked in substances that are not permitted to be thrown into household garbage.
The wastewater can be discharged via the drain as long as it does not contain illegal substances.
Scope of delivery
The scope of delivery of your appliance is illustrated on the packaging. Check the contents of the appliance for completeness when unpacking.
In the event of missing accessories or any transport damage, please contact your dealer.
Warranty
The terms of the guarantee applicable in each country have been published by our respective national distributors. We will repair possible faults on your unit free of charge within the warranty period, insofar as the faults are caused by material defects or defective workmanship. Guarantee claims should be addressed to your dealer or the nearest authorized customer service
centre, and supported by documentary evidence of purchase.
(See address on the reverse)
Customer Service
Our KÄRCHER branch will be pleased to help you further in the case of questions or faults.
(See address on the reverse)
Ordering spare parts and special attachments
At the end of the operating instructions you will find a selected list of spare parts that are often required.
You can procure the spare parts and the attachments from your dealer or your KÄRCHER branch office.
(See address on the reverse)
Safety instructions
- This device is not intended for use by persons (including children) with reduced physical, sensory or mental abilities or lacking experience and/or knowledge, unless they are supervised by a person responsible for their safety or are instructed by these persons on the use of the device. Children should be supervised, to ensure that they do not play with the device.
- In case of extended downtimes, switch the appliance off at the main switch / appliance switch or remove the mains plug.
Electrical connection
The appliance may only be connected to alternating current. The voltage must correspond with the type plate on the appliance.
⚠️ Risk of electric shock
Never touch the mains plug and the socket with wet hands.
Do not pull the plug from the socket by pulling on the connecting cable.
Check the power cord with mains plug for damage before every use. If the power cord is damaged, please arrange immediately
for the exchange by an authorized customer service or a skilled electrician.
To avoid accidents due to electrical faults we recommend the use of sockets with a line-side current-limiting circuit breaker (max. 30 mA nominal tripping current).
⚠️ Danger
Certain materials may produce explosive vapours or mixtures when agitated by the suction air!
Never vacuum up the following materials:
- Explosive or combustible gases, liquids and dust particles (reactive dust particles)
- Reactive metal dust particles (such as aluminium, magnesium, zinc) in combination with highly alkaline or acidic detergents
– Undiluted, strong acids and alkalies - Organic solvents (such as petrol, paint thinners, acetone, heating oil).
In addition, these substances may cause the appliance materials to corrode.
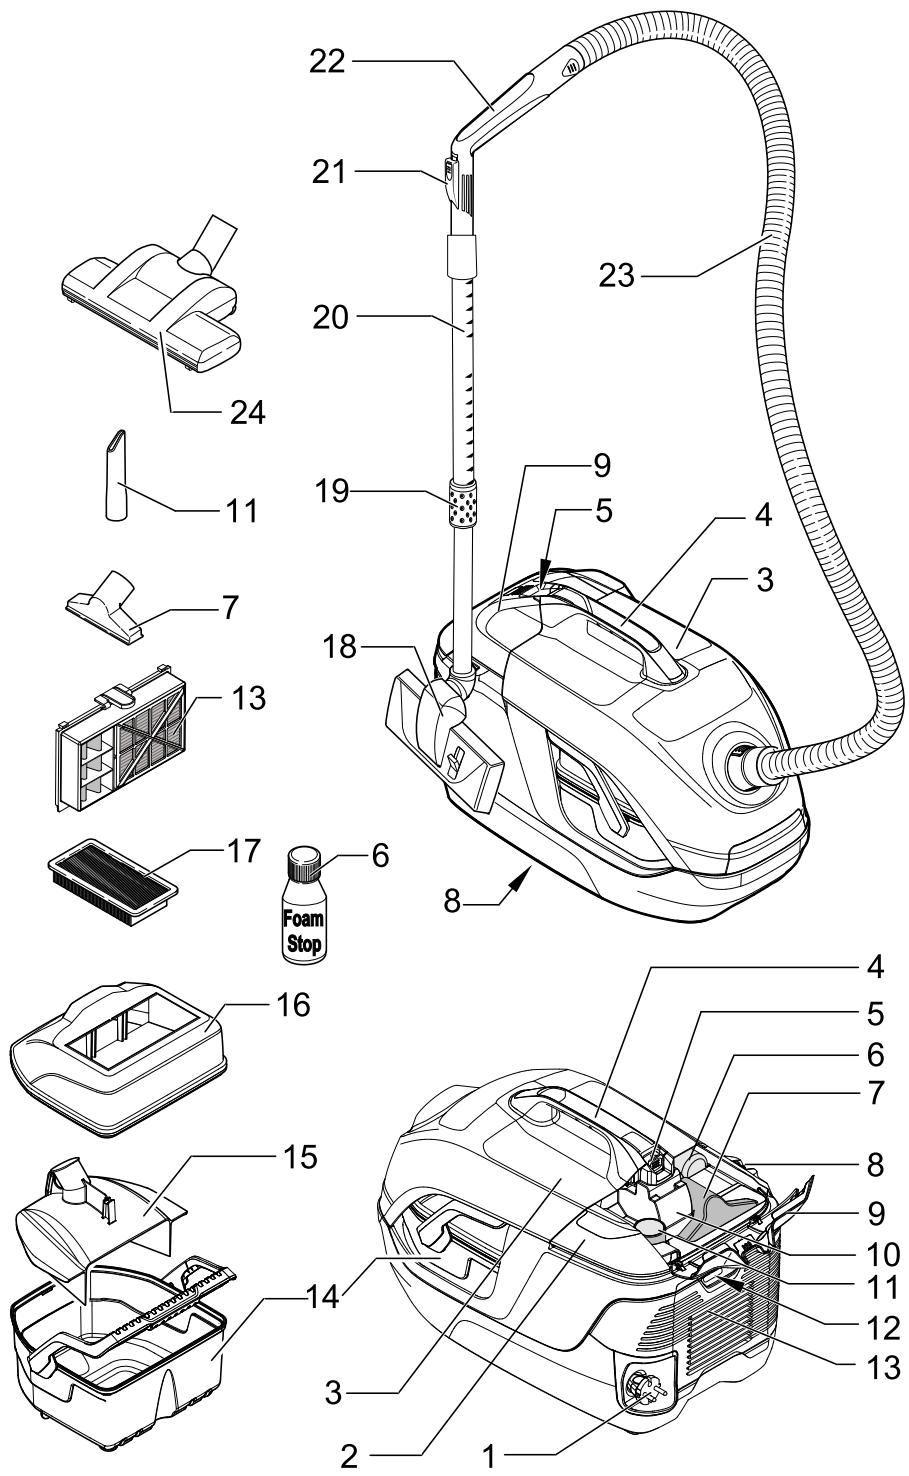
Description of the Appliance
→ Illustrations on fold-out page 4!

1 Power cord with plug
2 ON/OFF switch for appliance
3 Appliance flap
4 Carrying handle
5 Opening button for appliance flap
6 Defoamer liquid (FoamStop)
7 Upholstery nozzle
8 Storage holder for floor nozzle
9 Accessories flap
10 Accessory mount
11 Crevice nozzle
12 Outgoing air flap for HEPA filter
13 HEPA-filter
14 Water filter container
15 Baffle plate
16 Lid of the water filter container
17 Intermediate filter
18 Floor nozzle, reversible
19 Release to adjust the telescoping vacuum pipe
20 Telescopic suction pipe
21 False air slide
22 Handle
23 Suction hose
Additional scope of supply with appli- ance 1.195-202.0
24 Turbo floor nozzle
Commissioning/ Operations
Caution! When the water tank is filled, the appliance may only be operated in the horizontal position. Prior to moving the appliance into the upright position, the water tank must be drained. Otherwise the floor can be damaged.
Please take notice! Should, while turning the appliance on, the mains fuse tripper shut off, possibly, other electrical appliances are connected and are operating on the same electric circuit. Should this be the case, put the appliance in its lowest power stage, before turning the appliance on. Afterwards you may select a higher power stage. Refer to chapter "Technical data" for power fuse protection.
Important notice! The appliance will shut-down automatically, if there is danger of overheating. Turn the appliance off and pull the power plug. Replace the HEPA filter. After the elimination of the interference let the appliance cool down for a minimum of 1 hour, before using it again.
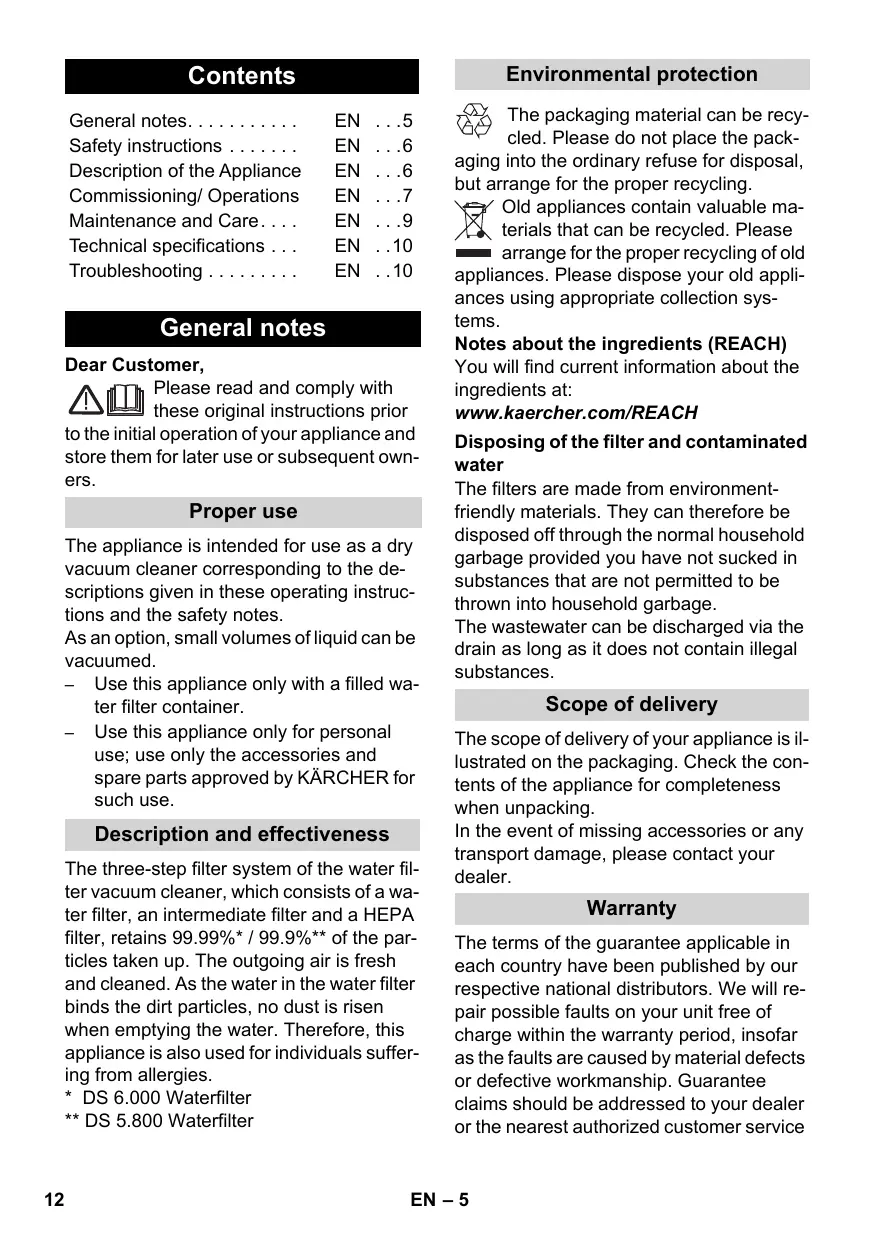
Connect accessories
Illustration 1
→ Connect suction hose to the appliance.
→ Connect the handle to the telescopic vacuum pipe and attach the floor nozzle.
Illustration 2
→ Activate the release and extend or retract the interior pipe to the desired length.
Note: Adjust the telescoping pipe matching your height so that you will be
able to work comfortably while walking upright.
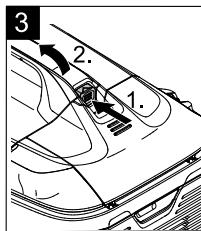
Fill the water filter reservoir
Caution
Do not use the device if the water filter container is empty!
When the appliance is delivered, the intermediate filter and the baffle plate are already installed. When filling, make sure that these components are installed properly (see: SCOPE OF DELIVERY). This could be the cause of poor vacuuming performance or untimely failure of the intermediate filter (see: FINISH OPERATION).
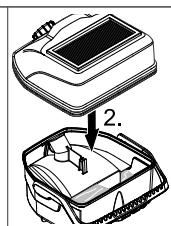
Illustration 3
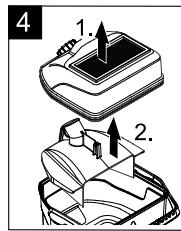
→ Open the appliance flap and remove the defoamer liquid (FoamStop) as well as the water filter container.
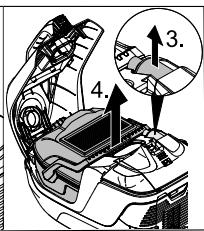
Illustration 4
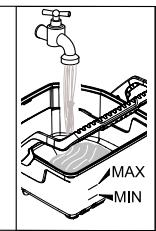
→ Remove the lid from the water filter container and take out the baffle plate, then fill the water filter container with tap water until the level settles between the MIN and MAX markings (approx. 1.7 l)!
Illustration 5
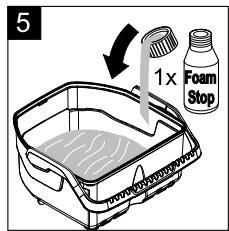
→ Add one cap full of the defoaming liquid (FoamStop) to the water filter reservoir.
Note: The functioning of the vacuum cleaner is based on the whirling of the suction air in the water filter. In the process, sucked-in materials and deposits of cleaning agents from floors get collected in the water bath. This can sometimes lead to the formation of foam. It is necessary to add a capful of the defoamer liquid to the water bath to avoid this situation. Slight foam formation is normal and does not hamper the functioning of the machine.
Illustration 6
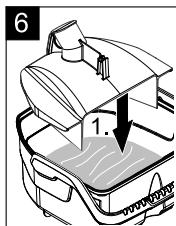
→ Note: Please refill water as soon as the water level in the reservoir sinks below the MIN mark.
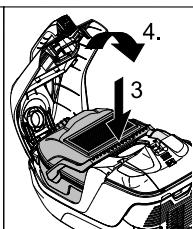
Insert the baffle plate and reattach the lid of the water filter container. Install the complete water filter container in the appliance.
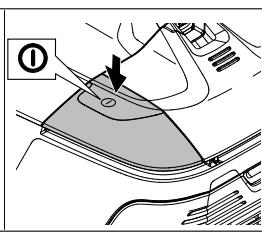
Start working
Illustration 7
→ Pull the power cable out of the appliance completely.
Illustration 8
→ Insert the appliance plug into the mains socket.
→ To switch on the appliance press the on/off switch.
Caution
Do not vacuum up large amounts of powdery materials such as cocoa, flour, laundry detergent, pudding powder or similar materials!
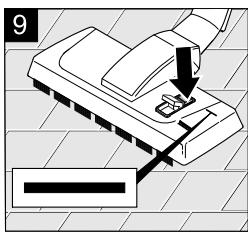
Working with the floor nozzle
Vacuuming hard surfaces
Illustration 9
→ Use your foot to press the reversing switch of the floor nozzle. The brush strips at the bottom of the floor nozzle are extended.
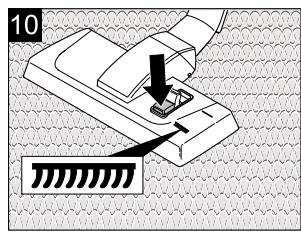
Vacuuming carpeted floors
Illustration 10
→ Use your foot to press the reversing switch of the floor nozzle. The brush strips at the bottom of the floor nozzle are retracted.
Note: Due to the continuously high suction power of the appliance, the suction nozzles can vacuum with excessive force on carpets, upholstery, etc. In this case, use the false air slide to reduce the suction power. Close it again after use.
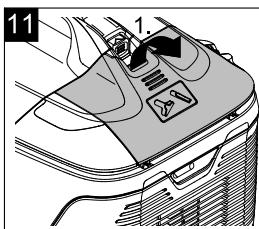
Working with the crevice nozzle and the upholstery nozzle
Note: The crevice and upholstery nozzles are stored in the appliance.
Illustration 11
→ Open the accessories flap and take out the desired nozzle for working.
Crevice nozzle
for edges, joints, heaters and hard to reach locations.
Upholstery nozzle
for cleaning upholstered furniture, laced curtains, mattresses, etc.
Turbo floor nozzle
* depending on model
Illustration 12
→ Turbo floor nozzle
(order no. 4.130-177.0) brush and vacuum in one work cycle. Especially suitable in order to pick up animal hair and to vacuum high floor carpets. The drive of the brush roller happens by the air stream. There is not electrical outlet necessary.
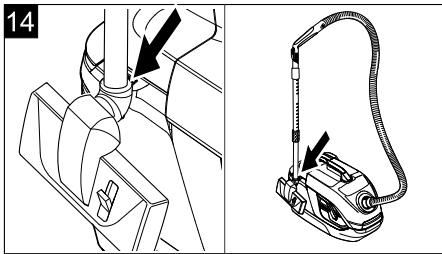
Park position
Illustration 13
→ Switch off the appliance; press the on/off foot switch to do so.
Illustration 14
→ Insert the floor nozzle into the pickup on the appliance when taking a break.
Finish operation
Illustration 13
→ Turn off the appliance and disconnect the mains plug.
Illustration 15
→ The cable is automatically retracted into the appliance by slightly pulling on the power cord.
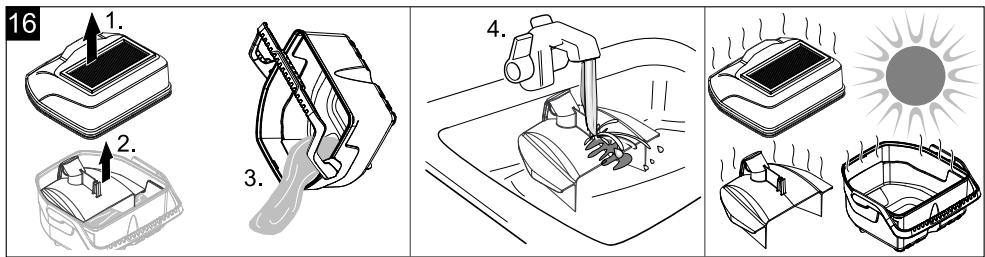
Cleaning the water filter system
Caution
Rinse the water filter container, the filter cover and the baffle plate under running water after each use and allow them to dry. Make sure that the guides of the baffle plate are also clean.
Illustration 3
→ Remove the water filter reservoir from the appliance (see: FILLING THE WATER FILTER RESERVOIR).
Illustration 16
→ Remove the lid from the reservoir and take out the baffle plate.
→ Empty the water filter container.
→ Rinse the cover, the baffle plate and the water filter container under running water and allow them to dry.
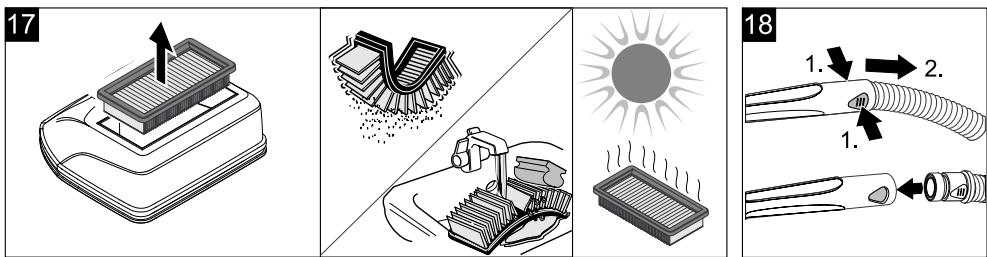
Illustration 17
→ Clean/rinse the intermediate filter as necessary.
(see: CARE, MAINTENANCE)
Caution
All parts of the water filter must be properly dried prior to assembly!
Transport, storage
Caution
Prior to storing the appliance, ensure that no water remains in the water filter container and all parts of the water filter system are properly dried.
→ Hold the appliance at the carrying handle when you want to transport it and store it in dry rooms.
Illustration 20
→ The appliance can be stored in an upright position. On the bottom of the appliance there is an additional parking position for the floor nozzle.
Maintenance and Care
Danger
Turn off the appliance and remove the mains plug prior to any care and maintenance work.
Cleaning/replacing the intermediate filter
Note: Clean the intermediate filter at least every 8 weeks with normal use. If the suction performance is deteriorating, the filter must be cleaned sooner.
Use a commercially available soft household sponge to clean the filter to avoid damaging the coated fins.
Illustration 17
→ The individual fins of the intermediate filter can be cleaned under running water using the sponge.
→ Allow the filter to dry completely.
→ With normal use, replace the intermediate filter at least every 12 months, if necessary, it can be replaced sooner. Note: The intermediate filter must be disposed off as residual waste.
Cleaning the appliance and accessories
Danger
Do not use abrasives, glass or universal cleaners! Never immerse the appliance in water.
Illustration 18
→ Suction hose and handle can be disassembled for cleaning.
→ Check the accessories for obstructions and clean if necessary. Do not use water to clean the floor nozzle.
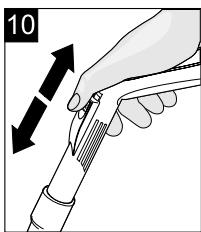
Clean the turbo floor nozzle
* depending on model
Cut hair that is entangled in the roller brush along the cutting edge with a pair of scissors, and vacuum them off using the crevice nozzle.
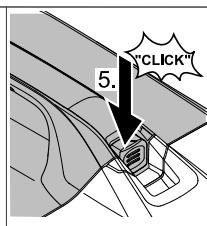
Change HEPA filter
Note: In order to ensure an optimised cleaning performance and function of the appliance, this filter must be changed at least every 12 months. Replace sooner if damaged or extremely dirty.
Caution
Do not rinse out the HEPA filter!
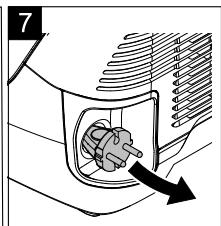
→ Remove the outgoing air flap.
Illustration 19
→ Remove the HEPA filter.
→ Insert a new HEPA filter so that it "CLICKS" into place.
→ Reinstall the lid so it "CLICKS" into place.
Technical specifications
| Nominal voltage1~50/60 Hz | 220-240 | V |
| Output P_nom | 900 | W |
| Fill capacity of the water filter reservoir | 1,7 | I |
| Sound | 66 | dB(A) |
| Weight (without accessories) | 7,5 | kg |
| Nominal width, accessories | 35 | mm |
DS 6.000 Waterfilter
DS 6.000 Waterfilter, Mediclean:
HEPA filter H 13 class according to EN 1822 (effective 1998)
DS 5.800 Waterfilter:
HEPA filter H 12 class according to EN 1822 (effective 1998)
Subject to technical modifications!
Troubleshooting
You can rectify minor faults yourself with the help of the following overview.
If in doubt, please consult the authorized customer service.
⚠️ Danger
Turn off the appliance and remove the mains plug prior to any care and maintenance work.
Repair works may only be performed by the authorized customer service.
Appliance does not vacuum
Power supply is interrupted
→ Remove the mains plug, check the connecting cable and the mains plug for damage.
Weak/diminishing suction power
Forgot the baffle plate or not inserted correctly
→ Reinsert the baffle plate correctly.
(see: FILLING THE WATER FILTER RESERVOIR)
Intermediate filter missing or not inserted correctly
→ Check the intermediate filter.
Intermediate filter is dirty
→ Wash the filter, install new intermediate filter if required.
(see: CARE, MAINTENANCE)
Intermediate filter is wet
→ Let the intermediate filter dry or install new dry filter.
(see: CARE, MAINTENANCE)
Strong foam generation in the water filter reservoir
→ Replace the water and add 1 to 2 cap-fuls of FoamStop. Check the intermediate filter for moisture. If necessary, clean the damp filter under running water and allow it to dry afterwards or install new filter.
Too little or too much water in the water filter reservoir
→ Check the MIN / MAX marks on the reservoir.
HEPA filter is soiled
→ Replace the HEPA filter.
(see: CARE, MAINTENANCE)
Accessory is blocked
→ Remove the blockage.
(see: CARE, MAINTENANCE)
False air slide at the handle is open
→ Close the false air slide.
(see: WORKING WITH THE FLOOR NOZZLE)
Appliance flap does not close
The cover of the water filter is not properly installed
→ Properly install the cover of the water filter container.
The water filter is not properly installed
→ Remove the water filter and correctly insert it into the appliance.
(see: FILLING THE WATER FILTER RESERVOIR)
Table des matières
Consignes générales ..... FR ...5
Consignes de sécurité .... FR ...6
Description de l'appareil... FR ...6
www.kaercher.com/REACH
Transport, conservation
Attention
www.kaercher.com/REACH
www.kaercher.com/REACH
Accessoire is verstopt
www.kaercher.com/REACH
www.kaercher.com/REACH
www.kaercher.com/REACH
www.kaercher.com/REACH
→ Skift HEPA-filter. (se: PLEIE, VEDLIKEHOLD)
→ Utbedre tilstopping. (se: PLEIE, VEDLIKEHOLD)
www.kaercher.com/REACH
www.kaercher.com/REACH
www.kaercher.com/REACH
www.kaercher.com/REACH
Filtre ve pis suyun tasfiye edilmesi
www.kaercher.com/REACH
www.kaercher.com/REACH
www.kaercher.com/REACH
www.kaercher.com/REACH
Odstranitev filtrov in umazane vode
→ Odstranite HEPA filter.
→ Nov HEPA filter vstavite tako, da se za- skoči s „KLIK-om".
→ Pokrov ponovno vstavite tako, da se za- skoči s „KLIK-om”.
Tehnični podatki
| Nazivna napetost1~50/60 Hz | 220-240 | V |
| Moč Pnazivna | 900 | W |
| Količina polnjenja filtrirne posode za vodo | 1,7 | l |
| Raven zvočnega tlaka | 66 | dB(A) |
| Teža (brez pribora) | 7,5 | kg |
| Nazivna širina, pribor | 35 | mm |
DS 6.000 Waterfilter DS 6.000 Waterfilter, Mediclean:
HEPA filter H 13 razred po EN 1822 (stanje 1998)
DS 5.800 Waterfilter:
HEPA filter H 12 razred po EN 1822 (stanje 1998)
Pridržana pravica do tehničnih spre- memb!
Pomoč pri motnjah
www.kaercher.com/REACH
Mult stimate client,

www.kaercher.com/REACH
www.kaercher.com/REACH
Zbrinjavanje filtra i prljave vode
Filtri su izrađeni od materijala koji ne štete okolišu. Ako ne sadrže nikakve usisane tvari, koje se ne smiju odlagati u kućanski otpad, može ih se zbrinuti kao običan kućanski otpad.
Ako ne sadrži zabranjene tvari, prljava voda se može zbrinuti putem kanalizacije.
Opseg isporuke
www.kaercher.com/REACH
Odlaganje filtera i prljave vode u otpad
Filteri su izrađeni od materijala koji ne štete životnoj sredini. Ako ne sadrže nikakve usisane supstance koje se ne smeju bacati u kućni otpad, mogu se tretirati kao običan kućni otpad.
Ako ne sadrži zabranjene supstance, prljava voda može da se prosledi u kanalizaciju.
Obim isporuke
Sadržaj isporuke Vašeg uređaja je prikazan na ambalaži. Pre vađenja uređaja iz ambalaže proverite da li je sadržaj potpun.
Ako pribor nedostaje ili je došlo do oštećenja prilikom transporta, molimo da o tome obavestite svog prodavca.
Garancija
U svakoj zemlji važe uslovi garancije koje je objavila naša prodajna služba. U garantnom roku besplatno otklanjamo sve smetnje na uređaju ako se radi o grešci materijala ili proizvodnim manama. U slučaju ostvarivanja garantnih prava obratite se svom prodavcu ili ovlašćenoj servisnoj službi; priložite pribor i originalni račun.
→ Proverite medufilter.
Međufilter je prljav.
→ Isperite filter i po potrebi umetnite novi međufilter.
(vidi: "Nega, održavanje").
→ Zamenite HEPA filter.
(vidi: "Nega, održavanje").
www.kaercher.com/REACH
www.kaercher.com/REACH
20 Teleskoop-imitoru
www.kaercher.com/REACH
www.kaercher.com/REACH
www.kaercher.com/REACH
6.195-248.0] -DS 5.800
5.964-661.0 25.01.2013