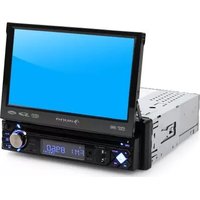
MVD-200 - Car radio Auna - Free user manual and instructions
Find the device manual for free MVD-200 Auna in PDF.


| Product Type | Car Stereo / Multimedia Receiver |
| Brand | Auna |
| Model | MVD-200 |
| Dimensions (W x H x D) | 178 x 100 x 165 mm (2-DIN) |
| Weight | 1.5 kg |
| Power Supply | 12 V DC (vehicle battery) |
| Display | 7-inch TFT touchscreen |
| Radio Bands | FM / AM |
| Bluetooth | Hands-free calling and audio streaming |
| USB Port | 1 x USB (front) |
| SD Card Slot | 1 x SD/MMC |
| AUX Input | 3.5 mm jack |
| Audio Outputs | 4-channel RCA preamp outputs (2 V) |
| Maximum Power | 4 x 50 W peak |
| Equalizer | Preset EQ (Rock, Pop, Classic, Flat) |
| Steering Wheel Control | Compatible (adapter may be needed) |
| Languages | English, French, Spanish, German, Italian |
| Mounting Type | DIN-compatible (sleeve or ISO brackets) |
| Included Accessories | Power wire harness, ISO connectors, mounting frame, screws |
| Cleaning Instructions | Wipe with dry soft cloth; avoid solvents |
| Safety Notes | Disconnect battery before installation; avoid direct sunlight exposure |
Frequently Asked Questions - MVD-200 Auna
User questions about MVD-200 Auna
0 question about this device. Answer the ones you know or ask your own.
Ask a new question about this device
Download the instructions for your Car radio in PDF format for free! Find your manual MVD-200 - Auna and take your electronic device back in hand. On this page are published all the documents necessary for the use of your device. MVD-200 by Auna.
USER MANUAL MVD-200 Auna
natural_image
Diagram showing a device being processed into a closed storage unit, with no visible text or symbols.
natural_image
Line drawing of a rectangular electronic device with mounting flanges (no text or symbols)Achtung

Auswerfen
natural_image
Hand inserting a component into a rectangular block with a handle (no text or symbols)OPEN/CLOSE
natural_image
Simple line drawing of a mechanical component with an arrow indicating rotation or movement (no text or symbols)natural_image
Technical line drawing of a mechanical assembly with multiple cylindrical components and a base component (no text or symbols)natural_image
Diagram of a device with two curved arrows indicating directional movement (no text or symbols)natural_image
Simple line drawing of a mechanical component with an arrow indicating downward motion (no text or symbols)- Öffnen/▲/▼-Taste
8. ▶ II /CH 1-6 (Radio-Senderspeicher)
A) Diskwiedergabe:
natural_image
Technical line drawing of a rectangular mechanical component with internal channels and mounting holes (no text or symbols)natural_image
Diagram of a computer case with internal components and a mouse, no text or symbols presentnatural_image
Illustration of a hand pressing a button on a rectangular device (no text or symbols)natural_image
Illustration of a hand pressing a button on a device panel (no text or symbols)natural_image
Diagram of a computer rear panel with a hand operating the button (no text or symbols present)natural_image
Simple line drawing of a trash bin with a 'X' symbol crossed out by a black X (no text or labels)Choose the mounting location where the unit will not interfere with the normal driving function of the driver.
Before finally installing the unit, connect the wiring temporarily and make sure it is all connected up properly and the unit and the system work properly.
Use only the parts included with the unit to ensure proper installation. The use of unauthorized parts can cause malfunctions.
Consult with your nearest dealer if installation requires the drilling of holes or other modifications of the vehicle.
Install the unit where it does not get in the driver's way and cannot injure the passenger if there is a sudden stop, like an emergency stop.
If installation angle exceeds 30 from horizontal, the unit might not give ist optimum performance.

Avoid installing the unit where it would be subject to high temperature, such as from direct sunlight, or from hot air, from the heater, or where it would be subject to dust, dirt or excessive vibration.
DIN FRONT/REAR-MOUNT
This unit can be properly installed either from "Front"(conventional DIN Front-mount) or "Rear"(DIN Rear-mount installation, utilizing threaded screw holes at the sides of the unit chassis). For details, refer to the following illustrated installation methods.
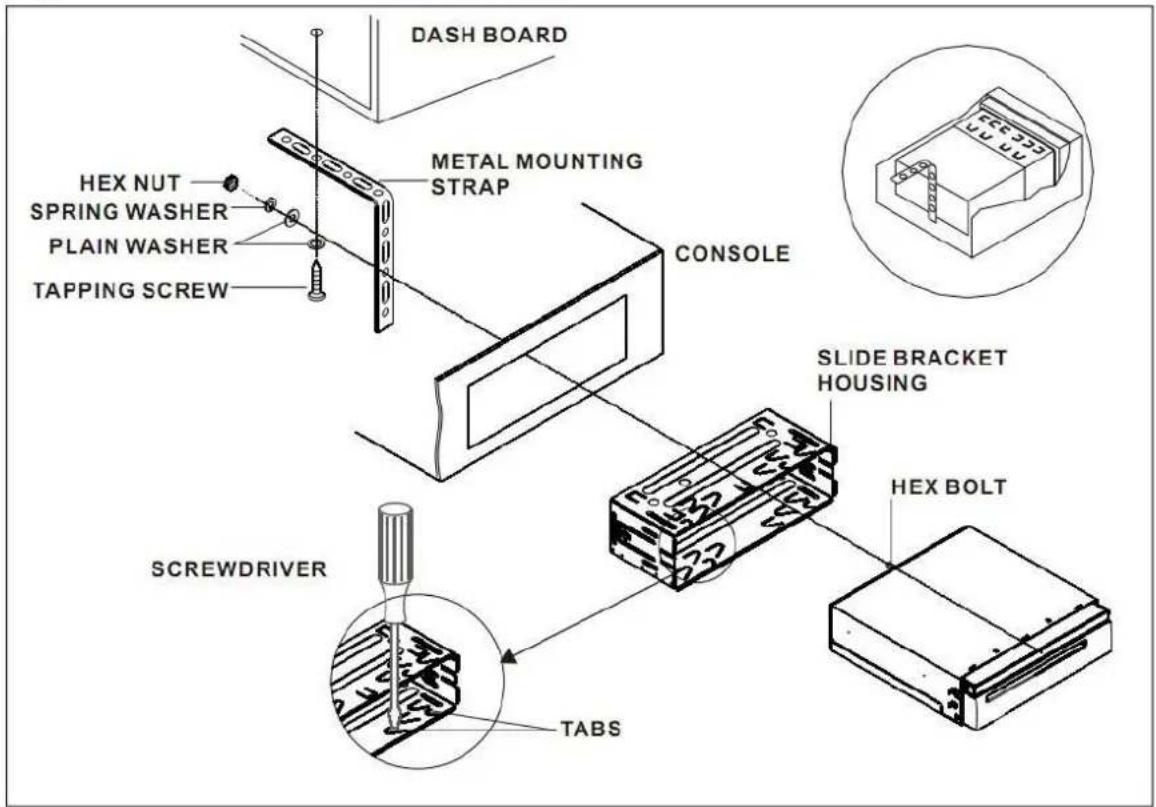
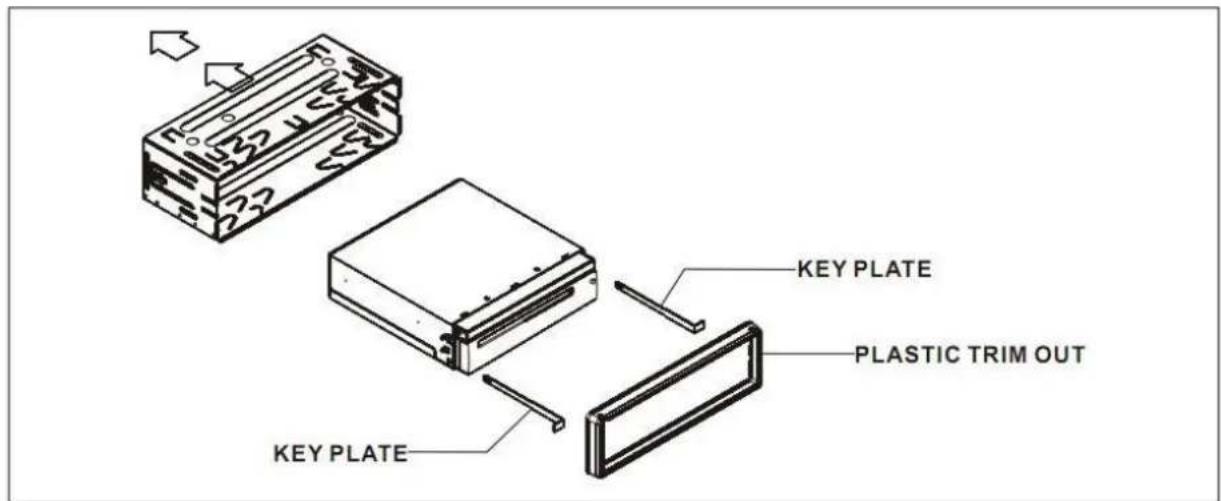
If you want to take CHASSIS out of the SLIDE BRACKET HOUSING, first remove the PLASTIC TRIM OUT of the both sides away, then insert the two KEY PLATE into left and right side of chassis as above illustration.
How To Remove And Install The Front Panel
When detaching or attaching the control panel, be careful not to damage the connectors on the back of the control panel and on the panel holder.
Detaching The Front Panel
Before detaching the control panel, be sure to turn off the power.
1) Press the "REL" release button and the right hand side of front pane will release. First pull up the panel as the direction indicated by the arrow (See (1)). And then taking out the panel as the direction indicated by the arrow (See (2)).
2) Put the front panel in the protective case for safe keeping.

natural_image
Diagram showing a device being processed into a closed storage unit, with no visible text or symbols.ATTACHING THE FRONT PANEL
1
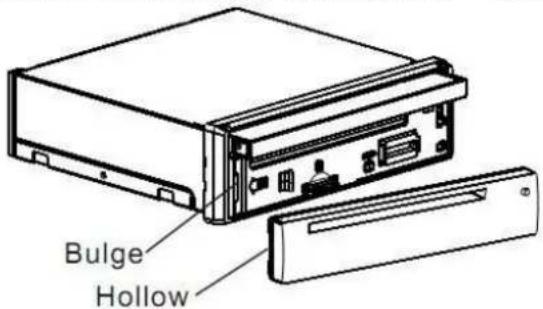
1) First, insert the left side of the front panel into the main unit (See (1)). (Note: the Hollow "point on the front panel must be attached into the "Bulge" point of the unit.)
2) Gently push the right-down hand side of the front panel until you feel a "Click". (SEE (2))


natural_image
Line drawing of a rectangular electronic device with mounting flanges (no text or symbols)Precautions
Do not touch the contacts on the front panel or the unit body, since this may result in poor electrical contact. If dirt or dust accumulates on the contacts, wipe them with a clean, dry cloth.
Anschlussplan

flowchart
graph TD
    A["RCH RED"] --> B["REAR RCA OUTPUT CABLE"]
    C["LCH WHITE"] --> D["RCA CABLE"]
    E["VIDEO IN YELLOW"] --> F["FRONT RCA OUTPUT CABLE"]
    G["RADIO ANTENNA JACK"] --> H["ISD CONNECTOR"]
    I["IGNITION SWITCH(B+)"] --> J["CHOKE BOX"]
    K["MEMORY BACK-UP(B+)"] --> J
    L["GROUND(B-)"] --> J
    M["FRONT LCH SPK."] --> N["WHITE"]
    O["REAR LCH SPK."] --> P["GREEN"]
    Q["PINK"] --> R["(B+)12V REAR CAMERA SWITCH"]
    S["BROWN"] --> T["(B-)PARKING BRAKE"]
    U["BLUE"] --> V["AUTO ANTENNA"]
    W["GREY"] --> X["FRONT RCH SPK."]
    Y["VIOLET"] --> Z["REAR RCH SPK."]
    style J fill:#f9f,stroke:#333
    style K fill:#f9f,stroke:#333
    style O fill:#f9f,stroke:#333
Note:
the earth connection cable (parking brake B-) must be connected in order for pictures to be played back to the monitor. If the cable has not been correctly connected, the message "PARKING BRAKE" appears on the monitor.
Remote Control

| # | Button | Function |
| 1 | CLK | Press it briefly to view the clock time. |
| 2 | PAIR | Press it to use the BT function, refer to the part of BT operation. Press once to pause playback. |
| 3 | STOP | Press once to pause playback. Press PLAY/PAUSE to resume playback. Please note: if you press STOP twice, playback will start at the beginning of the disc. |
| 4 | SETUP | Press this button to open the SETUP menu. |
| 5 | MO/ST (AUDIO) | In Radio mode, press this button to change between Mono and Stereo reception modes (when a station is weak, sometimes switching to Mono will improve sound quality). In Disc Playback (AUDIO) mode, pressing this button opens the AUDIO setup menu formaking changes to the way the soundtrack is reproduced. |
| 6 | SUBTITLE/LOCAL/DISTANT | In Digital Video Disc Playback mode, pressing this button will allow you to change the subtitle language on discs which have this as an option. In Radio mode, press this button to change the radio reception sensitivity in stations are near or far. |
| 7 | Redial | Press it to use the BT function, refer to the part of BT operation. |
| 8 | GOTO * | Press it button to begin playback at a moment in the program you designate. Use number buttons to enter the data that is needed.In BT menu, it serves as the asterisk button on your mobile handset. |
| 9 | ▶/◀ | Press these buttons to skip ahead or back one track. |
| 10 | SEL | Briefly press this button repeatedly to switch between BASS,TRE, BAL,FADE, COLOR,BRIGHT,CONTR, TINT and VOL; Long press this button to switch BT, then briefly press this button repeatedly to switch between REG,PI,TA,AF, LOUD,SWF,EQ,DX/LOCAL(in radio mode), STEREO/MONO (in radio mode), TIME 24H/12H, SET CLOCK, BUZZ, EUR/USA FREQ, ANIMA, BG and LED; After switching a desired item above, press VOL+ or VOL- button to set. |
| 11 | VOL +/- | Use these controls to adjust the volume level. |
| 12 | ◀/▶/▲/▼ | Richtungstasten für Menūnavigation. |
| 13 | Menu/Subwoofer | Press this button briefly to display the root level directory of DVD. Press and hold this button to turn on or off the SUBWOOFER output. |
| 14 | BAND (OSD) | In Radio mode, press this button repeatedly to switch between the five radio bands: FM1 > FM2 > FM3 > AM1(MW1) > AM2 (MW2). In Disc Playback modes, Press this button to see information about the disc currently in play. |
| 15 | On/Off/MOD | Press this button to turn the unit ON, press and hold to turn the unit OFF. Press briefly to select a desired work source. |
| 16 | Play/Pause | In Disc Playback mode, press to pause playback. Press again to start where playback stopped. |
| 17 | MUTE | Press this button to turn off the audio. Press again to restore the sound to its prior volume level. |
| 18 | TITLE/PBC (A/PS) | When playing a Digital Video, pressing this button will open the TITLE menu which is recorded on the Digital Video. When playing a VCD disc, press this button to create a PBC (Playback Control) menu for the disc to assist in making playback selections. In Radio mode, press and hold this button to start the Auto-Program mode, during which the tuner will scan for all strong stations and assign them to the radio preset buttons. |
| 19 | ▲/▼ | ress this button to Open/Close the operate monito. Long press it to adjust the angle of monitor Upward/Downward. |
| 20 | ZOOM/ANGLE | For Digital Video discs which have alternate viewing angles encoded, when you see the "angle mark" symbol advising you that these angles are available, longer press this button to see them.Shortly press it button to increase the picture in size. |
| 21 | EQ/LOUD | Press repeatedly to cycle through the different equalizer curve resets you may wish to use for enhanced listening. Press longer to switch the LOUDNESS function ON and OFF . |
| 22 | ▶ | In Disc Playback mode, press for fast forward playback. |
| 23 | ENTER | This button is used to confirm selections and settings within many of the menus in the OSD system. |
| 24 | ◀ | In DISC mode, press it to reverse rapidly |
| 25 | 0-9 | Use to input numerical values during programming, with the GOTO button, or to directly select a track to play. In Radio mode, (when the RDS engaged,), 0 serves as TA function, 9 serves as the AF function . |
| 26 | +10/# | This button is used with the other number buttons for use with two-digit number entries. In BT menu, it serves as the hash button on your mobile handset. |
| 27 | 1-6 | Six numbered preset buttons store and recall stations for each band. |
Preparing the Remote Control
Inserting the Battery
- First push to inside as the direction indicated by the arrow (See 1) and then Remove the battery holder as the direction indicated by the arrow (See 2).
- Replace the battery Set a new battery property with (+)side up as illustrated (See 3).
- Insert the battery holder. Push in the holder to the original position (See 4).

Using the Remote Control
Face the remote control towards the player front face IR mark (remote control signal receiver). Operation angle: About 30 degree in each the direction of the front of the IR mark.
Note :
The lithium cell in the battery compartment of remote control has been secured for transport with a foil. Before initial use please remove this foil so that the remote control is ready for operation.
POWER ON/OFF
Touch the "OFF" ICON on screen to turn the unit off. Press the "On/Off/Mod" on the front panel to turn It on, press it again to turn off.
LOADING/EJECTING A DISC
Loading a Disc
- Press the POWER button on the front panel to turn the device on.
- Insert the disc with printed side facing up into the disc slot (1).
- The player starts playback the disc automatically.

Ejecting a Disc
- In disc mode, Press the eject button on the front panel to eject the disc.
OPEN/CLOSE MONITOR AND ANGLE ADJUSTMENT
- Touch OPEN button on front panel, the monitor will draw out automatically.

natural_image
Hand inserting a component into a rectangular panel with arrows indicating direction (no text or symbols)OPEN/CLOSE
- When the monitor draws out to a certain location, it will turn upward automatically and stop at vertical position.

natural_image
Simple line drawing of a folded paper or document holder with an arrow indicating rotation (no text or symbols)- When the monitor does not move, you press ▲/▼ button on the panel to turn the monitor upward or downward at fine steps to get a desired viewing

natural_image
Technical line drawing of a mechanical component with multiple blades (no text or symbols)- Do not rotate the monitor forcibly to avoid mechanical damage.

natural_image
Diagram showing a device with two curved arrows indicating direction (no text or symbols)- Return the monitor to the central viewing position, then press OPENbutton on the front panel, the monitorwill turn downward automatically.

natural_image
Diagram of a mechanical component with a downward arrow indicating rotation or force (no text or symbols)- When the monitor turns downward to a certain angle, it will draw in.
Touch the screen to enter the home menu, the message like following as:

The touch buttons on the base of the touch monitor:
- Power Button: To switch the unit off.
- SETUP Button: To enter the setting menu.
- ▲ Button: To adjust the angle of the monitor upward until your desired angle.
- ▲/▼ Button: To open/close the monitor
- ▼ Button: To adjust the angle of monitor downward until your desired angle.
- Eject Button: To allow inserting or ejecting of the media discs.
Setup Menu:
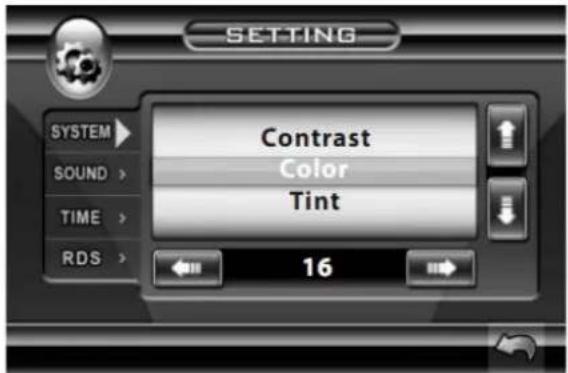
Touch "SYSTEM" on the setting menu, touch the ",▲/▼" ICONS to select the adjustment item, touch the ",◄/►" ICONS to adjust the selectment item, it depends on your habit to setup the data.
ADJUSTABLE ITEMS:
Brightness: 0 to 32
Contrast: 0 to 32
Color: 0 to 32
Tint: 0 to 32
In RADIO mode, you can change the playing time of animation among of "OFF, 10S, 30S, 1M,90S, 2M, 3M and 4M".
Note:
Please set the playing time of the animation to "10S" for the first, when you turn the unit on.
SETTING WALLPAPER
in wallpaper mode, you can select the among of "AUTO, GREEN, YELLOW, RED, LIGHT BLUE, BLUE, PINK".
When you select the "AUTO" item, the player will change the background automatically.
AUDIO ADJUSTMENT

Touch "SOUND" on the setting menu, touch the ",▲/▼" ICONS to select the adjustment item, touch the ",◄/►" ICONS to adjust the selectment item, it depends on your habit to setup the data.
ADJUSTABLE ITEMS:
Treble: -7 to +7
Bass: -7 to +7
Balance: R 0-10 to L 0-10
Fade: F 0-10 to R 0-10
Subwoofer: on/off
Loudness: on/off
Radio LOC/DX: LOC/DC
Radio Stereo: Stereo/Mono
Buzzer: on/off
SETTING TIME

Touch "TIME" on the setting menu, touch the
Reset Factory Settings
„▲/▼” ICONS to select the adjustment item, touch the „◄/►” ICONS to adjust the selectment item, it depends on your habit to setup the data.
ADJUSTABLE ITEMS:
Hour: 0-23
Minutes: 0-59
Time format: 24H/12H
Setting Audio Mode
In any modes, touch the "EQ" range on the touch screen (or press the EQ button on remote control) to select one of the preset sound modes:
ROCK/POP/ JAZZ/CLASSIC/USER.
The information will display in the monitor as follow

flowchart
graph TD
    A["ROCK"] --> B["USER"]
    B --> C["JAZZ"]
    C --> D["CLASSIC"]
    E["POP"] --> A
    E --> C
RESET button is placed on the housing and must be activated with either a ballpoint pen or thin metal object.

The RESET button is to be activated for the following reasons:
A. Initial installation of the unit when all wiring is completed.
B. All the function buttons do not operate.
C. Error symbol on the display.
Rear View Camera
When connecting the rear view camera the mirror image of the rear view is auto- matically displayed on the monitor
when you change the gear to the back position.
(Note: additional monitor can not display the image.)
Control Panel

1. OPEN/“▲/▼” BUTTON
To slide the monitor out and stand it up or into the monitor slot, press this button; To adjust the angle of the monitor, long press this button.
2. VOL KNOB & SEL BUTTON
In normal mode, VOL knob is used to increase or decrease the volume. Briefly press SEL button repeatedly to switch between BASS,TRE,BAL,FADE,COLOR,BRIGHT,CONTR,TINT and VOL; Long press SEL button to switch BT, then briefly press SEL button repeatedly to switch between REG, PI, TA, AF, LOUD,SWF,EQ, DX/LOCAL (in radio mode), STEREO/MONO(in radio mode), TIME 24H/12H, SET CLOCK, BUZZ,EUR/USA FREQ, ANIMA and BG; After switching a desired item above, rotate VOL knob to set.
3. (POWER On/Off)/MODE BUTTON
Press it to turn on the unit, Press and hold for two seconds to switch the device off. In playback mode, Press it repeatedly to select RADIO, DISC, USB, CARD, AUX IN and BT MUSIC mode.
4.
- ▶/
and /
In radio mode, Long pressing |<< or >>| button can automatically search down or up for an available station beginning from the current frequency; Briefly pressing |<< or >>| button can manually search down or up for a your desired station beginning from the current frequency.
In media or BT MUSIC mode, pressing |<< or >>| button can play previous or next track; continuously and long pressing |<< or >>| button can fast backwards or forwards at the following multiple of normal speed: x2, x4, x8, x20, x1.
In BT MUSIC mode, the function of the fast forwards or backwards is disabled. In BT PHONE mode, for
the function of the / buttons, please refer to the part of the BT Operation.
5. TA/AF BUTTON
TA Function [traffic Announcement] Button(for Rds Only)
In RADIO mode: When you swing briefly the MU/PTY knob in the direction of the TA/AF button, the TA function is activated, the TA symbol appears in the display. (swing it again to turn off.)
AF [Alternative Frequencies]
Swing and hold (more than 2's) the MU/PTY knob in the TA/AF direction, the AF function is activated. The AF symbol appears in the display. (swing and hold it again to cancel this function.) The function about RDS. Note: In Radio mode, press and hold the SEL knob for a long time to access the selection menu: REG ON/REG OFF, PI MUTE/PI SOUND, AF ON/AF OFF. Repeatedly pressing the SEL knob to select the item and by using the VOL+/- to change.
6. BND/PAIR BUTTON
In Radio mode, press it repeatedly to select the desired radio band: FM1, FM2, FM3, AM1(MW1), AM2(MW2). For the PAIR function, please refer to the part of the BT Operation.
7. MU/PTY BUTTON
Press it button to switch of the loudspeakers for a short period. The word MUTE flashes in the display. Press it again to cancel the mute function. This function can also be cancel led by rotating the VOL multifunction button. In Radio Mode, press this button and hold for a bout 2 seconds to select the PYT of the program type (examples of such types of program are: NEWS, POP.....)
8. ▶ II /CH 1-6 (Radio Preset)
A) In Disc Playback Mode
Press this button to pause playback, press it again to resume playback.
B) In Radio Mode
Press this button repeatedly to preset station. With this system a total of 30 stations can be stored in the memory. Each band store up to six preset stations. The stations might be FM1, FM2, FM3, AM1 (MW1) and AM2 (MW2) band.
Follow the instructions below:
- Store in Memory
Select the frequency band
Press repeatedly the button to select the desired memory key.
Select the station
Keep the desired memory key pressed in until the station is heard again after a brief interruption.
- Retrieve a preset station
Press the button repeatedly to retrieve a station which had been stored in the memory in advance the chose number is shown on display.
9. REL BUTTON
Press it to detach the control panel.
11. EJECT BUTTON
Insert the disc, label side facing up, until the mechanism senses its presence and draws the disc in.
Press it to eject the disc.
- IR sensor
- USB PORT
- AUX IN JACK
- LCD Display Screen
- SD CARD SLOT
- RESET BUTTON - Press this button to return to factory settings.
- Microphon
Listening to Radio
Touch the RADIO ICON in home menu to enter the RADIO mode:
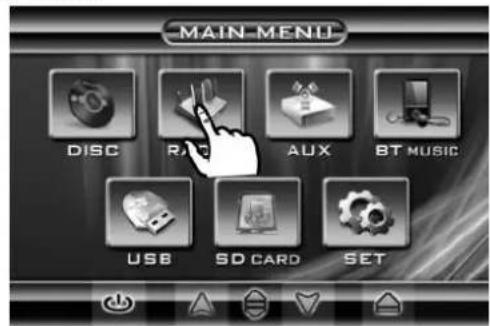
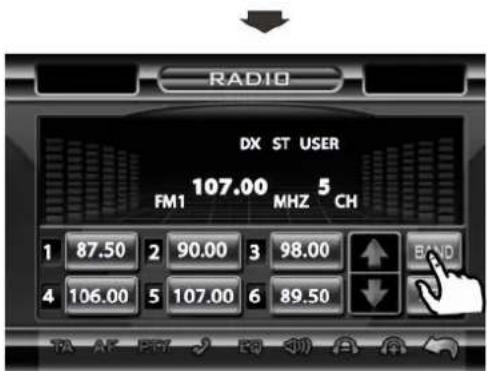
Selecting The Frequency Band
Touch the screen of "BAND" section repeatedly to select the band, themessage will show in turn: (FM1, FM2, FM3, MW1 und MW2).
When an FM stereo broadcast is hard to receive
Press ST/MO button on the remote control to select the MONO or STEREO mode. (When Stereo mode is activated, the ST symbol will appear.)
Start Searching For a Station
Manual Search
During Radio mode, briefly touch “▲” to increase frequency by one step of channel spacing.
Briefly touch “▼” to decrease frequency by one step of channel spacing.
Automatic Search
During Radio mode, touch and hold (for more than 2 seconds) either “▲/▼” ICONS to start search for a radio station automatically.
To tune in strong-singnal FM Station only (LO/DX function)
In radio model, Longer press the sel then rotate the VOL knob to choose
knob repeatedly to select LOC/DX, between the LOC and DX mode of Local and Long-distance traffic news.
Storing and Listening to a Memory Station
- Store in Memory
Select the frequency band
Select the station
Keep the desired memory key pressed in until the station is heard again after a brief interruption.
- Retrieve a preset station
Touch the 1-6 ranges briefly to retrieve a station which had been stored in the memory in advance the chose number is shown on display.
Automatic Preset Setup

In Radio Mode, touch and keep (for more than 2 'S) the screen of "APS" range to active automatic station storage. The radio searches within the current frequency band, e.g. FM1, for the strong-ger signal level until the search cycle has finished. The six strongest stations are then allocated to the corresponding storage locations.
Then the station of the first storage location is set.
Scan Function
In Radio mode, briefly touch the "APS" section on the touch screen, the radio briefly plays all the preset stations of the frequency band.
RDS Function
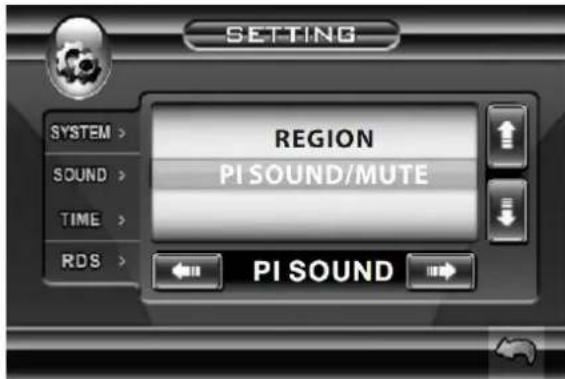
Touch "RDS" on the setting menu, touch the „▲/▼” ICONS to select the adjustment item, touch the „◀/▶” ICONS to adjust the selectment item, it depends on your habit to setup the data.
ADJUSTABLE ITEMS:
REGION SET
Touch to switch the REGION function ON and OFF.
PI SET
Touch to change between PI MUTE and PI SOUND
REG FUNCTION
at certain times some stations divide up their programs into regional programs with varying content.
REG ON: the message "REG ON" will appears in the display for a few seconds.
Note:
- the display capacity is limited. It is possible that in the double display mode some segments of the display are deleted.
- the function REG ON prevents the radio from switching to alternative frequency which have a different regional program content.
REG OFF : the program identification
(PI) of the regional program is ignored during the search for an alternative frequency (AF) or a program identification (PI).
PIMUTE / PISOUND
(only for radio operation)
if you are in an area where two program identifications (PI) overlap, you can select the option PI SOUND and PI MUTE for playback of the sound. Alternate switching of the program identification should be avoided.
PI SOUND:
if switching nevertheless occurs the sound of another station is heard for less than one second.
PI MUTE:
the sound of another station is suppressed.
TA Traffic Announcement
(Priority For Traffic Information)
In Radio mode, touch the cursor button to switch the TA function ON and OFF. When the TA function is activated, the TA symbol appears in the display.
During radio operation in one FM frequency band the search for a traffic announcement station is started automatically (TA SEEK).
If an FM station is being received which transmit the latest traffic announce-ments from time to time, the TP display lights up.
When the TA function is switched on, the FM traffic automatically interrupt CD operation (the word TRAFFIC appears in the display).
The volume level is increased to the minimum value for the transmission of traffic announcements.
After the traffic announcements has finished, the program that was previo- usly running is resumed. Interruption of the TA Function:
if you would like to interrupt the current traffic announcement, touch the TA section on screen briefly. This does switch off the TA mode.
AF FUNCTION
(Alter nati ve Frequencies)
In Radio mode, touch the cursor button to switch the AF function ON and OFF.
AF is a function that works with the help of RDS (Radio Data System) and can only be used with FM stations. The radio searches in the background for the best frequency reception of the station that has been tuned into.
Touch the AF section on touch screen or swing and keep the SEL knob in the TA/AF direction for about 2 seconds, the AF function is activated. The AF symbol appears in the display.
When the AF function has been switched on, the radio continuously tests the signal strength of the AF frequency.
The test interval for each AF frequency depends on the signal strength of the current station and varies from a few minutes in the case of weak signals.
Whenever the new AF frequency is stronger than the station that is currently tuned in, the radio switched to this frequency for a short time for a short time and the message "NEW FREQUENCY" is displayed for one or two seconds.
Note:
the status of the AF function is shown by an AF symbol in the display.
If the AF symbol appears in the display, the AF function is switched on and RDS transmission date is being received.
If the AF symbol flashes in the display, the AF function is selected but no RDS signal can be received at the moment.
PTY FUNCTION
In Radio mode, touch screen of "PTY" range to select the Program type.
In Radio mode, touch screen of "PTY" range to select the Program type.
PTY Selection of the program type besides the stations name, some FM stations also transmit information on the type of program. This information can be displayed by your car radio.
Examples of such types of program are : SPORT NEWS POP WEATHER .....
Basic Operations

Stopping Play
Pause (still pic ture)

Rapid Reverse

Rapid For ward

Skipping Track

Skipping Track

Zoom 2,3,4, 12 ,1/3,1/4,off
Note:
when the JPEG disc playback, in normal mode, you can use the cursor buttons to rotate the picture.
Press UP to invert an image.
Press DOWN to mirror an image.
Press LEFT to rotate an image to left.
Press RIGHT to rotate an image to right.
MEDIA SETUP MENU
USING THE MENU

-
IN disc model Touch the screen of "SETUP" range or press the SETUP button on remote.
-
The SETUP menu is displayed.
-
Touch directly the desired item to select the preferred item.
Or by using the ▶ / ◀ / ▼ / ▲ buttons.
- Touch the EXIT section to clear the setup menu or press the SETUP on the remote control.
SELECTING PLAY MODES
During the Disc playback, touch the "RPT, RDM, INT" range to select the different playing mode.
1) Repeat Function
2) Introfunction
4) TOP Function
3) RDM(RANDOM) FUNCTION
DISC Search (GOTO)
FOR Digital Video :
Touch the screen the of "GOTO". Touch the ◀ / ▶ to select the your adjustment item, then select the item you want to watch through CHAPTER/ TIME setting by touching the numeric buttons, then touch the ENTER button to confirm.
OSD
Touch OSD to access different playback informations.
Over view Of The Main Menu

- System Settings
- Language Settings
- Video Settings
- Digital Settings
System Setup

TV TYPE SETUP
This player is capable of playing discs recorded in either PAL or NTSC formats. Make the selection based on whether you are connecting the unit to a PAL TV or an NTSC TV. You can also set the unit to AUTO (autoselect). The disadvantage to autoselect is that each time you turn the unit on it checks to see what kind of monitor is connected, which causes a small delay and some flickering of the display image which you may find unpleasant.
SCREEN SAVER SETUP
If the screen displays a static image for too long, some "burn-in" may occur, leaving a permanent trace of the image behind. To avoid this, turn ON the SCREENSAVER item. After a short period of inactivity on the monitor, the unit will substitute a moving image to avoid burn-in.Screen Saver
TV Type

TV DISPLAY SETUP
This is to select the appropriate TV aspect (Normal/PS (For 4:3 TV), Normal/LB (For 4:3 TV), Wide (For 16:9 TV)) according to the connected TV set. Select when a wide-screen TV set is connected.
PASSWORD SELECTION
The password must be used to make changes to the Parental Control menu below. The factory default password is 0000. You will be asked for the current password. Key in "0000" and press the ENTER on the remote control, Once you have entered it, you have the opportunity to change it and enter your new pass-word. Then when you enter the Parental Control menu, you can make any changes.
RATING
Select suitable parental guidance with the cursor buttons and confirm it by pressing the ENTER button.
DEFAULTS
Selecting the DEFAULT item and confirming RESTORE will return ALL personal settings you have made, including radio and TV presets, to the factory default settings.
Language Setup
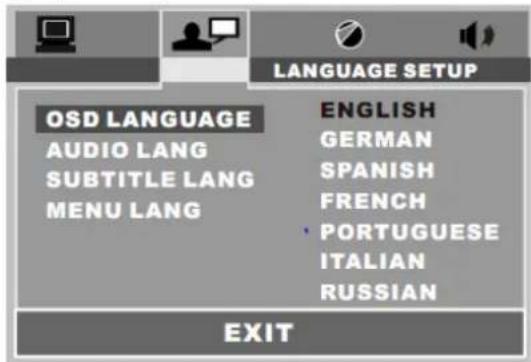
Select the preferred OSD, Audio, Subtitle, Disc Menu language by touching directly the desired language.
Video Setup

These settings allow you to set the video signal brightness, contrast, hue, and saturation.
DYNAMIC RANGE CONTROL
Select DRC and adjust the dynamic range of a Dolby Digital encoded program. There are 8 steps between full compression and off compression.
AUX-Operation
1) Please connect the external device with stereo jack (3.5mm) plug the Aux in socket.
2) In main menu, touch "AUX" ICON or press "MOD" button on control panel to enter AUX IN.
3) You now hear the sound from the external device played back through the loudspeakers.
4) Touch the volume+/- sections on touch screen or use the VOL+/- on the panel to adjust the volume level.
BT OPERATION
1. "Pair" To Your BT Phone
Prior to using the Car Kit for the fist time, you must pair it with a BT-enabled mobile handset. The following steps describes pairing the instruction for a typical BT-enabled mobile handset.
1) Place the Car Kit and mobile hand-set in 3 meters apart.
2) Put the Car Kit in pairing mode.
a. Press the POWER button to turn ON, the BT ICON will flash on TFT.
b. Touch the screen of "section or press longer the "PAIR/ on the remote control until the word "BT" icon flashing, it's now ready for pairing.
3) Set your BT phone to "discover" the Car Kit. Following your phone's instruction guide for details, activate your mobile handset's BT mode, the handset will search for accessible BT devices.
4) Your phone will find this Car Kit. Select this Car Kit from the list.
5) Enter passkey "8888", then press "OK" to pair the Car Kit and the hand-set.
6) Select the "CONNECT" from the list on the phone, if you connect successfully, the BT ICON remains solid on the screen, then you can operate the function of BT about the unite.
IMPORTANT:
1) If the pairing can not be completed within approximately 2 minutes, whiles the pairing mode is activated, and you will need to reattempt pairing (See steps 2-5 above).
2) After pairing is completed, if the BT ICON is stilling flash on the TFT, please follow the steps to reattempt pairing through your handset until the BT ICON remains solid on the screen.
2. Using The BT Car Kit
Once connecting is complete, you may access the following function. Some of the below mentioned functions only accessible for handset supported with hands-free profile.
MAKE A CALL
Touch the screen of "section, the dial numbers will display on the monitor.

then you can touch the number section on screen, and then touch the "section to call.
Note: When you dial the wrong number, you can touch the screen of “←” to delete the wrong number. (You can also press the ” ” button on the remote control to do so.) Please note: “*” and “#” serves as the “*” and “#” button on your mobile handset.
ANSWER A CALL
After you hear the ring tone, a incoming telephone number will display on the TFT monitor. Touch the screen of "range to listen or press the "PAIR/ button shortly on the remote control.
CALL TRANSFER
During talking mode, user can touch the screen of the "range (or press the "PAIR/ button on remote control) to transfer the audio from the unit back to the mobile phone for privacy reason.
END/REJECT A CALL
In BT menu, touch the screen of "range (or press briefly "REDIAL/ button on remote control).
REDIAL LAST NUMBER
In BT menu, touch "←" range (or press longer "REDIAL" button on the remote control the "DIAL LAST CALL/DIAL OUT NOW" will display on the TFT monitor.
ADJUST THE VOLUME
During conversation in progress, tune the Volume switch until you reach the desired volume level.
USB OPERATION
Following the diagram below, connect your USB device to the front panel USB port. If it is properly connected, the device will be mounted and start playing automatically.

IN USB PLAYBACK MODE
User can use your finger directly to touch the desired track to start play.
You can use the UP, DOWN, RIGHT or LEFT buttons to navigate and to select files to play, and press ENTER to begin playback (or viewing, in the case of JPEG files).
To skip to the next or last track, touch or press the ◀ or ▶. Press the ◀ or ▶ buttons for Fast Forward or Fast Reverse playback.
REPEAT play modes are also available by repeatedly pushing REPEAT until the desired mode is found.
Changing From USB to DISC Playback modes
If you are in USB Playback mode and wish to begin playback of a disc already in the player, touch the screen of the menu range to enter home menu, then touch the "DISC" ICON to enter the DISC mode.
Changing From DISC to USB Playback Mode
If the disc present in the player is an Digital Video or VCD or MP3/WMA or MP4 disc, touch the screen of the menu range to enter the home menu, then touch the "USB" ICON to enter the USB mode.
IMPORTANT NOTE:
To prevent damage to the USB device, do not remove or disconnect it during playback. it is also a good practice to remove the USB drive during disc playback.
SD/MMC card OPERATION
The unit can support playback MP3/WMA/JPEG/MP4 and Divx format which are stored into SD and MMC memory card. Please read below before you start the operation of memory card.
INSERTING THE SD OR MMC CARD.
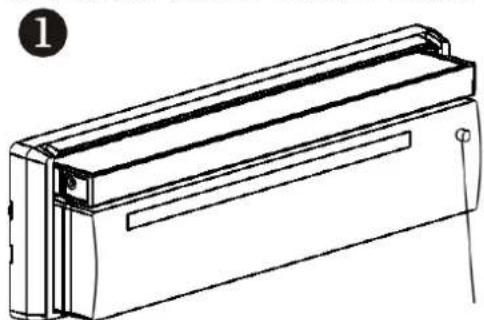
natural_image
Technical line drawing of a rectangular electronic component or enclosure with mounting holes and a side slot (no text or symbols)Press REL button to detachable the panel.

Insert the memory card into slot with label side facing upward. Note: the mini card slot for GPS only.
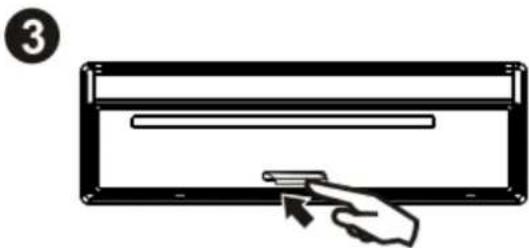
natural_image
Illustration of a hand pressing a button on a rectangular device (no text or symbols)Press in till heard a "CLICK".
REMOVING THE SD OR MMC CARD
1

natural_image
Illustration of a hand pressing a button on a device panel (no text or symbols)Press in till heard a "CLICK"
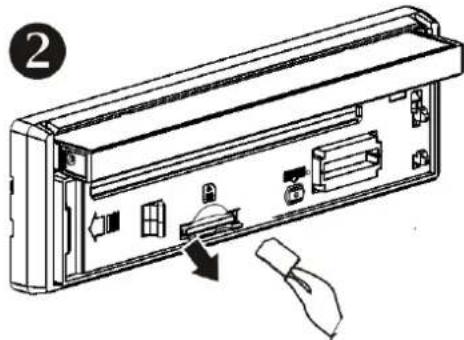
Remove the memory card
Mode change to SD/MMC card
After a SD or MMC card was inserted into the main unit card slot. the unit will starts playing the files contained on the memory card. Once the unit read the memory card successfully, the first file on the memory card will automatically start playback. Press the MODE button repeatedly is allowing changing to other modes.
Change DISC to SD/MMC card
The operations are same as USB mode, refer to see USB operation.
Change SD/MMC card to DISC
The operations are same as USB mode, refer to see USB operation.
File Playback Operation
All the SD or MMC memory car playback operation function is same as the operation on CD/MP3/WMA. Please to "MP3/WMA" operation for more details.
MP3/WMA/JPEG/MPEG4 PLAY
The unit is support MP3/WMA/JPEG/MPEG4. When a disc is inserted into player, the following picture will appear on the monitor. The unit will play the first track automatically. You can touch to directly others mode (MP3/JPEG /MPEG4) to play.
EX. : when the MP3 mode is selected.
![[MP3] ITLE / SONG: TRACK 03 / WMA MP3 001 002 003 004 005 006 007 008 ① ② ③ ④ ⑤ ⑥](/content/2026/06/1271321/images/8278398e846f9f03d0351ef9ea5590a3dd38a1357543e7ab590c6676f0187f52.jpg)
- Current type (highlighted bar).
- Current track (ID3 TAG display).
- The current play mode(MP3).
- Select the play mode(JPEG).
- Select the play mode(MPEG4).
- Current song in MP3 folder.
Touch directly to select the play mode and then touch the desired track to play.
Or Use ▲/▼/◄/► on the remote control to select the play mode or item, then press ENTER button on the remote control to confirm.
MOVING TO ANOTHER TRACK:
- Touch directly the desired song to start play.
- Touch the▶ or◀ range on the touch screen to skip a track ahead or back.
- Press the▶▶ or◀◀ button on the remote control to skip a track ahead or back.
- Touch briefly the ▶ or ◀ range on touch screen for fast forward / fast backward.
- Press shortly the ▶ or ◀ button on the remote control for forward or backward.
REPEAT FUNCTION
Touch the screen of "REPEAT" range or press longer "REPEAT" on the remote control repeatedly can select two kinds of repeat play mode.
REP-ONE:
REP ALL:
Play the same song over and over again.
Play all songs on the disc, then repeats the entire disc over and over again
NOTE:
in JPEG/MPEG4 mode, the details operations as same as MP3/WMA operation.
Troubleshooting
Before going through the check list, check wiring connection. If any of the problems persist after check list has been made, consult your nearest service dealer.
| SYMPTOM | CAUSE | SOLUTION |
| No power | The car ignition switch is not on | If the power supply is properly connected to the car accessory terminal,switch the ignition |
| The fuse is blown | Replace the fuse | |
| Disc can not be loaded or ejected | Presence of disc inside the player. | Remove the disc in the player, then put a new one |
| Inserting the disc in reverse direction | Insert the compact disc with the label facing upward | |
| The disc is extremely dirty or defective | Clean the disc or try to play a new one | |
| Temperature inside the car is too high | Cool off or until the ambient temperature return to normal | |
| Video/image appears black-white | The color system is set incorrectly | Please switch to correct color system from menu |
| No video/image appears | The unit is not connected to the parking brake detection switch | Make proper connection according to"wire connection" |
| The parking brake is not engaged | For safety reasons no video/images are displayed while the vehicle is moving. Engaging the parking brake will cause images to be displayed. | |
| No color in picture | The disc format is not according to the monitor used (PAL/NTSC) | Select a proper color mode |
| JPEG disc can not be played back | No JPEG files are recorded on the disc. | Change the disc |
| JPEG files are not recorded in a compliant formant | Change the disc Record JPEG files using a compliant application | |
| The operation keys do not work | The built-in microcomputer is not operating properly due to noise | Press the RESET button. Front panel is not properly fixed into its place |
| The radio does not work | The antenna cable is not connected | Insert the antenna cable firmly |
| The signals are too weak | Select a station manually |
Specification
General:
| Supply Voltage: | 12 V DC (11 V-15 V) | |
| Current Consumption: | Under 15 A | |
| Signal System: | Composite-Video 1.0 Vp-p 75 Ω | |
| Discs Played: | (1) DVD5"(12cm) single-sided, single-layer5"(12cm) single-sided, double-layer(2) CD (CD-DA, VIDEO-CD)5" (12cm) Disk | |
| Audio Signal Output: | 2ch&4ch Line-Out | |
| Characteristics: | (1) Frequency Response(2) S/N Ratio(3) Wow and Flutter | 20Hz-20KHz90 dB (JIS)Below measurable limits |
| Radiosection: | ||
| For 2 Bands(Europa)FM | For 2 Bands(U.S.A.)FM | |
| Frequency Coverage: | 87.5 to 108 MHz | 87.5 to 107.9 MHz |
| IF: | 10.7 MHz | 10.7 MHz |
| Sensitivity (S/N=30dB): | 15 dBuMW | 15 dBuAM |
| Frequency Coverage: | 522 to 1620 KHz | 530 to 1710 KHz |
| IF: | 450 KHz | 450 KHz |
| Sensitivity (S/N=20dB): | 40 dBu | 40 dBu |
| TFT Monitor: | ||
| Monitor Screen Size: | 7" wide | |
| Color System: | NTSC/PAL | |
| BT: | ||
| BT specifications: | V1.2 Class 2 | |
| BT profile supported: | Headset, Handsfree and A2DP & AVRCP profiles | |
| Sensitivity: | 2.4 GHz Spectrum | |
NOTE:
Specification and design are subject to modification, without notice, due to improvements in technology.


- Achtung
- Auswerfen
- ▶ II /CH 1-6 (Radio-Senderspeicher)
- DIN FRONT/REAR-MOUNT
- How To Remove And Install The Front Panel
- Detaching The Front Panel
- ATTACHING THE FRONT PANEL
- Precautions
- Remote Control
- Preparing the Remote Control
- Inserting the Battery
- Using the Remote Control
- Note :
- POWER ON/OFF
- LOADING/EJECTING A DISC
- Loading a Disc
- Ejecting a Disc
- OPEN/CLOSE MONITOR AND ANGLE ADJUSTMENT
- ADJUSTABLE ITEMS:
- SETTING WALLPAPER
- Setting Audio Mode
- Rear View Camera
- Control Panel
- OPEN/“▲/▼” BUTTON
- VOL KNOB & SEL BUTTON
- (POWER On/Off)/MODE BUTTON
- TA/AF BUTTON
- TA Function [traffic Announcement] Button(for Rds Only)
- AF [Alternative Frequencies]
- BND/PAIR BUTTON
- MU/PTY BUTTON
- ▶ II /CH 1-6 (Radio Preset)
- REL BUTTON
- EJECT BUTTON
- Listening to Radio
- Selecting The Frequency Band
- When an FM stereo broadcast is hard to receive
- Start Searching For a Station
- Manual Search
- Automatic Search
- To tune in strong-singnal FM Station only (LO/DX function)
- Storing and Listening to a Memory Station
- - Store in Memory
- - Retrieve a preset station
- Automatic Preset Setup
- Scan Function
- RDS Function
- REGION SET
- PI SET
- REG FUNCTION
- PIMUTE / PISOUND
- (only for radio operation)
- PI SOUND:
- PI MUTE:
- TA Traffic Announcement
- (Priority For Traffic Information)
- AF FUNCTION
- (Alter nati ve Frequencies)
- Note:
- PTY FUNCTION
- Basic Operations
- MEDIA SETUP MENU
- USING THE MENU
- SELECTING PLAY MODES
- DISC Search (GOTO)
- OSD
- Over view Of The Main Menu
- System Setup
- TV TYPE SETUP
- SCREEN SAVER SETUP
- TV Type
- TV DISPLAY SETUP
- PASSWORD SELECTION
- RATING
- DEFAULTS
- Language Setup
- Video Setup
- DYNAMIC RANGE CONTROL
- AUX-Operation
- BT OPERATION
- "Pair" To Your BT Phone
- IMPORTANT:
- Using The BT Car Kit
- MAKE A CALL
- ANSWER A CALL
- CALL TRANSFER
- END/REJECT A CALL
- REDIAL LAST NUMBER
- ADJUST THE VOLUME
- USB OPERATION
- IN USB PLAYBACK MODE
- Changing From USB to DISC Playback modes
- Changing From DISC to USB Playback Mode
- IMPORTANT NOTE:
- SD/MMC card OPERATION
- REMOVING THE SD OR MMC CARD
- Mode change to SD/MMC card
- Change DISC to SD/MMC card
- Change SD/MMC card to DISC
- File Playback Operation
- MP3/WMA/JPEG/MPEG4 PLAY
- MOVING TO ANOTHER TRACK:
- REPEAT FUNCTION
- Troubleshooting
- Specification
Brand : Auna
Model : MVD-200
Category : Car radio