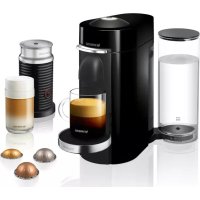
NESPRESSO M300 - Coffee machine MAGIMIX - Free user manual and instructions
Find the device manual for free NESPRESSO M300 MAGIMIX in PDF.
User questions about NESPRESSO M300 MAGIMIX
0 question about this device. Answer the ones you know or ask your own.
Ask a new question about this device
Download the instructions for your Coffee machine in PDF format for free! Find your manual NESPRESSO M300 - MAGIMIX and take your electronic device back in hand. On this page are published all the documents necessary for the use of your device. NESPRESSO M300 by MAGIMIX.
USER MANUAL NESPRESSO M300 MAGIMIX
a : Removable water tank
b: Cup heating plate
c : On/Off switch
d : Capsule holder
e : Spout ring
f : Grill
g : Drip-tray with indicator for water level
h : Steam / hot water knob
i : Display
i : Pivotal steam/hot water nozzle with integrated frothing attachment
k : Cleaning tool with discharging bit and spiral)
I : Hexagonal key (for removal of the capsule cage)
NL
Electrical Instructions for UK and Republic of Ireland only
WARNING: Always replace the fuse cover of the fitted plug, never use the plug with the fuse cover omitted. If a replacement fuse cover is required, ensure it is the same as the one visible on the pin face of the plug (i.e. RED OR ORANGE). Fuse covers are available from:
BBS Ltd
Po Box 110
Farnham Surrey GU 104XL
Phone: 01252 727755
Use a 3A fuse approved by ASTA to BS1362, marked thus

For Duo chromed only:
WARNING: a plug with a bared flexible cord is hazardous if engaged in a live socket. If the fitted plug has been cut from the power supply cord, it should be destroyed and replaced with a three pin plug in accordance with the following code:
BLUE: neutral
BROWN: live
GREEN/YELLOW: earth
The wire which is coloured BLUE must be connected to the terminal in the plug which is marked with the letter "N" or coloured BLUE or BLACK.
The wire which is coloured BROWN must be connected to the terminal in the plug which is marked with the letter "L" or coloured BROWN or RED which is connected to the fuse.
The wire which is coloured GREEN/YELLOW should be connected to the terminal marked with the letter "E", or by the earth symbol or coloured GREEN or GREEN/YELLOW.
Safety Instructions

Read these instructions carefully before using your Nespresso machine.
- Do not plug the machine into anything other than a grounded electrical socket. Verify that the voltage indicated on the technical specifications plate on the bottom of the unit corresponds to your electrical installation.
- Do not place your Nespresso machine on a hot surface (electrical heating plate for example) or near a flame.
- Do not remove the capsule holder from the spout ring while the machine is functioning since the extraction of coffee is done under high pressure.
- Do not use the machine without the drip tray and grill in place.
- Remove the plug when cleaning your machine.
- Ensure that the electrical cord does not come into contact with sharp or hot objects. Do not disconnect the electrical plug by pulling on the cord.
- Avoid touching the electrical cord as well as any other part which may become hot during the use of the machine (steam nozzle, chrome portion of capsule holder).
- Never plunge the machine in water.
- Keep the machine and the electrical cord out of children's reach.
- For descending, adhere to the directions which follow.
-
Do not use the machine if it is damaged or if the cord is in bad condition.
-
The cord or any other defective element must be replaced exclusively by an authorized after-sales service centre. Under no circumstances should you open the machine yourself.
Accessories
The machine is delivered with a range of accessories:
- 1 hexagonal key to remove the capsule cage,
- 1 cleaning tool,
- 2 Nespresso cups.
Equally included are 4 varieties of Nespresso coffee (4 x 10 capsules) allowing you to use the machine immediately.
For further information concerning the different varieties of Nespresso coffee and to order capsules, contact your Nespresso Club at the address found on your machine or in the «Welcome-pack».
Preparing the machine (1-3)
- Remove the water tank by lifting it out by its lid (1) and fill it with water (2).
Maximum capacity: 1.8l = about 36 Nespresso espresso cups or about 18 cappuccino cups. - Applying light pressure to facilitate the opening of the bottom valve, put the water tank back into place (3) and close the lid.
Since water quality is essential to a good Nespresso, we recommend that you:
Use fresh tap water.
- Change the water in the tank daily.
- Clean the tank at least once a week.
We advise you not to use distilled or mineral water.
Start up (4-8)
Before using the machine for the first time, we advise you to clean it as follows:
- connect the power plug
- fill the water tank with fresh, cold water (1-3)
- place the empty capsule holder in the capsule holder ring and turn from left to right. When it is correctly inserted, the handle faces forwards or slightly to the right (4)
- place a sufficiently large receptacle under the capsule holder and another under the steam/hot water nozzle (5)
- press key ① to start the machine (6). The words FILL WATER appear on the display
- turn the switch to position 山 water now emerges from the steam/hot water nozzle and the word WATER appears on the display (7)
- allow around 1/2 a litre of water to flow. Then reset the switch to position «O». READY appears on the display
- to clean the coffee system, now press the key 7 . LARGE appears on the display (8). This allows the quantity of water preset in the factory to flow through the coffee system. Repeat this operation five times.
Programming the machine (9)
Access to the programming mode
To access the programming mode, the machine must be connected to the power supply. Press the key (approx. 3 sec.) until TIME appears on the display.
When the programming mode is activated, the following messages appear on the display:
TIME AUTO ON AUTO OFF HARDNESS CUPS DECAL LANGUAGE
To quit the programming mode, press the key /P until the message READY appears on the display, or if the machine has not yet warmed up, WAIT.
Selection of the different programming points
Press the key 12 /P to select the different programming points. As soon as the desired programming point appears on the display, press the key 12 />> or the key 12 />> to access the corresponding programming point. You can modify the setting of the programming points by pressing the key 12 />> or the key 12 />>.
Setting the TIME
When the word TIME appears on the display, the display changes to ... Now press the key 2 / + or 2 / - and the time display flashes. You can now adjust the time with the key 2 / + or 2 / - . Confirm the entry by pressing the key /P. The minutes display now flashes. Set the exact time by pressing the key 2 / + or 2 / - . Confirm the entry by pressing the key 2 / P again.
Note: -- -- Function deactivated 00:00 Midnight
This function is not activated in the factory. If the machine is disconnected from the power supply, the time will have to be reprogrammed.
AUTO ON setting
When this programming point is activated, your machine starts automatically. This message only functions correctly if you have first set the right time. Press the key 12 /P until the message AUTO ON appears on the display.
Now press the key 2 / + or 2 / - . The time display flashes. You can now set the time using the keys 2 / + or 2 / - . Confirm the entry by pressing the key 2 / P . The minutes display now flashes. Set the exact time by pressing the key 2 / + or 2 / - . Confirm the entry again by pressing the key 2 / P .
Note: -- -- Function deactivated 00:00 Midnight
This function is not activated in the factory. If the machine is disconnected from the power supply, the time will have to be reprogrammed.
AUTO OFF setting
When this function is on, your machine stops automatically. However, if the machine is reactivated before it automatically stops, the machine will automatically re-start from the original programming time. e.g. if the machine is programmed on at 11 a.m. and is due to switch off at 12 noon, if it is reset at 11.55 a.m. the machine will then switch off at 12.55 p.m. This programming point functions, regardless of whether you have set the time. Press the key U /P until AUTO OFF is displayed on the display. Wait until - HRS begins to flash. Press the key /«+» or /«-» to enable the setting to be adjusted. Now you can set the desired stop time with the key /«+» or the key /«-» Confirm the entry, by pressing the key U /P.
Note: -- HRS Function deactivated 15h Maximum deactivation time This function is not activated in the factory. If the machine is disconnected from the power supply, the time will have to be reprogrammed.
Setting the water hardness
Limescale is the main cause of malfunctioning. Therefore your machine has an automatic scaling control. To enable this display to function properly, you must set the correct water
hardness. Use the enclosed test tab to determine the hardness. For this purpose, dip the tab briefly (1 second) in a glass containing tap water. Shake off excess and leave to dry for around 1 minute. Now you can read the degree of hardness.
Value of the levels :

4 green boxes = Very soft .... Set level 1

1 red box = Soft Set level 1

2 red boxes = Medium Set level 2

3 red boxes = Hard.. Set level 3

4 red boxes = Very hard ...Set level 4
The factory setting is programmed to level 3. Once you have programmed the water hardness the level will stay memorised - even if the machine is disconnected from the mains.
Displaying the number of cups
Press the key 1m / P until the word CUPS appears on the display. Release the key and the number of cups now appears on the flashing display.
Descaled display
Press the key U/P until DECALC appears on the display. Release the key and the number of descending operations effected flashes on the display.
Setting the language
Press the key Um / until LANGUAGE appears on the display. Press the key Um / + or Um / - to access this programming point. Now press the key Um / + or Um / - until the desired language appears. Confirm the entry by pressing the key Um / . You may choose between D/F/I/E/NL/Sp/Port.
Messages on the display
WAIT
The machine has not yet reached the necessary operating temperature.
READY
The machine has reached the necessary operating temperature. You can now begin to prepare coffee.
FILL WATER
Water tank empty. Please add water.
WATER
Displayed when water is being drawn off
LARGE
Displayed when a large cup is being filled
SMALL
Displayed when a small cup is being filled
WAIT STEAM
You have pressed the steam key. The machine is warming up.
STEAM READY
The machine has reached the necessary working temperature. Now you can draw off steam.
STEAM
Displayed when steam is drawn off.
TOO HOT
This message is displayed when you wish to serve coffee immediately after preparing steam without the temperature having fallen. To cool the machine down, proceed as described under «Steam preparation.»
TAP CLOSE
When you draw off warm water to reduce the steam temperature, this message is displayed after the machine has automatically interrupted the process of drawing off water.
ENOUGH COFFEE?
This message appears when the cup filling quantity is being programmed.
CHECK-UP
Service message.
- Make sure that there is enough water in the tank.
- Clean the capsule holder as described under «Cleaning»
- Press the key or with the capsule holder inserted but without coffee capsules; When READY is displayed on the display you can prepare your coffee normally. If the message does not disappear
- clean the needle cage as described under «Cleaning».
Making espresso (10-12)
To obtain optimal coffee quality, preheat the machine daily with the empty capsule holder and rinse the system before making the first and after the last Nespresso of the day. Do this by pressing the button (9).
- Fill the tank with fresh water. To preheat the capsule, leave it in position on the capsule cage (but empty, i.e. without a capsule)(1-3)
- Switch the machine on by pressing the key ① . WAIT is displayed on the display. When READY appears on the display the machine has reached the necessary operating temperature;
- Remove the capsule holder
-
Fit the capsule head downwards in the capsule holder. The capsule contains the right quantity of coffee for one cup of espresso (10).
-
Replace the capsule holder on the capsule cage and tighten until the handle is facing you or slightly offset towards the right
- Place the preheated cup (see «preheating cups») under the «coffee» outlet
Depending on the choice of cup, (large or small), press or (11). LARGE or SMALL now appears on the display and preparation of the espresso begins. The machine is set in the factory for 0.5 dl of coffee 1.0 dl of coffee - The machine stops automatically when the desired filling level is reached. READY appears on the display.
- Remove the full cup, remove the capsule holder and the used capsule (12)
To ensure that the quality of your next cup of espresso is ideal, replace the empty capsule holder on the capsule cage to retain the heat.
Setting the cup filing quantity
You can easily change or adjust the cup filling quantity set in the factory.
- Proceed as described under «Making espresso» up to «replace the capsule holder on the capsule cage.»
- Now place the cup for which you wish to set the filling quantity automatically under the coffee outlet
- Decide whether it is to be programmed by means of the key or the key
- Press the appropriate key until ENOUGH COFFEE ? appears on the display. Release the key. As soon as the cup filling level has been reached, press the key again and the word READY appears on the display
-
Proceed in exactly the same way to adjust the cup filling quantity, i.e. or
-
You can reduce the filling quantities set in the factory or those you have programmed yourself by briefly pressing either of the keys or before the automatic cutout occurs. This will not affect the programmed settings.
Note: if a power failure occurs, the values set in the factory and those programmed by you are memorized.
Making hot water (13)
This machine enables you to prepare hot water for tea, bouillon etc.
- Fill the water tank and connect the machine. When READY appears on the display, place a receptacle under the hot water nozzle
- Turn the switch to the right on the machine control box towards you to position 山 . WATER appears on the display.
- As soon as the desired quantity of water has been obtained, return the switch to its initial position

WARNING! The steam/hot water nozzle is very hot
Use of steam (14-16)
Steam can be used to foam milk for cappuccino. For this purpose your machine has a special foam device which guarantees ideal results. The steam can also be used to heat liquids. Proceed as follows. Note: Before making steam, remove the used capsule from the capsule holder to prevent the coffee from drying and clogging the coffee outlet opening.
Heating liquids (14,15) (such as cold milk)
-
Fill the water tank, start the machine with the ① , press the key . WAIT STEAM appears on the display. The necessary operating temperature is reached when STEAM READY appears.
-
Lift the special foaming device about 3-5mm by using the plastic handle
- Direct the steam/hot water nozzle towards the grid. Turn the knob slowly towards you in position and allow the water in the nozzle to flow out into the drip tank
- As soon as steam emerges from the nozzle, pivot the latter and immerse it deeply in the liquid to be heated but in such a way that this liquid cannot penetrate into the foaming device from above
- Heat the liquid by effecting circular movements from the bottom upwards. The duller the noise of the steam the higher the liquid temperature will be
Cappuccino foam (16)
- Fill the water tank, start the machine with the ① , press the key . WAIT STEAM appears on the display. The necessary operating temperature is reached when STEAM READY appears.
Take a receptacle which is as narrow and tall as possible and very clean. Pour in cold skimmed milk (make sure not to pour in too much at a time) and introduce the steam/hot water nozzle under the surface of the milk. Impart a circular movement to the receptacle until a thick foam has formed. Then immerse the steam/hot water nozzle fully into the milk until it is warm. - To end the steam preparation, turn the rotary knob in the other direction. Warning! Do not remove the receptacle until no more steam emerges from the nozzle. This will prevent hot liquid from splashing
- Clean the emulsifier immediately after use by means of a wet rag. Warning! The nozzle is very hot
-
When you need no more steam, deactivate the «Steam» function by pressing the steam key again. TOO HOT appears on the display
-
Leave the machine to cool down until READY appears on the display or purge the machine. Proceed as follows for this purpose
- Place a receptacle under the steam/hot water nozzle. Open the switch slowly. WATER appears on the display. As soon as the machine has reached the necessary coffee temperature, the water flow is interrupted automatically and TAP CLOSE appears on the display
- Close the switch. READY appears on the display
Note: when STEAM READY appears on the display but you do not draw steam off for three minutes, the display display changes and TOO HOT appears. Press the key again. STEAM READY now appears on the display again. The maximum steam withdrawal time is 8 minutes.
To obtain a good foam the following indications must be respected:
Use only fresh cold milk. The best possible foam will be obtained with skimmed milk
- Use a rather narrow and tall receptacle, if possible a small chromium-plated steel jug
To obtain milk foam, air is essential. Do not immerse the nozzle too deeply into the milk. Move the receptacle slowly up and down
- Do not heat the milk too much otherwise the foam will disappear
Cleaning (17-20)
After the extraction of each Nespresso or the use of the steam / hot water nozzle, residual water in the thermoblock is discharged into the drip tray provoking a light hissing noise. It is therefore necessary to remove the grill and empty the drip tray after about 20 coffees and, at same time, to clean them with a non-abrasive, dish washing liquid (17).
- Before replacing the drip tray and the drip grid, make sure that the back section of the
drip tray with the integral float is correctly positioned (push as far as it will go).
Important: make sure to run the drip tray into position until it touches the base. Otherwise water may run out below your machine from the back. To introduce the drip tank properly, raise it slightly and push backwards.
- The capsule holder must be rinsed frequently. Either run hot tap water through it or simply insert the empty capsule holder in the spout ring and let water run through it while slightly loosening and re-tightening the capsuleholder to vary the pressure flow. Cleaning the capsule holder in the dishwasher is not recommended (18).
- For optimal cleaning of your capsule holder, a specially conceived cleaning product is also available from your Nespresso Club.
- Clean the steam / hot water nozzle with clean, damp cloth after each use. If the nozzle is blocked, unscrew it with the aid of a coin and remove the residue causing the blockage with a needle. Take this occasion to remove the integrated frothing attachment from the bottom part of the steam nozzle by unscrewing it with the help a coin if necessary. Rinse all of the parts in hot water (19).
- When reconnecting the nozzle, ensure that the O-ring joints are put back properly into place (20) !
Cleaning the Capsule Cage (21-29)
The capsule cage is screwed into the bottom part of the thermoblock inside the spout ring. In order to clean it, follow the instructions below.
- Turn off the machine and remove the water tank, the drip tray and grill.
- Let the machine cool down.
-
Turn the machine upside down (21).
-
Put the hexagonal key on the capsule holder (22) and unscrew the capsule cage by turning the handle counterclockwise (23).
Finish unscrewing the capsule cage by hand (24). - Rinse the capsule cage under running water (25). With the cleaning tool delivered with the machine, clean the two holes on either side of the water spout as well as the water entry point of the capsule cage using the spiral end of the cleaning tool (26).

WARNING! Use the cleaning tool with care since improper handling can cause injury.
- Blow through the capsule cage in the direction of the arrow (27) in order to remove any deposits.
- Clean the two holes of the water spout with the cleaning tool a second time and blow through the capsule cage once again.
- Coat the threads of the capsule cage with lubricant (28) and ensure that the stopper (A), spring (B) and O-ring joint (C) are put back properly into place (29).
- Manually screw the capsule cage back into the spout ring with the help of the hexagonal key. Do not use the capsule holder to handle this procedure!
Dscaling your machine
- Your coffee machine automatically tells you when descaling is necessary. The message DESCALE NOW appears on the display. You can still make coffee, but we recommend descaling the machine within one week.
Your Nespresso Club will provide you a.
descaling kit including specific products and
Instructions for descending your machine.
You can also descale your machine before the message appears :
- Turn off the machine, then press the steam switch (9) (approx. 5 sec.)
- Follow the Instructions for descending your machine.

WARNING! Never use vinegar, it would damage your machine.
Solutions to Occasional Problems
Problem:
Your Nespresso is not hot enough.
Solution :
See the section on «Preheating Cups».
- Preheat the capsule holder by inserting it empty into the spout ring and running hot water through it (8).
Problem:
The pump makes a loud noise.
Solution :
- Ensure that there is water in the water tank.
- Verify that the water tank is properly in place.
Problem:
The milk for a cappuccino is not frothy enough.
Solution :
- Clean the steam nozzle and the integrated frothing attachment.
Only use cold, whole milk.
Problem:
Coffee does not flow out.
Solution :
-
Ensure that the capsule holder is properly in place in the spout ring (4).
-
Ensure that the water tank is properly in place and filled (3).
- Verify that the capsule cage is not blocked. To do this, remove the capsule holder from the spout ring, place a receptacle under the coffee spout and press the button. If water does not flow freely (with two clearly visible water jets), clean and unblock the capsule cage (see the section on «Cleaning the Capsule Cage»).
Problem:
Coffee runs down the sides of the capsule holder.
Solution :
- Ensure that the capsule holder is properly in place in the spout ring (4).
- Clean the capsule holder preferably with the product specially conceived for this purpose (see the section on «Cleaning»).
For more detailed information, contact your Nespresso Club.
Environment

Our packaging is made exclusively of recyclable materials. Check with your local authorities on how best to dispose of old machines.
3 rode hokjes = hard water
Instellen op niveau 3
#
4 rode hokjes = zeer hard water
Instellen op niveau 4
Fabrieksmatig is de hardheid ingesteld opiveau 3.