
CDC3300FD - Dash cam SALORA - Free user manual and instructions
Find the device manual for free CDC3300FD SALORA in PDF.


| Product Type | Dashboard Camera (Dashcam) |
| Brand | Salora |
| Model | CDC3300FD |
| Dimensions (approx.) | 65 x 55 x 30 mm |
| Weight (approx.) | 80 g |
| Power supply | 12V/24V cigarette lighter adapter |
| Video resolution | Full HD 1920x1080p |
| Viewing angle | 170° wide angle |
| Night vision | Yes, with infrared LED |
| Motion detection | Yes |
| Loop recording | Yes |
| G-sensor (shock detection) | Yes, with automatic file lock |
| Storage | microSD card up to 32 GB (not included) |
| Screen | 2-inch LCD screen |
| Maintenance and cleaning | Clean with a soft dry cloth. Avoid solvents. |
| Safety | Use only the supplied adapter. Do not expose to moisture. |
| Spare parts | USB cable, mounting bracket, cigarette lighter adapter |
| Repairability | Repairability index not provided. Consult a professional. |
| Operating temperature | -10°C to 60°C |
| Warranty | 2 years |
Frequently Asked Questions - CDC3300FD SALORA
User questions about CDC3300FD SALORA
0 question about this device. Answer the ones you know or ask your own.
Ask a new question about this device
Download the instructions for your Dash cam in PDF format for free! Find your manual CDC3300FD - SALORA and take your electronic device back in hand. On this page are published all the documents necessary for the use of your device. CDC3300FD by SALORA.
USER MANUAL CDC3300FD SALORA
natural_image
Black BalDRA digital camera with lens and control buttons, displayed against a blue gradient background (no text or symbols on device body)Product Specificaties....12
Product kenmerken
2
| 1. Mini USB Interface 2. AV-OUT Interface | 3. GPS Interface | |||
| 4. Aan/Uit indicator 5. REC 6. Modus | ||||
| 7. MENU 8. Aan/Uit 9. Camera | ||||
| 10. TF kaartlezer 11. Omlaag 12. Omhoog | ||||
| 13. LCD scherm 14. HDMI aansluiting | 15. Reset | |||
| 16. Sleuf voor bevestiging 17. Luidspreker | ||||
Functie toetsen
Product Specifications
| 1. Interface mini USB 2. Interface AV sortie | 3. Interface GPS | |||
| 4. Indicateur Power 5. REC 6. MODE | ||||
| 7. MEU 8. POWER 9. Caméra | ||||
| 10. Lecteur Carte TF 11. Bas 12. Haut | ||||
| 13. LCD 14. HDMI 15. Réinitialiser | ||||
| 16. Fente de montage 17. Haut-parleur | ||||
Fonctions touches
Presentation of the device....28
Diagram....28
Introduction to functions....29
Operation and instructions....30
Preparation....30
On/Off....30
Battery charging....30
Installation Memory Card....30
Basic operation....30
Record Mode....30
Photo Mode....33
Playback Mode....36
System Setting....36
Peripheral Interface....37
Mini USB Interface....37
HDMI Interface....37
Specifications Product....38
Presentation of the device
This product is multi-functional a High-tech Product, which is provided with HD Photography, night vision, record mode and an external TF card reader. With the high performance video coding it delivers a high ratio compression and HDMI. It can transmit the uncompressed HD video and multi-channel data. This product in general is mainly used to serve as evidence in case of a car accident. Of course it can also be used in daily life, offering you to snap a few lasting memories during your travels and outdoor activities.

| 1. Mini USB Interface 2. AV-OUT Interface | 3. GPS Interface | |||
| 4. Power LED 5. REC 6. MODE | ||||
| 7. MENU 8. POWER 9. CAMERA | ||||
| 10. TF Card Reader 11. Down 12. Up | ||||
| 13. LCD 14. HDMI 15. Reset | ||||
| 16. Rack Mounting Slot 17. Speaker | ||||
Key functions
| Name Function | |
| Power | Afters start-up, press shortly to power on, press longer to power off. |
| OK | To confirm your selection |
| MENU To enter the menu | |
| MODE | Press shortly to change the modes (Photo mode, Record mode, Playback mode) |
| UP | To upwards, making a selection |
| DOWN | To go downwards, making a selection |
| Reset | To reset the device |
Indicators significations
| Name | Signification |
| Power LED | The red indicator light will go on when power on, it will go out when power off |
| Charging indicator | The blue indicator light will lit during charging and will go out when charging is completed. |
Operation and InstructionsVoorbereiding
Preparation
On/Off
Press Power key once shortly to power on, to power off press longer.
Notes: in a low power state the car recorder will automatically power off. After connecting the car charger, the car recorder will automatically power on and start recording. When you disconnect the car charger and there will be enough power, the device will automatically save the record file and power off.
Battery charging
There are three methods to charge the car recorder: connecting it to a PC-USB interface, provided by the car power or connecting it to a power adaptor.
During charging the blue indicator light will be lit, it will take about 2 hours for the battery to be completely charged. After completion the blue indicator light will go out.
Installation of the memory card
Push the Micro SD memory card into the slot, following the direction on the device, until you hear a click sound.
To remove the card: You push the Micro SD Card inwards and it will pop out.
Basic operation:
This device offers three modes:
Record Mode: to record videos
Photo Mode: to take photos
Playback mode: to view the video or photos taken
After Start-up, the default system is in Record Mode.
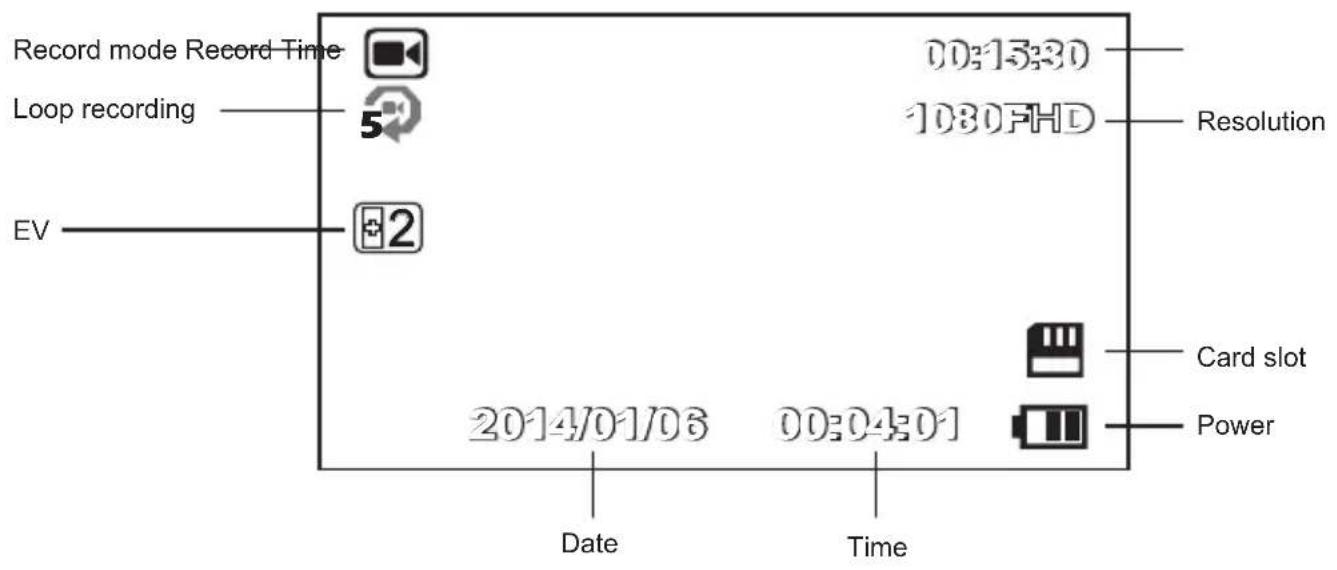
Press the M key to enter the menu setting
Resolution: six resolutions are optional: 1080HFD 1920x1080/1080P
1440x1080/720P 1280x720/WVGA 848x480/VGA 640x480/
QVGA 320x240
Loop recording: The device can record cycles of 2min/3min/5min or you can
unable the loop recording function.
WDR: Wide Dynamic Range, to provide clear images.
Exposure Compensation: +2.0, +5/3, +4/3, +1.0, +2/3, +1/3, +0.0, -1/3, -2/3, -1.0, -4/3, -5/3, -2.0
Motion detection: When the motion detection is activated, the device will
automatically start recording when a motion is detected. If there will be no motion during 10 seconds the camera will automatically stop recording.
Video Audio: You can turn the recording of audio on or off.
Date Tag: You can chose to show the date on the display or not.
G-sensor: You can chose between four options in sensibility of the
G-sensor: High/Medium/Low/Off.
Photo mode
Press the MODE to switch to the Photo mode, then press REC for shooting a picture.

Press the M key to enter the Photo setting in the Photo Mode:
Capture Mode: single shot, 2 seconds/5 seconds/10 seconds timing.
Resolution: 12M 4032 x 3024, 10M 3648 x 2736, 8M 3264 x 2448, 5M 2592, 1944, 3M 2048 x 1536, 2M HD 1920 x 1080, VGA 640 x 480, 1.3M 1280 x 960 (optional).
Image quality: premium/Standard/Economic.
Sharpness: Strong/Standard/Soft
White balance: Auto/Daylight/Cloudy/Tungsten/Fluorescent
Colour: Normal/Black&White/Sepia
ISO: Auto/100/200/400 (optional)
Exposure Compensation: +2.0, +5/3, +4/3, +1.0, +2/3, +1/3, +0.0, -1/3, -2/3, -1.0, -4/3, -5/3, -2.0.
Anti-Shake: On/Off (optional)
Date Tag: You can set the Date/Date &Time/Off
Playback mode
Press the MODE key to switch to the Playback mode. Press the UP or DOWN key to browse through the video and photo files. Press OK to play the selected file, press again on the OK key to pause the playback.
During Playback you can go fast-forward or rewind by pressing the UP or DOWN key.
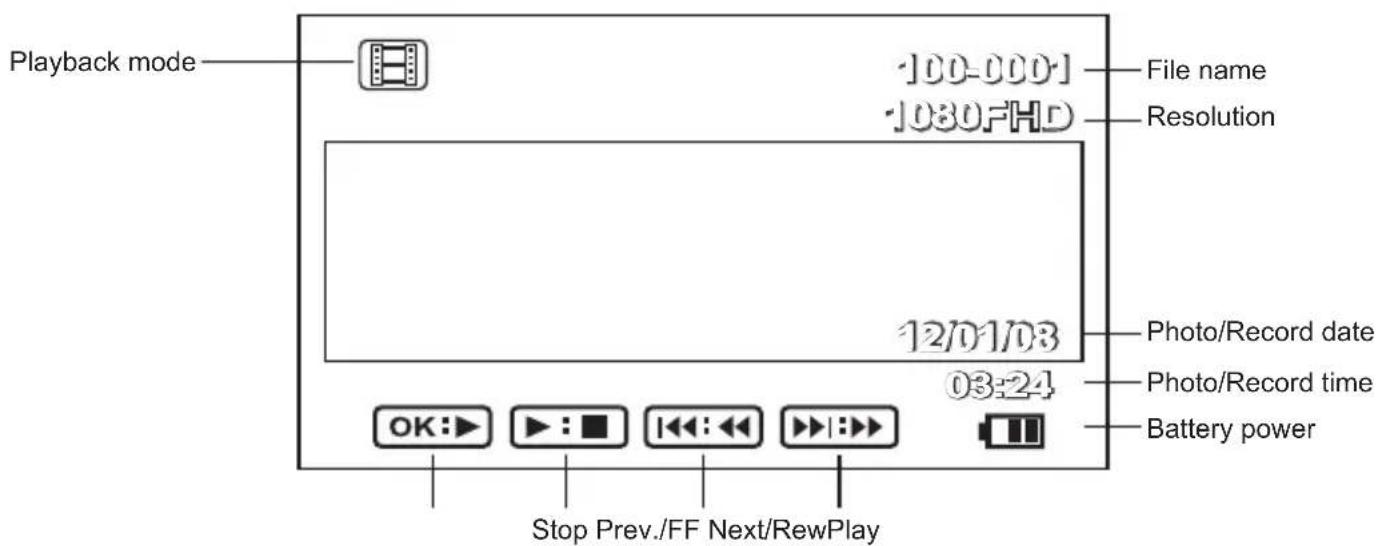
Palyback mode Menu
Press the M key to enter the Playback mode menu in Playback mode
Delete: Delete the current or all video and photo files.
Protect: Lock the current file or unlock the current file, lock or unlock all files (optional).
Slide Play: the slides will be shown every 2 seconds/5 seconds/8 seconds.
System setting
In the setting menu of the Record Mode, Photo Mode or the Playback Mode, press the UP or DOWN key to browse through the various system settings.
The settings include: "date/time", "language settings", "TV mode", "Frequency of light", "screen protection", "Fill-in light", "default setting", "Software version".
Date/Time: Adjsut the current time and date.
Key Tone: Off/On
Language Settings: 1) English, 2) French, 3) Spanish, 4) Portuguese, 5) German, 6) Italian, 7) Traditional Chinese, 8) Simplified Chinese, 9) Russian, 10) Japanese, 11) Dutch.
TV Mode: NTSC/PAL. The default setting is NTSC.
Frequency: 50HZ/60HZ, the default setting is 50 HZ.
Formatting: SD card formatting.
Software version: check the current software version of the car recorder.
Peripheral Interface
Mini USB Interface
TV mode
The car will automatically switch to TV via the AV interface when the device is connected to TV, and it will output video and audio from the car recorder. The output TV system can be set to NTSC/PAL through the system settings.
USB Mode
Connect the car recorder to a computer by means of a mini USB line. After Start-up, the device will automatically pop up the USB Menu. These two mode options are available:
1. Memory
The camera will save the video or photo files in this mode.
2. camera
In this mode there will be a USB video, for real-time video shooting or for live video chatting.
See image below:
To power off the device automatically, disconnect the device.
HDMI Interface
The car recorder is supplied with HDMI digital video and sound transmission. Transmitting high quality audio and video signals to STB, DVD Player, PC, TV games, integrated amplifier and digital sound- and TV sets.
Connect the device and the external device by means of the HDMI line, the video output of the device will automatically switch to TV.
Product specifications
| Chipset Nt96650 | |
| Platform DV Turnkey | |
| RAM DDR3 1GB | |
| Anti-handshake technology | Supported |
| Digital magnification 4 | |
| Video resolution | 1080HFD 1920x1080/1080P 1440x1080/720P 1280x720/WVGA 848x480/VGA 640x480/QVGA 320x240 |
| File format | Photo: JPGVideo: MOV |
| White balance Auto | |
| Colour effect Standard/Black&White/Sepia | |
| Seamless Video Supported | |
| Power-off file recovery Supported | |
| Motion detection Supported | |
| Date & Time Supported | |
| Media supporter SD Card (maximum 32GB) | |
| Languages | 1)English, 2) French, 3) Spanish, 4) Portuguese, 5) German, 6) Italian, 7) Traditional Chinese, 8) Simplified Chinese, 9)Russian, 10)Japanese,11)Dutch |
| HDMI Supported | |
| AV-OUT (mini USB interface) | Supported |
| System NTSC/PAL | |
| USB Function | 1. Memory card2. Camera |
- Product kenmerken
- Presentation of the device
- Operation and InstructionsVoorbereiding
- Preparation
- On/Off
- Battery charging
- Installation of the memory card
- Basic operation:
- Press the M key to enter the menu setting
- Photo mode
- Press the M key to enter the Photo setting in the Photo Mode:
- Playback mode
- Palyback mode Menu
- System setting
- Peripheral Interface
- Mini USB Interface
- TV mode
- USB Mode
- Memory
- camera
- HDMI Interface
Brand : SALORA
Model : CDC3300FD
Category : Dash cam