
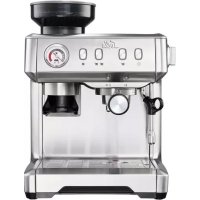
Grind & Infuse Pro - Coffee machine Solis - Free user manual and instructions
Find the device manual for free Grind & Infuse Pro Solis in PDF.


| Product type | Combined coffee machine with built-in grinder |
| Dimensions (W x D x H) | 25 x 30 x 40 cm |
| Weight | 8 kg |
| Power supply | 220-240 V, 50/60 Hz, 1400 W |
| Water tank capacity | 1.5 liters |
| Bean hopper capacity | 250 g |
| Pump pressure | 15 bar |
| Grind adjustment | 15 levels |
| Main functions | Whole bean coffee, espresso, lungo, steam for cappuccino, hot water |
| Cleaning program | Automatic descaling cycle and coffee circuit cleaning |
| Safety | Automatic shut-off, overheat protection, water tank lock |
| Spare parts | Door gasket, water filter, optional milk carafe |
| Repairability | Repairability index 8.3/10 |
| Warranty | 2 years |
Frequently Asked Questions - Grind & Infuse Pro Solis
User questions about Grind & Infuse Pro Solis
0 question about this device. Answer the ones you know or ask your own.
Ask a new question about this device
Download the instructions for your Coffee machine in PDF format for free! Find your manual Grind & Infuse Pro - Solis and take your electronic device back in hand. On this page are published all the documents necessary for the use of your device. Grind & Infuse Pro by Solis.
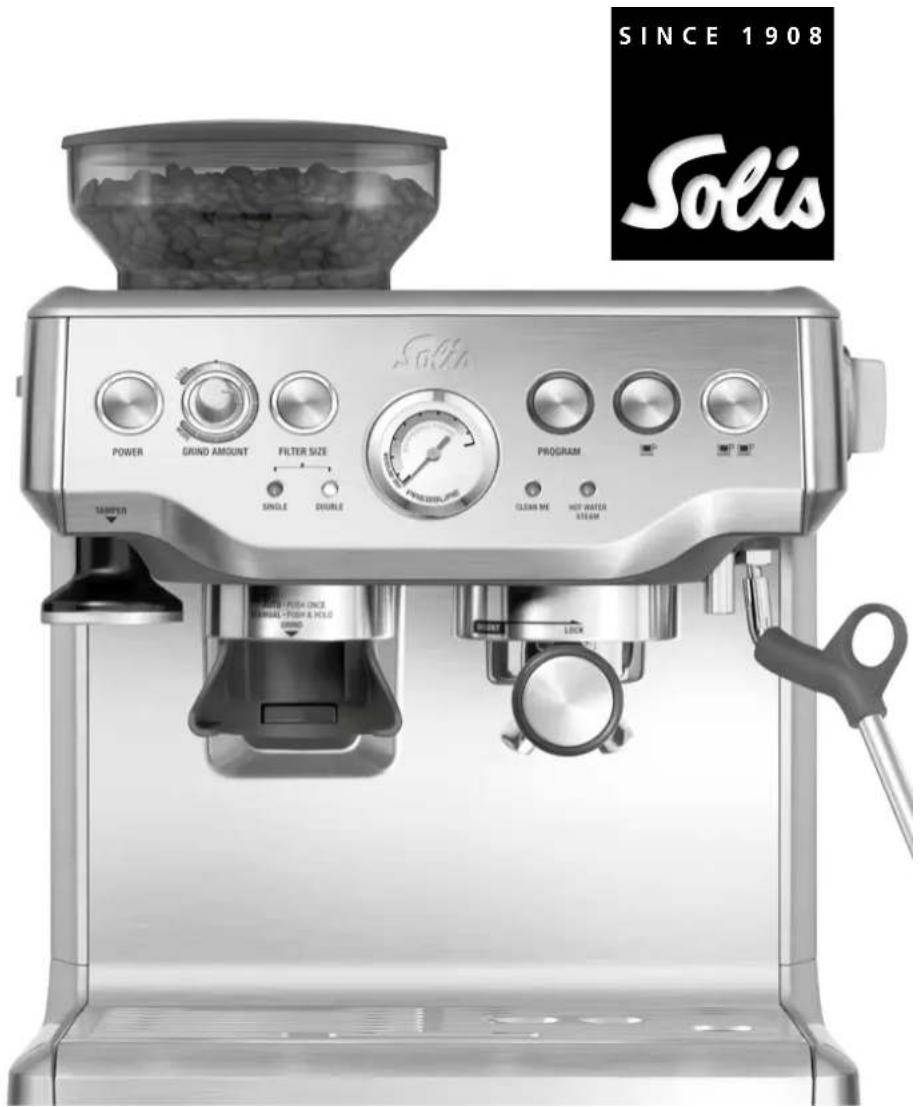
USER MANUAL Grind & Infuse Pro Solis
Programmable Espresso Machine with Grinder
INHALT TEIL 1

MERKMALE IHRER SOLIS GRIND & INFUSE PRO ESPRESSOMASCHINE
VOM MAHLWERK DIREKT IN DEN SIEBTRÄGER

EINWANDIGE FILTER FÜR PERFEKTEN KAFFEEGENUSS
ENERGIESPARFUNKTIONEN



GRIND & INFUSE PRO
DIE SOLIS GRIND & INFUSE PRO ESPRESSOMASCHINE
INHALT TEIL 2
Bedienung
reinigen

Milch einschenken
Espresso zu schwach?
Nicht heiss genug?
SCHRITT 1 - MILCH ZIEHEN

2 Tassen1 Tasse
RICHTIGES ANPRESSEN
Düse entfernen Düse

GEHÄUSE UND TASSENABLAGE REINIGEN
REINIGEN DER ABLAGESCHALE


KAFFEESORTEN
KLASSISCHER CAFFÈ LATTE


KAFFEESORTEN
CAFFÉ MOCHA


REZEPTVORSCHLÄGE
DESSERTS
D
REZEPTVORSCHLÄGE
DESSERTS
VANILLEPUDDING MIT FRISCHEN HIMBEEREN UND ESPRESSO
Für 6 Personen
750 ml Rahm
3/4 Tasse Zucker
Solis of Switzerland AG
GRIND & INFUSE PRO
Type 115

CHEZ SOLIS, LA SECURITE PASSE AVANT TOUT


CARACTERISTIQUES DE VOTRE MACHINE A ESPRESSO SOLIS GRIND & INFUSE PRO
DU MOULIN DIRECTEMENT DANS LE PORTE-FILTRE
CARACTERISTIQUES DE VOTRE MACHINE A ESPRESSO SOLIS GRIND & INFUSE PRO
FONCTION EAU CHAUDE
FILTRE A PAROI SIMPLE – POUR UN AROME DE CAFE PARFAIT
FONCTIONS D'ECONOMIE D'ENERGIE
PRESSE-MOUTURE INTEGRE / AMOVIBLE
RESERVOIR D'EAU DE 2 LITRES AMOVIBLE
AVANT LA PREMIERE UTILISATION
INSTALLATION DE VOTRE MACHINE A ESPRESSO SOLIS GRIND & INFUSE PRO
ETAPE 1


INSTALLATION DE VOTRE MACHINE A ESPRESSO SOLIS GRIND & INFUSE PRO
ETAPE 4

GRIND & INFUSE PRO
LA MACHINE A ESPRESSO SOLIS GRIND & INFUSE PRO
Servir le lait
PREPARATION DE L'ESPRESSO : NOTICE SUCCINCTE
6
Recherche d'erreurs

Pas assez chaud?
ETAPE 2 - PRECHAUFFAGE DES TASSES
ETAPE 4 - MOUTURE DU CAFE

PROGRAMMATION PERSONNALISEE D'UN ESPRESSO DOUBLE
INDICATION:
ETAPE 1 - AERER LE LAIT

2 tasses1 tasse
TASSEMENT APPROPRIE

NETTOYAGE DU BOITIER ET DE LA PLAQUE RECHAUFFE-TASSES
NETTOYAGE DU TIROIR DE RANGEMENT
116


SORTES DE CAFE
CAFFE LATTE CLASSIQUE

SORTES DE CAFE
CAFFE MOCHA
118


PROPOSITIONS DE RECETTES
DESSERTS
F
PROPOSITIONS DE RECETTES
DESSERTS
PUDDING A LA VANILLE, AUX FRAMBOISES FRAICHES ET A L'ESPRESSO
Pour 6 personnes
750 ml de crème
Solis of Switzerland SA
Solis-Haus • CH-8152 Glattbrugg-Zurich • Suisse
Programmable Espresso Machine with Grinder


CONTENTS PART 1
Congratulations on the purchase of your new Solis Grind & Infuse Pro Espresso Machine.
Getting to Know your Machine
Solis Recommends Safety First Page 129
Features of your Solis Grind & Infuse Pro Espresso Machine ......Page 131
Know your Solis Grind & Infuse Pro Espresso Machine ......Page 136
Before First Use ......Page 139
Assembling your Solis Grind & Infuse Pro Espresso Machine ......Page 140
INTRODUCING THE SOLIS GRIND & INFUSE PRO ESPRESSO MACHINE
Freshly ground coffee is one of the four most important factors in the preparation of coffee. This attribute is often referred to as one of the «four hands» in espresso preparation. The others are the grinder, the espresso machine and the barista.
While the degree and the selection of roast is a personal preference, correctly roasted and rested coffee beans produce espresso with much more taste, flavour and body than coffee that is pre-ground.
Pre-ground coffee deteriorates rapidly and over time produces thin flat coffee that has a light and small amount of crema.
Jason Chan Melbourne Barista of the Year 2005
With this in mind the Solis Grind & Infuse Pro Espresso Machine was developed with an integrated, dosing grinder. By using only the required amount of coffee, instantly after being ground, the Solis Grind & Infuse Pro Espresso Machine ensures all grounds are fresh, for a richer, full espresso.

SOLIS RECOMMENDS SAFETY FIRST
At Solis we are very safety conscious. We design and manufacture consumer products with the safety of you, our valued customer foremost in mind. In addition we ask that you exercise a degree of care when using any electrical appliance and adhere to the following precautions:
IMPORTANT SAFEGUARDS FOR YOUR SOLIS GRIND & INFUSE PRO ESPRESSO MACHINE
- Carefully read all instructions before operating and save for future reference.
- Remove safely discard any packaging material and promotional labels or stickers before using the Solis Grind & Infuse Pro Espresso Machine for the first time.
- Do not place the Solis Grind & Infuse Pro Espresso Machine near the edge of a bench or table during operation. Ensure the surface is level, clean and free of water and other substances.
- Do not use the Solis Grind & Infuse Pro Espresso Machine on a sink drain board.
- Do not place the Solis Grind & Infuse Pro Espresso Machine on or near a hot gas or electric burner, or where it could touch a heated oven.
- Always ensure the Solis Grind & Infuse Pro Espresso Machine is properly assembled before connecting to power outlet and operating. Follow the instructions provided in this book.
-
The appliance is not intended to be operated by means of an external timer or separate remote control system.
-
Only use the accessories delivered with the Solis Grind & Infuse Pro Espresso Machine or recommended by Solis.
- Do not attempt to operate the Solis Grind & Infuse Pro Espresso Machine by any method other than those described in this book.
- Do not operate the grinder without the hopper lid in position. Keep fingers, hands, hair, clothing and utensils away from the hopper during operation.
- Use only cold, tap water in the water tank. Do no use any other liquid.
- Never use the Solis Grind & Infuse Pro Espresso Machine without water in the water tank.
- Ensure the portafilter is firmly inserted and secured into the brewing head before using the machine.
- Never remove the portafilter during the brewing operation as the machine is under pressure.
-
Do not move the Solis Grind & Infuse Pro Espresso Machine whilst in operation.
-
Do not leave the Solis Grind & Infuse Pro Espresso Machine unattended when in use.
- Do not touch hot surfaces. Allow the Solis Grind & Infuse Pro Espresso Machine to cool down before moving or cleaning any parts.
- Do not place anything, other than cups for warming, on top of the Solis Grind & Infuse Pro Espresso Machine.
- Always switch off the Solis Grind & Infuse Pro Espresso Machine by pressing the POWER button to «Off» and unplug if appliance is to be left unattended, if not in use, before cleaning, before attempting to move the appliance, disassembling, assembling and when storing the appliance.
- Keep the appliance and accessories clean. Follow the cleaning instructions provided in this book.
SOLIS RECOMMENDS SAFETY FIRST
IMPORTANT SAFEGUARDS FOR ALL ELECTRICAL APPLIANCES
- Unwind the power cord fully before use.
- Do not let the power cord hang over the edge of a bench or table, touch hot surfaces, or become knotted.
- To protect against electric shock do not immerse power cord, power plug or appliance in water or any other substance.
- This appliance shall not be used by children. Keep the appliance and its cord out of reach of children.
- Appliances can be used by persons with reduced physical, sensory or mental capabilities or lack of experience and knowledge if they have been given supervision or instruction concerning use of the appliance in a safe way and if they understand the hazards involved.
• Children should be supervised to ensure they do not play with the appliance. -
Cleaning of the appliance must not be done by children.
-
It is recommended to regularly inspect the appliance. Do not use the appliance if power cord, power plug or appliance becomes damaged in anyway. Return the entire appliance to the nearest authorised Solis Service Centre for examination and/or repair.
- Any maintenance other than cleaning should be performed at an authorised Solis Service Centre.
- This appliance is recommended for household use only. Do not use this appliance for anything other than its intended use. Do not use in moving vehicles or boats. Do not use outdoors. Misuse may cause injury.
- The installation of a residual current device (safety switch) is recommended to provide additional safety protection when using electrical appliances. It is advisable that a safety switch with a rated residual operating current not exceeding 30 mA be installed in the electrical circuit supplying the appliance. See your electrician for professional advice.
This item is intended for domestic use only, not for commercial applications.
WARNING: UNWIND THE CORD FULLY BEFORE USE.
FEATURES OF YOUR SOLIS GRIND & INFUSE PRO ESPRESSO MACHINE
INTEGRATED CONICAL BURR GRINDER
The integrated conical burr grinder allows each espresso to be created using freshly ground beans – the key to achieving your ideal espresso.
The grinder has been specially designed to combine with the other key features of the Grind & Infuse Pro Espresso Machine.
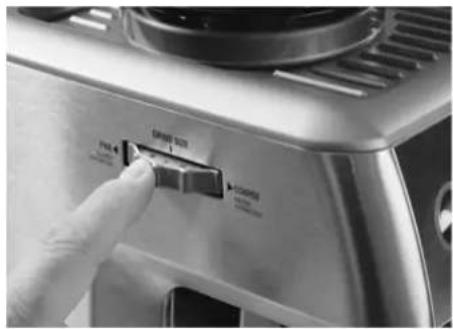
ADJUSTABLE GRIND SIZE
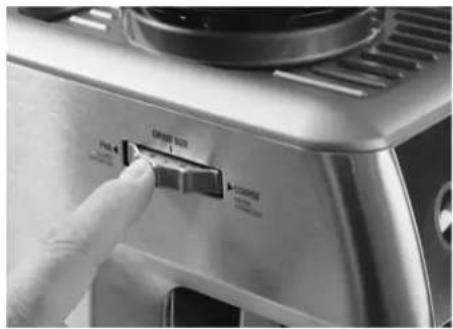
The grind size can be set more or less coarse/ fine in 18 steps using the GRIND SIZE selector to allow maximal coffee enjoyment.
The GRIND SIZE selector adjusts the grinding burrs to either move closer together for a finer grind or further apart for a coarser grind.
For further information, please refer to the section „ESPRESSO MAKING: STEP BY STEP“ on page 152.
PRE-SET GRIND AMOUNT FOR ONE OR TWO CUPS AND FINE TUNING
The „FILTER SIZE“ function will automatically grind the amount of coffee required for one or two cups. Depending on the grind size of the ground coffee, the GRIND AMOUNT dial can be used for finer adjustment. This allows you to easily increase or decrease the dose for one or two cups, according to your personal taste.
For further information, please refer to the section „ESPRESSO MAKING: STEP BY STEP“ on page 152.


FEATURES OF YOUR SOLIS GRIND & INFUSE PRO ESPRESSO MACHINE
HANDS FREE, DIRECT GRINDING TO PORTAFILTER
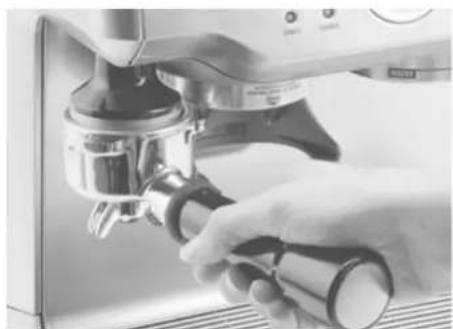
The Grind & Infuse Pro Espresso Machine features an integrated grinding cradle which fully supports the portafilter located below the integrated conical burr grinder. The «hands free» grinding feature allows you to continue with other preparations while the portafilter is being evenly filled with the selected amount of freshly ground coffee.
An integrated micro switch allows the start and stop of the grind function with a simple push on the portafilter.
Place the portafilter into the cradle and simply push the portafilter toward the machine lightly to activate the grind function.
TAMPER «ON BOARD»
The «on board» tamper assists the user to evenly and accurately tamp freshly ground coffee into the filter basket. The tamper is conveniently located «on board» the machine and can be used both in the «on board» position or whilst removed and used manually depending on your preference.
MEASURING INSTRUMENT
With the included measuring instrument „Razor“, measuring is simplified and you can quickly skim spare ground coffee off the edge of the portafilter.


Portafilter inserted into grinding cradle Tamper on board Tamper on its own
FEATURES OF YOUR SOLIS GRIND & INFUSE PRO ESPRESSO MACHINE
1700 WATTS OF POWER
Thanks to the 1700 Watts of power, your appliance can heat up extremely quickly and produces high pressure steam for ideal milk texturing.
ACCURATE TEMPERATURE CONTROL
Solis digital technology provides accurate temperature control for a full flavoured espresso.
AUTO PURGE FUNCTION
The water temperature will be optimally set for preparing coffee after the steam function for frothing milk is used.
MANUALLY ADJUSTING BREWING TEMPERATURE
You can increase or decrease the standard setting by up to 2 °C to individually set the brewing temperature, depending on coffee variant and roast.
DRY PUCK FEATURE
The «Dry Puck» feature uses an electronic valve to remove excess water from the ground coffee in the filter basket. This takes place after espresso extraction, whilst the portafilter is locked into the group head. This results in a desirable «dry coffee puck» which can then be disposed of easily and cleanly.
PROGRAMMABLE FUNCTION
This espresso machine offers a convenient choice between the manual operation or the intelligent programmable function that can be personalised with the user's favourite espresso setting.
LOW-PRESSURE PRE-BREWING FUNCTION FOR OPTIMAL AROMA DEVELOPMENT
Before brewing, the ground coffee is gently dampened and slightly swells up. This ensures that the ground coffee is evenly extracted afterwards.

FEATURES OF YOUR SOLIS GRIND & INFUSE PRO ESPRESSO MACHINE
ESPRESSO PRESSURE GAUGE
The espresso pressure gauge assists in obtaining the most favourable extraction pressure. This is achieved by measuring the pressure at which the water is being forced through the ground coffee in the portafilter.
IDEAL EXTRACTION RANGE
The gauge needle, when positioned within the espresso range during pouring, indicates that the espresso will be produced at the ideal pressure. The brewed espresso should have a generous layer of fine textured and evenly coloured, golden crema.
UNDER EXTRACTED ZONE
The gauge needle when positioned within the lower zone during pouring indicates that the espresso will be produced with insufficient pressure resulting in an «under extracted» espresso. This occurs when the water flow through the ground coffee in the filter is too fast. As a result the optimal flavour will not be extracted and the coffee will be watery and lack thick crema on the top. Possible other causes for under extraction are: coffee grind is too coarse and/or insufficient coffee in filter and/or under tamping.
OVER EXTRACTED ZONE
The gauge needle when positioned within the upper zone during pouring will indicate that the espresso will be produced with too much pressure resulting in an «over extracted» espresso. This occurs when the water flow through the ground coffee in the filter is too slow. As a result the coffee will be very dark and bitter, with a mottled and uneven crema on top. Possible other causes for over extraction are: ground coffee is too fine and/or too much ground coffee in filter and/or over tamping.


FEATURES OF YOUR SOLIS GRIND & INFUSE PRO ESPRESSO MACHINE
HOT WATER FUNCTION
Thanks to the hot water function, you can dilute coffee, prepare tea or hot drinks and warm up cups and filters.
The stainless swivel steam wand can be easily moved to the right position for texturing milk. The wand has a commercial style 360° ball joint.

SINGLE WALL FILTERS FOR PERFECT COFFEE ENJOYMENT
The single wall filter baskets of the Grind & Infuse Pro are ideal for freshly ground coffee, as the water flows through at just the right speed.
Thanks to these single wall filter baskets, you can experiment with grind size, grind amount and tamp force and thus influence your coffee's taste to create the optimal espresso for yourself.

ENERGY SAVING FEATURES
The Grind & Infuse Pro Espresso Machine will enter the «Power Save Mode» if not used for approx. 10 minutes, and will automatically switch off if not used for a further 10 minutes. The «Power Save Mode» uses 50% less power than when the machine is in «Stand by» Mode.
During «Power Save Mode» only the POWER button surround will flash slowly. All other button light surrounds will not be illuminated.
To re-activate the machine during «Power Save Mode» simply press any button except POWER. The POWER button surround will then illuminate and flash while the machine quickly reheats to operational temperature. When the correct temperature has been reached, all the button surrounds on the control panel will illuminate.
To switch off the espresso machine whilst it is in «Power Save Mode», simply press the POWER button once.
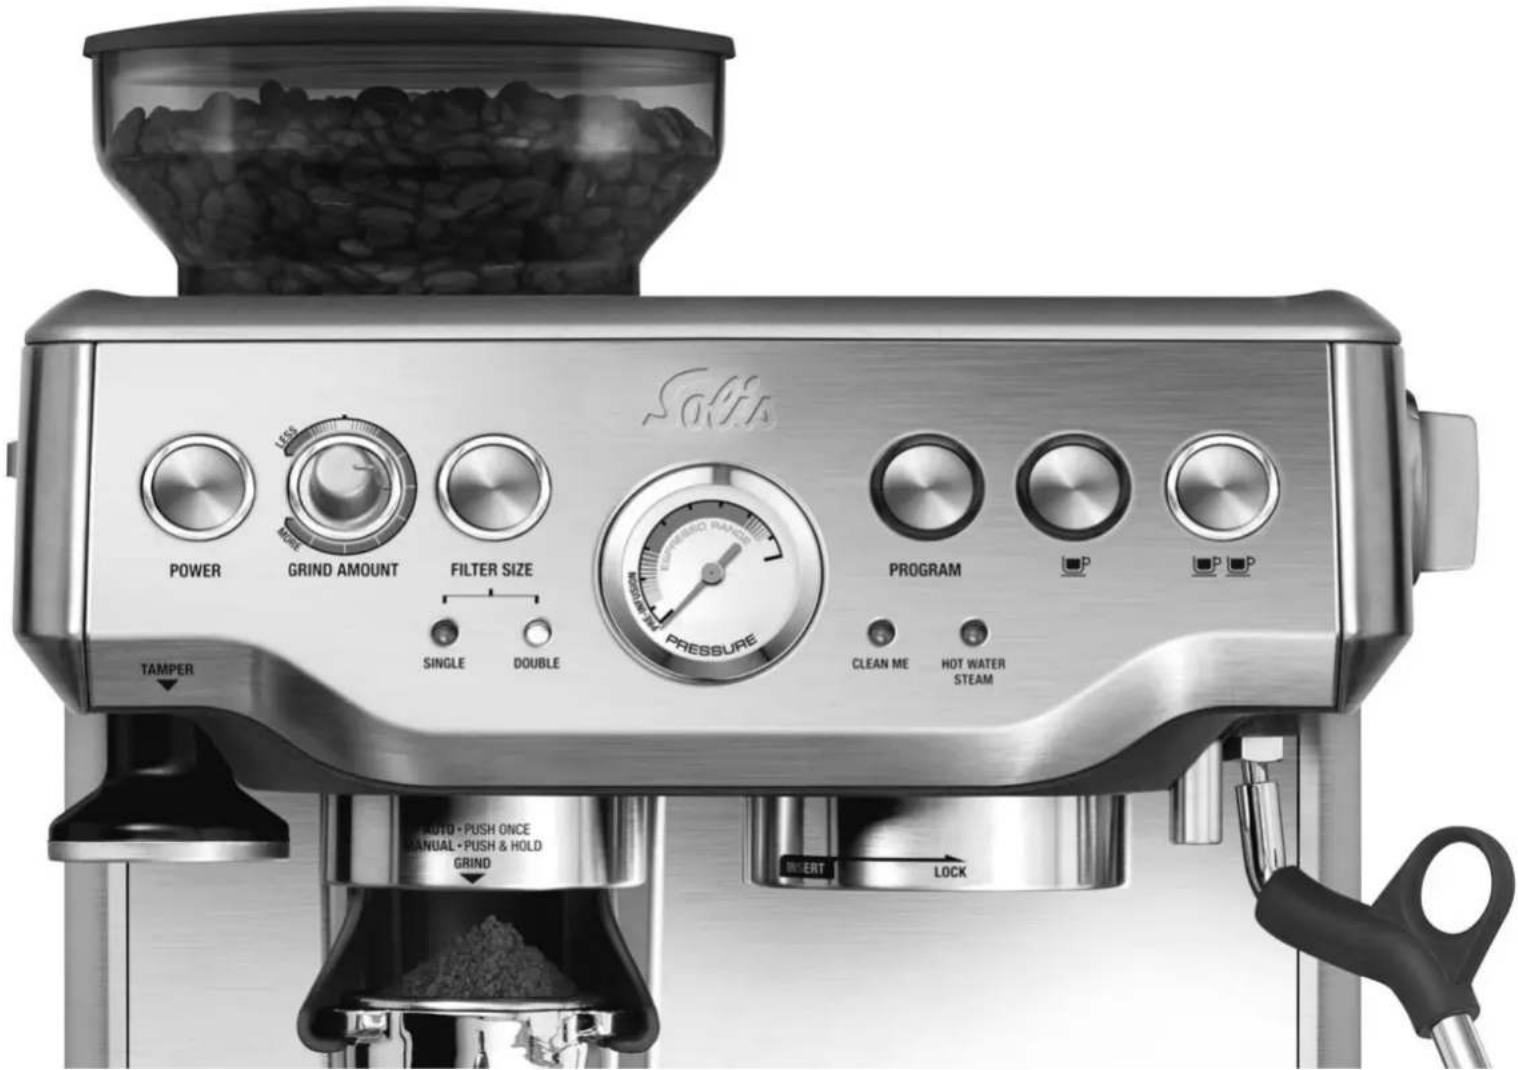
KNOW YOUR SOLIS GRIND & INFUSE PRO ESPRESSO MACHINE
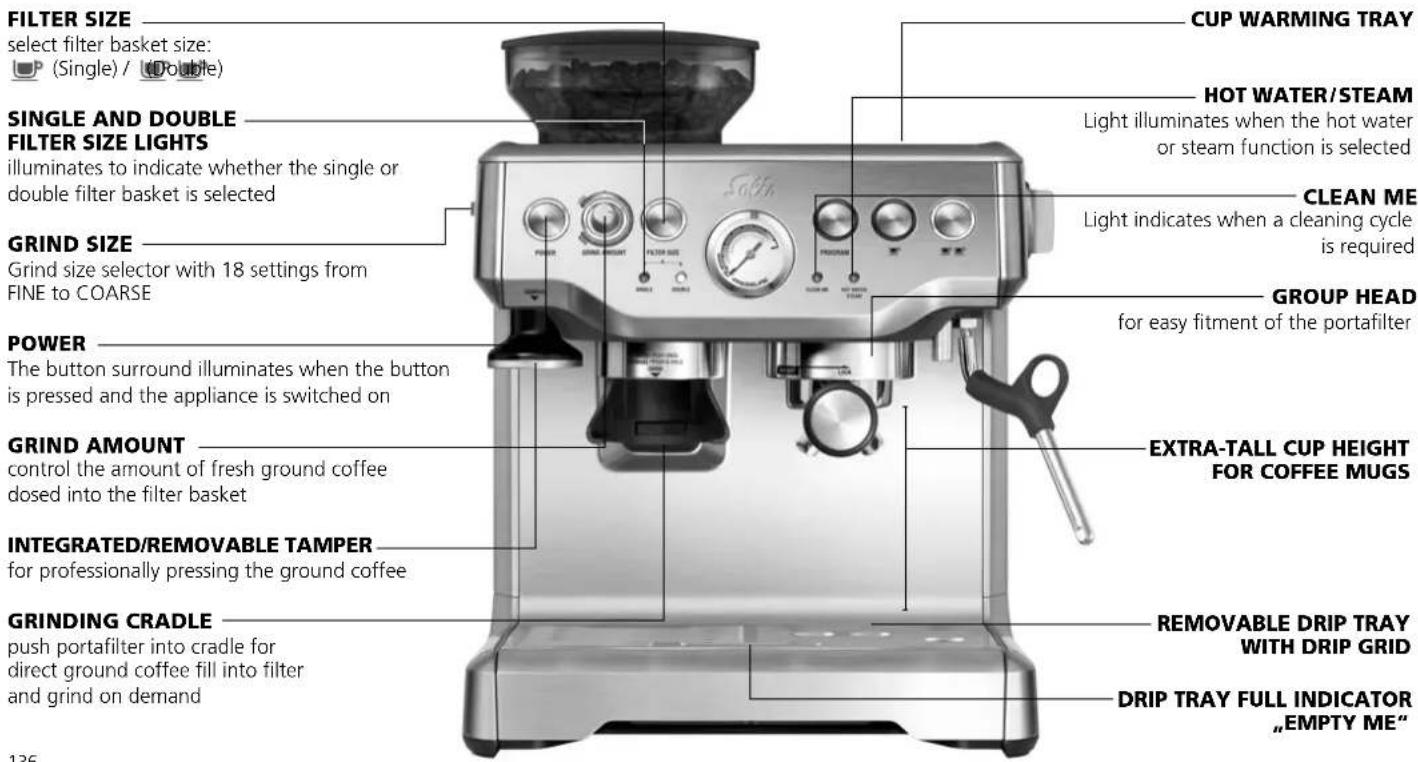
KNOW YOUR SOLIS GRIND & INFUSE PRO ESPRESSO MACHINE
REMOVABLE 2 LITRE WATER TANK
filled from the top of the water tank
BEAN HOPPER: 250 g CAPACITY
Hopper locking system allows removal of hopper without removing beans
INTEGRATED CONICAL
BURR GRINDER
adjustable to achieve your perfect grind
GRIND BUTTON
Micro switch for automatic or manual measuring; portafilter-operated
Accessories:
Stainless steel frothing jug, 480 ml
Measuring instrument „Razor“
Filter basket for 1 resp. 2 cups
Short manual
Cleaning accessories:
Cleaning tool/brush
Allen key
Rubber cover
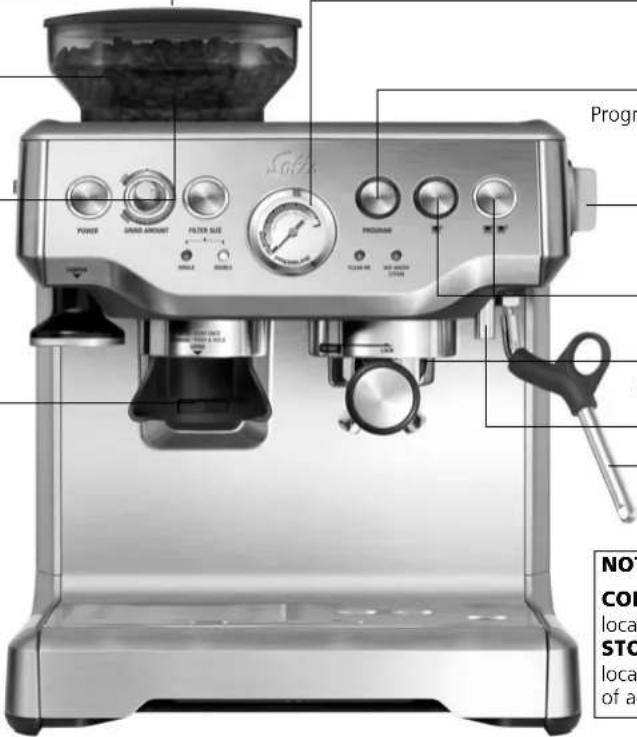
ESPRESSO RANGE GAUGE
monitors extraction pressure, guiding you towards the ideal espresso
PROGRAM
Programmable function for saving individual
espresso amounts and brewing
temperature settings
HOT WATER/STEAM
Selector for steam production
resp. the hot water function
PROGRAMMABLE FEATURE
Release of 1 cup or 2 cups
FORGED PORTAFILTER
commercial style with extended outlets
HOT WATER OUTLET
SWIVEL STEAM WAND
easily adjusts to perfect positioning
forsteaming and frothing milk
NOT SHOWN
CORD STORAGE
located under the water tank
STORAGE TRAY
located behind the drip tray for storage of accessories
KNOW YOUR SOLIS GRIND & INFUSE PRO ESPRESSO MACHINE
ADDITIONAL FEATURES
15 bar pump
Italian-designed and made
Accurate temperature control
Solis digital technology provides accurate temperature control for a full flavoured espresso
Thermocoil heating system with integrated stainless steel water coil
ensures accurately controlled water temperature
Pre-brew function
for optimal extraction and distribution of water through the coffee puck
Auto purge function
for optimal coffee extraction temperature
Control dry puck feature
removes excess water from the filter basket after coffee extraction
Flat shower head
for even distribution of water through the coffee puck

BEFORE FIRST USE
Your Solis Grind & Infuse Pro Espresso Machine has the drip tray, water tank and storage tray in place when you unpack it from the box. The drip tray is located in the base, towards the front of the machine. The water tank is located in the back of the machine. The storage tray is located at the base of the machine behind the drip tray. The drip tray, water tank and storage tray slide in and out for easy access.
Ensure you have removed all parts and accessories before discarding the packaging.
Remove the water tank and wash in warm, soapy water using a non-abrasive washing liquid. Rinse and dry thoroughly.
Wipe the outer housing, bean hopper and drip tray with a soft damp cloth and dry thoroughly. Do not immerse the outer housing, power cord or power plug in water or any other liquid.
NOTE:
Do not clean any of the parts or accessories in the dishwasher.

ASSEMBLING YOUR SOLIS GRIND & INFUSE PRO ESPRESSO MACHINE
STEP 1
Place the storage tray in the base of the machine and slide it to the back. The storage tray conveniently stores the cleaning tool, cleaning brush, allen key, rubber cover, stainless steel filters and short manual so that they are at hand when needed.
STEP 2
Insert the «Empty Me!» full indicator into the drip tray and place the drip tray cover on top. Then place grill on top. Slide the drip tray into position in the base of the machine in front of the storage tray.
STEP 3
Insert the empty water tank and push to lock into place.

140


ASSEMBLING YOUR SOLIS GRIND & INFUSE PRO ESPRESSO MACHINE
STEP 4
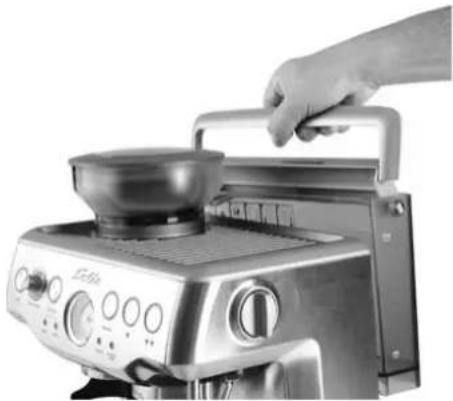
Insert the hopper into position and turn the hopper dial clockwise 90° to lock.
NOTE:
Before each use it is recommended to complete a water flushing operation, without ground coffee, to ensure that the machine has been preheated. Refer to section "ESPRESSO MAKING: STEP BY STEP" on page 150.

GRIND & INFUSE PRO
Programmable Espresso Machine with Grinder

Using your machine

INTRODUCING THE SOLIS GRIND & INFUSE PRO ESPRESSO MACHINE
At Solis, we know that coffee lovers will go to great lengths to refine the art of making coffee. They will experiment with flavours and adjust the grind of the beans and the tamp in search for the perfect espresso. And now with the Grind & Infuse Pro Espresso Machine and its integrated coffee grinder, making that perfect fresh espresso has never been simpler.
Why is freshly ground coffee best? It's all about the flavour. Once ground, coffee remains fresh for only a few short minutes and is therefore best to grind just before extracting. With the Grind & Infuse Pro Espresso Machine you can be the barista and explore the art of espresso at home.
Enjoy!
CONTENTS PART 2
Operation
Espresso Making: Quick Guide Page 146
Espresso Making: Step by Step ......Page 150
The Art of Texturing Milk Page 158
Hot Water Function ...... Page 160
Manually Adjusting the Brewing Temperature Page 160
Coffee Making Tips......Page 162
Care and Cleaning Page 165
Storage Page 171
Trouble Shooting Guide Page 173
Technical Specifications/Coffee and Supplies Page 177
Coffees to Try Page 178
Recipes Page 181
Please refer to pages 129 and 130 for safety precautions.
ESPRESSO MAKING: QUICK GUIDE
1 Before First Use
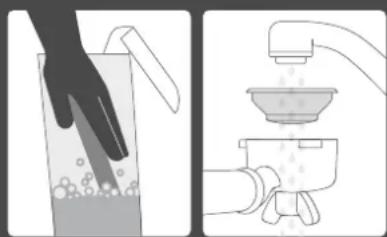
Wash water tank Place hopperWash portafilter & filters
2
Install Bean
Hopper


Lock hopper Fill hopper with beans
3
Check Before
Each Use
Preparing
the appliance

Beans in hopper?

Water in tank?

Power on
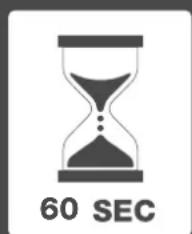
Heat up

Run water through group head to flush machine
ESPRESSO MAKING: QUICK GUIDE

![graph LR A["Tamp grinds to line Remove excess coffee with "Razor""] --> B["Insert portafilter Place 1 cup to extract 1 shot of espresso and press"] B --> C["Place 2 cups to extract 2 shots of espresso and press"]](/content/2026/06/1270546/images/41d5ed3a52b29660d27127010940d29f21cf118be821b57ea4f4fb04643ca2bc.jpg)
ESPRESSO MAKING: QUICK GUIDE
5
Frothing Milk

Fill jug ½ way Max

Insert steam wand
to 3 o'clock position
inside jug

Switch steam on Stop Sphiemmilk Switch steam off


jug are hot

Run steam to clear milk from wand after texturing

Wipe steam wand after each use with a damp cloth

Pour carefully
ESPRESSO MAKING: QUICK GUIDE
6
Trouble Shooting

Espresso too weak?
If your espresso is too weak, try the 2 cup filter to extract a single cup

Not hot enough?
Try heating the cups (with hot water function) and porta-filter first, or heat the milk longer
ESPRESSO MAKING: STEP BY STEP
A great coffee is a balance of main flavour elements: Acidity, aroma, bitterness, body, nuttiness, and sharpness. The single wall filters for this espresso machine give you the opportunity to experiment with adjusting grind, grind amount and tamp to extract a rich variety of flavours.
| GRIND + AMOUNT + TAMP = FLOW | ||||
| Over Extracted Bitter Too fine Too Astringent | Too much Too heavy | More than 40 sec. | ||
| Balanced Optima | 10 g 1 cup | 15-20 kg 25-35 sec. | ||
| 18g 2 cups | ||||
| Under extracted Weak/Watery | Too coarse | Too little | Too light | Less than 20 sec. |
STEP 1 - FILLING THE WATER TANK
- Fill the water tank with cold, tap water to the maximum mark on the side of the tank and slide the water tank carefully back into position at the back of the machine.
- Plug the power cord into a 230/240 V power outlet.
- Press the POWER button to «ON», the POWER button surround will flash while the machine is heating. When the correct temperature has been reached, all the button surrounds on the control panel will illuminate.
STEP 2 - PRE-WARMING THE CUPS
This will help maintain the coffee's optimal temperature when brewed into the cups.
- The cup warming plate will start to warm as the machine heats.
- Use the hot water function to fill the cups with hot water, wait for a while, empty out the water and dry the cups.
- Place the cups on the warming tray.
NOTE:
In order to brew the coffee at the ideal temperature we recommend running a complete cycle without ground coffee. This will ensure that all the main internal components are optimally preheated.
NOTE:
Check the water level before use and replace the water daily. The water tank should be refilled with fresh, cold tap water before each use. Do not use mineral or distilled water or any other liquid.
ESPRESSO MAKING: STEP BY STEP
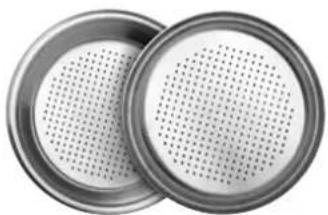
STEP 3 - PREPARING THE FILTER BASKETS
- Place the filter basket in the portafilter (use the smaller filter for 1 cup and the bigger one for 2 cups). Should you wish to brew a whole mug of coffee, always use the filter basket for 2 cups and let 60 ml of water run through. Should you wish to use more water, use the hot water function to fill the cup with hot water and then add the coffee.
- Preheat the filter basket and the portafilter, either by placing both items under the hot water outlet and pouring hot water over them with the hot water function or by inserting them (without coffee) into the group head and pressing the 📊 button. Thoroughly dry the portafilter and filter basket before using them.
STEP 4 - GRINDING THE COFFEE
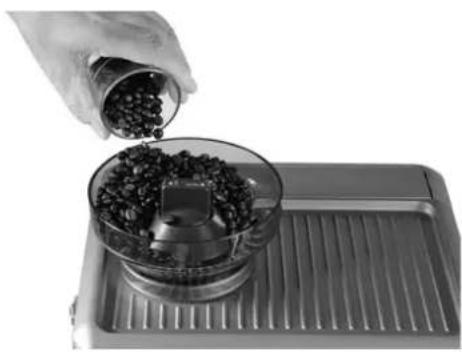
- Fill the hopper with fresh coffee beans.
- Press the FILTER SIZE button to select your desired grind amount (single or double).
- Place the portafilter into the grinding cradle.
• Automatic measuring: Push the portafilter once against the appliance and then release it. Once the grind button has been pushed, the ground coffee trickles into the portafilter. Wait for the automatic measurement to finish.
- Manual measuring: Press the portafilter against the appliance resp. the grind button until the desired amount of ground coffee is in the filter.
- Carefully pull the portafilter from the cradle to prevent coffee from falling out.
NOTE:
To interrupt the grinding process when measuring automatically, simply press the grind button again by pushing the portafilter against it for the second time or by pressing the FILTER SIZE button. To interrupt the grinding process when measuring manually, simply stop pressing the portafilter against the grind button. This will deactivate the micro button and stop the grinding process.
ESPRESSO MAKING: STEP BY STEP
STEP 5 - SET GRIND AMOUNT
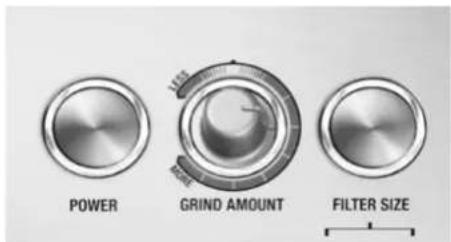
Turn the GRIND AMOUNT selector to the 3-o'clock-position and check if the coffee amount is to your taste.
To increase the grind amount, turn the GRIND AMOUNT selector clockwise in direction "MORE".
To decrease the grind amount, turn the GRIND AMOUNT selector counter-clockwisely in direction „LESS“.
STEP 6 - SETTING THE RIGHT GRIND

When setting the grind it should be fine but not too fine or powdery. The grind will effect the rate at which the water flows through the coffee in the filter and therefore the taste of the coffee.
You can choose from 18 settings. The lower the number, the finer the grind will be. In the setting "FINE", it is at its finest. The higher the number, the coarser the grind will be. In the setting "COARSE", it is at its coarsest. We recommend starting off at the setting "5" and, if need be,
adjusting the grind size depending on the type of coffee used and your personal taste.
If the grind is too fine (looks like powder and feels like flour when rubbed between fingers), the water will not flow through the coffee even when under pressure. The resulting coffee will be over extracted, too dark and bitter, with a mottled and uneven crema on top.
If the grind is too coarse the water will flow through the coffee too quickly. This will result in an under-extracted coffee lacking in flavour and without the thick crema on the top layer of coffee.
NOTE: You might have to change the setting a few times before you find the amount according to your taste by gently turning the GRIND AMOUNT selector.
IMPORTANT SAFETY NOTICE FOR SETTING THE GRIND SIZE:
Only adjust grind size while the grinder is running or if there are no beans in the hopper. The reason why: After grinding, partly ground beans might get stuck between the grinder discs. If the grinder discs are then moved to change the grind size, these beans might jam the grinder discs. This is why the fine adjustment should only be done while the grinder is running.
ESPRESSO MAKING: STEP BY STEP
For ease of use, there are two handy ways to tamper your coffee:
1. Tamper on board:
The tamper device is held in place, on the machine, allowing for convenient tamping.
a. Once the grind function has been completed, remove the portafilter from the grinding cradle and tap to collapse the grind.
b. With the tamper fitted into place, lift the portafilter towards the tamper base.
c. Push the portafilter upward firmly, applying even pressure to tamp the coffee.
2. With removed tamper:
The tamper device is removable for hand tamping.
a. Remove the tamper from the machine
b. Once the grind function has been completed, remove the portafilter from the grinding cradle and tap to collapse the grind.
c. Use one hand to grip the tamper and the other hand to hold the portafilter handle.
d. Apply even pressure down on the tamper and press firmly in order to level and pack the coffee grounds.
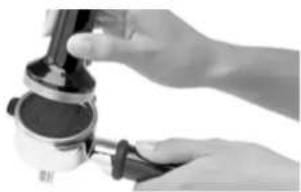

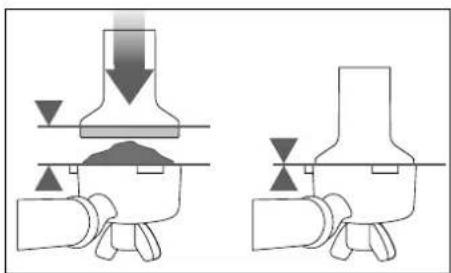
After pressing, the ground coffee should end just below the edge of the filter basket. When you press the tamper onto the portafilter, the metal part of the tamper should just so disappear in the filter basket.
After pressing, use the measuring instrument „Razor“ to remove excess coffee resp. coffee grounds leftovers from the edge of the portafilter, so that it can be properly installed into the group head. Refer to step 8 on the next page for more information.
Refer to «Coffee Making Tips», page 162.
ESPRESSO MAKING: STEP BY STEP
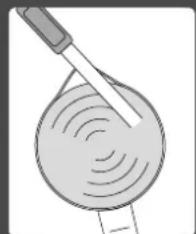
STEP 8 – REMOVING EXCESS GROUND COFFEE WITH THE MEASURING INSTRUMENT „RAZOR“
The specially designed measuring instrument „Razor” helps you remove excess ground coffee and clean the portafilter edge at the flick of a wrist.

Place the „Razor“ in the filter basket, the punched out corners of the instrument lie on the edge of the portafilter.
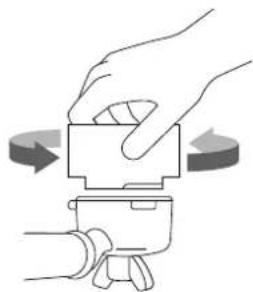
Turning the instrument to the left and right while holding the portafilter over the drain pan will remove excess ground coffee from the portafilter edge. The amount of ground coffee in the filter basket will be just right.
ESPRESSO MAKING: STEP BY STEP
STEP 9 - INSERTING THE PORTAFILTER

Place the portafilter underneath the group head so that the handle is aligned with the INSERT graphic.

Insert the portafilter up into the group head and rotate the handle to the right until resistance is felt, this will be at an approximate 90° angle to the machine.
STEP 10 - EXTRACTING THE ESPRESSO
- Ensure all the button surrounds on the control panel are illuminated, indicating the machine has reached the correct temperature for brewing, and is ready for use.
- Ensure the drip tray and portafilter are in place.
- Place one or two pre-warmed cups beneath the portafilter outlet.
NOTE TO PRE-BREWING FUNCTION:
After selecting one or two coffees with the corresponding button, the machine will briefly pump water with low pressure. After that, it will continue pumping water through the ground coffee in the portafilter with higher pressure. The ground coffee is moistened by a small amount of water before full extraction then expands resulting in greater pressure build-up to extract all the oils and full flavour from the ground coffee.
PRE-PROGRAMMED DOSE - ONE CUP

Press the one cup button once. A preset dose of approximately 30 ml will be delivered. A pumping noise will be heard in this operation. The machine will automatically stop once the preset pour has been delivered.
NOTE:
The amount of espresso extracted in the cup will vary depending on your grind and grind amounts.
NOTE:
When using a 1 cup filter, for optimal flavour, you should only extract approximately 30 ml. When using a 2 cup filter, for optimal flavour, you should only extract approximately 60 ml.
ESPRESSO MAKING: STEP BY STEP
PRE-PROGRAMMED DOSE - DOUBLE CUP

Press the two cup button once. A preset dose of approx. 60 ml will be delivered. A pumping noise will be heard in this operation. The machine will automatically stop once the preset pour has been delivered.
NOTE: Pressing the or buttons while brewing will immediately stop the water flow.
INDIVIDUALLY PROGRAMMING A SINGLE ESPRESSO
- Prepare to make a single cup of espresso by following steps 2 to 10 in «STEP BY STEP» on pages 150-155.
- Place your cup underneath the group head.
- To begin programming, press the PROGRAM button once. The machine will beep once and the program button will begin to flash. This indicates the machine is in programming mode.
- Press the one cup button once. The machine will commence normal pour function, and the one cup button surround will begin to flash.
- When the desired amount of espresso has poured into the cup, press the one cup button to stop the pour. The machine will beep twice, indicating it has saved your measured pour quantity and exited programming mode.
INDIVIDUALLY PROGRAMMING A DOUBLE ESPRESSO
- Prepare to make a double cup of espresso by following steps 2 to 10 in «STEP BY STEP» on pages 150–155.
- Place your cup underneath the group head.
- To begin programming, press the PROGRAM button once. The machine will beep once and the program button will begin to flash. This indicates the machine is in programming mode.
- Press the two cup button once. The machine will commence normal pour function, and the two cup button surround will begin to flash.
- When the desired amount of espresso has poured into the cup, press the two cup button to stop the pour. The machine will beep twice, indicating it has saved and exited programming mode.
ESPRESSO MAKING: STEP BY STEP
RESETTING DEFAULT VOLUMES
To reset the machine to the default one and two cup pour quantities, press and hold the PROGRAM button, until the machine beeps three times. Release button. This indicates the machine has returned to its original default settings.
MANUAL ESPRESSO
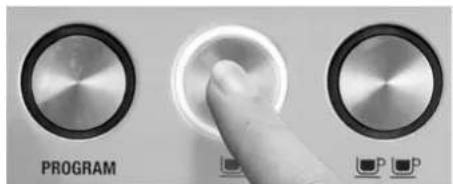
Press and hold the one cup 📋 two cup 🌐 🌐 🌐 button. Release the button once sufficient coffee has flowed into the cup.
STEP 11 - CLEANING THE PORTAFILTER
- Remove the portafilter from the group head by rotating the portafilter to the left until it releases.
- To empty the used coffee grounds, turn the portafilter upside down in a bin and gently knock out the coffee (used coffee grounds should be thrown away with domestic waste and not down the sink which may block drains).
- Rinse the portafilter with warm water until no coffee residues are visible.
• Dry both portafilter and filter basket.
NOTE:
Default settings: one cup pour is approximately 30 ml.
Two cups is approximately 60 ml.
NOTE:
When using the manual function refer to the espresso pressure gauge section on page 134 to ensure ideal extraction is obtained.
WARNING:
THE METAL PARTS OF THE
PORTAFILTER WILL BE VERY HOT.
THE ART OF TEXTURING MILK

The Solis Grind & Infuse Pro Espresso Machine is equipped with a professional swivel steam wand, allowing you to easily turn milk into creamy, steamed milk.
- Adjust the steam wand so that it is positioned above the drip grid.
- Fill the stainless steel frothing jug maximum 1/2 full with cold, fresh milk.
- Turn the dial to the position marked by the steam symbol. The white „HOT WATER/STEAM“ light will flash to indicate that the appliance is heating up to generate steam.
- When the steam light stops flashing it is ready to use.
- Before inserting the wand into the milk, pause the steam by returning the dial back to the STANDBY position. This will avoid splashing the milk out of the jug (this pause function lasts for 8 seconds before exiting steam mode).
- Dip the steam wand into the milk and return the dial to the position marked by the steam symbol.
- To stop if milk is hot, return the dial to the STANDBY position and remove the jug.

NOTE:
When the espresso machine creates steam, a pumping noise can be heard. This is the normal operation of the 15 bar pump.
NOTE:
After 5 minutes of continuous steaming, the machine will automatically disable the steam function. The steam light will flash. When this occurs return the steam dial to the «STANDBY» position.
WARNING:
TO PREVENT THE HOT MILK FROM SPLASHING AROUND, THE STEAM WAND HAS TO BE FULLY IMMERSED IN THE MILK OR END JUST ABOVE THE MILK'S SURFACE. PLEASE ENSURE THAT THE DIAL IS SET TO THE STANDBY-POSITION BEFORE THE MILK JUG IS REMOVED.
THE ART OF TEXTURING MILK
There are two phases to texture milk:
Stretching the milk to aerate it and swirling the milk to make it silky smooth and the right temperature. In practice these two operations should blend into one.

STEP 1 - STRETCHING THE MILK
Hold the jug so the tip of the steam wand is just below the surface of the milk and with your free hand engage the steam. Every so often lower the jug so the steam wand just breaks the surface of the milk and makes a «hissing» sound. Stretching the milk will increase the volume, so lower the jug as the milk rises to ensure the tip remains just above the surface of the milk.
STEP 2 - SWIRLING THE MILK
After a short while you will have aerated sufficiently. At this point, adjust the jug so the steam wand is off-centre and create a spinning motion in the milk. Compensate for the angle of the steam wand by slightly tilting the jug away from you, or to one side and at the same time lower the nozzle further into the body of the milk.
Continue swirling until milk is at desired temperature (between 55 °C and 65 °C). Without a thermometer you'll know the milk is ready when the jug base is «just too hot» to touch. When you get the balance right the milk should end up forming a «meringue-like» consistency that has a glassy sheen to it. Remove any excess air bubbles by gently knocking the jug against a hard flat surface and pour the milk down the inside of your chosen cup or glass to make your desired coffee.
Reactivate the steam blast to clean the steam wand from milk residues.
Lastly, don't forget to give your steam wand a good wipe down with a damp cloth.
NOTE:
If stretching makes a loud screeching sound, the chances are you have lowered the wand into the milk too early.
NOTE:
Using fresh, cold milk will deliver the best results. Clean the steam wand after every use. Refer to the section "Cleaning and maintenance" on page 164 for further directions.
NOTE:
For extracting more espresso immediately after using the steam function, this machine features an auto-purge function. This ensures the ground coffee will not be burnt by the initial water flow from the thermocoil being too hot. Instead this water is automatically released internally into the drip tray ensuring that the internal thermostat is at optimal temperature for extracting coffee. Your coffee will always be extracted at this optimal temperature ensuring only the best flavoured coffee is achieved.
HOT WATER FUNCTION MANUALLY ADJUSTING
THE BREWING TEMPERA- TURE

Should you require hot water to dilute the espresso, make tea, hot drinks or soups or warm cups, portafilter or filter basket, you can turn the dial to the position.
First, place the cup (or the portafilter resp. the filter basket) under the hot water outlet. The white control light HOT WATER/STEAM will begin to flash to indicate that the machine is heating up to generate hot water.
Once the control light permanently illuminates, the hot water function is ready. Water will flow out of the hot water outlet. If you want to stop the hot water flow, return the dial to the standby position in the middle.

You can manually reduce or increase the water temperature for brewing coffee by 1 °C or 2 °C. Depending on their origin or their roast, coffee beans might require different brewing temperatures to unfold their optimal aroma. Should your espresso taste slightly „ashy“, you can reduce the brewing temperature by 1 °C, should your espresso seem slightly „sour“, you can increase the brewing temperature by 1 °C.
How to change brewing temperature:
- If your appliance is deactivated and in OFF-mode, press and hold the PROGRAM button. Then, simultaneously press and hold the POWER button.
- A single, acoustic signal will sound to indicate that the temperature setting can now be changed.

PROGRAMPOWER
The setting the appliance is currently in will illuminate. Before changing the brewing temperature, PROGRAM will illuminate.
Specifically, the light indicators describe the following settings:
| Indicator light | Description |
| Standard setting | |
| +1°C* | |
| +2°C* | |
| -1°C* | |
| -2°C* |
Pressing one of the following buttons will change the setting according to the list. You can make adjustments between -2°C and +2°C or return to the standard setting. However, you have to press the button within 5 seconds once you are in changing mode.
* based on the standard setting
- Please note: If no button is pressed within the first 5 seconds of changing mode, the appliance will return to standby mode, the brewing temperature will not be changed and you will have to start over again.
- If you have made your adjustment and the desired light indicator illuminates, an acoustic signal will sound twice and your setting will be saved.
• After that, your appliance will return to standby mode.
To return to the standard setting: Press the PROGRAM button.

To increase brewing temperature by +1°C: Press the button for one cup 📁

To increase brewing temperature by +2°C: Press the button for two cups 📄

To reduce brewing temperature by -1°C: Press the FILTER SIZE button.

To reduce brewing temperature by -2°C: Press the POWER button.

COFFEE MAKING TIPS
WARMING YOUR CUP OR GLASS
A warm cup will guarantee that the coffee keeps it's optimal temperature. Place the cup under the hot water outlet and turn the dial for steam/hot water to the hot water function
Let hot water pour into the cup. Wait for a moment before emptying and drying the cup. Place the pre-warmed cup on the tray.
PRE WARMING PORTAFILTER AND FILTER BASKET
A cold portafilter and filter basket can lower the temperature so much during preparation that the coffee quality is impaired. Therefore, always make sure that the portafilter and filter basket are pre-warmed by a run-through of hot water before preparing coffee. Alternatively, you can use the hot water function to do this.
NOTE:
Always rub the filter basket and portafilter dry before beginning with the preparation of the coffee. Excess moisture might lead to the water being led past the ground coffee.
THE RIGHT FILTER BASKET
The single wall filter baskets of the Solis Grind & Infuse Pro are perfectly suited to freshly ground coffee. Experiment with the GRIND SIZE (see page 152) and the GRIND AMOUNT (see page 152) resp. the tamping pressure to create the coffee you enjoy most. Always use the correct filter size for 1 cup or 2 cups.
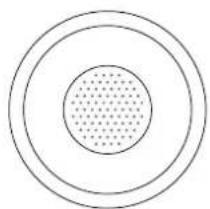

2 cups1 cup
TAMPING CORRECTLY
Level the desired amount of coffee by gently tapping the side of the portafilter before pressing down firmly with the tamper. Please refer to the directions given on page 153. When packing for a double espresso it is important only to tamp after the second measure. Tamping between measures will create a layer in the coffee that can impede full extraction.


REMOVING COFFEE RESIDUES
Use the measuring instrument „Razor“ to remove excess ground coffee and clean the porta-filter edge. Please refer to the directions given on page 154.
NOTE
Make sure to wipe off any excess coffee from the rim of the filter to ensure a proper seal is achieved under the group head.
COFFEE MAKING TIPS
PURGE THE GROUP HEAD
Before inserting the portafilter, run some water through the group head. It will ensure that your machine has a last minute «clean through» and stabilises the temperature prior to extracting.
BREWING YOUR ESPRESSO
The most common mistake in brewing is to over extract from your ground coffee. This results in a bitter beverage with visibly bleached crema. Crema is the caramel coloured layer that floats on top of the coffee following extraction.
NOTE:
If the extraction is too fast, turn the GRIND SIZE selector to a lower number. This will make the coffee grind finer. If the extraction is too slow, turn the GRIND SIZE selector to a higher number. This will make the coffee grind coarser.
NOTE:
The taste of your coffee will, of course, depend on personal preference and on many other factors such as the type of coffee bean used, the coarseness or fineness of the grind and the tamping pressure. We recommend experimenting by varying these factors to achieve the coffee taste of your preference.
EXTRACTION GUIDE
GRIND GRIND DOSE TAMP SHOT TIME
| OVER EXTRACTED bitter – astringend | too fine too much too heavy more than 40 Sec | ||
| BALANCED | optimal | 10 g (1 cup)18 g (2 cups) | 15–20 kg 25–35 Sec |
| UNDER EXTRACTED underdeveloped – sour | too coarse too little too light less than 20 Sec | ||
CARE AND CLEANING
CARE AND CLEANING
CLEANING CYCLE
The Grind & Infuse Pro Espresso Machine features an inbuilt cleaning cycle which should be carried out periodically. The CLEAN ME light will automatically illuminate to indicate to the user when a cleaning cycle is required.

PORTAFILTER CLEANING
Periodically run water through the machine with the portafilter in place, but without any ground coffee, to rinse out any residual coffee particles.

SOLITABS cleaning tablets (reference number: 993.02) and SOLIPOL ® special descaling agent (reference number: 703.02) as well as GRINDZ ™ grinder cleaner (reference number: 993.08) can be obtained from specialist shops or from Solis of Switzerland Ltd. Phone no. 0848 804 884, Facsimile: 0848 804 890, www.solis-onlineshop.ch (only within Switzerland).
CARE AND CLEANING
CLEANING CYCLE PROCESS GUIDE
If cleaning is required, simply follow the steps below:
- Use a SOLITABS cleaning tablet.
- Empty drip tray and fill water tank.
- Place the rubber cover in the filter basket and insert both into the portafilter.
- Pop 1 cleaning tablet into the filter.
- Lock the portafilter into the group head.
- Turn the machine «OFF».
- Simultaneously press and hold the one cup, two cup and the POWER button for 3 seconds.
- The cleaning cycle will commence and last for approximately 5 minutes. Once complete, 3 beeps will sound. Remove the portafilter and ensure the tablet has completely dissolved.
If the tablet has not dissolved, repeat steps 5 to 7 until tablet has dissolved.
DECALCIFYING
After regular use, hard water can cause mineral build up in and on many of the inner functioning components, reducing the brewing flow, power of the machine, and affecting the quality of coffee.
We advise decalcifying the machine on a regular basis (depending on the hardness of water, but at least every one to two months) using a mixture of water and SOLIPOL ® special.
Follow the instructions provided.
NOTE:
It is recommended to use only SOLIPOL ® special for decalcifying your machine and no liability can be assumed for damages that have been caused by other decalcifiers.
CAUTION:
If drops or splashes of the decalcifier – or of the mixture with decalcifier and water – get in contact with the housing of the appliance, please wipe them away immediately in order to avoid any damage of the surface of the housing.
WARNING:
Do not immerse power cord, power plug or appliance in water or any other liquid. The water tank should never be removed or completely emptied during decalcifying.
DECALCIFYING THE MACHINE
- Remove the portafilter. Fill up completely the water tank with the mixture of descaling agent (SOLIPOL® special in a 1:1 ratio – 1 part SOLIPOL® special, 1 part water).
- Plug the machine into the power outlet. Press the POWER button to the 'ON' position. Place a large container under the group head and steam wand.
- When the brewing temperature has been reached all the button surrounds on the control panel will illuminate. Press and hold the one cup or two cup button to commence manual pour and keep it pushed until approx. 50% of the mixture of decalcification liquid and water has run through the group head.
- Turn the dial to the position marked with the steam symbol and allow steam to run through the steam wand for approximately 2 minutes. Return the steam dial back to the STANDBY position.
- Place a container under the hot water outlet. Turn the dial to the position marked with the water symbol and let the water remaining in the tank flow through the hot water outlet.
- After decalcifying, remove the water tank and rinse thoroughly then refill with fresh cold water. To rinse the machine, repeat previous steps.
CARE AND CLEANING
CLEANING THE CONICAL BURR GRINDER
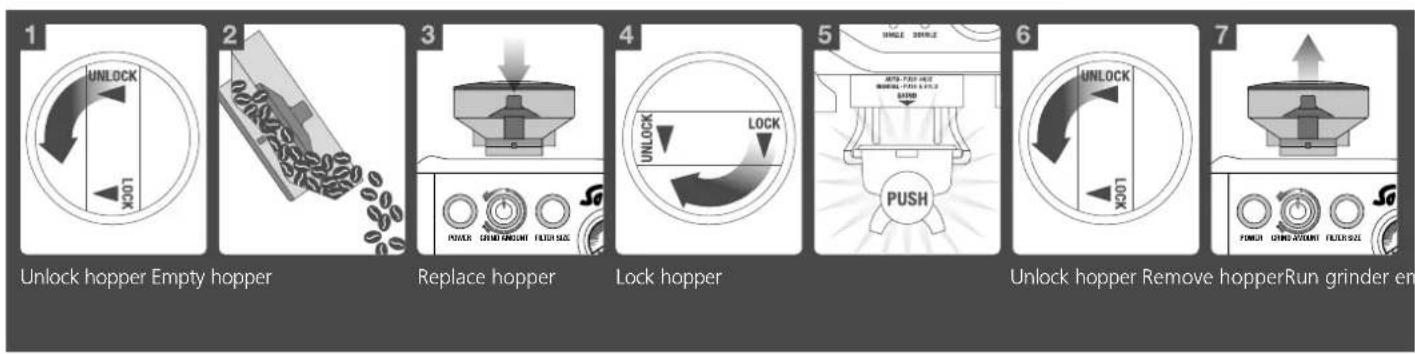
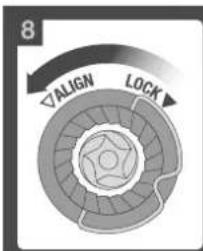
Unlock top burr Remove top burr


Clean burr with cleaning brush

Clean lower burr with cleaning brush
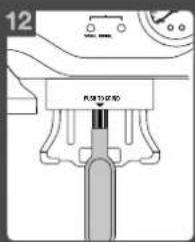
Clean coffee outlet duct
CLEANING THE CONICAL BURR GRINDER
This grinder cleaning cycle removes oil build-up on burr heads which can impede performance.
It is also recommended to clean the conical burr grinder by using GRINDZ™ grinder cleaner (reference number: 993.08). GRINDZ™ can be obtained from specialist shops or from Solis of Switzerland Ltd. Phone no. 0848 804 884, Facsimile: 0848 804 890, www.solis-onlineshop.ch (only within Switzerland).
CARE AND CLEANING
REMOVING BLOCKADE IN THE CONICAL BURR GRINDER
This step is only required if there's a blockade between the grinding burrs and the grinder outlet.
WARNING:
Care should be taken as the grinder burrs are extremely sharp.

Remove hopper

Set GRIND SIZE to '1' (finest setting)

Use 10mm socket. Rotate clockwise to remove nut
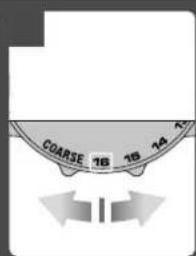
Set GRIND SIZE to '16' (coarsest setting)

Remove top burr

Before removing the lower burr, loosen nut & remove spring & flat washer
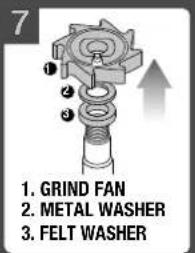
Remove grind fan & washers using long nose pliers

Remove blockade at the grinder duct using the cleaning brush or a pipe cleaner

Clean coffee outlet duct with cleaning brush

Reinstall grind fan & washers using long nose pliers

Insert lower burr (drive pin & cavity to align). Insert flat washer & spring washer

Rotate anti-clockwise to tighten nut

Reinsert top burr

Set GRIND SIZE to '5'. Place hopper on the machine
CARE AND CLEANING
CLEANING THE STEAM WAND
Steam Wand Maintenance

Run steam to clear milk from wand after texturing
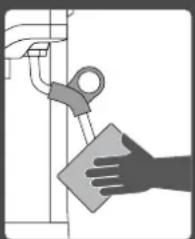
with damp cloth after each use
Clogged Steam Wand?

Clean hole with pinW

iBesteverTiparSdak tip

hot water
- Steam wand has to be cleaned every time after steaming.
- Position the steam wand over the drip tray and briefly turn the dial to the steam symbol. This will remove milk residues from the nozzle.
-
Wipe the steam wand with a damp cloth after each use.
-
Ensure the steam dial is in the STANDBY position. Press the POWER button to off and allow the machine to cool.
- If the steam wand remains blocked, use the pin on the cleaning tool to clear the opening.
-
If the steam wand continues to be blocked, the tip of the steam wand can be removed by using the fitting in the middle of the cleaning tool.
-
Unscrew the top with the cleaning tool.
- Soak the tip in hot water before using the pin on the cleaning tool to unblock. Replace the tip back onto the steam wand and secure with the cleaning tool.
CARE AND CLEANING
CLEANING/UNBLOCKING THE FILTERS, PORTAFILTER AND GROUP HEAD
Periodically run water through the machine with the portafilter in place, but without any ground coffee, to rinse out any residual coffee particles.

Should the fine holes in the filters become blocked follow the following steps:
- Place the filter into the portafilter. Run water through the machine with the filter and portafilter, without any ground coffee, in place.
- To clean the filters simply run water through the portafilter using the manual pour function by holding down the one cup
- The fine pin on the cleaning tool can be used to clear the filter basket holes.
- For a thorough clean of the filters, run a cleaning cycle of the machine with the portafilter and filter in place.

CLEANING THE OUTER HOUSING/CUP WARMING PLATE
The outer housing and cup warming plate can be cleaned with a soft, damp cloth. Then polish with a soft, dry cloth. Do not use abrasive cleansers, pads or cloths which can scratch the surface.
CARE AND CLEANING
CLEANING THE DRIP TRAY
The drip tray should be removed, emptied and cleaned at regular intervals, particularly when the drip tray full indicator is showing «Empty Me!».
Remove grid, compartments and «Empty Me!» indicator from the drip tray. Dispose of the grounds from the dry compartment into the bin. Wash the drip tray with warm soapy water, using a non-abrasive washing liquid, rinse and dry thoroughly. The «Empty Me!» indicator can be removed from the drip tray by pulling upwards to release the side latches.
The drip tray base and cover are dishwasher safe.

CLEANING THE STORAGE TRAY
The storage tray can be removed after the drip tray is removed then cleaned with a soft, damp cloth (do not use abrasive cleansers, pads or cloths which can scratch the surface).
STORING YOUR MACHINE
Before storing the appliance, turn it off with the POWER button, turn the hot water/steam dial to Standby and pull the plug.
Remove unused beans from the hopper, empty the water tank and the drip tray.
Ensure the machine is cool, clean and dry. Insert all accessories into position or into the storage tray.
Store upright. Do not place anything on top.
WARNING: DO NOT IMMERSE POWER CORD, POWER PLUG OR APPLIANCE IN WATER OR ANY OTHER LIQUID. THE WATER TANK SHOULD NEVER BE REMOVED OR COMPLETELY EMPTIED DURING DECALCIFYING.
CARE AND CLEANING
The optimally harmonised interaction of coffee and machine is a vital prerequisite for absolutely first-class results.
The Solis Grind & Infuse Pro Espresso Machine meets the highest standards and guarantees a consistently perfect coffee quality. And to ensure that the results you get are always outstanding, please keep the following few points in mind:
Always keep the filter baskets clean
Coffee residue can collect in the filter baskets. They have to be kept clean in order to ensure optimum flow. Therefore: please clean the filter baskets as described in section «Care and Cleaning».
Decalcifying the machine
The calcium contained in the water settles in the machine and, as well as reducing the service life of the machine, affects the quality of your coffee. We hence advise you to decalcify your machine at regular intervals. For details please refer to section «Care and Cleaning».
Do you need help?
The Solis Grind & Infuse Pro is extremely reliable. It will delight you with superb results, day in and day out, provided it is used and cared for appropriately. If you should nevertheless have a question regarding machine operation, please phone us: 091 802 90 10; (for customers in Switzerland only).
We will be delighted to help you!
TROUBLE SHOOTING GUIDE
| PROBLEM | POSSIBLE CAUSES | WHAT TO DO |
| When the machine is switched on, the steam / hot water light is flashing | Steam / hot water dial is not in «STANDBY» position | Turn the steam / hot water dial to «STANDBY» position. Machine will commence normal heat up procedure. |
| Coffee does not run through | Machine is not turned on or plugged inWater tank is emptyCoffee grind is too fineToo much coffee in the filterCoffee tamped too firmlyThe filter is blocked | Ensure the machine is plugged in, switched on at the power outlet and the POWER button is pressed to «ON».Refer to «Filling the Water Tank», page 150.Ensure you use a suitable espresso grind. Refer to «Setting the Right Grind» on page 152.Refer to «Adjusting the Grind Amount», page 152.Refer to «Tamping the Ground Coffee», page 153.Clean the filters. Refer to «Cleaning the Filters», page 170. |
| Coffee runs out too quickly | The coffee grind is too coarseNot enough ground coffee in the filterGround coffee not tamped firmly enough | Ensure you use a suitable espresso grind.Refer to «Setting the Right Grind» on page 152.Refer to «Adjusting the Grind Amount», page 152.Refer to «Tamping the Ground Coffee», page 153. |
| Coffee is too cold | Cups not preheatedMilk not heated enough (if making a cappuccino or latté) | Preheat cups. Refer to «Pre-Warming the Cups», page 162.When the base of the jug becomes too hot to touch this is when the milk is heated at the correct temperature. Refer to «The Art of Texturing Milk», page 158. |
TROUBLE SHOOTING GUIDE
| PROBLEM | POSSIBLE CAUSES | WHAT TO DO |
| No crema | Coffee is not tamped firmly enoughCoffee grind is too coarseGround coffee is not freshFilter holes are blocked | Refer to «Tamping the Ground Coffee», page 153.Ensure you use a suitable espresso grind.Refer to «Setting the Right Grind» on page 152.Change old beans with fresh roasted.Use the fine pin on the cleaning tool to clear the holes. Refer to «Cleaning the Filters», page 170. |
| Machine is making pulsing/pumping sound while extracting coffee or steaming milk | The machine is carrying out the normal operation of the 15 bar pump | No action required as this is the normal operation of the machine. |
| Coffee runs out around the edge of the filter holder | Portafilter is not inserted in the group head properlyThere are coffee grounds around the filter rimToo much ground coffee in the filterGround coffee has been tamped too firmlyIncorrect filter for amount of ground coffee used | Refer to «Inserting the Portafilter», page 154.Clean any excess ground coffee from the rim of the filter holder to ensure a proper fit into the brew head.Refer to «Adjusting the Grind Amount», page 152.Refer to «Tamping the Ground Coffee», page 153.Ensure you use the small filter for 1 cup of coffee and the larger filter for 2 cups of coffee. |
| Grinder safety clutch was engaged | An over-filled filter basket caused a tailback at the coffee outlet duct | Clean the grinder and the coffee outlet duct as described on page 168. |
TROUBLE SHOOTING GUIDE
| PROBLEM | POSSIBLE CAUSES | WHAT TO DO |
| Coffee extracts as drops from the portafilter | The water tank is empty or lowCoffee grind is too fineMachine is blocked by mineral deposits | Refer to step 1 – «Filling the Water Tank», page 150.Ensure you use a suitable espresso grind.Refer to «Setting the Right Grind» on page 152.Decalcify the machine. Refer to «Decalcifying», page 166. |
| Machine is making a loud and continuous pumping noise | Water tank is emptyWater tank is not securely in place | Refer to step 1 – «Filling the Water Tank», page 150.Refer to step 1 – «Filling the Water Tank», page 150. |
| No steam is generated | Machine is not turned onWater tank is emptySteam dial is not in «Steam» positionSteam wand is blocked | Ensure the machine is plugged in and the POWER button is pressed to «ON».Refer to step 1 – «Filling the Water Tank», page 150Turn the steam dial to the «Steam» positionUse the pin on the cleaning tool to clear the opening. If the steam wand continues to be blocked remove the tip of the steam wand using the fitting in the middle of the cleaning tool. Refer to «Care and Cleaning», page 169. |
| Milk is not foamy after texturing | Not enough steamMilk is not fresh and cold | Steam wand may be blocked.Refer to «Care and Cleaning», page 169.Use cold fresh milk. Refer to «The Art of Texturing Milk», page 158. |
TROUBLE SHOOTING GUIDE
| PROBLEM | POSSIBLE CAUSES | WHAT TO DO |
| Machine is not working | The unit appears to be «ON» but the machine ceases to operate | The safety thermal-cut may have activated due to the pump or grinder overheating. Turn the machine off and allow it to cool for about 30-60 minutes. |
| No ground coffee coming from grinder | No coffee beans in hopper | Fill hopper |
| The grinder makes a loud, clattering noise | Grinder blocked or jammed by foreign object | Immediately deactivate grinder. Demount bean hopper and remove blockade in the grinding duct. Remove top grinding burr and clean lower grinding burr. See p. 167, „Cleaning the Conical Burr Grinder”. |
| Grinding duct blocked | Clean grinding chamber and duct. See p. 168, „Removing Blockade in the Conical Burr Grinder” | |
| Water/moisture in grinding chamber + grinding duct | Clean grinding chamber and duct. See p. 168, „Removing Blockade in the Conical Burr Grinder” | |
| Grinder does not start when micro switch is pressed. «Filter Size» lights are cycling through single and double | Bean hopper safety interlock is open (hopper is not correctly in place) | Remove hopper, check for any debris then replace the hopper into the correct location |
TROUBLE SHOOTING GUIDE
| PROBLEM | POSSIBLE CAUSES | WHAT TO DO |
| Too much/too little ground coffee is being delivered to the filter basket | Grind amount settings are incorrect for particular grind size | Use the GRIND AMOUNT dial to increase or decrease the grind amount |
| Too much/too little espresso is being delivered to the cup | Grind amount settings and / or grind size require changing | Reset the machine to defaults or re-program new coffee dose settings |
TECHNICAL SPECIFICATIONS
Model-No. BES870, type 115
Product description Espresso machine with grinder
Voltage/Frequency 220-240V/50Hz
Output 1.560 - 1.850 Watt
Measurements approx. 33 × 40 × 31 cm (l × h × d)
Weight approx. 10 kg
COFFEE AND SUPPLIES
The following accessories, supplies and coffee variants are available for your Solis Grind & Infuse Pro:
Item-no. 978.40 Solis coffee grinder knock-out drawer
Item-no. 992.00 Solis De Luxe coffee beans (2 x 500 g)
Item-no. 992.04 Solis Exclusif coffee beans (2 x 500 g)
Item-no. 992.60 Solis Crema coffee beans (2 x 500 g)
Item-no. 907.20 Jug for milk texturing (0,251)
Item-no. 907.21 Jug for milk texturing (0,50l)
Item-no. 993.02 SOLITABS cleaning tablets (10 pcs.)
special descaling agent (1,0 l)
Item-no. 993.08 GRINDZ™ grinder cleaner
Accessories and supplies for your Solis Grind & Infuse Pro are available from specialist retailers or from Solis of Switzerland Ltd.
Phone: 0848 804 884, Fax: 0848 804 890, email: info@solis-onlineshop.ch or www.solis-onlineshop.ch (shipping only within Switzerland)
COFFEES TO TRY
ESPRESSO
Intense and aromatic, an espresso or short black as it's also known uses about 8 g of ground coffee. It is served in a small cup or glass to a level of approximately 30 ml.
LONG BLACK
A long black is generally a single or double shot of espresso with hot water added to taste.
FLAT WHITE
A single dose of espresso in a cup filled with steamed milk and topped with a skin of silky smooth foam.


COFFEES TO TRY
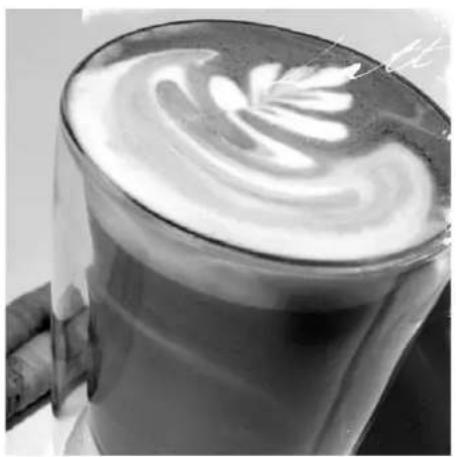
CLASSIC CAFÉ LATTÉ
Traditionally the morning coffee of Italy and France, taken with pain au chocolate or sweet biscotti. This blend of 1/3 espresso to 2/3 milk is made with a single shot of espresso. Top with steamed milk, poured down the inside rim of the glass to give a creamy consistency and perfect layer of froth.
CAPPUCCINO
The real thing is served very light and luke warm with 1/3 espresso to 1/3 steamed milk and a generous final 1/3 of creamy froth.
For added finesse, hold a piece of card over one half of the cappuccino before dusting with chocolate.
MACCHIATO
A shot of espresso served short in a 70 ml demitasse and stained with a dash of finely textured milk.


COFFEES TO TRY
CAFFÉ MOCHA
A glass of textured milk laced with melted cocoa or chocolate syrup and an espresso shot. Top sprinkled with dark chocolate shavings.
ESPRESSO AFFOGATO
Totally irresistible, this sweet temptation is simply a single scoop of premium vanilla bean ice cream, drenched in espresso and if desired, your favourite liqueur. To create a sense of occasion, serve ice cream in a martini glass with shots on the side.
CON PANNA
Meaning «with cream» this heart warmer is a chic variation on old-fashioned Vienna Coffee. In a 90-120 ml cup, dress a double shot of espresso with a dollop of fresh cream, whipped until glossy. Dust with cinnamon and serve immediately.

180


RECIPES
DESSERTS
E
RECIPES
DESSERTS
BAKED CUSTARDS WITH FRESH RASPBERRY AND COFFEE FLOAT
Serves 6
750 ml cream
3/4 cup caster sugar
2 vanilla beans, cut lengthways
1 tablespoon gelatine
1 punnet fresh raspberries
1 tablespoon caster sugar, extra
3/4 cup strong espresso coffee, cooled
- Combine the cream, caster sugar and vanilla beans in a saucepan. Stir over medium heat until just boiling. Remove the vanilla beans.
- Add the gelatine and stir constantly with a wooden spoon until dissolved. Remove from heat. Allow the custard to cool.
- Pour custard evenly into 6 x 150 ml glasses. Refrigerate for minimum 3 hours or until set.
- Place the raspberries into a medium sized bowl, sprinkle with sugar and crush lightly with a fork.
- Fold the cooled coffee through the crushed raspberries. Cover and chill in the refrigerator.
- To serve, top the custards, when set, with the raspberries and coffee mixture.
- Serve immediately with freshly brewed coffee.
TIRAMISU
Makes 4
1 ½ cups mascarpone
1 ¼ cups cream
2 ½ tablespoons icing sugar
1/2 cup strong espresso coffee, cooled
Cocoa powder, for dusting
- Combine mascarpone, cream and icing sugar in a large bowl. Whisk lightly until soft peaks form. Set aside.
- Combine coffee and liqueur in bowl. Dip the sponge fingers into the coffee mixture a few at a time. Ensure all the coffee mixture is absorbed evenly by the sponge fingers.
- Layer half the sponge fingers evenly into the base of 4 dessert bowls or glasses. Spread the layered sponge fingers with half of the cream mixture. Repeat the layers with remaining sponge fingers and cream mixture.
- Dust evenly with cocoa powder and refrigerate until required.
- Serve with fresh fruits and freshly brewed espresso coffee.
RECIPES
DESSERTS
COFFEE, CINNAMON AND WALNUT MUFFINS
Makes 12
2 ½ cups/375 g plain flour
2 teaspoons baking powder
1 teaspoon ground cinnamon
3/4 cup caster sugar
1 cup sour cream
2 x 60 g eggs
1 teaspoon finely grated lemon rind
1/3 cup olive oil
3/4 cup strong espresso coffee, cooled
1 cup roughly chopped walnuts
- Sift flour, baking powder and cinnamon into a large bowl and stir in sugar.
- Place sour cream, eggs, lemon rind, oil and espresso coffee into a medium bowl, stir until well combined.
- Fold creamed mixture and walnuts into the sifted ingredients, do not over mix.
- Spoon the mixture evenly into 12 lightly greased and base lined muffin pans until two-thirds full.
- Place into a preheated oven 180° C for 12-15 minutes or until cooked when tested.
- Serve warm, or cooled and spread with Rich Coffee Icing. Delicious with a Cappuccino or Café Latté.
RICH COFFEE ICING
2 cups icing sugar, sifted
1 tablespoon butter, softened
1/4 cup strong espresso coffee, warm
- Combine icing sugar, butter and half the coffee in a bowl, stir well and gradually add remaining coffee until a spreadable consistency is achieved.
Information for correct disposal of the product in accordance with the European Directive 2002/96/EC
At the end of its working life this equipment must not be disposed of as an household waste. It must be taken to special local community waste collection centres or to a dealer providing this service. Disposing of electrical and electronic equipment separately avoids possible negative effects on the environment and human health deriving from an inappropriate disposal and enables its components to be recovered and recycled to obtain significant savings in energy and resources. In order to underline the duty to dispose of this equipment separately, the product is marked with a crossed-out dustbin.
Solis of Switzerland Ltd reserves the right to carry out technical and visual changes and modifications to improve the product at any time.

HELPLINE:
802 90 10
(Only for customers in Switzerland)
This item stands out due to its long-life cycle and reliability. Despite this though, if a malfunction ever occurs, simply give us a call. Often a breakdown can be easily and quickly remedied with the right tip or technique without having to straight away send off the device for repair. We will give you all the advice and practical support you require.
Beans to Espresso
In Under a Minute
Beans on Board
Conical Burr Grinder

Grind on Demand
Preset & Adjustable Amount

Programmable Shot
Coffee as You Like it

High Pressure Pump
Made in Italy
Solis of Switzerland Ltd
Solis-House • CH-8152 Glattbrugg-Zurich • Switzerland
Phone +41 44 874 64 54 • Fax +41 44 874 64 99
info@solis.ch • www.solis.ch • www.solis.com

GARANTIE DE 2 ANS
We provide a guarantee for this product, if the defect has demonstrably arisen as a result of faults in the material or construction, and has arisen despite proper handling and care. The guarantee starts from the date of sale, as noted on the sales receipt, which must be enclosed with the item. For commercial use, the guarantee lasts for 12 months. The detailed guarantee conditions are available at www.solis.com.
CUSTOMER SERVICES
It is always worth calling us before sending in the product, as malfunctions can often be easily solved by the appropriate tip or trick from our experts. Please visit us at www.solis.com for country-specific contact details. Naturally, we would also be pleased to provide you with information over the phone. Please contact us via the following telephone numbers:
For Switzerland: +41 91 802 90 10
For Germany: 0800 724 0702
For Austria: 0800 22 03 92
For the Netherlands: +31 85 4010 722
For Belgium: +32 2 808 35 82
For the other countries: +41 44 874 64 84


- INHALT TEIL 1
- MERKMALE IHRER SOLIS GRIND & INFUSE PRO ESPRESSOMASCHINE
- VOM MAHLWERK DIREKT IN DEN SIEBTRÄGER
- EINWANDIGE FILTER FÜR PERFEKTEN KAFFEEGENUSS
- ENERGIESPARFUNKTIONEN
- GRIND & INFUSE PRO
- DIE SOLIS GRIND & INFUSE PRO ESPRESSOMASCHINE
- INHALT TEIL 2
- BEDIENUNG
- SCHRITT 1 - MILCH ZIEHEN
- RICHTIGES ANPRESSEN
- GEHÄUSE UND TASSENABLAGE REINIGEN
- REINIGEN DER ABLAGESCHALE
- KAFFEESORTEN
- KLASSISCHER CAFFÈ LATTE
- CAFFÉ MOCHA
- REZEPTVORSCHLÄGE
- VANILLEPUDDING MIT FRISCHEN HIMBEEREN UND ESPRESSO
- 750 ML RAHM
- SOLIS OF SWITZERLAND AG
- CHEZ SOLIS, LA SECURITE PASSE AVANT TOUT
- CARACTERISTIQUES DE VOTRE MACHINE A ESPRESSO SOLIS GRIND & INFUSE PRO
- DU MOULIN DIRECTEMENT DANS LE PORTE-FILTRE
- FONCTION EAU CHAUDE
- FILTRE A PAROI SIMPLE – POUR UN AROME DE CAFE PARFAIT
- FONCTIONS D'ECONOMIE D'ENERGIE
- PRESSE-MOUTURE INTEGRE / AMOVIBLE
- RESERVOIR D'EAU DE 2 LITRES AMOVIBLE
- AVANT LA PREMIERE UTILISATION
- INSTALLATION DE VOTRE MACHINE A ESPRESSO SOLIS GRIND & INFUSE PRO
- ETAPE 1
- ETAPE 4
- LA MACHINE A ESPRESSO SOLIS GRIND & INFUSE PRO
- PREPARATION DE L'ESPRESSO : NOTICE SUCCINCTE
- ETAPE 2 - PRECHAUFFAGE DES TASSES
- PROGRAMMATION PERSONNALISEE D'UN ESPRESSO DOUBLE
- INDICATION
- ETAPE 1 - AERER LE LAIT
- TASSEMENT APPROPRIE
- NETTOYAGE DU BOITIER ET DE LA PLAQUE RECHAUFFE-TASSES
- NETTOYAGE DU TIROIR DE RANGEMENT
- SORTES DE CAFE
- CAFFE LATTE CLASSIQUE
- CAFFE MOCHA
- PROPOSITIONS DE RECETTES
- PUDDING A LA VANILLE, AUX FRAMBOISES FRAICHES ET A L'ESPRESSO
- 750 ML DE CRÈME
- SOLIS OF SWITZERLAND SA
- CONTENTS PART 1
- GETTING TO KNOW YOUR MACHINE
- INTRODUCING THE SOLIS GRIND & INFUSE PRO ESPRESSO MACHINE
- SOLIS RECOMMENDS SAFETY FIRST
- IMPORTANT SAFEGUARDS FOR YOUR SOLIS GRIND & INFUSE PRO ESPRESSO MACHINE
- FEATURES OF YOUR SOLIS GRIND & INFUSE PRO ESPRESSO MACHINE
- INTEGRATED CONICAL BURR GRINDER
- ADJUSTABLE GRIND SIZE
- PRE-SET GRIND AMOUNT FOR ONE OR TWO CUPS AND FINE TUNING
- HANDS FREE, DIRECT GRINDING TO PORTAFILTER
- TAMPER «ON BOARD
- MEASURING INSTRUMENT
- 1700 WATTS OF POWER
- ACCURATE TEMPERATURE CONTROL
- AUTO PURGE FUNCTION
- MANUALLY ADJUSTING BREWING TEMPERATURE
- DRY PUCK FEATURE
- PROGRAMMABLE FUNCTION
- LOW-PRESSURE PRE-BREWING FUNCTION FOR OPTIMAL AROMA DEVELOPMENT
- ESPRESSO PRESSURE GAUGE
- IDEAL EXTRACTION RANGE
- UNDER EXTRACTED ZONE
- OVER EXTRACTED ZONE
- HOT WATER FUNCTION
- SINGLE WALL FILTERS FOR PERFECT COFFEE ENJOYMENT
- ENERGY SAVING FEATURES
- KNOW YOUR SOLIS GRIND & INFUSE PRO ESPRESSO MACHINE
- REMOVABLE 2 LITRE WATER TANK
- BEAN HOPPER: 250 G CAPACITY
- INTEGRATED CONICAL
- BURR GRINDER
- GRIND BUTTON
- ACCESSORIES
- CLEANING ACCESSORIES
- ESPRESSO RANGE GAUGE
- PROGRAM
- HOT WATER/STEAM
- PROGRAMMABLE FEATURE
- FORGED PORTAFILTER
- HOT WATER OUTLET
- SWIVEL STEAM WAND
- NOT SHOWN
- CORD STORAGE
- STORAGE TRAY
- ADDITIONAL FEATURES
- 15 BAR PUMP
- THERMOCOIL HEATING SYSTEM WITH INTEGRATED STAINLESS STEEL WATER COIL
- PRE-BREW FUNCTION
- CONTROL DRY PUCK FEATURE
- FLAT SHOWER HEAD
- BEFORE FIRST USE
- NOTE
- ASSEMBLING YOUR SOLIS GRIND & INFUSE PRO ESPRESSO MACHINE
- STEP 1
- STEP 2
- STEP 3
- STEP 4
- ENJOY
- CONTENTS PART 2
- OPERATION
- ESPRESSO MAKING: QUICK GUIDE
- ESPRESSO MAKING: STEP BY STEP
- STEP 1 - FILLING THE WATER TANK
- STEP 2 - PRE-WARMING THE CUPS
- STEP 3 - PREPARING THE FILTER BASKETS
- IMPORTANT SAFETY NOTICE FOR SETTING THE GRIND SIZE
- TAMPER ON BOARD
- WITH REMOVED TAMPER
- STEP 8 – REMOVING EXCESS GROUND COFFEE WITH THE MEASURING INSTRUMENT „RAZOR
- STEP 10 - EXTRACTING THE ESPRESSO
- NOTE TO PRE-BREWING FUNCTION
- PRE-PROGRAMMED DOSE - DOUBLE CUP
- INDIVIDUALLY PROGRAMMING A SINGLE ESPRESSO
- INDIVIDUALLY PROGRAMMING A DOUBLE ESPRESSO
- RESETTING DEFAULT VOLUMES
- STEP 11 - CLEANING THE PORTAFILTER
- WARNING
- THE ART OF TEXTURING MILK
- THERE ARE TWO PHASES TO TEXTURE MILK
- STEP 1 - STRETCHING THE MILK
- STEP 2 - SWIRLING THE MILK
- HOT WATER FUNCTION MANUALLY ADJUSTING
- THE BREWING TEMPERA- TURE
- HOW TO CHANGE BREWING TEMPERATURE
- COFFEE MAKING TIPS
- WARMING YOUR CUP OR GLASS
- PRE WARMING PORTAFILTER AND FILTER BASKET
- THE RIGHT FILTER BASKET
- TAMPING CORRECTLY
- REMOVING COFFEE RESIDUES
- PURGE THE GROUP HEAD
- BREWING YOUR ESPRESSO
- EXTRACTION GUIDE
- CARE AND CLEANING
- CLEANING CYCLE
- PORTAFILTER CLEANING
- CLEANING CYCLE PROCESS GUIDE
- DECALCIFYING
- CAUTION
- DECALCIFYING THE MACHINE
- CLEANING THE CONICAL BURR GRINDER
- REMOVING BLOCKADE IN THE CONICAL BURR GRINDER
- CLEANING THE STEAM WAND
- CLEANING/UNBLOCKING THE FILTERS, PORTAFILTER AND GROUP HEAD
- CLEANING THE OUTER HOUSING/CUP WARMING PLATE
- CLEANING THE DRIP TRAY
- CLEANING THE STORAGE TRAY
- STORING YOUR MACHINE
- THE OPTIMALLY HARMONISED INTERACTION OF COFFEE AND MACHINE IS A VITAL PREREQUISITE FOR ABSOLUTELY FIRST-CLASS RESULTS
- ALWAYS KEEP THE FILTER BASKETS CLEAN
- DO YOU NEED HELP
- TROUBLE SHOOTING GUIDE
- TECHNICAL SPECIFICATIONS
- COFFEE AND SUPPLIES
- COFFEES TO TRY
- ESPRESSO
- LONG BLACK
- FLAT WHITE
- CLASSIC CAFÉ LATTÉ
- CAPPUCCINO
- MACCHIATO
- ESPRESSO AFFOGATO
- CON PANNA
- RECIPES
- BAKED CUSTARDS WITH FRESH RASPBERRY AND COFFEE FLOAT
- TIRAMISU
- COFFEE, CINNAMON AND WALNUT MUFFINS
- RICH COFFEE ICING
- INFORMATION FOR CORRECT DISPOSAL OF THE PRODUCT IN ACCORDANCE WITH THE EUROPEAN DIRECTIVE 2002/96/EC
- HELPLINE
- 802 90 10
- BEANS TO ESPRESSO
- BEANS ON BOARD
- GRIND ON DEMAND
- PROGRAMMABLE SHOT
- HIGH PRESSURE PUMP
- SOLIS OF SWITZERLAND LTD
- GARANTIE DE 2 ANS
- CUSTOMER SERVICES
Brand : Solis
Model : Grind & Infuse Pro
Category : Coffee machine