
BS 18 LTX-X3 Quick - Drill METABO - Free user manual and instructions
Find the device manual for free BS 18 LTX-X3 Quick METABO in PDF.


| Brand | Metabo |
| Model | BS 18 LTX-X3 Quick |
| Product type | Cordless drill driver |
| Rated voltage | 18 V |
| Battery type | Li-Ion |
| Number of speeds | 2 |
| No-load speed (1st gear) | 0 - 500 rpm |
| No-load speed (2nd gear) | 0 - 1900 rpm |
| Max torque | 50 Nm |
| Chuck type | Keyless (Quick) |
| Drilling capacity (wood) | 65 mm |
| Drilling capacity (steel) | 13 mm |
| Screwing capacity | 10 mm |
| Weight (without battery) | 1.4 kg |
| Dimensions (L x W x H) | 215 x 70 x 215 mm |
| Protection system | Metabo Safety (MSD) |
| Hammer function | No |
| Electronic speed control | Yes |
| Motor brake | Yes |
| LED lighting | Yes |
| Charger type | Rapid charger (not included) |
| Maintenance | Clean with a dry cloth; do not use harsh chemicals |
| Manufacturer warranty | 2 years |
Frequently Asked Questions - BS 18 LTX-X3 Quick METABO
User questions about BS 18 LTX-X3 Quick METABO
0 question about this device. Answer the ones you know or ask your own.
Ask a new question about this device
Download the instructions for your Drill in PDF format for free! Find your manual BS 18 LTX-X3 Quick - METABO and take your electronic device back in hand. On this page are published all the documents necessary for the use of your device. BS 18 LTX-X3 Quick by METABO.
USER MANUAL BS 18 LTX-X3 Quick METABO
natural_image
Two Metabo electric drillers with black end caps and labeled base plates (no visible text or symbols on the devices themselves)
de Originalbetriebsanleitung 5
en Original instructions 9
fr Notice originale 13
nl Oorspronkelijke gebruiksaanwijzing 18
it Istruzioni originali 23
es Manual original 28
pt Manual original 33
sv Originalbruksanvisning 38
fi Alkuperäinen käyttöopas 42
no Original bruksanvisning 46
da Original brugsanvisning 50
pl Instrukcja oryginalna 54
el Πρωτότυπο οδηγιών χρήσης 59
hu Eredeti üzemeltetési útmutató 64
ru Оригинальное руководство по эксплуатации 69


| BS 14.4 LTX Impuls | BS 18 LTX BS 18 LTX Quick BS 18 LTX Impuls BS 18 LTX-X3 Quick | SB 14.4 LTX Impuls | SB 18 LTX | SB 18 LTX Impuls | |||
| Serial Number: | 02143... 02144... 02109... 02145... 02114... | 02146... 02147... 02148... | |||||
| U | V | 14,4 18 14,4 18 | |||||
| n0 | /min, rpm | 1 ≈ | 0 - 400 | ||||
| 2 ≈ | 0 - 1400 | ||||||
| M1 | Nm (in-lbs) | 38 (336) 42 (372) 40 (354) 44 (389) | |||||
| M2 | Nm (in-lbs) | 42 (372) - / 46 (407) 44 (389) - 48 (425) | |||||
| M3 | Nm (in-lbs) | 88 (779) 96 (850) 92 (814) 100 (885) | |||||
| M4 | Nm (in-lbs) | 2 ≈ | 1,5 - 3,5 (13 - 31) | ||||
| 1 ≈ | 3,5 - 13 (31 - 114) | ||||||
| D1 max | mm (in) | 1 ≈ | 13 ( 1/2 ) | ||||
| 2 ≈ | 8 ( 5/16 ) | ||||||
| D2 max | mm (in) | 1 ≈ | 45 ( 125/32 ) 50 ( 131/32 ) 45 ( 125/32 ) 50 ( 131/32 ) | ||||
| 2 ≈ | 25 (1) | ||||||
| D3 max | mm (in) | 2 ≈ | - | 13 ( 1/2 ) | 1 5/8 | 6 | |
| s | /min, bpm | 2 ≈ | -28000 | ||||
| m | kg (lbs) | 1,9 (4.2) | 2,0 (4.4) | 2,1 (4.6) | |||
| G | UNF(in) | 1/2“ - 20 UNF | |||||
| Dmax | mm (in) | 13 ( 1/2 ) | |||||
| ah, ID/Kh, ID | m/s 2 | - | 17 / 2,5 | ||||
| ah, D/Kh, D | m/s 2 | <2,5 / 1,5 | |||||
| ah, S/Kh, S | m/s 2 | <2,5 / 1,5 | |||||
| LpA/KpA | dB(A) | 75 / 3 | 92 / 3 | ||||
| LWA/KWA | dB(A) | 86 / 3 | 103 / 3 | ||||

EN 60745
2006/42/EC, 2004/108/EC, 2011/65/EU
2012-02-14
Volker Siegle
Director Product Engineering & Quality
Responsible Person for Documentation
Metabowerke GmbH, 72622 Nuertingen, Germany
A
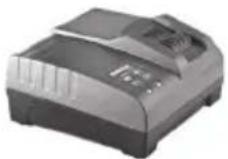
ASC 15

ASC 30
B

18 V 3,0 Ah 6.25455 Li-Power Extreme
18 V 4,0 Ah 6.25527 Li-Power Extreme
18 V 5,2 Ah 6.25587 Li-Power Extreme

14,4 V 3,0 Ah 6.25454 Li-Power Extreme
14,4 V 4,0 Ah 6.25526 Li-Power Extreme
©

343396590
D

6.31281

BS 18 LTX Quick:

natural_image
Close-up of a mechanical component with a central hub and metallic housing (no visible text or symbols)E

6.27240
F

6.27241
G

natural_image
Close-up of a metallic mechanical tool or valve component (no visible text or symbols)6.27242
Bohrfutter öffnen
Original instructions
1. Conformity Declaration
We, being solely responsible, hereby declare that this product conforms to the standards and directives specified on page 3.
2. Specified Use
The cordless drill/driver is suitable for drilling, screwing and thread tapping as well as impact drilling (depending on the model).
The user bears sole responsibility for damage caused by improper use.
Generally accepted accident prevention regulations and the enclosed safety information must be observed.
3. General Safety Instructions

For your own protection and for the protection of your electrical tool, pay attention to all parts of the text that are marked with this symbol!

WARNING – Reading the operating instructions will reduce the risk of injury.

WARNING Read all safety warnings and instructions. Failure to follow all safety warn-
ings and instructions may result in electric shock, fire and/or serious injury.
Keep all safety instructions and information for future reference.
Pass on your electrical tool only together with these documents.
4. Special Safety Instructions
Wear ear protectors with impact drills (machines with the designation SB). Exposure to noise can cause hearing loss.
Use auxiliary handles supplied with the tool (depending on the model). Loss of control can cause personal injury.
Hold power tool by insulated gripping surfaces, when performing an operation where the cutting accessory may contact hidden wiring. Cutting accessory contacting a "live" wire may make exposed metal parts of the power tool "live" and could give the operator an electric shock.
Ensure that the spot where you wish to work is free of power cables, gas lines or water pipes (e.g. using a metal detector).

Protect battery packs from water and moisture!
Do not expose battery packs to naked flame!
Do not use faulty or deformed battery packs!
Do not open battery packs!
Do not touch or short-circuit battery packs!

Slightly acidic, flammable fluid may leak from defective Li-ion battery packs!

If battery fluid leaks out and comes into contact with your skin, rinse immediately with plenty of water. If battery fluid leaks out comes into contact with your eyes, wash them clean water and seek medical treatment diately.
Dust from material such as paint containing lead, some wood species, minerals and metal may be harmful. Contact with or inhalation of the dust may cause allergic reactions and/or respiratory diseases to the operator or bystanders.
Certain kinds of dust are classified as carcinogenic such as oak and beech dust especially in conjunction with additives for wood conditioning (chromate, wood preservative). Material containing asbestos must only be treated by specialists.
- Where the use of a dust extraction device is possible it shall be used.
- The work place must be well ventilated.
- The use of a dust mask of filter class P2 is recommended.
Follow national requirements for the materials you want to work with.
Secure the workpiece against slipping, e.g. with the help of clamping devices.
LED (12): Do not view LEDs directly through optical instruments, LED class 1M, classified as per DIN
EN 60825-1: 2003, wavelength: 400-700 nm; 300 μs.
5. Overview
See page 2.
1 Additional handle
2 Key less chuck
3 Slide switch (drilling/impact drilling) *
4 Slide switch (torque control, drilling)
5 S w i(1st/2nd gear) - both sides of the machine
6 Rotation selector switch (rotation setting, transport lock) - both sides of the machine
7 Battery pack release button
8 Capacity indicator button
9 Capacity and signal indicator
10 Battery pack
11 Button for pulse function *
12 LED lights
13 Trigger
* depending on model
6. Commissioning
6.1 Assembly of additional handle (1) (depending on the model)

For safety reasons, always use the additional handle supplied.
ENGLISHen
Open the clamping ring by turning the additional handle (1) anticlockwise. Push the additional handle onto the collar of the machine. Securely tighten the additional handle at the angle required for the application.
7. Use
7.1 The machine's multifunctional monitoring system
If the machine switches off automatically, the machine electronics have activated automatic protection mode. A warning signal sounds (continuous beeping). The beeping stops after a maximum of 30 seconds or when the trigger is released (13).
In spite of this protective function, overloading is still possible with certain applications and can result in damage to the machine.
Causes and remedies:
-
Battery pack almost flat (the electronics prevent the battery pack from discharging totally and avoid irreparable damage). If one LED is flashing (9), the battery pack is almost flat. If necessary, press the (8) button and check the LEDs (9) to see the charge level. If the battery pack is almost flat, it must be recharged.
-
Long continuous overloading of the machine will activate the temperature cut-out. Leave the machine or battery pack to cool.
Note: If the battery pack feels very warm, the pack will cool more quickly in your "AIR COOLED" charger.
Note: The machine will cool more quickly if you operate it at idling speed.
- If the current is too high (for example, if the machine seizes continuously for long periods), the machine switches off.
Switch off the machine at the trigger (13). Then continue working as normal. Try to prevent the machine from seizing.
7.2 Battery pack
Charge the battery pack before use (10).
If performance diminishes, recharge the battery pack.
"Li-Power" li-ion battery packs have a capacity and signal indicator: (9)
- Press the (8) button, the LEDs indicate the charge level.
- If one LED is flashing, the battery pack is almost flat and must be recharged.
7.3 Removing and inserting the battery pack
Removal:
Press the battery pack release (7) button and pull the battery pack (10) forwards.
Inserting:
Slide in the battery pack (10) until it engages.
7.4 Setting the direction of rotation, engaging the transporting safety device (switch-on lock)
Set the rotation selector switch (6).
See page 2.
R = Clockwise setting
L = Counter-clockwise setting
0 = Central position: transport lock setting (switch-on lock)
7.5 Selecting gear stage
Do not actuate the switch (5) unless the motor has stopped completely!
If the switch (5) cannot be turned up to the stop, however, press the trigger (13) slightly so that the motor rotates slowly. It will then be possible to turn the switch (5) all the way up to the stop.
Press the switch (5) (left or right of the machine).
1
1st gear setting (low speed), very high torque
2
2nd gear setting (high speed)
7.6 Setting the torque limit
Press the slide switch (4).
1... = Torque setting (for working with torque control)
Note: the torque can be adjusted to different settings depending on the gear selected! In 2nd gear from 1.5 to 3.5 Nm and in 1st gear from 3.5 to 12.5 Nm.
Note: Once the set torque has been reached, the screwdriver clutch emits a rattling noise and the machine is automatically switched off.
◀ = Drill setting - no torque control (for max. torque)
7.7 Drilling and impact drilling (depending on the model)
Press the slide switch (3).
T
= Impact drilling
Note: Always work at high speeds when impact drilling.
[Non-Text]
= Normal drilling without impact
7.8 Activating the pulse function (depending on the model)
Do not work for long periods with pulse function switched on! (The motor can overheat.)
Press the button (11) to activate or deactivate the pulse function.
The button (11) flashes when the pulse function is active.
Note: If the machine is not used for approx. 5 minutes, the pulse function switches off automatically and the flashing button (11) goes out.
7.9 On/Off switch, setting the speed
Switching on, speed: press the trigger (13). The rotational speed can be changed at the trigger switch by pressing.
Switching off: Release the trigger (13). Note: The noise that the machine makes when it switches off is due to the design (quick stop) and has no influence on the function or the service life of the machine.
7.10 LED lights
For working on dimly lit areas. The LED lights (12) light up when the machine is switched on.
7.11 Opening, tensioning the keyless chuck
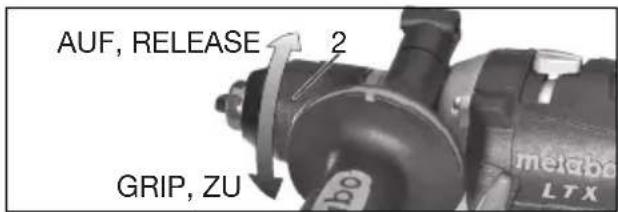
Opening the chuck
Turn sleeve (2) in the direction "AUF, RELEASE".
The grating sound which may be heard after opening the drill chuck is functional and is stopped by turning the sleeve (2) in the opposite direction.
Clamping the tool
- Open the keyless chuck and insert the tool as far as possible.
- Turn sleeve (2) in direction "GRIP, ZU" until the noticeable mechanical resistance has been overcome.
- Caution! The tool is not yet clamped! Keep turning the sleeve (it must "click" when turning) until it cannot be turned any further - only now is the tool securely clamped.
7.12 Chuck with Quick replacement system (for BS 18 LTX Quick)
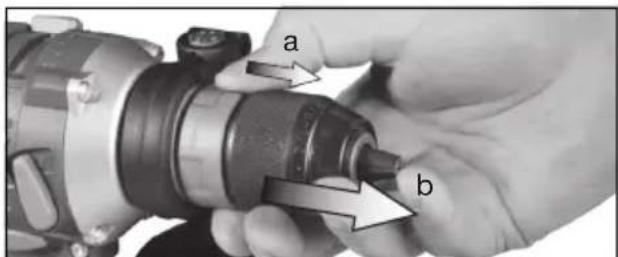
To remove: Push the interlock ring forward (a), advance and pull off the chuck (b).
To mount: Push the interlock ring forward and move the chuck as far as the limit stop on the drill spindle.
7.13 Unscrewing the chuck
(for BS 14.4 LTX Impuls, BS 18 LTX,
BS 18 LTX Impuls, SB 14.4 LTX Impuls, SB 18 LTX, SB 18 LTX Impuls)

- Open the keyless chuck.
- Slacken the screw (a) (note: left-handed thread!).
- Lock the spindle using a spanner (c) and unscrew the keyless chuck (2) using spanner (b).
Employ the same procedure when attaching the chuck, except in reverse order.
8. Maintenance, cleaning
From time to time, hold the machine vertically with the chuck facing downwards and turn the sleeve fully in the direction "GRIP, ZU" and then turn fully in the direction "AUF, RELEASE". The dust collected falls from the keyless chuck.
9. Tips and Tricks
Drilling
- Preferably in 2nd gear (high speed).
- Activate the pulse function (depending on the model) to drill steel, aluminium or tiles without centre punching or pre-drilling.
- Drill tiles and other brittle materials without impact (depending on the model).
- In the case of deep bores, pull the drill bit out of the bore from time to time in order to remove the drill dust or swarf.
Screws
- Preferably in 1st gear (low speed) and with torque control.
- Before inserting screws with deformed heads into wood, activate the pulse function (depending on the model).
- Activate the pulse function (depending on the model) to reach the maximum torque while inserting screws.
- The drill chuck can be removed for screwdriving. Insert the bit directly in the hexagon socket on the spindle.
With the BS 18 LTX Quick, the screwdriver bit is held in place by a magnet. Use the clamping bush for other tools. (The screwdriver bit is retained if a bit clamping bush (accessory, order no. 6.31281) is fitted.)
Thread tapping
- Lubricate the dies.
- Select 1st gear (low speed).
- Adjust torque control.
10. Accessories
Use only genuine Metabo accessories.
See page 4.
ENGLISHen
Use only accessories which fulfil the requirements and specifications listed in these operating instructions.
A Chargers
B Battery packs with different capacities.
Use battery packs only with voltage suitable for your power tool.
C Clamping ring with bit depot
Slide the clamping ring onto the machine flange from the front (remove additional handle (1) if necessary) and push together until they engage.
D Bit clamping bush
E Chuck with Quick replacement system
F Bit holder with Quick replacement system
G Screw-type angle attachment with Quick replacement system
For complete range of accessories, see www.metabo.com or the main catalogue.
11. Repairs
Repairs to electrical tools must be carried out by qualified electricians ONLY!
Contact your local Metabo representative if you have Metabo power tools requiring repairs. For addresses see www.metabo.com.
You can download a list of spare parts from www.metabo.com.
12. Environmental Protection
Observe national regulations on environmentally compatible disposal and on the recycling of disused machines, packaging and accessories.
Battery packs must not be disposed of with regular waste. Return faulty or used battery packs to your Metabo dealer!
Do not allow battery packs to come into contact with water!

Only for EU countries: Never dispose of power tools in your household waste! In accordance with European Guideline 2002/
96/EC on used electronic and electric equipment and its implementation in national legal systems, used power tools must be collected separately and handed in for environmentally compatible recycling. Before disposal, discharge the battery pack in the power tool. Prevent the contacts from short-circuiting (e.g. by protecting them with adhesive tape).
13. Technical Specifications
Explanatory notes on the information on page 3. Changes due to technological progress reserved
U = Voltage of battery pack n0 = No-load speed
Tightening torque for screwing:
M1 =Soft screwing application (wood)
M2 =Pulse torque
M3- =Hard screwing application (metal)
M4 =Adjustable torque
Max. drill diameter:
D1\ max = in\ steel
D2 =in softwood
D3\ max =in concrete
s = M a x . i m = W e i g h t (with smallest battery pack)
G = S p i n d l D max =Chuck clamping range
Measured values determined in conformity with EN 60745.
--- Direct current
The technical specifications quoted are subject to tolerances (in compliance with the relevant valid standards).
Emission values
These values make it possible to assess the emissions from the power tool and to compare different power tools. Depending on the operating conditions, the condition of the power tool or the accessories, the actual load may be higher or lower. For assessment purposes, please allow for breaks and periods when the load is lower. Based on the adjusted estimates, arrange protective measures for the user e.g. organisational measures.
Vibration total value (vector sum of three directions) determined in accordance with EN 60745:
ah, ID =Vibration emission value (impact drilling into concrete)
ah,D =Vibration emission value (drilling into metal)
ah,S =Vibration emission level (screwing without impact)
Kh,... =Uncertainty (vibration)
Typical A-effective perceived sound levels:
LpA =Sound pressure level
LWA =Acoustic power level
KpA, KWA = Uncertainty
During operation the noise level can exceed 80 dB(A).
Wear ear protectors!
Notice originale
Ouvrir le mandrin :
3 Schuif (boren/klopboren) *
4 Schuif (koppelbegrenzing, boren)
Boorhouder openen
Huls (2) in de richting „AUF, RELEASE“ draaien.
Abrir portabrocas
Abrir a bucha
Rodar o casquilho (2) no sentido "AUF, RELEASE".
--- Corrente contínua
Lossa chucken
3 Sleide (boring/slagboring) *
4 Sleide (dreiemomentbegrensning, boring)
5 Bryter (1. gir /2. gir) - på begge sider av maskinen
6 Omkoblingsbryter (dreieretningsinnstilling, transportsikring) - på begge sider av maskinen
Åpne chucken
Vri hylsen (2) i retningen "AUF, RELEASE".
3 Skydekontakt (boring/slagboring) *
ah,D =Vibrationsemission (boring i metal)
ah,S =Vibrationsemission (skruning uden slag)
Kn,... =Usikkerhed (vibration)
Άνοιγμα του τσοκ
metabo® work. don't play.
Metabowerke GmbH, 72622 Nürtingen, Germany www.metabo.com
- Bohrfutter öffnen
- Original instructions
- Conformity Declaration
- Specified Use
- General Safety Instructions
- Special Safety Instructions
- Overview
- Commissioning
- Assembly of additional handle (1) (depending on the model)
- ENGLISHen
- Use
- The machine's multifunctional monitoring system
- Causes and remedies:
- Battery pack
- Removing and inserting the battery pack
- Removal:
- Inserting:
- Setting the direction of rotation, engaging the transporting safety device (switch-on lock)
- Selecting gear stage
- Setting the torque limit
- Drilling and impact drilling (depending on the model)
- Activating the pulse function (depending on the model)
- On/Off switch, setting the speed
- LED lights
- Opening, tensioning the keyless chuck
- Opening the chuck
- Clamping the tool
- Chuck with Quick replacement system (for BS 18 LTX Quick)
- Unscrewing the chuck
- Maintenance, cleaning
- Tips and Tricks
- Drilling
- Screws
- Thread tapping
- Accessories
- Repairs
- Environmental Protection
- Technical Specifications
- Emission values
- Notice originale
- Ouvrir le mandrin :
- Boorhouder openen
- Abrir portabrocas
- Abrir a bucha
- Lossa chucken
- Åpne chucken
- Άνοιγμα του τσοκ
- metabo® work. don't play.
Brand : METABO
Model : BS 18 LTX-X3 Quick
Category : Drill