
GX860 - Mouse ASUS - Free user manual and instructions
Find the device manual for free GX860 ASUS in PDF.


| Product Type | Wired Gaming Mouse |
| Brand | ASUS |
| Model | GX860 |
| Dimensions (L x W x H) | 125 x 67 x 40 mm |
| Weight | 100 g (without cable) |
| Connection Interface | USB 2.0 |
| Cable Length | 1.8 m braided cable |
| Sensor Type | Optical |
| Maximum DPI | 6400 DPI |
| Number of Buttons | 5 programmable buttons |
| Scroll Wheel | Yes, with tilt |
| Lighting | RGB LED with customizable effects |
| Polling Rate | 1000 Hz (1 ms response) |
| Software Support | ASUS Armoury Crate |
| Compatibility | Windows, macOS |
| Power Source | USB powered (no batteries) |
| Cleaning Instructions | Wipe with a soft, dry cloth; avoid liquids |
| Safety Precautions | Use on a flat, dry surface; keep away from water |
| Spare Parts Availability | Replacement mouse feet (aftermarket) |
| Warranty | 2 years limited warranty |
Frequently Asked Questions - GX860 ASUS
User questions about GX860 ASUS
0 question about this device. Answer the ones you know or ask your own.
Ask a new question about this device
Download the instructions for your Mouse in PDF format for free! Find your manual GX860 - ASUS and take your electronic device back in hand. On this page are published all the documents necessary for the use of your device. GX860 by ASUS.
USER MANUAL GX860 ASUS
natural_image
Line drawing of a generic computer mouse with red logo and control buttons (no text or symbols on body)User Manual
E10753
First Edition
August 2015
Copyright © 2015 ASUSTeK Computer Inc. All Rights Reserved.
No part of this manual, including the products and software described in it, may be reproduced, transmitted, transcribed, stored in a retrieval system, or translated into any language in any form or by any means, except documentation kept by the purchaser for backup purposes, without the express written permission of ASUSTeK Computer Inc. ("ASUS").
Product warranty or service will not be extended if: (1) the product is repaired, modified or altered, unless such repair, modification of alteration is authorized in writing by ASUS; or (2) the serial number of the product is defaced or missing.
ASUS PROVIDES THIS MANUAL "AS IS" WITHOUT WARRANTY OF ANY KIND, EITHER EXPRESS OR IMPLIED, INCLUDING BUT NOT LIMITED TO THE IMPLIED WARRANTIES OR CONDITIONS OF MERCHANTABILITY OR FITNESS FOR A PARTICULAR PURPOSE. IN NO EVENT SHALL ASUS, ITS DIRECTORS, OFFICERS, EMPLOYEES OR AGENTS BE LIABLE FOR ANY INDIRECT, SPECIAL, INCIDENTAL, OR CONSEQUENTIAL DAMAGES (INCLUDING DAMAGES FOR LOSS OF PROFITS, LOSS OF BUSINESS, LOSS OF USE OR DATA, INTERRUPTION OF BUSINESS AND THE LIKE), EVEN IF ASUS HAS BEEN ADVISED OF THE POSSIBILITY OF SUCH DAMAGES ARISING FROM ANY DEFECT OR ERROR IN THIS MANUAL OR PRODUCT.
SPECIFICATIONS AND INFORMATION CONTAINED IN THIS MANUAL ARE FURNISHED FOR INFORMATIONAL USE ONLY, AND ARE SUBJECT TO CHANGE AT ANY TIME WITHOUT NOTICE, AND SHOULD NOT BE CONSTRUED AS A COMMITMENT BY ASUS. ASUS ASSUMES NO RESPONSIBILITY OR LIABILITY FOR ANY ERRORS OR INACCURACIES THAT MAY APPEAR IN THIS MANUAL, INCLUDING THE PRODUCTS AND SOFTWARE DESCRIBED IN IT.
Products and corporate names appearing in this manual may or may not be registered trademarks or copyrights of their respective companies, and are used only for identification or explanation and to the owners' benefit, without intent to infringe.
Contact Information
ASUSTeK COMPUTER INC.
Address 15 Li-Te Road, Peitou, Taipei, Taiwan 11259
Telephone +886-2-2894-3447
Fax +886-2-2890-7798
E-mail info@asus.com.tw
Online support support.asus.com
ASUS COMPUTER INTERNATIONAL (America)
Address 800 Corporate Way, Fremont, CA 94539, USA
Telephone +1-510-739-3777
Fax +1-510-608-4555
Web site usa.asus.com
Technical Support
Telephone +1-812-282-2787
Support fax +1-812-284-0883
Online support support.asus.com
ASUS COMPUTER GmbH (Germany and Austria)
Address Harkort Str. 21-23, D-40880 Ratingen, Germany
Fax +49-2102-959911
Web site www.asus.de
Online support support.asus.com
* EUR 0.14/minute from a German fixed landline; EUR 0.42/minute from a mobile phone.
Contents
Notices....5
Package Contents....7
Specifications Summary 7
Knowing your ASUS GX860 Gaming Mouse....8
Connecting your ASUS GX860 Gaming Mouse....10
Customizing your mouse (DPI values / Macro commands / Button functions) 10
Using the setup utility 10
Notices
Federal Communications Commission Statement
This device complies with Part 15 of the FCC Rules. Operation is subject to the following two conditions:
• This device may not cause harmful interference, and
- This device must accept any interference received including interference that may cause undesired operation.
This equipment has been tested and found to comply with the limits for a Class B digital device, pursuant to Part 15 of the FCC Rules. These limits are designed to provide reasonable protection against harmful interference in a residential installation. This equipment generates, uses and can radiate radio frequency energy and, if not installed and used in accordance with manufacturer's instructions, may cause harmful interference to radio communications. However, there is no guarantee that interference will not occur in a particular installation. If this equipment does cause harmful interference to radio or television reception, which can be determined by turning the equipment off and on, the user is encouraged to try to correct the interference by one or more of the following measures:
• Reorient or relocate the receiving antenna.
- Increase the separation between the equipment and receiver.
- Connect the equipment to an outlet on a circuit different from that to which the receiver is connected.
- Consult the dealer or an experienced radio/TV technician for help.
CAUTION: Any changes or modifications not expressly approved by the grantee of this device could void the user's authority to operate the equipment.
Safety Certifications
- CE Marking
• China RoHS EFUP Labeling - 10 Years
C-Tick Mark
• BSMI Certification

Complies with 21 CFR 1040.10 and 1040.11 except for deviations pursuant to Laser Notice No. 50, dated June 24, 2007.
REACH
Complying with the REACH (Registration, Evaluation, Authorisation, and Restriction of Chemicals) regulatory framework, we published the chemical substances in our products at ASUS REACH website at http://csr.asus.com/english/REACH.htm.

DO NOT throw the mouse in municipal waste. This product has been designed to enable proper reuse of parts and recycling. This symbol of the crossed out wheeled bin indicates that the product (electrical and electronic equipment) should not be placed in municipal waste. Check local regulations for disposal of electronic products.
ASUS Recycling/Takeback Services
ASUS recycling and takeback programs come from our commitment to the highest standards for protecting our environment. We believe in providing solutions for you to be able to responsibly recycle our products, batteries, other components, as well as the packaging materials. Please go to http://csr.asus.com/english/Takeback.htm for the detailed recycling information in different regions.
Package Contents
Check your ASUS ROG GX860 Gaming Mouse package for the following items:
• ASUS GX860 Gaming Mouse
- QSG x 1

If any of the above items is damaged or missing, contact your retailer immediately.
Specifications Summary
| Model Name | GX860 |
| Connectivity Technology | Wired / USB |
| Tracking | Laser |
| OS Support | Windows® 8.1 / Windows® 8 / Windows® 7 / Windows® XP |
| Dimensions (mm) | 118.2 (L) x 68.4 (W) x 4 (H) |
| Cable Length | 1.8m |
| Buttons / Switches | 1 x Left button / Right button / Scroll wheel2 x DPI switch (programmable)3 x Side buttons (programmable) |
| Resolution | 50 ~ 8200 dpi (adjustable)Default: 800dpi (Level 1), 1600dpi (Level 2), 3200dpi (Level 3), 5600dpi (Level 4) |
| Interface | USB |

Specifications are subject to change without prior notice.
Knowing your ASUS GX860 Gaming Mouse
Your ASUS ROG GX860 Gaming Mouse comes with a left button, a right button, a scroll wheel, three side buttons and a two-way DPI switch.


natural_image
Top-down line drawing of a car's front view with a blue circle marker labeled '10' pointing to the side (no text or symbols on the car itself)| 1 | Scroll wheel |
| 2 | Left button |
| 3 | Right button |
| 4 | DPI + button / indicator |
| 5 | DPI - button / indicator |
| 6 | IE Forward button (default) |
| 7 | IE Backward button (default) |
| 8 | Snap Switch button (default: Disabled) |
| 9 | Profile LED indicator |
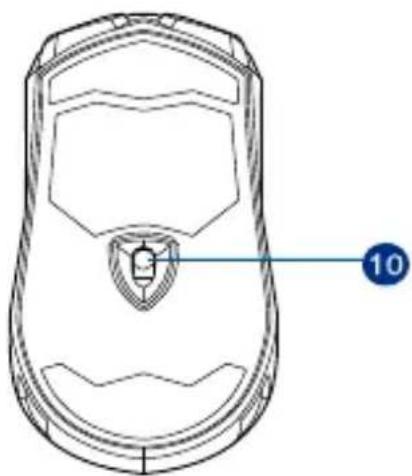
| 10 | Laser sensor |
* DPI LED indications
| Number of lit LEDs Indications |
| 1 Level 1 (Default: 800 dpi) |
| 2 Level 2 (Default: 1600 dpi) |
| 3 Level 3 (Default: 3200 dpi) |
| 4 Level 4 (Default: 5600 dpi) |
** Profile LED indications
| LED colors Indications | |
| Red Profile 1 | |
| Green Profile 2 | |
| Orange Profile 3 | |

NOTE: GX860 has four levels of DPI resolution. You can choose Level 1, 2, 3 or 4 on GX860 driver. Visit ASUS official website www.asus.com for more information.
Connecting your ASUS GX860 Gaming Mouse
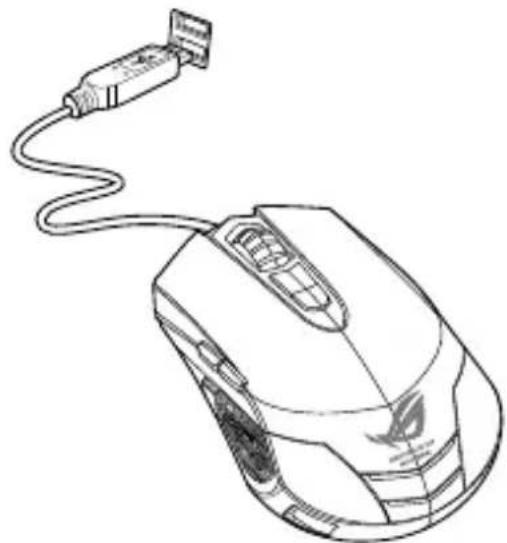
Connect your ASUS GX860 Gaming Mouse to your computer's USB port.
natural_image
Line drawing of a computer mouse with attached cable and connector (no text or symbols)Customizing your mouse (DPI values / Macro commands / Button functions)
Go to ASUS website at www.asus.com to download the latest driver and install it to customize your mouse's DPI values, Macro commands, and button functions.
Using the setup utility
Do either of the following to launch the setup utility:
- Click the ASUS ROG Gaming Mouse GX860 shortcut on the Windows® desktop.
- Click Start > All Programs > ASUS > ASUS ROG Gaming Mouse GX860 > ASUS ROG Gaming Mouse GX860.
• Right-click the icon √ from the Windows® taskbar, then select Launch GX860 APP.
On Windows® 8, click ASUS ROG Gaming Mouse GX860 from the Start screen.
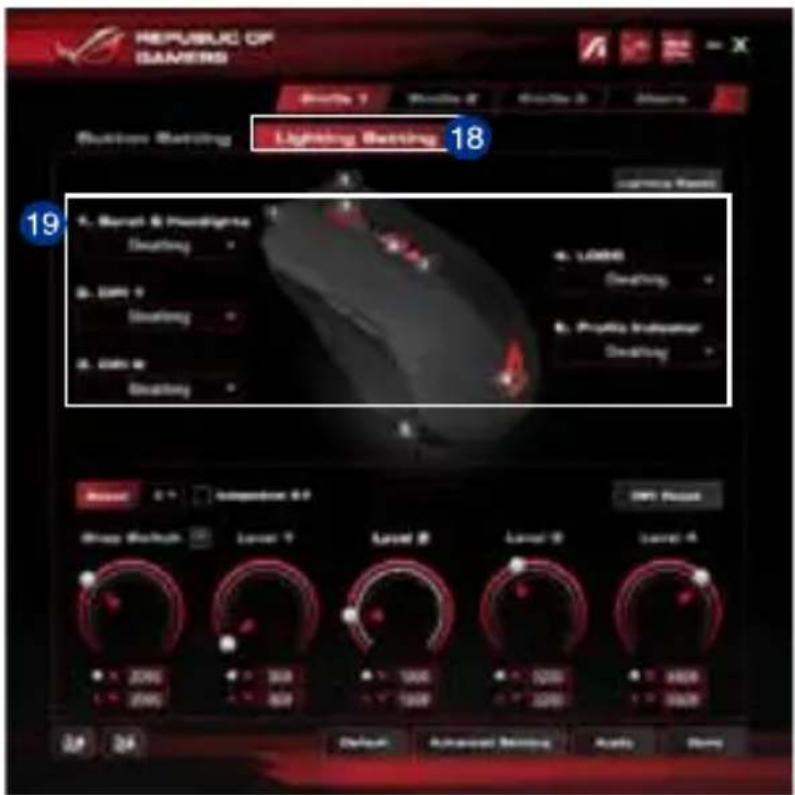
Main menu

| Items Descriptions | |
| 1. | Click to connect to ASUS official website. |
| 2. | Click to connect to ASUS ROG official website. |
| 3. | Click to connect to ASUS Shop official website. |
| 4. | Click each tab to display the selected profile menu. |
| 5. | Click to run the Macro Management*Refer to Page 16 for detailed instructions. |
| 6. | Click to run the Button setting. |
| 7. | Select an item to change the Button setting. |
| 8. | Click to reset the Button setting. |
| 9. | Click to choose the number of DPI resolution stages that you want to implement. |
| 10. | Tick / Untick to enable / disable the Independent X-Y instruction. |
| 11. | Click the tachometer to get rough DPI resolution or key in the DPI resolution you need in the column. |
| 12. | Click to reset DPI resolution. |
| 13. | Click to export or import a profile to your computer. |
| 14. | Click to reset all settings to the factory defaults. |
| 15. | Click to go to Advanced Setting. |
| 16. | Click to apply all setting. |
| 17. | Click to apply and save and exit the program. |
| 18. | Click to run the Lighting Setting. |
| 19. | Select an item to change the Lighting Setting. |
Button Settings
| Category Items Descriptions | ||
| Mouse Function | L-Button | Simulates the function of the left mouse button. |
| R-Button | Simulates the function of the right mouse button. | |
| M-Button | Simulates the function of the middle mouse button. | |
| Scroll Up | Click to change the Scroll Up setting. | |
| Scroll Down | Click to change the Scroll Down setting. | |
| Tilt Left | When selected, press the button to scroll left. | |
| Tilt Right | When selected, press the button to scroll right. | |
| Drag Lock | When selected, press the button to lock the drag function. | |
| DPI Switch | Click to change the DPI Switch setting. | |
| DPI [+] | When selected, press the button to increase the DPI value. | |
| DPI [-] | When selected, press the button to decrease the DPI value. | |
| Computer Function | Maximize Window® | When selected, press the button to maximize the window. |
| Minimize Window® | When selected, press the button to minimize the window. | |
| Computer | When selected, press the button to open Computer window. | |
Continued on the next page
| Category Items Descriptions | ||
| Computer Function | Calculator | When selected, press the button to launch the Calculator application. |
| Control Panel | When selected, press the button to launch the Control Panel. | |
| Start Button | When selected, press the button to launch the Start menu. | |
| Launch Program | When selected, press the button to launch a program. | |
| Application Switch | When selected, press the button to enable the Application Switch. | |
| Windows® Flip-3D | When selected, press the button to launch the Windows® Flip-3D (for Window® 7).When selected, press the button to switch between running applications (for Window® 8). | |
| Windows Charms | When Selected, press the button to launch Windows Charms (for windows®8). | |
| Copy | When selected, press the button to copy. | |
| Paste | When selected, press the button to paste. | |
| Cut | When selected, press the button to cut. | |
| Undo | When selected, press the button to undo. | |
| Media Function | Media Player | When selected, press the button to launch the default media player of your system. |
| Volume Up | When selected, press the button to increase the system volume. | |
| Volume Down | When selected, press the button to decrease the system volume. | |
| Play/Pause | When selected, these buttons become playback control buttons in an active media player. | |
| Next (Track) | ||
| Previous (Track) | ||
| Stop | ||
| Mute | When selected, press the button to turn the volume's mute mode on/off. | |
| Internet | Page Forward | When selected, press the button to go to the next page you viewed. |
| Page Backward | When selected, press the button to go to the previous page you viewed. | |
| Web Browser | When selected, press the button to launch your default web browser.* This function only works under Windows® XP / Vista / 7 operating systems. | |
| FastFindTM | When selected, press the button to launch FastFindTM. | |
| When selected, press the button to launch your default E-mail application.* This function only works under Windows® XP / Vista / 7 operating systems. | ||
| Rapid Fire | 3 times | When selected, press the button to do a rapid fire in a click-to-attack game, which is the same as clicking the left mouse for 3 / 5 times.* Rapid fire times (3x/5x) may vary with different game settings. |
| 5 times | ||
| Auto | ||
| Keyboard | Allows you to combine/record three keys to the maximum. | |
| Button Off | Disables the button function. | |
| Launch GX860 APP | When selected, press the button to launch this setup utility. | |
| Macro Macro List | Allows you to select the Macro that you want to assign and the Macro play mode.* Refer to the table on the next page for the Macro play mode. | |
| Snap Switch | Click once | Switch the DPI to specific resolution through just one click, and click once again to shift to the original DPI. |
| Click and hold | Click and hold the button to switch the DPI to specific resolution. Release the button to go back to the original one. | |
| Customized | Click the button to switch the DPI to specific resolution during customized period. The DPI would shift to the original one automatically once the time is expired. | |
Continued on the next page
* If you use GX860 on another computer, some of the button functions that you have previously configured on your computer will be reset to the default settings. Please install the application and configure the button functions again.
Macro Management
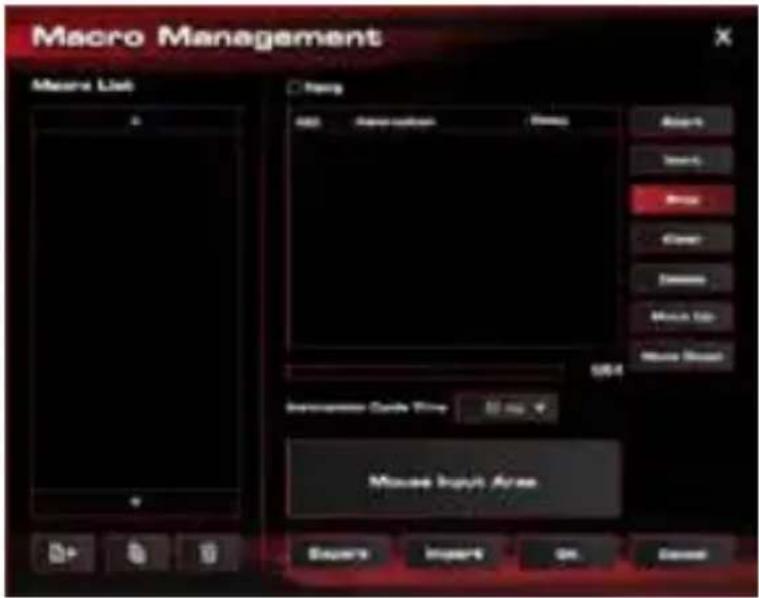
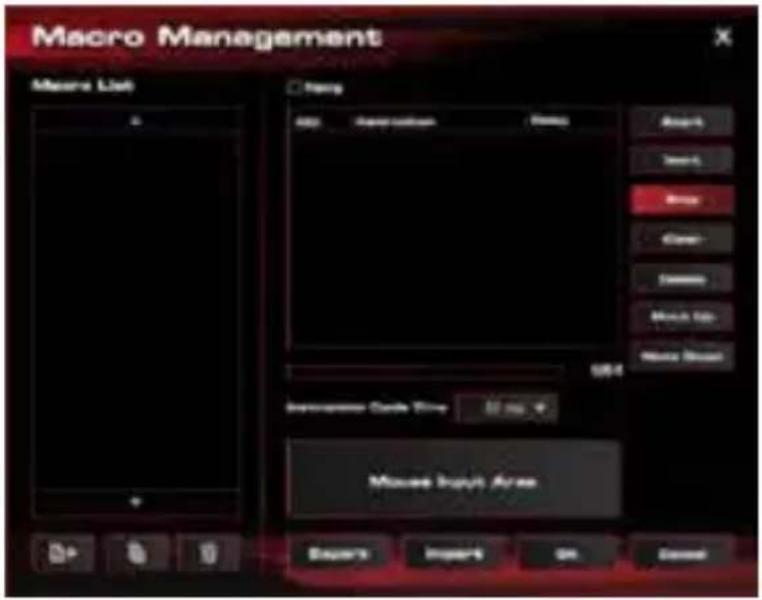
From the Main menu screen, click the Macro tab to enter Macro Management setup screen.
| Items Descriptions | |
| Timing | Tick this item to record the time between pressing down and releasing a button. (Default:12ms). |
| Insert | When this item is ticked, the new instruction will be inserted before the selected instruction. Otherwise, any new instruction will be given the first priority. |
| Start | Click to start recording the keystrokes and/or mouse actions. |
| Stop | Click to stop recording the keystrokes and/or mouse actions. |
| Clear | Click to clear all the saved instructions. |
| Move up / down | Click to move up/down the selected instruction. |
| Instruction cycle time | When Timing is not ticked, all the actions' delay time will be the value you chose from the dropdown list. |
| Loop | Sets the macro to run at a click and stop when you click again. |
Macro Mode

| Items Descriptions | |
| Once per click | Select to perform the selected Macro profile once when clicking the mouse button. |
| Click to repeat, next click to stop | Select to repeat performing the selected Macro profile when clicking the mouse button, and click the button again to stop. |
| Click to repeat | From the dropdown list, select the number of times you want to repeat performing the selected Macro profile when clicking the mouse button. |
| Press to repeat | Select to repeat performing the selected Macro profile when pressing down your mouse button and release the button to stop |
Advanced Setting
| Category Items Descriptions | ||
| Angle Snapping* | ON | Select to enable the Angle Snapping. |
| OFF | Select to disable the Angle Snapping. | |
| Lift Height** | High | Select to adjust the Lift Height. |
| Mid High | ||
| Mid | ||
| Mid Low | ||
| Low | ||
| Double click 1-10 | Choose the stage of Double Click. | |
| Lines/per scroll 1-10 | Choose the number of lines per scroll. | |
| USB Polling Rate | 1000Hz | Select to change the Polling Rate. |
| 500Hz | ||
| 250Hz | ||
| 125Hz | ||
* Angle Snapping brings smooth and straight mouse movements. By default, Angle Snapping is disabled.
** The tracking function stops when you lift the mouse off the mouse pad or surface higher than your selected Lift Height. If you encounter irregular mouse movements when you are using your mouse on your mouse pad or surface, try selecting a level higher than your selected Lift Height.
| Items Descriptions | |
| Click to add a new Macro Console. | |
| Click to duplicate the existing Macro Console. | |
| Click to delete the Macro Console. | |
| Export | Click to save the current macro to your hard disk drive. |
| Import | Click to load a macro from your hard disk drive. |
| OK | Click to apply the changes. |
| Cancel | Click to exit the Macro Management. |
* When a Macro function is not assigned to a mouse button, the Macro function and its name are stored in your computer. If you assign the Macro function to you mouse button and connect the mouse to another computer, the assigned Macro name changes automatically but does not affect the original Macro function.
Test Arena

| Items Descriptions | |
| 1. | Click to start Precision Test. |
| 2. | Click to start Movement and Click Test. |
| 3. | Click to select the test lifespan. |
| 4. | Click to select target quantity of the test. |
| 5. | Test environment. |
| 6. | Test Area. |
Taskbar menu

Items Descriptions
| 1. | The GX860 mouse logo appears on the taskbar when the program is properly installed. |
| 2. | Click to launch the main menu of the GX860 mouse setup utility. |
| 3. | Click to exit the setup utility. |
華碩 GX860 遊戲滑鼠

natural_image
Line drawing of a computer mouse with red logo and 'Republic of Gambus' text, no readable text or symbols beyond branding使用手册
T10753
第一版
2015 年 8 月發行
版權說明
Federal Communications Commission Statement
This device complies with Part 15 of the FCC Rules. Operation is subject to the following two conditions:
- This device may not cause harmful interference, and - This device must accept any interference received including interference that may cause undesired operation.
This equipment has been tested and found to comply with the limits for a Class B digital device, pursuant to Part 15 of the FCC Rules. These limits are designed to provide reasonable protection against harmful interference in a residential installation. This equipment generates, uses and can radiate radio frequency energy and, if not installed and used in accordance with manufacturer's instructions, may cause harmful interference to radio communications. However, there is no guarantee that interference will not occur in a particular installation. If this equipment does cause harmful interference to radio or television reception, which can be determined by turning the equipment off and on, the user is encouraged to try to correct the interference by one or more of the following measures:
• Reorient or relocate the receiving antenna.
- Increase the separation between the equipment and receiver.
- Connect the equipment to an outlet on a circuit different from that to which the receiver is connected.
- Consult the dealer or an experienced radio/TV technician for help.
CAUTION: Any changes or modifications not expressly approved by the grantee of this device could void the user's authority to operate the equipment.
Safety Certifications
- CE Marking
• China RoHS EFUP Labeling - 10 Years
• C-Tick Mark
• BSMI Certification - UL Mark
Complies with 21 CFR 1040.10 and 1040.11 except for deviations pursuant to Laser Notice No. 50, dated June 24, 2007.
REACH

natural_image
Top-down line drawing of a car's front view with a numbered label pointing to the side (no text or symbols on the diagram itself)natural_image
Line drawing of a computer mouse with a cable and connector (no text or symbols)個人化您的滑鼠
(DPI 數值/巨集指令/按鍵功能)
natural_image
Line drawing of a computer mouse with red logo and 'REPUBLIC OF GAINING' text, no readable document content用户手册
C10753
第一版
2015年8月发行
版权说明

natural_image
Top-down line drawing of a car's front panel with no text or symbolsnatural_image
Line drawing of a computer mouse with a cable and connector (no text or symbols)个性化您的鼠标
(DPI 数值/宏指令/按键功能)
natural_image
Line drawing of a white gaming computer mouse with red logo and 'REPUBLIC OF GAINING' text (no additional signage or symbols)Online support support.asus.com
ASUS COMPUTER INTERNATIONAL (Amérique)
Adresse 800 Corporate Way, Fremont, CA 94539, USA
Téléphone +1-510-739-3777
Fax +1-510-608-4555
Site Web usa.asus.com
Support technique
Téléphone +1-812-282-2787
Fax +1-812-284-0883
natural_image
Top-down line drawing of a car's front panel with a blue circle marker labeled '10' pointing to the interior (no text or symbols on the diagram itself)natural_image
Line drawing of a computer mouse with cable and connector (no text or symbols)natural_image
Line drawing of a white gaming computer mouse with red logo and 'REPUBLIC OF GAINING' text (no additional signage or symbols)Benutzerhandbuch
G10753
Erste Ausgabe
August 2015
Online Support support.asus.com
ASUS COMPUTER INTERNATIONAL (Amerika)
Adresse 800 Corporate Way, Fremont, CA 94539, USA Telefon
+1-510-739-3777
Fax +1-510-608-4555
Online Support support.asus.com
Online Support support.asus.com

natural_image
Top-down line drawing of a car's front panel with a numbered label pointing to the center (no text or symbols on the diagram itself)HINWEIS: GX860 has four levels of DPI resolution. You can choose Level 1, 2, 3 or 4 on GX860 driver. Visit ASUS official website www.asus.com for more information.
natural_image
Line drawing of a computer mouse with attached cable and connector (no text or symbols)From the Main menu screen, click the Macro tab to enter Macro Management setup screen.
natural_image
Line drawing of a white gaming computer mouse with red logo and 'REPUBLIC OF GAINING' text (no additional symbols or text)- CE Marking China RoHS EFUP Labeling - 10 Years - C-Tick Mark BSMI Certification


natural_image
Top-down line drawing of a car's front view with a blue circle and number 10 pointing to the side (no text or symbols on the diagram itself)natural_image
Line drawing of a computer mouse with cable and connector (no text or symbols)
natural_image
Line drawing of a computer mouse with red logo and 'REFERENCE CHINA' text, no readable document text or symbols beyond brandingManual del usuario
S10753
Federal Communications Commission Statement
This device complies with Part 15 of the FCC Rules. Operation is subject to the following two conditions:
• This device may not cause harmful interference, and
- This device must accept any interference received including interference that may cause undesired operation.
This equipment has been tested and found to comply with the limits for a Class B digital device, pursuant to Part 15 of the FCC Rules. These limits are designed to provide reasonable protection against harmful interference in a residential installation. This equipment generates, uses and can radiate radio frequency energy and, if not installed and used in accordance with manufacturer's instructions, may cause harmful interference to radio communications. However, there is no guarantee that interference will not occur in a particular installation. If this equipment does cause harmful interference to radio or television reception, which can be determined by turning the equipment off and on, the user is encouraged to try to correct the interference by one or more of the following measures:
• Reorient or relocate the receiving antenna.
- Increase the separation between the equipment and receiver.
- Connect the equipment to an outlet on a circuit different from that to which the receiver is connected.
- Consult the dealer or an experienced radio/TV technician for help.
CAUTION: Any changes or modifications not expressly approved by the grantee of this device could void the user's authority to operate the equipment.
Safety Certifications
- CE Marking
• China RoHS EFUP Labeling - 10 Years
C-Tick Mark
• BSMI Certification

Complies with 21 CFR 1040.10 and 1040.11 except for deviations pursuant to Laser Notice No. 50, dated June 24, 2007.
REACH
natural_image
Top-down line drawing of a car's front panel with a blue circle marker labeled '10' pointing to the center (no text or symbols on the diagram itself)natural_image
Line drawing of a computer mouse with cable and connector (no text or symbols)


- Copyright © 2015 ASUSTeK Computer Inc. All Rights Reserved.
- Contact Information
- ASUSTeK COMPUTER INC.
- ASUS COMPUTER INTERNATIONAL (America)
- Technical Support
- ASUS COMPUTER GmbH (Germany and Austria)
- Contents
- Notices
- Federal Communications Commission Statement
- Safety Certifications
- REACH
- ASUS Recycling/Takeback Services
- Package Contents
- Knowing your ASUS GX860 Gaming Mouse
- Connecting your ASUS GX860 Gaming Mouse
- Customizing your mouse (DPI values / Macro commands / Button functions)
- Using the setup utility
- Macro Management
- Macro Mode
- Test Arena
- Taskbar menu
- 華碩 GX860 遊戲滑鼠
- 版權說明
- 個人化您的滑鼠
- (DPI 數值/巨集指令/按鍵功能)
- 版权说明
- 个性化您的鼠标
- (DPI 数值/宏指令/按键功能)
- ASUS COMPUTER INTERNATIONAL (Amérique)
- Support technique
- ASUS COMPUTER INTERNATIONAL (Amerika)
Brand : ASUS
Model : GX860
Category : Mouse