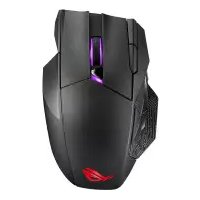
ROG Spatha X - Mouse ASUS - Free user manual and instructions
Find the device manual for free ROG Spatha X ASUS in PDF.



| Product Type | Gaming Mouse |
| Brand | ASUS |
| Model | ROG Spatha X |
| Connectivity | Wired USB-C / Wireless RF 2.4 GHz |
| Sensor | Optical |
| DPI Resolution | 100 - 19,000 DPI (presets: 400, 800, 1600, 3200 DPI) |
| Programmable Buttons | 14 buttons |
| Scroll Wheel | Yes (with DPI adjustment function) |
| Lighting | RGB Aura Sync (customizable) |
| Power | Rechargeable battery via USB-C or charging dock |
| Configuration Software | Armoury Crate |
| Integrated Profiles | 5 profiles |
| Included Cable | USB Type-C to USB-A |
| Included Charging Dock/Receiver | Yes |
| Maintenance | Clean with a soft, dry cloth |
| Safety | Compliant with CE and RoHS directives |
| Wireless Frequency | 2.4 GHz |
Frequently Asked Questions - ROG Spatha X ASUS
User questions about ROG Spatha X ASUS
0 question about this device. Answer the ones you know or ask your own.
Ask a new question about this device
Download the instructions for your Mouse in PDF format for free! Find your manual ROG Spatha X - ASUS and take your electronic device back in hand. On this page are published all the documents necessary for the use of your device. ROG Spatha X by ASUS.
USER MANUAL ROG Spatha X ASUS
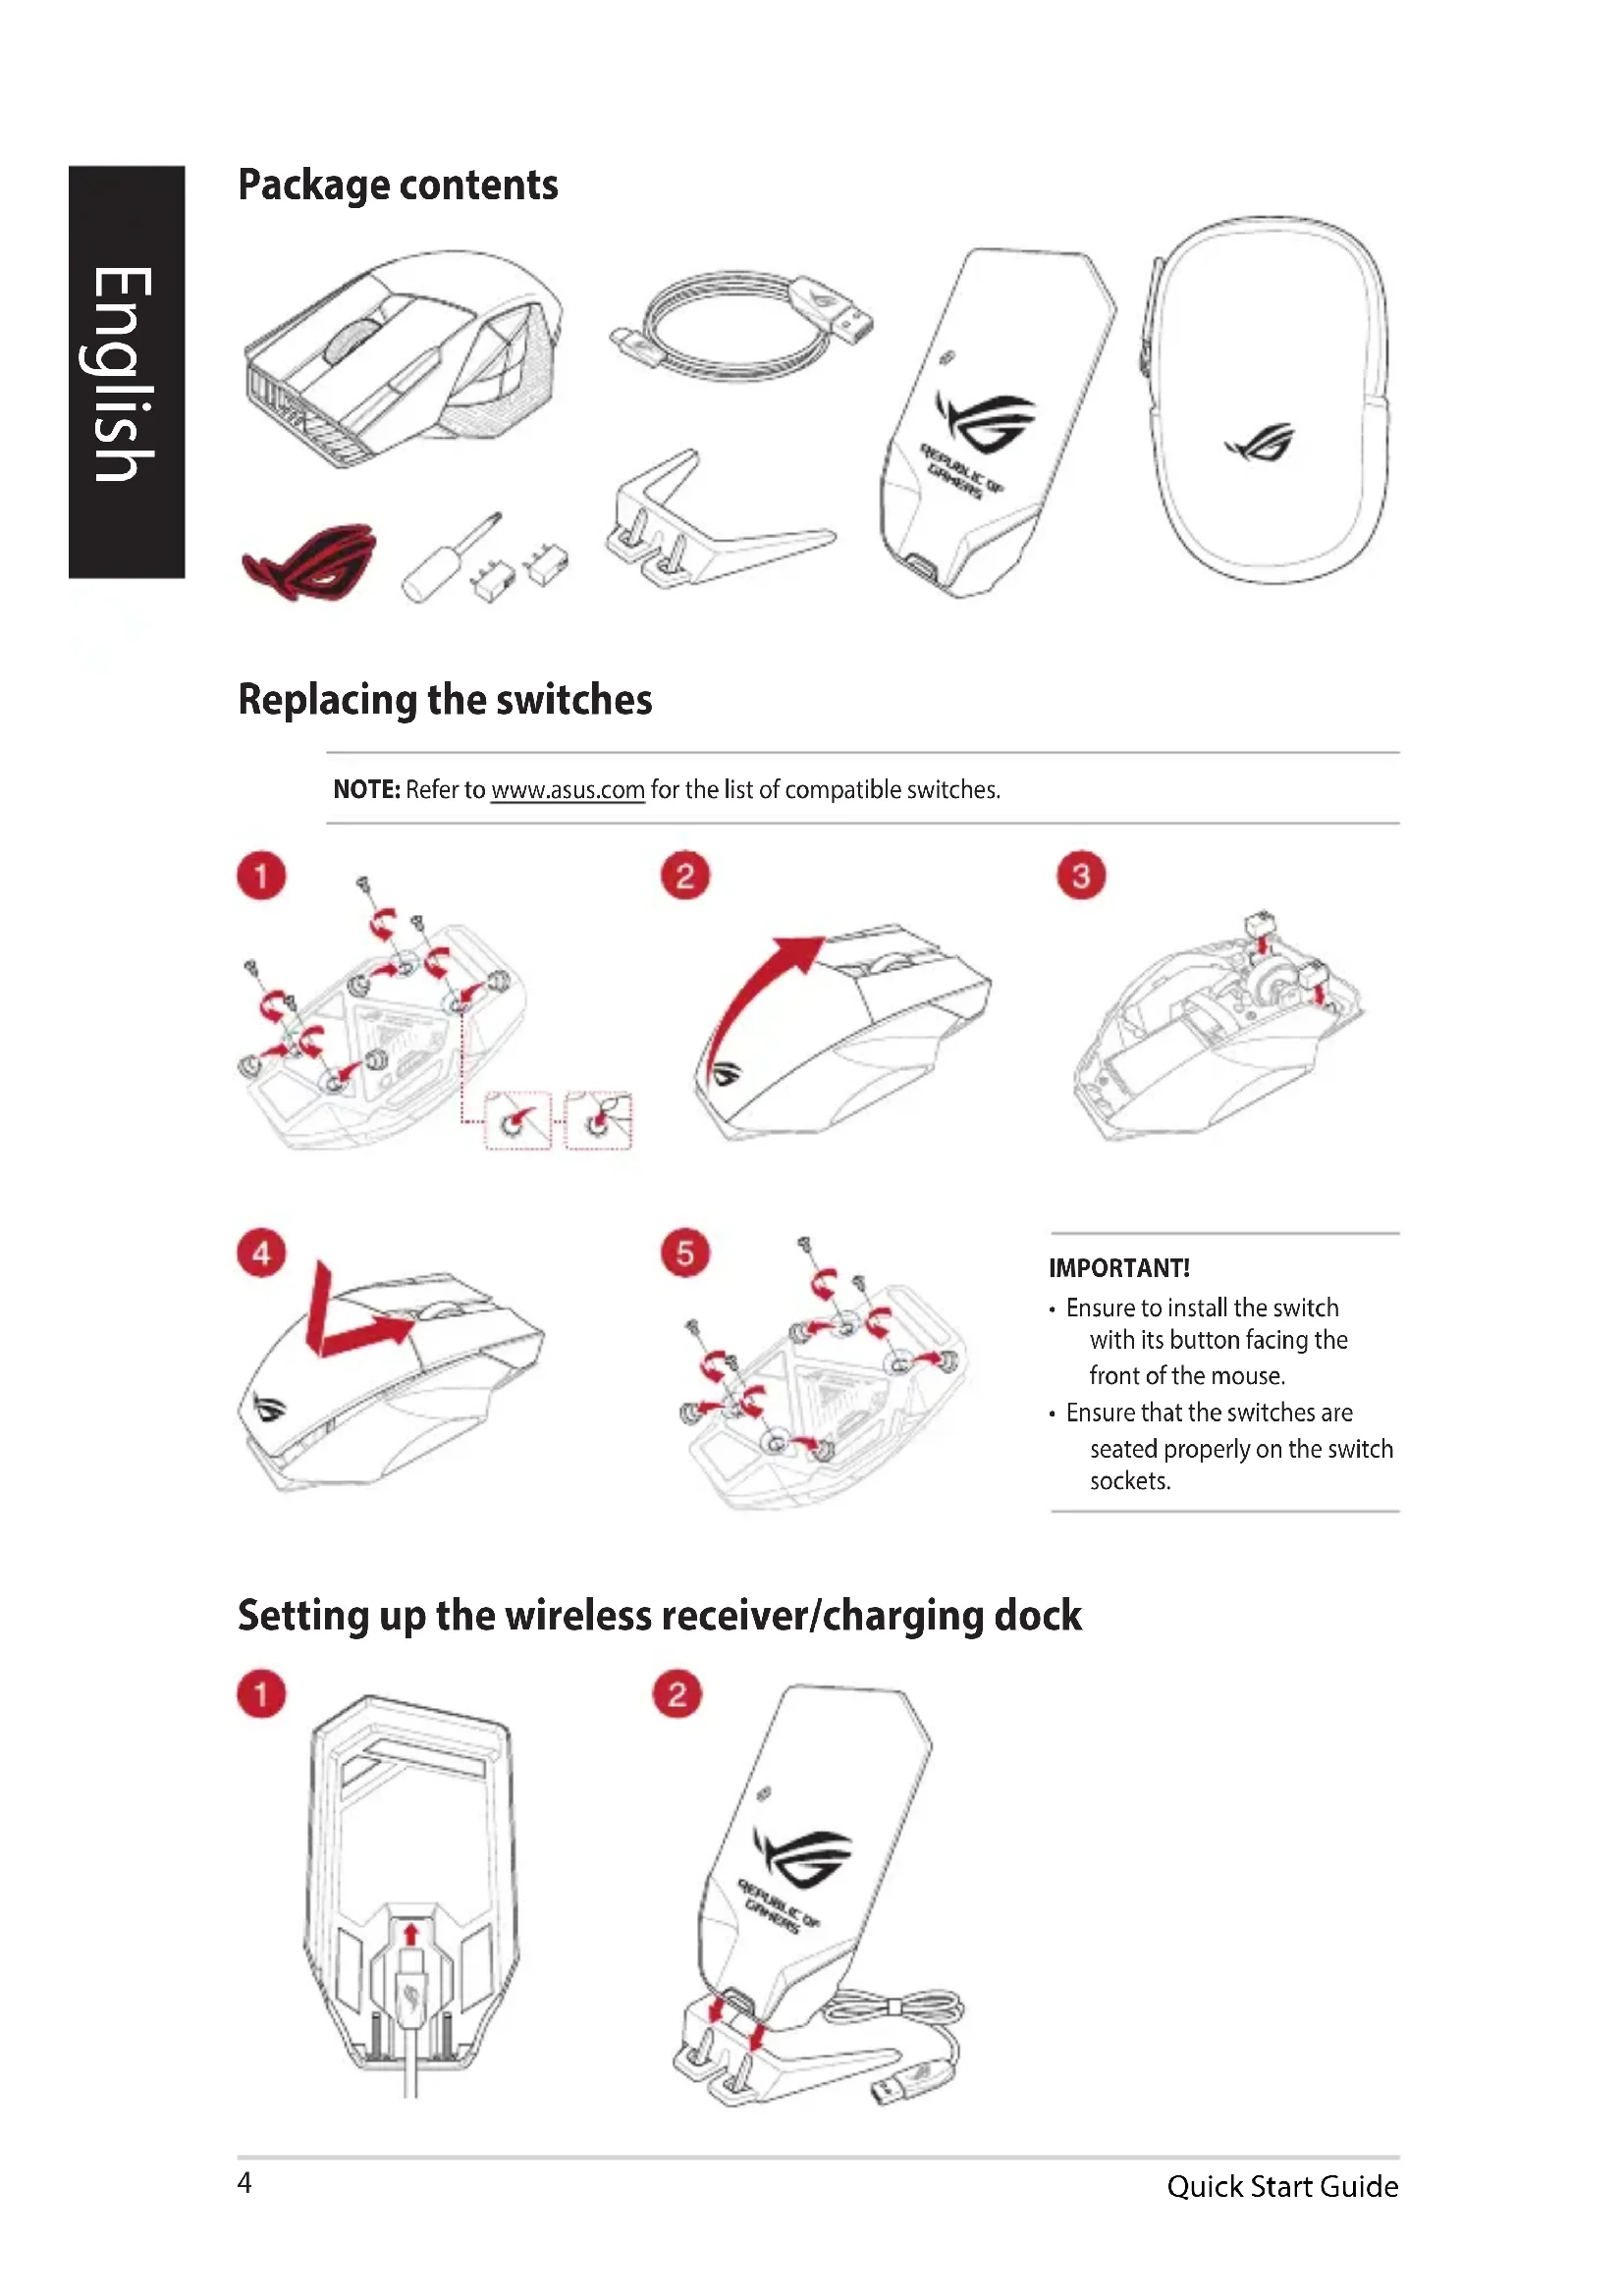
Setting up the wireless receiver/charging dock 4
English 5
繁體中文 8
简体中文 10
日本語 12
한국어 14
Français....16
Deutsch....18
Italiano....20
Español 22
Русский 24
natural_image
Line drawings of various electronic devices including a device with cable, accessories, and a branded orange device (no text or symbols present)Replacing the switches
NOTE: Refer to www.asus.com for the list of compatible switches.
natural_image
Line drawing of a 3D object with a red arrow indicating direction, no text or symbols present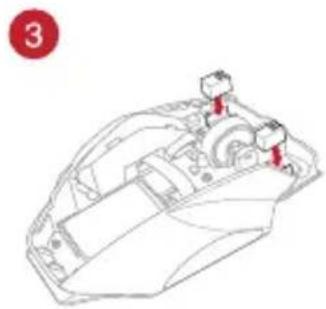
natural_image
Technical line drawing of a mechanical assembly with red indicator lights (no text or symbols)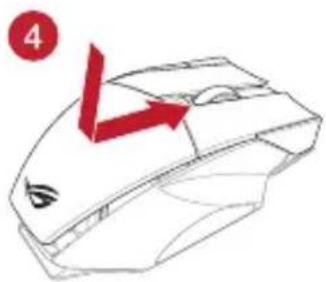
natural_image
Line drawing of a computer mouse with a red arrow pointing to the side panel (no text or symbols)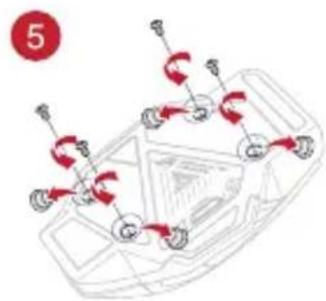
natural_image
Diagram of a car interior with red cable fasteners and sensors, no text or symbols presentIMPORTANT!
- Ensure to install the switch with its button facing the front of the mouse.
- Ensure that the switches are seated properly on the switch sockets.
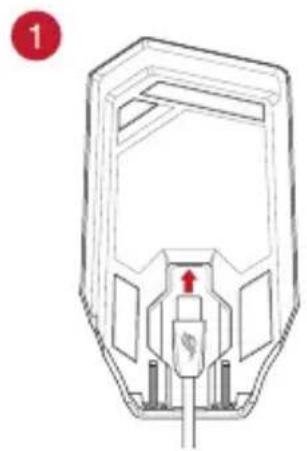
Setting up the wireless receiver/charging dock
natural_image
Technical line drawing of a mechanical component with no visible text or symbols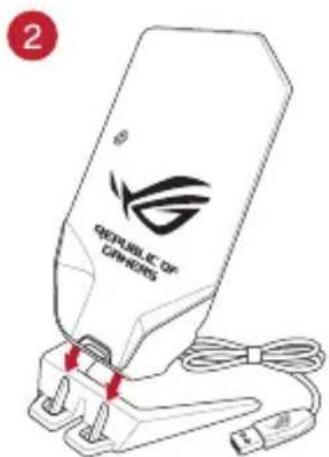
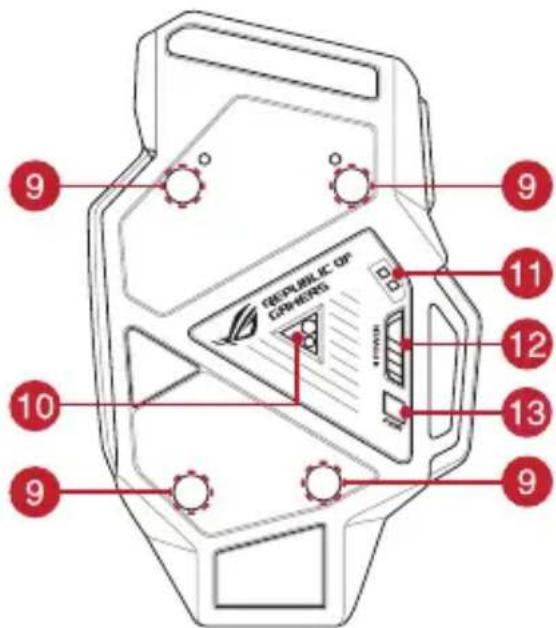
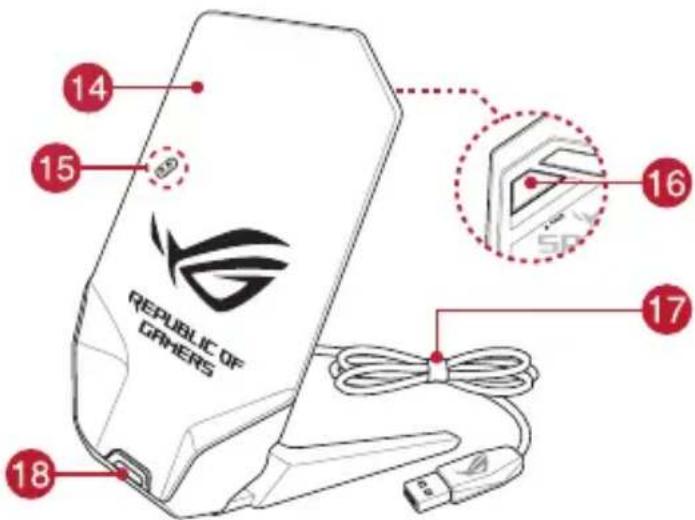
Device features
1 Right button
2 Scroll wheel
3 DPI button
4 USB Type-C® connector
5 Left button
6 Forward button
7 Backward button
8 Programmable thumb buttons
9 Rubber cover
10 Optical sensor
11 Mouse charging connectors
12 Power switch
13 Pairing button
14 Wireless receiver/charging dock
15 Dock charging connectors
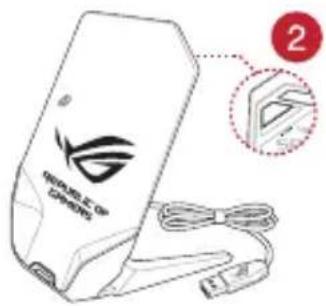
16 Pairing button (Dock)
17 USB Type-C® to Type-A cable
18 Dock LED indicator

Connecting your gaming mouse
Setting up your gaming mouse as a wired mouse
Connect the bundled USB Type-C ^® to Type-A cable to your gaming mouse and a USB port on your computer.
Setting up your gaming mouse as an RF wireless mouse
NOTE: Download the driver from https://www.asus.com and install it on your computer.
- Connect the bundled USB Type-C® to Type-A cable to your wireless receiver/charging dock and a USB port on your computer.
NOTE: Your gaming mouse comes paired by default. Please follow steps 2 - 5 only if you need to pair your gaming mouse again.
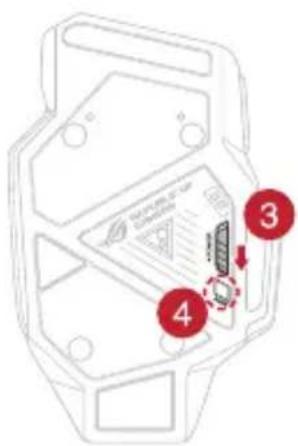
- Press the Pairing button for 3 seconds on the rear of your wireless receiver/charging dock, the Dock LED indicator should begin blinking green.
- Slide the Power Switch to turn on your ROG SPATHA X gaming mouse.
- Press the Pairing button for 3 seconds on your ROG SPATHA X gaming mouse, the LEDs should begin blinking green.
- The Dock LED indicator and gaming mouse LEDs will return to their original lighting effects when your ROG SPATHA X gaming mouse has successfully paired.
NOTE: Click on the left button to wake your ROG SPATHA X gaming mouse from sleep mode.
Specifications\*
Resolution DPI 1 DPI 2 DPI 3 (Default) DPI 4
100 DPI to 19000 DPI 400 DPI 800 DPI 1600 DPI 3200 DPI
* You may customize the DPI settings for DPI 1-4 through Armoury Crate or the DPI On-The-Scroll tuning function.
Gaming mouse profiles
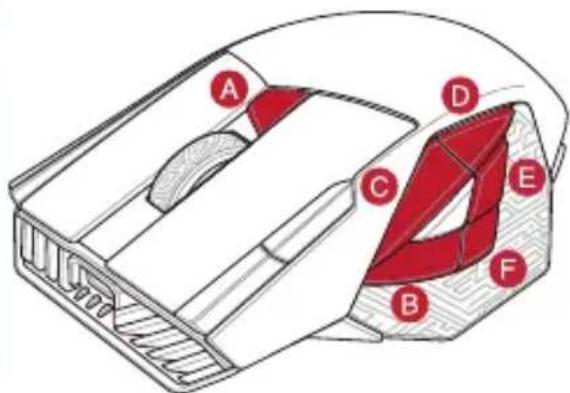
Profile Default lighting effect
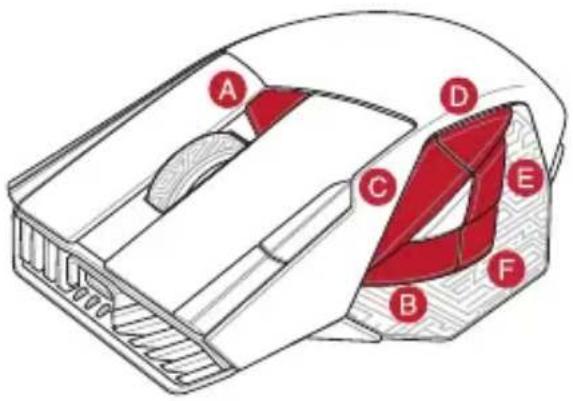
| Profile 1 | A + B | Rainbow (Default) |
| Profile 2 | A + C | Color cycle |
| Profile 3 | A + D | Breathing (blue) |
| Profile 4 | A + E | Reactive (Green) |
| Profile 5 | A + F | Comet |
Battery Status
The LEDs on your gaming mouse will turn red (breathing) when the battery power is below 20% in RF 2.4G mode. You may charge your gaming mouse by using the bundled USB cable or wireless receiver/charging dock.
Using the DPI On-The-Scroll tuning function
The DPI On-The-Scroll tuning function allows you to customize the DPI of your gaming mouse without using Armoury Crate.
- Press and hold the DPI button for 3 seconds until the LEDs on your gaming mouse light up.
- Scroll the scroll wheel forwards or backwards to adjust the DPI. The LED color hue on your scroll wheel will differ depending on the DPI adjustment.
NOTE:
- The DPI increments at 50 DPI per scroll forwards and decrements at 50 DPI per scroll backwards.
-
The DPI ranges from 100 DPI (blue) to 19000 DPI (red).
-
Press the DPI button once you have finished customizing the DPI value to save the changes made.
Updating the gaming mouse and wireless receiver/charging dock
- Connect your gaming mouse or wireless receiver/charging dock to your computer using the bundled cable.
- Download and install the Armoury Crate software from https://rog.asus.com/Mice-Mouse-Pads/Mice/Ergonomic-Right-Handed/ROG-Spath-X-model/helpdesk/.
- Follow the software instructions to update your gaming mouse's firmware.
- Customize your gaming mouse using Armoury Crate.
装置功能
電池狀態
电池状态
バッテリーの状態
배터리 상태
État de la batterie

Akkustatus
Profili del mouse gaming


Estado da Bateria

Stav baterie
Batterijstatus

Akun tila
Batteristatus

Stan baterii
Starea bateriei

Stav batérie
Batteristatus

Pil Durumu
Стан акумулятора
.https://rog.asus.com/Mice-Mouse-Pads/Mice/Ergonomic-Right-Handed/ROG-Spath-X-model/helpdesk
.DPI On-The-Scroll Among Among Armoury Crate Among Among DPI 1-4-7 DPI-In Among Among Among Among
בְרָה בְרִי אַלְאָה
Keep the device away from liquid, humidity, or moisture. Operate the device only within the specific temperature range of 0^(32^) to 40^(104^) . When the device exceeds the maximum temperature, unplug or switch off the device to let it cool down.
安全說明
About the accessories
The accessories packed together with this product has been designed and its safety is verified for the use in connection with this product. Also, never use the accessories for other products. Otherwise, electric shock or fire may be caused.
Limitation of Liability
Circumstances may arise where because of a default on ASUS' part or other liability, you are entitled to recover damages from ASUS. In each such instance, regardless of the basis on which you are entitled to claim damages from ASUS, ASUS is liable for no more than damages for bodily injury (including death) and damage to real property and tangible personal property; or any other actual and direct damages resulted from omission or failure of performing legal duties under this Warranty Statement, up to the listed contract price of each product. ASUS will only be responsible for or indemnify you for loss, damages or claims based in contract, tort or infringement under this Warranty Statement.
This limit also applies to ASUS' suppliers and its reseller. It is the maximum for which ASUS, its suppliers, and your reseller are collectively responsible.
UNDER NO CIRCUMSTANCES IS ASUS LIABLE FOR ANY OF THE FOLLOWING: (1) THIRD-PARTY CLAIMS AGAINST YOU FOR DAMAGES; (2) LOSS OF, OR DAMAGE TO, YOUR RECORDS OR DATA; OR (3) SPECIAL, INCIDENTAL, OR INDIRECT DAMAGES OR FOR ANY ECONOMIC CONSEQUENTIAL DAMAGES (INCLUDING LOST PROFITS OR SAVINGS), EVEN IF ASUS, ITS SUPPLIERS OR YOUR RESELLER IS INFORMED OF THEIR POSSIBILITY.
RF Exposure Warning
The equipment complies with FCC RF exposure limits set forth for an uncontrolled environment. The equipment must not be co-located or operating in conjunction with any other antenna or transmitter.
REACH
Complying with the REACH (Registration, Evaluation, Authorisation, and Restriction of Chemicals) regulatory framework, we published the chemical substances in our products at ASUS REACH website at http://csr.asus.com/english/REACH.htm.
ASUS Recycling/Takeback Services
ASUS recycling and takeback programs come from our commitment to the highest standards for protecting our environment. We believe in providing solutions for you to be able to responsibly recycle our products, batteries, other components as well as the packaging materials. Please go to http://csr.asus.com/english/Takeback.htm for detailed recycling information in different regions.
Lithium-Ion Battery Warning
CAUTION: Danger of explosion if battery is incorrectly replaced. Replace only with the same or equivalent type recommended by the manufacturer. Dispose of used batteries according to the manufacturer's instructions.
Federal Communications Commission Statement
This device complies with Part 15 of the FCC Rules. Operation is subject to the following two conditions:
- This device may not cause harmful interference.
-
This device must accept any interference received including interference that may cause undesired operation. This equipment has been tested and found to comply with the limits for a Class B digital device, pursuant to Part 15 of the FCC Rules. These limits are designed to provide reasonable protection against harmful interference in a residential installation. This equipment generates, uses and can radiate radio frequency energy and, if not installed and used in accordance with manufacturer's instructions, may cause harmful interference to radio communications. However, there is no guarantee that interference will not occur in a particular installation. If this equipment does cause harmful interference to radio or television reception, which can be determined by turning the equipment off and on, the user is encouraged to try to correct the interference by one or more of the following measures:
-
Reorient or relocate the receiving antenna.
- Increase the separation between the equipment and receiver.
- Connect the equipment to an outlet on a circuit different from that to which the receiver is connected.
- Consult the dealer or an experienced radio/TV technician for help.
CAUTION! Any changes or modifications not expressly approved by the grantee of this device could void the user's authority to operate the equipment.
Radio Frequency (RF) Exposure Information
The radiated output power of the Wireless Device is below the Innovation, Science and Economic Development Canada (ISED) radio frequency exposure limits. The Wireless Device should be used in such a manner such that the potential for human contact during normal operation is minimized.
This device has also been evaluated and shown compliant with the ISED RF Exposure limits under portable exposure conditions. (antennas are less than 20 cm of a person's body).
Compliance Statement of Innovation, Science and Economic Development Canada (ISED)
This device complies with Innovation, Science and Economic Development Canada licence exempt RSS standard(s). Operation is subject to the following two conditions: (1) this device may not cause interference, and (2) this device must accept any interference, including interference that may cause undesired operation of the device. CAN ICES-003(B)/NMB-003(B)
DO NOT throw the device in municipal waste. This product has been designed to enable proper reuse of parts and recycling. The symbol of the crossed out wheeled bin indicates that the product (electrical, electronic equipment and mercury-containing button cell battery) should not be placed in municipal waste. Check local regulations for disposal of electronic products.

DO NOT throw the device in fire. DO NOT short circuit the contacts. DO NOT disassemble the device.
NCC: Taiwan Wireless Statement
VCCI Class B Statement
KC: Korea Warning Statement

R-C-MSQ-P707 RC-MSQ-P707DOCK
Ukraine Certification Logo

EAC Certification Logo

RF Output table
| Function Frequency Maximum Output Power (EIRP) | |
| 2.4GHz wireless | (2403 - 2480MHz) - Mouse 6 dBm |
| (2403 - 2480 MHz) - Dongle 4 dBm | |
Wireless Operation Channel for Different Domains
The wireless operation channel of this mouse is universal worldwide: 2.402-2.480 GHz, Ch02 to Ch80.
CE Mark Warning

Simplified EU Declaration of Conformity
ASUSTek Computer Inc. hereby declares that this device is in compliance with the essential requirements and other relevant provisions of Directive 2014/53/EU. Full text of EU declaration of conformity is available at https://www.asus.com/support/
Address 1F., No. 15, Lide Rd., Beitou Dist., Taipei City 112, Taiwan
Telephone +886-2-2894-3447
Fax +886-2-2890-7798
Web site https://www.asus.com
Technical Support
Telephone: +86-21-38429911
Fax: +86-21-5866-8722, ext. 9101#
Online support: https://www.asus.com/support/Product/ContactUs/Services/questionform/?lang=en
ASUS COMPUTER INTERNATIONAL (America)
Address: 48720 Kato Rd., Fremont, CA 94538, USA
Telephone: +1-510-739-3777
Fax: +1-510-608-4555
Web site: http://www.asus.com/us/
Technical Support
Support fax: +1-812-284-0883
Telephone: +1-812-282-2787
Online support: https://www.asus.com/support/Product/ContactUs/Services/questionform/?lang=en-us
ASUS COMPUTER GmbH (Germany and Austria)
Address Harkortstrasse 21-23, 40880 Ratingen, Germany
Web site https://www.asus.com/de
Online contact https://www.asus.com/support/Product/ContactUs/Services/questionform/?lang=de-de
Technical Support
Telephone (DE) +49-2102-5789557
Telephone (AT) +43-1360-2775461
Online support https://www.asus.com/de/support
natural_image
Abstract red logo design on black background (no text or symbols)REPUBLIC OF GAMERS



- Replacing the switches
- IMPORTANT!
- Setting up the wireless receiver/charging dock
- Device features
- Connecting your gaming mouse
- Setting up your gaming mouse as a wired mouse
- Setting up your gaming mouse as an RF wireless mouse
- Specifications\*
- Gaming mouse profiles
- Battery Status
- Using the DPI On-The-Scroll tuning function
- NOTE:
- Updating the gaming mouse and wireless receiver/charging dock
- 装置功能
- 電池狀態
- 电池状态
- バッテリーの状態
- 배터리 상태
- État de la batterie
- Akkustatus
- Profili del mouse gaming
- Estado da Bateria
- Stav baterie
- Batterijstatus
- Akun tila
- Batteristatus
- Stan baterii
- Starea bateriei
- Stav batérie
- Pil Durumu
- Стан акумулятора
- בְרָה בְרִי אַלְאָה
- 安全說明
- About the accessories
- Limitation of Liability
- RF Exposure Warning
- REACH
- ASUS Recycling/Takeback Services
- Lithium-Ion Battery Warning
- Federal Communications Commission Statement
- Radio Frequency (RF) Exposure Information
- Compliance Statement of Innovation, Science and Economic Development Canada (ISED)
- NCC: Taiwan Wireless Statement
- VCCI Class B Statement
- KC: Korea Warning Statement
- Ukraine Certification Logo
- EAC Certification Logo
- RF Output table
- Wireless Operation Channel for Different Domains
- CE Mark Warning
- Simplified EU Declaration of Conformity
- Technical Support
- ASUS COMPUTER INTERNATIONAL (America)
- ASUS COMPUTER GmbH (Germany and Austria)
Brand : ASUS
Model : ROG Spatha X
Category : Mouse