
DCL500Z - Vacuum Cleaner MAKITA - Free user manual and instructions
Find the device manual for free DCL500Z MAKITA in PDF.


| Product type | Cordless stick vacuum |
| Brand | Makita |
| Model | DCL500Z |
| Power source | 18V Lithium-ion battery (Makita LXT) |
| Battery life (approx.) | Approximately 20 min (depending on use) |
| Dust capacity | 0.5 L |
| Filtration system | Cyclonic with washable filter |
| Dimensions (L x W x H) | 250 x 200 x 1100 mm |
| Weight (without battery) | 1.5 kg |
| Noise level | 75 dB(A) |
| Color | Black / Makita Blue |
| Main functions | Vacuuming floors and carpets, crevice tool, motorized brush |
| Maintenance and cleaning | Filter washable with water, transparent tank easy to empty |
| Safety | Automatic shutdown in case of overheating, battery protection |
| Spare parts and repairability | Filters, battery, charger, nozzles available separately |
| Warranty | 2 years (parts and labor) |
| Package contents | Vacuum cleaner, long nozzle, crevice tool, battery and charger (depending on version) |
| General information | Designed for domestic use, compatible with Makita LXT range |
Frequently Asked Questions - DCL500Z MAKITA
User questions about DCL500Z MAKITA
0 question about this device. Answer the ones you know or ask your own.
Ask a new question about this device
Download the instructions for your Vacuum Cleaner in PDF format for free! Find your manual DCL500Z - MAKITA and take your electronic device back in hand. On this page are published all the documents necessary for the use of your device. DCL500Z by MAKITA.
USER MANUAL DCL500Z MAKITA

| GB | Cordless Cyclone Cleaner Instruction manual |
| F | Aspirateur cyclonique sans fil Manuel d'instructions |
| D | Akku-Zyklon-Staubsauger Betriebsanleitung |
| I | Aspiratore a batteria Cyclone Istruzioni per l'uso |
| NL | Snoerloze stofzuiger zonder stofzak Gebruiksaanwijzing |
| E | Aspiradora Ciclón Inalámbrica Manual de instrucciones |
| DK | Batteridrevet cyklonstøvsuger Brugsanvisning |
| GR | Ασύρματη κυκλωνική σκούπα Εγχειρίδιο οδηγιών |
| S | Sladdlös Cyclonedammsugare Instruktionsmanual |
| N | Trådløs syklonstøvsuger Brukerhåndbok |
| FIN | Langaton syklonipölynimuri Käyttöohjeet |
| LV | Bezvadu puteklusūcējs Cyclone Lietošanas pamācība |
| LT | Belaidis cikloninis dulkių siurblys Instrukcija |
| EE | Juhtmeta tsüklontolmuimeja Kasutusjuhend |
| PO | Odkurzacz Akumulatorowy Instrukcja |
| HU | Zsinór nélküli, ciklon rendszerű porszívó Használati útmutató |
| SK | Bezšnúrový cyklónový vysávač Návod na použitie |
| CZ | Akumulátorový cyklonový vysavač Návod k použití |
| RUS | Аккумуляторный циклонный пылесос Инструкция по эксплуатации |
| BZ | Aspirador de Pó Ciclônico a Bateria Manual de instruções |
| CS | 充电式旋风吸尘机使用说明书 |

1

2

3

4
5
6

7

8

9
10
11 12
∴ m = 3/11
13 14

-

15 16

[Non-Text]
17 18

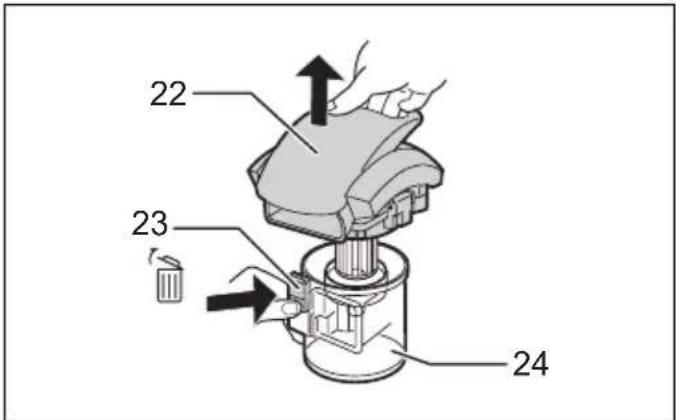
19 20

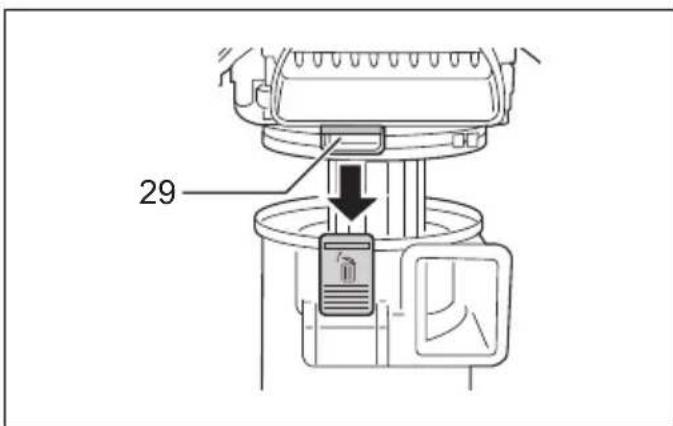

21 22

23 24
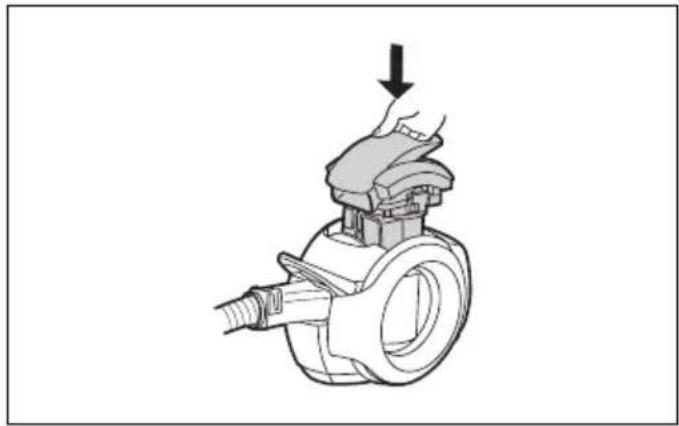
25 26


27 28
ENGLISH (Original instructions)
| Explanation of general view | ||
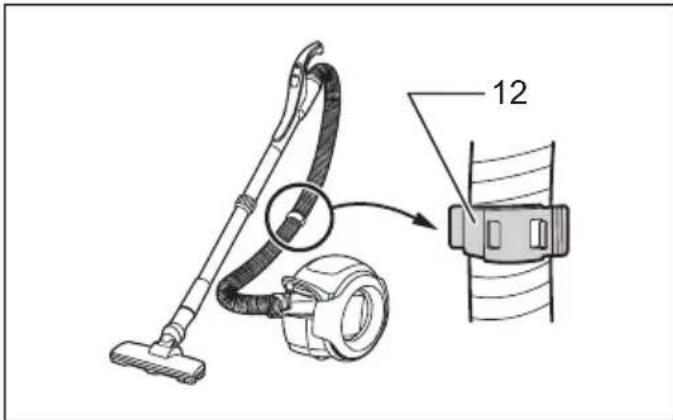
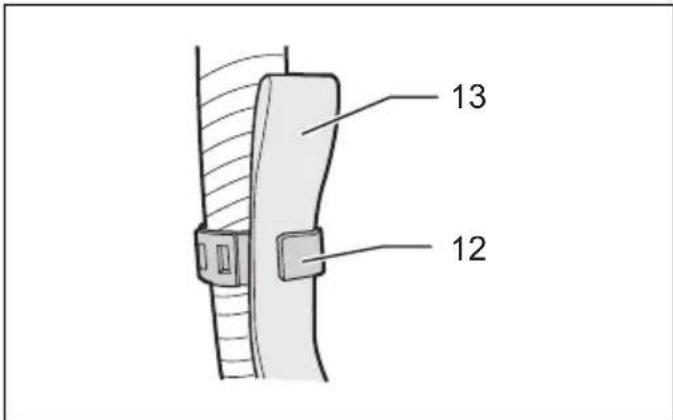
| 1. Red indicator | 12. Hose hook | 22. Cover |
| 2. Button | 13. Shoulder belt | 23. button |
| 3. Battery cartridge | 14. ON (2/1) button | 24. Dust cup |
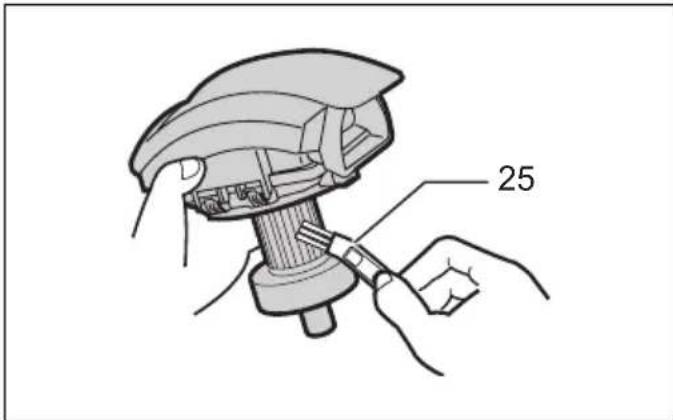
| 4. Star marking | 15. OFF (0) button | 25. Cleaning brush |
| 5. Release button | 16. Filter indicator (orange lamp) | 26. Red lever |
| 6. Suction hose opening | 27. Filter cover | |
| 7. Handle | 17. Battery indicator (red lamp) | 28. Knob |
| 8. Zoom pipe | 18. Cleaning lever | 29. Yellow indicator |
| 9. Ring | 19. Dust Full line — 📄 — | 30. Cylindrical filter (upper) |
| 10. Nozzle | 20. Cup Release lever | 31. Cylindrical filter (lower) |
| 11. Crevice nozzle | 21. Dust cup assembly | |
SPECIFICATIONS
| Model DCL500 | |
| Capacity 250 mL | |
| Continuous use (with battery BL1830) | HIGH (2): Approx. 12 min.LOW (1): Approx. 30 min. |
| Dimensions (L x W x H) (with battery BL1830) 352 mm x 189 mm x 252 mm | |
| Net weight (with battery BL1830) 4.2 kg | |
| Rated voltage D.C. 18 V | |
| Standard battery cartridges BL1815N, BL1830, BL1840 | |
- Due to our continuing program of research and development, the specifications herein are subject to change without notice.
- Specifications and battery cartridge may differ from country to country.
• Weight, with battery cartridge, according to EPTA-Procedure 01/2003
END114-1
Symbols
The following show the symbols used for the equipment. Be sure that you understand their meaning before use.


..... Read instruction manual.

..... Take particular care and attention.

Cd Ni-MH Li-ion
..... Only for EU countries
Do not dispose of electric equipment or battery pack together with household waste material! In observance of the European Directives, on Waste Electric and Electronic Equipment and Batteries and Accumulators and Waste Batteries and Accumulators and their implementation in accordance with national laws, electric equipment and batteries and battery pack(s) that have reached the end of their life must be collected separately and returned to an environmentally compatible recycling facility.
ENE084-1
Intended use
The appliance is intended for collecting dry dust.
IMPORTANT SAFETY INSTRUCTIONS
This appliance can be used by children aged from 8 years and above and persons with reduced physical, sensory or mental capabilities or lack of experience and knowledge if they have been given supervision or instruction concerning use of the appliance in a safe way and understand the hazards involved. Children shall not play with the appliance. Cleaning and user maintenance shall not be made by children without supervision.
When using an electrical appliance, basic precautions should always be followed, including the following:
READ ALL INSTRUCTIONS BEFORE USING THIS APPLIANCE.
WARNING - To reduce the risk of fire, electric shock or injury:
- This appliance is intended for household use.
- Do not expose to rain. Store indoors.
- Do not allow to be used as a toy. Close attention is necessary when used by or near children.
-
Use only as described in this manual. Use only manufacturer's recommended attachments.
-
Do not use with damaged battery. If appliance is not working as it should, has been dropped, damaged, left outdoors, or dropped into water, return it to a service center.
-
Do not handle appliance with wet hands.
-
Do not put any object into openings. Do not use with any opening blocked; keep free of dust, lint, hair, and anything that may reduce air flow.
-
Keep hair, loose clothing, fingers, and all parts of body away from openings and moving parts.
-
Turn off all controls before removing the battery.
-
Use extra care when cleaning on stairs.
-
Do not use to pick up flammable or combustible liquids, such as gasoline, or use in areas where they may be present.
-
Use only the charger supplied by the manufacturer to recharge.
-
Do not pick up anything that is burning or smoking, such as cigarettes, matches, or hot ashes.
-
Do not use without filters in place.
-
Do not charge the battery outdoors.
-
Do not pick up the following materials:
- Hot materials such as lit cigarettes or spark/metal dust generated by grinding/cutting metal
- Flammable materials such as gasoline, thinner, benzine, kerosene or paint
- Explosive materials like nitroglycerin
- Ignitable materials such as Aluminum, zinc, magnesium, titanium, phosphorus or celluloid
- Wet dirt, water, oil or the like
- Hard pieces with sharp edges, such as wood chips, metals, stones, glasses, nails, pins or razors
- Powder to clot such as cement or toner
- Conductive dust such as metal or carbon
-
Fine particle like concrete dust
Such action may cause fire, injury and/or property damage. -
Stop operation immediately if you notice anything abnormal.
- If you drop or strike the cleaner, check it carefully for cracks or damage before operation.
- Do not bring close to stoves or other heat sources.
- Do not block the intake hole or vent holes.
SAVE THESE INSTRUCTIONS.
ENC007-8
IMPORTANT SAFETY INSTRUCTIONS
FOR BATTERY CARTRIDGE
-
Disconnect the battery cartridge from the appliance before making any adjustments, changing accessories, or storing appliance. Such preventive safety measures reduce the risk of starting the appliance accidentally.
-
Recharge only with the charger specified by the manufacturer. A charger that is suitable for one type of battery cartridge may create a risk of fire when used with another battery cartridge.
-
Use appliances only with specifically designated battery cartridges. Use of any other battery cartridges may create a risk of injury and fire.
-
When battery cartridge is not in use, keep it away from other metal objects, like paper clips, coins, keys, nails, screws or other small metal objects, that can make a connection from one terminal to another. Shorting the battery terminals together may cause burns or a fire.
-
Under abusive conditions, liquid may be ejected from the battery; avoid contact. If contact accidentally occurs, flush with water. If liquid contacts eyes, additionally seek medical help. Liquid ejected from the battery may cause irritation or burns.
-
Do not use a battery cartridge or appliance that is damaged or modified. Damaged or modified batteries may exhibit unpredictable behavior resulting in fire, explosion or risk of injury.
-
Do not expose a battery cartridge or appliance to fire or excessive temperature. Exposure to fire or temperature above 130 °C (265 °F) may cause explosion.
-
Have servicing performed by a qualified repair person using only identical replacement parts. This will ensure that the safety of the product is maintained.
-
Before using battery cartridge, read all instructions and cautionary markings on (1) battery charger, (2) battery, and (3) product using battery.
-
Do not disassemble battery cartridge.
-
If operating time has become excessively shorter, stop operating immediately. It may result in a risk of overheating, possible burns and even an explosion.
-
If electrolyte gets into your eyes, rinse them out with clear water and seek medical attention right away. It may result in loss of your eyesight.
-
Do not short the battery cartridge:
(1) Do not touch the terminals with any conductive material.
(2) Avoid storing battery cartridge in a container with other metal objects such as nails, coins, etc.
(3) Do not expose battery cartridge to water or rain.
A battery short can cause a large current flow, overheating, possible burns and even a breakdown.
- Do not store the appliance and battery cartridge in locations where the temperature may reach or exceed 50 °C (122 °F).
- Do not incinerate the battery cartridge even if it is severely damaged or is completely worn out. The battery cartridge can explode in a fire.
- Be careful not to drop or strike battery.
- Do not use a damaged battery.
- Follow your local regulations relating to disposal of battery.
SAVE THESE INSTRUCTIONS.
Tips for maintaining maximum battery life
- Charge the battery cartridge before completely discharged.
Always stop appliance operation and charge the battery cartridge when you notice less appliance power. - Never recharge a fully charged battery cartridge. Overcharging shortens the battery service life.
- Charge the battery cartridge with room temperature at 10 °C - 40 °C (50 °F - 104 °F). Let a hot battery cartridge cool down before charging it.
- Charge the battery cartridge once in every six months if you do not use it for a long period of time.
PREPARATION
CAUTION:
- Always be sure that the appliance is switched off and the battery cartridge is removed before adjusting or checking function on the appliance.
Installing or removing battery cartridge (Fig. 1)
CAUTION:
- Always switch off the appliance before installing or removing of the battery cartridge.
- Hold the appliance and the battery cartridge firmly when installing or removing battery cartridge. Failure to hold the appliance and the battery cartridge firmly may cause them to slip off your hands and result in damage to the appliance and battery cartridge and a personal injury.
- Take care not to trap finger(s) between cleaner and battery as shown in diagram when loading battery. Trapping finger(s) may cause injury.
To remove the battery cartridge, slide it from the appliance while sliding the button on the front of the cartridge.
To install the battery cartridge, align the tongue on the battery cartridge with the groove in the housing and slip it into place. Insert it all the way until it locks in place with a little click. If you can see the red indicator on the upper side of the button, it is not locked completely.
CAUTION:
• Always install the battery cartridge fully until the red indicator cannot be seen. If not, it may accidentally fall
out of the appliance, causing injury to you or someone around you.
- Do not install the battery cartridge forcibly. If the cartridge does not slide in easily, it is not being inserted correctly.
Battery protection system (Lithium-ion battery with star marking) (Fig. 2)
Lithium-ion batteries with a star marking are equipped with a protection system. This system automatically cuts off power to the appliance to extend battery life.
The appliance will automatically stop during operation if the appliance and/or battery are placed under one of the following conditions:
- Overloaded:
The appliance is operated in a manner that causes it to draw an abnormally high current. In this situation, switch off the appliance and stop the application that caused the appliance to become overloaded. Then restart the appliance. If the appliance does not start, the battery is overheated. In this situation, let the battery cool before restarting the appliance.
- Low battery voltage:
The remaining battery capacity is too low and the appliance will not operate. In this situation, remove and recharge the battery.
Installing or removing attachments
CAUTION:
- Always be sure that the appliance is switched off and the battery cartridge is removed before carrying out any work on the appliance.
- Firmly push the nozzle or zoom pipe into the handle while twisting to securely attach to ensure that they do not come loose during use.
Attach the hose connector to the suction hose opening on the appliance.
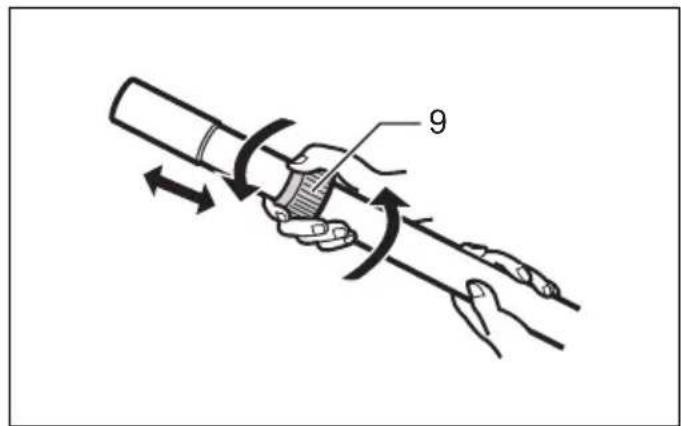
Press the release button to disconnect the hose. (Fig. 3) Insert the zoom pipe into the end of the handle. (Fig. 4) Loosen the zoom pipe ring and adjust the pipe length.
After adjustment, tighten the ring. (Fig. 5)
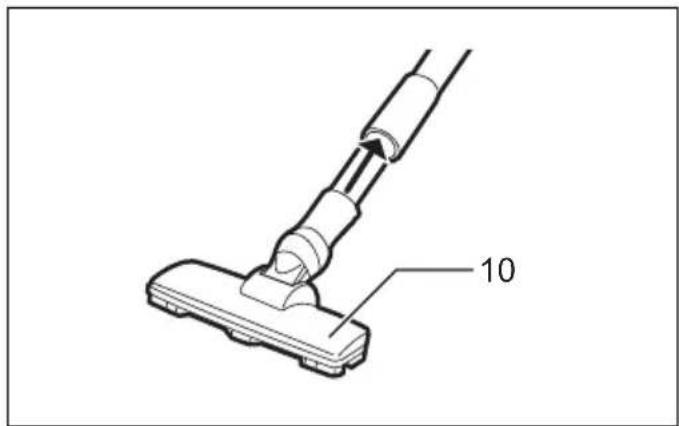
Attach the nozzle to the zoom pipe. (Fig. 6)
Attach the crevice nozzle to the handle or zoom pipe to use to clean crevices and other narrow, hard-to-reach areas. (Fig. 7)
Attaching the shoulder belt
CAUTION:
- When hanging the appliance on your shoulder, always hold the appliance itself by hand to prevent it from dropping. Dropping the appliance may cause injury or property damage.
Use the shoulder belt to hang the appliance on your shoulder for cleaning a high place. (Fig. 8)
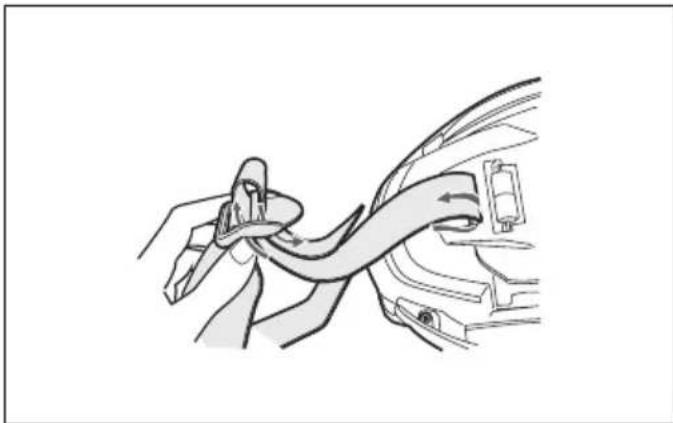
Loop the shoulder belt around both the carrying handle and the belt holder and then run it through the stopper as shown in the diagram. (Fig. 9 & Fig. 10)
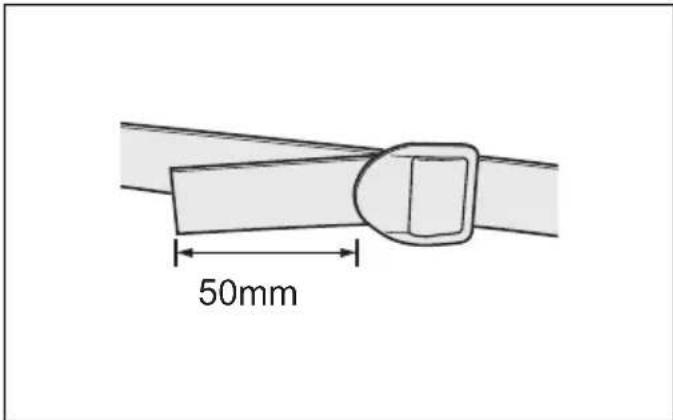
Pull the ends of the belt up so that they are at least 50 mm (2") from the top of the stopper. (Fig. 11)
Attach the hose hook at around the midpoint along the hose. Store the shoulder belt in the hose hook when not using it. (Fig. 12 & Fig. 13)
OPERATION
Switch action (Fig. 14)
To start the cleaner, simply press the ON (2/1) button. To switch off, press the OFF (0) button. To change the cleaner speed, press the ON (2/1) button. The first press on this button is for high speed and the second press for low speed. Each press on this button repeats the speed change alternatively.
Indicator lamps (Fig. 15)
The indicator lamps light up or flash to indicate the status of the appliance.
| Filter indicator (orange lamp) | Lighting on T | The filter is dirty. Clean the filter. Refer to Section “Cleaning the filter (after work)”. |
| Blinking rapidly | The filter is clogged with dust. Wash the filter. Refer to Section “Cleaning the filter (thoroughly cleaning)”. | |
| Battery indicator (red lamp) | Blinking The | battery power is getting low. |
| Lighting on T | The battery is very low and the appliance will stop. Charge the battery. |
NOTE:
- Always remove dust frequently. Suction power will be reduced if there is too much dust in cleaner.
MAINTENANCE

CAUTION:
• Always be sure that the appliance is switched off before attempting to perform inspection or maintenance.
- Place newspapers or a garbage can underneath to work over. The newspapers or garbage can will catch any falling dust from the appliance.
Cleaning the filter (after work) (Fig. 16)
After use, move the filter cleaning lever back and forth around ten times to loosen dust from the filter.
TROUBLE SHOOTING
Before asking for repairs, check the following points.
Disposing of dust
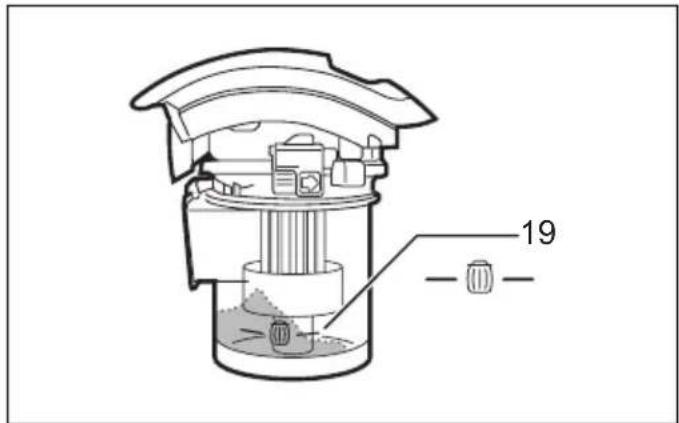
Dispose of dust before the level exceeds the Dust Full line. The suction power may drop if the level exceeds this line. Dispose of dust before it reaches the line, including it accumulates at one side only. (Fig. 17) To dispose of dust, follow the procedure below.
- Raise the Cup Release lever to eject the dust cup assembly. (Fig. 18)
- Press the button to remove the cover. Dispose of the dust in the dust cup. (Fig. 19)
- Use the cleaning brush attached to the dust cup to brush away dust inside the cup. (Fig. 20)
- Move the red lever on the filter cover in the direction of the arrow to flip the filter cover open. (Fig. 21)
- Grasp the knob and spin it around ten times. (Fig. 22)
- Close the filter cover. (Fig. 23)
- Attach the dust cup to the cover. (Fig. 24)
- Attach the dust cup assembly to the appliance body. (Fig. 25)
Cleaning the filter (thoroughly cleaning) (Fig. 26 & Fig. 27)
Wash out the filter if it gets too dirty, when suction power drops or the orange lamp starts flashing.
Remove the dust cup, filter cover, filter, and cylindrical filter apart and wash each separately to clean them. Use plain water or a neutral detergent solution to wash each part.
After washing the parts, leave them out to fully dry and then put them back together.
Cleaning the cleaner body
From time to time wipe off the outside (cleaner body) of the cleaner using a cloth dampened in soapy water.
CAUTION:
- Never use gasoline, benzine, thinner, alcohol or the like. Discoloration, deformation or cracks may result.
Dry it out thoroughly before use. An insufficiently dried filter may cause poor suction and shorten the service life of the motor.
Do not blow dust sticking on the cleaner by air duster. It brings dust into the housing and causes failure.
STORAGE
Shorten the zoom pipe and insert the hook into the holder securely. (Fig. 28)
| Symptom Area to be investigated Fixing method | ||
| Weak suction power | • Is dust cup full of dust? • Is filter clogged? • Is battery exhausted? | • Empty dust from dust cup. • Dust down or wash filter. • Recharge battery. |
| Not working • Is battery exhausted? • Recharge battery. | ||
010051
NOTE:
- Do not attempt to repair cleaner by yourself. To maintain product SAFETY and RELIABILITY, repairs, any other maintenance or adjustment should be performed by Makita Authorized Service Centers, always using Makita replacement parts.
OPTIONAL ACCESSORIES
CAUTION:
• These accessories or attachments are recommended for use with your appliance specified in this manual. The use of any other accessories or attachments might present a risk of injury to persons. Only use accessory or attachment for its stated purpose.
If you need any assistance for more details regarding these accessories, ask your local Makita Service Center.
- Makita genuine battery and charger
NOTE:
- Some items in the list may be included in the appliance package as standard accessories. They may differ from country to country.
FRANÇAIS (Instructions originales)
Descriptif général
OPTIONELE ACCESSOIRES
LET OP:
..... Kun for EU-land
OLULISED OHUTUSJUHISED
OLULISED OHUTUSJUHISED
AKUPLOKKI PUUDUTAVAD OHUTUSJUHISED
DÔLEŽITÉ BEZPEČNOSTNÉ POKYNY
TIETO POKYNY UCHOVAJTE.
ENC007-8
DÔLEŽITÉ BEZPEČNOSTNÉ POKYNY
PRE ZÁSOBNÍK NA BATÉRIU
TIETO POKYNY UCHOVAJTE.
TYTO POKYNY USCHOVEJTE.
ENC007-8
DŮLEŽITÉ BEZPEČNOSTNÍ POKYNY
PRO BATERIOVÝ MODUL
TYTO POKYNY USCHOVEJTE.
VOLITELNÉ PŘÍSLUŠENSTVÍ
⚠ UPOZORNĚNÍ:
- SYMBOLS
- INTENDED USE
- IMPORTANT SAFETY INSTRUCTIONS
- READ ALL INSTRUCTIONS BEFORE USING THIS APPLIANCE
- SAVE THESE INSTRUCTIONS
- FOR BATTERY CARTRIDGE
- TIPS FOR MAINTAINING MAXIMUM BATTERY LIFE
- PREPARATION
- CAUTION
- INSTALLING OR REMOVING BATTERY CARTRIDGE (FIG. 1)
- BATTERY PROTECTION SYSTEM (LITHIUM-ION BATTERY WITH STAR MARKING) (FIG. 2)
- INSTALLING OR REMOVING ATTACHMENTS
- ATTACHING THE SHOULDER BELT
- OPERATION
- SWITCH ACTION (FIG. 14)
- INDICATOR LAMPS (FIG. 15)
- NOTE
- MAINTENANCE
- CLEANING THE FILTER (AFTER WORK) (FIG. 16)
- TROUBLE SHOOTING
- DISPOSING OF DUST
- CLEANING THE FILTER (THOROUGHLY CLEANING) (FIG. 26 & FIG. 27)
- CLEANING THE CLEANER BODY
- STORAGE
- OPTIONAL ACCESSORIES
- FRANÇAIS (INSTRUCTIONS ORIGINALES)
- OPTIONELE ACCESSOIRES
- LET OP
- OLULISED OHUTUSJUHISED
- AKUPLOKKI PUUDUTAVAD OHUTUSJUHISED
- DÔLEŽITÉ BEZPEČNOSTNÉ POKYNY
- TIETO POKYNY UCHOVAJTE
- PRE ZÁSOBNÍK NA BATÉRIU
- TYTO POKYNY USCHOVEJTE
- DŮLEŽITÉ BEZPEČNOSTNÍ POKYNY
- PRO BATERIOVÝ MODUL
- VOLITELNÉ PŘÍSLUŠENSTVÍ
- ⚠ UPOZORNĚNÍ
Brand : MAKITA
Model : DCL500Z
Category : Vacuum Cleaner