
PA-1400 - Sandwich Maker FAGOR - Free user manual and instructions
Find the device manual for free PA-1400 FAGOR in PDF.


| Product type | Croque-monsieur press |
| Brand | Fagor |
| Model | PA-1400 |
| Dimensions (approx.) | 30 x 20 x 10 cm |
| Weight (approx.) | 1.5 kg |
| Power supply | 220-240 V, 50/60 Hz |
| Power | 750 W |
| Plate material | Non-stick coating |
| Cooking temperature | Fixed, optimized for croque-monsieur |
| Operation indicator light | Yes (green/red) |
| Thermally insulated handle | Yes |
| Secure closure | Locking clip |
| Non-slip feet | Yes |
| Removable plates | No (fixed) |
| Cleaning | Wipe with a damp cloth after cooling |
| Safety | Automatic thermostat shutdown |
| Spare parts available | Power cord, plates (subject to availability) |
| Warranty | 2 years |
| Use | Indoor use only |
Frequently Asked Questions - PA-1400 FAGOR
User questions about PA-1400 FAGOR
0 question about this device. Answer the ones you know or ask your own.
Ask a new question about this device
Download the instructions for your Sandwich Maker in PDF format for free! Find your manual PA-1400 - FAGOR and take your electronic device back in hand. On this page are published all the documents necessary for the use of your device. PA-1400 by FAGOR.
USER MANUAL PA-1400 FAGOR
natural_image
3D rendered image of two metallic mechanical components with circular ports and a small logo on the side (no text or symbols visible)SANDWICHERAS / SANDWICHEIRA / SANDWICH MAKERS / CROQUE-SANDWICH / TOETIEPEZ /
SZENDMICSSÜTÖ / SENDVIĆOVAĆ / OPIEKACZ DO SANDWICZY / TOCTEPN :
natural_image
3D rendered mechanical component with a curved arrow indicating rotation (no text or symbols)MOD. SW-220420
natural_image
3D rendered mechanical part with a central X-shaped feature and surrounding circular features (no text or symbols)MOD. PA-1400
"versiones en otros idiomas disponibles en la web www.tagor.com" "Other languages available on the web www.tagor.com"

ES
1. DESCRIPCION (FIG.1)
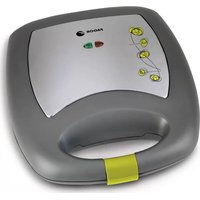
A. Cubiertas
A. Lids.
B. Heated surfaces.
C. Handles.
D. Red pilot light.
E. Green pilot light.
F. Lock.
Interference suppression: this appliance has been interference-suppressed in accordance with the interference-suppression directives.
Electromagnetic compatibility: this appliance has been suppressed in accordance with the EMC (electromagnetic compatibility) directives.
2. TECHNICAL DETAILS
Voltage / Frecuency: 230V\~50Hz.
Wattage: 700W (SW-220).
1400W (SW-420).
1400W (PA-1400).
This appliance conforms to EEC regulations relating to materials in contact with food.
3. IMPORTANT
- Read all instructions carefully and keep them for future reference.
- After removing the packaging, check that the product is in first-class condition. If you have any doubts, do not use the appliance and contact an authorised Technical Assistance Centre.
- The plastic bags in which the product is wrapped should be kept out of the reach of children as they constitute a possible health hazard.
- Before using the sandwich maker, check that the voltage of the domestic power supply corresponds to that indicated on the appliance.
- The electrical safety of the appliance is only guaranteed if it is connected to an efficient earth installation as specified in current electric safety regulations. The manufacturer does not accept
responsibility for any damage resulting from a lack of earth installation. In case of doubt, consult a qualified professional.
- In the case of the appliance's plug being incompatible with the wall socket, have a qualified professional replace this last with an appropriate substitute.
- We strongly advise against the use of adapters, extension plugs and/or leads. In the case of these being necessary, use only simple or multiple adapters and extension leads which conform to current safety regulations, taking care not to exceed the voltage limit indicated on the adapter and/or extension lead.
- If the appliance fails to function properly, contact an authorised Technical Assistance Centre only.
- The sandwich maker is designed for domestic use only as is clearly stated in this Manual. Any other use is considered inappropriate and therefore dangerous. The manufacturer does not accept responsibility for any damage resulting from incorrect, inappropriate or irresponsible use and/or from repairs carried out by unqualified personnel.
When using electric appliances, the following basic safety regulations should be followed to prevent the risk of fire, electric shocks and/or damage to people:
- To prevent electric shocks, do not submerge the sandwich maker, cable or plug in water or any other liquid.
- Keep the appliance out of the reach of children and the disabled.
- Disconnect the appliance when not in use and before cleaning. Let it cool before cleaning.
- Do not expose the appliance to the elements (rains, sun, frost, etc.)
- Do not use or place any part of the appliance on or near hot surfaces (gas or electric hobs or ovens).
-
Do not leave the cable hanging over the edge of the surface on which the appliance is placed. The cable should be of the minimum length required to comfortably plug the appliance into the mains.
-
Warning: When the sandwich maker is switched on, the inside surfaces can reach extremely high temperatures and can cause serious burns. Do not touch the appliance while it is switched on. Use the handles to move or adjust its position.
- Do not pull on the electric cable in order to unplug the appliance.
- Do not leave the appliance unattended while switched on and keep it well out of the reach of children or disabled people.
- Do not let the cable come into contact with parts of the appliance that may be hot.
- Never use an electric appliance whose cable or plug are in less than perfect condition. Never use an appliance that is not working properly or has been damaged in any way. Take the appliance to an authorised technical service centre to be examined, repaired or adjusted. If the cable is damaged, contact an authorised Technical Assistance Centre who will replace it.
- In the case of technical failure and/or imperfect working, switch off the appliance and do not attempt to repair it. Contact an authorised Technical Assistance Centre and ask them to use original replacement parts and accessories.
- If you decide to dispose of the appliance definitively, it is advisable to cut the electric cable after first ensuring that the appliance is unplugged.
- Do not use metallic utensils on the hot surfaces as this can damage their special non-stick coating.
- This appliance should not be used by physically, sensorially or mentally handicapped people or people without experience or knowledge of it (including children), unless they are supervised or instructed in the use of the appliance by a person responsible for their safety.
- Children should be watched to ensure they do not play with the appliance.
- For greater protection, we recommend installing a residual current device (RCD) with an operational residual current not exceeding 30 mA. Ask your installer for advice.
4. BEFORE USING FOR THE FIRST TIME
Before using the appliance for the first time:
- Clean the inside surfaces with a damp cloth and leave to dry.
- When the inside surfaces are dry, grease them lightly with vegetable oil.
5. TO USE
MOD. SW-220/ SW-420
- Place the appliance on a stable surface, leaving sufficient room around the edges and plug it in with the lid closed. The red pilot light will come on.
- Prepare the ingredients you wish to toast. For each sandwich you will need two slices of bread plus their corresponding filling. To achieve a golden brown toasting lightly butter the bread on the side that will be in contact with the hot surfaces.
- After about 5 minutes, the green pilot light will come on to indicate that the plates have reached the correct temperature for toasting. During toasting, the green pilot light will switch on and off at regular intervals showing the thermostat cycles; the red pilot light will remain constantly on to show that the appliance is connected to the mains.
- Lift the lid and place the sandwich(es) in the sandwich maker taking care not to burn your fingers. Carefully close the lid and fasten the closure catch (F) on the lower handle (fig.2). The sandwich maker can toast either one or two sandwiches.
-
After approximately 3 or 4 minutes (depending on how well done you wish your sandwich to be), the sandwiches will be ready to serve. Open the lid and carefully remove the sandwiches, taking care not to burn your fingers. We recommend that you use a wooden spatula. Do not use sharp instruments as they can damage the non-stick coating of the inside surfaces.
-
Unplug the appliance after use and leave it to cool before cleaning or storing.
Recommendations for a making better toasted sandwich
Always ensure the inside is properly heated before inserting the sandwiches.
We recommend the use of sliced bread designed especially for sandwiches. Do not sprinkle sugar over the bread, as it tends to burn. It should be added later.
The cheese used in your sandwiches should be soft and finely sliced.
We recommend starting with a cooking time of 3 minutes which can then be gradually increased or decreased according to taste.
MOD. PA-1400
-
Place the appliance on a stable surface, leaving sufficient room around the edges.
-
Prepare the ingredients for toasting. For correct browning, spread a little butter on both sides of the bread (the sides in contact with the plates).
-
After about 5 minutes, the green pilot light will come on to indicate that the plates have reached the correct temperature for toasting. During toasting, the green pilot light will switch on and off at regular intervals showing the thermostat cycles; the red pilot light will remain constantly on to show that the appliance is connected to the mains.
-
Lift up the lid and place the panini(s) in the sandwich maker, taking care not to burn your hand. Close the lid carefully.
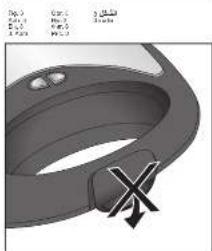
DO NOT CLOSE THE FASTENING CLIP (F) ON THE LOWER HANDLE
(Fig.3). Only close the fastening clip (F) when the appliance is not in use.
- When about 3 or 4 minutes have elapsed (depending on the degree of browning required), the panini(s) will be ready. Open the lid and take out the panini(s), taking care not to burn your hand. Use a wooden spatula to do this. Do not use sharp utensils as they could
damage the non-stick surface of the plates.
- Unplug the appliance after use and leave it to cool before cleaning or storing.
6. CLEANING
To clean the sandwich maker always unplug the appliance and wait until the surfaces have cooled.
Use a damp cloth, sponge or soft brush to clean both the inside and outside of the appliance.
Do not use detergents or abrasive materials which may scratch the inside surfaces.
Cleaning is easier if carried out while the inside surfaces are still warm.
NEVER PLACE THE SANDWICH MAKER IN WATER OR HOLD IT UNDER A RUNNING TAP.
7. INFORMATION FOR THE CORRECT DISPOSAL OF ELECTRICAL AND ELECTRONIC APPLIANCES

At the end of its working life, the product must not be disposed of as urban waste. It must be taken to a special local authority differentiated waste collection centre or to a
dealer providing this service. Disposing of a household appliance separately avoids possible negative consequences for the environment and health deriving from inappropriate disposal and enables the constituent materials to be recovered to obtain significant savings in energy and resources.
To remind you that you must collaborate with a selective collection scheme, the symbol shown appears on the product warning you not to dispose of it in traditional refuse containers.
For further information, contact your local authority or the shop where you bought the product.
FR
1. DESCRIPTION (FIG.1)

- ES
- DESCRIPCION (FIG.1)
- TECHNICAL DETAILS
- IMPORTANT
- When using electric appliances, the following basic safety regulations should be followed to prevent the risk of fire, electric shocks and/or damage to people:
- BEFORE USING FOR THE FIRST TIME
- TO USE
- SW-220/ SW-420
- Recommendations for a making better toasted sandwich
- PA-1400
- DO NOT CLOSE THE FASTENING CLIP (F) ON THE LOWER HANDLE
- CLEANING
- INFORMATION FOR THE CORRECT DISPOSAL OF ELECTRICAL AND ELECTRONIC APPLIANCES
- FR
- DESCRIPTION (FIG.1)
Brand : FAGOR
Model : PA-1400
Category : Sandwich Maker