
RT-11 - Audio Receiver ROTEL - Free user manual and instructions
Find the device manual for free RT-11 ROTEL in PDF.


| Product Type | Stereo Audio Receiver |
| Brand | Rotel |
| Model | RT-11 |
| Dimensions (W x H x D) | 440 x 120 x 350 mm |
| Weight | 8,5 kg |
| Power Supply | 230 V ~ 50/60 Hz |
| Power Consumption | 150 W max |
| Output Power | 2 x 50 W RMS into 8 Ω |
| Radio Frequency Bands | FM (87.5-108 MHz), AM (530-1600 kHz) |
| Audio Inputs | 3 x RCA line, 1 x Phono (MM) |
| Audio Outputs | 2 x speakers, 1 x headphone (6.35 mm) |
| Maintenance and Cleaning | Dust with a soft, dry cloth. Do not use any abrasive products. |
| Safety | Unplug the device before cleaning. Do not expose to moisture. |
| Spare Parts and Repairability | Contact Rotel customer service for any repairs. |
| Included Accessories | Power cord, FM antenna, instruction manual |
| Operating Temperature | 5 °C to 35 °C |
Frequently Asked Questions - RT-11 ROTEL
User questions about RT-11 ROTEL
0 question about this device. Answer the ones you know or ask your own.
Ask a new question about this device
Download the instructions for your Audio Receiver in PDF format for free! Find your manual RT-11 - ROTEL and take your electronic device back in hand. On this page are published all the documents necessary for the use of your device. RT-11 by ROTEL.
USER MANUAL RT-11 ROTEL
ROTEL®
RT-11
DAB/FM Stereo Tuner
Tuner Stéréo DAB/FM
DAB/FM-Stereo-Tuner
This symbol is to alert the user to the presence of uninsulated dangerous voltages inside the product's enclosure that may constitute a risk of electric shock.

This symbol is to alert the user to important operating and maintenance (service) instructions in this manual and literature accompanying the product.
APPLICABLE FOR USA, CANADA OR WHERE APPROVED FOR THE USAGE
CAUTION: TO PREVENT ELECTRIC SHOCK, MATCH WIDE BLADE OF PLUG TO WIDE SLOT. INSERT FULLY.
ATTENTION: POUR EVITER LES CHOCS ELECTRIQUES, INTRODUIRE LA LAME LA PLUS LARGE DE LA FICHE DANS LA BORNE CORRESPONDANTE DE LA PRISE ET POUSSER JUSQU AU FOND.
This Class B digital apparatus complies with Canadian ICES-003.
This symbol means that this unit is double insulated. An earth connection is not required.


Rotel products are designed to comply with international directives on the Restriction of Hazardous Substances (RoHS) in electrical and electronic equipment and the disposal of Waste Electrical and Electronic Equipment (WEEE). The crossed wheelie bin symbol indicates compliance and that the products must be appropriately recycled or processed in accordance with these directives.
ANTENNA GROUNDING ACCORDING TO NATIONAL ELECTRICAL CODE INSTRUCTIONS
SECTION 810: "RADIO AND TELEVISION EQUIPMENT"

Notice
The rear RS232 connection should be handled by authorized persons only.
FCC Information
This equipment has been tested and found to comply with the limits for a Class B digital device, pursuant to Part 15 of the FCC Rules. These limits are designed to provide reasonable protection against harmful interference in a residential installation. This equipment generates, uses and can radiate radio frequency energy and, if not installed and used in accordance with the instruction, may cause harmful interference to radio communications.
However, there is no guarantee that interference will not occur in a particular installation. If this equipment does cause harmful interference to radio or television reception, which can be determined by turning the equipment off and on, the user is encouraged to try to correct the interference by one or more of the following measures:
- Reorient or relocate the receiving antenna.(TV, radio, etc.)
- Increase the separation between the equipment and receiver.
- Connect the equipment to an outlet on circuit different from that to which the receiver is connected.
- Consult the dealer or an experienced radio/TV technician for additional help.
Caution
This device complies with part 15 of the FCC Rules. Operation is subject to the following to conditions: (1) This device may not cause harmful interference, and (2) this device must accept any interference received, including interference that may cause undesired operation.
NOTE TO CATV SYSTEM INSTALLER: Call the CATV system or antenna installer's attention to Article 820-40 of the NEC. This provides guidelines for proper grounding and, in particular, specifies that the cable ground shall be connected to the grounding system of the building, as close to the point of cable entry as practical. See installation diagram.
NOTE: This equipment has been tested and found to comply with the limits for a Class B digital device, pursuant to Part 15 of the FCC Rules. These limits are designed to provide reasonable protection against interference in a residential installation. This equipment generates and can radiate radio frequency energy and, if not installed and used in accordance with the instructions, may cause interference to radio or TV communications. There is no guarantee that interference will not occur in a particular installation. If this equipment does cause interference to radio or television reception, which can be determined by turning the equipment off and on, try to correct the interference by one or more of the following measures:
• Reorient or relocate the receiving antenna.
- Increase the separation between the unit and the television tuner.
- Connect the unit to an AC power outlet on a different electrical circuit.
- Consult your authorized Rotel retailer for assistance.
Important Safety Instructions
WARNING: There are no user serviceable parts inside. Refer all servicing to qualified service personnel.
WARNING: To reduce the risk of fire or electric shock, do not expose the unit to moisture or water. Do not expose the unit to dripping or splashing. Do not place objects filled with liquids, such as vases, on the unit. Do not allow foreign objects to get into the enclosure. If the unit is exposed to moisture, or a foreign object gets into the enclosure, immediately disconnect the power cord from the wall. Take the unit to a qualified service person for inspection and necessary repairs.
Read all the instructions before connecting or operating the component.
Keep this manual so you can refer to these safety instructions.
Heed all warnings and safety information in these instructions and on the product itself. Follow all operating instructions.
Clean the enclosure only with a dry cloth or a vacuum cleaner.
Do not use this unit near water.
Do not place the unit on a bed, sofa, rug, or similar surface that could block the ventilation openings. If the unit is placed in a bookcase or cabinet, there must be ventilation of the cabinet to allow proper cooling.
Keep the component away from radiators, heat registers, stoves, or any other appliance that produces heat.
WARNING: The rear panel power cord connector is the mains power disconnect device. The device must be located in an open area that allows access to the cord connector.
The unit must be connected to a power supply only of the type and voltage specified on the rear panel. (USA: 120 V/60Hz, EC: 230V/50Hz)
Connect the component to the power outlet only with the supplied power supply cable or an exact equivalent. Do not modify the supplied cable. A polarized plug has two blades, with one wider than the other. A grounding plug has two blades plus a third grounding prong. These are provided for your safety. Do not defeat grounding and/or polarization safety provisions. If the supplied plug does not fit your outlet, please consult an electrician for replacement of the obsolete outlet. Do not use extension cords.
The main plug of the power cord set is a disconnect device of the apparatus. In order to completely disconnect the apparatus from the supply mains, the main plug of the power cord set should be unplugged from the mains (AC) outlet. The stand-by LED indicator will not be lit up to show the power cord is unplugged. The disconnect device shall remain readily operable.
Do not route the power cord where it will be crushed, pinched, bent, exposed to heat, or damaged in any way. Pay particular attention to the power cord at the plug and where the cord exits the back of the unit.
The power cord should be unplugged from the wall outlet during a lightning storm or if the unit is to be left unused for a long period of time.
Use only accessories specified by the manufacturer.
Use only with a cart, stand, rack, bracket or shelf system recommended by Rotel. Use caution when moving the unit in a stand or rack to avoid injury from a tip-over.

Immediately stop using the component and have it inspected and/or serviced by a qualified service agency if: • The power supply cord or plug has been damaged.
- Objects have fallen or liquid has been spilled into the unit.
- The unit has been exposed to rain.
- The unit shows signs of improper operation.
- The unit has been dropped or damaged in any way.
The batteries in the remote control should not be exposed to excessive temperature such as sunshine, fire or other heat sources.
Figure 1: Controls and Connections
Commandes et Branchements
Bedienelemente und Anschlüsse
Controles y Conexiones
Bedieningselementen en aansluitingen
Controlli e connessioni
Funktioner och anslutningar
Органы управления и разъемы
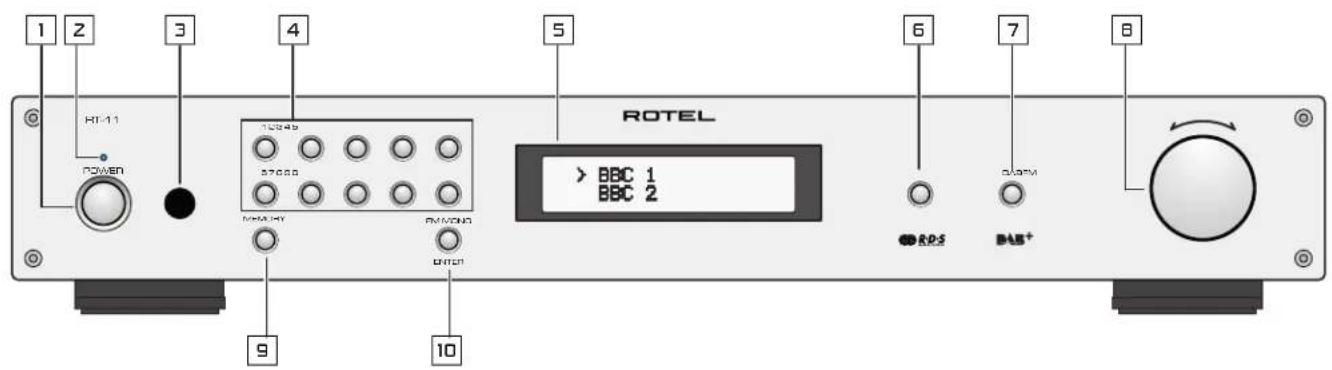

Figure 2: RR-T97 Remote Control Télécommande RR-T97 Fernbedienung RR-T97 Mando a Distancia RR-T97 Afstandsbediening RR-T97 Telecomando RR-T97 Fjärrkontrollen RR-T97 Пульт ДУ RR-T97
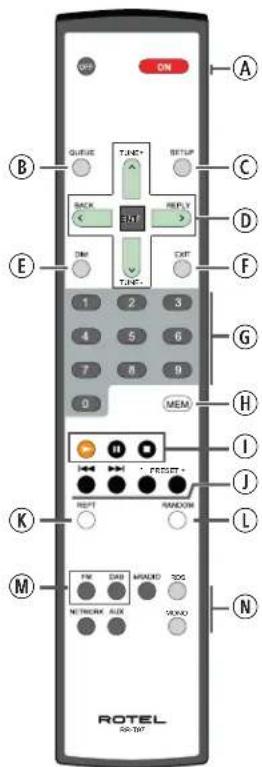
Figure 3: Hook-up Illustration
Branchements Principaux
Anschlussdiagramm
Ilustración del Conexionado
Aansluiten Afbeelding
Collegamenti
Inkoppling
Схема подключения
![CAUTION RMB OF ELECTRIC SHOCK DO NOT OPEN WARNING : SHOCK HAZARD-DO NOT OPEN AMS/RESQUE DE CHOC ELECTROJE-ME PAS OUIR This device complies with Part 15 of the ICC Flutes. Operation is required to the following fan conditions: [1]This device may not cause harmful interference, and [2]This device must accept any interference received, including interference that may cause undirected operation. Antenna DAB/FM RB232 OUTPUT RIGHT LEFT ROTEL DAB/FM STERED TUNER MODEL NO. : RT-11 POWER CONSUMPTION : 10W SERIAL NO. ~ RMS24A PRE AMPLIFIER R L INPUT](/content/2026/06/1265420/images/297179c32b3d990c46773efbde50c3e366387bc7e778f48c2ea017d72fd20cd4.jpg)
Important Notes
When making connections be sure to:
√ Turn off all the components in the system before hooking up any components, including loudspeakers.
√ Turn off all components in the system before changing any of the connections to the system.
It is also recommended that you:
√ Turn the volume control of the amplifier all the way down before the amplifier is turned on or off.
Remarques importantes
Important Safety Instructions....3
Figure 1: Controls and Connections 4
Figure 2: RR-T97 Remote Control 4
Figure 3: Hook-up Illustration 5
Important Notes 6
About Rotel....7
Getting Started 8
A Few Precautions 8
Key Features 8
Placement 8
AC Power and Control 8
AC Power Input 14 8
Power Switch 1 A and Power Indicator z 8
Connection Overview 8
DAB/FM Broadcasting 8
RS232 Connector 12 8
OUTPUT 13 8
FM RADIO....8
FM Radio Station Playing 8
Storing a radio station in a preset 9
Playing a preset radio station 9
FM Settings Menu 9
RDS Broadcast Reception 9
RDS Button N 9
MONO Button N 9
DAB RADIO....10
DAB Radio Station Playing 10
Storing a DAB station in a preset 10
Playing a preset DAB station 10
DAB Settings Menu 10
Remote Unit Advanced Buttons.... 10
Troubleshooting 11
Power Indicator Is Not Illuminated 11
No Sound 11
Cannot Tune to DAB/DAB+ Preset Station 11
Specifications 11
About Rotel
Our story began over 50 years ago. Over the decades, we have received hundreds of awards for our products and satisfied hundreds of thousands of people who take their entertainment seriously - like you!
Rotel was founded by a family whose passionate interest in music led them to manufacture high-fidelity components of uncompromising quality. Through the years, that passion has remained undiminished and the family goal of providing exceptional value for audiophiles and music lovers, regardless of their budget, is shared by all Rotel employees.
Rotel's engineers work as a close team, listening to, and fine tuning, each new product until it reaches their exacting musical standards. They are free to choose components from around the world in order to make that product the best they can. You are likely to find capacitors from the United Kingdom and Germany, semiconductors from Japan or the United States, while toroidal power transformers are manufactured in Rotel's own factory.
We all have concerns about our environment. And, as more and more electronics are produced it is especially important for a manufacturer to do all it can to engineer products that have a minimum impact on the environment.
At Rotel, we are proud to do our part. We have reduced the lead content in our products by using special lead-free ROHS solder and components. Our engineers continually strive to improve power supply efficiency without compromise to quality. When in standby mode Rotel products use minimal power to meet global Standby Power Consumption requirements.
The Rotel factory is also doing their part to help the environment through constant improvements to product assembly methods for a cleaner and greener manufacturing processes.
All of us at Rotel thank you for buying this product. We are sure it will bring you many years of enjoyment.
Getting Started
Thank you for purchasing the Rotel Tuner. When used in a high-quality music or home theater system, your Rotel Tuner will provide years of musical enjoyment.
A Few Precautions
WARNING: To avoid potential damage to your system, turn off ALL the components in the system when connecting or disconnecting components. Do not turn the system components back on until you are sure all the connections are correct and secure.
Please read this manual carefully. In addition to basic installation and operating instructions, it provides valuable information on various RT-11 system configurations as well as general information that will help you get the optimum performance from your system. Please contact your authorized Rotel dealer for answers to any questions you might have. In addition, all of us at Rotel welcome your questions and comments.
Save the RT-11 shipping carton and all enclosed packing material for future use. Shipping or moving the RT-11 in anything other than the original packing material may result in severe damage to your unit and void the warranty.
If included in the box please fill out and send in the owner's registration card. Also be sure to keep the original sales receipt. It is your best record of the date of purchase, which you will need in the event warranty service is ever required.
Key Features
- Listen to FM and DAB/DAB+ broadcasts.
• 30 Station Presets for memorizing your favorite DAB/DAB+, FM stations.
• RDS (Radio Data System) capability. - DAB/DAB+ (Digital Audio Broadcast), a digital transmission available throughout Europe and other parts of world.
Placement
Place the unit on a solid, level surface away from sunlight, heat, moisture, or vibration.
AC Power and Control
AC Power Input 14
Your unit is configured at the factory for the proper AC line voltage in the country where you purchased it (USA: 120 volts/60 Hz, Europe: 230 volts/50 Hz). The AC line configuration is noted on a label on the back panel.
NOTE: Should you move your unit to another country, it may be possible to reconfigure it for use on a different line voltage. Do not attempt to perform this conversion yourself. Opening the enclosure of the unit exposes you to dangerous voltages. Consult a qualified service person or the Rotel factory service department for information.
NOTE: Some products are intended for sale in more than one country and as such are included with more than one AC cord. Please use only the one appropriate for your country/region.
The RT-11 should be plugged directly into a 2-pin polarized wall outlet or into the switched outlet on another component in your audio system. Do not use an extension cord.
Be sure the POWER SWITCH ^1 on the front panel of the RT-1 1 is turned off (in the "out" position). Then, connect the supplied power cord to the Power Connector ^14 on the rear of the unit and the AC power outlet.
If you are going to be away from home for an extended period of time such as a month-long vacation, it is a sensible precaution to unplug the RT-11 (as well as other audio and video components) while you are away.
Power Switch 1⑨ and Power Indicator 2
The power switch is located on the left side of the front panel. To turn the unit ON, push the switch in.
The indicator light above the switch will light, indicating that the unit is turned on. To turn the unit off, push the button again and return it to the "out" position.
Connection Overview
Before continuing further to other sections in the manual, please make sure all the cable connections are made properly. Refer to figure 3.
DAB/FM Broadcasting 11
Please use the supplied indoor antenna to connect the DAB and FM connector on the rear panel. Experiment with different positions to maximize reception.
RS232 Connector 12
The RT-11 can be controlled via RS232 for integration with automation systems. The RS232 input accepts a standard straight DB-9 Male-to-Female cable.
For additional information on the connections, software, and operating codes for computer control of the RT-11, contact your authorized Rotel dealer.
OUTPUT 13
The unit outputs a stereo analog signal. Use the supplied audio cable to connect it with input jacks of your pre-amplifier or processor. Be careful and make sure that connections correspond to each other. Right channel output must be connected to right channel of pre-amplifier's or processor's right channel and vice versa.
FM RADIO
Before listening to FM radio, make sure that the antenna has been properly connected.
FM Radio Station Playing
- Select FM Button from the source buttons ☐M. The display will show as below.
95.25MHz Mo [No RadioText]
- Turn the knob ☐ on the front panel or use the up/down arrow keys on the remote control to change the frequency of radio station. Turning the knob on the front panel or using the up/down arrow keys on the remote control one step at a time changes the frequency one step.
-
To auto scan for an FM station, you can choose any of the steps below:
-
Press and hold the up/down arrow keys on the remote control.
- Press the fast-forward/back-ward ⏻ buttons on the remote control.
Storing a radio station in a preset
While a radio station is playing, push the memory button 9H, then press the number of preset assigned from numeric pad 4G, the display will show preset saved. Up to 30 preset FM radio stations may be stored.
Playing a preset radio station
When a radio station is playing, you can switch to a preset station in one of the following ways.
- From the numeric pad4⑤, press preset number of the desired station.
- Press PRESET +/- Ⓙ buttons on the remote control to call out preset numbers and corresponding station. Press the up/down Ⓓ arrow keys or the PRESET +/- Ⓙ buttons on the remote control or turn the knob ☐ on the front panel to select the desired station, then press the ENTER ☐ button on the front panel or the ENT Ⓓ key on the remote control to select. Press FM ☑ button again to exit the preset menu and back to playing status.
FM Settings Menu
Press the FM ☐ button and toggle to the FM settings Menu. There are 3 sub-menus under FM setting.
- Scan Settings: Select between STRONG STATIONS ONLY or ALL STATIONS.
Strong Stations Only * All Stations
- Audio Settings: Allow Stereo or Forced Mono.
Stereo or Mono * Mono Only
- FM Preset: Displays all 30 of the FM preset stations and allows tuning to the selected preset by pressing the ENTER button on front panel or the ENT key on the remote control.
To make changes in the FM settings menu, turn the knob ☐ on the front panel or use the up/down Ⓓ arrow keys on the remote control. To make
a change press the ENTER 10 button on the front panel. From the remote control, press the ENT ⑭ key.
RDS Broadcast Reception
This Rotel unit is equipped with RDS (Radio Data Systems) reception capabilities. The RDS broadcast system provides additional functionality to FM radio reception by transmitting encoded information along with the radio signal. This signal is decoded by an RDS receiver and can provide a range of informational features including:
- A display of the station's identifying name (e.g. BBC1).
- A display of the station's program content (e.g. ROCK or NEWS).
- Traffic information broadcasts.
-
A scrolling text display for announcements or information.
-
Current time and date.
RDS broadcasting has been widely available in many European markets for years. There are a large number of RDS stations and most users will be familiar with the features and operation.
NOTE: The RDS features are entirely dependent on the broadcaster sending properly encoded signals. Thus, they will only be available in markets where RDS is currently implemented and where stations are broadcasting these data signals.
RDS Button N
The RDS button on the remote control can step through the various displays. Press the RDS button on the remote control to step through the following displays.
- Radio Text.
- Name of station.
- PTY, or the type of content.
- Today's date and current time.
MONO Button N
The MONO button on the remote control changes the FM mode from stereo reception to mono reception. In stereo mode, a stereo signal will be heard if the station is broadcasting a stereo signal and there is sufficient signal strength.
NOTE: Switching to mono mode can be a useful way to improve the reception of weak or distant FM signals. Less signal strength is required for clean mono reception than for stereo reception.
DAB RADIO
Make sure that your local area can receive Digital Audio Broadcast (DAB) broadcasting signal.
Press the DAB 7 button on the front of the panel, or remote Ⓜ.
DAB channels are categorized into ensembles, which are also known as multiplexes. Each multiplex provides a number of stations and each service contains a primary service that can contain secondary services. DAB technology allows broadcasters to transmit additional data along with the audio, which can include other audio channels, text and even images and computer data in the future.
DAB Radio Station Playing
- Select DAB 7 Button from the front panel and the unit will scan for available stations. After scanning you will see the following menu.
BBC 1 BBC 2
- Press the ENTER ☐ button on the front panel or the ENT Ⓓ key on the remote control to select the station and start play.
Storing a DAB station in a preset
While a DAB station is playing, push the memory button 9, then press the number of preset assigned from numeric pad 4G. Up to 30 preset DAB radio stations may be stored.
Playing a preset DAB station
When a DAB station is playing, you can switch to a preset station in one of the following ways.
-
From the numeric pad4⑥, press the preset number of the desired station.
-
Press PRESET +/- Ⓙ buttons on the remote to call out preset numbers and corresponding station. Press the up/down Ⓓ arrow keys or the PRESET +/- Ⓙ buttons on the remote control or turn the knob Ⓔ on the front panel to choose the desired station, then press ENTER Ⓔ button on the front panel or the ENT Ⓔ key on the remote control.
DAB Settings Menu
Press the DAB 7 on the front panel or remote Ⓜ to toggle to the DAB settings Menu. Turn the knob on the front panel or use the up/down arrow keys on the remote control to go through each sub-menu.
• Station List: Shows station list.
- Local Scan: Start a limited scan of available stations by pressing the ENTER button on the front panel or the ENT key on the remote control. (Not available in all markets).
- Full Scan: Start a full range scan of available stations by pressing the ENTER 10 button on the front panel or the ENT ⑭ key on the remote control.
- Manual Tune: Press the ENTER button on the front panel or the ENT key on the remote control and select stations manually by turning the knob on the front panel or using the up/down arrow keys on the remote control.
- DRC, Dynamic Range Control: Select between "High", "Low" and "Off". Press the ENTER button on the front panel or the ENT key on the
remote control and turn the knob on the front panel or use the up/down ① arrow keys on the remote control to change.
- Station Order: Display station order as either "Alphanumeric", "Ensemble" or "Valid".
- Prune Station: Select between "Yes" or "No". The Prune setting allows you to remove stations that are not active or can not be received.
NOTE: Prune will remove unavailable stations from both the Station List and the DAB Preset List.
- DAB Preset: Displays all 30 of the DAB/DAB+ preset stations and allows tuning to the selected preset by pressing the ENTER button on the front panel or the ENT key on the remote control.
Remote Unit Advanced Buttons
Setup menu
To enter the setup menu, press the SETUP© button on the remote control and you will see the following display:
Dimmer Version
- Dimmer: Controls the brightness of the front panel display, it can be dimmed with seven steps. Press the LEFT or RIGHT arrow keys on the remote control to change the display brightness.
NOTE: This setting is stored permanently even after the RT-11 is powered off.
To temporarily change the display brightness, press the DIM Ⓔ button on the remote control.
- Version: Shows the software version loaded in the unit.
- Factory Default: Sets the unit into the original state as when it left the factory. Presets will be lost.
- Exit: Exits the setup menu.
QUEUE Button Ⓑ
This button is not used with the RT-11
BACK Button D
This button is not used with the RT-11
REPLY Button®
This button is not used with the RT-11
Transport Buttons ①
These buttons are not used with the RT-11
REPT Button K
This button is not used with the RT-11
RANDOM Button Ⓛ
This button is not used with the RT-11
NOTE: The input buttons i-Radio, Network, and AUX not labeled in the illustration figure 2, do not operate with the RT-11.
Troubleshooting
Most difficulties in audio systems are the result of incorrect connections, or improper control settings. If you encounter problems, isolate the area of the difficulty, check the control settings, determine the cause of the fault and make the necessary changes. If you are unable to get sound, refer to the suggestions for the following conditions:
Power Indicator Is Not Illuminated
The power Indicator should be illuminated whenever the unit is plugged into the wall power outlet and is pushed in. If it does not light, test the power outlet with another electrical device, such as a lamp. Be sure the power outlet being used is not controlled by a switch that has been turned off.
No Sound
Check the cables between the output and the pre-amplifier inputs, be sure they are connected properly. Refer to Fig. 3.
Cannot Tune to DAB/DAB+ Preset Station
Some stations may become unavailable and will be displayed in the Station List with a "?" character in front of the station name. These stations are no longer broadcasting or received by the RT-11. Presets that are set to these stations will not function and if selected the RT-11 will display the DAB menu. To remove stations no longer transmitting use the PRUNE function in the DAB Menu. This will remove these stations from the Station List and from the Preset list.
Specifications
FM Tuner
Usable Sensitivity 22.2 dBf
50dB Quieting Sensitivity 27.2 dBf (mono)
Signal to Noise Ratio (at 65 dBf)
MONO 63 dBf
STEREO 60 dBf
Harmonic Distortion (at 65 dBf)
MONO 0.2%
STEREO 0.3%
Frequency Response 10Hz - 15kHz, ± 3dB
Stereo Separation 40dB/37dB
(100Hz/1kHz)
Output level 1.0 V
Antenna Input 75 ohms F connector
DAB Tuner
Sensitivity - 80 dBm
Tuning Range Band III (174 - 240MHz)
Audio Data Rate 224kbps (Max)
Frequency Response 20 - 20kHz +/- 1.0 dB
Analog Output 2.1V at 0 dBFS
Antenna Input 75 ohms F connector
General
Power Consumption 10 watts
Standby Power Consumption 0.5 watts
BTU (at 5 watts) 17 BTU/h
Power Requirements (AC)
USA: 120V, 60Hz
Europe: 230V, 50Hz
Dimensions (W x H x D) 430 x 73 x 330 mm
(17×2 7/8×13 in)
Front panel height
60 mm
Weight (net) 4.3 kg (9.48 lbs)
All specifications are accurate at the time of printing.
Rotel reserves the right to make improvements without notice
Rotel and the Rotel Hifi logo are registered trademarks of The Rotel Co., Ltd. Tokyo, Japan.

CAUTION
RISK OF ELECTRIC SHOCK DO NOT OPEN

WARNING : SHOCK HAZARD-DO NOT OPEN AVIS: RISQUE DE CHOC ÉLECTRIQUE-NE PAS OUVRIR
This Class B digital apparatus complies with Canadian ICES-003.
Strong Stations Only * All Stations
Poids (net) 4,3 kg (9,48 lbs)
This Class B digital apparatus complies with Canadian ICES-003.
Strong Stations Only * All Stations
This Class B digital apparatus complies with Canadian ICES-003.
Strong Stations Only * All Stations
- "Audio Settings" ("Ajustes de Audio"): Permite seleccionar entre "Stereo" ("Estéreo") y "Forced Mono" ("Mono Forzado").
Stereo or Mono * Mono Only
This Class B digital apparatus complies with Canadian ICES-003.
Strong Stations Only * All Stations
- Audio Settings (Audio-instellingen): Allow Stereo (Stereo toegestaan) of Forced Mono (Alleen Mono).
Stereo or Mono * Mono Only
This Class B digital apparatus complies with Canadian ICES-003.
Antenna radio DAB/FM 11 44
Antenna radio DAB/FM 11
Strong Stations Only * All Stations
This Class B digital apparatus complies with Canadian ICES-003.
RDS-mottagning....52
RDS-knapp Ⓜ
MONO-knapp N
DAB-radio 53
Lyssna på DAB-radio
Lagra en DAB-radiostation i minnet
Lyssna på en sparad DAB-radiostation
Menyn DAB Settings
Strong Stations Only * All Stations
Strong Stations Only * All Stations
2-11-4, Nakane, Meguro-ku,
Tokyo, 152-0031
Japan
Rotel of America
54 Concord Street
North Reading, MA 01864-2699
USA
Phone: +1 978-664-3820
Fax: +1 978-664-4109
Rotel Europe
Dale Road
Worthing, West Sussex BN11 2BH
England
Phone: +44 (0)1903 221 710
Fax: +44 (0)1903 221 525
Rotel Deutschland

- ROTEL®
- RT-11
- APPLICABLE FOR USA, CANADA OR WHERE APPROVED FOR THE USAGE
- Notice
- FCC Information
- Caution
- Important Safety Instructions
- Important Notes
- When making connections be sure to:
- It is also recommended that you:
- Remarques importantes
- About Rotel
- Getting Started
- A Few Precautions
- Key Features
- Placement
- AC Power and Control
- AC Power Input 14
- Power Switch 1⑨ and Power Indicator 2
- Connection Overview
- DAB/FM Broadcasting 11
- RS232 Connector 12
- OUTPUT 13
- FM RADIO
- FM Radio Station Playing
- Storing a radio station in a preset
- Playing a preset radio station
- FM Settings Menu
- RDS Broadcast Reception
- RDS Button N
- MONO Button N
- DAB RADIO
- DAB Radio Station Playing
- Storing a DAB station in a preset
- Playing a preset DAB station
- DAB Settings Menu
- Remote Unit Advanced Buttons
- Setup menu
- QUEUE Button Ⓑ
- BACK Button D
- REPLY Button®
- Transport Buttons ①
- REPT Button K
- RANDOM Button Ⓛ
- Troubleshooting
- Power Indicator Is Not Illuminated
- No Sound
- Cannot Tune to DAB/DAB+ Preset Station
- Specifications
- FM Tuner
- DAB Tuner
- General
- This Class B digital apparatus complies with Canadian ICES-003.
- Antenna radio DAB/FM 11
- Rotel of America
- Rotel Europe
- Rotel Deutschland
Brand : ROTEL
Model : RT-11
Category : Audio Receiver