
BAR208HGA - Weather Station OREGON SCIENTIFIC - Free user manual and instructions
Find the device manual for free BAR208HGA OREGON SCIENTIFIC in PDF.


| Product type | Weather station |
| Brand | Oregon Scientific |
| Model | BAR208HGA |
| Dimensions (base unit) | Approximately 120 x 120 x 40 mm |
| Weight (base unit) | Approximately 200 g (without batteries) |
| Power supply | 5V AC adapter (included) or 3 AA batteries (not included) |
| Outdoor sensor | Wireless, range up to 30 m, powered by 2 AA batteries |
| Display | Backlit LCD |
| Indoor temperature | Range: -5°C to +50°C |
| Outdoor temperature | Range: -20°C to +60°C |
| Indoor humidity | Range: 25% to 95% RH |
| Outdoor humidity | Range: 25% to 95% RH |
| Barometric pressure | Display and trend |
| Weather forecast | Icons: sunny, cloudy, rainy, snowy |
| Radio-controlled clock | DCF-77 (Europe) or MSF (UK) |
| Calendar | Date, day, month |
| Moon phases | Display of 8 phases |
| Alarms | Single alarm and temperature alarm |
| Extreme memory | Min/max temperature and humidity |
| Care and cleaning | Wipe with a soft, dry cloth. Do not use abrasive products. |
| Safety | Do not expose to excessive moisture, shocks, or intense heat. |
| Spare parts and repairability | Outdoor sensor and AC adapter available. For repairs, contact customer service. |
| Warranty | 2 years |
Frequently Asked Questions - BAR208HGA OREGON SCIENTIFIC
User questions about BAR208HGA OREGON SCIENTIFIC
0 question about this device. Answer the ones you know or ask your own.
Ask a new question about this device
Download the instructions for your Weather Station in PDF format for free! Find your manual BAR208HGA - OREGON SCIENTIFIC and take your electronic device back in hand. On this page are published all the documents necessary for the use of your device. BAR208HGA by OREGON SCIENTIFIC.
USER MANUAL BAR208HGA OREGON SCIENTIFIC
Advanced Weather Station
Model: BAR208HG
with Atomic Time
USER MANUAL
Advanced Weather Station with Atomic Time Model: BAR208HG USER MANUAL
CONTENTS
Overview 2
Front View 2
Back View 3
Remote Sensor 3
Getting Started 3
Insert Batteries 3
Remote Sensor 4
Sensor Data Transmission 4
Clock 5
Clock Reception 5
Manually Set Clock 5
Weather Forecast 6
Weather Warning Message 6
Temperature and Humidity 6
Ice Warning 6
Weather Trends 7
Moon Phase 7
Backlight 7
Reset 7
Precautions 7
Specifications 8
About Oregon Scientific 8
EU-Declaration of Conformity 8
OVERVIEW
FRONT VIEW (FIG 1)
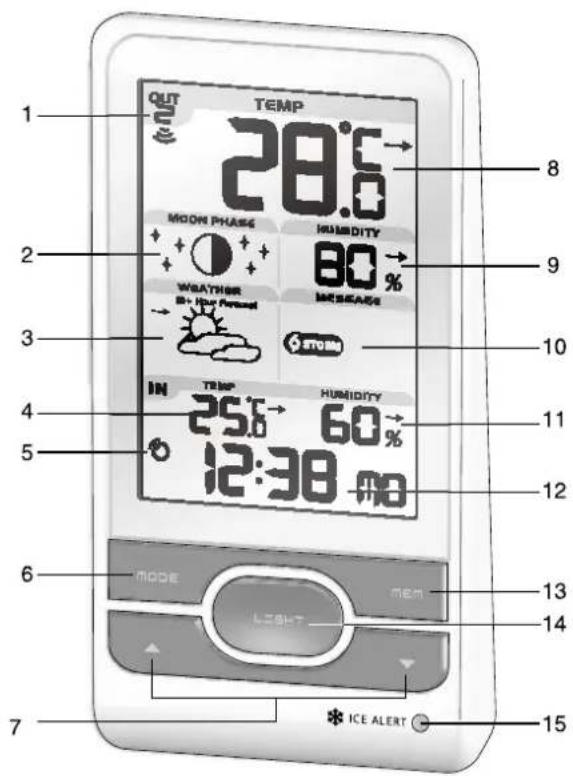
-
Remote sensor reception indicator
-
Moon phase reading
-
Weather forecast
-
Indoor temperature with temperature trend
-
Clock signal reception indicator
-
MODE: Change settings / display
-
▲ / ▼ Increase / decrease settings; activate / deactivate clock reception signal
-
Outdoor temperature with temperature trend
-
Outdoor humidity with humidity trend
-
Weather warning message
-
Indoor humidity with humidity trend
-
Clock with weekday
-
MEM: View current, maximum and minimum temperature / humidity
-
LIGHT: Activate backlight for 5 seconds
-
Ice alert LED indicator
BACK VIEW (FIG 2)

- °C / °F: Select temperature unit
- EU / UK: Select the nearest radio signal
- RESET: Reset unit to default settings
REMOTE SENSOR (FIG 3)
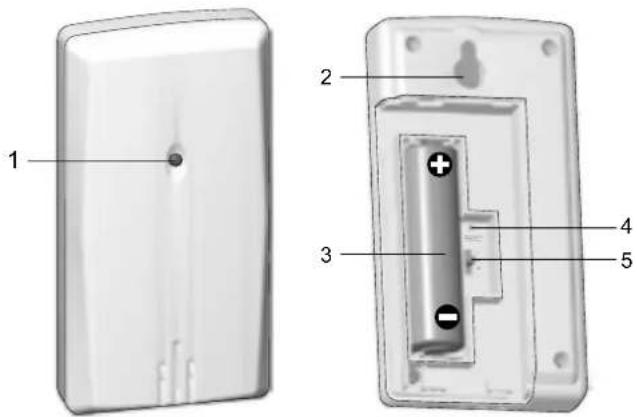
- LED status indicator
- Wall mount hole
- Battery compartment
- RESET hole
- CHANNEL switch
GETTING STARTED
INSERT BATTERIES
- Remove the battery compartment.
- Insert the batteries, matching the polarities (see FIG 2).
- Press RESET after each battery change.
| LOCATION | MEANING |
| Clock / alarm and Indoor temperature area | Main unit batteries low |
| Outdoor temperature area | Sensor batteries low |
REMOTE SENSOR
The main unit can collect data from up to 3 sensors.
To set up the sensor:
- Open the battery compartment (see FIG 3).
- Select a channel then press RESET.
- Close the battery door.
- Place the sensor within 30 m (98 ft) of the main unit using the table stand or wall mount.
TIP Ideal placements for the sensor would be in any location on the exterior of the home at a height of not more than 1.5 m (5 ft) and which can shield it from direct sunlight or wet conditions for an accurate reading.

NOTE Use alkaline batteries for longer usage and consumer grade lithium batteries in temperatures below freezing.
SENSOR DATA TRANSMISSION
To search for a sensor:
Press and hold ▲ + MODE.
The sensor reception icon in the remote sensor area shows the status:
| ICON DESCRIPTION | |
| Main unit is searching for sensor(s). | |
| A channel has been found. | |
| the sensor cannot be found. | |
TIP The transmission range may vary depending on many factors. You may need to experiment with various locations to get the best results.
CLOCK
CLOCK RECEPTION
This product is designed to synchronize its clock automatically with a clock signal.
Slide EU / UK to select the signal received.
- EU: DCF-77 signal: within 1500 km (932 miles) of Frankfurt, Germany.
- UK: MSF-60 signal: within 1500 km (932 miles) of Anthorn, England.
To enable / disable signal reception:
Press and hold ▲ to enable or ▼ to disable signal reception.
NOTE Reception takes 2-10 minutes. If the signal is weak, it can take up to 24 hours to get a valid signal. If signal
reception is unsuccessful, place your unit next to a window, press and hold ▲o force another signal search.
Clock signal reception indicator:
| STRONG SIGNAL | WEAK SIGNAL | NO SIGNAL |
 |  |  |
MANUALLY SET CLOCK
To set the clock manually, disable the signal reception first.
- Press and hold MODE.
- Press ▲ or ▼ to change the settings.
- Press MODE to confirm.
- The settings order is: time zone, 12/24 hr format, hour, minute, year, calendar mode (day – month / month – day), month, day and language.
Time zone offset sets the clock +/- 23 hours from the received clock signal time.
NOTE The language options are English (E), German (D), French (F), Italian (I), and Spanish (S).
To select display mode:
Press MODE to choose between clock with seconds / weekday / calendar / moon phase.
WEATHER FORECAST
This product forecasts the next 12 to 24 hours of weather within a 30-50 km (19-31 mile) radius with a 75% accuracy.
| Sunny | |
| Partially Cloudy | |
| Cloudy | |
| Rainy | |
| Snowy |
WEATHER WARNING MESSAGE
The weather warning messages provide indications of probable circumstances that may arise based on the weather station's calculations. The meanings for the warnings are illustrated below:
| Warning Meaning | |
| RiHEAT temperatures | |
| RiWIND wind speeds | |
| RiSTORM | |
| Ris CIFG conditions | |
| Ris FROST conditions |
TEMPERATURE AND HUMIDITY
To toggle temperature unit:
Press °C / °F.
To auto-scan between sensors:
Press and hold ▼ + MEM to display each sensor's data for 3 seconds.
To end press ▲.
To toggle between current, minimum and maximum records for the selected sensor:
Press MEM repeatedly.
To clear the records:
Press and hold MEM.
ICE WARNING
If the channel 1 sensor falls between 3° C to -2° C ( 37° F to 28° F), LED indicator will flash, and will stop flashing once the temperature is out of this range.
WEATHER TRENDS
The temperature, humidity and pressure trend icons are based on recent sensor readings.
| RISE STEADY FALL | ||
MOON PHASE
In moon phase mode, press ▲ to scan through the years (2001 to 2099).
| Moon Full Moon | |||
| Washing Crescent Waning Gibbons | |||
| First quarter Last quarter | |||
| Waxing Gibbous | Waning Crescent |
NOTE Star icons around the moon phase will be displayed from 6 o'clock in the evening to 6 o'clock the next morning.
BACKLIGHT
Press LIGHT to activate backlight for 5 seconds.
RESET
Press RESET to return to the default settings.
PRECAUTIONS
- Do not subject the unit to excessive force, shock, dust, temperature or humidity.
- Do not cover the ventilation holes with any items such as newspapers, curtains etc.
- Do not immerse the unit in water. If you spill liquid over it, dry it immediately with a soft, lint-free cloth.
- Do not clean the unit with abrasive or corrosive materials.
- Do not tamper with the unit's internal components. This invalidates the warranty.
- Only use fresh batteries. Do not mix new and old batteries.
- Images shown in this manual may differ from the actual display.
- When disposing of this product, ensure it is collected separately for special treatment.
- Placement of this product on certain types of wood may result in damage to its finish for which Oregon Scientific will not be responsible. Consult the furniture manufacturer's care instructions for information.
- The contents of this manual may not be reproduced without the permission of the manufacturer.
- Do not dispose old batteries as unsorted municipal waste. Collection of such waste separately for special treatment is necessary.
- Please note that some units are equipped with a battery safety strip. Remove the strip from the battery compartment before first use.
NOTE The technical specifications for this product and the contents of the user manual are subject to change without notice.
SPECIFICATIONS
| TYPE DESCRIPTION | |
| MAIN UNIT | |
| L x W x H 94 x 51 x (3.70 x 2.01 x 7.19 in) | 182.5 mm |
| Weight 241 g (8.5 oz) without battery | |
| Temperature range -5°C to 50°C (23°F to 122°F) | |
| Resolution 0.1°C (0.2°F) | |
| Signal frequency 433 MHz | |
| Humidity range 25% - 95% | |
| Humidity resolution 1% | |
| Power 3 x UM-3 (AA) 1.5 V batteries | |
| REMOTE UNIT (THGN132N) | |
| L x W x H 50 x 22 x 96 mm(1.97 x 0.87 x 3.78 in) | |
| Weight 62 g (2.22 ounces)without battery | |
| Transmission range 30 m (98 ft) unobstructed | |
| Temperature range -20°C to 60°C (-4°F to 140°F) | |
| Humidity range 25% - 95% | |
| Power 1 x UM-3 (AA) 1.5 V battery | |
ABOUT OREGON SCIENTIFIC
Visit our website (www.oregonscientific.com) to learn more about Oregon Scientific products. If you're in the US and would like to contact our Customer Care department directly, please visit: www2.oregonscientific.com/service/support
OR
Call 1-800-853-8883.
For international inquiries, please visit:
www2.oregonscientific.com/about/international
EU-DECLARATION OF CONFORMITY
Hereby, Oregon Scientific, declares that this Advanced Weather Station with Atomic Time (Model: BAR208HG) is in compliance with the essential requirements and other relevant provisions of Directive 1999/5/EC. A copy of the signed and dated Declaration of Conformity is available on request via our Oregon Scientific Customer Service.

COUNTRIES RTTE APPROVAL COMPLIED
All EC countries, Switzerland CH
and Norway N
SENSOR REMOTO (FIG 3)

CÓMO INTRODUCIR LAS PILAS
Über Oregon Scientific (....9
DÉCLARATION DE CONFORMITÉ
BUITENSENSOR (FIG 3)

SENSOR REMOTO (FIG 3)

- LED indikator
- Väggmonteringshål
- Batterifack
- RESET knapp
- Kanalomkopplare
ATT KOMMA IGÅNG
SÄTT I BATTERIER
© 2007 Oregon Scientific. All rights reserved.
086L005036-017
- ADVANCED WEATHER STATION WITH ATOMIC TIME MODEL: BAR208HG USER MANUAL
- CONTENTS
- OVERVIEW
- FRONT VIEW (FIG 1)
- BACK VIEW (FIG 2)
- REMOTE SENSOR (FIG 3)
- GETTING STARTED
- INSERT BATTERIES
- REMOTE SENSOR
- TO SET UP THE SENSOR
- SENSOR DATA TRANSMISSION
- CLOCK
- CLOCK RECEPTION
- MANUALLY SET CLOCK
- WEATHER FORECAST
- WEATHER WARNING MESSAGE
- TEMPERATURE AND HUMIDITY
- ICE WARNING
- WEATHER TRENDS
- MOON PHASE
- BACKLIGHT
- RESET
- PRECAUTIONS
- ABOUT OREGON SCIENTIFIC
- EU-DECLARATION OF CONFORMITY
- SENSOR REMOTO (FIG 3)
- CÓMO INTRODUCIR LAS PILAS
- DÉCLARATION DE CONFORMITÉ
- ATT KOMMA IGÅNG
- SÄTT I BATTERIER
Brand : OREGON SCIENTIFIC
Model : BAR208HGA
Category : Weather Station