
GOL 26 G Professional - Rangefinder BOSCH - Free user manual and instructions
Find the device manual for free GOL 26 G Professional BOSCH in PDF.

 FR
FR
 BG
BG
 CS
CS
 DA
DA
 DE
DE
 EL
EL
 EN
EN
 ES
ES
 ET
ET
 FI
FI
 HU
HU
 ID
ID
 IT
IT
 KK
KK
 KO
KO
 LT
LT
 LV
LV
 MK
MK
 NL
NL
 NO
NO
 PL
PL
 PT
PT
 RO
RO
 RU
RU
 SK
SK
 SV
SV
 TH
TH
 TR
TR
 UK
UK
 VI
VI
 ZH
ZH
| Product Type | Cross-line laser level (laser cross-lines) |
| Brand | Bosch |
| Model | GOL 26 G Professional |
| Category | Laser distance meter / Laser level |
| Beam Color | Green (532 nm) |
| Working Range (with detector) | Up to 30 m (with detector up to 50 m) |
| Leveling Accuracy | ± 0.3 mm/m |
| Self-leveling | Yes, leveling range ± 4° |
| Power Supply | 2 AA batteries (1.5 V) or optional mains adapter |
| Battery Life | Approximately 30 hours (with alkaline batteries) |
| Dimensions (L x W x H) | 120 x 65 x 105 mm |
| Weight (with batteries) | 0.5 kg |
| Main Functions | Horizontal and vertical line projection, pulse mode for use with detector, automatic shut-off after 30 minutes |
| Laser Class | Class 2 – Power < 1 mW |
| Maintenance and Cleaning | Clean the lenses with a soft, dry cloth; do not use solvents |
| Safety | Do not look directly into the beam; avoid eye contact |
| Spare Parts and Repairability | Replacement tripod, laser target, laser detector; repair only by an authorized Bosch service center |
| Warranty | Manufacturer's warranty 2 years (subject to conditions) |
| Box Contents | Laser level, 2 AA batteries, carrying case, instruction manual |
Frequently Asked Questions - GOL 26 G Professional BOSCH
User questions about GOL 26 G Professional BOSCH
0 question about this device. Answer the ones you know or ask your own.
Ask a new question about this device
Download the instructions for your Rangefinder in PDF format for free! Find your manual GOL 26 G Professional - BOSCH and take your electronic device back in hand. On this page are published all the documents necessary for the use of your device. GOL 26 G Professional by BOSCH.
USER MANUAL GOL 26 G Professional BOSCH
natural_image
Illustration of a BOSCH surveying instrument with dual scales and adjustment knobs (no text or symbols on the device itself)6.1.2.3.4.5.6.7.8.9.10.11.12.13.14.15.16.17.18.19.20.21.22.23.24.25.26.27.28.29.30.31.32.33.34.35.36.37.38.39.40.41.42.43.44.45.46.47.48.49.50.51.52.53.54.55.56.57.58.59.60.61.62.63.64.65.66.67.68.69.70.71.72.73.74.75.76.77.78.79.80.81.82.83.84.85.86.87.88.89.90.91.92.93.94.95.96.97.98.99.100
No Original Unit Smith structure
Translperatset project
el niporofrido conyow sponnc
by instructing originally
N. matruklas ongmeniandie
It Originali instrukcija
zh 正本使用说明书
zh原始使用说明書
ko시용 설명서 원부
www.bosch-pt.com/serviceaddresses
Entsorgung
All instructions must be read and observed in order for the measuring tool to function safely. The safeguards integrated into the measuring tool may be compromised if the
measuring tool is not used in accordance with these instructions. Never make warning signs on the measuring tool unrecognisable. SAVE THESE INSTRUCTIONS FOR FUTURE REFERENCE AND INCLUDE THEM WITH THE MEASURING TOOL WHEN TRANSFERRING IT TO A THIRD PARTY.
▶ Have the measuring tool serviced only by a qualified specialist using only original replacement parts. This will ensure that the safety of the measuring tool is maintained.
Product Description and Specifications
Please observe the illustrations at the beginning of this operating manual.
Intended Use
The measuring tool is intended for establishing and checking exactly horizontal height profiles. It is also suitable for measuring heights, distances and angles.
Product Features
The numbering of the product features shown refers to the illustration of the measuring tool on the graphic page.
(1) Lens
(2) Rough sight
(3) Bubble vial mirror
(4) Eyepiece cover
(5) Adjusting screw for sighting line
(6) Eyepiece
(7) Circular bubble vial
(8) Compensator locking button
(9) Horizontal circle reference mark
(10) Horizontal circle
(11) Adjusting screw for circular bubble vial
(12) Levelling screw
(13) 5/8" tripod mount (on the underside)
(14) Horizontal drive screw
(15) Serial number
(16) Focusing knob
(17) Hex key
(18) Adjusting pin
(19) Case
(20) Plumb-bob
Accessories shown or described are not included with the product as standard. You can find the complete selection of accessories in our accessories range.
Technical Data
Optical level GOL 20 D GOL 20 G GOL 26 D GOL 26 G GOL 32 D GOL 32 G
| Article number | 3 601 K68 400 | 3 601 K68 401 | 3 601 K68 000 | 3 601 K68 001 | 3 601 K68 500 | 3 601 K68 501 |
| Working range 60 m 60 m 100 m 100 m 120 m 120 m | ||||||
| Height accuracy for single measurement | 3 mm/30 m | 3 mm/30 m | 1.6 mm/30 m | 1.6 mm/30 m | 1 mm/30 m | 1 mm/30 m |
| Deviation for 1 km double lev-elling | 2.5 mm | 2.5 mm | 1.5 mm | 1.5 mm | 1.0 mm | 1.0 mm |
| Accuracy of the bubble vial | 8'/2 mm | 8'/2 mm | 8'/2 mm | 8'/2 mm | 8'/2 mm | 8'/2 mm |
| Compensator | ||||||
| - Levelling range | ±15' | ±15' | ±15' | ±15' | ±15' | |
| - Magnet dampening | ●●●●●● | |||||
| Telescope | ||||||
| - Image upright upright upright upright upright upright | ||||||
| - Magnification | 20 x | 20 x | 26 x | 26 x | 32 x | 32 x |
| - Field of view | 1°30' | 1°30' | 1°30' | 1°30' | 1°30' | 1°30' |
| - Lens dia-meter | 36 mm | 36 mm | 36 mm | 36 mm | 36 mm | 36 mm |
| - Minimum measuring distance | 0.3 m | 0.3 m | 0.3 m | 0.3 m | 0.3 m | 0.3 m |
| - Multiplication factor | 100 | 100 | 100 | 100 | ||
| - Addition con-stant | 0 | 0 | 0 | 0 | 0 | 0 |
| Horizontal circle graduation | 1° | 1 gon | 1° | 1 gon | 1° | 1 gon |
| Tripod mount | 5/8" | 5/8" | 5/8" | 5/8" | 5/8" | 5/8" |
10 | English
Optical level GOL 20 D GOL 20 G GOL 26 D GOL 26 G GOL 32 D GOL 32 G
| Weight according to EPTA-Procedure 01:2014 | 1.5 kg 1.5 kg 1.5 kg 1.5 kg 1.5 kg 1.5 kg |
| Protection rating | IP 54 (dust and splash-proof) |
The serial number (15) on the type plate is used to clearly identify your measuring tool.
Operation
▶ Check the levelling and display accuracy of the measuring tool each time before beginning work and after longer transport of the measuring tool.
▶ Protect the measuring tool from moisture and direct sunlight.
Do not expose the measuring tool to any extreme temperatures or variations in temperature. For example, do not leave it in a car for extended periods of time. In case of large variations in temperature, allow the measuring tool to adjust to the ambient temperature before putting it into operation. The precision of the measuring tool may be compromised if exposed to extreme temperatures or variations in temperature.
▶ Avoid any impact to or dropping of the measuring tool. Always carry out an accuracy check before continuing work if the measuring tool has been subjected to severe external influences (see "Accuracy Check of the Measuring Tool", page 11).
▶ Place the measuring tool in the provided case when transporting it over longer distances (e.g. in the car). Ensure that the measuring tool is correctly placed in the case. When placing in the case, the compensator is locked, as the measuring tool may otherwise be damaged by strong movements.
Setting Up/Aligning the Measuring Tool
Mounting on the Tripod
Set up the tripod so that it is stable and secured against tipping over or slipping. Place the measuring tool onto the thread of the tripod via the tripod mount (13) and secure the measuring tool with the locking screw of the tripod. Align the tripod roughly.
Over short distances, the measuring tool can be carried whilst mounted on the tripod. In order to avoid damage to the measuring tool, the tripod must be held vertically during transport and should not e.g. be carried lengthwise over the shoulder.
Aligning the Measuring Tool
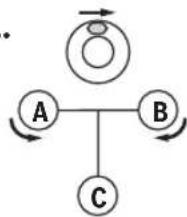
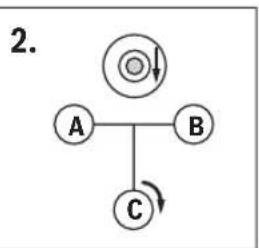
Align the measuring tool using the levelling screws (12) so that the air bubble is positioned in the centre of the circular bubble vial (7).
flowchart
graph TD
    A["A"] --> B["B"]
    B --> C["C"]
    A -->|↑| D["Top Circle"]
    B -->|←| E["Bottom Circle"]
    C -->|←| F["Bottom Circle"]

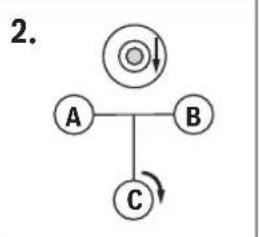
Turn the first two levelling screws A and B to move the air bubble so that it is centred between the two levelling screws. Then turn the third levelling screw C until the air bubble is positioned in the centre of the circular bubble vial.
Any remaining deviation of the measuring tool from the horizontal plane following the balancing of the circular bubble vial is compensated for by the compensator.
While working, check regularly (e.g. by looking through the bubble vial mirror (3)) whether the air bubble is still in the centre of the circular bubble vial.
Centring the Measuring Tool over a Ground Point
If necessary, centre the measuring tool over a ground point. To do this, hang the plumb-bob (20) on the locking screw of the tripod. Align the measuring tool over the ground point either by moving the measuring tool on the tripod or by adjusting the tripod.
Focusing the Telescope
Remove the protective cap from the lens (1).

Point the telescope at a bright object or hold a white sheet of paper in front of the lens (1). Turn the eyepiece (6) until the crosshairs appear sharp and deep black.
Point the telescope at the levelling rod, using the rough sight (2) if necessary. Turn the focusing knob (16) until the graduation field of the levelling rod can be seen sharply. Align the crosshairs exactly with the centre of the levelling rod by turning the horizontal drive screw (14).
When the telescope is correctly focused, the crosshairs and the image of the levelling rod must not move against each other when the eye is moved behind the eyepiece.
Measuring Functions
Always set up the levelling rod exactly vertically. Point the aligned and focused measuring tool at the levelling rod so that the crosshairs are on the centre of the levelling rod.
Reading Off the Height
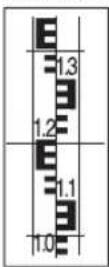
Read off the height on the levelling rod at the centre line of the crosshairs. Height measured in the figure: 1.195 m.
Measuring a Distance

Centre the measuring tool over the point from which the distance is to be measured. Read off the height on the levelling rod at the top and bottom lines of the crosshairs. Multiply the difference between the two heights by 100 to get the distance from the measuring tool to the levelling rod. Distance measured in the figure: (1.347 m - 1.042 m) x 100 = 30.5 m.
Measuring Angles
Centre the measuring tool over the point from which the angle is to be measured.


Point the measuring tool at point A. Rotate the horizontal circle (10) with the zero point toward the reference mark (9). Then point the measuring tool at point B. Read off the angle at the reference mark (9).
GOL 20 D/GOL 26 D/GOL 32 D: Angle measured in the example: 45°.
GOL 20 G/GOL 26 G/GOL 32 G: Angle measured in the example: 45 gon.
Accuracy Check of the Measuring Tool
Check the levelling and display accuracy of the measuring tool each time before beginning work and after longer transport of the measuring tool.
Checking the Circular Bubble Vial
Align the measuring tool using the levelling screws (12) so that the air bubble is positioned in the centre of the circular bubble vial (7).
Rotate the telescope by 180°. If the air bubble is no longer in the centre of the circular bubble vial (7), the circular bubble vial must be readjusted.
Readjusting the Circular Bubble Vial
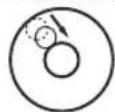
Move the air bubble of the circular bubble vial (7) to a position midway between the end position of the check and the centre by turning the levelling screws (12).

Using the hex key (17), turn the adjusting screws (11) until the air bubble is positioned in the centre of the circular bubble vial.
Check the circular bubble vial by rotating the telescope by 180°. Repeat the adjustment procedure if necessary or contact Bosch customer service.
Checking the Compensator
After aligning and focusing the measuring tool, measure the height at a reference point. Then press and release the locking button of the compensator (8). Measure the height at the reference point again.
If the two heights do not match exactly, have the measuring tool repaired by Bosch customer service.
Checking the Crosshairs
A measuring distance of approx. 30 m is required for the check. Set up the measuring tool in the centre and levelling rods A and B at both ends of the measuring distance.

After aligning and focusing the measuring tool, read off the heights at both levelling rods. Calculate the difference d between the height a1 on levelling rod A and the height b1 on levelling rod B.
Example:
a _ 1 = 1. 9 3 7 m
b _ 1 = 1. 6 8 9 m
a _ 1 - b _ 1 = 1. 9 3 7 m - 1. 6 8 9 m = 0. 2 4 8 m = d
12 | English

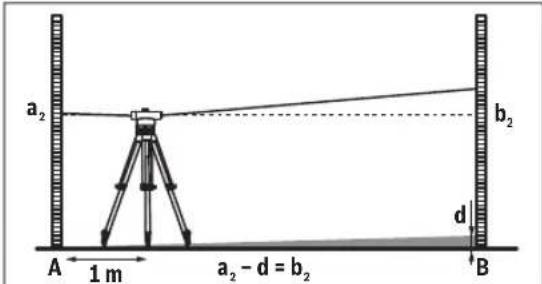
Set up the measuring tool approx. 1 m away from levelling rod A. After aligning and focusing the measuring tool, read off the height a2 at levelling rod A.
Subtract the previously calculated value d from the measured height a2 in order to obtain the set value for the height b2 at levelling rod B.
Measure the height b2 at levelling rod B. If the measured value deviates by more than 6 mm (GOL 20 D/G), 3 mm (GOL 26 D/G) or 2 mm (GOL 32 D/G) from the calculated set value, the crosshairs must be readjusted.
Example:
a2=1.724m
d = 0.248 m
a2 - d = 1.724m - 0.248m = 1.476m
GOL 20 D/G: When measuring, the height b2 must be 1.476 m ± 6 mm.
GOL 26 D/G: When measuring, the height b2 must be 1.476 m ± 3 mm.
GOL 32 D/G: When measuring, the height b2 must be 1.476 m ± 2 mm.
Readjusting the Crosshairs

Unscrew the eyepiece cover (4). Using the adjusting pin (18), turn the adjusting screw (5) clockwise or anticlockwise, until the calculated set value for the height b2 is reached when measuring on levelling rod B. Screw the eyepiece cover (4) back on.
Example:
When measuring b2 , the value 1.476 m must be set.
Check the crosshairs again. Repeat the adjustment procedure if necessary or contact Bosch customer service.
Maintenance and Service
Maintenance and Cleaning
Store and transport the measuring tool only in the supplied case.
Keep the measuring tool clean at all times.
Never immerse the measuring tool in water or other liquids. Wipe off any dirt using a damp, soft cloth. Do not use any detergents or solvents.
Handle the lenses with particular care. Remove dust only with a soft brush. Do not touch the lenses with your fingers. Before storing, allow the measuring tool and the case to dry completely. In the case, there is a bag containing desiccant, which binds residual moisture. Replace the desiccant bag regularly.
If the measuring tool needs to be repaired, send it off in the case.
After-Sales Service and Application Service
Our after-sales service responds to your questions concerning maintenance and repair of your product as well as spare parts. You can find explosion drawings and information on spare parts at: www.bosch-pt.com
The Bosch product use advice team will be happy to help you with any questions about our products and their accessories.
In all correspondence and spare parts orders, please always include the 10-digit article number given on the nameplate of the product.
Great Britain
Robert Bosch Ltd. (B.S.C.)
P.O. Box 98
Broadwater Park
North Orbital Road
Denham Uxbridge
UB 9 5HJ
At www.bosch-pt.co.uk you can order spare parts or arrange the collection of a product in need of servicing or repair.
Tel. Service: (0344) 7360109
E-Mail: boschservicecentre@bosch.com
You can find further service addresses at:
www.bosch-pt.com/serviceaddresses
Disposal
Measuring tools, accessories and packaging should be recycled in an environmentally friendly manner.
Only for EU countries:
According to the Directive 2012/19/EU on waste electrical and electronic equipment and its transposition into national law, measuring tools that are no longer usable, and, according to the Directive 2006/66/EC, defective or drained batteries must be collected separately and disposed of in an environmentally correct manner.
If disposed incorrectly, waste electrical and electronic equipment may have harmful effects on the environment and
human health, due to the potential presence of hazardous substances.
Only for United Kingdom:
According to The Waste Electrical and Electronic Equipment Regulations 2013 (SI 2013/3113) (as amended) and the Waste Batteries and Accumulators Regulations 2009 (SI 2009/890) (as amended), products that are no longer usable must be collected separately and disposed of in an environmentally friendly manner.
Français
www.bosch-pt.com/serviceaddresses
www.bosch-pt.com/serviceaddresses
Eliminación
www.bosch-pt.com/serviceaddresses
Eliminação
flowchart
graph TD
    A["A"] --> B["B"]
    B --> C["C"]
    C --> A
    style A fill:#fff,stroke:#000
    style B fill:#fff,stroke:#000
    style C fill:#fff,stroke:#000
    style_D["Top Right Circle"] --> E["Arrow up"]
    style_F["Arrow down"] --> G["Arrow left"]

flowchart
graph TD
    A["A"] --> B["B"]
    B --> C["C"]
    style A fill:#fff,stroke:#000
    style B fill:#fff,stroke:#000
    style C fill:#fff,stroke:#000
www.bosch-pt.com/serviceaddresses
Smaltimento
www.bosch-pt.com/serviceaddresses
Afvalverwijdering
Bosch Service Center
Telegrafvej 3
2750 Ballerup
På www.bosch-pt.dk kan der online bestilles reservedele eller oprettes en reparations ordre.
Tlf. Service Center: 44898855
Fax: 44898755
E-Mail: vaerktoej@dk.bosch.com
www.bosch-pt.com/serviceaddresses
Bortskaffelse
Bosch Service Center
Telegrafvej 3
2750 Ballerup
Danmark
Tel.: (08) 7501820 (inom Sverige)
Fax: (011) 187691
www.bosch-pt.com/serviceaddresses
Avfallshantering
Rett stativet grovt opp.
www.bosch-pt.com/serviceaddresses
Kassering
www.bosch-pt.com/serviceaddresses
Hävitys
flowchart
graph TD
    A["A"] --> B["B"]
    B --> C["C"]
    C --> A
    style A fill:#fff,stroke:#000
    style B fill:#fff,stroke:#000
    style C fill:#fff,stroke:#000
    style A stroke:#000,stroke-width:2px
    style B stroke:#000,stroke-width:2px
    style C stroke:#000,stroke-width:2px
    note right of A "1."

flowchart
graph TD
    A["A"] --> B["B"]
    B --> C["C"]
    style A fill:#fff,stroke:#000
    style B fill:#fff,stroke:#000
    style C fill:#fff,stroke:#000
www.bosch-pt.com/serviceaddresses
Απόσυρση
www.bosch-pt.com/serviceaddresses
Tasfiye
Robert Bosch Sp. z o.o.
www.bosch-pt.com/serviceaddresses
Utylizacja odpadów
Bosch Service Center PT
K Vápence 1621/16
692 01 Mikulov
www.bosch-pt.com/serviceaddresses
Likvidace
www.bosch-pt.com/serviceaddresses
Likvidácia
flowchart
graph TD
    A["A"] --> B["B"]
    B --> C["C"]
    C --> A
    style A fill:#fff,stroke:#000
    style B fill:#fff,stroke:#000
    style C fill:#fff,stroke:#000
    style A stroke:#000,stroke-width:2px
    style B stroke:#000,stroke-width:2px
    style C stroke:#000,stroke-width:2px
    note right of A "1."
flowchart
graph TD
    A["A"] --> B["B"]
    B --> C["C"]
    C --> A
    style A fill:#f9f,stroke:#333
    style B fill:#ccf,stroke:#333
    style C fill:#cfc,stroke:#333
www.bosch-pt.com/serviceaddresses
Hulladékkezelés
www.bosch-pt.com/serviceaddresses
Утилизация
www.bosch-pt.com/serviceaddresses
Утилізація
flowchart
graph TD
    A["A"] --> B["B"]
    B --> C["C"]
    C --> A
    style A fill:#fff,stroke:#000
    style B fill:#fff,stroke:#000
    style C fill:#fff,stroke:#000
    style A stroke:#000,stroke-width:2px
    style B stroke:#000,stroke-width:2px
    style C stroke:#000,stroke-width:2px
    note right of A "1."
flowchart
graph TD
    A["A"] --> B["B"]
    B --> C["C"]
    C --> A
    style A fill:#fff,stroke:#000
    style B fill:#fff,stroke:#000
    style C fill:#fff,stroke:#000
www.bosch-pt.com/serviceaddresses
Кәдеге жарату
flowchart
graph TD
    A["A"] --> B["B"]
    B --> C["C"]
    C --> A
    style A fill:#fff,stroke:#000
    style B fill:#fff,stroke:#000
    style C fill:#fff,stroke:#000
    style A stroke:#000,stroke-width:2px
    style B stroke:#000,stroke-width:2px
    style C stroke:#000,stroke-width:2px
    note right of A "1."

flowchart
graph TD
    A["A"] --> B["B"]
    B --> C["C"]
    style A fill:#fff,stroke:#000
    style B fill:#fff,stroke:#000
    style C fill:#fff,stroke:#000
Service scule electrice
Strada Horia Măcelariu Nr. 30-34, sector 1
013937 Bucureşti
www.bosch-pt.com/serviceaddresses
Eliminarea
Service scule electrice
Strada Horia Măcelariu Nr. 30–34, sector 1
013937 Bucureşti, România
www.bosch-pt.com/bg/bg/
www.bosch-pt.com/serviceaddresses
Бракуване
www.bosch-pt.com/serviceaddresses
Отстранување
flowchart
graph TD
    A["A"] --> B["B"]
    B --> C["C"]
    style A fill:#fff,stroke:#000
    style B fill:#fff,stroke:#000
    style C fill:#fff,stroke:#000
    note right of A: Arrow pointing to top circle
    note right of B: Arrow pointing to bottom circle

flowchart
graph TD
    A["A"] --> B["B"]
    B --> C["C"]
    C --> A
    style A fill:#fff,stroke:#000
    style B fill:#fff,stroke:#000
    style C fill:#fff,stroke:#000
Okretanjem prva dva nožna zavrtnja A i B, dovedite vazdušni mehur u sredinu između ova dva zavrtnja. Zatim okrećite treći nožni zavrtanj C dok mehur vazduha ne bude u sredini kružne libele.
Nakon početnog podešavanja kružne libele, sva odstupanja mernog alata od horizontalne linije kompenzuju se pomoću kompenzatora.
Tokom rada redovno proveravajte (npr. posmatranjem ogledala libele (3)) da li je vazdušni mehur i dalje u sredini kružne libele.
Koristeći šestougaoni ključ (17), okrećite zavrtnje za podešavanje (11) dok se vazdušni mehur ne nalazi u sredini kružne libele.
Proverite kružnu libelu okretanjem teleskopa za 180°. Po potrebi, ponovite postupak podešavanja ili se obratite Bosch korisničkom servisu.
Provera kompenzatora
Nakon centriranja i fokusiranja mernog alata, izmerite visinu u referentnoj tački. Pritisnite dugme za blokadu (8) kompenzatora i otpustite ga. Ponovo izmerite visinu u referentnoj tački.
110 | Srpski
Ako se dve visine ne podudaraju tačno, obratite se Bosch korisničkom servisu radi popravke mernog alata.
Provera nitnog krsta
Za proveru vam je potrebna merna putanja dužine oko 30 m. Postavite merni alat u sredinu, a nivelacione letve A i B na oba kraja merne putanje.

Nakon centriranja i fokusiranja mernog alata, očitajte visinu sa obe nivelacione letve. Izračunajte razliku d između visine a na nivelacionoj letvi A i visine b na nivelacionoj letvi B.
Primer:
a1=1,937m
b=1,689m
a1-b1=1,937m-1,689m=0,248m=d
Postavite merni alat oko 1 m od nivelacione letve A. Nakon centriranja i fokusiranja mernog alata, očitajte visinu a 2 sa nivelacione letve A.
www.bosch-pt.com/serviceaddresses
Uklanjanje dubreta
Merni alati, pribor i ambalaža treba da se uključe u reciklažu koja odgovara zaštiti čovekove okoline.
Samo za EU-zemlje:
Merilno napravo postavite približno 1 m stran od nivelirnega količka A. Po poravnavi in izostritvi merilne naprave odčitajte višino a₂ na nivelirnem količku A.
Prej izračunano vrednost d odštejte od izmerjene višine a2 , da dobite želeno vrednost za višino b2 na nivelirnem količku B.
www.bosch-pt.com/serviceaddresses
Odlaganje
Merilne naprave, pribor in embalažo oddajte v okolju prijazno recikliranje.
Postavite mjerni alat na udaljenosti od cca. 1 m od letve za niveliranje A. Nakon poravnavanja i fokusiranja mjernog alata očitajte visinu a2 na letvi za niveliranje A.
www.bosch-pt.com/serviceaddresses
Zbrinjavanje
Mjerne alate, pribor i ambalažu treba dovesti na ekološki prihvatljivo recikliranje.
Samo za zemlje EU:
U skladu s europskom Direktivom 2012/19/EU o električnim i elektroničkim starim uređajima i njihovom provedbom u nacionalno pravo neupotrebljivi mjerni alati i u skladu s europskom Direktivom 2006/66/EZ neispravne ili istrošene aku-baterije/baterije moraju se odvojeno sakupljati i dovesti na ekološki prihvatljivo recikliranje.
www.bosch-pt.com/serviceaddresses
Jäätmekäitlus
www.bosch-pt.com/serviceaddresses
www.bosch-pt.com/serviceaddresses
Šalinimas
www.bosch-pt.com/serviceaddresses
废弃处理
www.bosch-pt.com/serviceaddresses
廢棄物處理
www.bosch-pt.com/serviceaddresses
처리
flowchart
graph TD
    A["A"] --> B["B"]
    B --> C["C"]
    C --> A
    style A fill:#fff,stroke:#000
    style B fill:#fff,stroke:#000
    style C fill:#fff,stroke:#000
    style A stroke:#000,stroke-width:2px
    style B stroke:#000,stroke-width:2px
    style C stroke:#000,stroke-width:2px
    note right of A "1."

flowchart
graph TD
    A["A"] --> B["B"]
    B --> C["C"]
    style A fill:#fff,stroke:#000
    style B fill:#fff,stroke:#000
    style C fill:#fff,stroke:#000
www.bosch-pt.com/serviceaddresses
การกำจัดขยะ
www.bosch-pt.com/serviceaddresses
Cara membuang
www.bosch-pt.com/serviceaddresses
Sự thải bổ
ρ 1,476 = ρ 0,248 - ρ a₂ - d = 1,724
Robert Bosch Morocco SARL
53,شارع الملازم محمد مÜRود
20300 الدار البضاء
www.bosch-pt.com/serviceaddresses


- Entsorgung
- Product Description and Specifications
- Intended Use
- Product Features
- Technical Data
- Operation
- Setting Up/Aligning the Measuring Tool
- Mounting on the Tripod
- Aligning the Measuring Tool
- Centring the Measuring Tool over a Ground Point
- Focusing the Telescope
- Measuring Functions
- Reading Off the Height
- Measuring a Distance
- Measuring Angles
- Accuracy Check of the Measuring Tool
- Checking the Circular Bubble Vial
- Readjusting the Circular Bubble Vial
- Checking the Compensator
- Checking the Crosshairs
- Maintenance and Service
- Maintenance and Cleaning
- After-Sales Service and Application Service
- Great Britain
- You can find further service addresses at:
- Disposal
- Only for EU countries:
- Only for United Kingdom:
- Français
- Eliminación
- Eliminação
- Smaltimento
- Afvalverwijdering
- Bortskaffelse
- Avfallshantering
- Kassering
- Hävitys
- Απόσυρση
- Tasfiye
- Utylizacja odpadów
- Likvidace
- Likvidácia
- Hulladékkezelés
- Утилизация
- Утилізація
- Кәдеге жарату
- Eliminarea
- Бракуване
- Отстранување
- Provera kompenzatora
- | Srpski
- Provera nitnog krsta
- Uklanjanje dubreta
- Samo za EU-zemlje:
- Odlaganje
- Zbrinjavanje
- Samo za zemlje EU:
- Jäätmekäitlus
- Šalinimas
- 废弃处理
- 廢棄物處理
- 처리
- การกำจัดขยะ
- Cara membuang
- Sự thải bổ
Brand : BOSCH
Model : GOL 26 G Professional
Category : Rangefinder