Avance Collection HR2365 - Pasta machine PHILIPS - Free user manual and instructions
Find the device manual for free Avance Collection HR2365 PHILIPS in PDF.

| Product Type | Pasta machine |
| Brand | Philips |
| Model | Avance Collection HR2365 |
| Dimensions (W x D x H) | 25.0 x 20.0 x 30.0 cm |
| Weight | 3.5 kg |
| Power Consumption | 200 W |
| Voltage | 220-240 V, 50-60 Hz |
| Material | Plastic body, stainless steel discs |
| Functions | Makes fresh pasta: spaghetti, linguine, lasagna, fettuccine |
| Dough Capacity | Up to 500 g flour |
| Included Shaping Discs | 8 discs (spaghetti, linguine, lasagna, fettuccine, etc.) |
| Safety Features | Overheat protection, non-slip feet |
| Cleaning | Removable parts dishwasher safe |
| Spare Parts Availability | Replacement discs and accessories available |
| Noise Level | < 75 dB |
| Color | White and grey |
| Certifications | CE, ETL |
| Warranty | 2 years |
Frequently Asked Questions - Avance Collection HR2365 PHILIPS
User questions about Avance Collection HR2365 PHILIPS
0 question about this device. Answer the ones you know or ask your own.
Ask a new question about this device
Download the instructions for your Pasta machine in PDF format for free! Find your manual Avance Collection HR2365 - PHILIPS and take your electronic device back in hand. On this page are published all the documents necessary for the use of your device. Avance Collection HR2365 by PHILIPS.
USER MANUAL Avance Collection HR2365 PHILIPS
natural_image
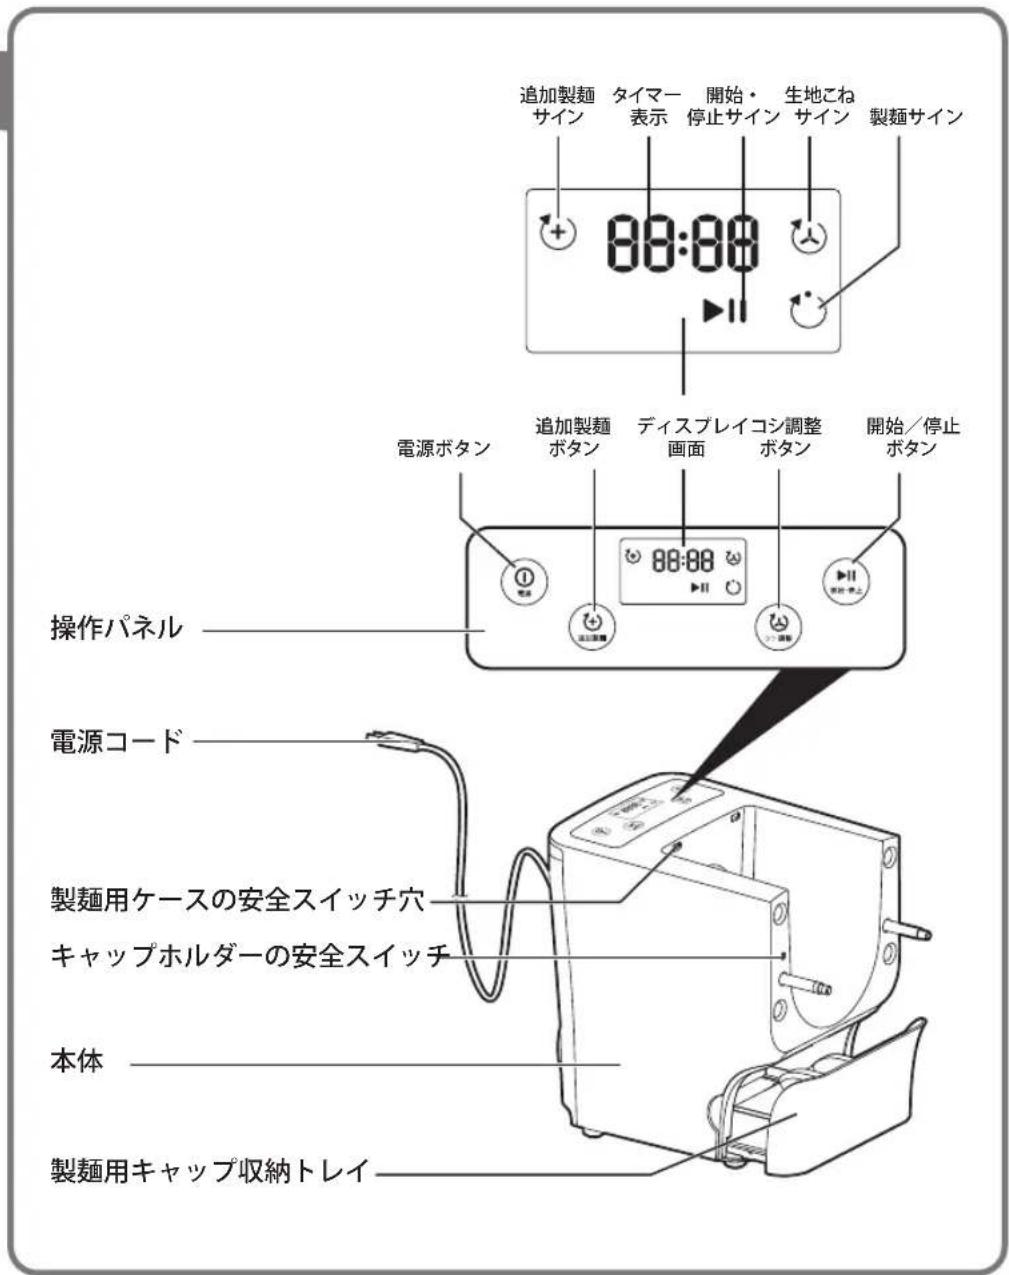
White Philips kitchen appliance with a circular control panel and side buttons (no visible text or symbols on the device body)フィリップス ヌードルメーカー
品番 HR2365/01
取扱説明書
保証書付
natural_image
Line drawing of a kitchen electric oven with attached cable and control panel (no text or symbols)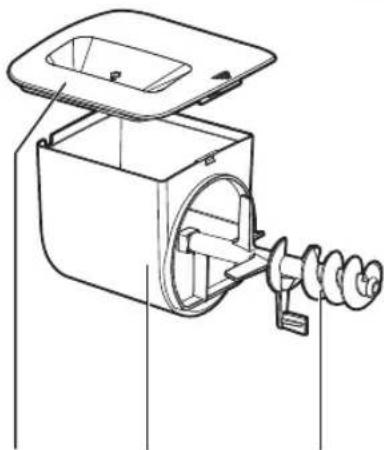
natural_image
Technical line drawing of a mechanical device with internal components and housing (no text or symbols)カバー
製麺用ケース
製麵棒
キャップホルダー

natural_image
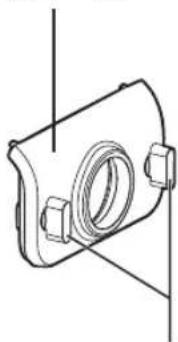
Technical line drawing of a mechanical fan or impeller assembly (no text or symbols)キャップホルダーの
製麵用
キャップ
前面パネル
natural_image
Technical line drawing of a mechanical component with bolts and a central bore (no text or symbols)前面パネルの
つまみ
natural_image
Diagram of a car interior showing a lid and vent, with an arrow indicating direction (no text or symbols)2 前面パネルのつまみを緩めます。
natural_image
Diagram of a device component with circular vent and directional arrows indicating movement (no text or symbols)natural_image
Two grayscale illustrations of industrial waste sorting machines, one with a pipe and pile, the other with a bag (no text or symbols)準備する
natural_image
Diagram of a car interior showing a device housing with an arrow pointing to a component (no text or symbols present)natural_image
Mechanical assembly diagram showing a bracket with levers and gears, no text or symbols presentnatural_image
Two technical diagrams showing a fan assembly process: one with internal components and the other with a fan blade (no text or symbols present)5 前面パネルを本体に取り付けます。
natural_image
Diagram of a device interior showing internal components with arrows indicating movement (no text or symbols)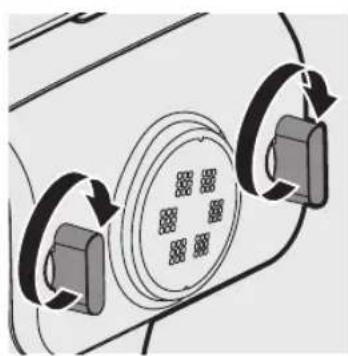
natural_image
Diagram of a car interior showing circular components with directional arrows indicating rotation or movement (no text or symbols)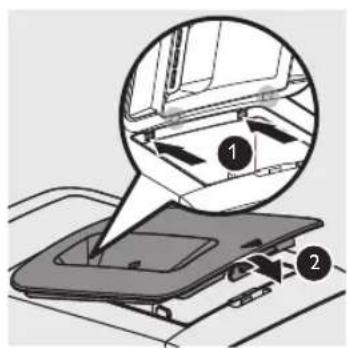
ヌードルメーカーの使用
natural_image
Diagram of a car interior showing a lid and air vent with an arrow indicating direction (no text or symbols)3 製麺用ケースに粉を入れます。
natural_image
Diagram of a device interior showing a switch and fan mechanism (no text or symbols)natural_image
Line drawing of a car interior with a funnel pouring liquid into a sink (no text or symbols)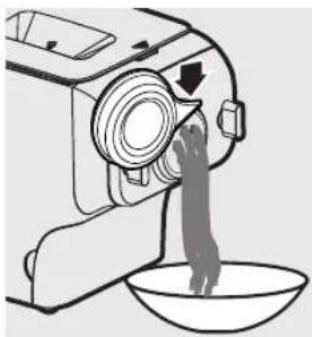
natural_image
Line drawing of a sewing machine pouring liquid into a bowl (no text or symbols)natural_image
Diagram of a car interior showing a lid and vent, with an arrow indicating direction (no text or symbols)3 前面パネルのつまみを緩めます。
natural_image
Diagram of a device with circular component and two directional arrows indicating movement or force (no text or symbols)natural_image
Hand cleaning a device with a cloth, showing the clean interior and button (no text or symbols)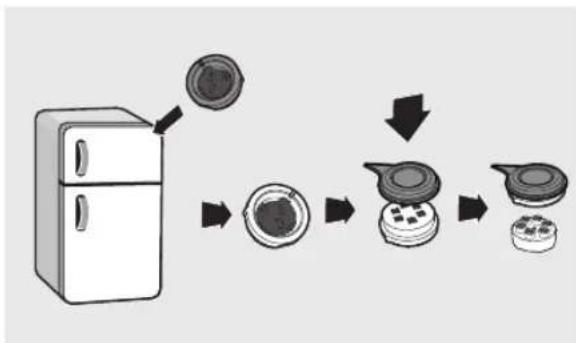
flowchart
graph TD
    A["Refrigerator with lid"] --> B["Reinforced oven with lid"]
    B --> C["Reinforced oven with lid, closed lid, and closed dish"]
    C --> D["Reinforced oven with lid, closed dish"]
natural_image
Illustration of hands pouring liquid into a container (no text or symbols)natural_image
Illustration of a mechanical device with a pipe and explosion effect (no text or symbols)natural_image
Line drawing of a kitchen machine with a cloth cover and handle (no text or symbols)製麺用キャップ収納トレイ
flowchart
graph LR
    A["Step 1: Component 1"] --> B["Step 2: Component 2"]
    B --> C["Step 3: Internal assembly with internal components"]
Congratulations on your purchase, and welcome to Philips!
To fully benefit from the support that Philips offers, register your product at www.Philips.com/welcome.
Read this user manual carefully before you install and use the unit. Save it for future reference.
What's in the box
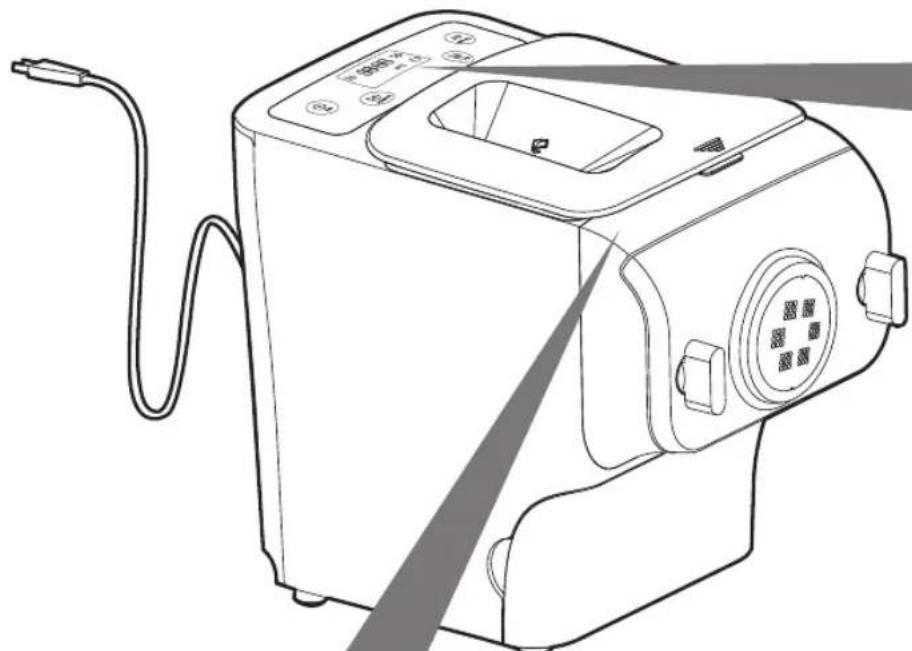
Main unit
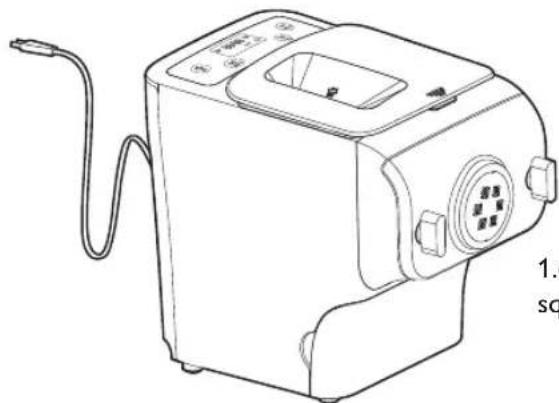
natural_image
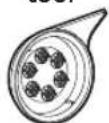
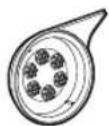
Line drawing of a kitchen appliance with control panel and cable (no text or symbols)Shaping discs
1.6mm square

Disc cleaning tool
User manual
Recipe book
2.5mm square

1.6mm flat

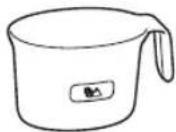
Flour cup
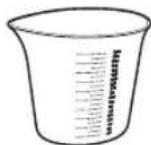
Water cup
2mm round

Specifications are subject to change without notice.
Contents
What's in the box 22
Contents 23
Important 24
Overview 26
Disassembling and cleaning before first use 28
Assembling 30
Using the noodle maker 32
Cleaning 36
Recipes 39
Troubleshooting 40
Product information 42
Recycling 42
Guarantee and service 42
Important
Safety
- Read this user manual carefully before you use the appliance, and save it for future reference.

Warnings
● Before you connect the appliance to the power, make sure that the voltage indicated on the bottom of the appliance corresponds to the local power voltage.
● Make sure that the plug is firmly inserted into the power outlet.
● Make sure that your hands are dry before you insert the plug into the power outlet.
● Never connect this appliance to a timer switch, to avoid a hazardous situation.
● Before you insert the plug into the power outlet, make sure that the appliance is assembled correctly.
- If the power cord, the plug, or other parts are damaged, do not use the appliance.
- If the power cord is damaged, you must have it replaced by Philips, a service center authorized by Philips or similarly qualified persons to avoid a hazard.
- Do not replace parts of the appliance yourself.
● This appliance is not intended for use by persons (including children) with reduced physical, sensory or mental capabilities, or lack of experience and knowledge, unless they have been given supervision or instructions concerning use of the appliance by a person responsible for their safety.
- For their safety not allow children to play with the appliance. Keep the appliance and its power cord out of the reach of children.
● To prevent any accidents, do not use the appliance if it is damaged for any reasons.
EMF
This Philips appliance complies with all applicable standards and regulations regarding exposure to electromagnetic fields.

Safety
● Before using the appliance for the first time, disassemble and wash the accessories thoroughly (see "Disassemble and cleaning before first use" section.)
● The appliance is intended for household use only.
- Do not use this appliance on an unstable or uneven surface.
- Keep the appliance and its power cord out of the reach of children.
- Do not disconnect the power cord before processing is complete, you have to stop processing, disconnect the power cord before you perform other operations.
● To better protect the lifetime of the appliance, we recommend the continuous working time to be less than 45 minutes. You can restart using the appliance after 15 minutes.
- If you intend to use the appliance continuously, clean the shaping disc with the supplied cleaning tool each time after use. For cleaning ease, do not soak the shaping disc into the water directly.
- Do not bent the power code forcibly, jerk, twist, bundle nor put a heavy goods.
- When hearing thunder, do not touch the appliance or power plug.
- Do not put metal or flammable objects in the mixing chamber.
● Plug off the power cord when you are not using the appliance. - Do not use the appliance near flammable objects such as cloth or draper.
● Pull out the power plug immediately when you detect smoke.
- When taking off the power cord, do not pull the cable but grab the plug part.
- Keep the power plug clean.
● Do not put heavy objects on the appliance.
● This appliance is designed as consumer kitchen appliance. Do not use for the purpose.
- Do not move the appliance while it is operating.
- Disconnect the power and above the power cord before cleaning or disassembling this appliance.
- Do not immerse the main unit in water.
● Place the appliance to a dry and well ventilated place after use.
● To prevent a short circuit or an electric shock, do not pour water or any liquid into the safety switch.
- Do not use dish washer to clean the machine and the accessories.
Overview
natural_image
Line drawing of a kitchen washing machine with attached cable and control panel (no text or symbols)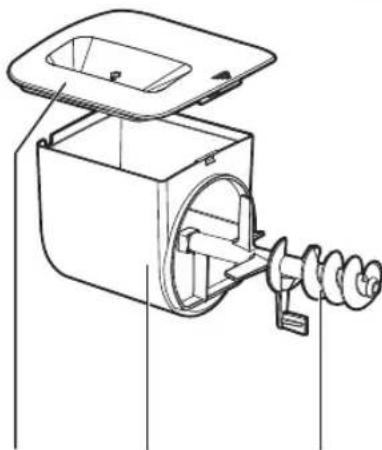
natural_image
Technical line drawing of a mechanical device with internal components (no text or symbols)Mixing
chamber lid
Mixing
chamber
Mixing paddle
Disc holder Front panel
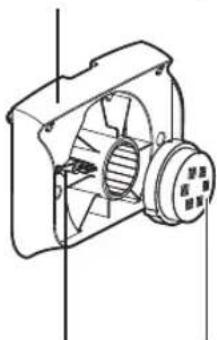
natural_image
Technical line drawing of a fan or impeller assembly (no text or symbols)switch lever

natural_image
Technical line drawing of a mechanical component with bolted ends and a central cylindrical feature (no text or symbols)Shaping discsDisc holofr safety panel knob
Disassembling and cleaning before first use

Caution
- Do not use water to rinse nor soak the main unit.
- Do not use a scourer or similar cleaners as these will scratch the plastic surface and affect the lifetime of the noodle maker.
● Take extra caution when cleaning the parts to avoid getting cut by the edges.
Take out all the parts and accessories.
- Clean the parts and accessories before first use (cleaning" section).
- Do not use dish washer to clean the machine and the accessories.
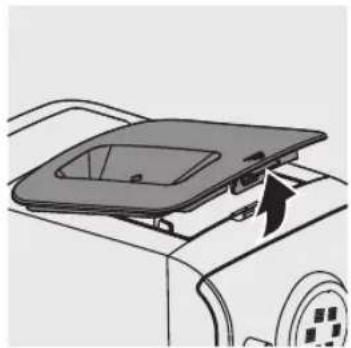
1 Remove the chamber lid from the appliance.
natural_image
Diagram of a car interior showing a lid and vent, with an arrow indicating direction (no text or symbols)2 Loosen the front panel control knob.
※ The front panel is heavy. Take extra caution when removing it.
natural_image
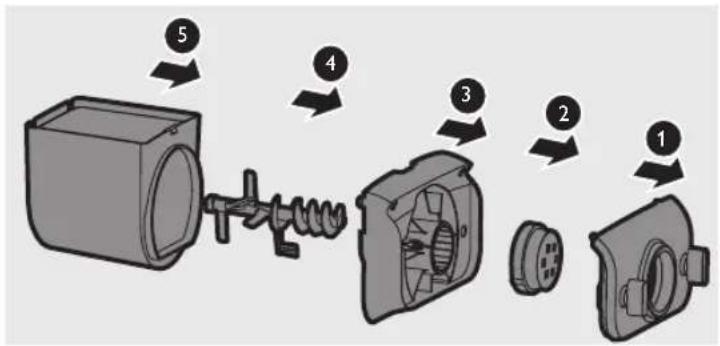
Diagram of a device with circular component and two directional arrows indicating rotation or movement (no text or symbols)3 Disassemble the front panel, the shaping disc, the shaping disc holder, the mixing paddle, and the mixing chamber in order.
4 Clean all detachable parts, and wipe them dry.
natural_image
Two grayscale illustrations of industrial waste sorting machines, one with a funnel and dust drop, the other with a meshed pile (no text or symbols)Assembling
Follow below assembling steps to install the noodle maker.

Caution
● Make sure to tighten the front panel knob during assembling.
● Make sure the appliance is not plugged in when assembling the appliance.
● Before using the noodle maker, make sure all parts and accessories are completely dry.
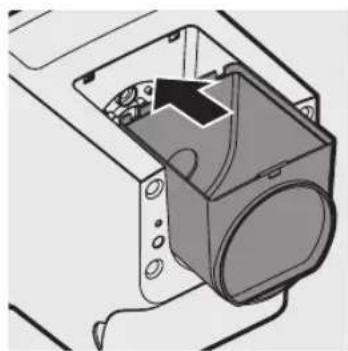
1 Push the mixing chamber into the appliance.
natural_image
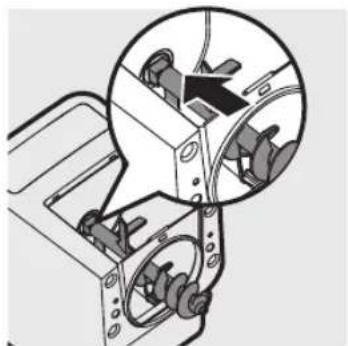
Technical line drawing of a mechanical component with no visible text or symbols2 Point the mixing paddle to the hole in the main unit. Insert the mixing paddle all the way into the main unit.
natural_image
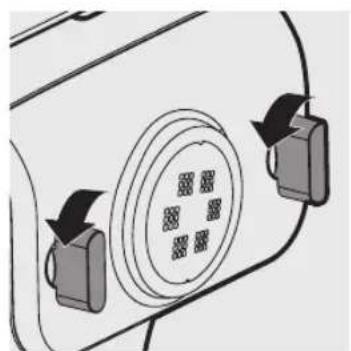
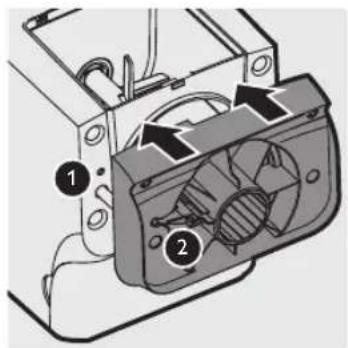
Mechanical assembly diagram showing a bracket with gears and a magnified inset highlighting a component (no text or symbols)3 Attach the disc holder onto the appliance.
※① Disc holder safety switch
※② Disc holder safety switch lever
※ Check that the safety switch ① and safety switch lever ② are set as shown in the right image.
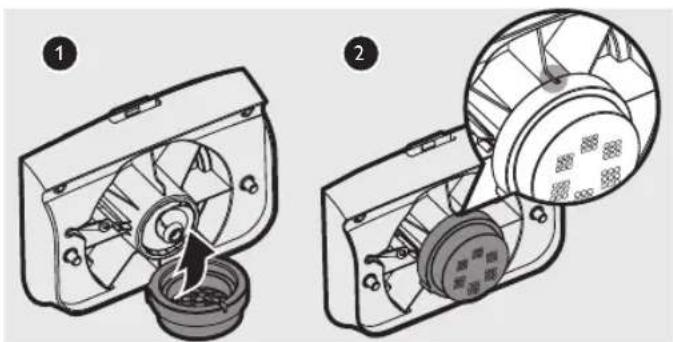
4 Put the shaping disc onto the disc holder ①, and make sure it is firmly fixed on the disc holder ②.
※ Make sure the abyss of the shaping disc and the disc holders is properly fitted.
natural_image
Two technical illustrations of a fan assembly, showing internal components and a close-up view (no text or symbols)5 Attach the front panel to the main unit.
※① Disc holder safety switch lever
※ Make sure the front panel is completely fastened before using the appliance.
※ The front panel is heavy. Take extra caution when assembling it.
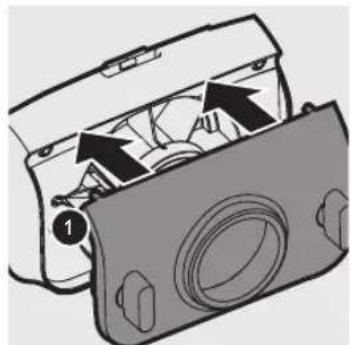
natural_image
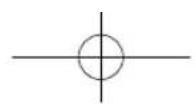
Diagram of a camera module with labeled parts and directional arrows indicating internal components (no text or symbols present)6 Fasten the front panel control knob.
※ If the front panel or the shaping disc is not properly assembled, the safety switch will prevent the appliance from working.

natural_image
Diagram of a car interior showing circular components with directional arrows indicating rotation or movement (no text or symbols)7 Close the chamber lid properly.
※ If the chamber lid is not properly installed, the safety switch will prevent the appliance from working.
Using the noodle maker
● Make sure to follow the right order to add flour and water into the chamber. Put in the flour into the chamber first, then place the chamber lid onto the chamber. Start the noodle maker, and then slowly pour water along the entire length of the opening in the lid.
- Do not pour water into the mixing chamber before turning on the noodle maker. Follow the instruction carefully to enjoy home madenoodles.

Cautions
● Never put in excessive ingredients in the noodle maker. Otherwise, it will damage the appliance. The maximum amount of flour used for each batch is 500g.
- Do not put in any ingredients that are 60^ C or above to the noodle maker, nor place the noodle maker in surroundings with high temperature ( 60^ C), for instance in a high temperature sterilization. This will deform the appliance.
● Never powder before you place the chamber lid onto the chamber. Do not pour in any liquids into the safety switch hole.
※ After processing, it is normal to find some leftover dough inside the mixing chamber.
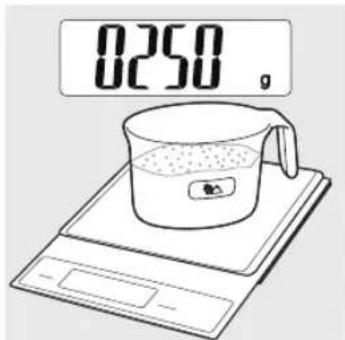
Preparing the ingredients
1 Use a kitchen scale to measure the flour. For instance, 250g flour is for 1-2 servings; 500g flour is for 3-4 servings.
2 Remove the chamber lid.
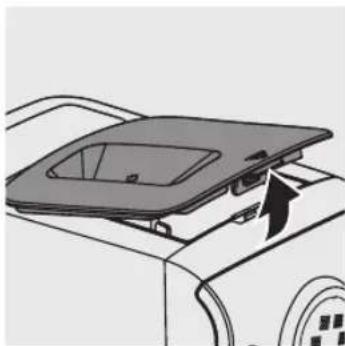
natural_image
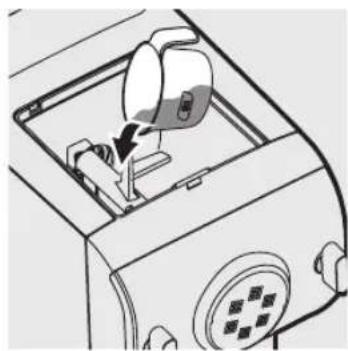
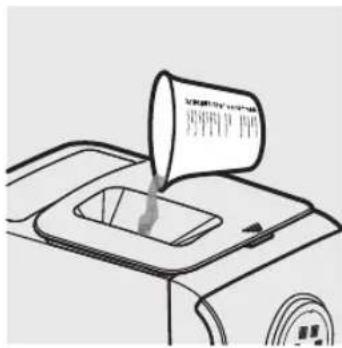
Diagram of a car interior showing a lid and air vent with an arrow indicating direction (no text or symbols)3 Pour the flour into the chamber.
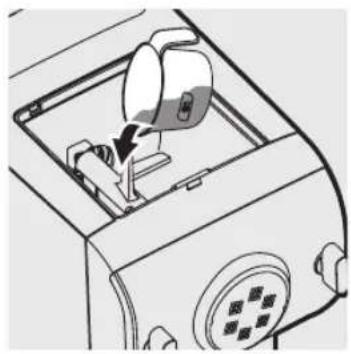
natural_image
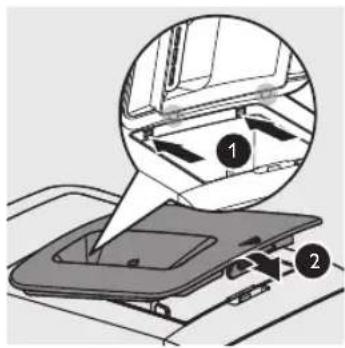
Diagram of a device interior showing a fan or scanner with a handle and control panel (no text or symbols)4 Close the chamber lid properly.
※ If the chamber lid is not closed properly, the appliance will not start processing. If the chamber lid is open or loose during processing, the appliance will automatically pause the processing.
※ The appliance will not work if the chamber lid is not properly closed. During the noodle making process, if the chamber lid becomes loose, the appliance will automatically stop working.
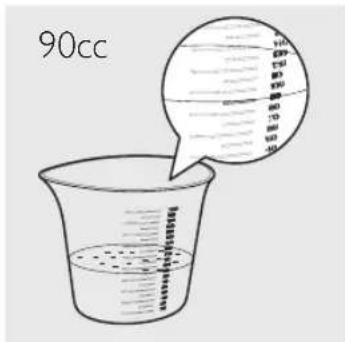
5 Refer to the "Noodle-making recipe table" on page 39 and measure the required amount of water by using the provided water cup. For instance, measure 90cc water to make Undo noodles with 250g flour.
※ Do not pour water into the mixing chamber before turning on the noodle maker.
※ To measure the water volume accurately, please use a kitchen scale.
Selecting the noodle making program
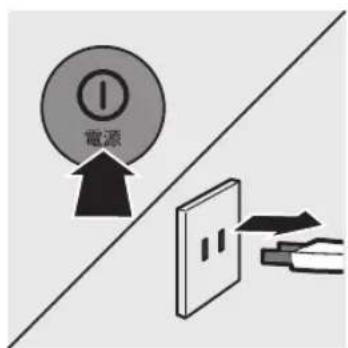
1 Connect to the power. The noodle maker will sound once, and all indicators will flash once. Press the power on/off button ( )to switch on the noodle maker. The display light up.

2 The default kneading time is 5 minutes. Press the bounciness control button (④) to set the kneading time from 5 to 8 minutes. You can adjust the kneading time for different types of noodles and your own preference.
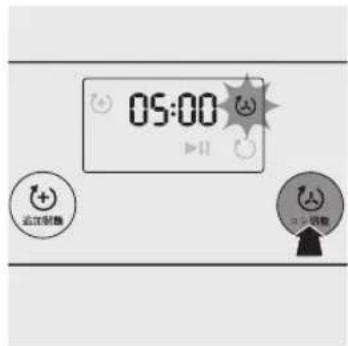
3 Press the start/pause button ( )to start processing.
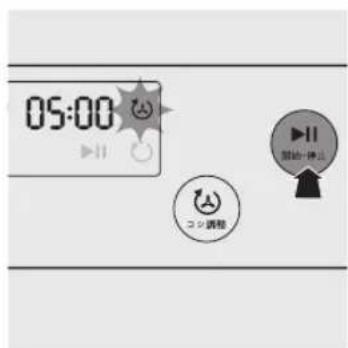
※ The appliance beeps once, and the kneading indicator (💡) starts flashing. ※ The selected kneading time starts to count down.
4 After the kneading starts, slowly pour in the liquid along the entire length of the slot in the lid.
※ Do not add in other ingredients after you have poured in the water during kneading. Otherwise, it will affect the result of the noodle texture.
※ When the kneading process is finished, the appliance beeps and pauses for 10 seconds to prepare for extruding. The extruding indicator (○) starts flashing.
After 10 seconds, the appliance will automatically start extruding noodles. Put the dish or tray under the shaping disc to collect the extruded noodles.

natural_image
Line drawing of a car interior with a funnel pouring liquid into a sink (no text or symbols)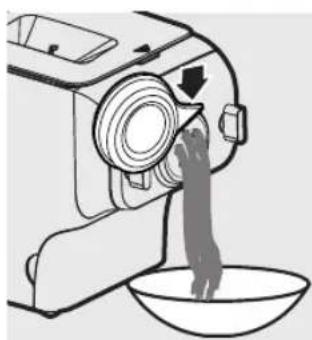
natural_image
Illustration of a washing machine pouring liquid into a bowl (no text or symbols)5 After the program is finished, cut the noodles into the desired length with the supplied cleaning tool.
※ Move the cleaning tool downwards to cut the noodles.
※ The extruding time depends on the amount of ingredients in the mixing chamber.
※ After 3 minutes of extrusion, the mixing paddle will be moving backward to pick up dough for further extrusion. This is not a machine error.
※ You may find some fine noodle threads on the noodle surface. This is normal.
※ If the ratio of water and flour is not correct, the extrusion will not succeed. In this case please prepare the ingredients from scratch.
6 After the noodle making is complete, if you notice there are some leftover doughs inside the chamber, you can press the extra-extruding button ( ) and press start/pause ( ) for extra extrusion. The countdown timer of the extra-extruding program is 3 minutes.
Cleaning

Cautions
- Disconnect the power and remove the power cord before cleaning or disassembling this appliance.
- Do not immerse the main unit in water.
- Do not use a scourer, caustic cleaners, or abrasive cleaners (for examples, gasoline, alcohol, and propanol) to clean the appliance.
● Clean the appliance each time after use, or the appliance might have malfunctions.
Take extra caution when cleaning appliance to avoid getting cut the edges. - Do not use dish washer to clean the machine and the accessories.
1 Press the power on/off button (☐to turn off the noodle maker, and then disconnect it from the power outlet.
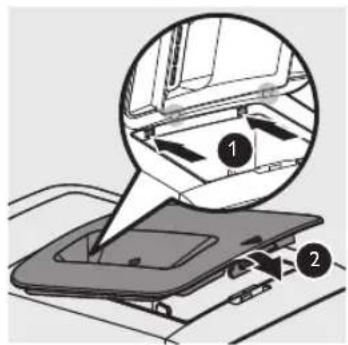
2 Remove the chamber lid from the appliance.
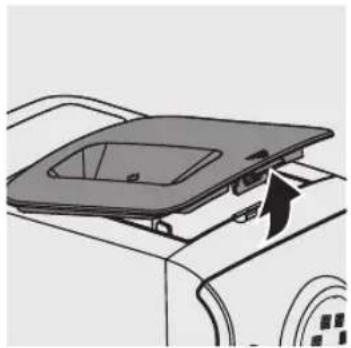
natural_image
Diagram of a car interior showing a lid and vent, with an arrow indicating direction (no text or symbols)3 Loosen the front panel control knob.
※ The front panel is heavy. Take extra caution when removing it.
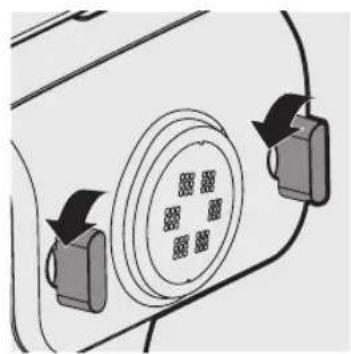
natural_image
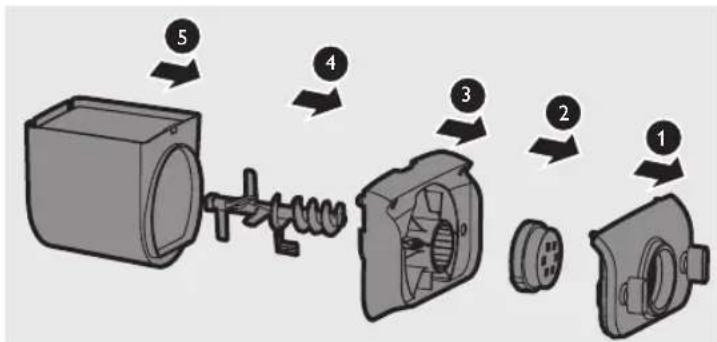
Diagram of a vehicle rearview with circular vent and directional arrows indicating movement (no text or symbols)4 Disassemble the front panel, the shaping disc, the shaping disc holder, the mixing paddle, and the mixing chamber in order.
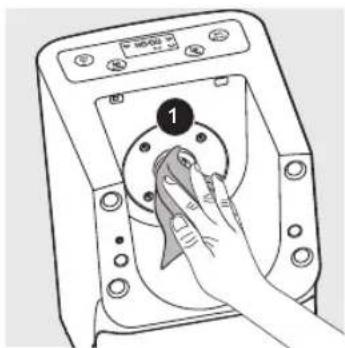
5 Use a dry cloth to clean flour residue in the hole (1) where the mixing paddle is placed.
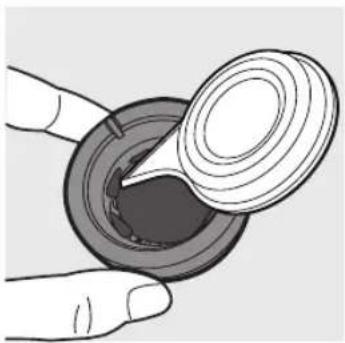
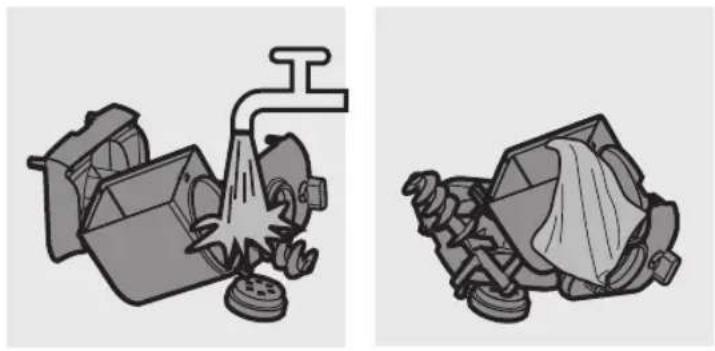
6 Clean the shaping disc with the supplied cleaning tool to remove the dough residues. After that, you can clean it with water.
※ For better cleaning result, put the shaping disc into the freezer for 2 hours. Then use the cleaning tool to poke the dough in the holes out.
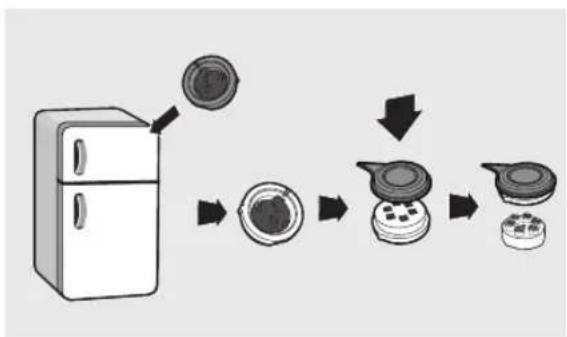
flowchart
graph TD
    A["Refrigerator"] --> B["Close-up of circular component"]
    B --> C["Close-up of circular component with four dots"]
    C --> D["Close-up of circular component with four dots"]

natural_image
Illustration of hands pouring liquid into a circular container (no text or symbols)7 Clean all detachable parts.
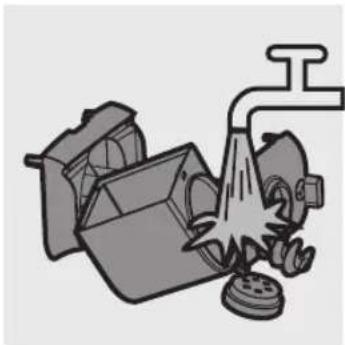
natural_image
Illustration of a kitchen with a drain and waste pipe (no text or symbols)8 Use a dry cloth to clean the main unit, control panel, and the exterior of the noodle maker.
※ After cleaning, make sure all parts and the shaping disc storage are dry. Assemble the noodle maker back for next use.
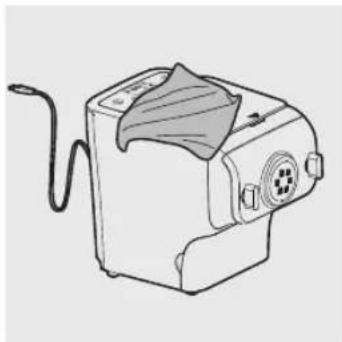
natural_image
Line drawing of a sewing machine with a cloth cover and handle (no text or symbols)Storing the shaping discs and cleaning tools
1 Insert the shaping disc ① and cleaning tool ② together. Put ① and ② into the storage drawer. Move the sliding bar ③ to fasten the shaping discs and cleaning tools.
※ Make sure the cleaning tools and shaping discs are dry before putting them into the storage drawer.
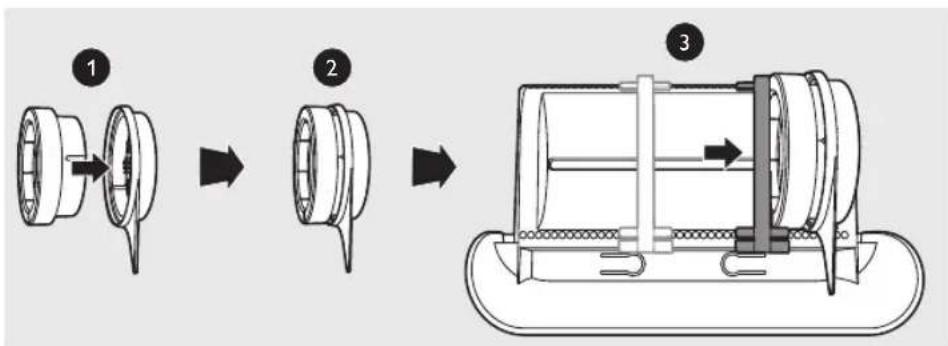
Refer to the recipe booklet for detailed recipes.
Recipes
※ To guarantee the quality of the noodle, use gluten flour to make noodle. Follow the recommended proportion to add the ingredients.
※ Seasonal changes and using ingredients from different regions may affect the flour/water ratio. You may adjust based on the recommended proportion.
※ When making the egg noodle or vegetable noodle, make sure you whisk the egg mixture or vegetable juice evenly before pouring into the chamber.
※ When making Ramen, mix hot water with the baking powder first, and then pour the hot water into the suggested amount of cold water. Do not pour the hot water directly into the mixing chamber.
※ To add salt, you can either mix it with the flour or liquid.
※ 0.8mm sheet shaping disc is not included in this model.
| Flour/water ratio table | |||||
| Noodle type Shaping disc* Flour | Liquid | Other ingredients | noodle/pasta quantity | ||
| Udon |  2.5mm square 2.5mm square | 250g Udon flour 90cc cold water 2g salt | 300g(For 1-2 servings) | ||
| 500g Udon flour 180cc cold water 4g salt | 600g(For 3-4 servings) | ||||
| Ramen |  2mm round 2mm round | 250g Hard/bread flour | Cold water 70ccHot water 20cc with the baking powder | 2g salt2g baking powder | 300g(For 1-2 servings) |
| 500g Hard/bread flour | Cold water 140ccHot water 40cc with the baking powder | 4g salt4g baking powder | 600g(For 3-4 servings) | ||
| Pasta |  1.6mm flat 1.6mm flat | 75g Soft/weak flour175g Hard/ bread flour | Mix 1 medium size egg into cold water, the total amount to be 90cc. | 1g salt | 300g(For 1-2 servings) |
| 150g Soft/weak flour350g Hard/ bread flour | Mix 2 medium size eggs into cold water, the total amount to be 180cc. | 2g salt | 600g(For 3-4 servings) | ||
| Soba |  1.6mm square 1.6mm square | 175g Hard/break flourSoba flour 75g | Cold water 90cc 2g salt | 300g(For 1-2 servings) | |
| 350g Hard/ bread flourSoba flour 150g | Cold water 180cc 4g salt | 600g(For 3-4 servings) | |||
| Dumpling skin |  0.8mm flat sheet 0.8mm flat sheet | 250g Hard/bread flour Cold water 95cc 3g salt | |||
※ The recipes can be shared among different shaping discs except the one for the dumpling skin.
※ For recipes other than the above, please refer to the recipe booklet or adjust the flour and water ratio based on the above recipe.
Troubleshooting
Check this chapter if you encounter problems when using the appliance.
The indicators do not light up.
The power plug is connected incorrectly.
Check whether the power plug is plugged correctly.
The power button is not pressed.
Press the power on/off button ( 🔒 ).
After pressing the start/pause button ( )the appliance sounds but it does not work.
The chamber is assembled incorrectly.
The shaping disc, or the front panel is assembled incorrectly.
Make sure you follow the user manual to assemble all parts correctly.
The safety switch is triggered and the appliance suddenly stops or suddenly restarts during the processing.
The front panel knob is loosen.
Make sure the front panel is securely assembled.
▶ Excessive ingredients in the noodle maker.
The maximum amount of flour used for each batch is 500g. If more than 500g is added, please reduce the amount of flour before next batch.
During processing, the appliance stops. There is no alarm sound or flashes.
The noodle maker is overheat due to long continuous working time.
Disconnect from the power, and allow the noodle maker to cool down. To better protect the lifetime of the appliance, the continuous working time should be less than 45 minutes. You can restart using the appliance after 15 minutes.
The appliance stops during processing, then EEEE is displayed on the screen, the indicators are flashing quickly, and the alarm sounds.
The mixing paddle can be blocked by some foreign objects.
The dough can be too dry.
The wrong program is selected.
Disconnect from the power, clean the noodle maker, and follow the user manual again to restart the noodle making.
Too much leftover dough inside the chamber.
The flour is either exposed to moisture before use, or the dough is too wet.
Keep your flour dry during storage. Follow the user manual to restart the noodle making.
The chamber, the mixing paddle, the shaping disc are not cleaned properly before use.
Make sure all parts are clean before use.
The mixing paddle or the chamber is still wet.
Make sure all parts are dry before use.
▶ Water is poured in the right order.
The flour type is not suitable.
Follow the user manual to make noodle.
Small amount of water is leaking out from the appliance.
▶ Water is added before the program starts.
Follow the user manual to add water right after the program starts.
The mixing paddle is running idle, and there is no noddle coming out.
The ratio of the flour and water is incorrect.
Disconnect from the power, clean the noodle maker, and follow the user manual again to restart the noodle making.
Product information
| Model HR2365/01 | |
| Motor power 200W | |
| Rated voltage AC100V (50/60Hz) | |
| Dimensions (L x W x H) 215mm x 343mm x 300mm | |
| Weight 7.8kg | |
※ For rated voltage and frequency information, refer to the typeplate on the product. Product information is subjected to change without prior notice.
Recycling
Do not throw away the appliance with normal household waste at the end of its life, but hand it in at an official collection point for recycling. By doing this, you help to preserve the environment.
Guarantee and service
If you have a problem, need service or need information, see www.philips.com/support or contact the Philips Consumer Care Center in your country.