IS6200D1 COMPACT VALET - Steam plant ROWENTA - Free user manual and instructions
Find the device manual for free IS6200D1 COMPACT VALET ROWENTA in PDF.

| Product type | Steam generator (vertical garment steamer) |
| Brand | Rowenta |
| Model | IS6200D1 COMPACT VALET |
| Power supply | 120-127 V ~, 15 A |
| Main functions | Vertical steaming, fabric brush, crease attachment, lint brush, telescopic pole, built-in hanger, on/off pedal, indicator light |
| Safety | Vertical steam head to prevent splashes, automatic shut-off not specified, do not immerse, use on flat surface |
| Maintenance | Clean with damp cloth, descale at least once a year or every 50 hours of use |
| Included accessories | Fabric brush, crease attachment, lint brush |
| Warranty | 1 year |
| Customer service | Available at rowenta.com, phone for each country |
Frequently Asked Questions - IS6200D1 COMPACT VALET ROWENTA
User questions about IS6200D1 COMPACT VALET ROWENTA
0 question about this device. Answer the ones you know or ask your own.
Ask a new question about this device
Download the instructions for your Steam plant in PDF format for free! Find your manual IS6200D1 COMPACT VALET - ROWENTA and take your electronic device back in hand. On this page are published all the documents necessary for the use of your device. IS6200D1 COMPACT VALET by ROWENTA.
USER MANUAL IS6200D1 COMPACT VALET ROWENTA
IMPORTANT SAFETY INSTRUCTIONS
This appliance complies with the technical rules and standards for safety currently in force (Electromagnetic compatibility, low voltage, environment...).
Warning ! The voltage of your electrical installation must correspond to that of the appliance (120V or 127V). Connecting to the wrong voltage may cause irreversible damage to the appliance and will invalidate the guarantee.
When using your appliance, basic precautions should always be followed, including the following :
READ ALL INSTRUCTIONS BEFORE USING
- To reduce the risk of contact with hot water emitting from steam vents, check appliance before each use by holding it away from body and operating steam button.
- Use appliance for its intended use only.
- To reduce the risk of electric shock, do not immerse the appliance in water or other liquids.
- Appliance should always be turned «OFF» before plugging or unplugging from outlet. Never yank the cord to disconnect from the outlet, instead grasp plug and pull to disconnect.
- Do not allow cord to touch hot surfaces. Let appliance cool completely before storing away. Loop cord loosely around appliance when storing.
- Do not direct steam at people or animals, or use steamer on garments while they are being worn.
- Always disconnect appliance from electrical outlet when filling with water, emptying or when not in use.
- Do not operate appliance with a damaged cord, or if the appliance has been dropped or damaged. To reduce the risk of electrical shock, do not disassemble or attempt to repair the appliance, take it to a qualified service person for examination and repair. Incorrect reassembly or repair could cause a risk of fire, electric shock, or injury to persons when the appliance is used.
-
Close supervision is required for any appliance used by or near children. Do not leave the appliance unattended while connected.
-
This appliance is not intended for use by or near children and other persons whose physical, sensory or mental capabilities or lack of experience and knowledge prevents them from using the appliance safely without supervision or instruction by a responsible person to ensure that they can use the appliance safely.
- Children should be supervised by the responsible person to ensure that they do not play with the appliance.
- Burns could occur from touching hot metal parts, hot water or steam. Use care when you empty a steam appliance, there may be hot water in the tank or inside the appliance.
- Fill water in water tank only and remove the water tank only when it is empty.
- Never drop or insert any object into any opening or hose.
- Always keep the hose and nozzle elevated above the water tank.
- Steam only in an up and down vertical motion. Never use steamer in a horizontal position or tilt into a backward position, this may result in hot water discharge.
- Do not place the steam nozzle directly on any surface or the appliance power cord while it is hot or plugged in. Use the stand provided.
- Use caution when changing attachments, as they may contain hot water from condensation. Ensure the attachments are cooled off to avoid contact with hot water.
- The use of accessory attachments other than those provided by Rowenta is not recommended and may result in fire, electric shock or personal injury.
- This unit is for indoor use only.
- Do not cut or attempt to extend the steaming hose.
- To prevent the appliance over heating, when you hang clothes on garment hook for removing winkle, please assemble all attached garment telescopic rod and extend it at highest position.
- To reduce the risk of electric shock, this appliance has a polarized plug (one blade is widehan the other). This plug will fit in a polarized outlet only one way. If the plug does not fit fully in the outlet, reverse the plug. If it still does not fit, contact a qualified electrician to install the proper outlet. Do not change the plug in any way.
SPECIAL INSTRUCTIONS
- To avoid a circuit overload, do not operate another high wattage appliance on the same circuit. If an extension cord is absolutely necessary, a 15-amp rated cord should be used. Cords rated for less amperage may overheat. Care should be taken to arrange the cord so that it cannot be pulled or tripped over.
SAVE THESE INSTRUCTIONS
ENVIRONMENTAL PROTECTION FIRST!
① Your appliance contains valuable materials which can be recovered or recycled.
- When disposing of it, take it to a collection point or an approved service center.
DESCRIPTION
- Steam head
- Steam hose connector
- Steam head hook
- Removable water tank
- Built in hanger
- ON/OFF pedal
- Trouser/dress clips
- Transport wheels
- Hanger holder
- Textile steam hose
- Pole locking clips
- On/off light
- Electric cord holder
- Built in accessories
- Electric cord
a. Fabric brush - Velcro strip
b. Crease attachment - Telescopic pole
c. Lint pad - Pole fastening screw
GARMENT STEAMER ASSEMBLY Pole and hanger assembly
- Unscrew the pole's fastening screw on the base of the pole. (fig. 1)
- Hold the pole such that the cord holder is on the left. Check that the 2 pole clips are unlocked. (fig. 2)
-
Insert the pole into the base by pressing downwards until the holes of the pole and base are at the same level, so that you can put the screw back. If the holes are not aligned, check that the clips of the pole are well and truly unlocked. (fig. 3)
-
Screw the pole fastening screw back in as far as it will go so that the pole is firmly fixed to the base. (fig. 4)
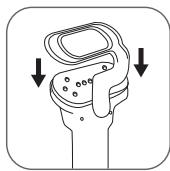
- Push the hanger on the top of the pole vertically until you hear a click. (fig. 5)
- Adjust the pole to the height required by sliding it upwards then locking the 2 clips. (fig. 6a, 6b)
- Install the steam head between the hanger hooks.
Filling the water tank
IMPORTANT: Never use water that contains additives (starch, perfume, aromatic substances, softener, etc) in the steamer. Additives such as these can affect the properties of the steam and lead to the formation of deposits.
- Ensure that the steamer is unplugged. Remove the water tank from the base of the appliance by pulling the handle upwards (fig. 7). Unscrew the tank cap and fill the tank. (fig. 8). Maximum capacity is indicated by the "max" mark.
- The steamer must be used with TAP WATER. If the water in your area is hard, Rowenta recommends that you mix half tap water and half distilled water, which reduces the hardness. You can also use bottled spring water.
- After closing the cap, turn the tank down and hold it by the handle. Check out that no water is leaking through the cap.
- Place the water tank on the base (fig. 9).
USE
Warning: Never steam a garment while it is being worn.
The flexible pipe and the end of the steam head can become extremely hot during use. This is perfectly normal. Be careful and avoid any prolonged contact.
- Only operate the steamer on the floor clear of any materials which may obstruct the base of the steamer (flat and horizontal surface). Do not obstruct the openings on the lower part of the appliance. This device should not be used on very thick carpets or rugs.
- Undo the Velcro strip and completely unwind the electrical cord. (fig.10)
- Plug in to power socket. (fig.11)
- Switch on by pressing the pedal located at the front of the device. The power indicator light will come on. (fig.12)
- The device will begin producing steam after approximately 60 seconds.
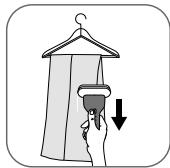
- Hang the garments from the built-in hanger or from another hanger which
may be suspended from the hook located on the hanger rod. To steam trousers, we recommend that you also use the support with clips as indicated in the illustration. (fig.14)
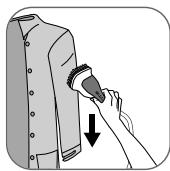
- Grasp the steam head with the steam vents pointing away from you.
- Start steaming by brushing material lightly with the grain of the fabric in an up/down vertical motion. The fabric brush opens the weave of the fabrics for better steam penetration.
- Start at the top the garment and gradually move downward (fig.13). Always steam in a vertical position.
- For more ease, we recommend to pull the garment downward with your free hand while steaming. Be careful not to touch the hot steam.
- During use, the hose may make a gurgling noise. This is a normal occurrence due to condensation. If the device begins to gurgle, rest the steam head on its support for a few moments in order to direct the condensation into the device once again.
ACCESSORIES
Before using an accessory, check the manufacturer recommendations. It is also recommend that you carry out a test on part of the fabric which cannot be seen.
Fabric brush
The fabric brush opens the weave of the fabrics for better steam penetration.
Be sure unit is unplugged and completely cool before attaching accessories.
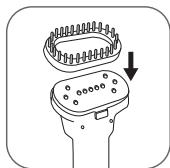
- Attach the fabric brush to the steam head by lining up the bottom of the brush with the bottom of the steam head. Gently push the top of the brush onto the steam head until it clicks into place.
- Gently brush the area to be steamed with the grain or nap of the fabric.
- Remove the fabric brush once unit is unplugged and completely cool. Remove it by pressing on the release tab on top of brush while pulling it forward.
Crease attachment
- Remove the fabric brush. Completely slide the hook of the accessory into the slot located in the lower part of the steam head.
- Push on the handle to open the crease attachment.
- Place the garment between the crease attachment and steam head.
- Release the handle.
- Starting at the top of the garment, move the crease attachment in a downwards motion.
- Once unit is unplugged and completely cooled down, remove the crease attachment by sliding it off of the steam head.
Lint pad
The lint pad is a separate accessory and cannot be attached to the steam head. You can use the lint pad independently from the steamer.
The lint pad removes hair, lint and animal fur for a professional finish.
- To use the lint pad, slowly brush the clothing with the grain or nap of the fabric.
- The pad can be cleaned by brushing it in the opposite direction. We recommend cleaning the pad on an old cloth that can be discarded.
AFTER USE
- After using the garment steamer, switch off the device by pressing the pedal once again. The power indicator light will go off, and you can then unplug the device.
- Hang the steam head in an upright position on the hook when not in use.
- Empty and rinse the water tank each time before storage in order to flush out any scale particles. (fig.15)
- Loosely wind up the electrical cord and close with the Velcro strip, then hang it from the clip on the pole. (fig.16a, 16b)
- Do not carry the steamer by the water tank handle. This appliance includes luggage style wheels for added convenience when transporting.
Warning: Never touch the steam head until it has cooled down completely.
TRANSPORT
- Your device is fitted with two wheels for ease of transport. Tilt the device towards the rear holding the pole and then pull along to transport.
- You can also lift up the device in order to transport it, again holding the device by the pole.
Do not attempt to lift up or transport the device holding the pedal, the water tank handle or the built-in hanger.
CLEANING
- Clean the main unit with a damp cloth.
- To maintain maximum performance, your steamer must be descaled occasionally. The time between descending operations depends on the quality of the water and the frequency with which you use the appliance. The appliance must be descaled at least once a year or after 50 hours of use.
-
To carry out a descaling operation, follow the following steps:
-
Ensure that the appliance has cooled down completely (2 hours minimum).
- Fill the water tank with fresh water and place it on the main unit allowing water to fill the boiler.
- Remove the water tank from the base and empty out the water via the water tank filling hole by tipping the device over a sink. Limescale and other residues are thus removed.
- Repeat step 2 and 3 several times until the scale has been removed.
CAUTION: Don't fill the boiler by the steam head holes!
Never immerse the steam head in water!
TIPS FOR BEST RESULTS WITH YOUR GARMENT STEAMER
- We recommend checking the garment care label for manufacturer recommendations before steaming. We also recommend testing the garment and strength of the color on an unobtrusive area such as an inner seam.
- Gently pull down on bottom of garment while steaming
- Gently press steamer brush into fabric while making slow passes
- To put crisp edges on pants and shirts, use crease attachment
- Avoid contact between the steam head and silk or velvet.
- Certain garments are smoothed more easily on the reverse side.
- Heavy fabrics may need to be steamed longer.
- If you are using the steam head at a position close to the ground, raise the hose frequently in order to avoid the formation of condensation. A gurgling noise may be heard if the flexible pipe is pinched.
- If no steam is produced, if a gurgling sound is heard or if water is drip
ping through the holes of the steam head, raise the steam hose occasionally to remove condensation inside.
- Be careful at all times.
TROUBLESHOOTING
| Problems | Possible causes | Solutions |
| There is no steam. | The appliance has not been turned on. | Check that the device has been plugged in correctly. Next press the On/Off pedal, the power indicator light located at the front of the device will come on. |
| The hose has been obstructed. | Check that the hose is not bent or twisted. | |
| There is no water left in the water tank. | Switch off the device and fill the water tank. | |
| The steam flow is low. | Your steamer has a build-up of scale because it has not been rinsed out regularly. | See descaling process (Cleaning paragraph). |
| The hose has been obstructed. | Check that the hose is not bent or twisted. | |
| Water runs through the holes of the steam head. | There is condensation in the hose. | Never use a steamer in the horizontal position. Hold the hose vertically outstretched and wait for the condensed water to return to the steamer. |
| The steamer takes a long time to heat and/or ejects white particles. | Your steamer has a build-up of scale because it has not been descaled regularly. | See descaling process (Cleaning paragraph). |
If it is not possible to establish the cause of the problem, seek the assistance of an approved ROWENTA Service Center www.rowenta.com
ROWENTA MANUFACTURER'S WARRANTY
:www.rowenta.com
With a strong commitment to the environment, most of Rowenta products are repairable during and after the warranty period. Before returning any defective products to the point of purchase, please call Rowenta consumer service directly at the phone number below for repair options.
Your help to sustain the environment is appreciated!
The Warranty
This product is guaranteed by Rowenta for 1 year against any manufacturing defect in materials or workmanship, starting from the initial date of purchase.
The manufacturer's warranty by Rowenta is an extra benefit which does not affect consumer's Statutory Rights.
The Rowenta warranty covers all costs related to restoring the proven defective product so that it conforms to its original specifications, through the repair or replacement of any defective part and the necessary labor. At Rowenta's choice, a replacement product may be provided instead of repairing a defective product.
Rowenta's sole obligation and your exclusive resolution under this warranty are limited to such repair or replacement.
Conditions & Exclusions
The Rowenta warranty only applies within USA, Canada & Mexico, and is valid only on presentation of a proof of purchase. The product can be taken directly in person to an authorized service center or must be adequately packaged and returned, by recorded delivery (or equivalent method of postage), to a Rowenta authorized service center. Full address details for each country's authorized service center are listed on the Rowenta website (www(rowenta.com) or by calling the appropriate telephone number listed below to request the appropriate postal address.
Rowenta shall not be obligated to repair or replace any product which is not accompanied by a valid proof of purchase.
This warranty will not cover any damage which could occur as a result of misuse, negligence, failure to follow Rowenta instructions, use on current or voltage other than as stamped on the product, or a modification or unauthorized repair of the product. It also does not cover normal tear and wear, maintenance or replacement of consumable parts, and the following:
- using the wrong type of water
- scaling (any de-scaling must be carried out according to the instructions for use);
- ingress of water, dust or insects into the product;
- mechanical damages, overloading
- damages or bad results due to wrong voltage or frequency
- accidents including fire, flood, lightning, etc
- professional or commercial use
- damage to any glass or porcelain ware in the product
This warranty does not apply to any product that has been tampered with, or to damages incurred through improper use and care, faulty packaging by the owner or mishandling by any carrier.
The Rowenta manufacturer's warranty applies only for products purchased and used in USA, Canada & Mexico. Where a product purchased in one country and then used in another one:
a) The Rowenta guarantee duration is the one in the country of usage of the product, even if the product was purchased in another listed country with different guarantee duration.
b) The Rowenta guarantee does not apply in case of non conformity of the purchased product with the local standards, such as voltage, frequency, power plugs, or other local technical specifications
c) The repair process for products purchased outside the country of use may require a longer time if the product is not locally sold by Rowenta
d)In cases where the product is not repairable in the new country, the Rowenta guarantee is limited to a replacement by a similar product or an alternative product at similar cost, where possible.
Consumer Statutory Rights
This Rowenta manufacturer's warranty does not affect the statutory rights a consumer may have or those rights that cannot be excluded or limited, nor rights against the retailer from which the consumer purchased the product. This warranty gives a consumer specific legal rights, and the consumer may also have other legal rights which vary from State to State or Country to Country or Province to Province. The consumer may assert any such rights at his sole discretion.
Additional information
Accessories, Consumables and end-user replaceable parts can be purchased, if locally available, as described in Rowenta internet site.
| CANADA GROUPE SEB CANADA 345 Passmore Avenue Toronto, ON M1V 3N8 | MEXICO GROUPE SEB MÉXICO, S.A. de C.V. Calle Goldsmith 38 401 Piso 4 Polanco, Distrito Federal C.P. 11560 México. RFC GSM8211123P5 | U.S.A. GROUPE SEB USA 2121 Eden Road Millville, NJ 08332 |
| 1-800-418-3325 | (01800) 112 83 25 | 800-769-3682 |
:www.rowenta.com