
BT-PO 1100 E - Sander EINHELL - Free user manual and instructions
Find the device manual for free BT-PO 1100 E EINHELL in PDF.


| Brand | Einhell |
| Model | BT-PO 1100 E |
| Product type | Random orbital sander |
| Rated power | 1100 W |
| Supply voltage | 230 V ~ 50 Hz |
| No-load speed | 8000 to 14000 rpm |
| Plate diameter | 125 mm |
| Orbital stroke | 5 mm |
| Dimensions (L x w x h) | 300 x 130 x 160 mm |
| Weight | 2.6 kg |
| Cable length | 3 m |
| Protection class | II |
| Sound pressure level (LpA) | 82 dB(A) |
| Sound power level (LWA) | 93 dB(A) |
| Vibration (hand-arm) | < 2.5 m/s² |
| Abrasive paper attachment system | Self-adhesive (Velcro) |
| Dust extraction connection | Yes, diameter 36 mm |
| Electronic speed variator | Yes, with wheel |
| Ergonomic handle | With softgrip grip area |
| On/off switch | With continuous lock |
| Maintenance and cleaning | Regularly clean ventilation slots and dust container |
| Spare parts and repairability | Sanding pad, carbon brushes, switch, power cable available |
| General information | Universal use for wood, metal, plastic and paint |
Frequently Asked Questions - BT-PO 1100 E EINHELL
User questions about BT-PO 1100 E EINHELL
0 question about this device. Answer the ones you know or ask your own.
Ask a new question about this device
Download the instructions for your Sander in PDF format for free! Find your manual BT-PO 1100 E - EINHELL and take your electronic device back in hand. On this page are published all the documents necessary for the use of your device. BT-PO 1100 E by EINHELL.
USER MANUAL BT-PO 1100 E EINHELL
natural_image
Silhouette of a mechanical power tool with lever and base (no text or symbols)BT-PO 1100 E

© Gebrauchsanweisung beachten!
GB Note the instructions for use!
⑤ Respecter le mode d'emploi!
① Osservate le istruzioni per l'uso!
DKN Læs og følg betjeningsvejledningen!
⑧ Figyelembe venni a használati utasítást!
HR③Pridržavajte se uputa za uporabu!
®Uvažite uputstva za upotrebu
©Dodržovat návod k obsluze!
⑨Dodržiavajte návod na použitie!

© Schutzbrille tragen!
GB Wear safety goggles!
⑤ Portez des lunettes de protection!
① Portare occhiali protettivi!
DKN Bær sikkerhedsbriller!
⑧ Védőszemüveget hordani!
HR BIH Nosite zaštitne naočale!
R5 Nosite zaštitu za oči
©Nosit ochranné brýle!
SK Používajte ochranné okuliare!


natural_image
Close-up of a hand using a power tool to adjust a black mechanical component (no text or symbols visible)
natural_image
Close-up of a hand using a screwdriver to adjust a mechanical component (no visible text or symbols)
natural_image
Close-up of hands using a power tool to adjust or install a mechanical component (no visible text or symbols)
natural_image
Close-up of a hand holding a propeller with a black plastic component, showing mechanical assembly (no text or symbols visible)
natural_image
Close-up of a hand holding a white cylindrical object with an arrow pointing downward, partially covered by a black circular disc (no text or symbols visible)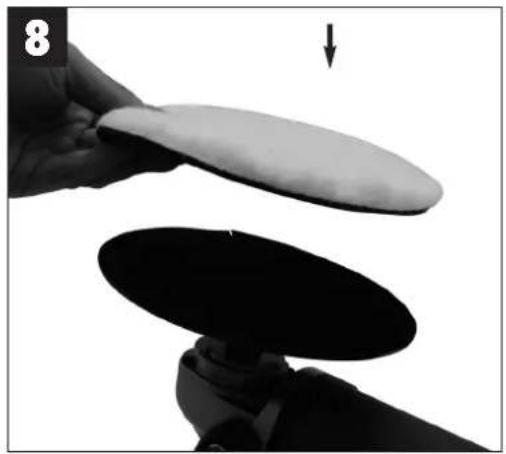
natural_image
Two black-and-white images showing a hand holding a white oval object and a black oval object, with an arrow indicating direction (no text or symbols)
natural_image
Close-up of a hand holding two black oval-shaped objects, one above the other, with an arrow indicating motion (no text or symbols)D
⚠️Achtung!
When using equipment, a few safety precautions must be observed to avoid injuries and damage. Please read the complete operating manual with due care. Keep this manual in a safe place, so that the information is available at all times. If you give the equipment to any other person, give them these operating instructions as well.
We accept no liability for damage or accidents which arise due to non-observance of these instructions and the safety information.
1. Safety regulations
The corresponding safety information can be found in the enclosed booklet.
CAUTION!
Read all safety regulations and instructions.
Any errors made in following the safety regulations and instructions may result in an electric shock, fire and/or serious injury.
Keep all safety regulations and instructions in a safe place for future use.
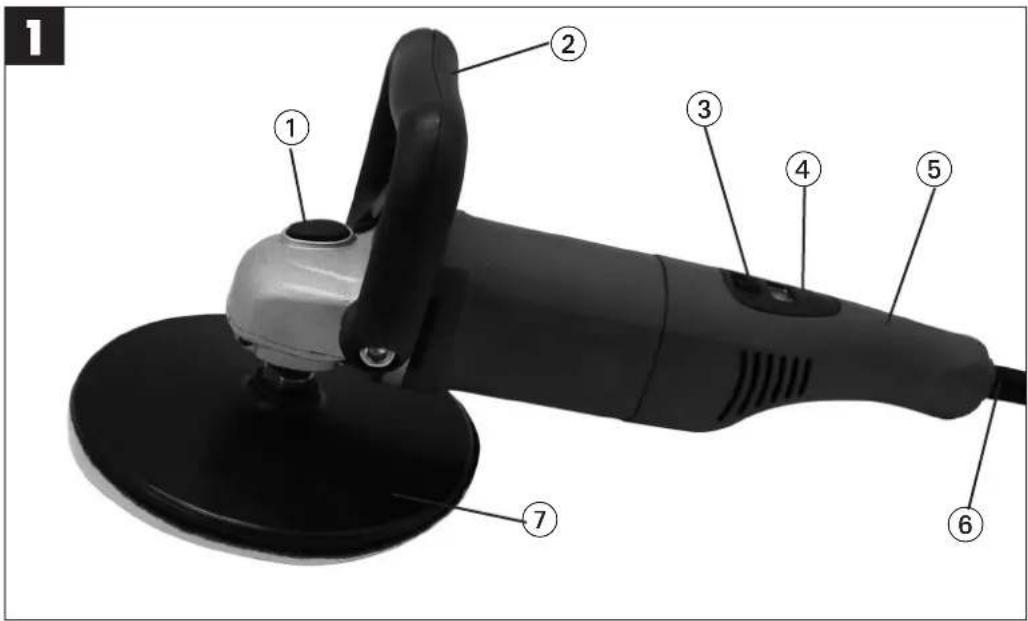
2. Layout (Fig. 1/2)
- Spindle lock
- Front grip
- ON/OFF switch
- Speed control
- Rear grip
- Power cord
- Polishing / sanding disk
3. Proper use
The machine is designed for polishing coated surfaces and for sanding wood, iron, plastic and similar materials using the appropriate abrasive paper.
The machine is to be used only for its prescribed purpose. Any other use is deemed to be a case of misuse. The user / operator and not the manufacturer will be liable for any damage or injuries of any kind caused as a result of this.
Please note that our equipment has not been designed for use in commercial, trade or industrial applications. Our warranty will be voided if the machine is used in commercial, trade or industrial
businesses or for equivalent purposes.
4. Technical data
Voltage: 230V \~ 50 Hz
Power rating: 1100 W
Speed: 1000-3000 min
Polishing / sanding disk diameter: 180 mm
Connection thread: M14
LWA sound power level: 98 dB(A)
LPA sound pressure level: 87 dB(A)
Vibration aw 6,76 m/s
Totally insulated II/回
Weight: 2.2 kg
5. Before starting the equipment
Before you connect the equipment to the mains supply make sure that the data on the rating plate are identical to the mains data.
6. Starting up
6.1 Assembly (Fig. 3-6)
Important! Pull out the mains power plug before starting the assembly work.
6.2 Using as a polishing machine When using waxing and polishing agents, observe the instructions issued by their manufacturer!
IMPORTANT!
To prevent damage to the surfaces of the workpieces you wish to polish, make sure that you observe the following instructions:
●Make sure that the polishing attachment is always mounted precisely in the center of the sanding/grinding disk.
●Before you start the equipment, check to ensure that the attachments are securely installed.
●Never touch the area you wish to polish with the edge of the sanding/grinding disk.
●Use the speed selector (Fig. 2/Item 4) to select the following maximum speeds for polishing:
- Working in polish: approx. 1000 rpm
- Polishing to a high gloss: approx. 1000-1100 rpm
- Polishing up: approx. 1400 rpm
If you do not comply with these instructions, the manufacturer cannot accept any liability.
GB
The Velcro fastener enables easy changing of the polishing attachment.
- Use the foamed plastic attachment to apply the polishing agent (Fig. 7).
●Make sure that the foamed plastic attachment is free of any foreign bodies.
- Spread the polishing paste evenly over the polishing pad. Do not apply the polish directly to the polishing surface.
●Switch the polishing machine on and off only when the polishing machine is resting on the polishing surface.
●Place the extension lead over your shoulder and work first on the large, flat surfaces such as the bonnet, boot lid and roof.
- Keep your movements as regular as possible.
●Important! Allow the polishing machine to glide over the polishing surface. Do not exert pressure!
●Work next on the smaller surfaces (doors, for example)
●Use the fleece attachment to finish off the polishing (Fig. 8).
●Make sure that the fleece attachment is free of all foreign bodies.
- Remove the layer of polish in the same order as it was applied.
●Important! Do not exert pressure on the polishing machine!
Care tips
●For optimum paintwork protection, you should polish your car 2 to 3 times a year.
●Wash your car at least every 2 weeks. Avoid using household detergents as these can damage the paintwork and remove the layer of wax.
●Wash your car with a clean sponge, working from top to bottom.
- Remove all insects, bird droppings and tar stains from the paintwork daily.
- If you use any window-cleaning agents, spray them onto a cloth and not directly onto the windows in order to prevent them wetting the paintwork.
6.3 Using as a sanding machine
Use the supplied sanding attachments (Fig. 9) for sanding purposes.
The Velcro fastener enables easy changing of the sanding attachments.
●Place the whole surface area of the sanding disk on the material.
●Switch on the machine and move it with gentle pressure over the workpiece completely circular movements or moving it to and fro and up and down.
- Use a coarse paper for coarse sanding and a finer paper for finish sanding. You can find the best paper for the job by means of testing.
6.4 Speed Control (Fig. 2)
Use the speed control to set the desired working speed.
Press the “+” button to increase the speed.
Press the “-” button to decrease the speed.
Refer to the display (8) for the set speed.
Set speed = Display x 100
7. Replacing the power cable
If the power cable for this equipment is damaged, it must be replaced by the manufacturer or its after-sales service or similarly trained personnel to avoid danger.
8. Cleaning, maintenance and ordering of spare parts
Always pull out the mains power plug before starting any cleaning work.
8.1 Cleaning
- Keep all safety devices, air vents and the motor housing free of dirt and dust as far as possible. Wipe the equipment with a clean cloth or blow it with compressed air at low pressure.
●We recommend that you clean the device immediately each time you have finished using it.
●Clean the equipment regularly with a moist cloth and some soft soap. Do not use cleaning agents or solvents; these could attack the plastic parts of the equipment. Ensure that no water can seep into the device.
●Wash the polishing attachments only by hand and let them air-dry. Use only a mild soap and a damp cloth.
8.2 Carbon brushes
●In case of excessive sparking, have the carbon brushes checked only by a qualified electrician. Important! The carbon brushes should not be replaced by anyone but a qualified electrician.
8.3 Maintenance
●There are no parts inside the equipment which require additional maintenance.
GB
8.4 Ordering replacement parts
Please provide the following information on all orders for spare parts:
●Model/type of machine
●Article number of the machine
●ID number of the machine
●Replacement part number of the required spare part
For our latest prices and information please go to www.ISC-GmbH.info
9. Disposal and recycling
The unit is supplied in packaging to prevent its being damaged in transit. This packaging is raw material and can therefore be reused or can be returned to the raw material system.
The unit and its accessories are made of various types of material, such as metal and plastic. Defective components must be disposed of as special waste. Ask your dealer or your local council.
F
Attention!
X 98/37/EC 87/404/EEC
X 2006/95/EC R&TTED 1999/5/EC
97/23/EC 2000/14/EC_2005/88/EC:
X 2004/108/EC 95/54/EC:
90/396/EEC 97/68/EC:
89/686/EEC
EN 50144-1; EN 50144-2-3; EN 55014-1; EN 55014-2; EN 61000-3-2; EN 61000-3-3; EN 60745-1
natural_image
Symbol of a trash bin crossed out by two diagonal lines (no text or numbers present)
©Nur für EU-Länder
Never place any electric tools in your household refuse.
To comply with European Directive 2002/96/EC concerning old electric and electronic equipment and its implementation in national laws, old electric tools have to be separated from other waste and disposed of in an environment-friendly fashion, e.g. by taking to a recycling depot.
Recycling alternative to the demand to return electrical devices:
As an alternative to returning the electrical device, the owner is obliged to cooperate in ensuring that the device is properly recycled if ownership is relinquished. This can also be done by handing over the used device to a returns center, which will dispose of it in accordance with national commercial and industrial waste management legislation. This does not apply to the accessories and auxiliary equipment without any electrical components which are included with the used device.
The reprinting or reproduction by any other means, in whole or in part, of documentation and papers accompanying products is permitted only with the express consent of ISC GmbH.
F
All of our products undergo strict quality checks to ensure that they reach you in perfect condition. In the unlikely event that your device develops a fault, please contact our service department at the address shown on this guarantee card. Of course, if you would prefer to call us then we are also happy to offer our assistance under the service number printed below. Please note the following terms under which guarantee claims can be made:
- These guarantee terms cover additional guarantee rights and do not affect your statutory warranty rights. We do not charge you for this guarantee.
- Our guarantee only covers problems caused by material or manufacturing defects, and it is restricted to the rectification of these defects or replacement of the device. Please note that our devices have not been designed for use in commercial, trade or industrial applications. Consequently, the guarantee is invalidated if the equipment is used in commercial, trade or industrial applications or for other equivalent activities. The following are also excluded from our guarantee: compensation for transport damage, damage caused by failure to comply with the installation/assembly instructions or damage caused by unprofessional installation, failure to comply with the operating instructions (e.g. connection to the wrong mains voltage or current type), misuse or inappropriate use (such as overloading of the device or use of non-approved tools or accessories), failure to comply with the maintenance and safety regulations, ingress of foreign bodies into the device (e.g. sand, stones or dust), effects of force or external influences (e.g. damage caused by the device being dropped) and normal wear resulting from proper operation of the device.
The guarantee is rendered null and void if any attempt is made to tamper with the device.
-
The guarantee is valid for a period of 2 years starting from the purchase date of the device. Guarantee claims should be submitted before the end of the guarantee period within two weeks of the defect being noticed. No guarantee claims will be accepted after the end of the guarantee period. The original guarantee period remains applicable to the device even if repairs are carried out or parts are replaced. In such cases, the work performed or parts fitted will not result in an extension of the guarantee period, and no new guarantee will become active for the work performed or parts fitted. This also applies when an on-site service is used.
-
In order to assert your guarantee claim, please send your defective device postage-free to the address shown below. Please enclose either the original or a copy of your sales receipt or another dated proof of purchase. Please keep your sales receipt in a safe place, as it is your proof of purchase. It would help us if you could describe the nature of the problem in as much detail as possible. If the defect is covered by our guarantee then your device will either be repaired immediately and returned to you, or we will send you a new device.
Of course, we are also happy offer a chargeable repair service for any defects which are not covered by the scope of this guarantee or for units which are no longer covered. To take advantage of this service, please send the device to our service address.
F BULLETIN DE GARANTIE
Chère Cliente, Cher Client,


- D
- ⚠️Achtung!
- Safety regulations
- CAUTION!
- Layout (Fig. 1/2)
- Proper use
- Technical data
- Before starting the equipment
- Starting up
- Assembly (Fig. 3-6)
- Using as a polishing machine When using waxing and polishing agents, observe the instructions issued by their manufacturer!
- IMPORTANT!
- GB
- Care tips
- Using as a sanding machine
- Speed Control (Fig. 2)
- Replacing the power cable
- Cleaning, maintenance and ordering of spare parts
- Cleaning
- Carbon brushes
- Maintenance
- Ordering replacement parts
- Disposal and recycling
- F
- Attention!
- ©Nur für EU-Länder
- F BULLETIN DE GARANTIE
- Chère Cliente, Cher Client,
Brand : EINHELL
Model : BT-PO 1100 E
Category : Sander